Quick SOICbite review: A small programming connector
-
If you ever designed a very compact PCB, you may have noticed that there aren't many options for small, reliable, yet easy to use temporary connections for in-circuit programming or debugging. While it is rather simple to replace various components like DIPs with a QFP, SOIC or SOP to save space, standard 2.54mm pitch plated through holes are usually the smallest feasible solution for beginners and hobbyists.
Note: There is a list of pros and cons at the end of this post if you prefer a tl;dr version.
Introduction: What is SOICbite?
Some month ago, I stumbled upon SOICbite. It is essentially just a PCB footprint, which is freely available for KiCAD and Eagle. The idea here is to repurpose a conventional SOIC-8 test clip as a programming connector and clip it to the PCB - much like an aligator clip. Those clips are rather cheap, starting at about 2 USD / EUR from China, but most notably, they provide a total of eight contacts in a very small area: compared to a standard 2x4 pin header, the footprint requires about 2.5 times less space!
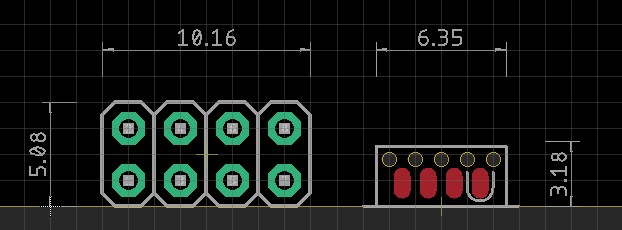
By the way: you are not restricted to 8 contacts. There are SOIC clips with a higher pin count available as well - you would just have to adjust the SOICbite footprint accordingly.
Modification: Make it bite
Unfortunately, it is not possible to use a SOIC-8 clip on the SOICbite footprint without prior modification. The jaws don't close far enough to clamp themselves to the board. To get them to close further, you have to remove some of the plastic in front of the clip's hinge. This is best done with a small, straight needle file. A bit of sandpaper on a scraping card should work as well.
You need to remove enough material so that the little plastic teeth at the front of the clip can "bite" (hence the name) into the registration holes of the footprint. Keep in mind though: The more material you remove, the closer the opposing contacts get. So close, that they can eventually touch each other and cause a short circuit, if the clip is powered while it is not connected to a PCB.
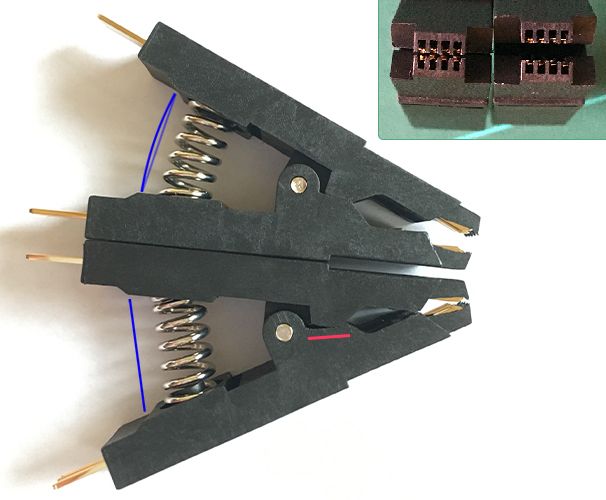
The picture above shows a stock and modified clip side by side. You can clearly see how much closer the contacts get after modification. The red line marks where the plastic needs to be filed away. The blue lines are added to emphasize how straight the spring of the modified clip is. It is almost completely unloaded and it already has the tiniest amount of backlash. Luckily, the spring is just long enough to make it work with this particular clip.
Experience: Practical use
Although there is no real standard for pinouts, the creator of the SOICbite provides suggestions for different use cases:
Pin UART SPI SWIM SWD ESP8266 USB I2C PIC ICSP 1 Vcc Vcc Vcc Vcc Vcc Vcc Vcc Vcc 2 RX2 CS GPIO0 D- Vpp 3 TX2 GPIO2 D+ 4 GND GND GND GND GND GND GND GND 5 RX MOSI/MOMI SWIM SWDIO RX SDA DAT 6 TX MISO SWO TX AUX 7 CTS SCK/CLK SWCLK CH_PD SCL CLK 8 RTS RST NRST NRST RST ID I'm not following any of these right now and assign the pins as I feel fits best for a certain PCB. This can be a pro or a con, whether you prefer a "foolproof" plug-and-play connection which is always the same, or enjoy the flexibility to adjust it to your needs and simplify routing. But since these clips are so cheap, you could buy a bunch and wire each to a standard-compliant layout for AVRISP, UART, SWD or whatever you need.
Routing the traces is obviously a bit more difficult than with a standard pin header, due to the compactness of the footprint and the five registration holes in front of the pads. There's only about 20 mil space between each set of holes. Depending on your DRC settings, the traces may be as thin as 6 mil, but even the cheaper PCB manufacturers should be able to do this properly.
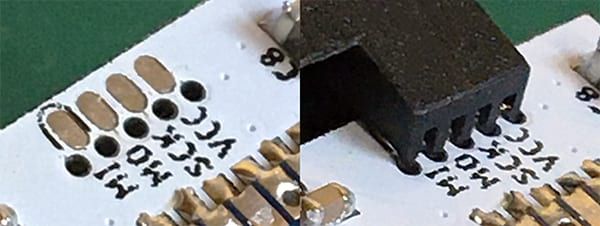
Anyway - the spring clamps the contact pins onto the PCB and the plastic teeth register in the holes to keep everything aligned. The holes could maybe be the tiniest bit smaller in diameter for a little less play, but it's working great as it is and any smaller drill size could cause problems depending on the manufacturing tolerances, so it's probably best to not fiddle with it.
I'm using a standard 1.6mm thickness PCBs. While it may also work with 1.2mm boards, I can't really recommend this connector for thinner boards. As I've mentioned above, the spring of the modified clip is almost fully extended and at the very edge of getting loose. To use it on thinner boards and improve the clamping force overall, swapping the spring for a slightly longer one would be advisable.
For what it is though, the mechanical strength of the connection is rather impressive. The contact pins inside the clip have some spring to them, so they cling onto the pads even if the surface finish is uneven or the clip isn't perfectly perpendicular to the board. It doesn't fall off if you try to pull it out straight, you can move the whole assembly while it is connected and powered - no problem. But you can tilt the PCB out quite easily. I think it is certainly better suited for small and lightweight PCBs, which is fine, because those are typically the kind of boards, where you'd want to use a space-efficient connector on.
It's definitely not as robust as an interlocking socket-plug type of connector - you honestly can't expect that - but it is certainly on par with a spring-loaded pogo pin jig. So far I've programmed almost a dozen of nodes with it and kept serial connections open for hours while they were sitting on my desk completely unprotected and had no issues.
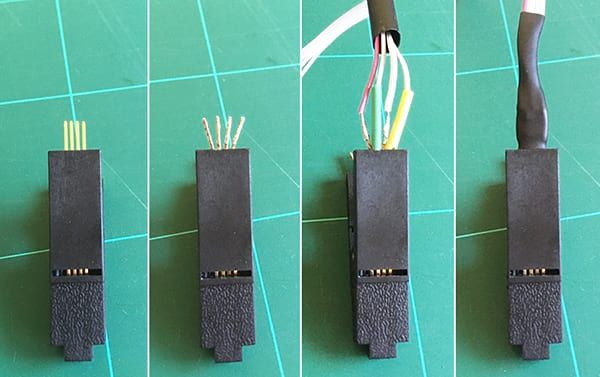
What I would recommend though, is buying a clip with an already attached wires, because it is a mess to properly solder flexible stranded wires onto the pins - there's only a very tiny gap between them. The following method worked best for me:
- Fan the pins out by carefully bending them outwards. This provides enough space to solder on regular 30 - 24 AWG stranded wires.
- Pull on a small diameter piece of shrink tubing over every second wire to avoid shorts later on - using different colors may help to ensure all wires are soldered in the correct order - and solder all four wires.
- Bend the pins back straight and secure everything with a larger piece of shrink tubing.
- Repeat the same on the other half of the connector.
Conclusion: Give it a try!
Is it the best option available for small-scale temporary in-circuit programming and debugging connections? Maybe, maybe not. It works surprisingly well and it can't get much more compact. It is reliable when handled with care, easy to implement into a design, simple to use and doesn't require custom built jigs, which makes it a great, easily accessible choice for hobbyists. It also has the benefit that it doesn't require additional permanently soldered parts on the PCB. And it's dirt cheap.
The primary downside of the SOICbite is that it needs to be at the PCB edge, which might not always be what you want. Modifying it isn't too troublesome and you can buy already wired clips if you can't be bothered to do it yourself.
There might be more straight-forward, professional alternatives which are equally space-efficient, like Tag-Connect or pogo pins, but they come with their own downsides. Their spring loaded contacts may were out and fail over time, they need to be pushed down into the PCB manually for the duration of the programming process or require a custom jig to hold it in place. Also, Tag-Connect cables can easily cost 50 USD / EUR.
I think the SOICbite is a viable option for simple, space-efficient temporary connections and I can totally recommend it for this use-case. I will definitely use it more often in the future.
TL;DR
To sum it up, here's a quick rundown of the pro's and con's of the SOICbite connector:
PROS
- Very space-efficient (2.5x smaller than a standard 2x4 pin header)
- Provides a reliable, sufficiently strong connection, comparable to a pogo pin jig, if some caution is exercised
- Doesn't require any permanently soldered parts on the PCB
- With prices starting at 2 USD / EUR, SOIC-8 clips are super affordable
- Higher pin-count SOIC clips are available, if 8 pins aren't enough
CONS
- The SOIC-8 clips must be modified to work, but it's easy to do
- It can only be used at a PCB edge
- Using thin traces of 5-7 mil width (depending on your design rules) to route between the registration holes might be problematic for some manufacturers
- It is not really suitable for thin PCBs (< 1.6mm), without replacing the spring
Where to buy?
I ordered a bunch of clips from different sellers on AliExpress. They all seem to sell the same model, at least in the lower price ranges. So it should be safe to get the cheapest offer you find.
Currently, I would recommend this set which comes with an already soldered ribbon cable and two handy little adapters for just 2 USD / 1.80 EUR (plus shipping):
https://www.aliexpress.com/item/33058340727.htmlThis is the model I'm showing in the pictures above. It comes without wires, if you prefer that:
https://www.aliexpress.com/item/32953869303.htmlThis one can be wired up with regular DuPont wires if you prefer that, although it looks a little weak and flimsy:
https://www.aliexpress.com/item/32908232000.htmlIf you don't trust AliExpress or eBay, I'm sure you'll find them at your prefered distributor aswell!