EthernetGateway error in MYSController
-
Good afternoon!
I'm a newbie .. I decided to start with a gateway based MySensor. Assembled Arduino Mega 2560 and WizNET (W5100) Ethernet module ... ... Filled sketch before pouring changed to the IP. Ping passes, but telnet to port 5003 is not. Tell me what I did wrong?
it is my sketch:
/**
 * The MySensors Arduino library handles the wireless radio link and protocol
 * between your home built sensors/actuators and HA controller of choice.
 * The sensors forms a self healing radio network with optional repeaters. Each
 * repeater and gateway builds a routing tables in EEPROM which keeps track of the
 * network topology allowing messages to be routed to nodes.
 *
 * Created by Henrik Ekblad <henrik.ekblad@mysensors.org>
 * Copyright (C) 2013-2015 Sensnology AB
 * Full contributor list: https://github.com/mysensors/Arduino/graphs/contributors
 *
 * Documentation: http://www.mysensors.org
 * Support Forum: http://forum.mysensors.org
 *
 * This program is free software; you can redistribute it and/or
 * modify it under the terms of the GNU General Public License
 * version 2 as published by the Free Software Foundation.
 *
 *******************************
 *
 * REVISION HISTORY
 * Version 1.0 - Henrik EKblad
 * Contribution by a-lurker and Anticimex,
 * Contribution by Norbert Truchsess <norbert.truchsess@t-online.de>
 *
 *
 * DESCRIPTION
 * The EthernetGateway sends data received from sensors to the ethernet link.
 * The gateway also accepts input on ethernet interface, which is then sent out to the radio network.
 *
 * The GW code is designed for Arduino 328p / 16MHz.  ATmega168 does not have enough memory to run this program.
 *
 *
 * COMPILING WIZNET (W5100) ETHERNET MODULE
 * > Edit MyConfig.h in (libraries\MySensors\) to enable softspi (remove // before "#define SOFTSPI").
 *
 * COMPILING ENC28J60 ETHERNET MODULE
 * > Use Arduino IDE 1.5.7 (or later)
 * > Disable DEBUG in Sensor.h before compiling this sketch. Othervise the sketch will probably not fit in program space when downloading.
 * > Remove Ethernet.h include below and include UIPEthernet.h
 * > Remove DigitalIO include
 * Note that I had to disable UDP and DHCP support in uipethernet-conf.h to reduce space. (which means you have to choose a static IP for that module)
 *
 * VERA CONFIGURATION:
 * Enter "ip-number:port" in the ip-field of the Arduino GW device. This will temporarily override any serial configuration for the Vera plugin.
 * E.g. If you want to use the defualt values in this sketch enter: 192.168.178.66:5003
 *
 * LED purposes:
 * - To use the feature, uncomment WITH_LEDS_BLINKING in MyConfig.h
 * - RX (green) - blink fast on radio message recieved. In inclusion mode will blink fast only on presentation recieved
 * - TX (yellow) - blink fast on radio message transmitted. In inclusion mode will blink slowly
 * - ERR (red) - fast blink on error during transmission error or recieve crc error
 *
 * See http://www.mysensors.org/build/ethernet_gateway for wiring instructions.
 *
 */
#define NO_PORTB_PINCHANGES

#include <DigitalIO.h>     // This include can be removed when using UIPEthernet module
#include <SPI.h>

#include <MySigningNone.h>
#include <MyTransportRFM69.h>
#include <MyTransportNRF24.h>
#include <MyHwATMega328.h>
#include <MySigningAtsha204Soft.h>
#include <MySigningAtsha204.h>

#include <MyParserSerial.h>
#include <MySensor.h>
#include <stdarg.h>
#include <PinChangeInt.h>
#include "GatewayUtil.h"


// Use this if you have attached a Ethernet ENC28J60 shields
// #include <UIPEthernet.h>

// Use this for WizNET W5100 module and Arduino Ethernet Shield
#include <Ethernet.h>


#define INCLUSION_MODE_TIME 1 // Number of minutes inclusion mode is enabled
#define INCLUSION_MODE_PIN  3 // Digital pin used for inclusion mode button

#define RADIO_CE_PIN        5  // radio chip enable
#define RADIO_SPI_SS_PIN    6  // radio SPI serial select

#define RADIO_ERROR_LED_PIN 7  // Error led pin
#define RADIO_RX_LED_PIN    8  // Receive led pin
#define RADIO_TX_LED_PIN    9  // the PCB, on board LED


// NRFRF24L01 radio driver (set low transmit power by default)
MyTransportNRF24 transport(RADIO_CE_PIN, RADIO_SPI_SS_PIN, RF24_PA_LEVEL_GW);
//MyTransportRFM69 transport;

// Message signing driver (signer needed if MY_SIGNING_FEATURE is turned on in MyConfig.h)
//MySigningNone signer;
//MySigningAtsha204Soft signer;
//MySigningAtsha204 signer;

// Hardware profile
MyHwATMega328 hw;

// Construct MySensors library (signer needed if MY_SIGNING_FEATURE is turned on in MyConfig.h)
// To use LEDs blinking, uncomment WITH_LEDS_BLINKING in MyConfig.h
#ifdef WITH_LEDS_BLINKING
MySensor gw(transport, hw /*, signer*/, RADIO_RX_LED_PIN, RADIO_TX_LED_PIN, RADIO_ERROR_LED_PIN);
#else
MySensor gw(transport, hw /*, signer*/);
#endif


#define IP_PORT 5003        // The port you want to open
IPAddress myIp (192, 168, 0, 198);  // Configure your static ip-address here    COMPILE ERROR HERE? Use Arduino IDE 1.5.7 or later!

// The MAC address can be anything you want but should be unique on your network.
// Newer boards have a MAC address printed on the underside of the PCB, which you can (optionally) use.
// Note that most of the Ardunio examples use  "DEAD BEEF FEED" for the MAC address.
byte mac[] = { 0x90, 0xA2, 0xDA, 0x0D, 0x11, 0x12 };  // DEAD BEEF FEED

// a R/W server on the port
EthernetServer server = EthernetServer(IP_PORT);
// handle to open connection
EthernetClient client = EthernetClient();

char inputString[MAX_RECEIVE_LENGTH] = "";    // A string to hold incoming commands from serial/ethernet interface
int inputPos = 0;
bool sentReady = false;

void output(const char *fmt, ... ) {
   va_list args;
   va_start (args, fmt );
   vsnprintf_P(serialBuffer, MAX_SEND_LENGTH, fmt, args);
   va_end (args);
   Serial.print(serialBuffer);
   server.write(serialBuffer);
}

void setup()
{
  Ethernet.begin(mac, myIp);

  setupGateway(INCLUSION_MODE_PIN, INCLUSION_MODE_TIME, output);

  // Add interrupt for inclusion button to pin
  PCintPort::attachInterrupt(pinInclusion, startInclusionInterrupt, RISING);

  // give the Ethernet interface a second to initialize
  delay(1000);

  // Initialize gateway at maximum PA level, channel 70 and callback for write operations
  gw.begin(incomingMessage, 0, true, 0);


  // start listening for clients
  server.begin();

}


void loop() {
  gw.process();

  checkButtonTriggeredInclusion();
  checkInclusionFinished();

  // if an incoming client connects, there will be
  // bytes available to read via the client object
  EthernetClient newclient = server.available();
  // if a new client connects make sure to dispose any previous existing sockets
  if (newclient) {
      if (client != newclient) {
       client.stop();
       client = newclient;
       output(PSTR("0;0;%d;0;%d;Gateway startup complete.\n"),  C_INTERNAL, I_GATEWAY_READY);
     }
   }

   if (client) {
     if (!client.connected()) {
       client.stop();
     } else if (client.available()) {
       // read the bytes incoming from the client
       char inChar = client.read();
       if (inputPos<MAX_RECEIVE_LENGTH-1) {
         // if newline then command is complete
         if (inChar == '\n') {
           Serial.println("Finished");
            // a command was issued by the client
            // we will now try to send it to the actuator
            inputString[inputPos] = 0;

            // echo the string to the serial port
            Serial.print(inputString);

            parseAndSend(gw, inputString);

            // clear the string:
            inputPos = 0;
         } else {
           // add it to the inputString:
           inputString[inputPos] = inChar;
           inputPos++;
         }
      } else {
         // Incoming message too long. Throw away
         inputPos = 0;
      }
    }
  }
}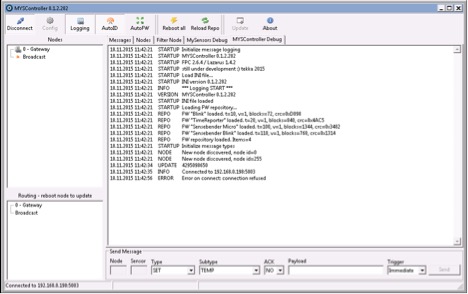
In MYSController an error
1
28.10.2015 15:21:26 INFO Connected to 192.168.0.198:5003
2
28.10.2015 15:21:47 ERROR Error on connect: connection refused
-
-
I did not properly connected RF24 ... after a wrong connection GW earned ...)