TEMT6000 Breakout board
-
Hi Folks, my first post to the forum! I´m building a weather station for education purposes and would like to check on one information.
For this build, I´m using the ESP32DEV KIT C, and inputs and outputs are 3.3V. One of the components is a TEMT6000 brakout board (i´m more of a maker then engineer lol) and all the tutorials I see for this breakout list input VCC as 5V and the need for a 1Kohm resistor on the out pin, to avoid burning the input.
Thing is, this breakout can be powered with 3.3V as well, (as of the datasheet) and the sensoir is quite simple - This sensor can handle voltages from both 5V and 3.3V devices.
To make taking light measurements as easy as possible, this sensor has been designed into a voltage divider circuit. The TEMT600 acts as one of the resistors in the divider, and, as the light hitting it changes, so too does the voltage on the SIG pin. To read that voltage, simply connect the SIG pin on the TEMT6000 to any analog to digital conversion pin on your microcontroller.
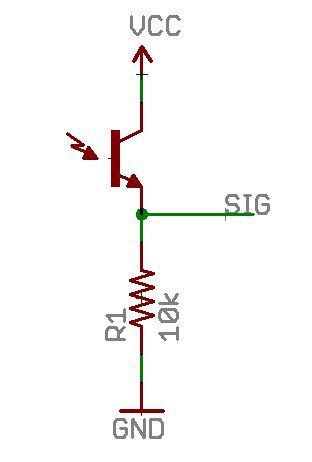
My question is - by powering with 3.3V and this diagram, the max output voltage is also 3.3V correct? In this case no resistor would be needed. Am I reading it right?
Thanks!
-
Hi Folks, my first post to the forum! I´m building a weather station for education purposes and would like to check on one information.
For this build, I´m using the ESP32DEV KIT C, and inputs and outputs are 3.3V. One of the components is a TEMT6000 brakout board (i´m more of a maker then engineer lol) and all the tutorials I see for this breakout list input VCC as 5V and the need for a 1Kohm resistor on the out pin, to avoid burning the input.
Thing is, this breakout can be powered with 3.3V as well, (as of the datasheet) and the sensoir is quite simple - This sensor can handle voltages from both 5V and 3.3V devices.
To make taking light measurements as easy as possible, this sensor has been designed into a voltage divider circuit. The TEMT600 acts as one of the resistors in the divider, and, as the light hitting it changes, so too does the voltage on the SIG pin. To read that voltage, simply connect the SIG pin on the TEMT6000 to any analog to digital conversion pin on your microcontroller.
My question is - by powering with 3.3V and this diagram, the max output voltage is also 3.3V correct? In this case no resistor would be needed. Am I reading it right?
Thanks!
@Daniel-Brunod said in TEMT6000 Breakout board:
First of all, when trying to figure out something about electronic component, read the datasheet first. https://www.vishay.com/docs/81579/temt6000.pdf says that maximum "Collector emitter voltage" is 6V. So, of course you won't damage the sensor by wiring it like that.
BUT! You're right that it is a voltage divider scheme, so you need a resistor to take a reading. -
So, after working with it this weekend, I´ve got the following design for my weather station:
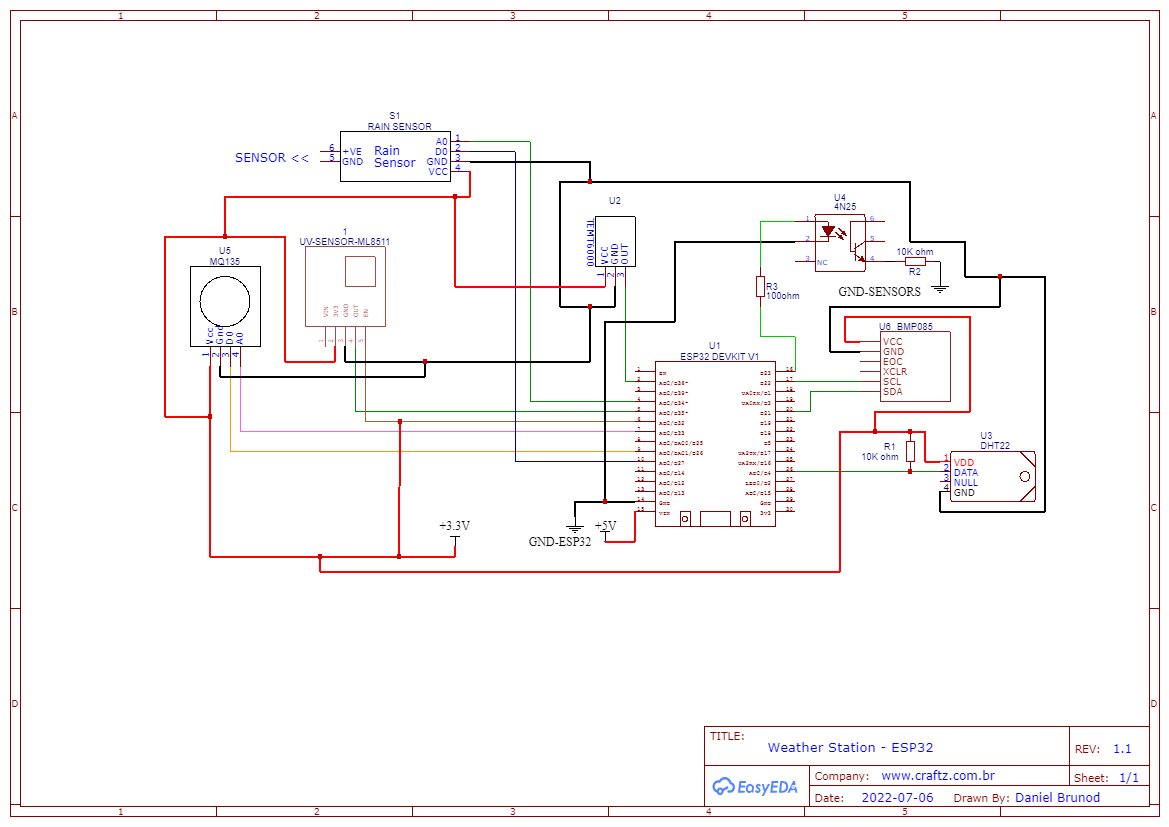
I´m using this project with 6 sensors (breakout boards)
- Rain Sensor (lm393)
- Co2 Gas Sensor (MQ135)
- UV Sensor (ML8511)
- Light Sensor (temt6000)
- Humidity Sensor (DHT22)
- Preassure Sensor (GY-65 - BMP085)
For the TEMT6000, the resistor is already on the breakout board, therefore no need to add to the circuit. This sensor will be replaced with BH1750, since the temt6000 has a really high saturation (1-1000) vs BH1750 (65K lux).
In the project there is also an optocoupler 4N25 (I had it available) to turn on and off the sensors power during ESP32 deepsleep. This can also be a design reused for high power devices connected to the ESP32. on wakeup, this pin is set to HIGH to power everything.
ESP32 itself is powered by a separate 5-12V line, as recommended from expressif on VIN. GND on Sensor lines is separated from the ESP32.
All analog sensor readings wired to ADC1 ports on the ESP32 board and a 3.3V is applied pin 32 for reference voltage for the UV sensor.
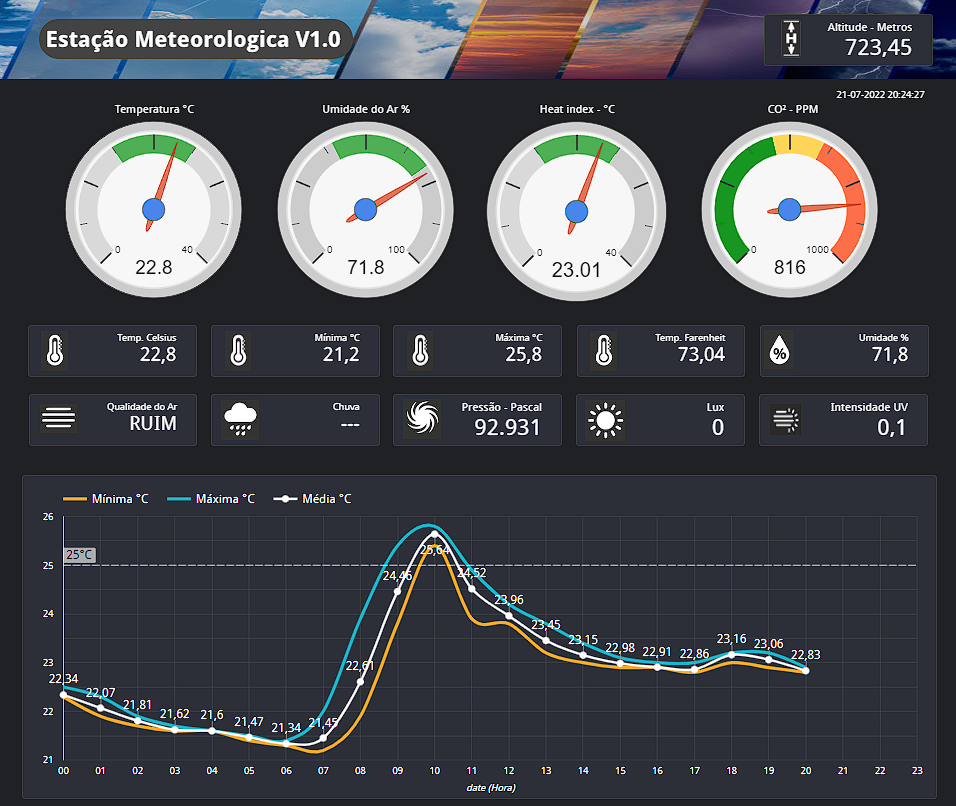
Time is updated from an NTPServer and all data from the sensors are send to a GoogleSheet directly, and dashboard is being created on GoogleData Studio. I need to improve this code, because it´s hanging after 24h, and a manual boot is required.
Next step is figuring out how to add a solar panel and a battery to power everything. I have a 12V - 1W solar and 18650 batteries. Have not yet figured out this circuit.
From this station, I´m able to get the following readings:
TEMT6000 - lux, luxpercent
BMP085 - temp celsius,temp_farenheit, pressure (ATM, PASCAL, BAR, PSI), Altitude (Meters and Ft)
MQ135 - Co2ppm, Gas Detection (0 - yes / 1 - No),
DHT22 - Humidity, Heat Index (humidity / temp - Celsius and Farenheit)
ML8511- UV Intensity
LM393 - Rain Intensity, Rain Indicator (yes / No)#include <Wire.h> // Biblioteca para sensores que usam SDA / SCL #include <Adafruit_BMP085.h> //Biblioteca do Sensor GY-65(BMP085) - (Barômetro / temperatura / Altitude) #include "DHT.h" //Biblioteca Sensor DHT #include "WiFi.h" //Biblioteca Wifi #include <HTTPClient.h> // Para enviar e receber requests #include "time.h" // Para Atualizar o data/hora via NtpServer //Definição de Pinos ESP32 #define sensorLuz 36 //Sensor de Luz Ambiente #define MqDigitalPin 26 //Sensor MQ135 #define MqAnalogPin 33 //Sensor MQ135 #define DHTPIN 4 //PINO DIGITAL UTILIZADO PELO DHT22 #define UVOUTPIN 35 //PINO ANALOGICO UTILIZADO PELO SensorUV #define UVREF 32 //PINO DIGITAL UTILIZADO PELO SensorUV #define RAIN 34 //PINO analogico UTILIZADO PELO SensorChuva #define RAINDIG 27 //PINO Digital UTILIZADO PELO SensorChuva //ESP32 DeepSleep #define uS_TO_S_FACTOR 1000000 /* Conversion factor for micro seconds to seconds */ #define TIME_TO_SLEEP 300 /* Time ESP32 will go to sleep (in seconds) - 5 minutes*/ //Variáveis NTPServer const char* ntpServer = "pool.ntp.org"; const long gmtOffset_sec = -10800; // GMT-3 const int daylightOffset_sec = 0; // WiFi credentials const char* ssid = "YOURSSID"; // change SSID const char* password = "YOURPASS"; // change password // Google script ID and required credentials String GOOGLE_SCRIPT_ID = "YOURKEY"; // change Gscript ID //Variáveis de Leitura #define DHTTYPE DHT22 //DEFINE O MODELO DO SENSOR (DHT22 / AM2302) //Inicializa Sensor GY-65 (BMP085) Adafruit_BMP085 bmp; // Parâmetros do sensor DHT DHT dht(DHTPIN, DHTTYPE); void setup() { // Definição dos Pinos pinMode(sensorLuz, INPUT); pinMode(MqDigitalPin, INPUT); pinMode(MqAnalogPin, INPUT); pinMode(UVOUTPIN, INPUT); pinMode(UVREF, INPUT); pinMode(RAIN, INPUT); pinMode(RAINDIG, INPUT); Serial.begin(9600); //Sensor DHT dht.begin(); // Sensor GY-65 if (!bmp.begin()) { Serial.println("Não foi encontrado um sensor BMP085!"); while (true) {} } // connect to WiFi Serial.println(); Serial.print("Connecting to wifi: "); Serial.println(ssid); Serial.flush(); WiFi.begin(ssid, password); while (WiFi.status() != WL_CONNECTED) { delay(500); Serial.print("."); } // Init and get the time configTime(gmtOffset_sec, daylightOffset_sec, ntpServer); } void loop() { delay(15000); // Delay para permitir acionamento dos sensores quando retorna do deepsleep // Leitura do Sensor GY-65(BMP085) float temperaturaCelsius = bmp.readTemperature(); //Leitura Celsius (30 °C × 9/5) + 32 = 86 °F float temperaturaFarenheit = (bmp.readTemperature() * 1.8) + 32; //Leitura Farenheit (30 °C × 9/5) + 32 = 86 °F float pressaoPascal = bmp.readPressure(); //Leitura pressão Pascal double pressaoAtm = pressaoPascal / 101325; //Leitura pressão ATM double pressaoBar = pressaoPascal / 100000; //Leitura pressão Bar float pressaoPsi = pressaoPascal / 6895; //Leitura pressão Bar float altitudeMetros = bmp.readAltitude(); //Leitura Altitude Metros float altitudePes = bmp.readAltitude() * 3.281; //Leitura Altitude Pés //Leitura Sensor DHT delay(2000); //INTERVALO DE 2 SEGUNDO ANTES DE INICIAR float umidade = dht.readHumidity(); //realiza a leitura Umidade do DHT float temperatura2Celsius = dht.readTemperature(); //realiza a leitura temperatura DHT - Celisus float temperatura2Farenheit = dht.readTemperature(true); // Read temperature as Fahrenheit (isFahrenheit = true) float hif = dht.computeHeatIndex(temperatura2Farenheit, umidade); // Heat index em Farenheit float hic = dht.computeHeatIndex(temperatura2Celsius, umidade, false); // Heat index em Celsius // Leitura do Sensor MQ135 (Gás) // Cálcula offset Atmosférico e mapeia os valores para monitoramento analogReadResolution(10); int co2Zero = 60; //Calibra o offset do C02 atmosférico - valor de Referência int MQsensorValue = averageAnalogRead(MqAnalogPin) - co2Zero; //Leitura Analogica MQ135 com compensação int MQdigitalValue = digitalRead(MQdigitalValue); //Leitura Digital MQ135 int co2ppm = map(MQsensorValue, 0, 1023, 0, 5000); //Leitura Sensor UV analogReadResolution(10); int uvLevel = averageAnalogRead(UVOUTPIN); int refLevel = averageAnalogRead(UVREF); delay(1000); float outputVoltage = 3.3 * uvLevel / refLevel; float uvIntensity = mapfloat(uvLevel, 310, 1023, 1.0, 15.0); // 310 = 1V, 1023 = 3.3V // Leitura do Sensor TEMT6000 analogReadResolution(10); float volts = analogRead(sensorLuz) * 5 / 1024.0; // Converte Leitura ADC para LUX float luzPercent = analogRead(sensorLuz) / 1024.0 * 100; //Realiza a Leitura da Luz em percentual float amps = volts / 10000.0; // em 10,000 Ohms float microamps = amps * 1000000; // Converte em Microamps float lux = microamps * 2.0; // Converte em Lux // Leitura do Sensor Chuva analogReadResolution(10); int chuva = digitalRead(RAINDIG); // Realiza a leitura do pino Digital - 1=Sem Chuva / 0 = Chuva int ChuvaInt = analogRead(RAIN); // Realiza a leitura do pino Analogico medição intensidade delay(2000); //Envia Dados Para o Google Sheets if (WiFi.status() == WL_CONNECTED) { static bool flag = false; struct tm timeinfo; if (!getLocalTime(&timeinfo)) { Serial.println("Failed to obtain time"); return; } char timeStringBuff[50]; //50 chars should be enough strftime(timeStringBuff, sizeof(timeStringBuff), "%F %T %Z", &timeinfo); String asString(timeStringBuff); asString.replace(" ", "-"); Serial.print("Time:"); Serial.println(asString); String urlFinal = "https://script.google.com/macros/s/" + GOOGLE_SCRIPT_ID + "/exec?" + "lux=" + String(lux) + "&date=" + asString + "&luxpercent=" + String(luzPercent) + "&temp_celsius=" + String(temperaturaCelsius) + "&temp_farenheit=" + String(temperaturaFarenheit) + "&pressao_pascal=" + String(pressaoPascal) + "&pressao_atm=" + String(pressaoAtm) + "&pressao_bar=" + String(pressaoBar) + "&pressao_psi=" + String(pressaoPsi) + "&altitude_m=" + String(altitudeMetros) + "&altitude_ft=" + String(altitudePes) + "&co2ppm=" + String(co2ppm) + "&gas=" + String(MQdigitalValue) + "&umidade=" + String(umidade) + "&heat_index_f=" + String(hif) + "&heat_index_c=" + String(hic) + "&uv_intensity=" + String(uvIntensity) + "&chuvaint=" + String(ChuvaInt) + "&chuva=" + String(chuva); //Serial.print("POST data to spreadsheet:"); //Serial.println(urlFinal); HTTPClient http; http.begin(urlFinal.c_str()); http.setFollowRedirects(HTTPC_STRICT_FOLLOW_REDIRECTS); int httpCode = http.GET(); Serial.print("HTTP Status Code: "); Serial.println(httpCode); //--------------------------------------------------------------------- //getting response from google sheet String payload; if (httpCode > 0) { payload = http.getString(); // Serial.println("Payload: "+payload); } //--------------------------------------------------------------------- http.end(); } delay(1000); //WiFi.disconnect(true); //WiFi.mode(WIFI_OFF); // Outputs Saída Serial (Para leitura e debug) Serial.print(lux); Serial.print(" LUX - "); Serial.print(luzPercent); Serial.println("%"); Serial.print("Temperatura: "); Serial.print(temperaturaCelsius); Serial.println(" °C"); Serial.print("Temperatura: "); Serial.print(temperaturaFarenheit); Serial.println(" °F"); Serial.print("Pressão: "); Serial.print(pressaoPascal); Serial.println(" Pa"); Serial.print("Pressão: "); Serial.print(pressaoAtm , 2); Serial.println(" Atm"); Serial.print("Pressão: "); Serial.print(pressaoBar); Serial.println(" Bar"); Serial.print("Pressão: "); Serial.print(pressaoPsi); Serial.println(" Psi"); Serial.print("Altitude: "); Serial.print(altitudeMetros); Serial.println(" metros"); Serial.print("Altitude: "); Serial.print(altitudePes); Serial.println(" ft"); Serial.print("PPM: "); Serial.println(co2ppm); Serial.print("GAS: "); Serial.println(MQdigitalValue); Serial.print("Umidade: "); Serial.print(umidade); Serial.println("%"); Serial.print("Heat index: "); Serial.print(hif); Serial.print("°F - "); Serial.print(hic); Serial.println("°C"); Serial.print("UV Intensity (mW/cm^2): "); Serial.print(uvIntensity, 4); Serial.print(" - REFLevel: "); Serial.print(refLevel); Serial.print(" - ML8511 voltage "); Serial.print(outputVoltage); Serial.print(" - ML8511 output: "); Serial.println(uvLevel); Serial.print("Chuva: "); Serial.println(chuva); Serial.print("Intensidade: "); Serial.println(ChuvaInt); Serial.println(); delay(5000); // ESP32 Deepsleep esp_sleep_enable_timer_wakeup(TIME_TO_SLEEP * uS_TO_S_FACTOR); Serial.println("Setup ESP32 to sleep for every " + String(TIME_TO_SLEEP) + " Seconds"); esp_deep_sleep_start(); } //Takes an average of readings on a given pin //Returns the average int averageAnalogRead(int pinToRead) { analogReadResolution(10); byte numberOfReadings = 8; unsigned int runningValue = 0; for (int x = 0 ; x < numberOfReadings ; x++) runningValue += analogRead(pinToRead); runningValue /= numberOfReadings; return (runningValue); } float mapfloat(float x, float in_min, float in_max, float out_min, float out_max) { return (x - in_min) * (out_max - out_min) / (in_max - in_min) + out_min; }Let me know your toughts!
Thanks! -
For future reference, I´ve put toghether a page on Github with all TEMT6000 Specs and info I have aquired.
https://github.com/CraftzAdmin/esp32/blob/main/Sensors/TEMT6000/README.mdThanks!