Leaf Wetness
-
ok...Thank you... I will try the "voltage divider" and I will see what will happen!
-
-
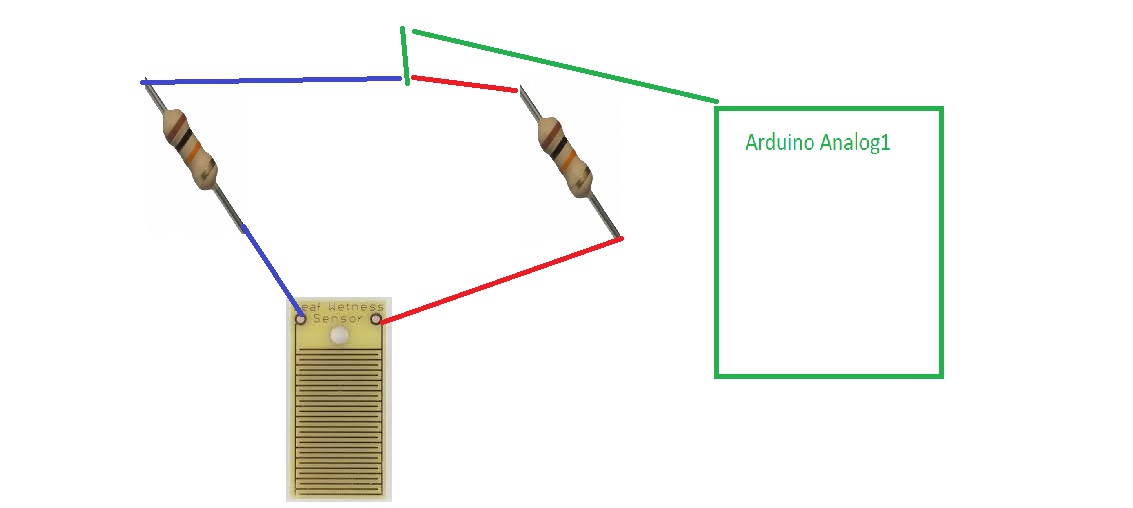
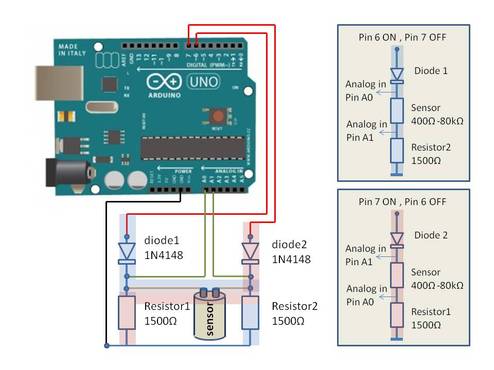
Did you mean something like the figure above? Or I only need to connect one resistor to one wire and the other wire to another pin in the Arduino?
-
Did you mean something like the figure above? Or I only need to connect one resistor to one wire and the other wire to another pin in the Arduino?
@elisavetgrig You're missing the connections to a voltage source and ground. You also only need one resistor as the wetness sensor is the 2nd resistor in the voltage divider circuit. Take a look at this: http://homepage.cs.uri.edu/faculty/hamel/workshops/as220-sept-09/sensors-voltage-dividers.html.
Cheers
Al -
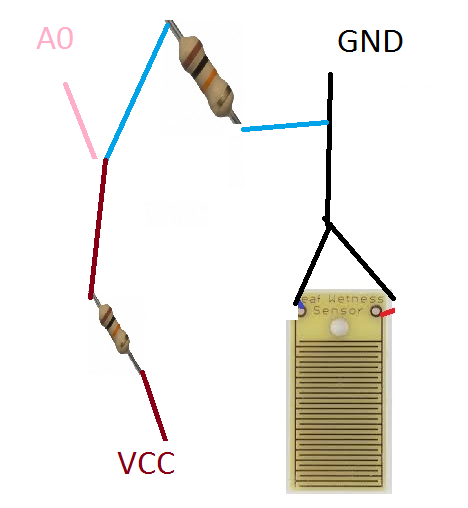
You are right! I thought that I missing something... always there are Data connection, VCC connection and GND.. and I had only one! I made another dummy scheme... Is that better?

-
You are right! I thought that I missing something... always there are Data connection, VCC connection and GND.. and I had only one! I made another dummy scheme... Is that better?
@elisavetgrig Take a look at the second diagram of the link I posted. Right now you show the GND pin connected to the Analog pin and Vcc is also connected to the same spot, so that's not going to work.
Cheers
Al -
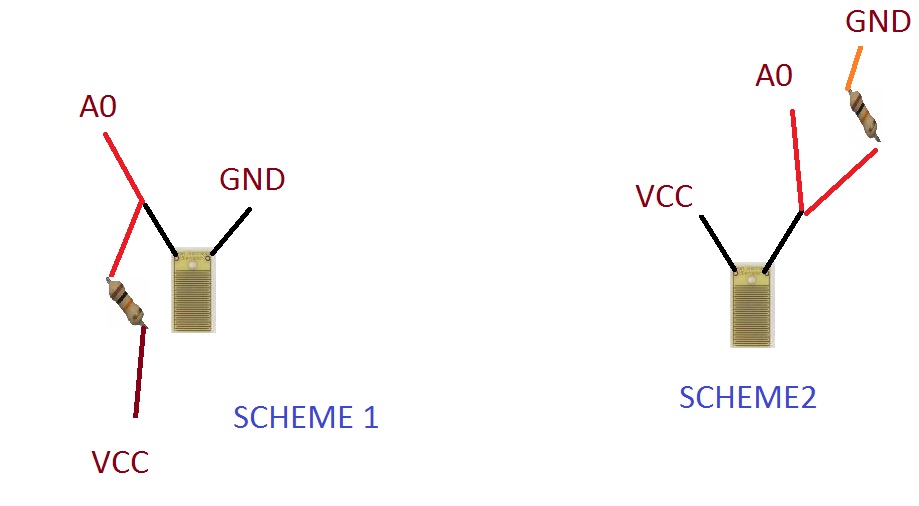
I based in the second diagram... i think that I understand it...
-
I based in the second diagram... i think that I understand it...
@elisavetgrig As I mentioned a few posts ago and how it's shown in the diagram on that link, is that you only need one resistor. The leaf wetness sensor becomes the other resistor in the circuit. In your last diagram, you have both the terminals of the wetness sensor connected to ground. Think of the wetness sensor as a resistor, with each of the terminals representing one leg of a regular resistor.
Cheers
Al -
OK... So I need only one resister... I think that "Scheme 2" is closer to the solution...
-
Hello,
gold plating is a must have for outdoor.
I am now regarding to have something more robust in time , I'm waiting for a light with movement with solar pannel to modify it for it.
-
In the case described there is a constant battery drain when there is "wetness" (moisture) on the sensor. This also implies an electrolytic process which takes care of eroding your sensor. No matter if you use gold plating or not.
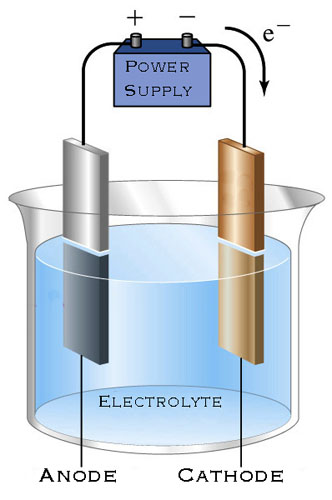
To avoid both you can supply the sensor during measurement only -and- reverse te polarity each time.
An example ketch which takes care of measuring three moisture sensors which relies on this principle.
(the actual measurement is in the "ReadMoistureValues()" routine)
/* PROJECT: MySensors / Floor moisture sensor - measures moisture PROGRAMMER: AWI DATE: june 7, 2015/ last update: june 9, 2015 FILE: AWI_FloorMoisture.ino LICENSE: Public domain Hardware: tbd .- ATmega328p board w/ NRF24l01 and MySensors 1.4 (later: Temp & Humidity - HTU21) Special: program with Arduino Pro 3.3V 8Mhz SUMMARY: Moisture by analog read a polarity switching voltage divider between (high/ low) Remarks: Fixed node-id */ #include <SPI.h> #include <MySensor.h> #include <Wire.h> // I2C #define batteryVoltagePin A0 #define MoistureHighPin 3 #define MoistureLowPin 4 #define Moisture1ReadPin A1 #define Moisture2ReadPin A2 #define Moisture3ReadPin A3 #define BuzzerPin 5 #define LedPin 6 // MySensors Child ID's #define MOISTURE1_CHILD_ID 5 // Moisture 1 #define MOISTURE2_CHILD_ID 6 // Moisture 2 #define MOISTURE3_CHILD_ID 7 // Moisture 3 // #define MOISTURE4_CHILD_ID 8 // Moisture 4 // MySensors messages MyMessage moisturePercentageMsg1(MOISTURE1_CHILD_ID, V_HUM); // Percentage MyMessage moisturePercentageMsg2(MOISTURE2_CHILD_ID, V_HUM); // Percentage MyMessage moisturePercentageMsg3(MOISTURE3_CHILD_ID, V_HUM); // Percentage // MySensors instantiate MySensor gw(9,10); // board, 3.3v (pin default 9,10) // Reference values for ADC and Battery measurements const float VccMin = 1.0*3.5; // Minimum expected Vcc level, in Volts. Example for 1 rechargeable lithium-ion. const float VccMax = 1.0*4.2; // Maximum expected Vcc level, in Volts. float VccReference = 3.3 ; // voltage reference for measurement (=vcc) unsigned long SLEEP_TIME = 60000; // 10 sec sleep time between reads (seconds * 1000 milliseconds) // **** class for Moisture measurement ***** // attaches an analog input to a data structure for measurements // measures % of full scale voltage and scales the range of actual values // stores current/ min & max values for the sensor class MoistureSense { public: // Create an instance of MoistureSense and initialize (digital & input pin and reference values) MoistureSense(uint8_t ReadPin, int LowValue, int HighValue) ; // attach to pin and init void ReadHigh(); // Read moisture if positive void ReadLow(); // Read moisture with polarity inverted // average the low/ high readings ang get the moisture percent value uint8_t MoisturePercent(); void ResetMinMax(); // reset min & max values protected: uint8_t _ReadPin ; // Hardware Analog Pin number int _CurMoisture, _MaxMoisture, _MinMoisture, _Low, _High, _HighValue, _LowValue ; uint8_t _curState; }; // to create an instance of MoistureSense and initialize (input pin and reference values) MoistureSense::MoistureSense(uint8_t ReadPin, int LowValue, int HighValue) { // attach to pins and init _ReadPin = ReadPin; _LowValue = LowValue; _HighValue = HighValue; _CurMoisture = _MaxMoisture = _MinMoisture = NULL ; // min & max in percent } void MoistureSense::ReadHigh() // Read moisture with high polarity (in relation to Gnd) { _High = analogRead(_ReadPin); } void MoistureSense::ReadLow() // Read moisture with low polarity (in relation to Vcc) { _Low = 1024 - analogRead(_ReadPin); } void MoistureSense::ResetMinMax() // Reset min & max values { _MinMoisture = _MaxMoisture = _CurMoisture; } uint8_t MoistureSense::MoisturePercent() // average the low/ high readings ang get the moisture percent value { uint8_t reading = constrain(map((_Low + _High)/2, _LowValue, _HighValue, 0, 100),0,100); // average map to the 0-100% range _MinMoisture = min(reading, _MinMoisture); // set min and max values _MaxMoisture = max(reading, _MaxMoisture); } // Instantiate moisture sensor objects MoistureSense Moisture1(Moisture1ReadPin, 0, 1024); MoistureSense Moisture2(Moisture2ReadPin, 0, 1024); MoistureSense Moisture3(Moisture3ReadPin, 0, 1024); void setup(){ // MySensors setup (baud 115200) gw.begin(NULL, 21); // fixed node 21, (final: connected to repeater 3 (living))" // Send the sketch version information to the gateway and Controller gw.sendSketchInfo("AWI FloorMoisture 21", "1.0"); gw.present(MOISTURE1_CHILD_ID, S_HUM); // Present Moisture sensors as humidity gw.present(MOISTURE2_CHILD_ID, S_HUM); // Present Moisture sensors as humidity gw.present(MOISTURE3_CHILD_ID, S_HUM); // Present Moisture sensors as humidity Serial.print("AWI Moisture Started "); pinMode(BuzzerPin,OUTPUT); // Setup intermittent buzzer & light pinMode(LedPin,OUTPUT); } void loop(){ // Serial.println("Moisture Percentages"); ReadMoistureValues(); gw.send(moisturePercentageMsg1.set(Moisture1.MoisturePercent())); // MySensors Send (V) gw.send(moisturePercentageMsg2.set(Moisture2.MoisturePercent())); // MySensors Send (V) gw.send(moisturePercentageMsg3.set(Moisture3.MoisturePercent())); // MySensors Send (V) gw.sendBatteryLevel(batteryPercentage()); // show local alarm if moisture > 20% if ((Moisture1.MoisturePercent()>20) || (Moisture2.MoisturePercent()>20) || (Moisture3.MoisturePercent()>20) || (batteryPercentage() < 10)) { MoistureAlarm(); } gw.sleep(SLEEP_TIME); // low power for sleep time } unsigned ReadMoistureValues() // read all moisturevalues { pinMode(MoistureLowPin, OUTPUT); // first set all pins to measurement(non floating) mode pinMode(MoistureHighPin, OUTPUT); digitalWrite(MoistureLowPin, LOW); // Set polarity on voltage divider high and read the values digitalWrite(MoistureHighPin, HIGH); delayMicroseconds(100); Moisture1.ReadLow(); delayMicroseconds(100); Moisture2.ReadLow(); delayMicroseconds(100); Moisture3.ReadLow(); delayMicroseconds(100); digitalWrite(MoistureLowPin, HIGH); // reverse polarity on voltage divider and read values digitalWrite(MoistureHighPin, LOW); delayMicroseconds(100); Moisture1.ReadHigh(); delayMicroseconds(100); Moisture2.ReadHigh(); delayMicroseconds(100); Moisture3.ReadHigh(); delayMicroseconds(100); pinMode(MoistureLowPin, INPUT); // reset pins to floating, to avoid power leakage pinMode(MoistureHighPin, INPUT); Serial.print("Moist1: "); Serial.print(Moisture1.MoisturePercent()); Serial.print(" , Moist2: "); Serial.print(Moisture2.MoisturePercent()); Serial.print(" , Moist3: "); Serial.print(Moisture3.MoisturePercent()); Serial.println(); } unsigned MoistureAlarm() // If moisturelevel to high, sound & show local alarm { digitalWrite(MoistureLowPin, HIGH); digitalWrite(MoistureHighPin, HIGH); delay(100); // sound & light for 100ms, uses a lot of power, so no no need for power down digitalWrite(MoistureLowPin, LOW); digitalWrite(MoistureHighPin, LOW); } // get Battery Voltage & charge current // assumes a balanced voltage divider on Battery and uses the Vcc as reference (3.3V in this case) // Parameters: // - VccMin = minimum battery voltage // - VccMax = maximum battery voltage // - VccReference = reference voltage for ADC uint8_t batteryPercentage() { float batteryVoltage = ((float)analogRead(batteryVoltagePin)* VccReference/1024) * 2; // actual voltage is double Serial.print("Batt: "); Serial.print(batteryVoltage); Serial.print("V ; "); return(constrain(map(batteryVoltage, VccMin, VccMax, 0, 100),0,100)); // and map to the 0-100% range } -
@AWI your sketch has 3 sensors ? do you use a special wiring or you just get through high and low ?
The sketch on soil humidity does this but with two pins to make kind of AC current, but it needs also some gypsum to protect the electrodes.
. Leaf wetness is not immersed by nature hopefully ;-)
-
@AWI your sketch has 3 sensors ? do you use a special wiring or you just get through high and low ?
The sketch on soil humidity does this but with two pins to make kind of AC current, but it needs also some gypsum to protect the electrodes.
. Leaf wetness is not immersed by nature hopefully ;-)
@epierre It has 3 sensors with copper wiring. It switches the polarity of the voltage divider (1 Mohm in series with the "sensor") and measures the voltage over the sensor. Actualy it is a moisture alarm for a sensitive wooden floor.
and I learned something today :smirk:
"Gypsum is a soft sulfate mineral composed of calcium sulfate dihydrate, with the chemical formula CaSO4·2H2O" -
@AWI You can call it also "Plaster of Paris" ;-)
When immersed you need to protect it whatever you do : http://vanderleevineyard.com/1/category/vinduino/1.html
-
Hello,
I guess it is the same as Vinduino :
with their test code:
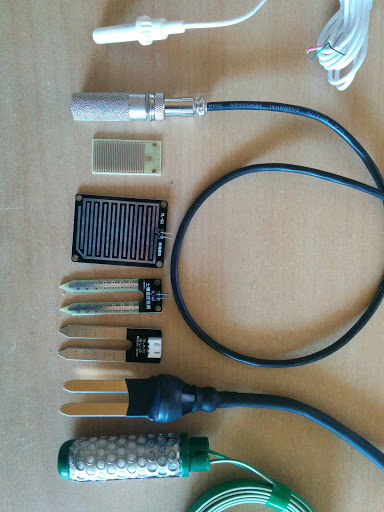
// This program tests 3 soil sensor inputs and prints bias caused by galvanic effects
// Copyright (C) 2015, Reinier van der Lee
// www.vanderleevineyard.com


// This program is free software: you can redistribute it and/or modify
// it under the terms of the GNU General Public License as published by
// the Free Software Foundation, either version 3 of the License, or
// any later version.

// This program is distributed in the hope that it will be useful,
// but WITHOUT ANY WARRANTY; without even the implied warranty of
// MERCHANTABILITY or FITNESS FOR A PARTICULAR PURPOSE.  See the
// GNU General Public License for more details.

#include <math.h>       // Conversion equation from resistance to %


// Setting up format for reading 3 soil sensors
#define NUM_READS 10    // Number of sensor reads for filtering
long buffer[NUM_READS];
int index;

typedef struct {        // Structure to be used in percentage and resistance values matrix to be filtered (have to be in pairs)
  int moisture;
  long resistance;
} values;


const long knownResistor = 1500;  // Constant value of known resistor in Ohms

int supplyVoltage;                // Measured supply voltage
int sensorVoltage;                // Measured sensor voltage

values valueOf[NUM_READS];        // Calculated moisture percentages and resistances to be sorted and filtered


int i;                            // Simple index variable


void setup() {
  // initialize serial communications at 9600 bps:
  Serial.begin(115200);


  // initialize the digital pins as an output.
  // Pin 6,7 is for sensor 1
  pinMode(6, OUTPUT);
  pinMode(7, OUTPUT);


}

void loop() {


measure(1,6,7,1);
Serial.print ("\t");
Serial.println (average());
long read1 = average();

measure(1,7,6,0);
Serial.print ("\t");
Serial.println (average());
long read2= average();

long sensor1 = (read1 + read2)/2;

Serial.print ("resistance bias =" );
Serial.println (read1-read2);
Serial.print ("sensor bias compensated value = ");
Serial.println (sensor1);
Serial.println ();

 delay (3000);

}

void measure (int sensor, int phase_b, int phase_a, int analog_input)
{

  // read sensor, filter, and calculate resistance value
  // Noise filter: median filter

  for (i=0; i<NUM_READS; i++) {

    // Read 1 pair of voltage values
    digitalWrite(phase_a, HIGH);                 // set the voltage supply on
    delayMicroseconds(25);
    supplyVoltage = analogRead(analog_input);   // read the supply voltage
    delayMicroseconds(25);
    digitalWrite(phase_a, LOW);                  // set the voltage supply off
    delay(1);

    digitalWrite(phase_b, HIGH);                 // set the voltage supply on
    delayMicroseconds(25);
    sensorVoltage = analogRead(analog_input);   // read the sensor voltage
    delayMicroseconds(25);
    digitalWrite(phase_b, LOW);                  // set the voltage supply off

    // Calculate resistance
    // the 0.5 add-term is used to round to the nearest integer
    // Tip: no need to transform 0-1023 voltage value to 0-5 range, due to following fraction
    long resistance = (knownResistor * (supplyVoltage - sensorVoltage ) / sensorVoltage)-457 ;

    delay(1);
    addReading(resistance);
    Serial.print (resistance);
    Serial.print ("\t");
  }
  }


// Averaging algorithm
void addReading(long resistance){
  buffer[index] = resistance;
  index++;
  if (index >= NUM_READS) index = 0;
}

long average(){
  long sum = 0;
  for (int i = 0; i < NUM_READS; i++){
    sum += buffer[i];
  }
  return (long)(sum / NUM_READS);
}
and my hall of fame and shame of sensors I've tried :
Hello! It looks like you're interested in this conversation, but you don't have an account yet.
Getting fed up of having to scroll through the same posts each visit? When you register for an account, you'll always come back to exactly where you were before, and choose to be notified of new replies (either via email, or push notification). You'll also be able to save bookmarks and upvote posts to show your appreciation to other community members.
With your input, this post could be even better 💗
Register Login