Clock with temperature, humidity and CO2 level sensors

-
My bedside alarm clock recently got broken so I decided to build up one by myself.
The prototype looks like that:
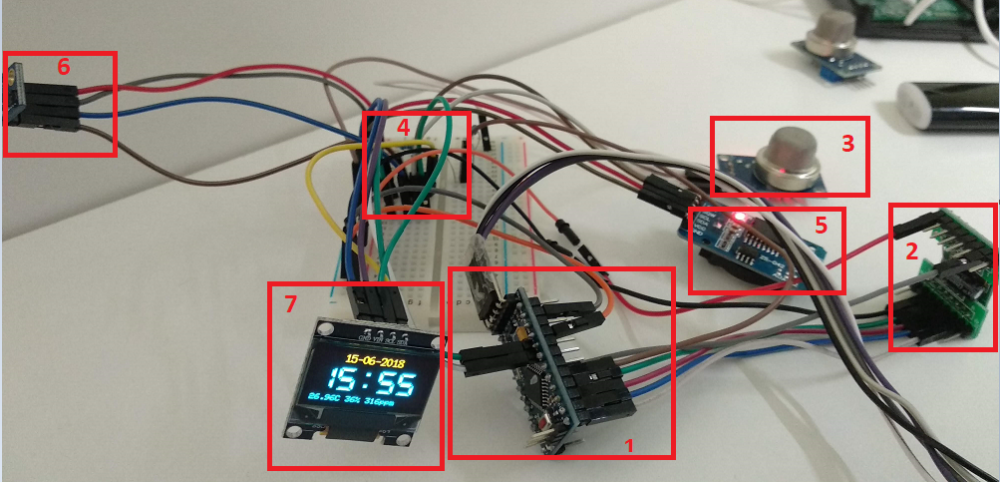
- 1: arduino pro mini 3.3v
- 2: RFM69 radio
- 3: MQ135 sensor to measure CO2 level
- 4: 20k/10k voltage divider to connect the MQ AO pin to an analog pin of the arduino (the MQ sensor runs at 5v, the arduino at 3.3v so we need to "scale" the output)
- 5: DS3231 RTC so when the power goes down the node will be able to restore its clock even without requesting time to the controller
- 6: SHT21 sensor for temperature and humidity
- 7: SSD1306 OLED display 128x64
The "production" version looks like this:
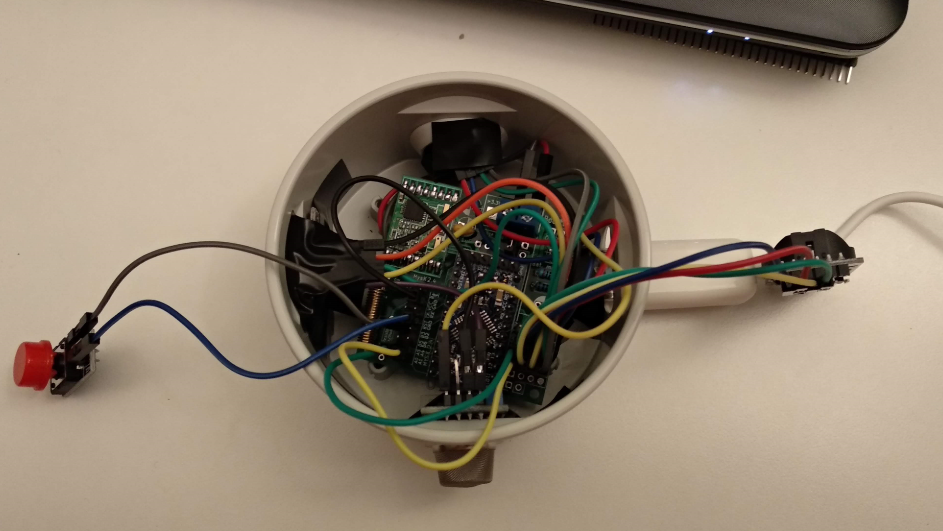
I'm again using the versatile EasyPCB from @sundberg84, here in the middle. The voltage divider has been soldered on the board, where battery measurement level is used to be placed. Of course Vin is not connected but instead it is used for MQ's AO pin connection.
The SH21 and MQ sensors are just outside the box so to have accurate readings. The project is powered by 0.5€ USB ttl Chinese key which allows to power both the board (3.3v) and the MQ sensor (5v).
I've also added a push button, hidden within the case which will request the time to the controller for the first initialization of the RTC.As for the code this is what I'm using based on NodeManager (with the latest SensorMQ code change not yet merged into the development branch):
/**********************************
 * MySensors node configuration
 */

// General settings
#define SKETCH_NAME "Clock"
#define SKETCH_VERSION "1.0"
//#define MY_DEBUG
#define MY_NODE_ID 1

// RFM69 radio settings
#define MY_RADIO_RFM69
//#define MY_RFM69_FREQUENCY RFM69_433MHZ
#define MY_IS_RFM69HW
#define MY_RFM69_NEW_DRIVER

/***********************************
 * NodeManager modules for supported sensors
 */

#define USE_SIGNAL
#define USE_SHT21
#define USE_INTERRUPT
#define USE_MQ
#define USE_SSD1306

/***********************************
 * NodeManager built-in features
 */

// Enable/disable NodeManager's features
#define FEATURE_DEBUG OFF
#define FEATURE_POWER_MANAGER OFF
#define FEATURE_INTERRUPTS ON
#define FEATURE_CONDITIONAL_REPORT OFF
#define FEATURE_EEPROM OFF
#define FEATURE_SLEEP OFF
#define FEATURE_RECEIVE ON
#define FEATURE_TIME ON
#define FEATURE_RTC ON
#define FEATURE_SD OFF
#define FEATURE_HOOKING ON

/***********************************
 * Load NodeManager Library
 */

#include "NodeManagerLibrary.h"
NodeManager node;

/***********************************
 * Add your sensors below
 */

// built-in sensors
SensorSignal signal(node);

// Attached sensors
SensorSHT21 sht21(node);
SensorMQ mq(node,A0);
DisplaySSD1306 ssd1306(node);
SensorInterrupt button(node,3);

/***********************************
 * Main Sketch
 */

void syncTime(Sensor* sensor) {
  // update the time with the controller
  node.syncTime();
  // update the display
  ssd1306.onLoop(ssd1306.children.get(1));
}

// before
void before() {
  // setup the serial port baud rate
  Serial.begin(MY_BAUD_RATE);
  /*
  * Configure your sensors below
  */

  // temperature/humidity sensor
  sht21.setReportIntervalMinutes(5);

  // gas sensor
  mq.setReportIntervalMinutes(5);
  mq.setRoValue(56842);
  mq.setCurveScalingFactor(38.35);
  mq.setCurveExponent(-2.74);

  // display
  ssd1306.setReportIntervalSeconds(30);

  // button
  button.setInitialValue(HIGH);
  button.setInterruptMode(FALLING);
  button.setInterruptHook(&syncTime);

  /*
  * Configure your sensors above
  */
  node.before();
}

// presentation
void presentation() {
  // call NodeManager presentation routine
  node.presentation();
}

// setup
void setup() {
  // call NodeManager setup routine
  node.setup();
}

// loop
void loop() {
  // call NodeManager loop routine
  node.loop();
}

#if FEATURE_RECEIVE == ON
// receive
void receive(const MyMessage &message) {
  // call NodeManager receive routine
  node.receive(message);
}
#endif

#if FEATURE_TIME == ON
// receiveTime
void receiveTime(unsigned long ts) {
  // call NodeManager receiveTime routine
  node.receiveTime(ts);
}
#endif
To show on the display only the information relevant for this project, I had to override DisplaySSD1306 onLoop() function in this way:
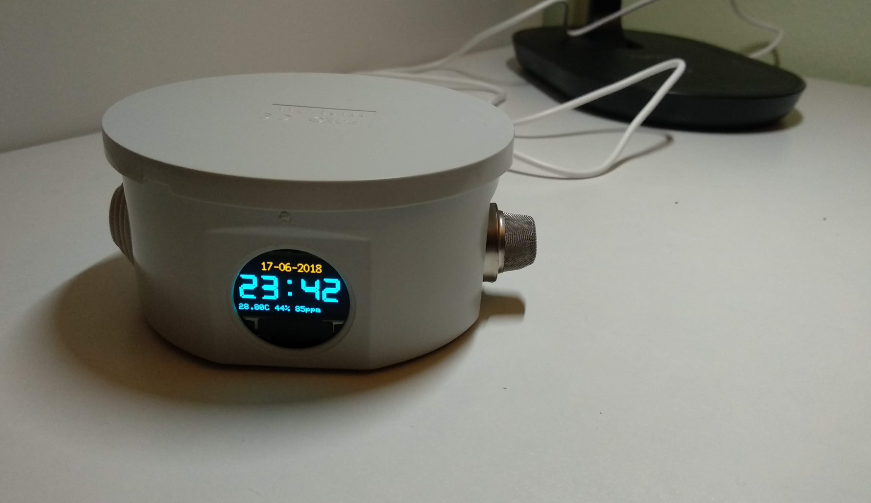
void DisplaySSD1306::onLoop(Child* child) {
  long timestamp = now()+60*60*2;
  _oled->setCursor(0,0);
  // print the current date
  _oled->setFont(X11fixed7x14);
  _oled->print(F("    "));
  if (day(timestamp) < 10) _oled->print(F("0"));
  _oled->print(day(timestamp));
  _oled->print(F("-"));
  if (month(timestamp) < 10) _oled->print(F("0"));
  _oled->print(month(timestamp));
  _oled->print(F("-"));
  _oled->println(year(timestamp));
  // print the current time
  _oled->setFont(lcdnums12x16);
  _oled->set2X();
  if (hour(timestamp) < 10) _oled->print(F("0"));
  _oled->print(hour(timestamp));
  _oled->print(F(":"));
  if (minute(timestamp) < 10) _oled->print(F("0"));
  _oled->println(minute(timestamp));
  // print the sensors' data
  _oled->setFont(Adafruit5x7);
  _oled->set1X();
  _oled->println("");
  _oled->print(((ChildFloat*)_node->getChild(1))->getValueFloat());
  _oled->print(F("C "));
  _oled->print((int)((ChildFloat*)_node->getChild(2))->getValueFloat());
  _oled->print(F("% "));
  _oled->print(((ChildInt*)_node->getChild(3))->getValueInt());
  _oled->print(F("ppm"));
  _oled->clearToEOL();
}
Finally some pictures of the project once finalized:
-
My bedside alarm clock recently got broken so I decided to build up one by myself.
The prototype looks like that:
- 1: arduino pro mini 3.3v
- 2: RFM69 radio
- 3: MQ135 sensor to measure CO2 level
- 4: 20k/10k voltage divider to connect the MQ AO pin to an analog pin of the arduino (the MQ sensor runs at 5v, the arduino at 3.3v so we need to "scale" the output)
- 5: DS3231 RTC so when the power goes down the node will be able to restore its clock even without requesting time to the controller
- 6: SHT21 sensor for temperature and humidity
- 7: SSD1306 OLED display 128x64
The "production" version looks like this:
I'm again using the versatile EasyPCB from @sundberg84, here in the middle. The voltage divider has been soldered on the board, where battery measurement level is used to be placed. Of course Vin is not connected but instead it is used for MQ's AO pin connection.
The SH21 and MQ sensors are just outside the box so to have accurate readings. The project is powered by 0.5€ USB ttl Chinese key which allows to power both the board (3.3v) and the MQ sensor (5v).
I've also added a push button, hidden within the case which will request the time to the controller for the first initialization of the RTC.As for the code this is what I'm using based on NodeManager (with the latest SensorMQ code change not yet merged into the development branch):
/**********************************
 * MySensors node configuration
 */

// General settings
#define SKETCH_NAME "Clock"
#define SKETCH_VERSION "1.0"
//#define MY_DEBUG
#define MY_NODE_ID 1

// RFM69 radio settings
#define MY_RADIO_RFM69
//#define MY_RFM69_FREQUENCY RFM69_433MHZ
#define MY_IS_RFM69HW
#define MY_RFM69_NEW_DRIVER

/***********************************
 * NodeManager modules for supported sensors
 */

#define USE_SIGNAL
#define USE_SHT21
#define USE_INTERRUPT
#define USE_MQ
#define USE_SSD1306

/***********************************
 * NodeManager built-in features
 */

// Enable/disable NodeManager's features
#define FEATURE_DEBUG OFF
#define FEATURE_POWER_MANAGER OFF
#define FEATURE_INTERRUPTS ON
#define FEATURE_CONDITIONAL_REPORT OFF
#define FEATURE_EEPROM OFF
#define FEATURE_SLEEP OFF
#define FEATURE_RECEIVE ON
#define FEATURE_TIME ON
#define FEATURE_RTC ON
#define FEATURE_SD OFF
#define FEATURE_HOOKING ON

/***********************************
 * Load NodeManager Library
 */

#include "NodeManagerLibrary.h"
NodeManager node;

/***********************************
 * Add your sensors below
 */

// built-in sensors
SensorSignal signal(node);

// Attached sensors
SensorSHT21 sht21(node);
SensorMQ mq(node,A0);
DisplaySSD1306 ssd1306(node);
SensorInterrupt button(node,3);

/***********************************
 * Main Sketch
 */

void syncTime(Sensor* sensor) {
  // update the time with the controller
  node.syncTime();
  // update the display
  ssd1306.onLoop(ssd1306.children.get(1));
}

// before
void before() {
  // setup the serial port baud rate
  Serial.begin(MY_BAUD_RATE);
  /*
  * Configure your sensors below
  */

  // temperature/humidity sensor
  sht21.setReportIntervalMinutes(5);

  // gas sensor
  mq.setReportIntervalMinutes(5);
  mq.setRoValue(56842);
  mq.setCurveScalingFactor(38.35);
  mq.setCurveExponent(-2.74);

  // display
  ssd1306.setReportIntervalSeconds(30);

  // button
  button.setInitialValue(HIGH);
  button.setInterruptMode(FALLING);
  button.setInterruptHook(&syncTime);

  /*
  * Configure your sensors above
  */
  node.before();
}

// presentation
void presentation() {
  // call NodeManager presentation routine
  node.presentation();
}

// setup
void setup() {
  // call NodeManager setup routine
  node.setup();
}

// loop
void loop() {
  // call NodeManager loop routine
  node.loop();
}

#if FEATURE_RECEIVE == ON
// receive
void receive(const MyMessage &message) {
  // call NodeManager receive routine
  node.receive(message);
}
#endif

#if FEATURE_TIME == ON
// receiveTime
void receiveTime(unsigned long ts) {
  // call NodeManager receiveTime routine
  node.receiveTime(ts);
}
#endif
To show on the display only the information relevant for this project, I had to override DisplaySSD1306 onLoop() function in this way:
void DisplaySSD1306::onLoop(Child* child) {
  long timestamp = now()+60*60*2;
  _oled->setCursor(0,0);
  // print the current date
  _oled->setFont(X11fixed7x14);
  _oled->print(F("    "));
  if (day(timestamp) < 10) _oled->print(F("0"));
  _oled->print(day(timestamp));
  _oled->print(F("-"));
  if (month(timestamp) < 10) _oled->print(F("0"));
  _oled->print(month(timestamp));
  _oled->print(F("-"));
  _oled->println(year(timestamp));
  // print the current time
  _oled->setFont(lcdnums12x16);
  _oled->set2X();
  if (hour(timestamp) < 10) _oled->print(F("0"));
  _oled->print(hour(timestamp));
  _oled->print(F(":"));
  if (minute(timestamp) < 10) _oled->print(F("0"));
  _oled->println(minute(timestamp));
  // print the sensors' data
  _oled->setFont(Adafruit5x7);
  _oled->set1X();
  _oled->println("");
  _oled->print(((ChildFloat*)_node->getChild(1))->getValueFloat());
  _oled->print(F("C "));
  _oled->print((int)((ChildFloat*)_node->getChild(2))->getValueFloat());
  _oled->print(F("% "));
  _oled->print(((ChildInt*)_node->getChild(3))->getValueInt());
  _oled->print(F("ppm"));
  _oled->clearToEOL();
}
Finally some pictures of the project once finalized:
And if you don't like a hot MQ sensor just aside your bed, or want a 3.3v sensor or even something which can run on battery (even if not recommended) , you can try using a CCS811 which is more expensive (€7) than a MQ sensor but not as expensive as many other digital sensors for detecting e.g. CO2 (https://www.aliexpress.com/item/CJMCU-811-CCS811-Carbon-Monoxide-CO-VOCs-Air-Quality-Numerical-Gas-Sensor-Module/32846769569.html).
There's a library on Adafruit. I'd not say it is that accurate for measurements but for sure way better than the MQ. -
@zrom69 sorry for the delay! This is because I was using the development version of NodeManager available at https://github.com/mysensors/NodeManager/tree/development where SensorMQ implementation has been completely reviewed. Sorry for not making it clear!
Hello! It looks like you're interested in this conversation, but you don't have an account yet.
Getting fed up of having to scroll through the same posts each visit? When you register for an account, you'll always come back to exactly where you were before, and choose to be notified of new replies (either via email, or push notification). You'll also be able to save bookmarks and upvote posts to show your appreciation to other community members.
With your input, this post could be even better 💗
Register Login