Skip to content
  • MySensors
  • OpenHardware.io
  • Categories
  • Recent
  • Tags
  • Popular
Skins
  • Light
  • Brite
  • Cerulean
  • Cosmo
  • Flatly
  • Journal
  • Litera
  • Lumen
  • Lux
  • Materia
  • Minty
  • Morph
  • Pulse
  • Sandstone
  • Simplex
  • Sketchy
  • Spacelab
  • United
  • Yeti
  • Zephyr
  • Dark
  • Cyborg
  • Darkly
  • Quartz
  • Slate
  • Solar
  • Superhero
  • Vapor

  • Default (No Skin)
  • No Skin
Collapse
Brand Logo
  1. Home
  2. Hardware
  3. Easy/Newbie PCB for MySensors

Easy/Newbie PCB for MySensors

Scheduled Pinned Locked Moved Hardware
257 Posts 37 Posters 105.3k Views 38 Watching
  • Oldest to Newest
  • Newest to Oldest
  • Most Votes
Reply
  • Reply as topic
Log in to reply
This topic has been deleted. Only users with topic management privileges can see it.
  • sundberg84S Offline
    sundberg84S Offline
    sundberg84
    Hardware Contributor
    wrote on last edited by sundberg84
    #36

    Hi dakipro! Aaah that was you :) sorry.
    I wasnt notified (or missed in spam?) I got a donation until i got an email this morning saying it was returned. During this time i had not visited paypal and I had not idea I had to accept.

    Controller: Proxmox VM - Home Assistant
    MySensors GW: Arduino Uno - W5100 Ethernet, Gw Shield Nrf24l01+ 2,4Ghz
    MySensors GW: Arduino Uno - Gw Shield RFM69, 433mhz
    RFLink GW - Arduino Mega + RFLink Shield, 433mhz

    1 Reply Last reply
    0
    • N Offline
      N Offline
      nunver
      wrote on last edited by
      #37

      @sundberg84 Just received the boards and installed my first node with it. I wanted to test all voltages are correct before hooking up the Arduino and NRF. Noticed that I get battery voltage at NRF and booster voltage on Arduino. Checked the schematic. It the board I received is correct after all. Is this intentional that we do not use booster voltage for NRF?

      THanks

      1 Reply Last reply
      0
      • sundberg84S Offline
        sundberg84S Offline
        sundberg84
        Hardware Contributor
        wrote on last edited by
        #38

        Hi @nunver - Yes that is correct, Search the forum - it has been proven much better.
        Nrf can handle down to 0.9v so its not a problem.

        Controller: Proxmox VM - Home Assistant
        MySensors GW: Arduino Uno - W5100 Ethernet, Gw Shield Nrf24l01+ 2,4Ghz
        MySensors GW: Arduino Uno - Gw Shield RFM69, 433mhz
        RFLink GW - Arduino Mega + RFLink Shield, 433mhz

        1 Reply Last reply
        0
        • barduinoB Offline
          barduinoB Offline
          barduino
          wrote on last edited by
          #39

          Hi folks,

          I finally had some time to assemble a couple of boards and they work perfectly.
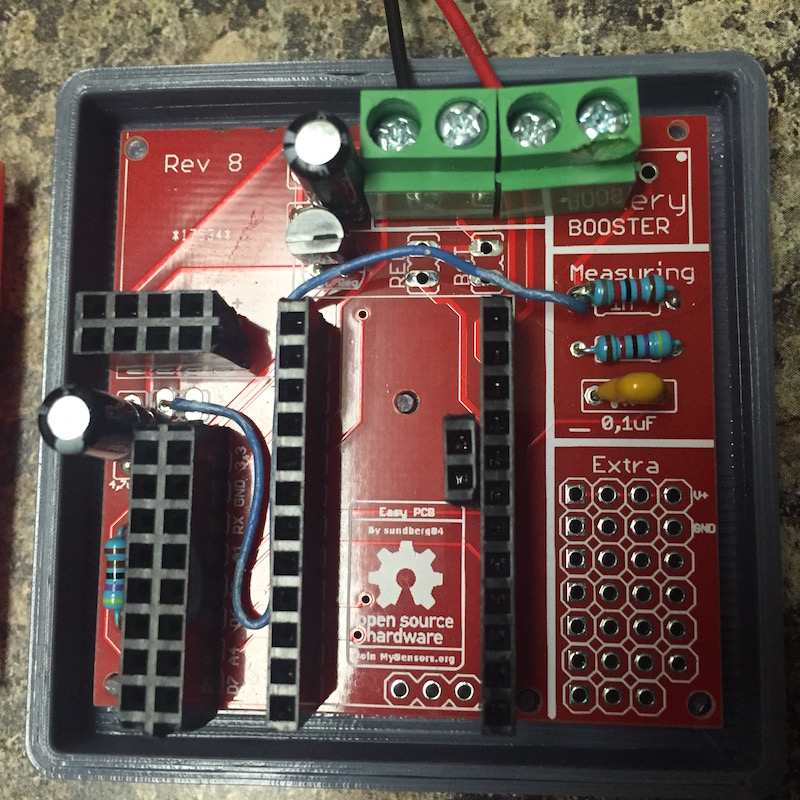
          0_1460304197463_IMG_0451.JPG

          0_1460304220163_IMG_0452.JPG

          2 things I need to do though and I appreciate any feed back folks may have.

          Connect the voltage divider in a more elegant way, perhaps directly from the raw, however I wanted to keep the options open just in case some of the boards end up using REG or BAT.

          Find a way to protect the VIN input against accidental reverse polarity. I ended up frying the voltage regulator on the arduino when I accidental touched the 9v battery on its connector reversed. Its quite a show with glowing red and sparks flying (the arduino actually survived but no more raw power).

          @sundberg84 once again thanks for this board!!!

          Cheers

          sundberg84S 1 Reply Last reply
          0
          • barduinoB barduino

            Hi folks,

            I finally had some time to assemble a couple of boards and they work perfectly.
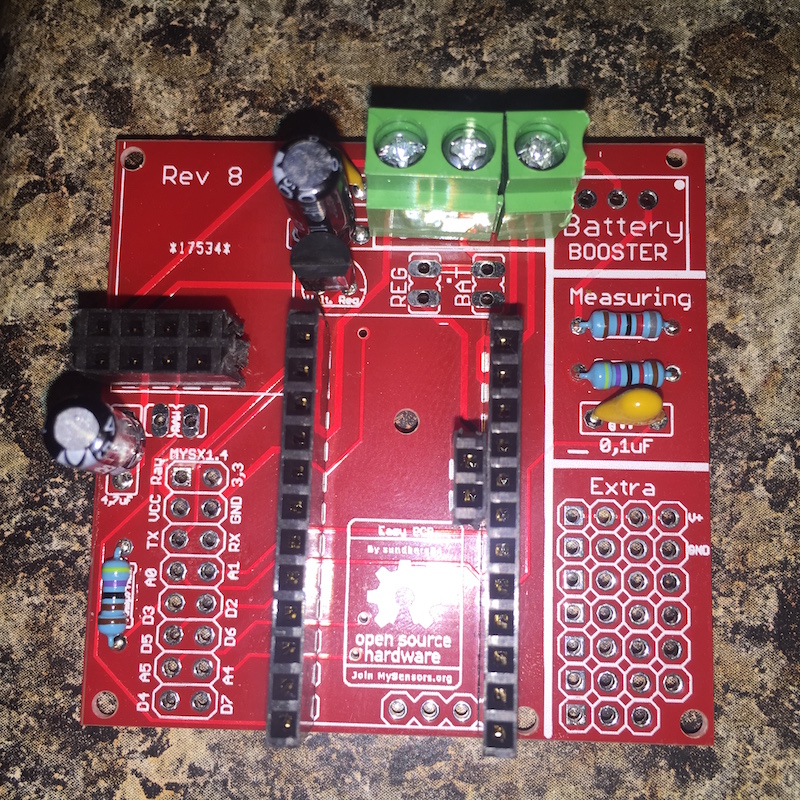
            0_1460304197463_IMG_0451.JPG

            0_1460304220163_IMG_0452.JPG

            2 things I need to do though and I appreciate any feed back folks may have.

            Connect the voltage divider in a more elegant way, perhaps directly from the raw, however I wanted to keep the options open just in case some of the boards end up using REG or BAT.

            Find a way to protect the VIN input against accidental reverse polarity. I ended up frying the voltage regulator on the arduino when I accidental touched the 9v battery on its connector reversed. Its quite a show with glowing red and sparks flying (the arduino actually survived but no more raw power).

            @sundberg84 once again thanks for this board!!!

            Cheers

            sundberg84S Offline
            sundberg84S Offline
            sundberg84
            Hardware Contributor
            wrote on last edited by
            #40

            @barduino - thank you for great feedback!
            I will look into whats possible if i have any upcoming revs.

            Controller: Proxmox VM - Home Assistant
            MySensors GW: Arduino Uno - W5100 Ethernet, Gw Shield Nrf24l01+ 2,4Ghz
            MySensors GW: Arduino Uno - Gw Shield RFM69, 433mhz
            RFLink GW - Arduino Mega + RFLink Shield, 433mhz

            barduinoB 1 Reply Last reply
            0
            • sundberg84S sundberg84

              @barduino - thank you for great feedback!
              I will look into whats possible if i have any upcoming revs.

              barduinoB Offline
              barduinoB Offline
              barduino
              wrote on last edited by
              #41

              @sundberg84 , I forgot to mention something.

              I get my pro mini's from the local mega store and they have their own brand at a very good price.

              In the model they sell the A6, A7 and Ground do not line up with the board.

              Not a problem for my applications (I'm thinking of soldering some angled connectors) but I was wondering if they are supposed to be in that position from the original specs.

              If you ever think of making the board a bit bigger, having 4 extra connectors for A6, A7, D8 (and an extra ground perhaps) would be nice.

              Great job on these!!!

              Cheers
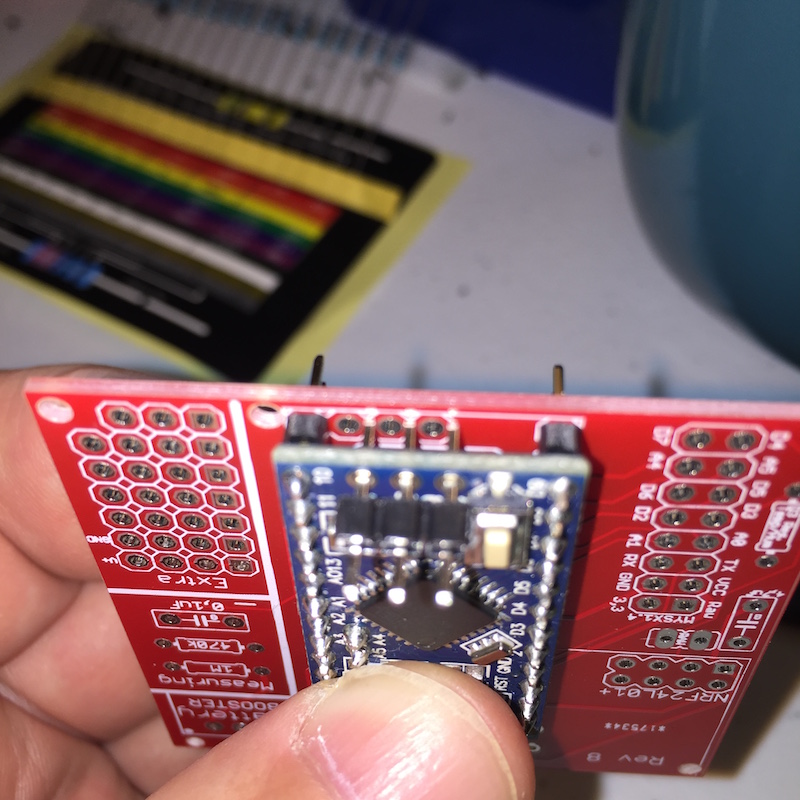
              0_1460343220919_IMG_0456.JPG

              1 Reply Last reply
              0
              • N Offline
                N Offline
                nunver
                wrote on last edited by
                #42

                @barduino nice board. One question, why do you have the cable? Sorry for my newbie question :blush:

                barduinoB 1 Reply Last reply
                0
                • N nunver

                  @barduino nice board. One question, why do you have the cable? Sorry for my newbie question :blush:

                  barduinoB Offline
                  barduinoB Offline
                  barduino
                  wrote on last edited by
                  #43

                  @nunver, it's not my board, @sundberg84 design it and made it available for all of us.

                  The wire you see is to connect the RAW input to the voltage divider so I can measure the 9v battery.

                  Cheers

                  N 1 Reply Last reply
                  0
                  • barduinoB barduino

                    @nunver, it's not my board, @sundberg84 design it and made it available for all of us.

                    The wire you see is to connect the RAW input to the voltage divider so I can measure the 9v battery.

                    Cheers

                    N Offline
                    N Offline
                    nunver
                    wrote on last edited by
                    #44

                    @barduino yes I know the boards are designed by sundberg84. I got my boards manufactured as well. What I meant was nicely done.

                    As for the cable, you could have got raw voltage from the battery booster pin. I was wondering if for any specific reason you had the cable. I understand not.

                    Regarding protection against reverse polarity, can't you use a diode? You loose 0.6V but there is ample margin.

                    barduinoB 1 Reply Last reply
                    0
                    • N nunver

                      @barduino yes I know the boards are designed by sundberg84. I got my boards manufactured as well. What I meant was nicely done.

                      As for the cable, you could have got raw voltage from the battery booster pin. I was wondering if for any specific reason you had the cable. I understand not.

                      Regarding protection against reverse polarity, can't you use a diode? You loose 0.6V but there is ample margin.

                      barduinoB Offline
                      barduinoB Offline
                      barduino
                      wrote on last edited by
                      #45

                      @nunver your're right I need a more elegant solution for that wire, there was no particular reason to connect it on the other side.

                      For the protection i'm thinking a daughter board with the diode and the 9v connector and then join it with angle connectors on the main.

                      Cheers

                      1 Reply Last reply
                      1
                      • sundberg84S Offline
                        sundberg84S Offline
                        sundberg84
                        Hardware Contributor
                        wrote on last edited by
                        #46

                        @barduino ok - strange with that footprint.
                        According to Arduino website those holes does not exist in that position at all (either as your board or my PCB are designed). I downloaded a popular pro mini footprint from somewhere and used that - first time i see they are not aligned.

                        Controller: Proxmox VM - Home Assistant
                        MySensors GW: Arduino Uno - W5100 Ethernet, Gw Shield Nrf24l01+ 2,4Ghz
                        MySensors GW: Arduino Uno - Gw Shield RFM69, 433mhz
                        RFLink GW - Arduino Mega + RFLink Shield, 433mhz

                        1 Reply Last reply
                        0
                        • barduinoB Offline
                          barduinoB Offline
                          barduino
                          wrote on last edited by
                          #47

                          yes, indeed

                          alt text

                          source: https://www.arduino-board.com/boards/arduino-pro-mini

                          anyway, no worries, I was just curious

                          Cheers

                          1 Reply Last reply
                          0
                          • N Offline
                            N Offline
                            nunver
                            wrote on last edited by
                            #48

                            @sundberg84 Assembled my second node. This time 5V regulated. One remark and a quick question. You have LE33 in BOM as regulator. I did not have one readily available but an LM1117 which is a totally different package. I had to go through all datasheets to get correct pinout. Could you put labels near pins like 5 3 G?

                            And the question; dumb as it may sound, do we place a jumper at REG pins when using the regulator version? :confused:

                            1 Reply Last reply
                            0
                            • sundberg84S Offline
                              sundberg84S Offline
                              sundberg84
                              Hardware Contributor
                              wrote on last edited by
                              #49

                              @nunver - great idea with the labels for voltage reg - that makes it more userfriendly! Will do.
                              Yes - REG should have a jumper connected.

                              Controller: Proxmox VM - Home Assistant
                              MySensors GW: Arduino Uno - W5100 Ethernet, Gw Shield Nrf24l01+ 2,4Ghz
                              MySensors GW: Arduino Uno - Gw Shield RFM69, 433mhz
                              RFLink GW - Arduino Mega + RFLink Shield, 433mhz

                              1 Reply Last reply
                              0
                              • S Offline
                                S Offline
                                shabba
                                wrote on last edited by
                                #50

                                What is the purpose of the Raw connection under the radio connection? Designed for a jumper to supply RAW to MYSX connection?
                                Also any other caveats to be aware of when using RAW and a 3.3 mini and skipping the regulator?

                                dbemowskD 1 Reply Last reply
                                0
                                • sundberg84S Offline
                                  sundberg84S Offline
                                  sundberg84
                                  Hardware Contributor
                                  wrote on last edited by
                                  #51

                                  @shabba - Its a criteria of the MysX connector - to be able to switch RAW on/off from a daughter pcb. Nothing I have ever used and you dont have to think about it until you have a mother/daughter board.

                                  Using RAW input and the internal regulator on the arduino you need to bypass the "REG" jumper and also the external voltage regulator if i remember right.

                                  Controller: Proxmox VM - Home Assistant
                                  MySensors GW: Arduino Uno - W5100 Ethernet, Gw Shield Nrf24l01+ 2,4Ghz
                                  MySensors GW: Arduino Uno - Gw Shield RFM69, 433mhz
                                  RFLink GW - Arduino Mega + RFLink Shield, 433mhz

                                  1 Reply Last reply
                                  0
                                  • S Offline
                                    S Offline
                                    shabba
                                    wrote on last edited by
                                    #52

                                    @sundberg84 :+1:

                                    1 Reply Last reply
                                    0
                                    • B Offline
                                      B Offline
                                      BastienVH
                                      wrote on last edited by
                                      #53

                                      @sundberg84
                                      Hey, I've been having a bit of trouble lately.
                                      I've been trying to setup a node with your board which supports a PIR and a temp sensor (ds18b20).
                                      Since there is a spot for a resistor on D3 on your board, I attached the temp sensor to that pin.
                                      The PIR needs a pin that supports interrupts, so I connected that to D2.
                                      Here is where the confusion starts.
                                      If I read this page correctly, D2 is already in use for the radio.
                                      I only checked it after I soldered everything together and found out my PIR doesn't work (it always sends a 1-signal).

                                      Any thoughts on this?
                                      Is D2 really free for use on the board?

                                      Thanks!

                                      1 Reply Last reply
                                      0
                                      • sundberg84S Offline
                                        sundberg84S Offline
                                        sundberg84
                                        Hardware Contributor
                                        wrote on last edited by sundberg84
                                        #54

                                        @BastienVH - D2 is connected, but at this point not used by the radio (unless its been changed very recently). On the PCB its connected though - so if you want to use this I suggest you do not solder that pin (ie disconnect it) from the PCB and try.

                                        If your PIR doesnt work you should start there... the cheap PIRS are very power sensitive (feed 5v not 3.3!! (you can modify this but standard is 5v!)) so check the connection with a multimeter. Try to connect only PIR and run a basic sketch to get that one to work. As you said you need to connect them to 2 or 3 if you want to use interrupt.

                                        Add some serial.println to get info out whats happeing with the PIR.

                                        Controller: Proxmox VM - Home Assistant
                                        MySensors GW: Arduino Uno - W5100 Ethernet, Gw Shield Nrf24l01+ 2,4Ghz
                                        MySensors GW: Arduino Uno - Gw Shield RFM69, 433mhz
                                        RFLink GW - Arduino Mega + RFLink Shield, 433mhz

                                        B 1 Reply Last reply
                                        0
                                        • sundberg84S sundberg84

                                          @BastienVH - D2 is connected, but at this point not used by the radio (unless its been changed very recently). On the PCB its connected though - so if you want to use this I suggest you do not solder that pin (ie disconnect it) from the PCB and try.

                                          If your PIR doesnt work you should start there... the cheap PIRS are very power sensitive (feed 5v not 3.3!! (you can modify this but standard is 5v!)) so check the connection with a multimeter. Try to connect only PIR and run a basic sketch to get that one to work. As you said you need to connect them to 2 or 3 if you want to use interrupt.

                                          Add some serial.println to get info out whats happeing with the PIR.

                                          B Offline
                                          B Offline
                                          BastienVH
                                          wrote on last edited by
                                          #55

                                          @sundberg84
                                          About D2: you mean I shouldn't solder the IRQ of the radio to the board?
                                          I will try that next time.

                                          I've been testing the PIR with a nano and the 3.3V it supplies and that works fine.
                                          If I take VCC or ground (or both) from the board with booster, the PIR starts acting up.
                                          I guess I'll have to try some more if I want to get to the bottom of things.

                                          1 Reply Last reply
                                          0
                                          Reply
                                          • Reply as topic
                                          Log in to reply
                                          • Oldest to Newest
                                          • Newest to Oldest
                                          • Most Votes


                                          15

                                          Online

                                          11.7k

                                          Users

                                          11.2k

                                          Topics

                                          113.1k

                                          Posts


                                          Copyright 2025 TBD   |   Forum Guidelines   |   Privacy Policy   |   Terms of Service
                                          • Login

                                          • Don't have an account? Register

                                          • Login or register to search.
                                          • First post
                                            Last post
                                          0
                                          • MySensors
                                          • OpenHardware.io
                                          • Categories
                                          • Recent
                                          • Tags
                                          • Popular