[Tutorial] How to burn 1Mhz & 8Mhz bootloader using Arduino IDE 1.6.5-r5
-
Dear Sir,
I'm trying to use the 8MHz bootloader, but I kindly ask you in detail where I've to copy the files extracted from the zip file breadboard-1-6-x.zip.Actually I'm using an Arduino IDE 1.8.10, the sentence that I need some explanation/confirmation is the following one:
"Open your Arduino folder path and move the breadboard folder from the zip archive to the "hardware" folder of your Arduino sketchbook."
is the Arduino sketchbook folder located at the path listed from:
File=>Preferences=>Settings
at the text field with label "Sketchbook location"?
At this path I've no other "hardware" directory, just only a libraries folder, so if this is the right path I've just to simply copy and paste the "breadboard" folder into this one, I'm correct?
Thanks!
Fire -
Dear Sir,
I'm trying to use the 8MHz bootloader, but I kindly ask you in detail where I've to copy the files extracted from the zip file breadboard-1-6-x.zip.Actually I'm using an Arduino IDE 1.8.10, the sentence that I need some explanation/confirmation is the following one:
"Open your Arduino folder path and move the breadboard folder from the zip archive to the "hardware" folder of your Arduino sketchbook."
is the Arduino sketchbook folder located at the path listed from:
File=>Preferences=>Settings
at the text field with label "Sketchbook location"?
At this path I've no other "hardware" directory, just only a libraries folder, so if this is the right path I've just to simply copy and paste the "breadboard" folder into this one, I'm correct?
Thanks!
Fire@FIRE-FOX The answer depends a little on what OS you're using.
In linux I have an Arduino-folder where the program files (not necessarily the sketches) are AND a hardware folder. Also on OSX I have an Arduino-folder (where I have my sketch-directories and libraries and hardware.
Locate the hardware-folder (use whatever search-option your OS has) and you can pretty easily figure out where the breadboard-directory goes.I wish you luck with the bootloader programming. I went crazy a couple of times but once I got the routine down, it's worth the trouble.
-
Dear Sir,
I'm trying to use the 8MHz bootloader, but I kindly ask you in detail where I've to copy the files extracted from the zip file breadboard-1-6-x.zip.Actually I'm using an Arduino IDE 1.8.10, the sentence that I need some explanation/confirmation is the following one:
"Open your Arduino folder path and move the breadboard folder from the zip archive to the "hardware" folder of your Arduino sketchbook."
is the Arduino sketchbook folder located at the path listed from:
File=>Preferences=>Settings
at the text field with label "Sketchbook location"?
At this path I've no other "hardware" directory, just only a libraries folder, so if this is the right path I've just to simply copy and paste the "breadboard" folder into this one, I'm correct?
Thanks!
Fire@FIRE-FOX Today I should not go that way, see https://forum.mysensors.org/topic/2067/my-slim-2aa-battery-node. In the first topic you will see Update1 and to use the github project MiniCore. Much easier to use!
In the readme of the MiniCore github you will find how to install and how to use. -
hi,
i am using pro mini, i installed the blink code, pro mini does not work at 2.3v. I burned minicore bootloader(1Mhz-1,98).
my purpose: running pro mini up to 1.8v and saving power.
The blink code continues to run. no longer working pro mini 2.3V. but I can't upload new code.
What can I do to use it again?the error he gave:
avrdude: stk500_recv(): programmer is not responding avrdude: stk500_getsync() attempt 1 of 10: not in sync: resp=0x03 avrdude: stk500_recv(): programmer is not responding avrdude: stk500_getsync() attempt 2 of 10: not in sync: resp=0x03 avrdude: stk500_recv(): programmer is not responding avrdude: stk500_getsync() attempt 3 of 10: not in sync: resp=0x03 avrdude: stk500_recv(): programmer is not responding avrdude: stk500_getsync() attempt 4 of 10: not in sync: resp=0x03 Karta yüklenirken sorun oluştu. Tavsiyeler için http://www.arduino.cc/en/Guide/Troubleshooting#upload adresine göz atabilirsiniz. avrdude: stk500_recv(): programmer is not responding avrdude: stk500_getsync() attempt 5 of 10: not in sync: resp=0x03 avrdude: stk500_recv(): programmer is not responding avrdude: stk500_getsync() attempt 6 of 10: not in sync: resp=0x03 avrdude: stk500_recv(): programmer is not responding avrdude: stk500_getsync() attempt 7 of 10: not in sync: resp=0x03 avrdude: stk500_recv(): programmer is not responding avrdude: stk500_getsync() attempt 8 of 10: not in sync: resp=0x03 avrdude: stk500_recv(): programmer is not responding avrdude: stk500_getsync() attempt 9 of 10: not in sync: resp=0x03 avrdude: stk500_recv(): programmer is not responding avrdude: stk500_getsync() attempt 10 of 10: not in sync: resp=0x03 -
@electrik said in [Tutorial] How to burn 1Mhz & 8Mhz bootloader using Arduino IDE 1.6.5-r5:
@emre299 Did you changed the upload speed in boards.txt?
See in the first message of this topic
https://forum.mysensors.org/uploads/files/1454449114161-9.png@emre299 did use the Minicore project, so that is different. See my comment just above his.
@emre299 can you describe the steps you did? step by step
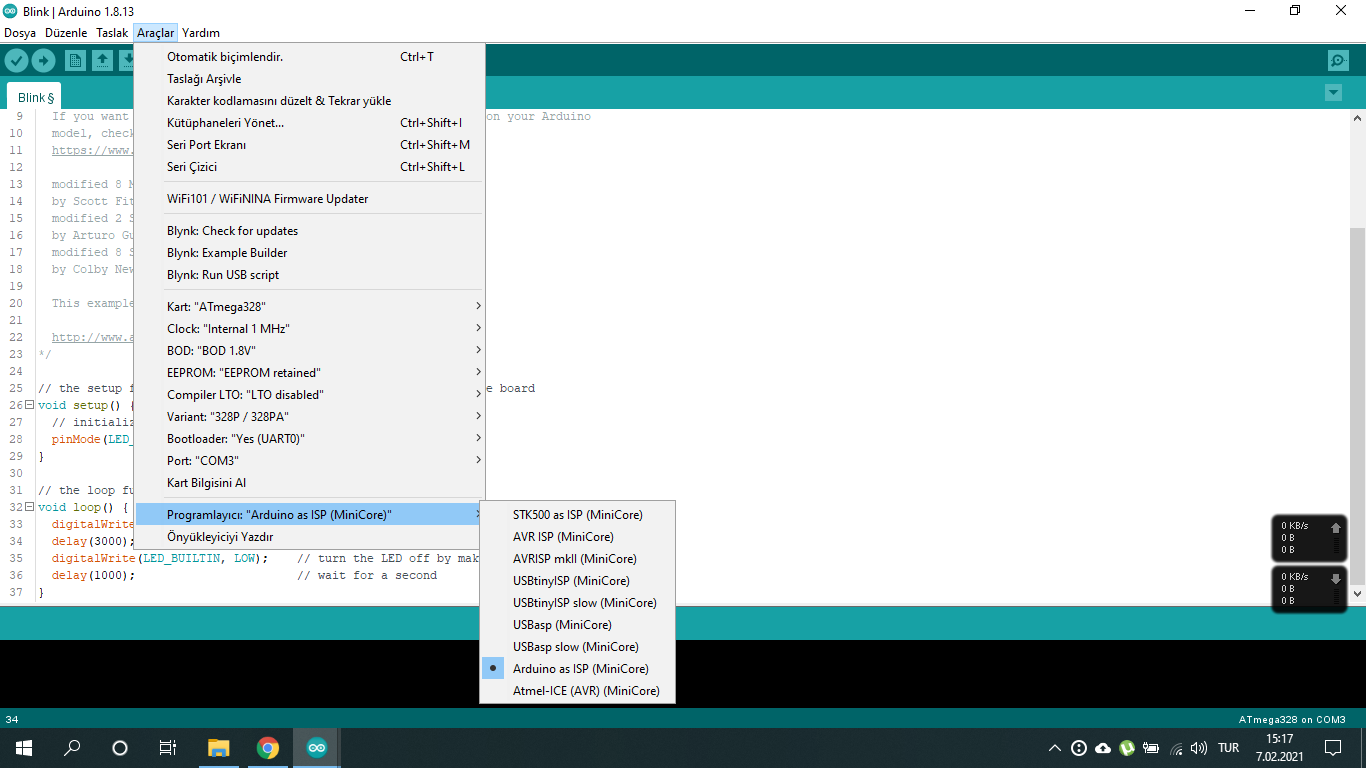
Which version of Arduino IDE did you use?
Without more information, it will be difficult to respond to your question. -
@electrik said in [Tutorial] How to burn 1Mhz & 8Mhz bootloader using Arduino IDE 1.6.5-r5:
@emre299 Did you changed the upload speed in boards.txt?
See in the first message of this topic
https://forum.mysensors.org/uploads/files/1454449114161-9.png@emre299 did use the Minicore project, so that is different. See my comment just above his.
@emre299 can you describe the steps you did? step by step
Which version of Arduino IDE did you use?
Without more information, it will be difficult to respond to your question.First of all, for checking purposes, i installed the blink code to pro mini 3,3V with the ISP method(arduino nano). My goal is not to use the stupid booster circuit and using arduino up to 1.8v
I added arduino ide(1.8.13) minicore.Then i chosed;
Board: minicore->ATmega328
Clock: internal 1MHZ
BOD: 1.8V
Arduino as ISP and Ctrl + shift + U
Then Blink works at 3.3v (but a little slow) but didn't work with 2.3v to the arduino.Then;
Board: minicore->ATmega328
Clock: internal 1MHZ
BOD: 1.8V
Arduino as ISP and burn bootloader.blink works well at 3.3v and 2,3v but now it gives an error when uploading new code to the arduino.I haven't made any other settings.
what is missing Is the minicore method wrong?
Thank you for your help.
-
First of all, for checking purposes, i installed the blink code to pro mini 3,3V with the ISP method(arduino nano). My goal is not to use the stupid booster circuit and using arduino up to 1.8v
I added arduino ide(1.8.13) minicore.Then i chosed;
Board: minicore->ATmega328
Clock: internal 1MHZ
BOD: 1.8V
Arduino as ISP and Ctrl + shift + U
Then Blink works at 3.3v (but a little slow) but didn't work with 2.3v to the arduino.Then;
Board: minicore->ATmega328
Clock: internal 1MHZ
BOD: 1.8V
Arduino as ISP and burn bootloader.blink works well at 3.3v and 2,3v but now it gives an error when uploading new code to the arduino.I haven't made any other settings.
what is missing Is the minicore method wrong?
Thank you for your help.
Ok, you programmed the blink sketch the first time via the ISP way of uploading
- the pro mini at 3.3V : works
- the pro mini at 2.3V : didn't do anything ==> this is already strange, it should also work
Then you did the same using the default way by uploading the sketch via the bootloader
- the pro mini at 3.3V : works
- the pro mini at 2.3V : works
And now you can't upload anymore new sketches to the pro mini.
Of course you upload your sketch with the pro mini again at 3.3V?Further I should:
- double check your wirings
- is your programmer connected with fixed pinheaders or by folding the programmer a little in the holes of the pro mini? Verify if you have strong connections.
- Reprogram the bootloader. If this works, you should be able to upload a sketch.
Post some photo's that we can see something.
-
Ok, you programmed the blink sketch the first time via the ISP way of uploading
- the pro mini at 3.3V : works
- the pro mini at 2.3V : didn't do anything ==> this is already strange, it should also work
Then you did the same using the default way by uploading the sketch via the bootloader
- the pro mini at 3.3V : works
- the pro mini at 2.3V : works
And now you can't upload anymore new sketches to the pro mini.
Of course you upload your sketch with the pro mini again at 3.3V?Further I should:
- double check your wirings
- is your programmer connected with fixed pinheaders or by folding the programmer a little in the holes of the pro mini? Verify if you have strong connections.
- Reprogram the bootloader. If this works, you should be able to upload a sketch.
Post some photo's that we can see something.
@evb
hello, yes, it gives an error while loading code right now (Pro mini 3.3v 1 mhz minicore bootloader).i checked my cables 2 times. I already have a board for ISP code.!
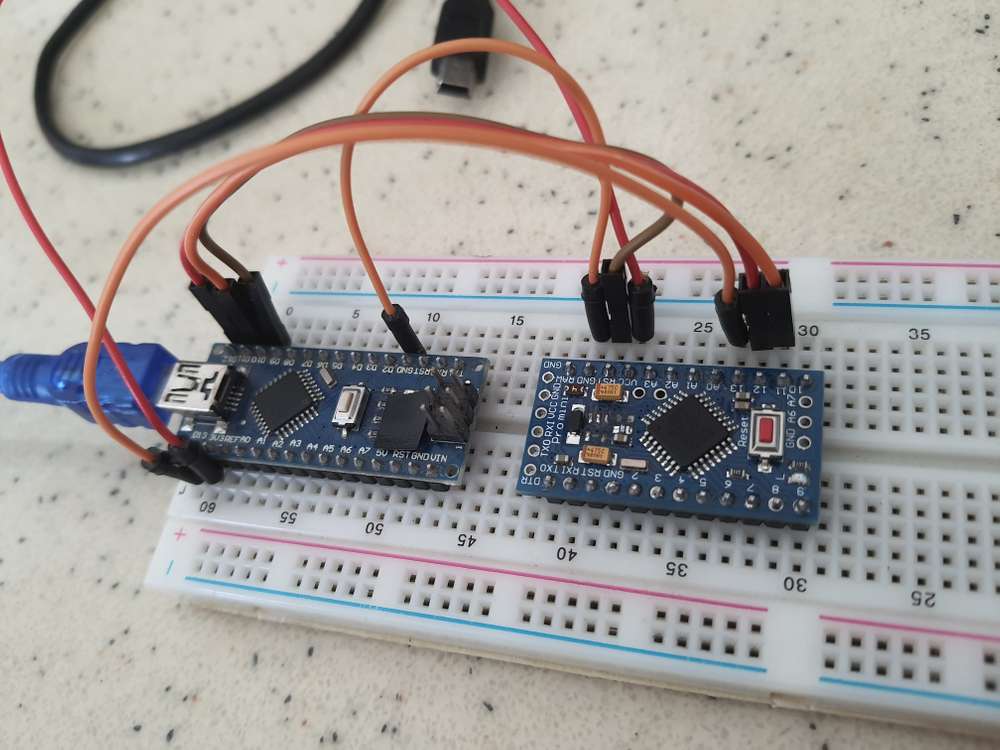
Is there any detail picture you want? do you think the boot loader might be broken while writing
-
@evb
hello, yes, it gives an error while loading code right now (Pro mini 3.3v 1 mhz minicore bootloader).i checked my cables 2 times. I already have a board for ISP code.!
Is there any detail picture you want? do you think the boot loader might be broken while writing
@emre299 when you click on Burn Bootloader, you get these errors
avrdude: stk500_recv(): programmer is not responding
avrdude: stk500_getsync() attempt 1 of 10: not in sync: resp=0x03
avrdude: stk500_recv(): programmer is not responding
avrdude: stk500_getsync() attempt 2 of 10: not in sync: resp=0x03
So you verified the connections. Did you verify also with a multimeter? A wire can be broken internally
Do you have another pro mini to verify the connections?
I would try different settings like the normal settings 3.3V and 8Mzh externally, etcIf this does not work, I have no ideas anymore...