How do I burn a bootloader to an 328p with UNO bootloader preinstalled?
-
I am new to burning bootloaders and the "chips" I got was preloaded with UNO R3 Bootloader.
I have:
USBtiny
USBasp
Arduino UNO (With SMD)Can I use any of them somehow to flash a new bootloader without using a crystal?
-
I'm using a Uno as Isp.https://www.arduino.cc/en/Tutorial/ArduinoISP works great.
-
Ok, my Uno has a small smd chip so I guess that won't work for me
-
Ok, my Uno has a small smd chip so I guess that won't work for me
-
Ok, but in that case I should be able to use one of the other programmers to? The explenation I got from another thread was that the atmega chips has a preinstalled arduino uno bootloader that was burned using a crystal and therefore I need a crystal to be able to burn a new one.
But I will go and buy an arduino uno clone today with a big socket so I hope that will fix it.
-
Ah, damit. Accidentally logged in using my kids Google account when replying.
-
Can anyone write down the exact precedure of how to install a new bootloader on a atmega328p chip?
I have a uno connected to another uno like this:
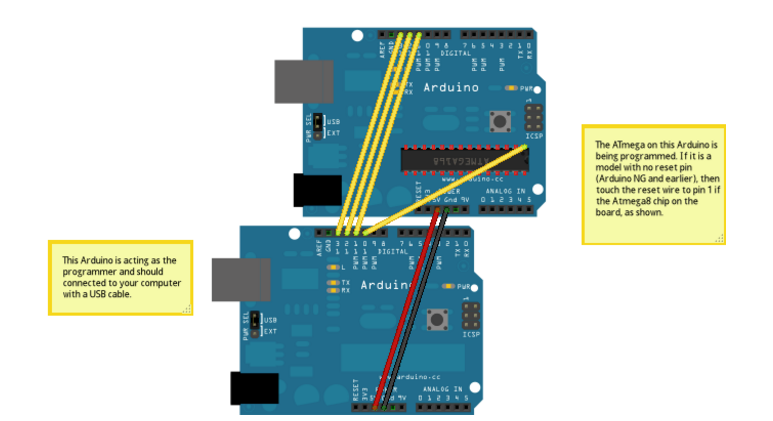
Only difference is that the lower arduino is connected from pin10 to the upper arduino reset-pin.Downloaded:
atmega328_1a.hex (Optiboot for 9600baud at 1MHz):107E0000112484B714BE81FFE6D085E08093810001 :107E100082E08093C00088E18093C10086E0809377 :107E2000C2008CE08093C4008EE0BFD0259A86E02B :107E300023EC3FEF91E0309385002093840096BBC4 :107E4000B09BFECF1D9AA8958150A9F7EE24FF2480 :107E5000AA24A394B5E0CB2EA1E1BA2EF3E0DF2E45 :107E600098D0813461F495D0082FA5D0023829F13B :107E7000013811F485E001C083E083D07FC08234F3 :107E800011F484E103C0853419F485E09CD076C0F8 :107E9000853579F47ED0E82EFF247BD0082F10E0C2 :107EA000102F00270E291F29000F111F84D07801E1 :107EB00065C0863521F484E086D080E0DECF84364C :107EC00009F040C066D065D0082F63D080E0E81686 :107ED00080E7F80618F4F701D7BEE895C0E0D1E0D6 :107EE00058D089930C17E1F7F0E0EF16F0E7FF06A2 :107EF00018F0F701D7BEE8955ED007B600FCFDCFBD :107F0000A701A0E0B1E02C9130E011968C9111977F :107F100090E0982F8827822B932B1296FA010C0160 :107F2000A7BEE89511244E5F5F4FF1E0A038BF0770 :107F300051F7F701C7BEE89507B600FCFDCFB7BE05 :107F4000E8951CC0843761F424D023D0082F21D0B9 :107F500032D0F70185917F0114D00150D1F70EC0C6 :107F6000853739F428D08EE10CD085E90AD08FE02E :107F700084CF813511F488E018D01DD080E101D084 :107F80006FCF982F8091C00085FFFCCF9093C600E3 :107F900008958091C00087FFFCCF8091C00084FDD0 :107FA00001C0A8958091C6000895E0E6F0E098E150 :107FB000908380830895EDDF803219F088E0F5DF4B :107FC000FFCF84E1DECF1F93182FE3DF1150E9F7D5 :107FD000F2DF1F910895282E80E0E7DFEE27FF27CC :027FE000099402 :027FFE0000057C :0400000300007E007B :00000001FFAnd placed it in: ...\Arduino\hardware\arduino\avr\bootloaders\optiboot
Added:
##############################################################
# Add the new board to boards.txt (normally located at "C:\Program Files\Arduino\hardware\arduino\avr"
# The *.bootloader.* etries only matters if you want to program bootloader (and fuses) from Arduino IDE.
# See http://www.engbedded.com/fusecalc (select Atmega328p) for interpretation of fuse values and how
# extended fuses are written in different applications (07h in Arduino IDE = FFh in Atmel studio).
##############################################################

apm96.name=APM Optiboot internal 1MHz noBOD 9600baud

apm96.upload.tool=avrdude
apm96.upload.protocol=arduino
apm96.upload.maximum_size=32256
apm96.upload.speed=9600
apm96.bootloader.tool=avrdude
apm96.bootloader.low_fuses=0x62
apm96.bootloader.high_fuses=0xde
apm96.bootloader.extended_fuses=0x07
apm96.bootloader.path=optiboot_v50
apm96.bootloader.file=atmega328_1a.hex
apm96.bootloader.unlock_bits=0x3F
apm96.bootloader.lock_bits=0x2F
apm96.build.mcu=atmega328p
apm96.build.f_cpu=1000000L
apm96.build.core=arduino
apm96.build.variant=standard

##############################################################
To ...\Arduino\hardware\arduino\avr\boards.txt
Selecting Optiboot in Arduino IDE, selecting com-port and Arduino as ISP.
Burn bootloader results in:
"Error while burning bootloader: missing 'bootloader.tool' configuration parameter"
This is the thread where I got my instructions from: my-slim-2aa-battery-node
I also tried using a portable version of the arduino IDE and did the same things but I got this error instead:
avrdude: stk500_getsync() attempt 1 of 10: not in sync: resp=0x18
avrdude: stk500_getsync() attempt 2 of 10: not in sync: resp=0x66
avrdude: stk500_getsync() attempt 3 of 10: not in sync: resp=0x86
avrdude: stk500_getsync() attempt 4 of 10: not in sync: resp=0x66
avrdude: stk500_getsync() attempt 5 of 10: not in sync: resp=0x66
avrdude: stk500_getsync() attempt 6 of 10: not in sync: resp=0x7e
avrdude: stk500_getsync() attempt 7 of 10: not in sync: resp=0x66
avrdude: stk500_getsync() attempt 8 of 10: not in sync: resp=0xe6
avrdude: stk500_getsync() attempt 9 of 10: not in sync: resp=0xf8
avrdude: stk500_getsync() attempt 10 of 10: not in sync: resp=0x06
Fel vid bränning av bootloader. (error burning bootloader) -
Problem is that there are so many ways to program bootloader and fuses ( and even more ways to do wrong). I've already told how I do it in the thread you refer to. Which environment, system, preferences do you have? Windows...? Arduino IDE v....? Hopefully some can share their experience for a similar setup.
I think the procedure of almost any combination is found with google. But it looks like you're doing about right already. I had similar issues like you when I started with bootloader programming. I gave up and went for completely different (and expensive) setup as I think you've already read. Thats my why of fast noob troubleshooting and solving - try all reasonable varations.
Anyhow, I think you should make it soon with what you already have. Did you try your USBtiny? And then, your Uno (with the target AVR), it has a nice standard 3x2pin ISP header, use it. I don't know anything about Arduino IDE "portable" version, but alternatives to try usually are v1.0.x and v1.6.x.
-
Can anyone write down the exact precedure of how to install a new bootloader on a atmega328p chip?
I have a uno connected to another uno like this:
Only difference is that the lower arduino is connected from pin10 to the upper arduino reset-pin.Downloaded:
atmega328_1a.hex (Optiboot for 9600baud at 1MHz):107E0000112484B714BE81FFE6D085E08093810001 :107E100082E08093C00088E18093C10086E0809377 :107E2000C2008CE08093C4008EE0BFD0259A86E02B :107E300023EC3FEF91E0309385002093840096BBC4 :107E4000B09BFECF1D9AA8958150A9F7EE24FF2480 :107E5000AA24A394B5E0CB2EA1E1BA2EF3E0DF2E45 :107E600098D0813461F495D0082FA5D0023829F13B :107E7000013811F485E001C083E083D07FC08234F3 :107E800011F484E103C0853419F485E09CD076C0F8 :107E9000853579F47ED0E82EFF247BD0082F10E0C2 :107EA000102F00270E291F29000F111F84D07801E1 :107EB00065C0863521F484E086D080E0DECF84364C :107EC00009F040C066D065D0082F63D080E0E81686 :107ED00080E7F80618F4F701D7BEE895C0E0D1E0D6 :107EE00058D089930C17E1F7F0E0EF16F0E7FF06A2 :107EF00018F0F701D7BEE8955ED007B600FCFDCFBD :107F0000A701A0E0B1E02C9130E011968C9111977F :107F100090E0982F8827822B932B1296FA010C0160 :107F2000A7BEE89511244E5F5F4FF1E0A038BF0770 :107F300051F7F701C7BEE89507B600FCFDCFB7BE05 :107F4000E8951CC0843761F424D023D0082F21D0B9 :107F500032D0F70185917F0114D00150D1F70EC0C6 :107F6000853739F428D08EE10CD085E90AD08FE02E :107F700084CF813511F488E018D01DD080E101D084 :107F80006FCF982F8091C00085FFFCCF9093C600E3 :107F900008958091C00087FFFCCF8091C00084FDD0 :107FA00001C0A8958091C6000895E0E6F0E098E150 :107FB000908380830895EDDF803219F088E0F5DF4B :107FC000FFCF84E1DECF1F93182FE3DF1150E9F7D5 :107FD000F2DF1F910895282E80E0E7DFEE27FF27CC :027FE000099402 :027FFE0000057C :0400000300007E007B :00000001FFAnd placed it in: ...\Arduino\hardware\arduino\avr\bootloaders\optiboot
Added:
##############################################################
# Add the new board to boards.txt (normally located at "C:\Program Files\Arduino\hardware\arduino\avr"
# The *.bootloader.* etries only matters if you want to program bootloader (and fuses) from Arduino IDE.
# See http://www.engbedded.com/fusecalc (select Atmega328p) for interpretation of fuse values and how
# extended fuses are written in different applications (07h in Arduino IDE = FFh in Atmel studio).
##############################################################

apm96.name=APM Optiboot internal 1MHz noBOD 9600baud

apm96.upload.tool=avrdude
apm96.upload.protocol=arduino
apm96.upload.maximum_size=32256
apm96.upload.speed=9600
apm96.bootloader.tool=avrdude
apm96.bootloader.low_fuses=0x62
apm96.bootloader.high_fuses=0xde
apm96.bootloader.extended_fuses=0x07
apm96.bootloader.path=optiboot_v50
apm96.bootloader.file=atmega328_1a.hex
apm96.bootloader.unlock_bits=0x3F
apm96.bootloader.lock_bits=0x2F
apm96.build.mcu=atmega328p
apm96.build.f_cpu=1000000L
apm96.build.core=arduino
apm96.build.variant=standard

##############################################################
To ...\Arduino\hardware\arduino\avr\boards.txt
Selecting Optiboot in Arduino IDE, selecting com-port and Arduino as ISP.
Burn bootloader results in:
"Error while burning bootloader: missing 'bootloader.tool' configuration parameter"
This is the thread where I got my instructions from: my-slim-2aa-battery-node
I also tried using a portable version of the arduino IDE and did the same things but I got this error instead:
avrdude: stk500_getsync() attempt 1 of 10: not in sync: resp=0x18
avrdude: stk500_getsync() attempt 2 of 10: not in sync: resp=0x66
avrdude: stk500_getsync() attempt 3 of 10: not in sync: resp=0x86
avrdude: stk500_getsync() attempt 4 of 10: not in sync: resp=0x66
avrdude: stk500_getsync() attempt 5 of 10: not in sync: resp=0x66
avrdude: stk500_getsync() attempt 6 of 10: not in sync: resp=0x7e
avrdude: stk500_getsync() attempt 7 of 10: not in sync: resp=0x66
avrdude: stk500_getsync() attempt 8 of 10: not in sync: resp=0xe6
avrdude: stk500_getsync() attempt 9 of 10: not in sync: resp=0xf8
avrdude: stk500_getsync() attempt 10 of 10: not in sync: resp=0x06
Fel vid bränning av bootloader. (error burning bootloader)@Cliff-Karlsson
@ahmedadelhosni posted a great tutorial. Looks like it's just what you asked for. Don't miss it! -
@Cliff-Karlsson
@ahmedadelhosni posted a great tutorial. Looks like it's just what you asked for. Don't miss it!@m26872 Thanks a lot for referring to the tutorial. I hope it helps him.
@Cliff-Karlsson You have two problems I guess. It is in the path of the .hex file.
You places it in \Arduino\hardware\arduino\avr\bootloaders\optiboot while the boards.txt is at
apm96.bootloader.file=atmega328_1a.hexTwo soultions:
1- Change it to apm96.bootloader.file=optioboot/atmega328_1a.hex
2- Better move the .hex location to \arduino-1.6.5-r5\hardware\arduino\avr\bootloaders- The other thing is to choose APM Optiboot internal 1Mhz noBOD 9600baud" in the Tools > Board menu.
Please download IDE 1.6.5 and follow the steps in the tutorial and inform me if it solved your issue.
-
@ahmedadelhosni said:
@Cliff-Karlsson You have two problems I guess. It is in the path of the .hex file.
Ok thanks. I only have one question. As my 328p have Uno bootloaders preinstalled I my understanding is that I need a external crystal to be able to burn a new bootloader, correct? If that is so do I still need an external crystal If I burn the bootloader using two arduino Uno's (one with 328p socket) ?
@Cliff-Karlsson I didn't try this before. I tried using a breadboard. But I guess since the UNO board has a crystal then it is Ok as the atmega is already connected to the board.
-
Right. The Uno with the 328p socket provides the crystal.
-
I followed along with this tutorial: http://www.gammon.com.au/breadboard
It is very straight forward. If you need to add a clock to the chip you are trying to program you can do so via the "Alternate clock source" where he has put out an 8mhz signal on D9 you can use. All my bare-bones chips go through the process from gammon to start with then I mess with changing up any other options after.
-
I tried and failed almost every procedure. But in my last atempt I plugged in an USBtinyISP to my new(old) arduino with 328p socket. After clicking burn bootloader it took like 2 sec then it said that the burning was colmplete. The only visual clue that anything has changed is that the default blink-sketch that blinks the built in led have stoped blinking on the UNO and is solid now.
How can I test if everything is ok?
I tried uploading the blink sketch again to the UNO and the upload took alot longer and I got this error:
Board arduino:avr:apm96 doesn't define a 'build.board' preference. Auto-set to: AVR_APM96
But it all complied and uploaded correctly in the end and it started blinking again.
Hello! It looks like you're interested in this conversation, but you don't have an account yet.
Getting fed up of having to scroll through the same posts each visit? When you register for an account, you'll always come back to exactly where you were before, and choose to be notified of new replies (either via email, or push notification). You'll also be able to save bookmarks and upvote posts to show your appreciation to other community members.
With your input, this post could be even better 💗
Register Login