HDC1080 battery operated temp/humidity sensor with wall box

-
@dbemowsk Very well done, especially if this is your first openScad project! :clap:
I just started with openScad, but it's clear to me that the possibilities and flexibility are endless.
And ofcourse I'd like to see the openscad code ;-)Which part of your design did you try to bevel from openscad? Maybe I can help.
@Yveaux said in HDC1080 battery operated temp/humidity sensor with wall box:
Which part of your design did you try to bevel from openscad? Maybe I can help.
I wanted to bevel the top edges as well as the first ridge at the lower end of the vent slots.
Here is the code. I know there is probably ways to clean this up with FOR loops for things like the vent holes, but I don't quite have the hang of that part yet.
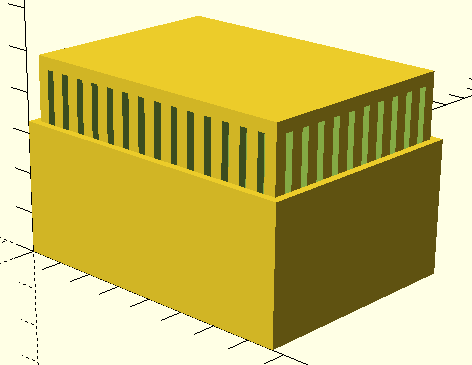
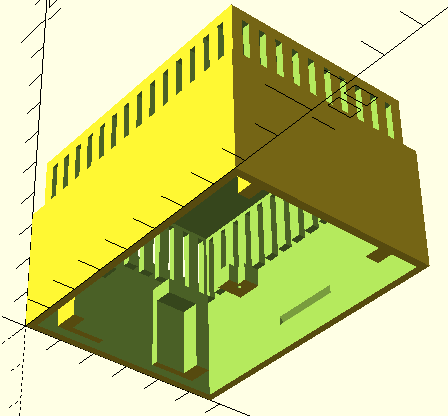
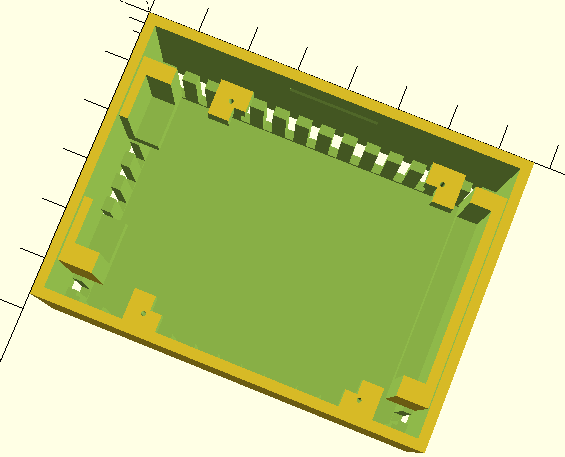
//Humidity sensor project box

$fn = 50;

//cover();
wall_plate();

module wall_plate() {
    //Create the base platform with mounting holes
    difference() {
        union() {
            translate([0, 0, -1]) cube([77, 57, 1]);
            translate([2.25, 2.25, 0]) cube([72.5, 52.5, 2]);
        }
        translate([15, 28.5, -2]) cylinder(d=4, h=5);
        translate([62, 28.5, -2]) cylinder(d=4, h=5);

        translate([15, 28.5, 1]) cylinder(d=8, h=2);
        translate([62, 28.5, 1]) cylinder(d=8, h=2);
    }

    //Create the snap tab uprights
    difference() {
        translate([30.5, 2.25, 0]) cube([16, 52.5, 10]);

        translate([30.5, 5.25, 0]) cube([16, 46.5, 10]);
    }

    //Create the latches
    translate([30.5, 2.25, 7.2]) rotate([45, 0, 0]) cube([16, 2, 2]);
    translate([30.5, 54.75, 7.2]) rotate([45, 0, 0]) cube([16, 2, 2]);
}

module cover() {
    //Create the main vented box
    difference() {
        //Create the outer box layers
        union() {
            translate([2, 2, 0]) cube([73, 53, 49]);
            cube([77, 57, 33]);
        }
        //Hollow out the box
        translate([4, 4, 0]) cube([69, 49, 47]);
        translate([2, 2, 0]) cube([73, 53, 28]);

        //Create the latch reliefs
        translate([29.5, 2.25, 7.2]) rotate([45, 0, 0]) cube([18, 2, 2]);
        translate([29.5, 54.75, 7.2]) rotate([45, 0, 0]) cube([18, 2, 2]);

        //Add the horizontal vent slots to the top layer
        translate([5, 2, 28]) cube([2, 53, 18]);
        translate([10, 2, 28]) cube([2, 53, 18]);
        translate([15, 2, 28]) cube([2, 53, 18]);
        translate([20, 2, 28]) cube([2, 53, 18]);
        translate([25, 2, 28]) cube([2, 53, 18]);
        translate([30, 2, 28]) cube([2, 53, 18]);
        translate([35, 2, 28]) cube([2, 53, 18]);
        translate([40, 2, 28]) cube([2, 53, 18]);
        translate([45, 2, 28]) cube([2, 53, 18]);
        translate([50, 2, 28]) cube([2, 53, 18]);
        translate([55, 2, 28]) cube([2, 53, 18]);
        translate([60, 2, 28]) cube([2, 53, 18]);
        translate([65, 2, 28]) cube([2, 53, 18]);
        translate([70, 2, 28]) cube([2, 53, 18]);
        //Add the vertical vent slots to the top layer
        translate([2, 5, 28]) cube([73, 2, 18]);
        translate([2, 10, 28]) cube([73, 2, 18]);
        translate([2, 15, 28]) cube([73, 2, 18]);
        translate([2, 20, 28]) cube([73, 2, 18]);
        translate([2, 25, 28]) cube([73, 2, 18]);
        translate([2, 30, 28]) cube([73, 2, 18]);
        translate([2, 35, 28]) cube([73, 2, 18]);
        translate([2, 40, 28]) cube([73, 2, 18]);
        translate([2, 45, 28]) cube([73, 2, 18]);
        translate([2, 50, 28]) cube([73, 2, 18]);
    }

    //Create the battery case holder
    difference() {
        translate([2, 7.75, 2]) cube([73, 41.5, 22.5]);

        translate([8.75, 7.75, 2]) cube([60, 41.5, 22.5]);
        translate([3.75, 11, 2]) cube([69.25, 34.25, 18.3]);

        translate([2, 20, 0]) cube([10, 16.5, 25]);

    }

    //Create the mounting tabs for the PCB
    difference() {
        translate([15, 2, 23]) cube([52.75, 55, 5]);

        translate([19.5, 6.5, 23]) cube([43.75, 44, 5]);
        translate([22, 2, 23]) cube([38.75, 55, 5]);
        translate([14, 9.5, 23]) cube([54.75, 38, 5]);

        translate([18.5, 5.5, 23]) cylinder(d=1, h=5);
        translate([64, 5.5, 23]) cylinder(d=1, h=5);
        translate([18.5, 51.5, 23]) cylinder(d=1, h=5);
        translate([64, 51.5, 23]) cylinder(d=1, h=5);
    }
}
I just uncomment the cover() or wall_plate() lines when I want to export the .stl files. I realize I could do a translate() on one of them and put them next to each other, but I exported them as separate .stl files in the event that I only wanted to print one part.
-
I've used openSCAD a few times now, to print enclosures, including MySensors and RaspberryPi's (note to self: must publish these here / on Thingiverse), and I like the way you can precisely define shapes through its structured language.
I recently came across an RPi case with rounded corners and edges, which was simply achieved by creating small spheres at each of the corners, and then producing a 'hull' around them:


Here's some simple code which I used to create the above examples:// Rounded box example r = 2; box = [80, 40, 20]; hull_build(box,r); //Utility module to make a solid box with rounded corners module hull_build(box,r){ //spheres at the corners of a box and run hull over it x = box - 2 * [r,r,r]; difference(){ hull(){ for (i=[0:1]){ for (j=[0:1]) { for (k=[0:1]){ translate([i*x[0],j*x[1],k*x[2]]+[r,r,r]) //move up r because we moved box up sphere(r); } } } } } } -
The box is finished. overall I am happy with the way it turned out, even though there are some layers on the outer shell which are pretty rough.
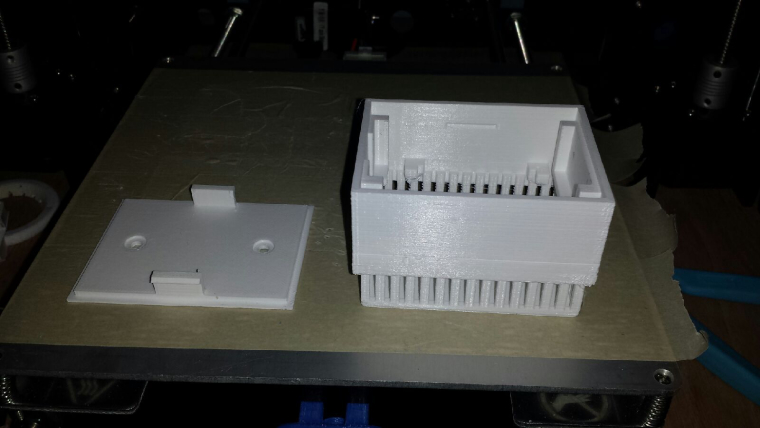
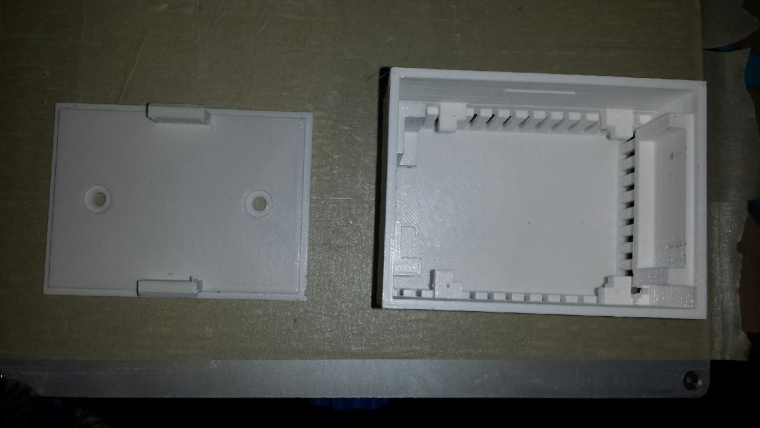
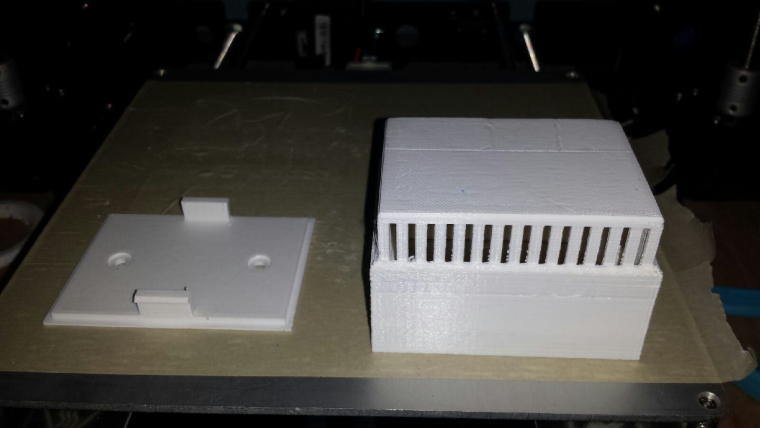
The board mounts pretty nice on the mounting tabs with some 2mm x 5mm screws (bought a bag of 100 off of ebay).

The battery box fit perfectly in it's slot. I had to put the power switch to the inside for the bottom to fit on, which was no big deal because I didn't really need the switch anyway. The switch came mounted in the battery boxes when I bought them.
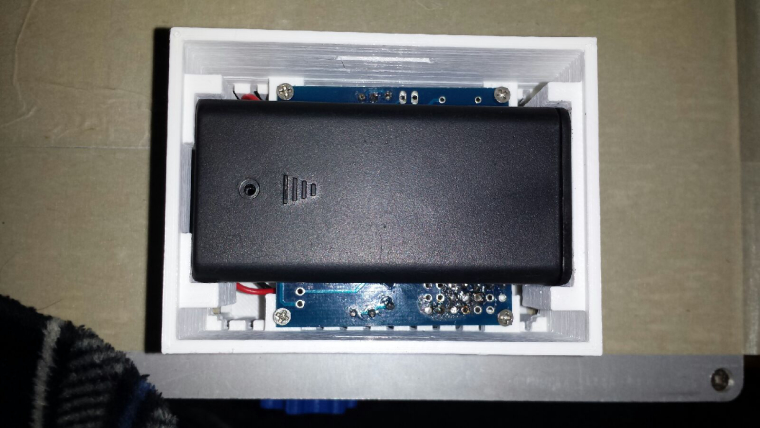
The bottom snapped on perfectly too. I have the holes to screw it to the wall, then the box should just snap right on. I could incorporate a small slot on the edge of the case on each side to pry it off with a screwdriver if I need to, but that is minor and I think this is going to be perfect just the way it is.
-
The box is finished. overall I am happy with the way it turned out, even though there are some layers on the outer shell which are pretty rough.
The board mounts pretty nice on the mounting tabs with some 2mm x 5mm screws (bought a bag of 100 off of ebay).
The battery box fit perfectly in it's slot. I had to put the power switch to the inside for the bottom to fit on, which was no big deal because I didn't really need the switch anyway. The switch came mounted in the battery boxes when I bought them.
The bottom snapped on perfectly too. I have the holes to screw it to the wall, then the box should just snap right on. I could incorporate a small slot on the edge of the case on each side to pry it off with a screwdriver if I need to, but that is minor and I think this is going to be perfect just the way it is.
@dbemowsk - I love your box! May I use it as a good example on how to box the EasyPcb?
-
@dbemowsk - I love your box! May I use it as a good example on how to box the EasyPcb?
@sundberg84 Most definately. I will be posting it to my things on thingiverse in a bit. I plan to link this forum post in the comments. I'll also post a link to the battery boxes that I bought on ebay as they fit perfectly. I'll post the link when I have it up.
-
For those interested, here is the 3D project and files on thingiverse.
http://www.thingiverse.com/thing:2186286I had not even had the project posted on the site for a minute and I had someone collected it. I thought that was impressive.
-
As I was perusing the forum I just noticed that we have a category for 3D printing. This topic could be moved to that category where it is more suited.. Not sure who all has the authority to move it there.
Vera Plus running UI7 with MySensors, Sonoffs and 1-Wire devices
Visit my website for more Bits, Bytes and Ramblings from me: http://dan.bemowski.info/ -
As I was perusing the forum I just noticed that we have a category for 3D printing. This topic could be moved to that category where it is more suited.. Not sure who all has the authority to move it there.
-
@mfalkvidd Thanks, I'll keep that in mind.
Hello! It looks like you're interested in this conversation, but you don't have an account yet.
Getting fed up of having to scroll through the same posts each visit? When you register for an account, you'll always come back to exactly where you were before, and choose to be notified of new replies (either via email, or push notification). You'll also be able to save bookmarks and upvote posts to show your appreciation to other community members.
With your input, this post could be even better 💗
Register Login