Multisensor node using Ceech board


  • Hardware Contributor

    Ah, yes. I think i know what the problem is. The LTC4079 has a built-in MPPT power tracking for solar panels and won't charge if the input voltage is below set point. This helps optimizing power extraction from solar panels. If you are using 5V input, then you should adjust the trimmer pot on the board. Like this
    0_1464367270031_hiijeejj.jpg
    Turn the top round part of the trimmer to the left so that the wiper reaches 5V mark like on the above picture. In other words reduce trimmer resistance to minimum. The other way around is for 18V solar panels.


  • @ceech That did it - thanks! 😄

    Currently charging at c. 90mA:

    Vcc = 3.30V
    Charge current = 89.93mA
    Solar cell voltage = 4.95V
    Battery voltage = 3.62V
    CHRG = 0


  • @ceech I have the same problem with the LTC4079 board:

    Running a simplified sketch gives the following:

    Vcc = 3.39V
    Charge current = 2.26mA
    Solar cell voltage = 5.40V
    Battery voltage = 4.11V
    CHRG = 502
    
    
    Vcc = 3.42V
    Charge current = 0.25mA
    Solar cell voltage = 5.41V
    Battery voltage = 4.11V
    CHRG = 500
    
    Vcc = 3.35V
    Charge current = 0.00mA
    Solar cell voltage = 5.24V
    Battery voltage = 4.11V
    CHRG = 498
    
    Vcc = 3.33V
    Charge current = 0.00mA
    Solar cell voltage = 5.19V
    Battery voltage = 4.08V
    CHRG = 496
    

    CHRG is never goes to zero or close and the charging current is low or zero. Shall I try to adjust the same potentiometer as above?


  • Hardware Contributor

    If the trimmer is in the same position as when new, then yes. Turn it anti-clockwise to reach its minimum value. Either that or raise the input voltage to 11V.


  • @ceech I cannot supply more than 6V as this is my solar panel maximum voltage.

    How many turns or degrees shall turn it?
    I did one and a half turn, but it still does not charge the battery. This is the current position.

    0_1464621473404_image.jpeg


  • Hardware Contributor

    This is a one turn trimmer. Its minimum value is close to 5V mark on one of the above pictures. And its maximum value is next to 18V mark. Since you've turned it more than once, you have to first determine the current wiper position. If you look closely you can see that the turning top is not quite round. One side is a bit flattened. That is the opposite side of the wiper. Now if you take a look at your picture then I think your wiper position is at around 6 or 7V ( to use the same terminology). I would say 20 more degrees to the left and you'll reach 5V.

    You can also measure the trimmer's resistance. Like so
    0_1464622721379_42262818.jpg
    Find the minimum value between marked points. That is your target resistance value.


  • @ceech - many thanks for above.
    I think I nailed it finally.
    Is the voltage below normal or can that be adjusted somehow?

    Vcc = 3.35V
    Charge current = 34.22mA
    Solar cell voltage = 4.55V
    Battery voltage = 3.80V
    CHRG = 446
    
    
    Vcc = 3.39V
    Charge current = 31.87mA
    Solar cell voltage = 4.72V
    Battery voltage = 3.78V
    CHRG = 451
    

    When does analogue A7 (CHRG) go down to zero or around zero?


  • Hardware Contributor

    What voltage would you like to adjust?
    The current is a bit low. What is your panel's maximum available current?
    The charger is not operating at its full power. Either you are a bit high with the setting on the trimmer or the panel can't supply enough. Charging current should be around 90mA.


  • @ceech The solar panal is 6V 4.5W, but right now it is used inside under my table lamp hence a lower voltage (4.7V). I'll to put it in the sun once the weather improves to test it.

    EDIT: I have not tested the solar panel before in the sun. Obviously, it provides ~4.8V inside and not sure if it will provide closer to 6v in the sun. I purchased it here http://www.ebay.co.uk/itm/281945297221

    Can I connect 5.5v power supply to the 'solar cell' contacts from a reliable PSU to test the trimmer settings ?


  • @ceech

    Ok, it looks like the trimmer is set to 5.5-6V
    I am feeding it from 5.5V PSU instead of the solar panal

    Charge current = 92.28mA
    Solar cell voltage = 5.54V
    Battery voltage = 3.82V
    CHRG = 467


  • Hardware Contributor

    Sure use your power supply. No problem. If the solar cell is 6V, than leave the trimmer. I think you got it just right.
    And you were getting 30mA INDOORS? That's great. I'm quite pleased with that information.
    This means that this sensor board can also be used as Indoors solar harvester.


  • @ceech yes, 30ma indoor, but it is under a direct light. The cut-off voltage is around 4.7V for charging.

    1_1464625903597_image.jpeg 0_1464625903596_image.jpeg


  • Hardware Contributor

    @alexsh1 You are at the minimum then. The trimmer was calculated for 4.75V minimum voltage. You might want to raise it a little to get 5.5V-6V MPPT.


  • @ceech Ok, but what's the tolerance please? I do want the threashhold to be at the minimum level, but meantime I do not want to damage LTC4079.


  • Hardware Contributor

    @alexsh1 No need to worry about minimum voltage destroying the IC. It is just necessary for the battery to receive full charge that the input voltage is within 4.75V and 20V.


  • @ceech Ok so if I have a sunny day and the solar panel is providing 6V, but I have 4.75V MPPT set as a minimum, there is no problem?


  • Hardware Contributor

    @alexsh1 No problem.


  • @ceech Thanks for your help!


  • I am really impressed with this board. On a very grey day outside, I have 4.7V on the solar cell and around 32mA charging current. Cannot wait for the sun to come out to test it.


  • Hi ceech,

    first things first: I have a really small knowledge about charging batteries.

    Could you give me a hint how to adopt the floating voltage for a NiCd battery?
    By reading the datasheet I only found NiMh with a 3kOhm PROG resistor while yours is 1180Ohm. Do I have to modify him to lower the charge current?
    And how about the timer capacitor. I red, that NiCd shouldn't charged too long. You pulled TIMER to ground, so the device will charge forever?

    Maybe this problem is solved by the sunset itself?

    Again thanks for your contribution!


  • Hardware Contributor

    The float, or better cut-off voltage for NiCd batteries is between 1.5V and 1.6V per cell.
    Programming resistor of 3k equals to 100mA of charging current and 1180 ohm equals to 250mA, which is a maximum value that the LTC4079 can handle (it gets too hot at this value). I equip the boards with 3k resistors.
    Batteries can be charged with different currents. One option is 0.1C (the C rate is the hour capacity of the battery). That is 10% of battery's nominal value. For 1000mAh battery that would mean 100mA.
    I pulled timer to ground which means that the charger will stop charging at C/10 or 10% of programmed current, or 10mA in case where a 3k resistor is used. This works fine for lithium batteries.
    NiCd or NiMH batteries should be charged with timer limit as you mention. It is not absolutelly necessary in our case. Let me explain. If you charge a NiCd battery with a 0.1C, that means that the battery will be fully charged in approximately 14 hours. So the sunset will be the timer that we need. And even if we charge the battery all the time a C/10 termination will reduce the charging current to a value which is close to a battery's self-discharge rate, thus keeping the battery voltage on safe levels.
    There is also battery voltage monitoring circuit on the board which can be used to report whenever the battery voltage is out of bounds.


  • Thank you very much!

    The 1180 ohm value was found in the IoT_pro_04.sch file at https://www.openhardware.io/view/44/Solar-powered-sensor-board#tabs-design. Or isnt it the resistance value? Maybe a smd size?


  • Hardware Contributor

    SMD size of the resistor is 0805.


  • As I understood, there is a buck boost converter that lifts the battery voltage to 3,3V. So I thought, two 1,5V batteries would be sufficient. Am I wrong?

    I've got a 5V solar panel and turned the trimmer clockwise to the end. Correct? (tried counterclockwise also, nothing changed.)

    Vcc = 2.96V
    Charge current = 0.00mA
    Solar cell voltage = 4.89V
    Battery voltage = 2.79V
    CHRG = 0


  • I've got light a bit closer and a current showed up:

    Vcc = 3.01V
    Charge current = 2.23mA
    Solar cell voltage = 4.89V
    Battery voltage = 2.85V
    CHRG = 0
    

    Is Vcc messuring the voltage comming from the usb device?


  • Hardware Contributor

    There are two versions of the board. One with a voltage regulator and one with a buck-boost converter. The first one does not step-up the voltage and the other does.
    Here is how the trimmer potentiometer work:
    0_1469951800535_hiijeejj.jpg
    The viper is on the red line. Turn it counterclockwise till it reaches the 5V mark. This is a 5V setting.
    5V solar cell is fine, just remember that the minimum voltage for the charger to operate is 4.75V. You are already on the minimum, so the solar cell needs to be well lit in order for system to operate.
    Vcc is a voltage rail that powers the microcontroller. It measures its own voltage.
    If you already have the solar cell and the battery connected than the USB voltage must not be applied!


  • In the ebay auction I bought it your text says buck boost converter. On the chip there is a number gnq 666 601, but I cant find him. Board says: 77534K_Y471


  • Hardware Contributor

    The first number from IC is the LTC4079. Board number means that you have one with a voltage regulator. You somehow ended with one. You can send it back and I'll send you replacement if you wish.


  • I am not amused...

    I will buy additonal batteries and a second solar cell.


  • Hardware Contributor

    There are also the appropriate charging voltage and current settings to be made to accommodate for the NiCd batteries. Are you sure you don't want for me to do it for you?


  • I thought, sunset will be enough to terminate charging on NiCd?

    So its easier to take 3,2V LiFePo4, right? And because my board only regulates down, I have to take 2 in series to provide enough voltage to regulate, right?

    All these flat LiPo types provide ~3,7V. Is that enough to feed the regulator (+dropout)?


  • Hardware Contributor

    Proper voltage and current also take effect in charging NiCd batteries.
    And LiFePO4 would also require different charge voltage (3.6V).
    The best option is a single cell LiPo battery with a capacity between 1000mAh and 2500mAh.
    Charge voltage matches (4.2V) and the current as well. Voltage regulator on the board is extremely efficient with just 2uA of consumption and 180mV dropout voltage. At 3V with the battery you still get 2.82V for the microcontroller. That's plenty. And quiescent current is the same in dropout. You'll be well off.


  • Hardware Contributor

    Like that one, yes. Or, if you do not mind doing some soldering yourself, you can choose one from this list:
    http://www.ebay.com/sch/i.html?_from=R40&_sacat=0&_nkw=Li-ion+Replacement+Battery+For+Samsung&_sop=15

    I do it like this:
    0_1470041071125_20160801_103631.jpg


  • I wanted to use it outside for collecting weather data. But the battery which the board is designed for isn't suitable for temperatures below 0°C.

    Is that right so far?

    Or did you successfully used Li-Ion outside below 0°C?


  • Hardware Contributor

    The capacity of LiPo batteries start to decline below 0 degrees Celsius. But that is a fact in all kinds of batteries. You are not going to notice much change till below -20 degrees. I found this post which describes it perfectly ( scroll down a little 😞
    https://backpackinglight.com/forums/topic/84570/


  • Ok, now I've got a 12V 50mA solar cell and a 3,7V 2000mAh LiPo. Potentiometer is at 12 o'clock (flat segment at the single solder pad)

    Can you please try to explain what exactly the potentiometer is adjusting?
    Does the charger only charge if the cell voltage is below the adjusted voltage level?

    Your example sketch is not showing any charging current:

    Vcc = 3.32V
    Charge current = 0.00mA
    Solar cell voltage = 0.24V
    Battery voltage = 3.79V
    CHRG = 424
    
    Vcc = 3.32V
    Charge current = 0.00mA
    Solar cell voltage = 7.44V
    Battery voltage = 3.79V
    CHRG = 409
    
    Vcc = 3.32V
    Charge current = 0.00mA
    Solar cell voltage = 11.72V
    Battery voltage = 3.79V
    CHRG = 0


  • @rollercontainer I would suggest you scroll up and see a few posts above concerning your question. The setting for potentiometer- for you it should be around 6 o'clock (or 12 o'clock where the cut-off mark is).

    Basically what it does is adjusting when your battery is being charged. For example, I have a 5V solar panel and I'd like the LiPO to start being charged at 4.75V therefore I put the potentiometer at the minimum (around 2pm or 8pm cut-off mark). This threshold (in my case 4.75V) can be adjusted by this potentiometer.


  • Hardware Contributor

    @rollercontainer The potentiometer is adjusting the voltage at which the solar panel is operating at its maximum power. It is so called MPPT. Just set it to the solar panel's nominal voltage.
    When the voltage on the solar panel is reduced (is in shade or we want to extract too much from it), the charger reduces the charging current in order to prevent the solar panel from collapsing entirely.


  • D'oh! I thought, the wiper of the trimmer is at the flat side, but its opposite to the flat, got it finally. Now pimatic is showing a current (0.74A).


  • Hi everyone, I'm new to arduino, and I bougth Ceech board.
    Can someone please let me know how to upload sketch on this board? I read it's compatible with arduino but I can't find any wiring schema.
    Also where is A7/CHRG ? Because my board go from analog A0 to A5.
    And I bought the following one :
    http://www.ebay.com/itm/331838940273?_trksid=p2057872.m2749.l2649&ssPageName=STRK%3AMEBIDX%3AIT

    I just want a solar/battery powered sensor. And I have anduino nano.
    Thank


  • @Fraid-DIRON welcome to the forum! This is beginners question and I would suggest you browse www.arduino.cc
    You will find tons of international on that web-site concerning programming Arduino in general. This is how I was learning it.

    Concerning Ceech's board, it is programmed the same way as any Arduino Pro or Arduino Pro Mini - with a help of FTDI USB to TTL converter (there are many on eBay) connected to the 6 angled pins on the board.

    This link is for Pro Mini, but Pro (Ceech's board) is programmed in exactly the same way:
    https://www.arduino.cc/en/Guide/ArduinoProMini


  • @alexsh1 said:

    FTDI
    Ohh thank you @alexsh1 , and my bad, you made me realize that Ceech's board as the ATMega. Now that make more sense the A7 is the analog pin 7 that is linked with the CHRG of LTC4067. Anyway Thanks 😄 !


  • @Fraid-DIRON No worries


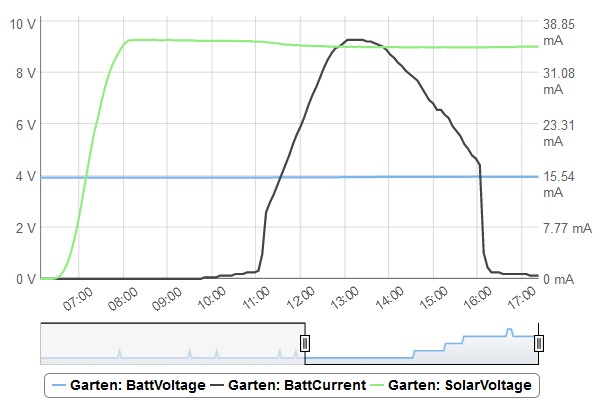
  • Can someone explain, why the charger isnt charging all the time or at least earlier? BattVoltage is 3.96V on the right end. Is the cell considered full?

    0_1473780327845_solar.jpg


  • Hardware Contributor

    @rollercontainer For some reason current started to drop. Once it reached C/10 (around 10mA), charger stopped charging. This is a programmed function.
    I can see two reasons why the current started to drop. Voltage readings might be off for one. Or the battery doesn't accept charge above 4V. Its internal resistance might risen.

    Late charge start might indicate wrong voltage readings. If we assume that in the morning the voltage is 4.2V, then at 11 o'clock the voltage dropped just enough for the charger to start charging (also a programmed feature).


  • I've built nodes using two versions of the Ceech board intended for solar cells - one with the LTC4079 charger, the other with the earlier LTC4067 charger.

    I now want to use one of these as a pulse power sensor without sleep (as per MySensors example sketch), so it needs to be on non-battery power, i.e., from a 5V USB charger. If I remove the battery, which input should I connect the 5V to: the battery input or the solar input?


  • @MikeF Definitely the solar input. (Battery max voltage is 4.2V fully charged)


  • Hardware Contributor

    On the board with the LTC4079 there is a voltage regulator behind the input, so you can use battery connector. On the board with the LTC4067 use the VIN pin on the bottom connector.


  • Hello,
    I use a My Sensors 2.0 version of "Multisensor node using @ceech board" but I have this error:

    TSP:MSG:SEND 5-5-0-0 s=255,c=3,t=11,pt=0,l=12,sg=0,ft=1,st=ok:JMP-LightLux
    TSP:MSG:SEND 5-5-0-0 s=255,c=3,t=12,pt=0,l=3,sg=0,ft=0,st=ok:1.0
    TSP:MSG:SEND 5-5-0-0 s=10,c=0,t=13,pt=0,l=0,sg=0,ft=0,st=ok:
    TSP:MSG:SEND 5-5-0-0 s=11,c=0,t=13,pt=0,l=0,sg=0,ft=0,st=ok:
    TSP:MSG:SEND 5-5-0-0 s=1,c=0,t=16,pt=0,l=0,sg=0,ft=0,st=ok:
    Request registration...
    TSP:MSG:SEND 5-5-0-0 s=255,c=3,t=26,pt=1,l=1,sg=0,ft=0,st=ok:2
    TSP:MSG:READ 0-0-5 s=255,c=3,t=27,pt=1,l=1,sg=0:1
    Node registration=1
    Init complete, id=5, parent=0, distance=1, registration=1
    BH1750 lux: 387TSP:MSG:SEND 5-5-0-0 s=1,c=1,t=37,pt=3,l=2,sg=0,ft=0,st=ok:387
    
    Batt: 3.74V ; 414.08mA 
    Solar: 0.00V ; 0.00 mA; charge: Yes
    BattPct: 61% 
    TSP:MSG:SEND 5-5-0-0 s=10,c=1,t=38,pt=7,l=5,sg=0,ft=0,st=ok:3.738
    TSP:MSG:SEND 5-5-0-0 s=10,c=1,t=39,pt=7,l=5,sg=0,ft=0,st=ok:0.414
    TSP:MSG:SEND 5-5-0-0 s=11,c=1,t=38,pt=7,l=5,sg=0,ft=0,st=ok:0.000
    TSP:MSG:SEND 5-5-0-0 s=11,c=1,t=39,pt=7,l=5,sg=0,ft=0,st=ok:0.000
    !TSP:MSG:SEND 5-5-0-0 s=255,c=3,t=0,pt=1,l=1,sg=0,ft=0,st=fail:61
    

    after that the node doesn't send data to gateway.
    Do you have some ideas to solve the problem?
    thanks


Log in to reply
 

Suggested Topics

28
Online

11.2k
Users

11.1k
Topics

112.5k
Posts