Sound Sensor
-
The electret schema is here :
http://www.edutek.ltd.uk/CBricks_Pages/Electret_Microphone.htmland IMHO the best we could use is this one:
https://www.adafruit.com/products/1063This fully assembled and tested board comes with a 20-20KHz electret microphone soldered on. For the amplification, we use the Maxim MAX4466, an op-amp specifically designed for this delicate task! The amplifier has excellent power supply noise rejection, so this amplifier sounds really good and isn't nearly as noisy or scratchy as other mic amp breakouts we've tried! This breakout is best used for projects such as voice changers, audio recording/sampling, and audio-reactive projects that use FFT. On the back, we include a small trimmer pot to adjust the gain. You can set the gain from 25x to 125x. That's down to be about 200mVpp (for normal speaking volume about 6" away) which is good for attaching to something that expects 'line level' input without clipping, or up to about 1Vpp, ideal for reading from a microcontroller ADC. The output is rail-to-rail so if the sounds gets loud, the output can go up to 5Vpp!Why do we need an FFT afterward ?
Using the normal Arduino analogRead() function would be much too slow for sampling audio. Instead, a feature of the microcontroller’s analog-to-digital converter called free-run mode is utilized. This automatically takes repeated analog samples at precise intervals…about 9.6 KHz for this project, the maximum a 16 MHz Arduino can handle with 10-bit samples.

The raw audio samples are converted into a frequency spectrum using a fast Fourier transform or FFT. There are a number of Arduino FFT libraries out there, but we keep finding ourselves returning to the venerable ELM-ChaN ffft library for its speed and good looks.

The FFT output still needs a bit of massaging to make for a good presentation on the limited 8x8 matrix. Several tables of scales and weights de-emphasize certain frequency ranges as they’re reduced to just eight columns. The software works at keeping the graph interesting, but some columns will always be less lively than others, especially comparing live speech against music of varying genres. If everything seems to stick toward one end of the graph, try another musician, musical genre, or different speakers.

 Finally, because ADC registers are accessed directly, specific interrupts are used, and the FFT code is in AVR assembly language, this software will not run on upscale boards like the Arduino Due, ChipKIT or Teensy 3.0. It is strictly for “classic” Arduinos.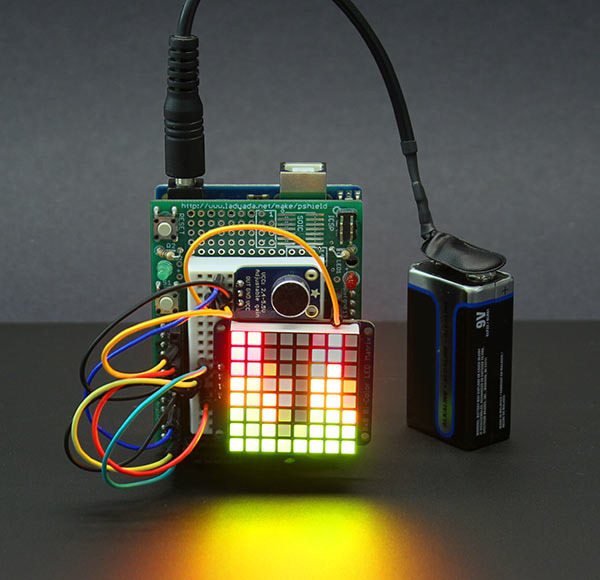
-
The electret schema is here :
http://www.edutek.ltd.uk/CBricks_Pages/Electret_Microphone.htmland IMHO the best we could use is this one:
https://www.adafruit.com/products/1063This fully assembled and tested board comes with a 20-20KHz electret microphone soldered on. For the amplification, we use the Maxim MAX4466, an op-amp specifically designed for this delicate task! The amplifier has excellent power supply noise rejection, so this amplifier sounds really good and isn't nearly as noisy or scratchy as other mic amp breakouts we've tried! This breakout is best used for projects such as voice changers, audio recording/sampling, and audio-reactive projects that use FFT. On the back, we include a small trimmer pot to adjust the gain. You can set the gain from 25x to 125x. That's down to be about 200mVpp (for normal speaking volume about 6" away) which is good for attaching to something that expects 'line level' input without clipping, or up to about 1Vpp, ideal for reading from a microcontroller ADC. The output is rail-to-rail so if the sounds gets loud, the output can go up to 5Vpp!Why do we need an FFT afterward ?
Using the normal Arduino analogRead() function would be much too slow for sampling audio. Instead, a feature of the microcontroller’s analog-to-digital converter called free-run mode is utilized. This automatically takes repeated analog samples at precise intervals…about 9.6 KHz for this project, the maximum a 16 MHz Arduino can handle with 10-bit samples. The raw audio samples are converted into a frequency spectrum using a fast Fourier transform or FFT. There are a number of Arduino FFT libraries out there, but we keep finding ourselves returning to the venerable ELM-ChaN ffft library for its speed and good looks. The FFT output still needs a bit of massaging to make for a good presentation on the limited 8x8 matrix. Several tables of scales and weights de-emphasize certain frequency ranges as they’re reduced to just eight columns. The software works at keeping the graph interesting, but some columns will always be less lively than others, especially comparing live speech against music of varying genres. If everything seems to stick toward one end of the graph, try another musician, musical genre, or different speakers. Finally, because ADC registers are accessed directly, specific interrupts are used, and the FFT code is in AVR assembly language, this software will not run on upscale boards like the Arduino Due, ChipKIT or Teensy 3.0. It is strictly for “classic” Arduinos.@epierre said:
Why do we need an FFT afterward ?
We don't 'need' an fft, it simply depends on your application.
An fft breaks down your audio signal into the different frequency components it is composed of.
This can be used to display a frequency-intensity chart, as shown on the pixel display in your picture.
Low frequency (bass) is usually shown on the left, high frequency (treble) on the right. -
@yveaux very nice to see you again !
Although I just want to get a dB mesure out, Davide Gironi described a more complex process:
sound level meter or sound meter is an instrument which measures sound pressure level. Sound pressure level (SPL) or sound level is a logarithmic measure of the effective sound pressure of a sound relative to a reference value. It is measured in decibels (dB) above a standard reference level. The commonly used reference sound pressure in air is = 20 µPa (rms) which is usually considered the threshold of human hearing. Keep in mind that 1 pascal will equal an SPL of 94 dB. Because the frequency response of human hearing changes with amplitude, a weighting have been established for measuring sound pressure. Usually the A-weighting curve is used. A weighting curve is a graph of gain across the frequency range (10Hz to 20kHz). To compute SPL measurements, the meters loop is: 1- collects N samples 2- do FFT for the N samples collected, the signal is now transformed in the frequency domain 3 - apply A-weighting (in freq domain) 4 - get magnitude of the signal 5- get RMS value of the signal 6 - apply a time-weight filter to RMS value 7 - compute the SPL using the RMS value 8 - output data -
@Yveaux for calibration we have some software in the smartphone, at least they would be equal of course ;-)
-
Did anyone get this working? I have the 1st mic in epierre's picture above. I am getting values from it. I am currently using the analog pin, based on the posts here. The values dont seem accurate. They dont change with sound level. I am just trying to get a noise % level.
-
Hello,
First my sketch is not good enough, I don't know why it keeps increasing the value reported...
Second, I do have results just from the raw adc with these, check the wiring again. Also be reminded some sensors above with only 3 pins may have only a digital output (may so you have to check before buying). In case it is digital, the resistor knob will serve to say above which level it wil send the HIGH signal.
-
Hey everyone, I’ve been messing around with these sound sensors lately too. The biggest headache I’ve found isn’t the wiring, but actually calibrating the 'sensitivity' screw so it doesn't just trigger on every little background hum. If you're trying to figure out if your sensor is actually picking up the right ambient levels, I found this web tool https://noisemeter.co/ pretty handy. It’s easier than lugging a dedicated SPL meter around just to see if your room's baseline noise matches what the Arduino is reporting.
Curious to see if anyone has managed to get a reliable 'glass break' or 'clapper' trigger out of these without a ton of false positives!
Hello! It looks like you're interested in this conversation, but you don't have an account yet.
Getting fed up of having to scroll through the same posts each visit? When you register for an account, you'll always come back to exactly where you were before, and choose to be notified of new replies (either via email, or push notification). You'll also be able to save bookmarks and upvote posts to show your appreciation to other community members.
With your input, this post could be even better 💗
Register Login