nRF5 action!
-
@waspie I was actually about to go down that route. Would you mind posting a code snippet for how you're triggering the reboot?
throw this somewhere in your code:
void reboot() {
  wdt_disable();
  wdt_enable(WDTO_15MS);
  while (1) {}
}
and then calling the reboot (in the entire loop):
void loop() { if (motion_change) { motionDetected=!motionDetected; if (motionDetected) { send(msg.set("1")); // motion detected } else { digitalWrite(LED_BUILTIN,LOW); //turn-off LED to signify motion no longer detected send(msg.set("0")); // send all-clear to prepare for future detections } NRF_LPCOMP->EVENTS_CROSS=0; motion_change=false; } else { //must be a scheduled wake-up. Time to report voltage as a heartbeat. batteryVoltage=((float)hwCPUVoltage())/1000.0; //take voltage measurement after transmission to hopefully measure lowest voltage that occurs. send(msg_S_MULTIMETER_V_VOLTAGE.set(batteryVoltage,3)); //send battery voltage with 3 decimal places time = millis(); if (time > 14400000 ) { reboot(); } } mySleep(1200000); //sleep for 20 minutes }``` -
@NeverDie Interesting. What have pulled you from nrf52 towards PICs?
Can you post a link on the board you ordered, (or one like that)? Thanks. -
@NeverDie Interesting. What have pulled you from nrf52 towards PICs?
Can you post a link on the board you ordered, (or one like that)? Thanks.@sergio-rius I'm still deciding. What's holding me back from plunging into pic is that. it appears, the pics won't be able to leverage the arduino libraries. For that reason, I think I'm probably better off staying arduino compatible. In the end, it may be less effort to simply write my own OTA firmware update bootloader.
-
@Terrence said in Minimalist SAMD21 TQFP32 Pro Mini:
@NeverDie I love the Feather boards. Currently working with the RFM69 feather. Build in battery connector/charger is very nice to have.
Have you found a cheaper source than Amazon for buying them?
@neverdie said in nRF5 action!:
@Terrence said in Minimalist SAMD21 TQFP32 Pro Mini:
@NeverDie I love the Feather boards. Currently working with the RFM69 feather. Build in battery connector/charger is very nice to have.
Have you found a cheaper source than Amazon for buying them?
where it's just every pin of the SAMD21 mapped to a post, and it's only just the SAMD21 chip on the board. Then I can experiment on breadboard and figure out what I want and what works before finally reducing it to a subsequent PCB.
-
Any charitative soul can help me prepare a black magic probe? I'm following the guides but at some point I can't continue.
For example, following this one: https://hackaday.io/project/28180-bluetooth-gamepad-phone-case/log/71316-stm32-black-magic-probe-flashing
I do:$ mkdir mbp && cd mbp $ wget https://raw.githubusercontent.com/jsnyder/stm32loader/master/stm32loader.py $ chmod 774 stm32loader.py $ sudo apt install python-pip $ pip install pyserial # There I remove '--assume-yes' as this is a wrong parameter # Then here starts the funk $ sudo apt install arm-none-eabi-gdb # The package does not exist. # I found online that it may be already incorporated and my worth a try, so I continue. # So I change the boot0 jumper to 1, that it not said in the guide, connect the two boards and plug it into the computer. $ dmesg | grep tty # Nothing. $ sudo dmesg | tail [10680.891711] usb 1-12: Product: STM32 STLink [10680.891714] usb 1-12: Manufacturer: STMicroelectronics [10680.891716] usb 1-12: SerialNumber: PÿqRpQP2$g [11990.202434] usb 1-12: USB disconnect, device number 7 [11998.926846] usb 1-12: new full-speed USB device number 8 using xhci_hcd [11999.076060] usb 1-12: New USB device found, idVendor=0483, idProduct=3748, bcdDevice= 1.00 [11999.076066] usb 1-12: New USB device strings: Mfr=1, Product=2, SerialNumber=3 [11999.076069] usb 1-12: Product: STM32 STLink [11999.076072] usb 1-12: Manufacturer: STMicroelectronics [11999.076074] usb 1-12: SerialNumber: PÿqRpQP2$g # But no usb port. So I add udev rule. $ ls -l /dev/stl* lrwxrwxrwx 1 root root 15 oct 15 14:32 /dev/stlinkv2_12 -> bus/usb/001/008 $ sudo ./stm32loader.py -p /dev/stlinkv2_12 Traceback (most recent call last): File "./stm32loader.py", line 427, in <module> cmd.open(conf['port'], conf['baud']) File "./stm32loader.py", line 71, in open timeout=5 # set a timeout value, None for waiting forever File "/home/sergio/.local/lib/python2.7/site-packages/serial/serialutil.py", line 240, in __init__ self.open() File "/home/sergio/.local/lib/python2.7/site-packages/serial/serialposix.py", line 272, in open self._reconfigure_port(force_update=True) File "/home/sergio/.local/lib/python2.7/site-packages/serial/serialposix.py", line 326, in _reconfigure_port raise SerialException("Could not configure port: {}".format(msg)) serial.serialutil.SerialException: Could not configure port: (25, 'Inappropriate ioctl for device') $ sudo apt install gdb-multiarch # Same effect.And here I am. Does anyone knows what kind of magic is required to put inside this little thing? :smirk:
-
@Sergio-Rius
I can't help you with blackmagic probe unfortunately.
Just personal opinion, I prefer Segger probe.
For example, Segger EDU mini is cheap. for the price don't bother with clones..- very affordable
- compatible with a lot of IDEs, and when you use it with Segger IDE then you get best integration
- segger provides lot of tools for debugging for free
- easy updates and drivers install
The only cons to a jlink probe could be no additional uart, but I don't need uart for debug&prints (segger ozone and rtt tools), and nor uploading sketch.
Or a nrf5dk board is a nice alternative too, a little bit more expensive than EDU Mini but you get jlink+devboard+ later you could hook a power profiler kit on it ;)
Still a jlink mini at hand is quite useful.Like I said just personal, I'm sure BMP is nice too, I guess you'll get it working before you can get a jlink :)
-
Any charitative soul can help me prepare a black magic probe? I'm following the guides but at some point I can't continue.
For example, following this one: https://hackaday.io/project/28180-bluetooth-gamepad-phone-case/log/71316-stm32-black-magic-probe-flashing
I do:$ mkdir mbp && cd mbp $ wget https://raw.githubusercontent.com/jsnyder/stm32loader/master/stm32loader.py $ chmod 774 stm32loader.py $ sudo apt install python-pip $ pip install pyserial # There I remove '--assume-yes' as this is a wrong parameter # Then here starts the funk $ sudo apt install arm-none-eabi-gdb # The package does not exist. # I found online that it may be already incorporated and my worth a try, so I continue. # So I change the boot0 jumper to 1, that it not said in the guide, connect the two boards and plug it into the computer. $ dmesg | grep tty # Nothing. $ sudo dmesg | tail [10680.891711] usb 1-12: Product: STM32 STLink [10680.891714] usb 1-12: Manufacturer: STMicroelectronics [10680.891716] usb 1-12: SerialNumber: PÿqRpQP2$g [11990.202434] usb 1-12: USB disconnect, device number 7 [11998.926846] usb 1-12: new full-speed USB device number 8 using xhci_hcd [11999.076060] usb 1-12: New USB device found, idVendor=0483, idProduct=3748, bcdDevice= 1.00 [11999.076066] usb 1-12: New USB device strings: Mfr=1, Product=2, SerialNumber=3 [11999.076069] usb 1-12: Product: STM32 STLink [11999.076072] usb 1-12: Manufacturer: STMicroelectronics [11999.076074] usb 1-12: SerialNumber: PÿqRpQP2$g # But no usb port. So I add udev rule. $ ls -l /dev/stl* lrwxrwxrwx 1 root root 15 oct 15 14:32 /dev/stlinkv2_12 -> bus/usb/001/008 $ sudo ./stm32loader.py -p /dev/stlinkv2_12 Traceback (most recent call last): File "./stm32loader.py", line 427, in <module> cmd.open(conf['port'], conf['baud']) File "./stm32loader.py", line 71, in open timeout=5 # set a timeout value, None for waiting forever File "/home/sergio/.local/lib/python2.7/site-packages/serial/serialutil.py", line 240, in __init__ self.open() File "/home/sergio/.local/lib/python2.7/site-packages/serial/serialposix.py", line 272, in open self._reconfigure_port(force_update=True) File "/home/sergio/.local/lib/python2.7/site-packages/serial/serialposix.py", line 326, in _reconfigure_port raise SerialException("Could not configure port: {}".format(msg)) serial.serialutil.SerialException: Could not configure port: (25, 'Inappropriate ioctl for device') $ sudo apt install gdb-multiarch # Same effect.And here I am. Does anyone knows what kind of magic is required to put inside this little thing? :smirk:
@sergio-rius I too have struggled to flash st-link clone with bmp firmware, but eventually I managed to do it. Unfortunately I don't remember what exactly I did, but I remember that I came to a solution when decided to try another st-link as a destination. If I remember correctly, there are different stm32 chips on these boards and some of them have insufficient amount of flash memory for bmp firmware.
arm-none-eabi-gdb package is not available in ubuntu's repositories starting from 18.04. You can either download toolchain from eclipse's github archive or try to install older package as described here.
Also, I used info from this blogs when flashed my st-link:
http://blog.linuxbits.io/2016/02/15/cheap-chinese-st-link-v-2-programmer-converted-to-black-magic-probe-debugger/
http://nuft.github.io/arm/2015/08/24/blackmagic-stlink.htmlAs for buying stuff, don't forget you can buy ready to use BMP from their creators too ;)
-
Maybe this will help: I once looked into the Black Magic Probe, but came to the conclusion that it was basically a PC program that they crammed onto the "probe." Therefore, unless I'm mistaken, you could run the very same source software from either a PC or a linux box and get the same results. I don't recall any advantage to running it on the so-called "probe" that the authors picked.
-
@neverdie and how do you suggest connecting SWD and SWCLK lines from MCU to computer, not using the "probe"?
-
@monte I guess he means taking the debugger program to the computer layer and leave only the com channel to a TTL device.
-
@sergio-rius but debugger is running on a computer side anyway, as far as I understand. And BMP is the "thing" that connects it to MCU via SWD.
-
@monte I may be wrong, but from what I understand while reading on it, it seems that the debugger is implemented in the probe. The program you run is an interface.
I see it like a Ilogger interface that you implement in a program.@sergio-rius well, I guess you are right. I revisited description of BMP and it says, that it runs GBD server on itself and eliminates need for STlink server. So I guess you could do all the same with just an st-link...however it seems that it would require more setup and I don't think that it will be easier than flashing BMP firmware :)
Just a snippet from their wiki:
"There are a few advantages of the Black Magic Probe. BMP is open-source, meaning that you can look inside it if you need or want to. We are getting support for new ARM Cortex-M based chips on a regular basis, so you are not limited to just the STM32. We have preliminary support for Cortex-A this will result in the ability to use the probe with Raspberry PI and Beagle Bone Black and many others. The Black Magic Probe also supports JTAG not only SWD, because not all microcontrollers use SWD. Also JTAG makes it possible to chain together more than one microcontroller. The GDB server is implemented on the probe itself, this means we do not use some proprietary protocol to talk to your debugger software, making the setup more repeatable and removing the need for custom config files." -
"BMP is open-source, meaning that you can look inside it if you need or want to"
"The GDB server is implemented on the probe itself, this means we do not use some proprietary protocol to talk to your debugger software"
sounds so useful when you simply want to upload fw and debug :sweat_smile:
open-source does not mean better quality than proprietary imho, it can be a burden too. I prefer mature product for working.is BMP compatible/integrated with as many IDE as a proprietary probe?
If for instance someday you want to use it with Segger IDE+nordic sdk, is it compatible? I don't think so.
I "compared" probes recently and decided to stick to jlink. The second probe in my list is cmsis-dap/daplink, looks nice too, but don't need it (at least, not so far)I use many different toolchains and CLI too. So when there is a tool that just needs download and exec to install driver, autoupdates etc, without spending life in CLI, I don't hesitate.
struggling or working..
-
"BMP is open-source, meaning that you can look inside it if you need or want to"
"The GDB server is implemented on the probe itself, this means we do not use some proprietary protocol to talk to your debugger software"
sounds so useful when you simply want to upload fw and debug :sweat_smile:
open-source does not mean better quality than proprietary imho, it can be a burden too. I prefer mature product for working.is BMP compatible/integrated with as many IDE as a proprietary probe?
If for instance someday you want to use it with Segger IDE+nordic sdk, is it compatible? I don't think so.
I "compared" probes recently and decided to stick to jlink. The second probe in my list is cmsis-dap/daplink, looks nice too, but don't need it (at least, not so far)I use many different toolchains and CLI too. So when there is a tool that just needs download and exec to install driver, autoupdates etc, without spending life in CLI, I don't hesitate.
struggling or working..
@scalz well, that's nice that you know what you want and can get it, but that doesn't mean that's suitable for everybody else. That's good to have a choice, but when you need it done, you better find a way to get it done easier and faster.
So I went to local store, bought second st-link clone for 4$ and then spent a few hours figuring out, how to properly flash it. The day after I could unlock my Ebyte e73 board, with newly acquired BMP.
If I'd took the route suggested by you, I would spend minimum 30$ and 1-2 weeks of waiting time. And then I would still need to figure out how to work with that proprietary software.
I am far from experienced programmer, so I can't get use of BMP's full potential, but now I have a very useful tool in my arsenal, that can be used with variety of different chips.
Also, in my opinion, the main advantage of opensource not the software itself, but a community. Your experience may vary, but I'd say you have better chances finding solution in opensource community, than on commercial software forum, unless you have some kind of paid support subscription. -
@neverdie and how do you suggest connecting SWD and SWCLK lines from MCU to computer, not using the "probe"?
@monte said in nRF5 action!:
@neverdie and how do you suggest connecting SWD and SWCLK lines from MCU to computer, not using the "probe"?
st-link. Roger Clark previously had a youtube video showing this setup, but it looks as though he has since deleted all his videos: https://www.youtube.com/user/synergie8/featured
Anyhow, I'm not trying to dissuade anyone from using BMP. If you want a probe that has a command line interface built into it, then AFAIK it's still available.
-
@monte said in nRF5 action!:
@scalz well, that's nice that you know what you want and can get it, but that doesn't mean that's suitable for everybody else. That's good to have a choice, but when you need it done, you better find a way to get it done easier and faster.
Why so much impatience :) So many things to tinker.. I mean you can get a jlink in 2days if you need it. I ordered mine while I was waiting for stuff coming from China..and in my case, there is no close-door store for geeks.
Do you mean you would suggest a nrf5 newcomer to diy a BMP for mcu flashing??When I got my jlink, I didn't have to flash it to make it working.. I just had to donwload win drivers, install them, and voilà.
Which proprietary sw do you think you need to learn?? I don't use any special sw for flashing..just regular IDEs like arduino/vs studio, or more advanced like Segger (free) or Keil. For all these IDEs, I just click on a button to upload fw, simple. There is nordic windows apps, or nrfjlink in CLI too.I know the power of oss and its flaws, same for commercial, in practice it's not rare to see communities sitting/waiting for updates (not hard to find examples on github), whereas money makes commercial products live.
No need to debate on this, it's useless debate I think
The reality is different here, I think you'll find more subscriptions-free resources on internet about Jlink than BMP, and for a reason ;) I agree that you'll find lot of howtos save a few bucks by diy-ing and flashing a BMP..
everyone acts in one's own interest :)
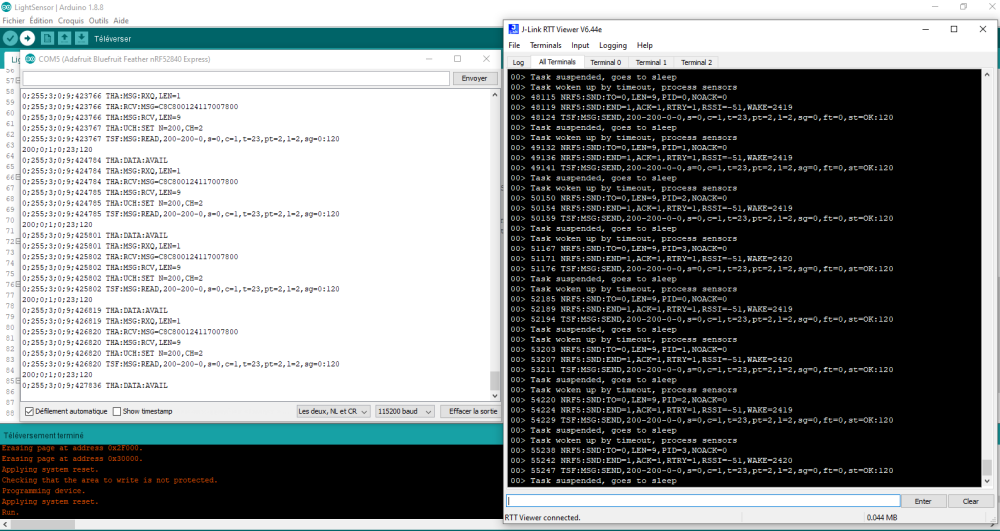
Just to sum up my thought, I think for a newcomer it's easier to get started with a Jlink vs diy probe that you need to flash with what, a probe ??Below is a screenshot of a running nrf5 test, stability test.. but for example you can see, I don't use any additional uart for debug printing, and fw is just uploaded by a click in IDE.
-
@scalz said in Minimalist SAMD21 TQFP32 Pro Mini:
Also, when doing very tiny pcb, the gnd plane can be too small regarding the wavelength etc, decreasing even more the antenna efficiency.
The more tiny, the less range..that's not a problem for a wearable, that you wear, close to your phone.As long as it's within range of a gateway, then it's good enough. Fortunately, it's really cheap to make gateways using ESP8266's, so you can have lots of gateways sprinkled around if needed. Of course, that's yet another trade-off, as it's not free, and it's arguably not even desirable either. Still, for tiny antenna's (like maybe for a soil moisture sensor in an indoor flower pot), being inconspicuous may make it worth the price.
-
@monte said in nRF5 action!:
@scalz well, that's nice that you know what you want and can get it, but that doesn't mean that's suitable for everybody else. That's good to have a choice, but when you need it done, you better find a way to get it done easier and faster.
Why so much impatience :) So many things to tinker.. I mean you can get a jlink in 2days if you need it. I ordered mine while I was waiting for stuff coming from China..and in my case, there is no close-door store for geeks.
Do you mean you would suggest a nrf5 newcomer to diy a BMP for mcu flashing??When I got my jlink, I didn't have to flash it to make it working.. I just had to donwload win drivers, install them, and voilà.
Which proprietary sw do you think you need to learn?? I don't use any special sw for flashing..just regular IDEs like arduino/vs studio, or more advanced like Segger (free) or Keil. For all these IDEs, I just click on a button to upload fw, simple. There is nordic windows apps, or nrfjlink in CLI too.I know the power of oss and its flaws, same for commercial, in practice it's not rare to see communities sitting/waiting for updates (not hard to find examples on github), whereas money makes commercial products live.
No need to debate on this, it's useless debate I think
The reality is different here, I think you'll find more subscriptions-free resources on internet about Jlink than BMP, and for a reason ;) I agree that you'll find lot of howtos save a few bucks by diy-ing and flashing a BMP..
everyone acts in one's own interest :)
Just to sum up my thought, I think for a newcomer it's easier to get started with a Jlink vs diy probe that you need to flash with what, a probe ??Below is a screenshot of a running nrf5 test, stability test.. but for example you can see, I don't use any additional uart for debug printing, and fw is just uploaded by a click in IDE.
@scalz I'm not trying to dismiss your point, I get it. It just surprises me that you stand against "diy'ing a probe" while still being a part of DIY community which gathered around idea of making things fast and cheap. Why bother with mysensors, if we can buy all the same from Ikea, Xiaomi of Philips, or many other manufacturers, sometimes not even much pricier?
To sum up what I'm trying to say, and finish this debate. I've spoken about my experience as nrf5 newcomer. And exactly as a newcomer I've found this way being better for me. I don't use Segger, Keil or Windows, nor I am planning to use them in future, and if I will, I would probably be able to afford buying myself a J-link.
To get "DIY" version of BMP you need either ST-link v2 or any STM32 board, bluepill for example. And to flash one of those you obviously need another ST-link. That's all.
BMP supports SWO which have it's own specifics compared to RTT, but basically does the same thing.
Hello! It looks like you're interested in this conversation, but you don't have an account yet.
Getting fed up of having to scroll through the same posts each visit? When you register for an account, you'll always come back to exactly where you were before, and choose to be notified of new replies (either via email, or push notification). You'll also be able to save bookmarks and upvote posts to show your appreciation to other community members.
With your input, this post could be even better 💗
Register Login