MH-Z14A CO2 sensor
-
@korttoma said:
@FotoFieber My new sensor is giving me the exact same behaivour. Could it be that the problem is that I'm using a 5V Pro Mini?
Yes. You have to use a 3.3V arduino and power the sensor with 5V (seperate voltage). The sensor may break with a 5V arduino. I use a 3.3V 8 MHz pro mini.
So the symptom I see as the sensor constantly reporting the value 562 could be because it is already broken?
Or would a broken sensor just stop communicating via serial? -
So the symptom I see as the sensor constantly reporting the value 562 could be because it is already broken?
Or would a broken sensor just stop communicating via serial?@korttoma
As I do not have a broken sensor, I can not tell you.
If I were you, I would try to fix the voltage issues and check, if it is working then.The sensor requires a preheat. Have you used my sketch from above?
-
@korttoma
As I do not have a broken sensor, I can not tell you.
If I were you, I would try to fix the voltage issues and check, if it is working then.The sensor requires a preheat. Have you used my sketch from above?
@FotoFieber I swapped out the 5V Pro Mini with a 3.3V Pro Mini yesterday and I'm afraid it did not help at all. If the Sensor would have had a problem with the 5V on the serial pins I bet it would no longer communicate.
I used some parts of your sketch but since I use an Si7021 and a different radio I had to do some modifications:
/**
 * The MySensors Arduino library handles the wireless radio link and protocol
 * between your home built sensors/actuators and HA controller of choice.
 * The sensors forms a self healing radio network with optional repeaters. Each
 * repeater and gateway builds a routing tables in EEPROM which keeps track of the
 * network topology allowing messages to be routed to nodes.
 *
 * Created by Henrik Ekblad <henrik.ekblad@mysensors.org>
 * Copyright (C) 2013-2015 Sensnology AB
 * Full contributor list: https://github.com/mysensors/Arduino/graphs/contributors
 *
 * Documentation: http://www.mysensors.org
 * Support Forum: http://forum.mysensors.org
 *
 * This program is free software; you can redistribute it and/or
 * modify it under the terms of the GNU General Public License
 * version 2 as published by the Free Software Foundation.
 *
 *******************************
 *
 * DESCRIPTION
 *
 *  MH-Z14 CO2 sensor
 *
 *  Wiring:
 *   Pad 1, Pad 5: Vin (Voltage input 4.5V-6V)
 *   Pad 2, Pad 3, Pad 12: GND
 *   Pad 6: PWM output ==> pin 6
 *
 *  From: http://davidegironi.blogspot.fr/2014/01/co2-meter-using-ndir-infrared-mh-z14.html
 *    MH-Z14 has a PWM output, with a sensitivity range of 0ppm to 2000ppm CO2, an accurancy of ±200ppm.
 *    The cycle is 1004ms±5%, given the duty cicle Th (pulse high), Tl is 1004-Th, we can convert it to CO2 value using the formula:
 *    CO2ppm = 2000 * (Th - 2ms) /(Th + Tl - 4ms)
 *  From: http://airqualityegg.wikispaces.com/Sensor+Tests
 *    - response time is less than 30 s
 *   - 3 minute warm up time
 *  datasheet:
 *
* Contributor: epierre
**/
//#define MY_DEBUG

#define MY_RADIO_NRF24

#define MY_NODE_ID  6
#define SN "AIQ CO2 MH-Z14 TxRx"
#define SV "2.1"
#define MY_BAUD_RATE  9600
#include <MyConfig.h>
#include <MySensors.h>
#include <Wire.h>
#include <SI7021.h>
#include <SPI.h>
#include <RunningAverage.h>
#include <SoftwareSerial.h>
// Define a static node address, remove if you want auto address assignment

SoftwareSerial mySerial(6, 7); // RX, TX

byte cmd[9] = {0xFF, 0x01, 0x86, 0x00, 0x00, 0x00, 0x00, 0x00, 0x79};
char response[9];

// Child sensor ID's
#define CHILD_ID_AIQ 1
#define CHILD_ID_HUM   2
#define CHILD_ID_TEMP  3

//#define AIQ_SENSOR_ANALOG_PIN 5

// TEMP_TRANSMIT_THRESHOLD for temperature threshold.
#define HUMI_TRANSMIT_THRESHOLD 0.5
#define TEMP_TRANSMIT_THRESHOLD 0.5
#define AVERAGES 2

unsigned long SLEEP_TIME = 30000; // Sleep time between reads (in milliseconds)

float valAIQ =0.0;
float lastAIQ =0.0;
unsigned int loop_round = 0;
int lastppm = 0;
boolean preheat = true;  // wait TEMP_HUM_ROUNDS for preheat

SI7021 humiditySensor;


MyMessage msg(CHILD_ID_AIQ, V_LEVEL);
MyMessage msg2(CHILD_ID_AIQ, V_UNIT_PREFIX);
MyMessage msgHum(CHILD_ID_HUM, V_HUM);
MyMessage msgTemp(CHILD_ID_TEMP, V_TEMP);

// Global settings

boolean isMetric = true;


// Storage of old measurements
float lastTemperature = -100;
int lastHumidity = -100;

RunningAverage raHum(AVERAGES);

void setup()
{

  mySerial.begin(9600);

  humiditySensor.begin();

  sleep(SLEEP_TIME);

  //pinMode(AIQ_SENSOR_ANALOG_PIN, INPUT);

  isMetric = getConfig().isMetric;
  Serial.print(F("isMetric: ")); Serial.println(isMetric);
  raHum.clear();
     wait(200);

  send(msg2.set("ppm"));
}

void presentation()
{
 // Send the sketch version information to the gateway and Controller

  sendSketchInfo(SN, SV);
  // Register all sensors to gateway (they will be created as child devices)
  present(CHILD_ID_AIQ, S_AIR_QUALITY);
  present(CHILD_ID_TEMP,S_TEMP);
  present(CHILD_ID_HUM,S_HUM);

  wait(200);

  send(msg2.set("ppm"));
}

void loop() {


    mySerial.write(cmd, 9);
  mySerial.readBytes(response, 9);
  int responseHigh = (int) response[2];
  int responseLow = (int) response[3];
  int co2ppm = (256 * responseHigh) + responseLow;
  Serial.print(F("c02ppm :"));Serial.println(co2ppm);
  if ( (abs(co2ppm - lastppm) >= 10)) {

      send(msg.set(co2ppm));
      lastppm = co2ppm;

  }


  si7021_env data = humiditySensor.getHumidityAndTemperature();

  raHum.addValue(data.humidityPercent);

  float diffTemp = abs(lastTemperature - (isMetric ? data.celsiusHundredths : data.fahrenheitHundredths)/100.0);
  float diffHum = abs(lastHumidity - raHum.getAverage());

  Serial.print(F("TempDiff :"));Serial.println(diffTemp);
  Serial.print(F("HumDiff  :"));Serial.println(diffHum);


  if (diffTemp > TEMP_TRANSMIT_THRESHOLD) {
    float temperature = (isMetric ? data.celsiusHundredths : data.fahrenheitHundredths) / 100.0;
    Serial.print("T: ");Serial.println(temperature);
    send(msgTemp.set(temperature,1));
    lastTemperature = temperature;
  }
  if (diffHum > HUMI_TRANSMIT_THRESHOLD) {
    int humidity = data.humidityPercent;

    Serial.print("H: ");Serial.println(humidity);

    send(msgHum.set(humidity));

    lastHumidity = humidity;

  }


  //Serial.println();

  // Power down the radio.  Note that the radio will get powered back up
  // on the next write() call.
  sleep(SLEEP_TIME); //sleep for: sleepTime
}
I hope I made a mistake in the sketch since I'm running out of ideas and I don't want the sensors to be broken.
From where did you buy your sensor? I got them from aliexpress... -
@korttoma
Where is the preheat logic in your sketch?Values in the preheat time could be wrong....
-
@korttoma
Where is the preheat logic in your sketch?Values in the preheat time could be wrong....
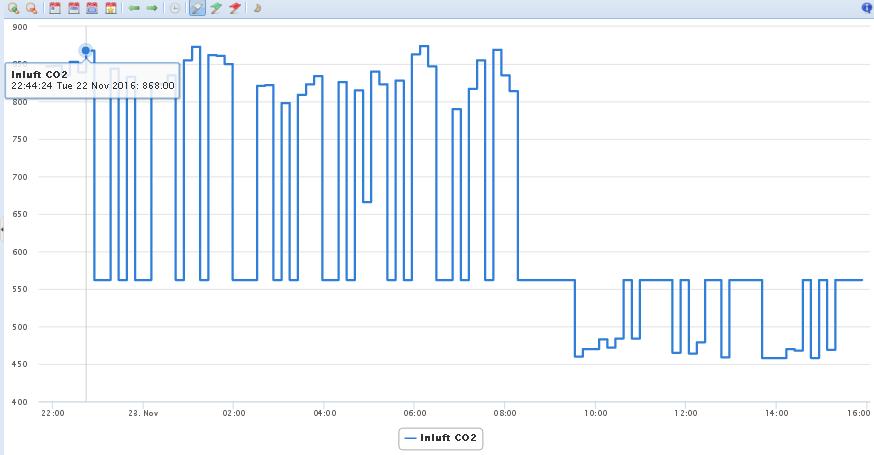
@FotoFieber Yeah, I don't have preheat logic but that would only account for values when I first plug it in. I get the strange values even if it has been running for weeks. I will try to get a graph of what I see this evening so you can see what I mean. I'm seriously considering to just exclude the value 562 from being sent to the controller.
-
@FotoFieber Yeah, I don't have preheat logic but that would only account for values when I first plug it in. I get the strange values even if it has been running for weeks. I will try to get a graph of what I see this evening so you can see what I mean. I'm seriously considering to just exclude the value 562 from being sent to the controller.
@korttoma Sounds like you have a faulty sensor. Did you try analogue output? This is just to make sure the sensor is working.
There are PWM or UART.
Did you try both of them? I am using 5V Arduino Nano with no problem.The digital pins communicate via PWM or UART. Output (and input for UART) of these ports work on 3.3 Volts - this means you should change the ARef of your Arduino - or rescale your values -

-
@korttoma try to put it outside for some time to recalibrate. If it does not help, you may need to calibrate it.
Or you just got a bad one.
@alexsh1 Will the sensor really recalibrate by itself if I put it outside?
I could send a "zero calibration" command via serial but then I would need to "input Nitrogen gas for 5 minutes when make zero calibration. "
Instead of exposing it to nitrogen gas could I just like you said put it outside and then send the "zero calibration" command?
To do the " span calibration" I would need to know what kind of values to send to it and I have no idea.
btw, here are some values I read now via serial at the office (I do not get the 562 value so far) but does these values seem reasonable for a well ventilated office?
HiResp :3
LoResp :-21
Tem.channel :63
c02ppm :747

HiResp :3
LoResp :124
Tem.channel :63
c02ppm :892


HiResp :3
LoResp :21
Tem.channel :63
c02ppm :789

HiResp :2
LoResp :-57
Tem.channel :63
c02ppm :455

HiResp :2
LoResp :-110
Tem.channel :63
c02ppm :402

HiResp :2
LoResp :99
Tem.channel :63
c02ppm :611

HiResp :2
LoResp :51
Tem.channel :63
c02ppm :563

HiResp :2
LoResp :20
Tem.channel :63
c02ppm :532

HiResp :1
LoResp :-2
Tem.channel :63
c02ppm :254

HiResp :1
LoResp :-32
Tem.channel :63
c02ppm :224

HiResp :1
LoResp :-55
Tem.channel :63
c02ppm :201

HiResp :1
LoResp :-68
Tem.channel :63
c02ppm :188

HiResp :1
LoResp :-75
Tem.channel :63
c02ppm :181

HiResp :1
LoResp :-79
Tem.channel :63
c02ppm :177

HiResp :1
LoResp :-98
Tem.channel :63
c02ppm :158

HiResp :1
LoResp :-102
Tem.channel :63
c02ppm :154

HiResp :1
LoResp :-109
Tem.channel :63
c02ppm :147

HiResp :1
LoResp :-116
Tem.channel :63
c02ppm :140

HiResp :1
LoResp :-125
Tem.channel :63
c02ppm :131

HiResp :1
LoResp :-124
Tem.channel :63
c02ppm :132

HiResp :1
LoResp :111
Tem.channel :63
c02ppm :367

HiResp :1
LoResp :115
Tem.channel :63
c02ppm :371

HiResp :1
LoResp :121
Tem.channel :63
c02ppm :377

HiResp :1
LoResp :114
Tem.channel :63
c02ppm :370

HiResp :1
LoResp :-62
Tem.channel :63
c02ppm :194

HiResp :1
LoResp :-7
Tem.channel :63
c02ppm :249

HiResp :1
LoResp :-53
Tem.channel :63
c02ppm :203

HiResp :1
LoResp :-68
Tem.channel :63
c02ppm :188

HiResp :1
LoResp :-96
Tem.channel :63
c02ppm :160

HiResp :1
LoResp :-111
Tem.channel :63
c02ppm :145

HiResp :1
LoResp :-121
Tem.channel :63
c02ppm :135

HiResp :1
LoResp :-127
Tem.channel :63
c02ppm :129

HiResp :1
LoResp :-124
Tem.channel :63
c02ppm :132

HiResp :1
LoResp :-126
Tem.channel :63
c02ppm :130

HiResp :1
LoResp :-126
Tem.channel :63
c02ppm :130

HiResp :1
LoResp :-110
Tem.channel :63
c02ppm :146

HiResp :1
LoResp :-110
Tem.channel :63
c02ppm :146

HiResp :1
LoResp :-60
Tem.channel :63
c02ppm :196

HiResp :1
LoResp :-69
Tem.channel :63
c02ppm :187

HiResp :1
LoResp :-101
Tem.channel :63
c02ppm :155

HiResp :1
LoResp :-104
Tem.channel :63
c02ppm :152

HiResp :1
LoResp :-114
Tem.channel :63
c02ppm :142

HiResp :1
LoResp :-128
Tem.channel :63
c02ppm :128

HiResp :1
LoResp :-122
Tem.channel :63
c02ppm :134

HiResp :1
LoResp :122
Tem.channel :63
c02ppm :378

HiResp :1
LoResp :119
Tem.channel :63
c02ppm :375

HiResp :1
LoResp :-128
Tem.channel :63
c02ppm :128

HiResp :1
LoResp :-86
Tem.channel :63
c02ppm :170

HiResp :1
LoResp :-110
Tem.channel :63
c02ppm :146

HiResp :1
LoResp :-123
Tem.channel :63
c02ppm :133

HiResp :1
LoResp :-101
Tem.channel :63
c02ppm :155

HiResp :1
LoResp :-75
Tem.channel :63
c02ppm :181

HiResp :1
LoResp :-92
Tem.channel :63
c02ppm :164

HiResp :1
LoResp :-101
Tem.channel :63
c02ppm :155

HiResp :1
LoResp :-123
Tem.channel :63
c02ppm :133

HiResp :1
LoResp :-114
Tem.channel :63
c02ppm :142

HiResp :1
LoResp :-127
Tem.channel :63
c02ppm :129

HiResp :1
LoResp :-120
Tem.channel :63
c02ppm :136

HiResp :1
LoResp :126
Tem.channel :63
c02ppm :382

HiResp :1
LoResp :118
Tem.channel :63
c02ppm :374

HiResp :1
LoResp :-127
Tem.channel :63
c02ppm :129

HiResp :1
LoResp :118
Tem.channel :63
c02ppm :374

HiResp :1
LoResp :120
Tem.channel :63
c02ppm :376

HiResp :1
LoResp :118
Tem.channel :63
c02ppm :374

HiResp :1
LoResp :115
Tem.channel :63
c02ppm :371

HiResp :1
LoResp :124
Tem.channel :63
c02ppm :380

HiResp :1
LoResp :120
Tem.channel :63
c02ppm :376

HiResp :1
LoResp :-119
Tem.channel :63
c02ppm :137

HiResp :1
LoResp :-126
Tem.channel :63
c02ppm :130

HiResp :1
LoResp :-127
Tem.channel :63
c02ppm :129

HiResp :1
LoResp :-124
Tem.channel :63
c02ppm :132

HiResp :1
LoResp :121
Tem.channel :63
c02ppm :377

HiResp :1
LoResp :114
Tem.channel :63
c02ppm :370

HiResp :1
LoResp :108
Tem.channel :63
c02ppm :364

HiResp :1
LoResp :108
Tem.channel :63
c02ppm :364

HiResp :1
LoResp :119
Tem.channel :63
c02ppm :375

HiResp :1
LoResp :-110
Tem.channel :63
c02ppm :146

HiResp :1
LoResp :124
Tem.channel :63
c02ppm :380

HiResp :1
LoResp :127
Tem.channel :63
c02ppm :383

HiResp :1
LoResp :-43
Tem.channel :63
c02ppm :213

HiResp :1
LoResp :-72
Tem.channel :63
c02ppm :184

HiResp :1
LoResp :-77
Tem.channel :63
c02ppm :179

HiResp :1
LoResp :-63
Tem.channel :63
c02ppm :193

HiResp :1
LoResp :-92
Tem.channel :63
c02ppm :164

HiResp :1
LoResp :-105
Tem.channel :63
c02ppm :151

HiResp :1
LoResp :-116
Tem.channel :63
c02ppm :140

HiResp :2
LoResp :41
Tem.channel :63
c02ppm :553

HiResp :2
LoResp :47
Tem.channel :63
c02ppm :559

HiResp :2
LoResp :26
Tem.channel :63
c02ppm :538

HiResp :2
LoResp :-107
Tem.channel :63
c02ppm :405

HiResp :2
LoResp :-76
Tem.channel :63
c02ppm :436

HiResp :2
LoResp :-97
Tem.channel :63
c02ppm :415

HiResp :2
LoResp :-109
Tem.channel :63
c02ppm :403

HiResp :2
LoResp :106
Tem.channel :63
c02ppm :618

HiResp :2
LoResp :-96
Tem.channel :63
c02ppm :416

HiResp :2
LoResp :80
Tem.channel :63
c02ppm :592

HiResp :2
LoResp :69
Tem.channel :63
c02ppm :581

HiResp :2
LoResp :40
Tem.channel :63
c02ppm :552

HiResp :2
LoResp :84
Tem.channel :63
c02ppm :596

HiResp :2
LoResp :45
Tem.channel :63
c02ppm :557

HiResp :2
LoResp :3
Tem.channel :63
c02ppm :515

HiResp :1
LoResp :-30
Tem.channel :63
c02ppm :226

HiResp :1
LoResp :-62
Tem.channel :63
c02ppm :194

HiResp :1
LoResp :-73
Tem.channel :63
c02ppm :183

HiResp :1
LoResp :-75
Tem.channel :63
c02ppm :181

HiResp :1
LoResp :-96
Tem.channel :63
c02ppm :160

HiResp :1
LoResp :-89
Tem.channel :63
c02ppm :167

HiResp :1
LoResp :-101
Tem.channel :63
c02ppm :155

HiResp :1
LoResp :-112
Tem.channel :63
c02ppm :144

HiResp :1
LoResp :-107
Tem.channel :63
c02ppm :149

HiResp :1
LoResp :-112
Tem.channel :63
c02ppm :144

HiResp :1
LoResp :-110
Tem.channel :63
c02ppm :146

HiResp :1
LoResp :-124
Tem.channel :63
c02ppm :132

HiResp :1
LoResp :-120
Tem.channel :63
c02ppm :136

HiResp :1
LoResp :-75
Tem.channel :63
c02ppm :181
Some of the values seem a bit low to me. Especially while the HiResp is 1 or the LoResp is negative.
I will do this test again at home when I get the chance.
-
@korttoma
In the technical specification I only find the calibration with nitrogen. I don't think, that putting it outside, will help, as it is usually at around 400 ppm at the moment. (AFAIK netatmo sets the lowest measured value in the last one or two weeks to 400 for calibration). -
@korttoma values are completely off. Co2 cannot go down below 300 level. This is a value of co2 outside (300-400).
You have to calibrate it regularly. Zero calibration (this is what you are talking about) is different.
8.1 The sensor should be calibrated regularly. The cycle time is better to be no more than 6 months. 8.2 Do not use the sensor in the high dusty environment for long time.
8.3 Please use the sensor with correct power supply.
8.4 Forbidden to cut the sensor pin.
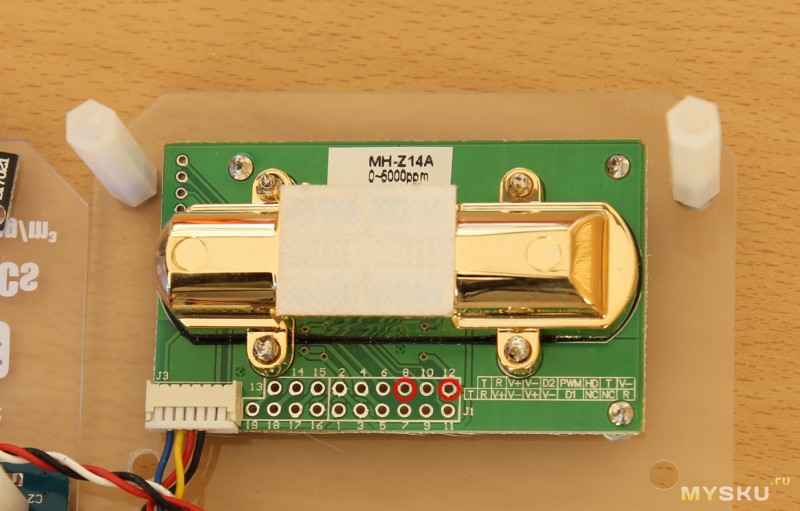
Try to put it outside for 10mins and then short pins 8 and 12 (see the photo below). This worked for me when I had some weird readings

-
@korttoma
In the technical specification I only find the calibration with nitrogen. I don't think, that putting it outside, will help, as it is usually at around 400 ppm at the moment. (AFAIK netatmo sets the lowest measured value in the last one or two weeks to 400 for calibration).@FotoFieber Netatmo is using index also cannot be compared with mh-z14a.
I think the idea putting the sensor outside is to stabilise it - the reading is in the range of 300-400
-
@korttoma values are completely off. Co2 cannot go down below 300 level. This is a value of co2 outside (300-400).
You have to calibrate it regularly. Zero calibration (this is what you are talking about) is different.
8.1 The sensor should be calibrated regularly. The cycle time is better to be no more than 6 months. 8.2 Do not use the sensor in the high dusty environment for long time.
8.3 Please use the sensor with correct power supply.
8.4 Forbidden to cut the sensor pin.
Try to put it outside for 10mins and then short pins 8 and 12 (see the photo below). This worked for me when I had some weird readings

@alexsh1 said:
Try to put it outside for 10mins and then short pins 8 and 12 (see the photo below). This worked for me
Where did you get this kind of information from? The MH-Z14.pdg I found online does not mention anything about this.
-
@alexsh1 said:
Try to put it outside for 10mins and then short pins 8 and 12 (see the photo below). This worked for me
Where did you get this kind of information from? The MH-Z14.pdg I found online does not mention anything about this.
-
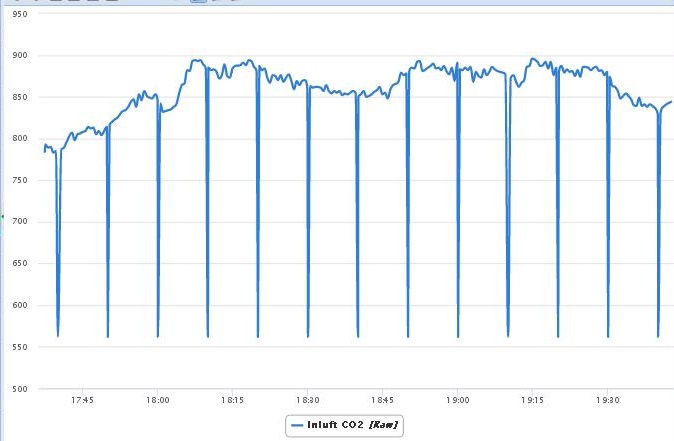
I finally found some time to really look in to this 562 issue. I looked at the raw data in DataMine2 and I noticed that the 562 value appeared every 10 minutes on the minute.

Then I knew that this value cannot possibly come from the sensor. I search around in my Vera device for a bit and I found some lua code that copied the "Variable1" value from the sensor to the "CurrentLevel" every 10 minutes. Then I remembered that in the previous version of this sensor the value was reported via V_VAR1 and I had to copy it to another variable in Vera to be able to draw any graph. The current version of the sensor reports the value directly to the "CurrentLevel" variable and the value 562 that was still in the old variable was copied over the "real" value every 10 minutes.
I also previously had some really low values from time to time from the sensor mostly when responseHigh = 1 and responseLow = negative value
so I forced the responseLow to always be a positive value like this:
int responseLow = abs((int) response[3]);
I will keep an eye on the behavior of the sensor now that I have finally removed the confusing 562 value.
