Reverse-engineering a GL10 ble / bluetooth battery monitor using ESP32
-
As mentioned in the "what did you build today" thread, I have reverse-engineered the data sent from a GL10 bluetooth battery monitor.
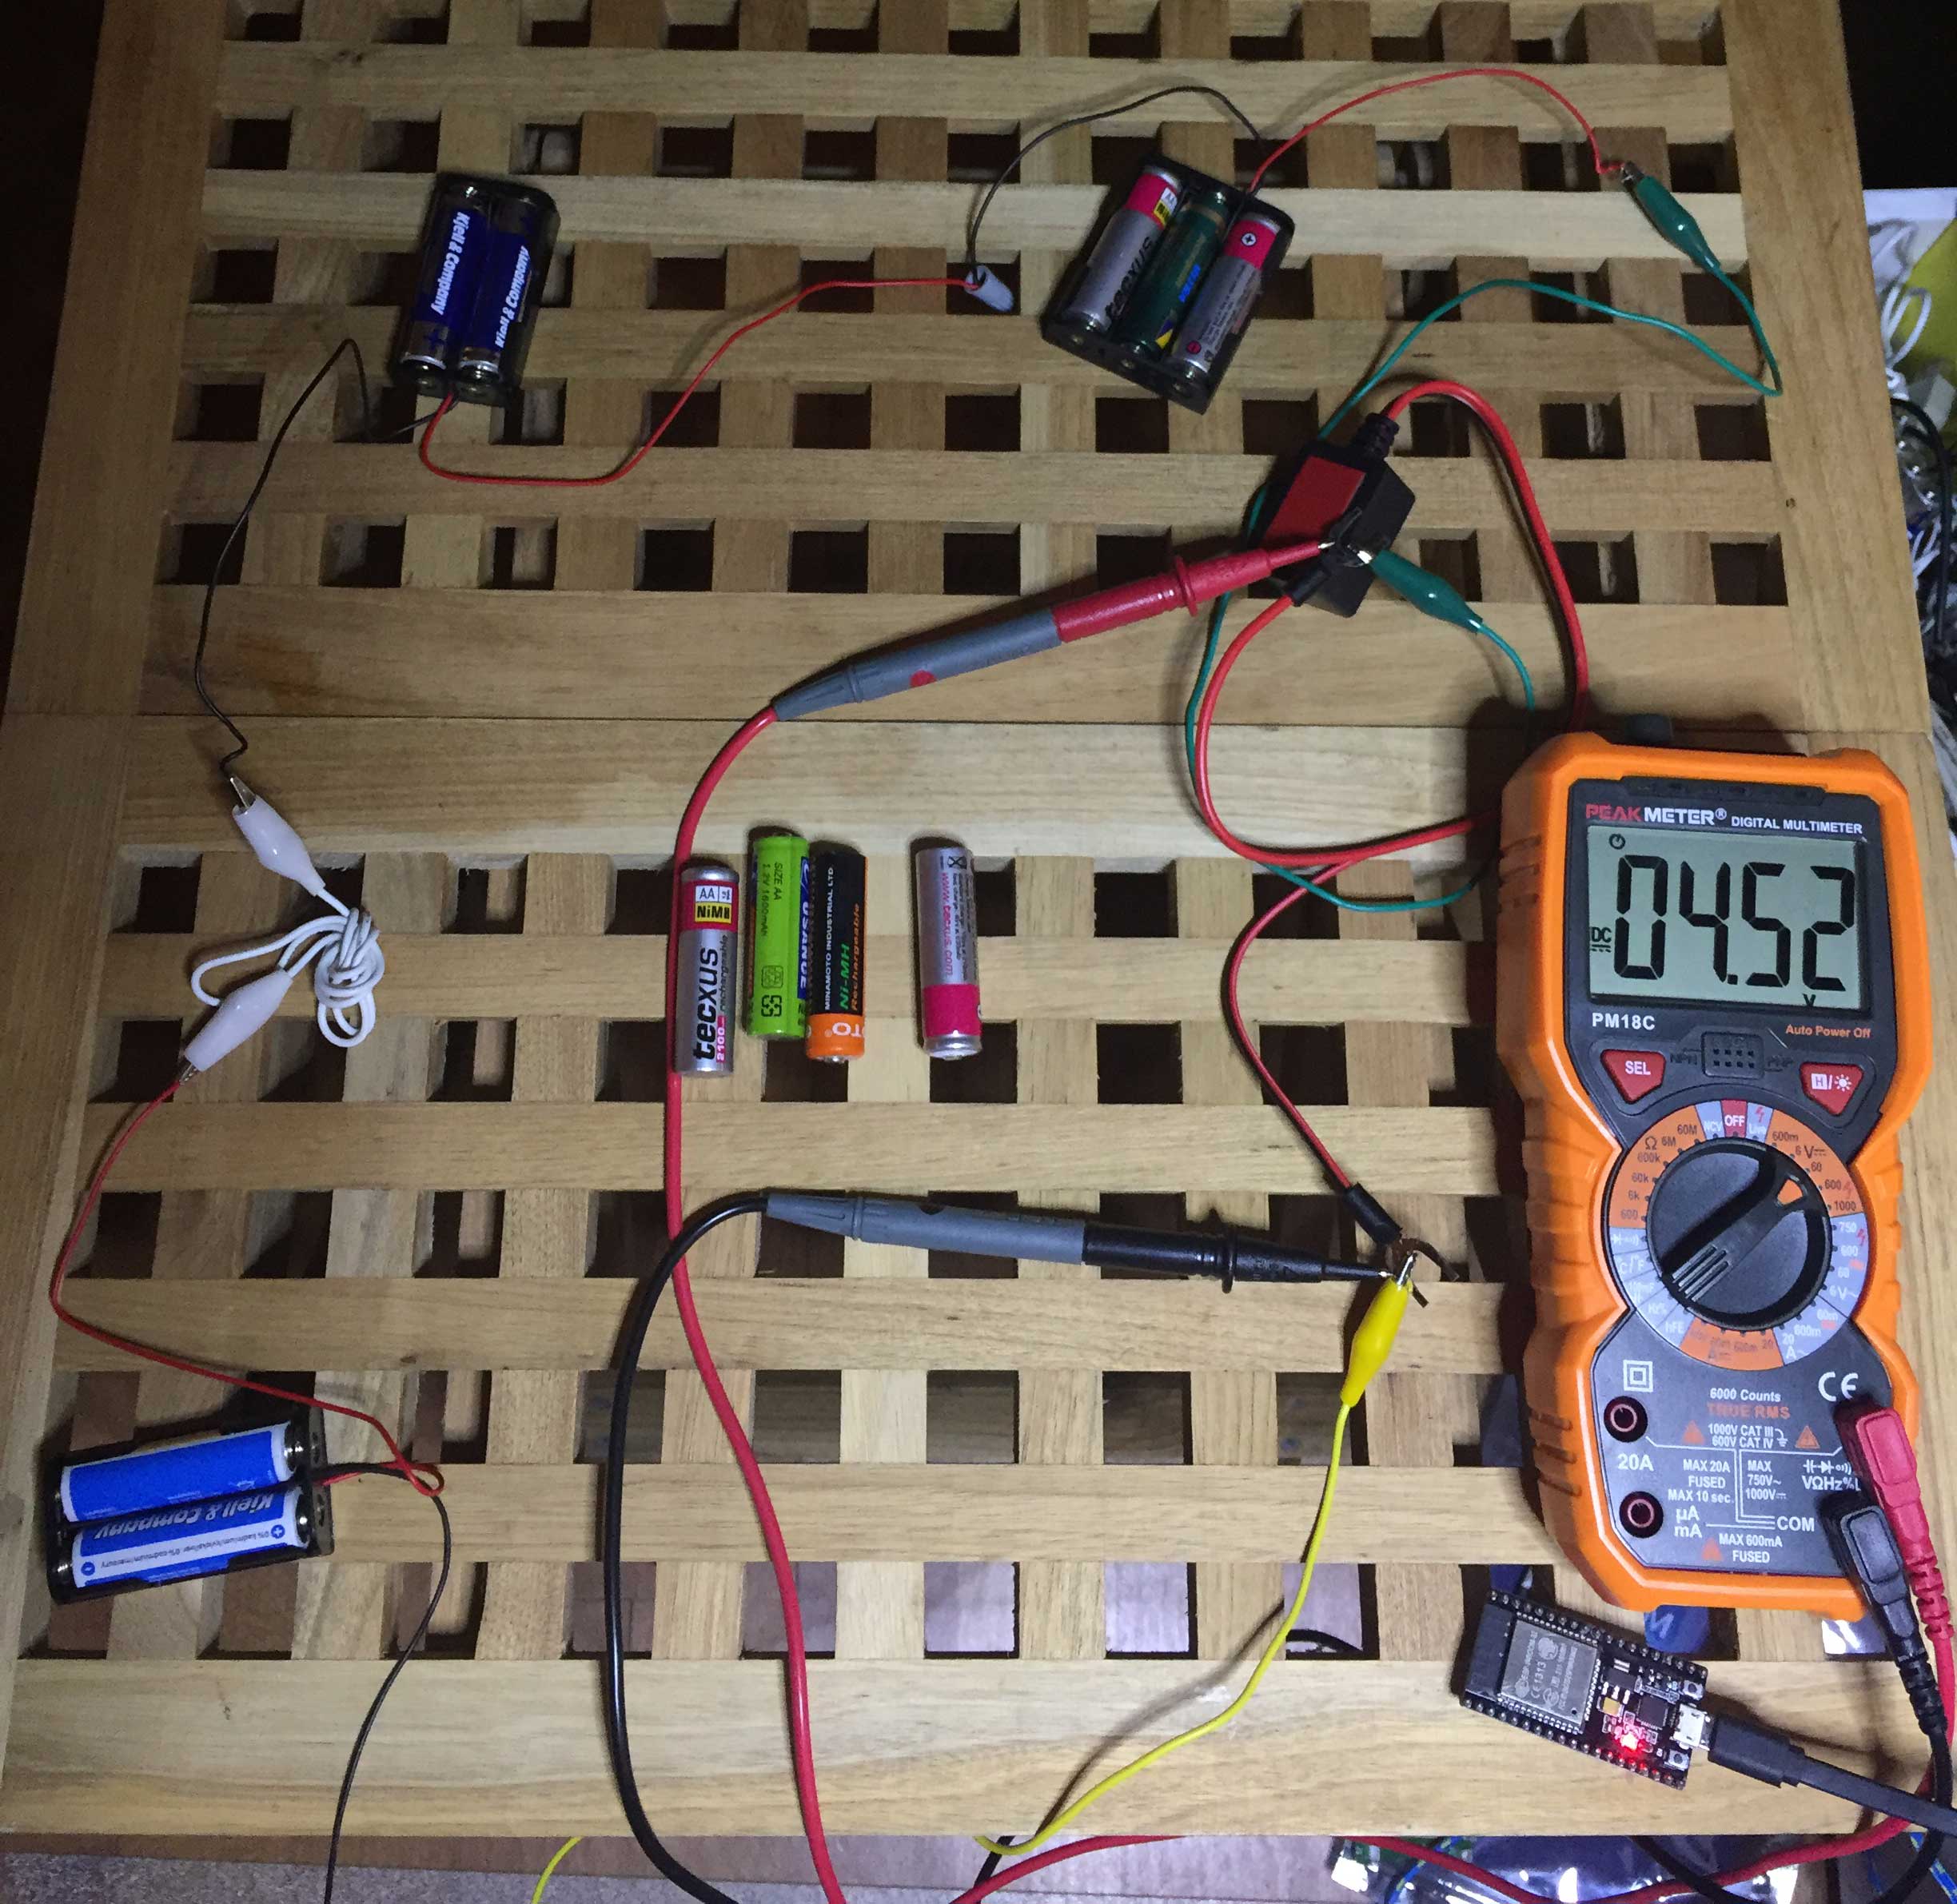
The setup:
The battery monitor has an Android and iOS app that displays voltage, but I wanted to read the data from an ESP32 (lower right corner of the pic).
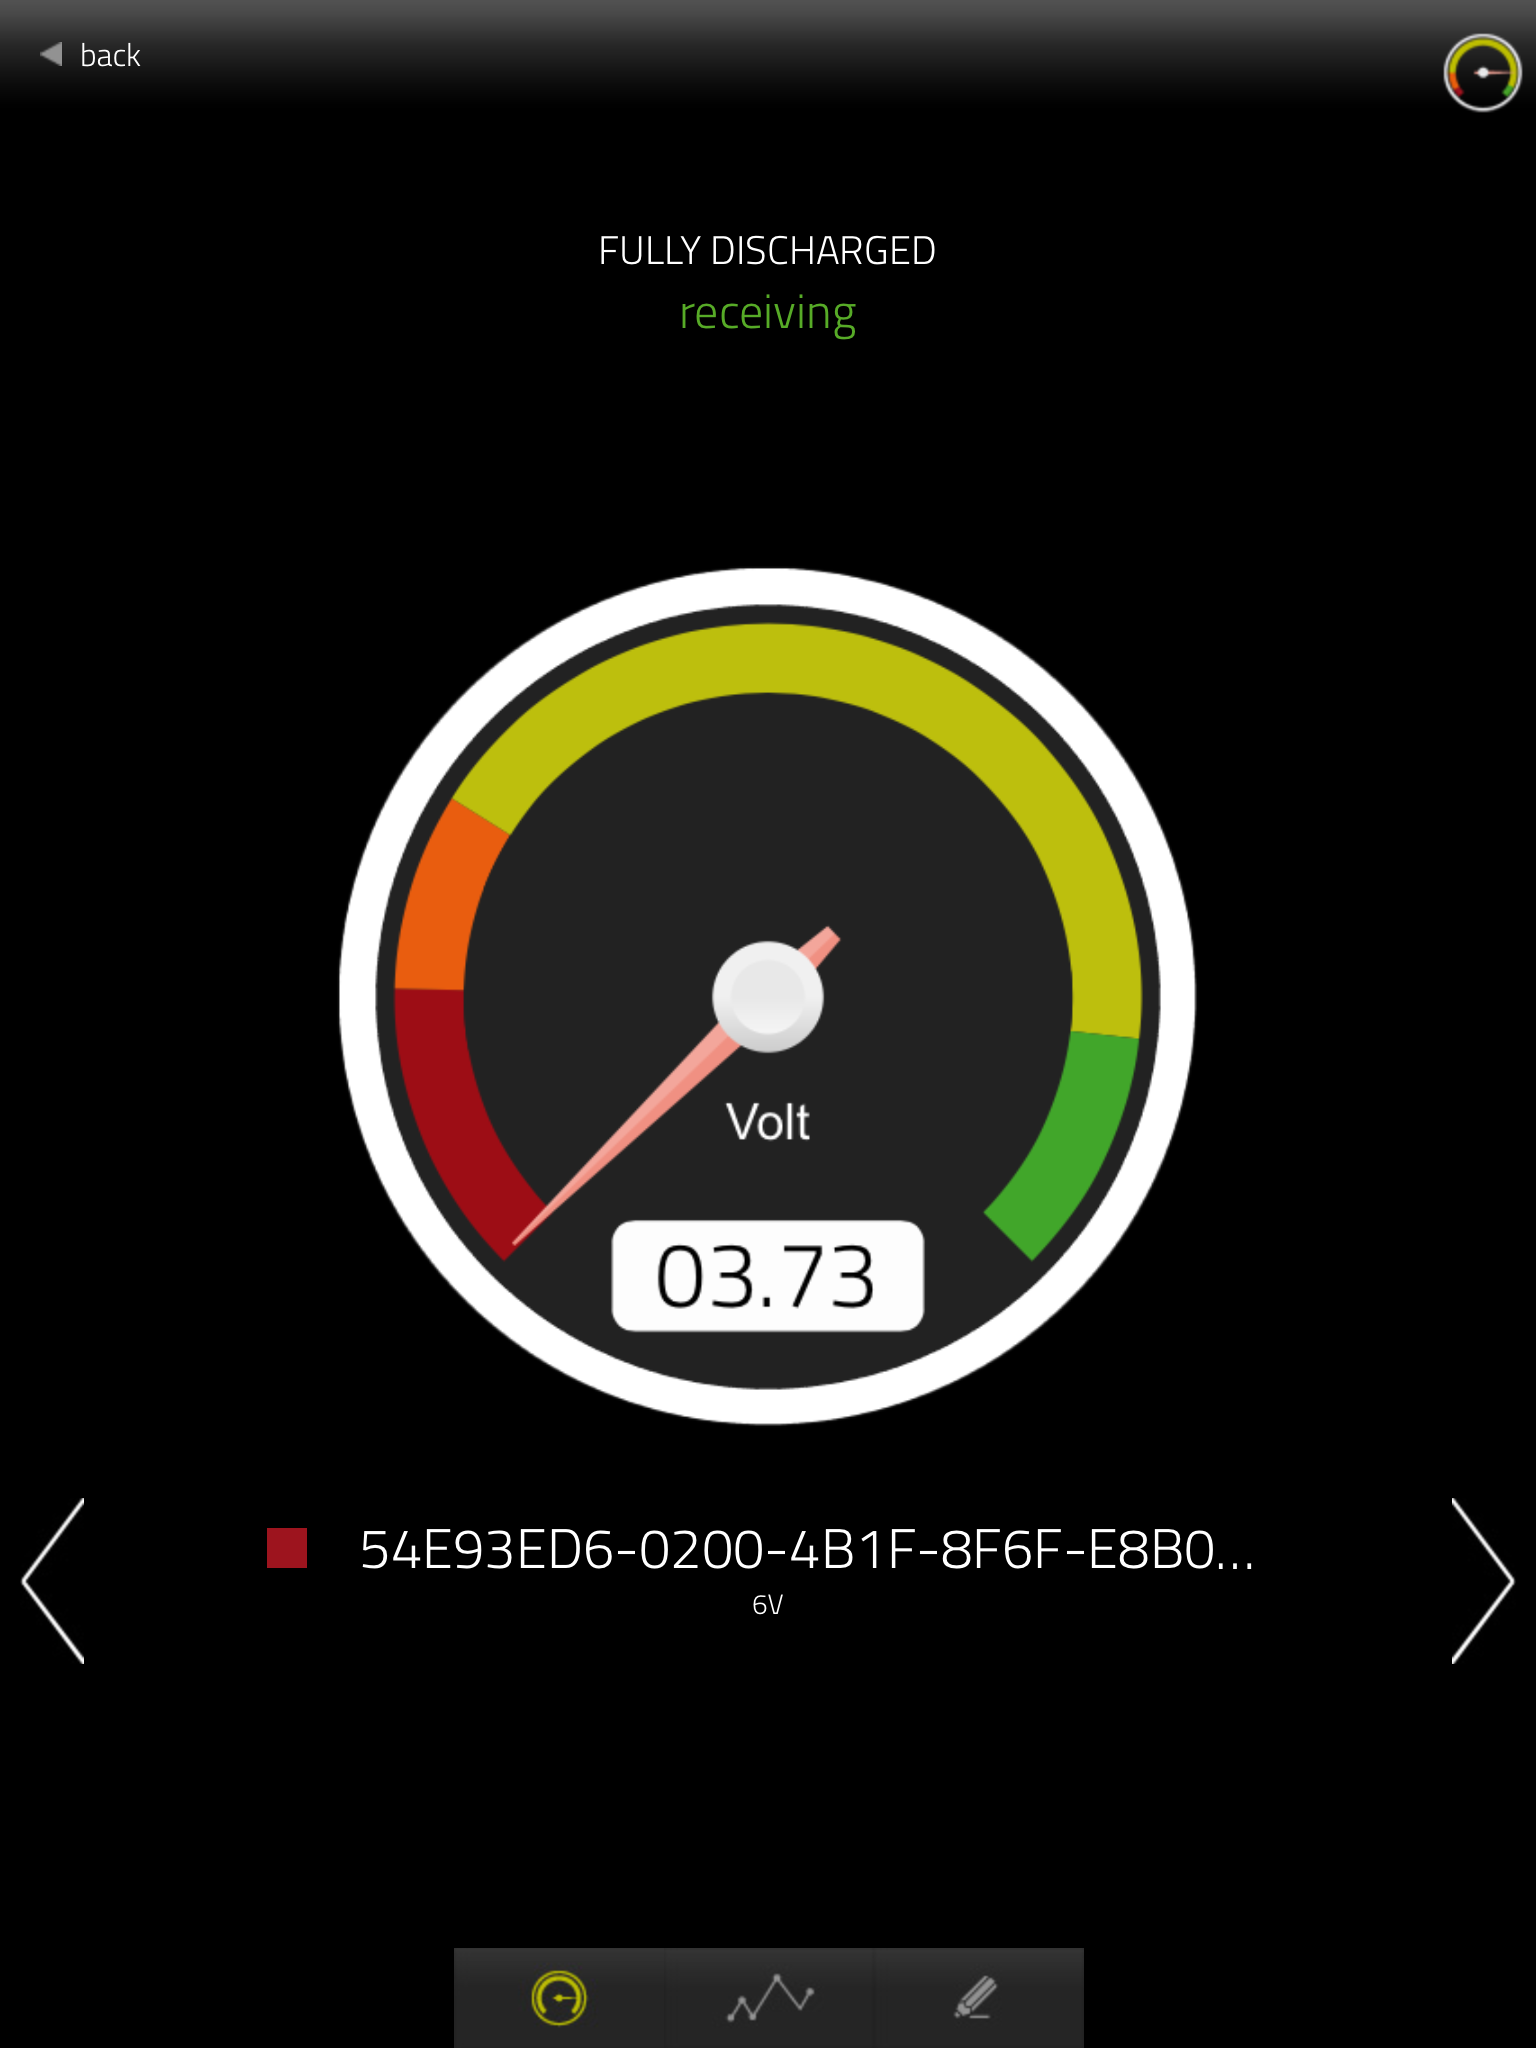
The app looks like this:
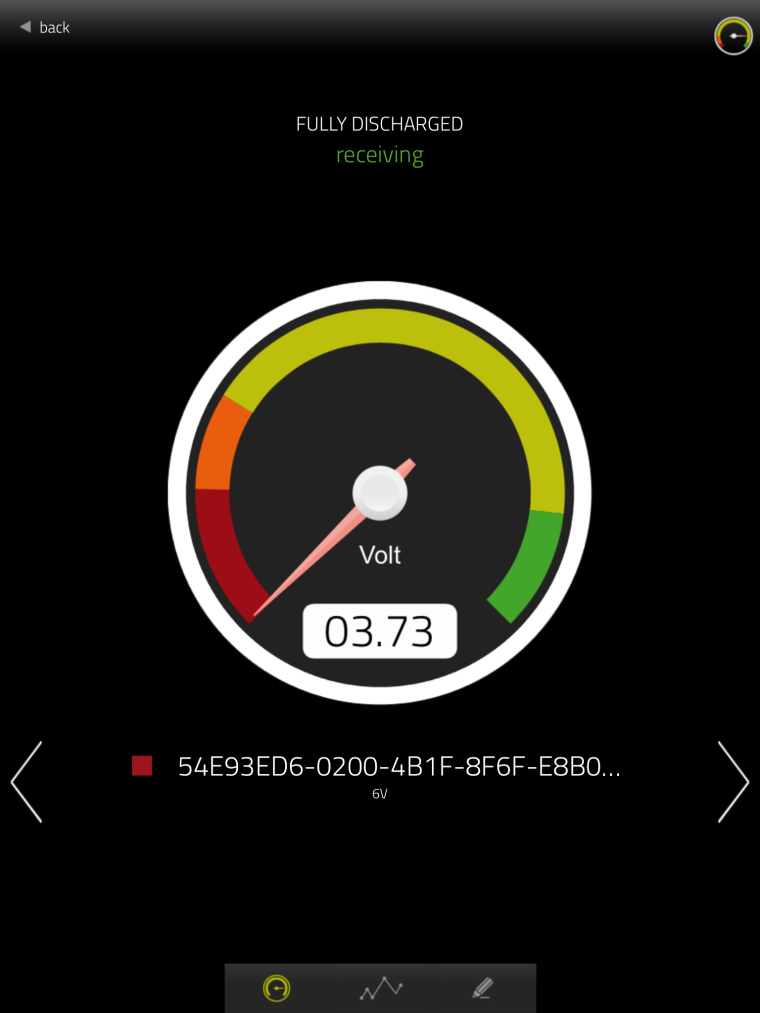
I got the idea when watching this video by Andreas Spiess, who has made many great videos on LoRa, ESP8266 and ESP32.
https://www.youtube.com/watch?v=osneajf7XkgIn the video, Andreas explains to read a different BLE device, a heart rate monitor. If that's possible, I should be able to read the battery meter as well!
The heart rate monitor uses BLE service UUID 0x180D and BLE characteristics 0x2A37. Anders explains service and characteristics uuids in the video if you want the details. basically, it is a standardized way to present data over BLE.
My battery monitor does not present itself as a heart rate monitor, so I suspected it wouldn't use the same uuids. I fired up a great iOS application called BLE Scanner. It is also available for Android.
BLE scanner is a great tool when messing with BLE devices. It can scan for all nearby devices, show which services they support. It is also possible to write data to BLE devices (if they support it) and you can even clone a BLE devices, making it possible to emulate the device from the iphone/android device at any time. This can be very handy if you need to experiment.
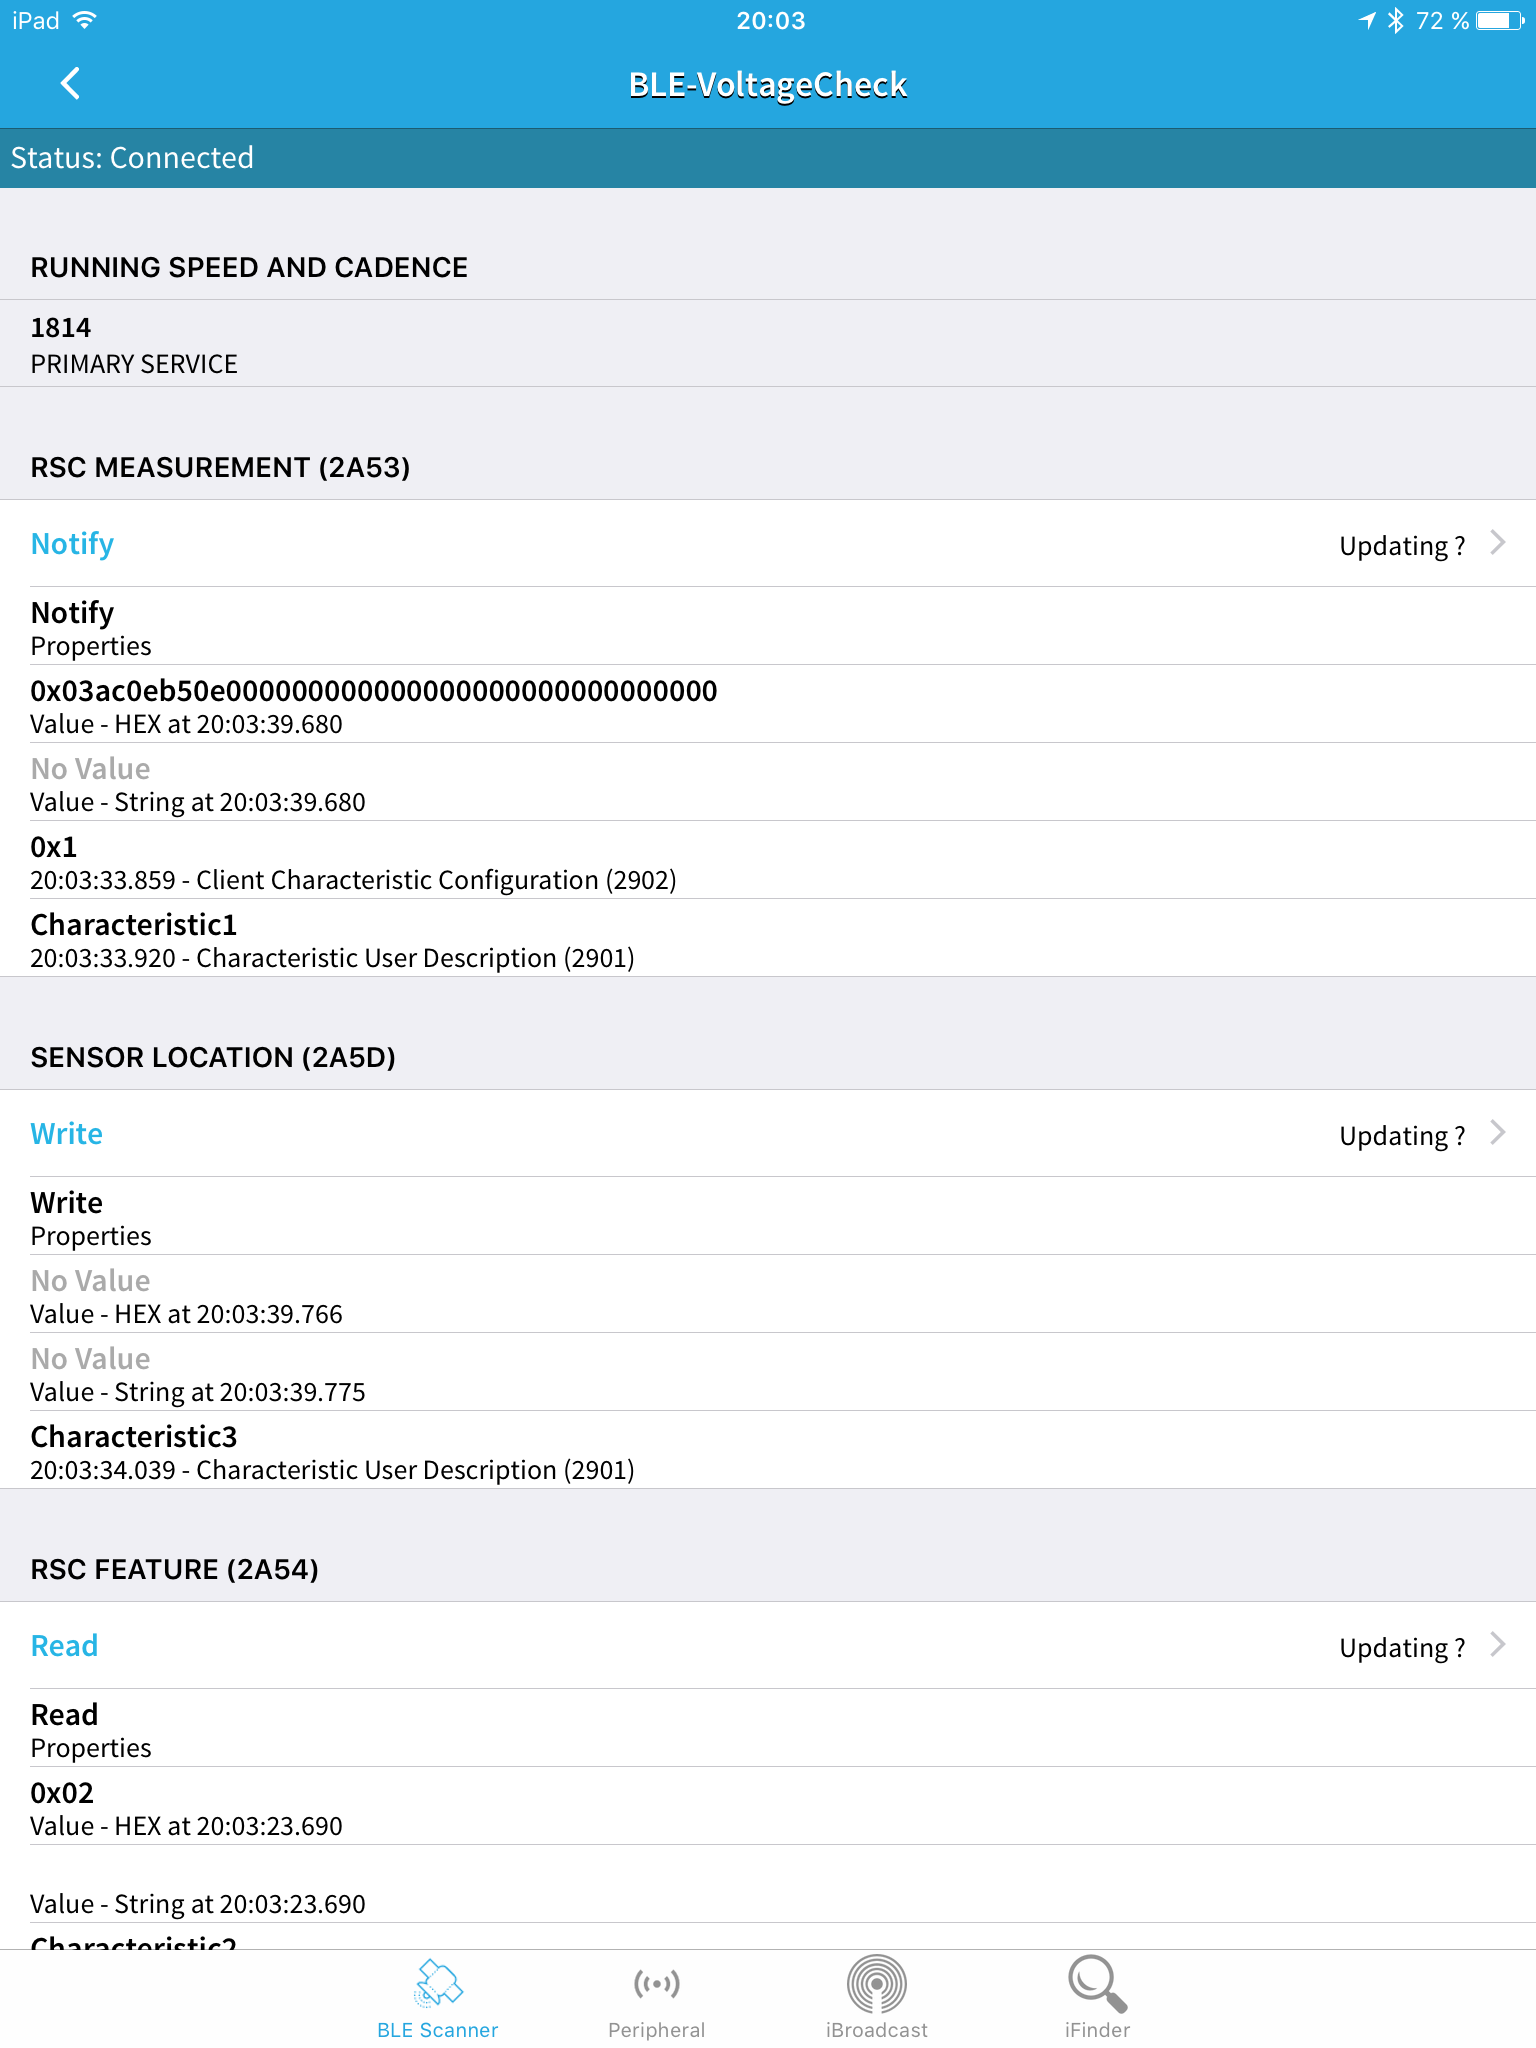
Here is what my battery monitor device looks like in BLE scanner:
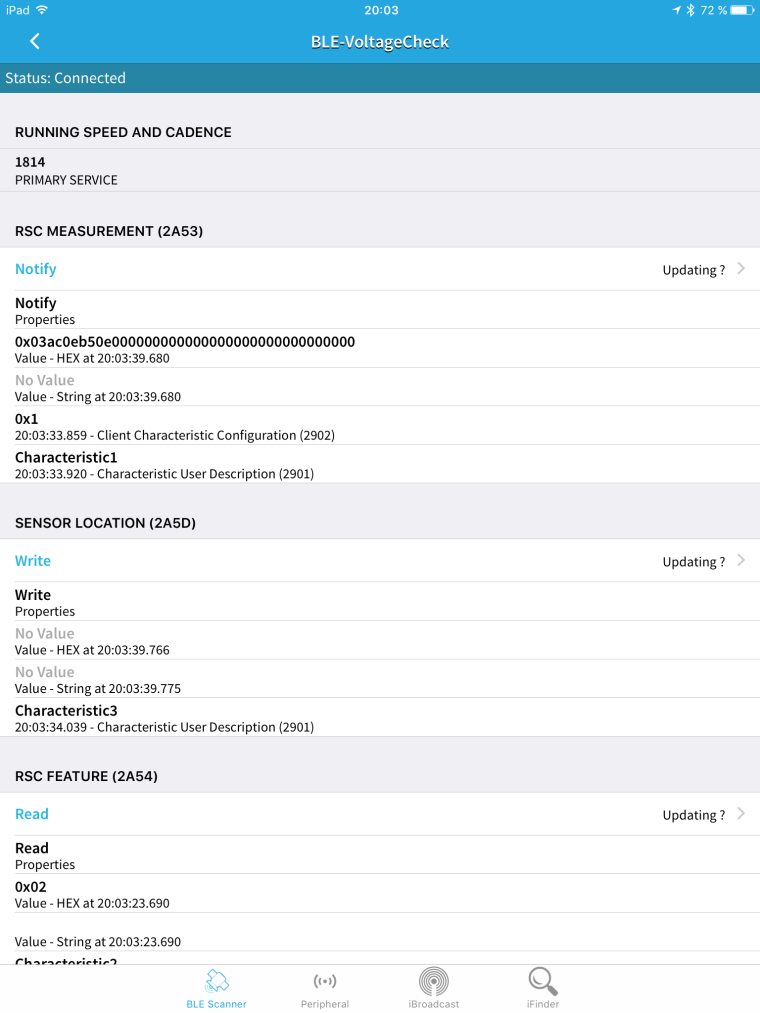
From that information, we can see that the battery monitor does not present itself as a heart rate monitor, as expected. But I didn't expect it to present itself as a running speed and cadence device either:interrobang:
Well, now we know that the service uuid is 0x1814 and the characteristics uuid is 0x2A53.
I plugged in the UUIDs in Andreas' receiver sketch and modified the code to print the received data. It looked like this:
3 155 14 163 14 0 0 0 0 0 0 0 0 0 0 0 0 0 0 0wth? This doesn't look very much like the 3.75V I was seeing in the app.
I tried with some different voltages (that's why there are so many batteries in the photo above). This is the data I got:~3.75V 3 155 14 163 14 0 0 0 0 0 0 0 0 0 0 0 0 0 0 0 3 154 14 163 14 0 0 0 0 0 0 0 0 0 0 0 0 0 0 0 3 154 14 163 14 0 0 0 0 0 0 0 0 0 0 0 0 0 0 0 3 150 14 163 14 0 0 0 0 0 0 0 0 0 0 0 0 0 0 0 3 154 14 163 14 0 0 0 0 0 0 0 0 0 0 0 0 0 0 0 3 149 14 167 14 0 0 0 0 0 0 0 0 0 0 0 0 0 0 0 3 155 14 163 14 0 0 0 0 0 0 0 0 0 0 0 0 0 0 0 3 150 14 159 14 0 0 0 0 0 0 0 0 0 0 0 0 0 0 0 3 154 14 167 14 0 0 0 0 0 0 0 0 0 0 0 0 0 0 0 3 154 14 162 14 0 0 0 0 0 0 0 0 0 0 0 0 0 0 0 3 154 14 163 14 0 0 0 0 0 0 0 0 0 0 0 0 0 0 0 3 154 14 167 14 0 0 0 0 0 0 0 0 0 0 0 0 0 0 0 ~6.4V 3 17 25 39 25 0 0 0 0 0 0 0 0 0 0 0 0 0 0 0 // 11 19 27 19 0x1911=6417 0x1927=6439 3 13 25 35 25 0 0 0 0 0 0 0 0 0 0 0 0 0 0 0 3 9 25 27 25 0 0 0 0 0 0 0 0 0 0 0 0 0 0 0 3 13 25 35 25 0 0 0 0 0 0 0 0 0 0 0 0 0 0 0 3 16 25 34 25 0 0 0 0 0 0 0 0 0 0 0 0 0 0 0 3 30 25 52 25 0 0 0 0 0 0 0 0 0 0 0 0 0 0 0 3 35 25 52 25 0 0 0 0 0 0 0 0 0 0 0 0 0 0 0 3 35 25 57 25 0 0 0 0 0 0 0 0 0 0 0 0 0 0 0 3 35 25 52 25 0 0 0 0 0 0 0 0 0 0 0 0 0 0 0 3 40 25 58 25 0 0 0 0 0 0 0 0 0 0 0 0 0 0 0 3 39 25 57 25 0 0 0 0 0 0 0 0 0 0 0 0 0 0 0 3 39 25 57 25 0 0 0 0 0 0 0 0 0 0 0 0 0 0 0 3 38 25 60 25 0 0 0 0 0 0 0 0 0 0 0 0 0 0 0 3 40 25 58 25 0 0 0 0 0 0 0 0 0 0 0 0 0 0 0 3 35 25 61 25 0 0 0 0 0 0 0 0 0 0 0 0 0 0 0 3 39 25 61 25 0 0 0 0 0 0 0 0 0 0 0 0 0 0 0 3 35 25 57 25 0 0 0 0 0 0 0 0 0 0 0 0 0 0 0 ~4.4V 3 76 17 89 17 0 0 0 0 0 0 0 0 0 0 0 0 0 0 0 // 4C 11 59 11 0x114C=4428 0x1789=6025 3 67 17 80 17 0 0 0 0 0 0 0 0 0 0 0 0 0 0 0 3 58 17 71 17 0 0 0 0 0 0 0 0 0 0 0 0 0 0 0 3 54 17 71 17 0 0 0 0 0 0 0 0 0 0 0 0 0 0 0 3 50 17 59 17 0 0 0 0 0 0 0 0 0 0 0 0 0 0 0 3 89 17 102 17 0 0 0 0 0 0 0 0 0 0 0 0 0 0 0 3 82 17 95 17 0 0 0 0 0 0 0 0 0 0 0 0 0 0 0 3 89 17 107 17 0 0 0 0 0 0 0 0 0 0 0 0 0 0 0 3 80 17 93 17 0 0 0 0 0 0 0 0 0 0 0 0 0 0 0 3 93 17 107 17 0 0 0 0 0 0 0 0 0 0 0 0 0 0 0 3 71 17 89 17 0 0 0 0 0 0 0 0 0 0 0 0 0 0 0 3 85 17 98 17 0 0 0 0 0 0 0 0 0 0 0 0 0 0 0 3 72 17 90 17 0 0 0 0 0 0 0 0 0 0 0 0 0 0 0 3 81 17 99 17 0 0 0 0 0 0 0 0 0 0 0 0 0 0 0 3 71 17 84 17 0 0 0 0 0 0 0 0 0 0 0 0 0 0 0 3 82 17 95 17 0 0 0 0 0 0 0 0 0 0 0 0 0 0 0 3 71 17 85 17 0 0 0 0 0 0 0 0 0 0 0 0 0 0 0 3 80 17 93 17 0 0 0 0 0 0 0 0 0 0 0 0 0 0 0 ~4.0V 3 120 15 134 15 0 0 0 0 0 0 0 0 0 0 0 0 0 0 0 // 78 0F 86 0F 0x0F78=3960 0x0F86=3974 3 134 15 151 15 0 0 0 0 0 0 0 0 0 0 0 0 0 0 0 3 120 15 134 15 0 0 0 0 0 0 0 0 0 0 0 0 0 0 0 3 139 15 156 15 0 0 0 0 0 0 0 0 0 0 0 0 0 0 0 3 126 15 139 15 0 0 0 0 0 0 0 0 0 0 0 0 0 0 0 3 142 15 156 15 0 0 0 0 0 0 0 0 0 0 0 0 0 0 0 3 129 15 147 15 0 0 0 0 0 0 0 0 0 0 0 0 0 0 0The numbers are in decimal, and I have converted some of the numbers to hex in the comment to the right of the output.
Looking at the numbers, I noticed that the 1st number was always 0x03, regardless of voltage, so I decided to ignore that.
Position 3 and 5 change with voltage, but they change much less than position 2 and 4. My guess was that I was looking at two 16-but numbers, with the most significant byte last. I reversed the bytes, converted them from hex to decimal and boom! These were the numbers I was looking at:6.4V 6417 6439 4.4V 4428 6025 4.0V 3960 3974The second number seems to be some sort of trailing average, so I decided to focus on the first number. Dividing it by 1000 yields the voltage:
  uint16_t voltage = pData[1] | pData[2] << 8;
  Serial.println(voltage / 1000.0);
That was it! I can now read the battery voltage monitor from my ESP32, and forward the information wherever I like. It should be possible to MySensorize the ESP32 as a wifi gateway with a local "multimeter" sensor. For now, I'm happy that I am able to extract the data at all.
This method should be possible to use on all BLE devices that export data. Time to bring out all your BLE devices :-)
:santa:
-
As mentioned in the "what did you build today" thread, I have reverse-engineered the data sent from a GL10 bluetooth battery monitor.
The setup:

The battery monitor has an Android and iOS app that displays voltage, but I wanted to read the data from an ESP32 (lower right corner of the pic).
The app looks like this:

I got the idea when watching this video by Andreas Spiess, who has made many great videos on LoRa, ESP8266 and ESP32.
https://www.youtube.com/watch?v=osneajf7XkgIn the video, Andreas explains to read a different BLE device, a heart rate monitor. If that's possible, I should be able to read the battery meter as well!
The heart rate monitor uses BLE service UUID 0x180D and BLE characteristics 0x2A37. Anders explains service and characteristics uuids in the video if you want the details. basically, it is a standardized way to present data over BLE.
My battery monitor does not present itself as a heart rate monitor, so I suspected it wouldn't use the same uuids. I fired up a great iOS application called BLE Scanner. It is also available for Android.
BLE scanner is a great tool when messing with BLE devices. It can scan for all nearby devices, show which services they support. It is also possible to write data to BLE devices (if they support it) and you can even clone a BLE devices, making it possible to emulate the device from the iphone/android device at any time. This can be very handy if you need to experiment.
Here is what my battery monitor device looks like in BLE scanner:

From that information, we can see that the battery monitor does not present itself as a heart rate monitor, as expected. But I didn't expect it to present itself as a running speed and cadence device either:interrobang:
Well, now we know that the service uuid is 0x1814 and the characteristics uuid is 0x2A53.
I plugged in the UUIDs in Andreas' receiver sketch and modified the code to print the received data. It looked like this:
3 155 14 163 14 0 0 0 0 0 0 0 0 0 0 0 0 0 0 0wth? This doesn't look very much like the 3.75V I was seeing in the app.
I tried with some different voltages (that's why there are so many batteries in the photo above). This is the data I got:~3.75V 3 155 14 163 14 0 0 0 0 0 0 0 0 0 0 0 0 0 0 0 3 154 14 163 14 0 0 0 0 0 0 0 0 0 0 0 0 0 0 0 3 154 14 163 14 0 0 0 0 0 0 0 0 0 0 0 0 0 0 0 3 150 14 163 14 0 0 0 0 0 0 0 0 0 0 0 0 0 0 0 3 154 14 163 14 0 0 0 0 0 0 0 0 0 0 0 0 0 0 0 3 149 14 167 14 0 0 0 0 0 0 0 0 0 0 0 0 0 0 0 3 155 14 163 14 0 0 0 0 0 0 0 0 0 0 0 0 0 0 0 3 150 14 159 14 0 0 0 0 0 0 0 0 0 0 0 0 0 0 0 3 154 14 167 14 0 0 0 0 0 0 0 0 0 0 0 0 0 0 0 3 154 14 162 14 0 0 0 0 0 0 0 0 0 0 0 0 0 0 0 3 154 14 163 14 0 0 0 0 0 0 0 0 0 0 0 0 0 0 0 3 154 14 167 14 0 0 0 0 0 0 0 0 0 0 0 0 0 0 0 ~6.4V 3 17 25 39 25 0 0 0 0 0 0 0 0 0 0 0 0 0 0 0 // 11 19 27 19 0x1911=6417 0x1927=6439 3 13 25 35 25 0 0 0 0 0 0 0 0 0 0 0 0 0 0 0 3 9 25 27 25 0 0 0 0 0 0 0 0 0 0 0 0 0 0 0 3 13 25 35 25 0 0 0 0 0 0 0 0 0 0 0 0 0 0 0 3 16 25 34 25 0 0 0 0 0 0 0 0 0 0 0 0 0 0 0 3 30 25 52 25 0 0 0 0 0 0 0 0 0 0 0 0 0 0 0 3 35 25 52 25 0 0 0 0 0 0 0 0 0 0 0 0 0 0 0 3 35 25 57 25 0 0 0 0 0 0 0 0 0 0 0 0 0 0 0 3 35 25 52 25 0 0 0 0 0 0 0 0 0 0 0 0 0 0 0 3 40 25 58 25 0 0 0 0 0 0 0 0 0 0 0 0 0 0 0 3 39 25 57 25 0 0 0 0 0 0 0 0 0 0 0 0 0 0 0 3 39 25 57 25 0 0 0 0 0 0 0 0 0 0 0 0 0 0 0 3 38 25 60 25 0 0 0 0 0 0 0 0 0 0 0 0 0 0 0 3 40 25 58 25 0 0 0 0 0 0 0 0 0 0 0 0 0 0 0 3 35 25 61 25 0 0 0 0 0 0 0 0 0 0 0 0 0 0 0 3 39 25 61 25 0 0 0 0 0 0 0 0 0 0 0 0 0 0 0 3 35 25 57 25 0 0 0 0 0 0 0 0 0 0 0 0 0 0 0 ~4.4V 3 76 17 89 17 0 0 0 0 0 0 0 0 0 0 0 0 0 0 0 // 4C 11 59 11 0x114C=4428 0x1789=6025 3 67 17 80 17 0 0 0 0 0 0 0 0 0 0 0 0 0 0 0 3 58 17 71 17 0 0 0 0 0 0 0 0 0 0 0 0 0 0 0 3 54 17 71 17 0 0 0 0 0 0 0 0 0 0 0 0 0 0 0 3 50 17 59 17 0 0 0 0 0 0 0 0 0 0 0 0 0 0 0 3 89 17 102 17 0 0 0 0 0 0 0 0 0 0 0 0 0 0 0 3 82 17 95 17 0 0 0 0 0 0 0 0 0 0 0 0 0 0 0 3 89 17 107 17 0 0 0 0 0 0 0 0 0 0 0 0 0 0 0 3 80 17 93 17 0 0 0 0 0 0 0 0 0 0 0 0 0 0 0 3 93 17 107 17 0 0 0 0 0 0 0 0 0 0 0 0 0 0 0 3 71 17 89 17 0 0 0 0 0 0 0 0 0 0 0 0 0 0 0 3 85 17 98 17 0 0 0 0 0 0 0 0 0 0 0 0 0 0 0 3 72 17 90 17 0 0 0 0 0 0 0 0 0 0 0 0 0 0 0 3 81 17 99 17 0 0 0 0 0 0 0 0 0 0 0 0 0 0 0 3 71 17 84 17 0 0 0 0 0 0 0 0 0 0 0 0 0 0 0 3 82 17 95 17 0 0 0 0 0 0 0 0 0 0 0 0 0 0 0 3 71 17 85 17 0 0 0 0 0 0 0 0 0 0 0 0 0 0 0 3 80 17 93 17 0 0 0 0 0 0 0 0 0 0 0 0 0 0 0 ~4.0V 3 120 15 134 15 0 0 0 0 0 0 0 0 0 0 0 0 0 0 0 // 78 0F 86 0F 0x0F78=3960 0x0F86=3974 3 134 15 151 15 0 0 0 0 0 0 0 0 0 0 0 0 0 0 0 3 120 15 134 15 0 0 0 0 0 0 0 0 0 0 0 0 0 0 0 3 139 15 156 15 0 0 0 0 0 0 0 0 0 0 0 0 0 0 0 3 126 15 139 15 0 0 0 0 0 0 0 0 0 0 0 0 0 0 0 3 142 15 156 15 0 0 0 0 0 0 0 0 0 0 0 0 0 0 0 3 129 15 147 15 0 0 0 0 0 0 0 0 0 0 0 0 0 0 0The numbers are in decimal, and I have converted some of the numbers to hex in the comment to the right of the output.
Looking at the numbers, I noticed that the 1st number was always 0x03, regardless of voltage, so I decided to ignore that.
Position 3 and 5 change with voltage, but they change much less than position 2 and 4. My guess was that I was looking at two 16-but numbers, with the most significant byte last. I reversed the bytes, converted them from hex to decimal and boom! These were the numbers I was looking at:6.4V 6417 6439 4.4V 4428 6025 4.0V 3960 3974The second number seems to be some sort of trailing average, so I decided to focus on the first number. Dividing it by 1000 yields the voltage:
  uint16_t voltage = pData[1] | pData[2] << 8;
  Serial.println(voltage / 1000.0);
That was it! I can now read the battery voltage monitor from my ESP32, and forward the information wherever I like. It should be possible to MySensorize the ESP32 as a wifi gateway with a local "multimeter" sensor. For now, I'm happy that I am able to extract the data at all.
This method should be possible to use on all BLE devices that export data. Time to bring out all your BLE devices :-)
:santa:
-
@mfalkvidd nice hack! :+1:
Out of curiosity, why did you buy a ble sensor instead of using a MySensors sensor with voltage divider, or even better, e.g. an ina219?@yveaux thanks!
Partly because this is for a project that will be mounted in a boat and I don't want cables all over the place. Partly because I (eventually) need all parts CE certified. Partly because I didn't choose the components. But mainly because the system will be run on a microcontroller that runs a standard firmware, so I can't add whatever i want to it.
-
Nice, thank you for sharing.
Not very surprised about the use of running speed and cadence profile as there is no profile for voltage reporting (battery service can only report a percentage). -
As mentioned in the "what did you build today" thread, I have reverse-engineered the data sent from a GL10 bluetooth battery monitor.
The setup:

The battery monitor has an Android and iOS app that displays voltage, but I wanted to read the data from an ESP32 (lower right corner of the pic).
The app looks like this:

I got the idea when watching this video by Andreas Spiess, who has made many great videos on LoRa, ESP8266 and ESP32.
https://www.youtube.com/watch?v=osneajf7XkgIn the video, Andreas explains to read a different BLE device, a heart rate monitor. If that's possible, I should be able to read the battery meter as well!
The heart rate monitor uses BLE service UUID 0x180D and BLE characteristics 0x2A37. Anders explains service and characteristics uuids in the video if you want the details. basically, it is a standardized way to present data over BLE.
My battery monitor does not present itself as a heart rate monitor, so I suspected it wouldn't use the same uuids. I fired up a great iOS application called BLE Scanner. It is also available for Android.
BLE scanner is a great tool when messing with BLE devices. It can scan for all nearby devices, show which services they support. It is also possible to write data to BLE devices (if they support it) and you can even clone a BLE devices, making it possible to emulate the device from the iphone/android device at any time. This can be very handy if you need to experiment.
Here is what my battery monitor device looks like in BLE scanner:

From that information, we can see that the battery monitor does not present itself as a heart rate monitor, as expected. But I didn't expect it to present itself as a running speed and cadence device either:interrobang:
Well, now we know that the service uuid is 0x1814 and the characteristics uuid is 0x2A53.
I plugged in the UUIDs in Andreas' receiver sketch and modified the code to print the received data. It looked like this:
3 155 14 163 14 0 0 0 0 0 0 0 0 0 0 0 0 0 0 0wth? This doesn't look very much like the 3.75V I was seeing in the app.
I tried with some different voltages (that's why there are so many batteries in the photo above). This is the data I got:~3.75V 3 155 14 163 14 0 0 0 0 0 0 0 0 0 0 0 0 0 0 0 3 154 14 163 14 0 0 0 0 0 0 0 0 0 0 0 0 0 0 0 3 154 14 163 14 0 0 0 0 0 0 0 0 0 0 0 0 0 0 0 3 150 14 163 14 0 0 0 0 0 0 0 0 0 0 0 0 0 0 0 3 154 14 163 14 0 0 0 0 0 0 0 0 0 0 0 0 0 0 0 3 149 14 167 14 0 0 0 0 0 0 0 0 0 0 0 0 0 0 0 3 155 14 163 14 0 0 0 0 0 0 0 0 0 0 0 0 0 0 0 3 150 14 159 14 0 0 0 0 0 0 0 0 0 0 0 0 0 0 0 3 154 14 167 14 0 0 0 0 0 0 0 0 0 0 0 0 0 0 0 3 154 14 162 14 0 0 0 0 0 0 0 0 0 0 0 0 0 0 0 3 154 14 163 14 0 0 0 0 0 0 0 0 0 0 0 0 0 0 0 3 154 14 167 14 0 0 0 0 0 0 0 0 0 0 0 0 0 0 0 ~6.4V 3 17 25 39 25 0 0 0 0 0 0 0 0 0 0 0 0 0 0 0 // 11 19 27 19 0x1911=6417 0x1927=6439 3 13 25 35 25 0 0 0 0 0 0 0 0 0 0 0 0 0 0 0 3 9 25 27 25 0 0 0 0 0 0 0 0 0 0 0 0 0 0 0 3 13 25 35 25 0 0 0 0 0 0 0 0 0 0 0 0 0 0 0 3 16 25 34 25 0 0 0 0 0 0 0 0 0 0 0 0 0 0 0 3 30 25 52 25 0 0 0 0 0 0 0 0 0 0 0 0 0 0 0 3 35 25 52 25 0 0 0 0 0 0 0 0 0 0 0 0 0 0 0 3 35 25 57 25 0 0 0 0 0 0 0 0 0 0 0 0 0 0 0 3 35 25 52 25 0 0 0 0 0 0 0 0 0 0 0 0 0 0 0 3 40 25 58 25 0 0 0 0 0 0 0 0 0 0 0 0 0 0 0 3 39 25 57 25 0 0 0 0 0 0 0 0 0 0 0 0 0 0 0 3 39 25 57 25 0 0 0 0 0 0 0 0 0 0 0 0 0 0 0 3 38 25 60 25 0 0 0 0 0 0 0 0 0 0 0 0 0 0 0 3 40 25 58 25 0 0 0 0 0 0 0 0 0 0 0 0 0 0 0 3 35 25 61 25 0 0 0 0 0 0 0 0 0 0 0 0 0 0 0 3 39 25 61 25 0 0 0 0 0 0 0 0 0 0 0 0 0 0 0 3 35 25 57 25 0 0 0 0 0 0 0 0 0 0 0 0 0 0 0 ~4.4V 3 76 17 89 17 0 0 0 0 0 0 0 0 0 0 0 0 0 0 0 // 4C 11 59 11 0x114C=4428 0x1789=6025 3 67 17 80 17 0 0 0 0 0 0 0 0 0 0 0 0 0 0 0 3 58 17 71 17 0 0 0 0 0 0 0 0 0 0 0 0 0 0 0 3 54 17 71 17 0 0 0 0 0 0 0 0 0 0 0 0 0 0 0 3 50 17 59 17 0 0 0 0 0 0 0 0 0 0 0 0 0 0 0 3 89 17 102 17 0 0 0 0 0 0 0 0 0 0 0 0 0 0 0 3 82 17 95 17 0 0 0 0 0 0 0 0 0 0 0 0 0 0 0 3 89 17 107 17 0 0 0 0 0 0 0 0 0 0 0 0 0 0 0 3 80 17 93 17 0 0 0 0 0 0 0 0 0 0 0 0 0 0 0 3 93 17 107 17 0 0 0 0 0 0 0 0 0 0 0 0 0 0 0 3 71 17 89 17 0 0 0 0 0 0 0 0 0 0 0 0 0 0 0 3 85 17 98 17 0 0 0 0 0 0 0 0 0 0 0 0 0 0 0 3 72 17 90 17 0 0 0 0 0 0 0 0 0 0 0 0 0 0 0 3 81 17 99 17 0 0 0 0 0 0 0 0 0 0 0 0 0 0 0 3 71 17 84 17 0 0 0 0 0 0 0 0 0 0 0 0 0 0 0 3 82 17 95 17 0 0 0 0 0 0 0 0 0 0 0 0 0 0 0 3 71 17 85 17 0 0 0 0 0 0 0 0 0 0 0 0 0 0 0 3 80 17 93 17 0 0 0 0 0 0 0 0 0 0 0 0 0 0 0 ~4.0V 3 120 15 134 15 0 0 0 0 0 0 0 0 0 0 0 0 0 0 0 // 78 0F 86 0F 0x0F78=3960 0x0F86=3974 3 134 15 151 15 0 0 0 0 0 0 0 0 0 0 0 0 0 0 0 3 120 15 134 15 0 0 0 0 0 0 0 0 0 0 0 0 0 0 0 3 139 15 156 15 0 0 0 0 0 0 0 0 0 0 0 0 0 0 0 3 126 15 139 15 0 0 0 0 0 0 0 0 0 0 0 0 0 0 0 3 142 15 156 15 0 0 0 0 0 0 0 0 0 0 0 0 0 0 0 3 129 15 147 15 0 0 0 0 0 0 0 0 0 0 0 0 0 0 0The numbers are in decimal, and I have converted some of the numbers to hex in the comment to the right of the output.
Looking at the numbers, I noticed that the 1st number was always 0x03, regardless of voltage, so I decided to ignore that.
Position 3 and 5 change with voltage, but they change much less than position 2 and 4. My guess was that I was looking at two 16-but numbers, with the most significant byte last. I reversed the bytes, converted them from hex to decimal and boom! These were the numbers I was looking at:6.4V 6417 6439 4.4V 4428 6025 4.0V 3960 3974The second number seems to be some sort of trailing average, so I decided to focus on the first number. Dividing it by 1000 yields the voltage:
  uint16_t voltage = pData[1] | pData[2] << 8;
  Serial.println(voltage / 1000.0);
That was it! I can now read the battery voltage monitor from my ESP32, and forward the information wherever I like. It should be possible to MySensorize the ESP32 as a wifi gateway with a local "multimeter" sensor. For now, I'm happy that I am able to extract the data at all.
This method should be possible to use on all BLE devices that export data. Time to bring out all your BLE devices :-)
:santa:
This post is deleted!

