Particle Powered Air Quality Sensor Logging to Google Docs
-
Hey All,
I recently completed a project to simplify air quality measurements throughout my home. It uses a CCS811 (TVOC + C02), Si7021 (Humidity and Temp) and a HPMA115S0 (PM2.5 and PM10)
I did base this off of a more manual DIY project here. If you're interested in simple though, continue on!
Gather the Goods
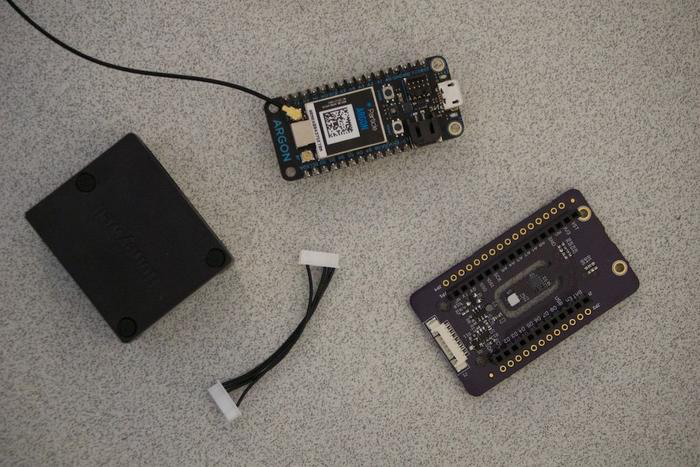
Get everything together that you’ll need for this project.
This includes:
- A Particle Mesh board (Argon, Boron, Xenon). You can get them almost anywhere. Buying direct always works too. Note: if you're just starting out, the Argon is your best bet.
- Particle^2 Air Quality Sensor.
- Honeywell HPMA115S0 Particle Sensor.
- Cable for HPMA115S0 Sensor. ( The last three you can get here. )
The Leg Bones Connect to The ..
Put everything together in the short few steps below:-
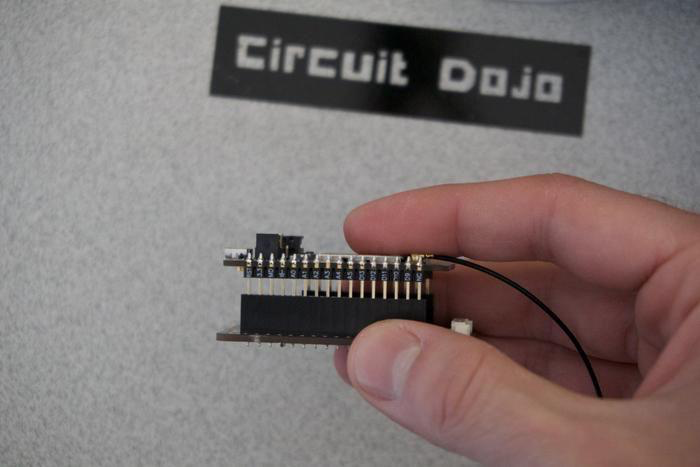
Attach the Particle to the Particle^2 board
-
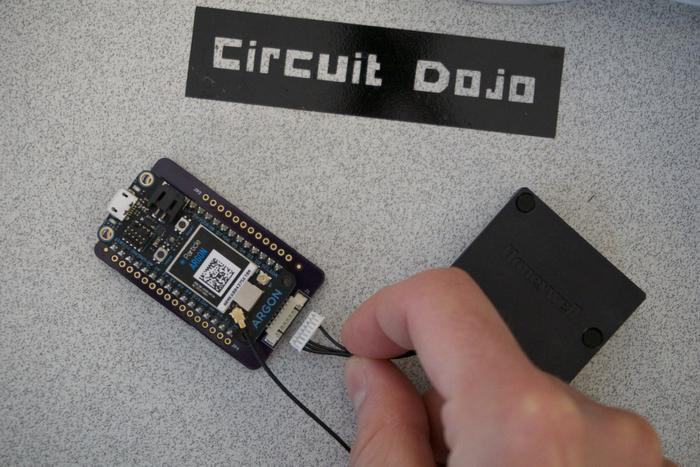
Connect the HPM Particle sensor to the Particle^2 using the cable
-
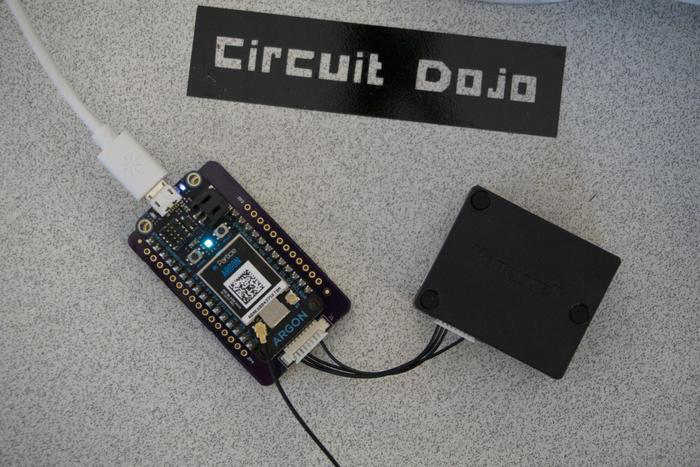
Plug in USB!
Configure Google Docs Script
- Create a new Google Sheet
- Then click the Tools menu and click Script Editor
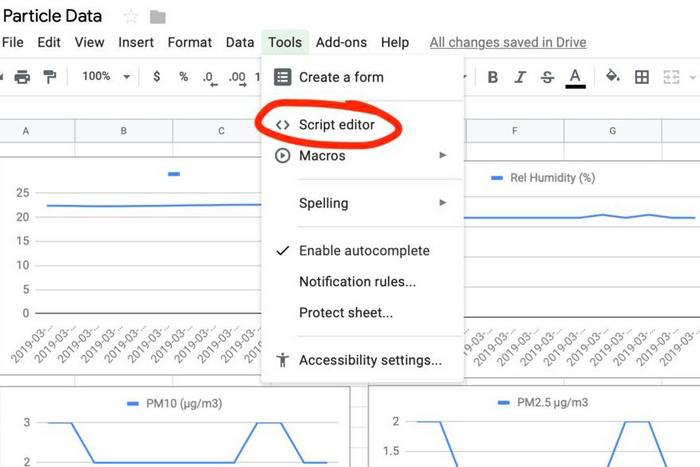
- Create a new script
- Insert the below code into the script:
  //this is a function that fires when the webapp receives a POST request
   function doPost(e) {

     //Return if null
     if( e == undefined ) {
       Logger.log(“no data”);
       return HtmlService.createHtmlOutput(“need data”);
     }

     //Parse the JSON data
     var event = JSON.parse(e.postData.contents);
     var data = JSON.parse(event.data);

     //Get the last row without data
     var sheet = SpreadsheetApp.getActiveSheet();
     var lastRow = Math.max(sheet.getLastRow(),1);
     sheet.insertRowAfter(lastRow);

     //Get current timestamp
     var timestamp = new Date();

     //Insert the data into the sheet
     sheet.getRange(lastRow + 1, 1).setValue(event.published_at);
     sheet.getRange(lastRow + 1, 2).setValue(data.temperature);
     sheet.getRange(lastRow + 1, 3).setValue(data.humidity);
     sheet.getRange(lastRow + 1, 4).setValue(data.pm10);
     sheet.getRange(lastRow + 1, 5).setValue(data.pm25);
     sheet.getRange(lastRow + 1, 6).setValue(data.tvoc);
     sheet.getRange(lastRow + 1, 7).setValue(data.c02);

     SpreadsheetApp.flush();
     return HtmlService.createHtmlOutput(“post request received”);
   }
Configure Webhook
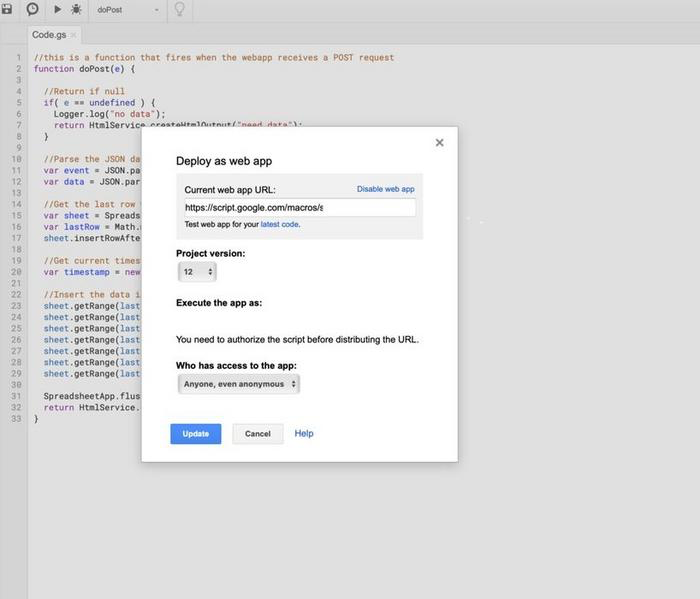
- Go to Publish and click Deploy as Web App
- Set Execute the app as yourself
- Then set Who has access to the app to Anyone, even anonymous. (Important: if you’re working with. mission critical data, you may want a more robust and custom solution. This allows anyone, if they have your web hook link to post data to that page!)
- Change the Project Version to new and deploy!
- Copy the Current App URL that the output provides.
Configure Particle Cloud
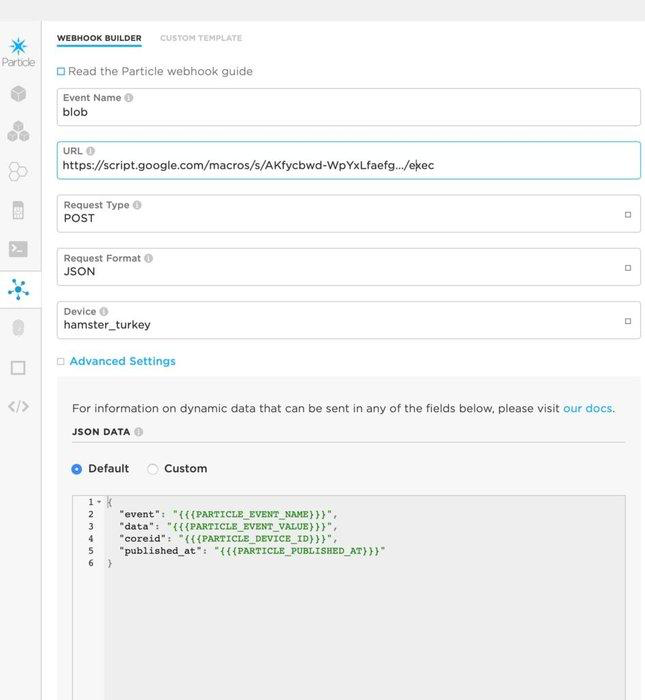
- In the Particle.io console, go to the Integrations section and Create a New Webhook
- Fill in the name of the event that get’s forwarded from the code (in this case it’s blob)
- Enter the Current App URL from the last step in the URL Box
- Set the request type to POST
- Set the request format to JSON
- Target the device you’ll be using (or leave it as is if you only have one device)
- Click save
Beam me up
It’s time to program your board. Follow the steps below:
- Setup your Particle Account and Particle Mesh device. Use the Quickstart if you haven’t done this before.
- Download Particle Workbench and install if you haven’t already. Instructions here.
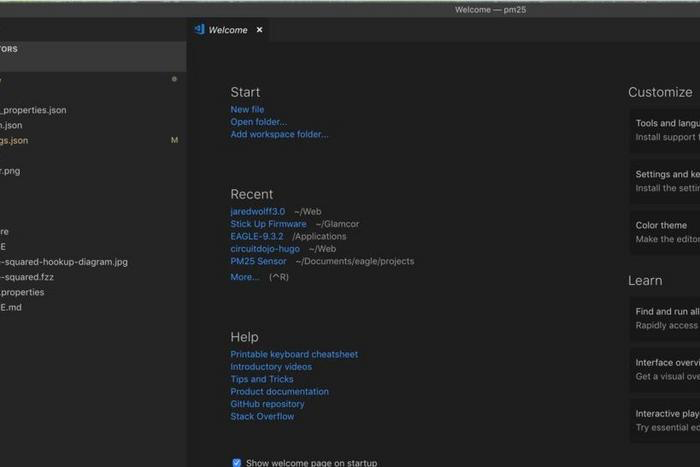
- Get the code here.
- Once the code is downloaded, open it with Visual Code (that you installed in Step 1)
- Login to Particle if you haven’t already (The fastest way is to hit Command + Shift + P to open the command window. Then start typing login)
- Publish to Particle Cloud - Again this uses the command window. Use the same Command + Shift + P as above and type Cloud Flash.
- Once you’ve found the Cloud Flash option, press enter.
- Your board should be programmed shortly. You can watch the LEDs for changes during this time. Once it’s glowing blue, you’re good to go!
Last Step (I promise)
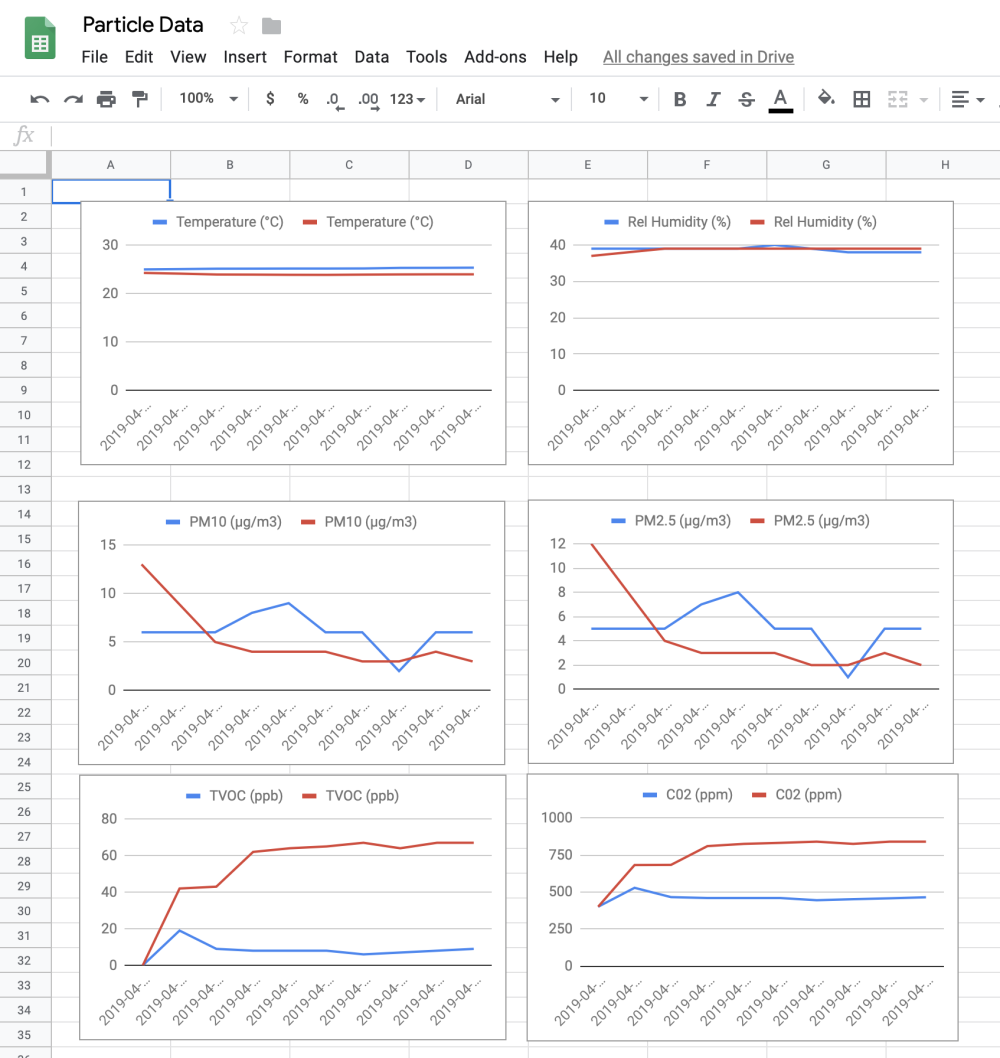
- In the Google sheet you can create a header in the first row with all the labels.
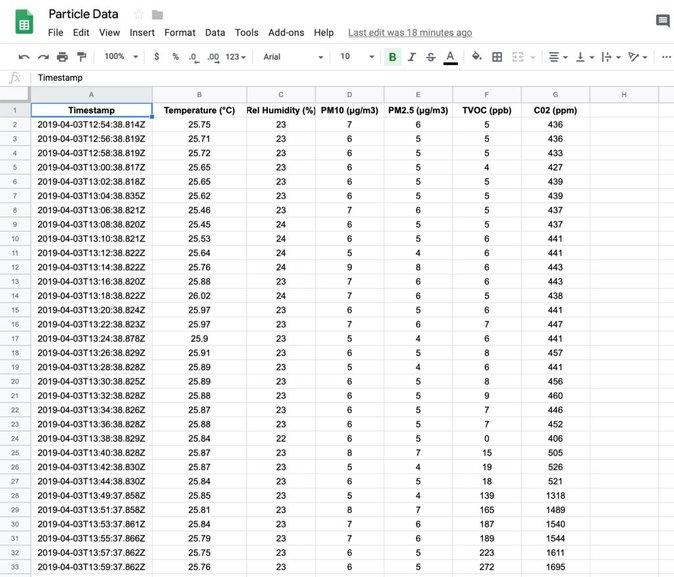
- You should notice by now that new data is showing up in the sheet (if you set everything up correctly). Go back to the previous steps if you don’t see it.
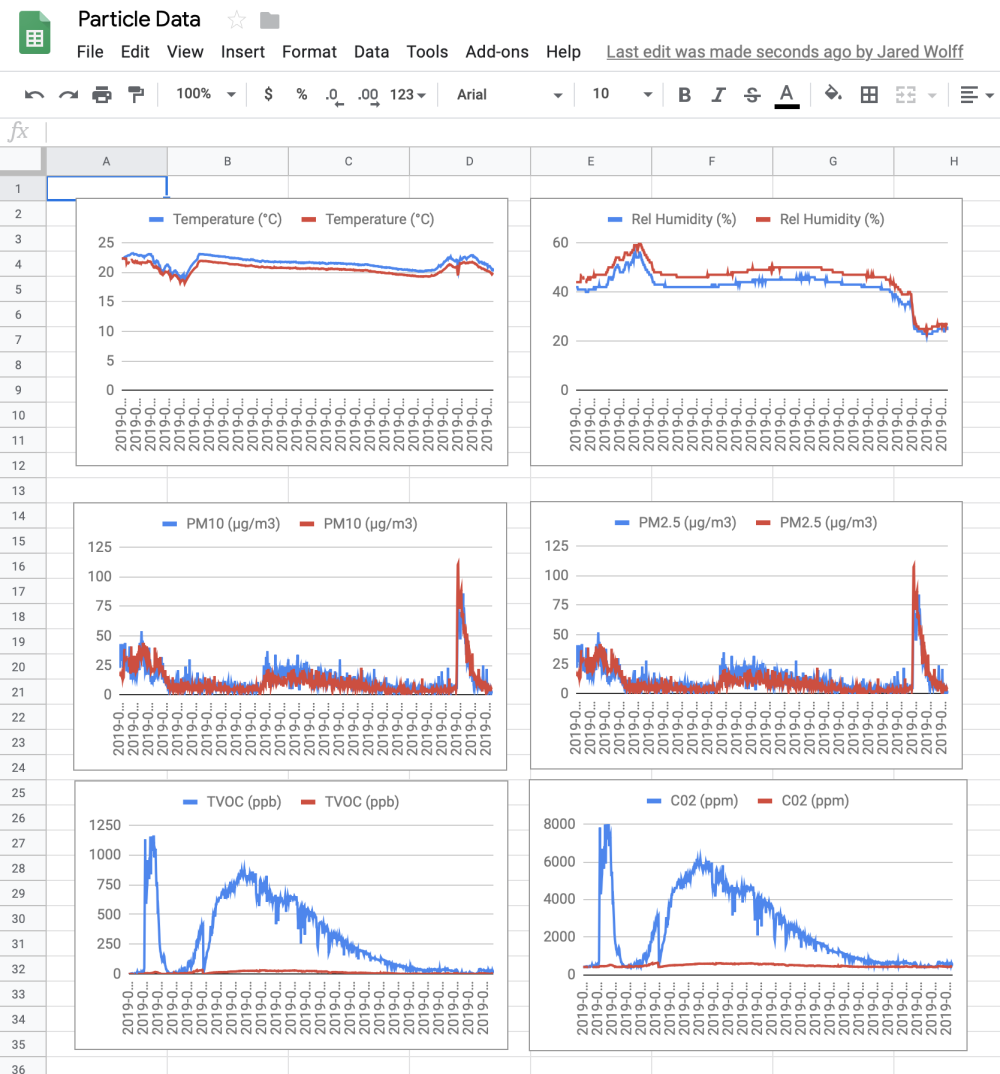
- You can graph the data by selecting a full column and creating a new chart from it.
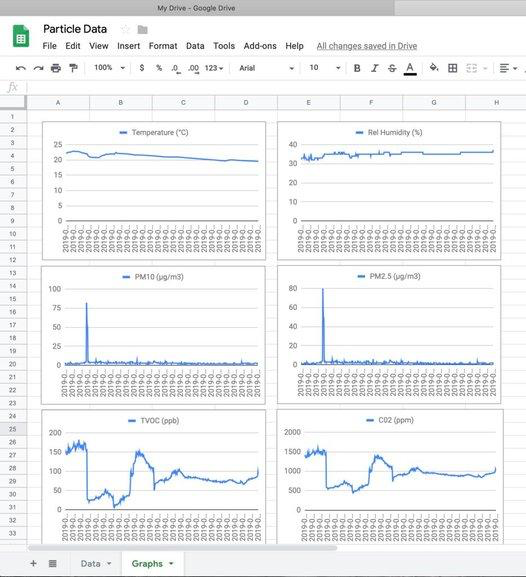
- You can graph everything in one or in separate like I’ve done above.
If everything is working and you have some pretty graphs, congrats!! If you’re ready to move on to the next step using an IoT service like Adafruit’s check out my full guide here.
Conclusion
I hope you've found this useful. Especially the bit about Google Docs. (It's changed my life that's for sure!!) Now it's on to bigger and better things like getting a battery optimized version running. Now that will be fun.. -
Nice work.
Does it use the temperature and humidity values to optimise the fine dust calculation?
-
Nice work.
Does it use the temperature and humidity values to optimise the fine dust calculation?
@alowhum said in Particle Powered Air Quality Sensor Logging to Google Docs:
Nice work.
Does it use the temperature and humidity values to optimise the fine dust calculation?
No it doesn't.
And by the way PM10 values are worthless, they are evaluated based on PM2.5 values. Meaning if you put the sensor in an environment with only 2.5-10 µm sized particles, it will say 0ug/m3.
Not saying the sensor is bad, it's good but only for pm2.5. I suspect it's just a remake of a PMS5003 with longer lasting laser and fan. -
Wait, are you saying you believe the Honeywell device is a remake of the Plantower PMS5003?
-
@jaredwolff said in Particle Powered Air Quality Sensor Logging to Google Docs:
Particle^2 Air Quality Sensor
The CO2 measurement seems to be based on AMS CCS811. What is your experience with this sensor?
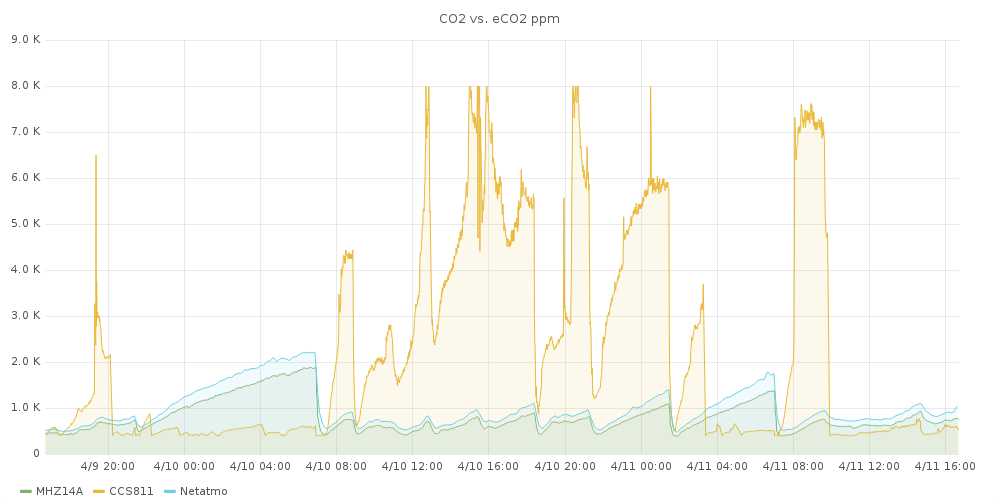
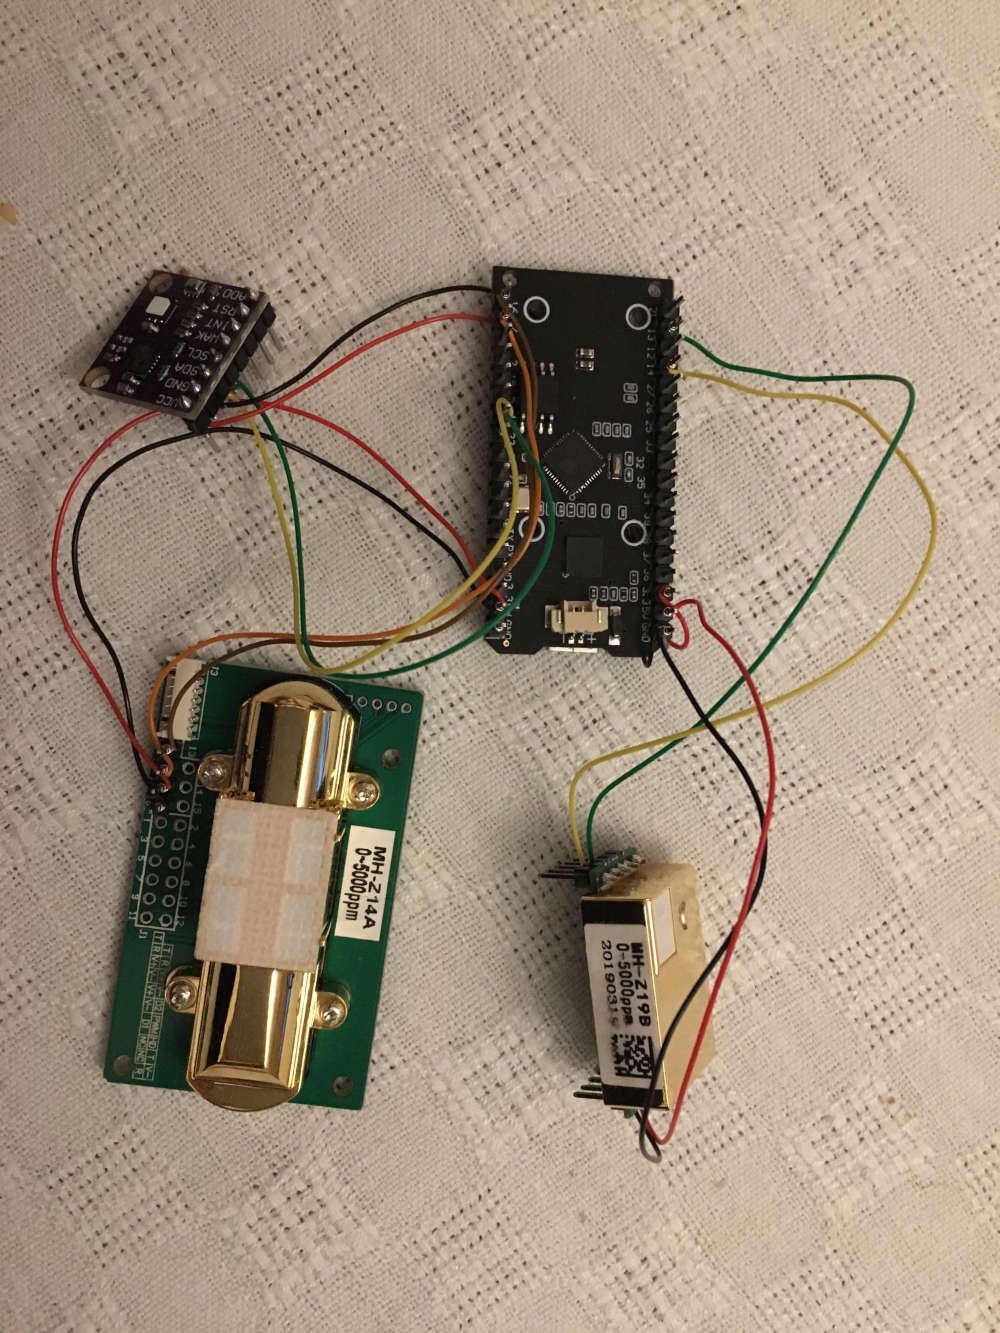
I was comparing this sensor with Netatmo (+-50 ppm accuracy according to the website) and a MH-Z14A. Maybe you can tell me from my graph, if my sensor is broken and I should consider oredering another:
-
Nice work.
Does it use the temperature and humidity values to optimise the fine dust calculation?
@alowhum Only used for TVOC. Though I think that algorithm is suspect. I've put a line in with AMS about it.
@fotofieber are you running the sensor as-is or are you updating the environmental data as you run it? As I mention above, I've seen some weird results with the CCS811. (Lots of correlation with humidity and temperature) There are other TVOC/C02 sensors out there that I definitely want to check out and compare side-by-side. (right now I only have one data point which is the CCS811)
-
@jaredwolff said in Particle Powered Air Quality Sensor Logging to Google Docs:
Particle^2 Air Quality Sensor
The CO2 measurement seems to be based on AMS CCS811. What is your experience with this sensor?
I was comparing this sensor with Netatmo (+-50 ppm accuracy according to the website) and a MH-Z14A. Maybe you can tell me from my graph, if my sensor is broken and I should consider oredering another:
@FotoFieber btw which code are you using? Adafruit's library?
-
@alowhum said in Particle Powered Air Quality Sensor Logging to Google Docs:
Nice work.
Does it use the temperature and humidity values to optimise the fine dust calculation?
No it doesn't.
And by the way PM10 values are worthless, they are evaluated based on PM2.5 values. Meaning if you put the sensor in an environment with only 2.5-10 µm sized particles, it will say 0ug/m3.
Not saying the sensor is bad, it's good but only for pm2.5. I suspect it's just a remake of a PMS5003 with longer lasting laser and fan.@nca78 said in Particle Powered Air Quality Sensor Logging to Google Docs:
@alowhum said in Particle Powered Air Quality Sensor Logging to Google Docs:
Nice work.
Does it use the temperature and humidity values to optimise the fine dust calculation?
No it doesn't.
And by the way PM10 values are worthless, they are evaluated based on PM2.5 values. Meaning if you put the sensor in an environment with only 2.5-10 µm sized particles, it will say 0ug/m3.
Not saying the sensor is bad, it's good but only for pm2.5. I suspect it's just a remake of a PMS5003 with longer lasting laser and fan.I would have to agree with this observation thus far. The PM10 readings correlate 1:1 with the PM2.5. Good thing PM2.5 is what we really care about! For anyone who's curious, the sensor saturates at 1000µg/m3. Just had an interesting experience with that... 😬
-
@FotoFieber btw which code are you using? Adafruit's library?
@jaredwolff
I am using the adafruit library and compensating temp/hum with the measurements of a SI7021. The results are really bad and I have ordered another CCS811 for comparison.void readCCS811(JsonObject &root) { static bool bFirst = true; static Adafruit_CCS811 sensor; if (bFirst) { DEBUG_PRINTLN("Initializing CCS811"); if (!sensor.begin()) { DEBUG_PRINTLN("CCS811 Initialization failed."); } else { sensor.setDriveMode(CCS811_DRIVE_MODE_IDLE); delay(10000); sensor.setDriveMode(CCS811_DRIVE_MODE_60SEC); bFirst = false; } } if (sensor.available()) { // setEnvironmentalData(uint8_t humidity, double temperature); sensor.setEnvironmentalData(lasthum, lasttemp); if (!sensor.readData()) { uint16_t lastppm = sensor.geteCO2(); if (lastppm > 0) { JsonObject rootCCS811 = root.createNestedObject("ccs811"); rootCCS811["co2"] = lastppm; rootCCS811["tvoc"] = sensor.getTVOC(); } } else { DEBUG_PRINTLN("CCS811 ERROR!"); } } } -
@jaredwolff
I am using the adafruit library and compensating temp/hum with the measurements of a SI7021. The results are really bad and I have ordered another CCS811 for comparison.void readCCS811(JsonObject &root) { static bool bFirst = true; static Adafruit_CCS811 sensor; if (bFirst) { DEBUG_PRINTLN("Initializing CCS811"); if (!sensor.begin()) { DEBUG_PRINTLN("CCS811 Initialization failed."); } else { sensor.setDriveMode(CCS811_DRIVE_MODE_IDLE); delay(10000); sensor.setDriveMode(CCS811_DRIVE_MODE_60SEC); bFirst = false; } } if (sensor.available()) { // setEnvironmentalData(uint8_t humidity, double temperature); sensor.setEnvironmentalData(lasthum, lasttemp); if (!sensor.readData()) { uint16_t lastppm = sensor.geteCO2(); if (lastppm > 0) { JsonObject rootCCS811 = root.createNestedObject("ccs811"); rootCCS811["co2"] = lastppm; rootCCS811["tvoc"] = sensor.getTVOC(); } } else { DEBUG_PRINTLN("CCS811 ERROR!"); } } }@fotofieber you're not alone in this. I've actually stopped setting the environmental data.
I don't see as many random spikes as with. I've asked AMS about the frequency or when the data should be updated. I have a feeling it's supposed to be sparingly..
-
@jaredwolff
I am using the adafruit library and compensating temp/hum with the measurements of a SI7021. The results are really bad and I have ordered another CCS811 for comparison.void readCCS811(JsonObject &root) { static bool bFirst = true; static Adafruit_CCS811 sensor; if (bFirst) { DEBUG_PRINTLN("Initializing CCS811"); if (!sensor.begin()) { DEBUG_PRINTLN("CCS811 Initialization failed."); } else { sensor.setDriveMode(CCS811_DRIVE_MODE_IDLE); delay(10000); sensor.setDriveMode(CCS811_DRIVE_MODE_60SEC); bFirst = false; } } if (sensor.available()) { // setEnvironmentalData(uint8_t humidity, double temperature); sensor.setEnvironmentalData(lasthum, lasttemp); if (!sensor.readData()) { uint16_t lastppm = sensor.geteCO2(); if (lastppm > 0) { JsonObject rootCCS811 = root.createNestedObject("ccs811"); rootCCS811["co2"] = lastppm; rootCCS811["tvoc"] = sensor.getTVOC(); } } else { DEBUG_PRINTLN("CCS811 ERROR!"); } } }@fotofieber I've had some luck with removing the fraction portion of the temperature readings. It looks like the Adafruit code does use it. The suggested code from AMS does not use it.
I'm also tooling around with saving the baseline. They suggest every 24h. That should help bring your readings back up to where they were in the event of a reset.
-
@fotofieber I've had some luck with removing the fraction portion of the temperature readings. It looks like the Adafruit code does use it. The suggested code from AMS does not use it.
I'm also tooling around with saving the baseline. They suggest every 24h. That should help bring your readings back up to where they were in the event of a reset.
@jaredwolff said in Particle Powered Air Quality Sensor Logging to Google Docs:
@fotofieber I've had some luck with removing the fraction portion of the temperature readings. It looks like the Adafruit code does use it. The suggested code from AMS does not use it.
Could you please share your code?
There is an application note about update frequency on https://ams.com/documents/20143/36005/CCS811_AN000369_2-00.pdf/fb08da36-5b40-732b-39b0-62d2d9db5a3c
It is recommended that the T+RH data is read from the ENS210 at the same frequency as the
CCS811 generates eCO2 and TVOC outputs. For example in mode 3, 60 second mode, the
application software should read the ENS210 data once every minute.The code in the application notes
i2c_buff[0] = ((RH % 1000) / 100) > 7 ? (RH/1000 + 1)<<1 : (RH/1000)<<1;
i2c_buff[1] = 0;
if(((RH % 1000) / 100) > 2 && (((RH % 1000) / 100) < 8))
{
i2c_buff[0] |= 1;
}
looks quit different to the adafruit implementation:
uint8_t hum_perc = humidity << 1;

// other code


	uint8_t buf[] = {hum_perc, 0x00,
		(uint8_t)((temp_conv >> 8) & 0xFF), (uint8_t)(temp_conv & 0xFF)};
In the same document the handling of baseline is described. I think the adafruit code may be incomplete... :)
I'll try the sparkfun lib, it hase baseline support and looks more like the programming note from aws.
-
@jaredwolff said in Particle Powered Air Quality Sensor Logging to Google Docs:
@fotofieber I've had some luck with removing the fraction portion of the temperature readings. It looks like the Adafruit code does use it. The suggested code from AMS does not use it.
Could you please share your code?
There is an application note about update frequency on https://ams.com/documents/20143/36005/CCS811_AN000369_2-00.pdf/fb08da36-5b40-732b-39b0-62d2d9db5a3c
It is recommended that the T+RH data is read from the ENS210 at the same frequency as the
CCS811 generates eCO2 and TVOC outputs. For example in mode 3, 60 second mode, the
application software should read the ENS210 data once every minute.The code in the application notes
i2c_buff[0] = ((RH % 1000) / 100) > 7 ? (RH/1000 + 1)<<1 : (RH/1000)<<1;
i2c_buff[1] = 0;
if(((RH % 1000) / 100) > 2 && (((RH % 1000) / 100) < 8))
{
i2c_buff[0] |= 1;
}
looks quit different to the adafruit implementation:
uint8_t hum_perc = humidity << 1;

// other code


	uint8_t buf[] = {hum_perc, 0x00,
		(uint8_t)((temp_conv >> 8) & 0xFF), (uint8_t)(temp_conv & 0xFF)};
In the same document the handling of baseline is described. I think the adafruit code may be incomplete... :)
I'll try the sparkfun lib, it hase baseline support and looks more like the programming note from aws.
The CCS81 seems to be much more complicated to handle than the MH-Z14A. There is an MCU on the sensor and you can make firmware upgrades which should reduce the burn in time. After burn in, you shoul save the actual baseline from time to time (e.g. every 24 hours) and restore it, when you reboot.
My hacked code looks now much more complicated:
void readCCS811(JsonObject &root)
{
  static int loopCount = 0;
  static bool bFirst = true;
  static CCS811 myCCS811(CCS811_ADDR);
  JsonObject rootCCS811;

  loopCount++;
  if (bFirst)
  {
    DEBUG_PRINTLN("Initializing CCS811");
    CCS811Core::status returnCode = myCCS811.begin();
    DEBUG_PRINT("CCS811 begin exited with: ");
    printDriverError(returnCode);
    DEBUG_PRINTLN("");

    if (returnCode == CCS811Core::SENSOR_SUCCESS)
      bFirst = false;

    //This sets the mode to 60 second reads, and prints returned error status.
    returnCode = myCCS811.setDriveMode(3);
    DEBUG_PRINT("Mode request exited with: ");
    printDriverError(returnCode);
    DEBUG_PRINTLN("");

    if ((EEPROM.read(0) == 0xA5) && (EEPROM.read(1) == 0xB2))
    {
      DEBUG_PRINTLN("EEPROM contains saved data.");
      //The recovered baseline is packed into a 16 bit word
      unsigned int baselineToApply = ((unsigned int)EEPROM.read(2) << 8) | EEPROM.read(3);
      DEBUG_PRINT("Saved baseline: 0x");
      if (baselineToApply < 0x100)
        DEBUG_PRINT("0");
      if (baselineToApply < 0x10)
        DEBUG_PRINT("0");
      DEBUG_PRINT(baselineToApply, HEX);
      //This programs the baseline into the sensor and monitors error states
      CCS811Core::status errorStatus = myCCS811.setBaseline(baselineToApply);
      if (errorStatus == CCS811Core::SENSOR_SUCCESS)
      {
        DEBUG_PRINTLN("Baseline written to CCS811.");
      }
      else
      {
        printDriverError(errorStatus);
      }
    }
  }

  if (myCCS811.dataAvailable())
  {

    myCCS811.readAlgorithmResults();
    myCCS811.setEnvironmentalData(lasthum, lasttemp);

    uint16_t lastppm = myCCS811.getCO2();

    if (lastppm > 0)
    { // bis und mit 400 nur an der Initialisierung
      rootCCS811 = root.createNestedObject("ccs811");
      rootCCS811["co2"] = lastppm;
      rootCCS811["tvoc"] = myCCS811.getTVOC();
    }
  }

  // save Baseline every 24 hours
  if (loopCount >= 24 * 60)
  {
    // read baseline
    unsigned int baseline = myCCS811.getBaseline();

    rootCCS811["baseline"] = baseline;

    DEBUG_PRINTLN("baseline for this sensor: 0x");
    if (baseline < 0x100)
      DEBUG_PRINT("0");
    if (baseline < 0x10)
      DEBUG_PRINT("0");
    DEBUG_PRINTLN(baseline, HEX);
    //The baseline is saved (with valid data indicator bytes)
    EEPROM.write(0, 0xA5);
    EEPROM.write(1, 0xB2);
    EEPROM.write(2, (baseline >> 8) & 0x00FF);
    EEPROM.write(3, baseline & 0x00FF);
    EEPROM.commit();

    loopCount = 0;
  }
}
The results in the first 24 hours don't seem better. Hope they will getting better after 48 hours. :(
I am not really keen on programming a firmware upgrade program for the CCS811. The second sensor I ordered from aliexpress is hopefully better.
-
I have no experience with the MH-Z14A but compared to other comparable parts I think the CCS811 is a bit more simple to implement. (And less costly, despite it's $$$ price)
Since my firmware improvements here (MSB for temp and humidity for saving the environmental data) seems to have helped tremendously. I have implemented the baseline save/restore but I haven't seen any crazy jumps or differences in operation. Maybe your MOX sensor is contaminated.
I'm playing with some other sensors to see how they compare. I'll share my results here too.
@jaredwolff said in Particle Powered Air Quality Sensor Logging to Google Docs:
I have no experience with the MH-Z14A but compared to other comparable parts I think the CCS811 is a bit more simple to implement. (And less costly, despite it's $$$ price)
The MH-Z14A is really simple to implement. Just send some characters over serial interface and get the CO2 value. You don't need to think about baselines and firmware versions. A cheap sensor is of no use, if you can't get correct readings. Maybe I am doing something wrong? :)
But maybe you can share your code and I can get better results?
The CCS811 I have here maybe cheap….
-
@jaredwolff said in Particle Powered Air Quality Sensor Logging to Google Docs:
I have no experience with the MH-Z14A but compared to other comparable parts I think the CCS811 is a bit more simple to implement. (And less costly, despite it's $$$ price)
The MH-Z14A is really simple to implement. Just send some characters over serial interface and get the CO2 value. You don't need to think about baselines and firmware versions. A cheap sensor is of no use, if you can't get correct readings. Maybe I am doing something wrong? :)
But maybe you can share your code and I can get better results?
The CCS811 I have here maybe cheap….
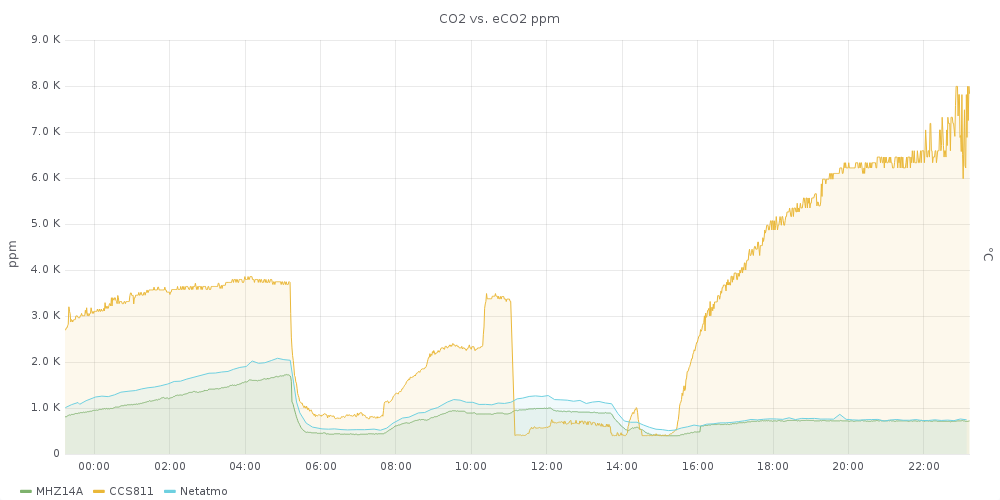
@fotofieber after assembling and testing a few more boards. I've noticed that the fresh sensors, do need some time to "burn-in." I'm seeing wild values in the 1000's whereas the one I've been using for a few weeks is rock solid.
Here's a capture of one I'm testing right now:
The blue is the one that's been running for a while. The red is a fresh unused sensor.
I haven't had a chance to play with the MH-Z14A. I'm currently doing an eval of all sensors that I can (easily) get my hands on to compare side by side.
All the latest and greatest code for my project is located under the Beam me Up section in my original post above. #3 I think. Here's the link again though.
-
@fotofieber after assembling and testing a few more boards. I've noticed that the fresh sensors, do need some time to "burn-in." I'm seeing wild values in the 1000's whereas the one I've been using for a few weeks is rock solid.
Here's a capture of one I'm testing right now:
The blue is the one that's been running for a while. The red is a fresh unused sensor.
I haven't had a chance to play with the MH-Z14A. I'm currently doing an eval of all sensors that I can (easily) get my hands on to compare side by side.
All the latest and greatest code for my project is located under the Beam me Up section in my original post above. #3 I think. Here's the link again though.
@jaredwolff
Thx for the link to your sourcecode.
How long is the time interval on the graph in your post?I tried to use drive mode 1 (measurement every second) with an average calculation for every minute. But it didn't get better... :(
I added now a MH-Z19B to the testbed.
Awaiting still from aliexpress:
SGP30
MICS-VZ-89TE
GY-MCU680V1 BME680
Senseair S8-0053
and another CCS811.
-
@jaredwolff
Thx for the link to your sourcecode.
How long is the time interval on the graph in your post?I tried to use drive mode 1 (measurement every second) with an average calculation for every minute. But it didn't get better... :(
I added now a MH-Z19B to the testbed.
Awaiting still from aliexpress:
SGP30
MICS-VZ-89TE
GY-MCU680V1 BME680
Senseair S8-0053
and another CCS811.
@fotofieber said in Particle Powered Air Quality Sensor Logging to Google Docs:
How long is the time interval on the graph in your post?
The interval was either 20 seconds or 2 minutes. My code defaults to 2 minutes. There's just no reason to be checking it that often.
The CCS811 on the other hand takes a measurement every second. (I left it in the default mode) I just take the latest measurement when it's time to send the update to the server.
Curious to see what conclusions you come to with your tests. I think we'll get there right around the same time!
-
@fotofieber said in Particle Powered Air Quality Sensor Logging to Google Docs:
How long is the time interval on the graph in your post?
The interval was either 20 seconds or 2 minutes. My code defaults to 2 minutes. There's just no reason to be checking it that often.
The CCS811 on the other hand takes a measurement every second. (I left it in the default mode) I just take the latest measurement when it's time to send the update to the server.
Curious to see what conclusions you come to with your tests. I think we'll get there right around the same time!
@jaredwolff
The MHZ19B is working out of the box without tuning. NDIR sensors seem to be easier to handle but are more power hungry.
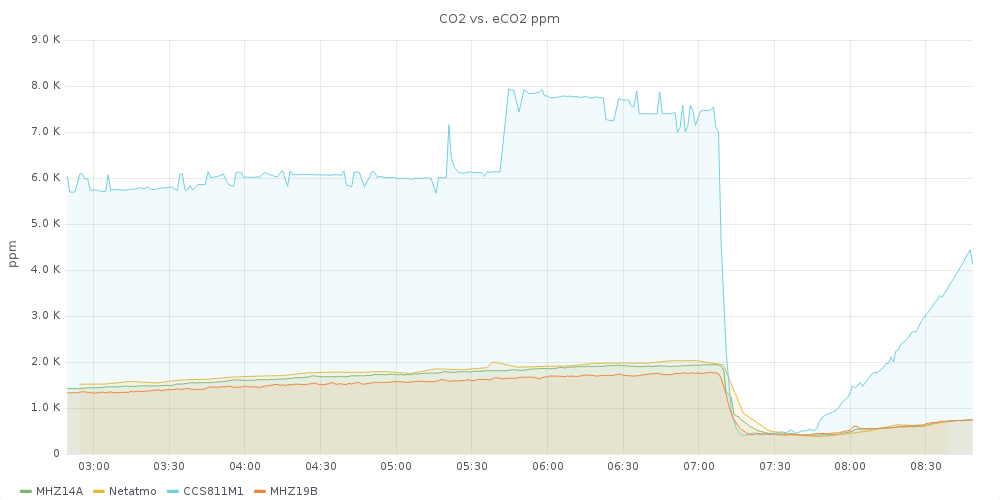
In addition to the CO2 ppm, it has a temperature reading, which is not to bad:
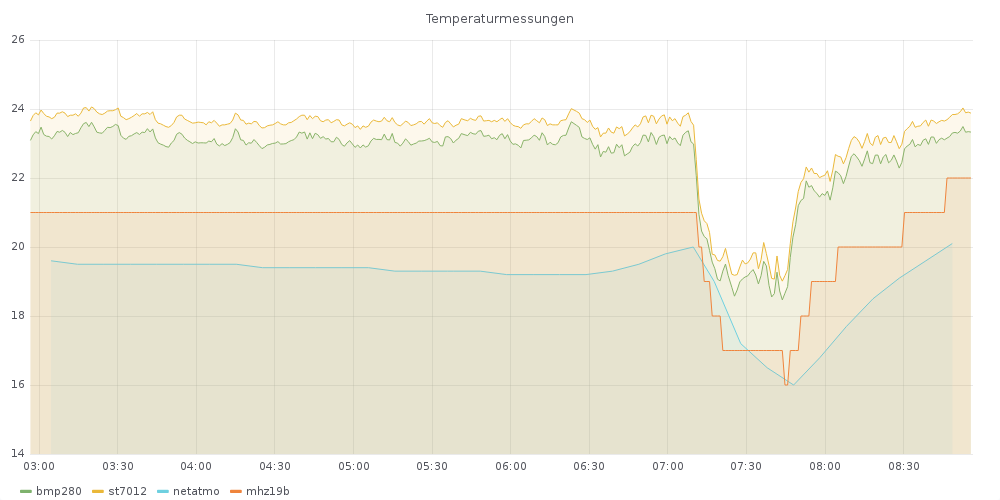
The temperature of the BMP280 and ST7012 are quite high. They are on the same small pcb as the CCS811. -
@fotofieber said in Particle Powered Air Quality Sensor Logging to Google Docs:
The MHZ19B is working out of the box without tuning. NDIR sensors seem to be easier to handle but are more power hungry.
Nice! Glad to see something working for you. The MHZ19B seems like a good option when you have the space. I wonder how it is long term.
How many hours have you continuously run your CCS811? I'm seeing the fresh one I had normalize to zero over almost 24h of continuous running. (See the blue trace below for TVOC & C02)
I'm also not surprised by the readings you're getting on temp. Unless you get a sensors that is specifically more precise you could get some significant deviations. I would expect ±1 °C from most sensors though..