Most reliable "best" radio
-
Unfortunately, it also looks like it's the most work. I tried the picoblade on Version 1.0 of the Barebones, but I found that although picoblade makes the connection easily, the disconnection process is hard because it locks into place when you plug into it. So, for small projects, I'm looking into JST-SH connections, which have 1.0mm pitch and maybe (?) don't lock as well, which in this instance would be a good thing. I found some on amazon:
https://www.amazon.com/dp/B01DUC1M2O?psc=1&ref=ppx_yo2ov_dt_b_product_details
but the sockets are vertical. For right-angle sockets, I may may have to order from Aliexpress, because even Mouser just doesn't seem to stock them.I was faced with this same problem previously when I did this project: https://www.openhardware.io/view/510/Multi-Sensor-TempHumidityPIR-LeakMagnetLightAccel
My "solution" at the time was, in future versions, to use a micro-usb connector, which indeed was much smaller, but there was nearly universal pushback on that from people saying that anything which looks like a micro-usb connector would be mistaken for an actual USB connector, and at some point end-users would hook it up wrongly on that assumption and basically destroy the system with 5 volts. Thinking about it now, that grim outcome could be avoided by the addition of just a single diode, but then again that's yet another extra part and more board real estate.
@NeverDie Jonathan Oxer a little while back went through a similar process with programming headers for ESP8266/ESP32 boards. He discusses some of the challenges and tradeoffs in his video(s).
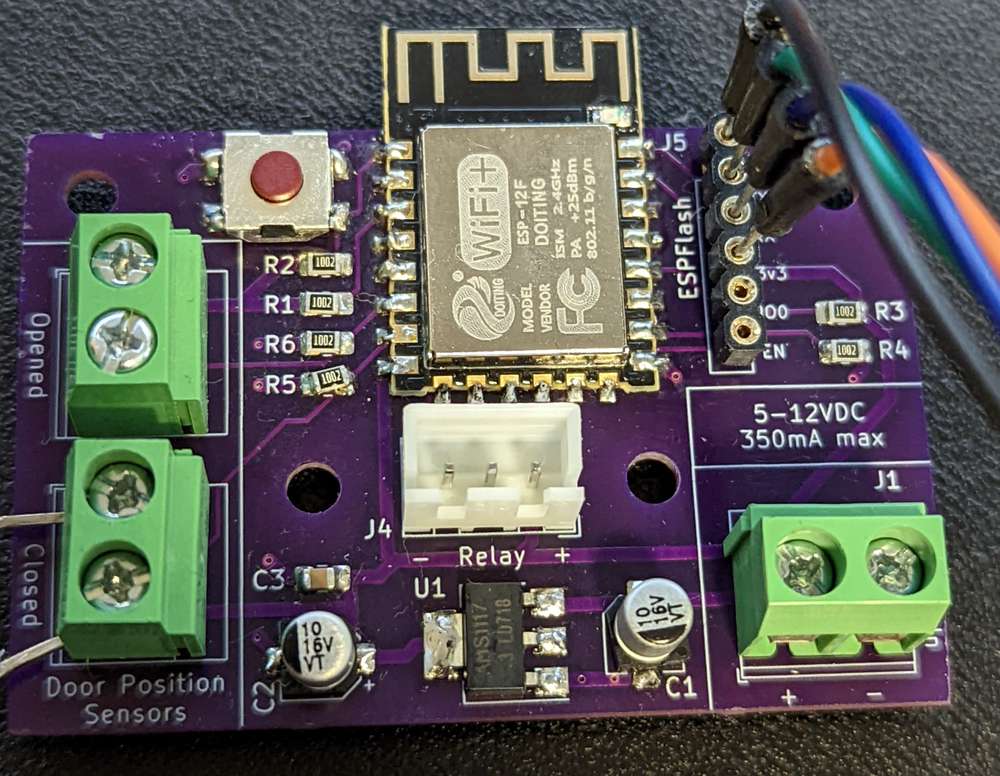
My personal opinion on trying to shrink them down is to keep with pin headers and just make them smaller. It's easy enough to find 1.27mm pitch IDC connectors. Your JST connector idea is good too. In the end, this is mostly a target audience scenario, it seems to me. My most recent board (still working on it), employed Oxer's ESPFlash header but I kept it with a 2.54mm pitch package because I have a ~million headers with that spacing and I wasn't cramped for space. (pic below)
If it's board-to-board as in connecting a radio module to an MCU backplane, then it's more of a use-case and dealer's choice scenario, in my mind. Those Molex SlimStack connectors look interesting.
I don't know if that helps or if I'm blowing smoke in the wrong direction. Just adding my voice.
-
@NeverDie Jonathan Oxer a little while back went through a similar process with programming headers for ESP8266/ESP32 boards. He discusses some of the challenges and tradeoffs in his video(s).
My personal opinion on trying to shrink them down is to keep with pin headers and just make them smaller. It's easy enough to find 1.27mm pitch IDC connectors. Your JST connector idea is good too. In the end, this is mostly a target audience scenario, it seems to me. My most recent board (still working on it), employed Oxer's ESPFlash header but I kept it with a 2.54mm pitch package because I have a ~million headers with that spacing and I wasn't cramped for space. (pic below)
If it's board-to-board as in connecting a radio module to an MCU backplane, then it's more of a use-case and dealer's choice scenario, in my mind. Those Molex SlimStack connectors look interesting.
I don't know if that helps or if I'm blowing smoke in the wrong direction. Just adding my voice.
@alphaHotel Thanks for your post. It reminded me that for one-time programming, all one really needs is just the through-holes on the board. You can then bend the pins on a male header to create a kind of "weave" pattern, and that alone is enough to hold it into place during the programming, after which you can simply remove it. I've confirmed this works at 2.54mm pitch, and so I'll try it at 1.27mm pitch. I expect it should work well with that too.
I did find this video, which makes it seem fairly straightforward to set up a custom bed of nails:
https://www.youtube.com/watch?v=_ILqQ1kpqEQbut he did say during the Q&A that it took him 4 days to design it. However, with the benefit of knowing his solution, I don't think it should take anywhere near that long to design just the PCB part of it. Maybe an hour, give or take? Someday I'm going to try it. His approach to the push-pin alignment seems quite simple and, I would think, should be easy to adapt to a whole range of different targets.
-
@alphaHotel Thanks for your post. It reminded me that for one-time programming, all one really needs is just the through-holes on the board. You can then bend the pins on a male header to create a kind of "weave" pattern, and that alone is enough to hold it into place during the programming, after which you can simply remove it. I've confirmed this works at 2.54mm pitch, and so I'll try it at 1.27mm pitch. I expect it should work well with that too.
I did find this video, which makes it seem fairly straightforward to set up a custom bed of nails:
https://www.youtube.com/watch?v=_ILqQ1kpqEQbut he did say during the Q&A that it took him 4 days to design it. However, with the benefit of knowing his solution, I don't think it should take anywhere near that long to design just the PCB part of it. Maybe an hour, give or take? Someday I'm going to try it. His approach to the push-pin alignment seems quite simple and, I would think, should be easy to adapt to a whole range of different targets.
@NeverDie My personal preference is the Tag-Connect. It costs a bit upfront to get into it, but then there's zero ongoing BOM cost per board, and the connectors are very sturdy, so I don't get bad connections, even while doing extended troubleshooting.
Of course, if I hadn't needed them for a customer project, I might never have sprung for the upfront cost, as the cables are somewhat spendy for the what they are. But they are very well made, and have been great for me. The board footprint is pretty tiny, so that has yet to have ever been an issue in my projects. The footprint is also keyed, so you can't put the cable on backwards. Always a good thing. Also, since the connection points are not through-holes, you still have the back and interior of the board for routing traces. Of course the alignment pins are still through-hole. I prefer the type without the locking pins, and then there's a little board that you slide on the alignment pins from the back to hold everything together.
If I were to go with a standard, I wouldn't be excited about his ESP Flash one, simply because I don't see a need for it. Yet another 'standard' just fragments things worse. I would use the ESP-Prog one if needed, and use the .05" pins if I needed tiny.
-
@NeverDie My personal preference is the Tag-Connect. It costs a bit upfront to get into it, but then there's zero ongoing BOM cost per board, and the connectors are very sturdy, so I don't get bad connections, even while doing extended troubleshooting.
Of course, if I hadn't needed them for a customer project, I might never have sprung for the upfront cost, as the cables are somewhat spendy for the what they are. But they are very well made, and have been great for me. The board footprint is pretty tiny, so that has yet to have ever been an issue in my projects. The footprint is also keyed, so you can't put the cable on backwards. Always a good thing. Also, since the connection points are not through-holes, you still have the back and interior of the board for routing traces. Of course the alignment pins are still through-hole. I prefer the type without the locking pins, and then there's a little board that you slide on the alignment pins from the back to hold everything together.
If I were to go with a standard, I wouldn't be excited about his ESP Flash one, simply because I don't see a need for it. Yet another 'standard' just fragments things worse. I would use the ESP-Prog one if needed, and use the .05" pins if I needed tiny.
@ejlane said in Most reliable "best" radio:
I prefer the type without the locking pins, and then there's a little board that you slide on the alignment pins from the back to hold everything together.
Aha! Thank you. So that's how it's done with the so called "legg-less" connector. I had worried that without the legs it would be flapping in the breeze whenever I wasn't applying hand pressure to guarantee the connections.
Another thing I like about the tag-connect is that there's no soldering involved. With the JST_SH, it's one more thing to solder, not to mention the cost of the JST connectors themselves. So, I agree with you: the amortized cost of the Tag-Connect seems reasonable to me.
-
@ejlane said in Most reliable "best" radio:
I prefer the type without the locking pins, and then there's a little board that you slide on the alignment pins from the back to hold everything together.
Aha! Thank you. So that's how it's done with the so called "legg-less" connector. I had worried that without the legs it would be flapping in the breeze whenever I wasn't applying hand pressure to guarantee the connections.
Another thing I like about the tag-connect is that there's no soldering involved. With the JST_SH, it's one more thing to solder, not to mention the cost of the JST connectors themselves. So, I agree with you: the amortized cost of the Tag-Connect seems reasonable to me.
@NeverDie Yes, though sometimes you have to dig a bit on their site to find them. Here's the one for use with the 6 pin tag-connect: https://www.tag-connect.com/product/tc2030-retaining-clip-board-3-pack
They don't automatically come with the cables, which could be a pain if you didn't know to add them to the order. Though this way I guess if they wear out it's easy to just buy the one without the other...
-
@NeverDie Yes, though sometimes you have to dig a bit on their site to find them. Here's the one for use with the 6 pin tag-connect: https://www.tag-connect.com/product/tc2030-retaining-clip-board-3-pack
They don't automatically come with the cables, which could be a pain if you didn't know to add them to the order. Though this way I guess if they wear out it's easy to just buy the one without the other...
@ejlane said in Most reliable "best" radio:
They don't automatically come with the cables, which could be a pain if you didn't know to add them to the order.
Uh, which cables do I need to add? I thought the Tag-Connect came with a cable already built into it. Unfortunately, none of them seem to come with Dupont wires on the other end of them, so it looks as though I may need to build some kind of adapter board to make use of the cable-connectors it does come with.
-
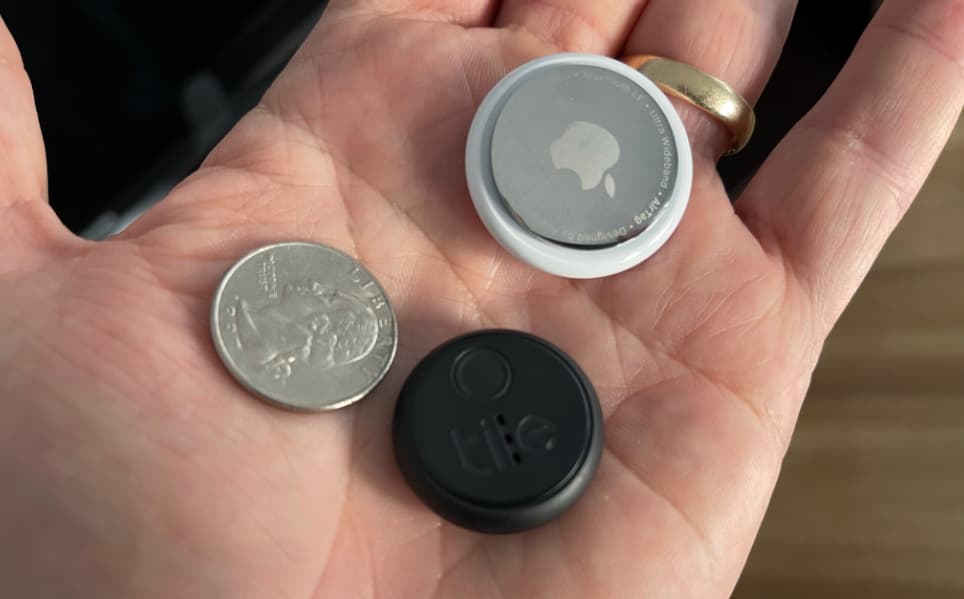
Apple's AirTag measures in at 1.26 inches in diameter, and it has a height of 0.31 inches, or 32mm and 8mm respectively.
Part of that is going to be due to the inevitable bulk of the surrounding enclosure, yet I think I might be able to get in the ballplark to the same dimensions with a DIY solution that leverages inexpensive sample containers as the enclosure:
https://www.amazon.com/gp/product/B00YOS7N4A/ref=ox_sc_saved_image_4?smid=AS7VB9OCJNT4I&psc=1
I say that because a surface mount CR2032 holder needs a footprint of around 25mm in diameter. That allows for a little extra space for the module antenna to overhang without hovering over the GND plane. That means I can craft a solution that's close to the one I had already done 5 years ago:
https://www.openhardware.io/view/510/Multi-Sensor-TempHumidityPIR-LeakMagnetLightAccel
but this time it can be just an MCU (nF52805 this time around) with a buzzer and LED, without the need for all the other bells and whistles. I'll try to see whether I can fit a Tag-Connect footprint onto it. I'm fairly sure it can be done. By the way, I've looked at a lot of nRF52 "beacons", and none of them come with a buzzer, nor would it be easy to add one, so that's what necessitates this as a DIY project. The only reason the earlier project had the big 10pin box connector was that it was very easy to plug it into an nRF52-DK for J-TAG using just an IDE ribbon cable with that particular connector. With time comes better options, and so this time it'll be ixnay to the box connector. -
I had to open one up to get this photo, but this is what the inside of a Fanstel beacon looks like:
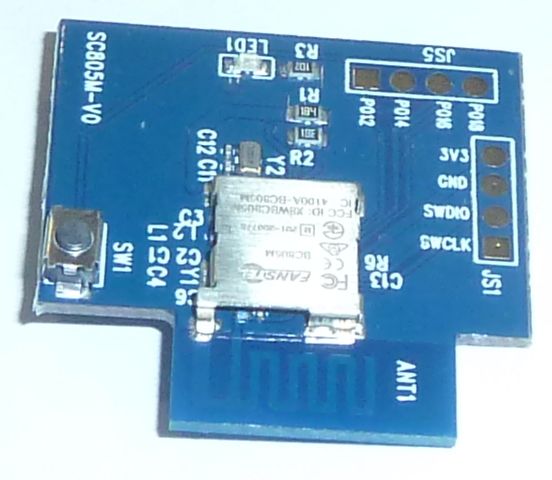
Obviously it's meant to be programmed with pogo pins. Interestingly, although the case is black, it has some translucency to it, so maybe the LED can shine through it enough to be visible.
It has one intriguing feature though that none of the aliexpress beacons have, which is that they also expose 4 other pins along the JS5 connector outline. This opens the possibility that with the right ultra-thin buzzer, the right resistor, some UV glue, and some solder, it just might be possible to kludge a buzzer onto this board and still fit it back in its case, which looks like this:

which has dimensions: 30x31x10mm (9300 mm^3) , which is just a tad narrower than the Apple AirTag but 2mm thicker. Assuming that the apple airtag is fully optimized for size, I'd say that's pretty good. As a further datapoint, my el cheapo keyfinder tag that I took apart earlier in this thread is 47x31x6mm (8,742 mm^3), so thinner than either than either the AirTag or the Fanstel, but obviously 50% longer. Being circular, the airtag has the least volume, at just 6,430 mm^3, whereas the sample case I linked above has a radius of 31mm but a thickness of 15mm, giving it a volume of 11,114 mm^3, so hopefully I can find a thinner sample jar with less volume to repurpose for my DIY enclosure, although given the cheap price for sample jars I could certainly live with 15mm if I can't find better. I do like that the sample jars appear to be very clear, and since they're acrylic, I assume (?) they won't yellow if kept away from UV light sources like the sun.Anyhow, I estimate that a 2mm thick buzzer might not exceed the height limitation imposed by the casing, so today I ordered a few different 2mm thick buzzers from mouser to try and see if I get lucky. :face_with_rolling_eyes: If that fails, then there does exist at least one buzzer that's 1.9mm thick that might be able to squeeze in, but that appears to be the minimum possible buzzer thickness, at least for what's available on Mouser. In general thinner means both less loud and more expensive, so there's that as a trade-offs.
-
@NeverDie Yes, though sometimes you have to dig a bit on their site to find them. Here's the one for use with the 6 pin tag-connect: https://www.tag-connect.com/product/tc2030-retaining-clip-board-3-pack
They don't automatically come with the cables, which could be a pain if you didn't know to add them to the order. Though this way I guess if they wear out it's easy to just buy the one without the other...
@ejlane said in Most reliable "best" radio:
They don't automatically come with the cables, which could be a pain if you didn't know to add them to the order. Though this way I guess if they wear out it's easy to just buy the one without the other...
I ordered this one: https://www.tag-connect.com/product/tc2030-idc-nl-10-6-pin-plug-of-nails-spring-pin-cable-with-0-1-ribbon-connector-10-version
and it looks to me as though the cable will be baked right into it. I ordered the 2.54mm pitch cable connector because it should be relatively easy to create an adapter board for it using 2x3 male pin header that I already have.I also ordered the little holder pieces that you mentioned: https://www.tag-connect.com/product/tc2050-clip-3pack-retaining-clip though I didn't buy their $1 paper clip for holding it. Sheesh! The audacity.
-
@alphaHotel Thanks for your post. It reminded me that for one-time programming, all one really needs is just the through-holes on the board. You can then bend the pins on a male header to create a kind of "weave" pattern, and that alone is enough to hold it into place during the programming, after which you can simply remove it. I've confirmed this works at 2.54mm pitch, and so I'll try it at 1.27mm pitch. I expect it should work well with that too.
I did find this video, which makes it seem fairly straightforward to set up a custom bed of nails:
https://www.youtube.com/watch?v=_ILqQ1kpqEQbut he did say during the Q&A that it took him 4 days to design it. However, with the benefit of knowing his solution, I don't think it should take anywhere near that long to design just the PCB part of it. Maybe an hour, give or take? Someday I'm going to try it. His approach to the push-pin alignment seems quite simple and, I would think, should be easy to adapt to a whole range of different targets.
@NeverDie said in Most reliable "best" radio:
@alphaHotel Thanks for your post. It reminded me that for one-time programming, all one really needs is just the through-holes on the board. You can then bend the pins on a male header to create a kind of "weave" pattern, and that alone is enough to hold it into place during the programming, after which you can simply remove it. I've confirmed this works at 2.54mm pitch, and so I'll try it at 1.27mm pitch. I expect it should work well with that too.
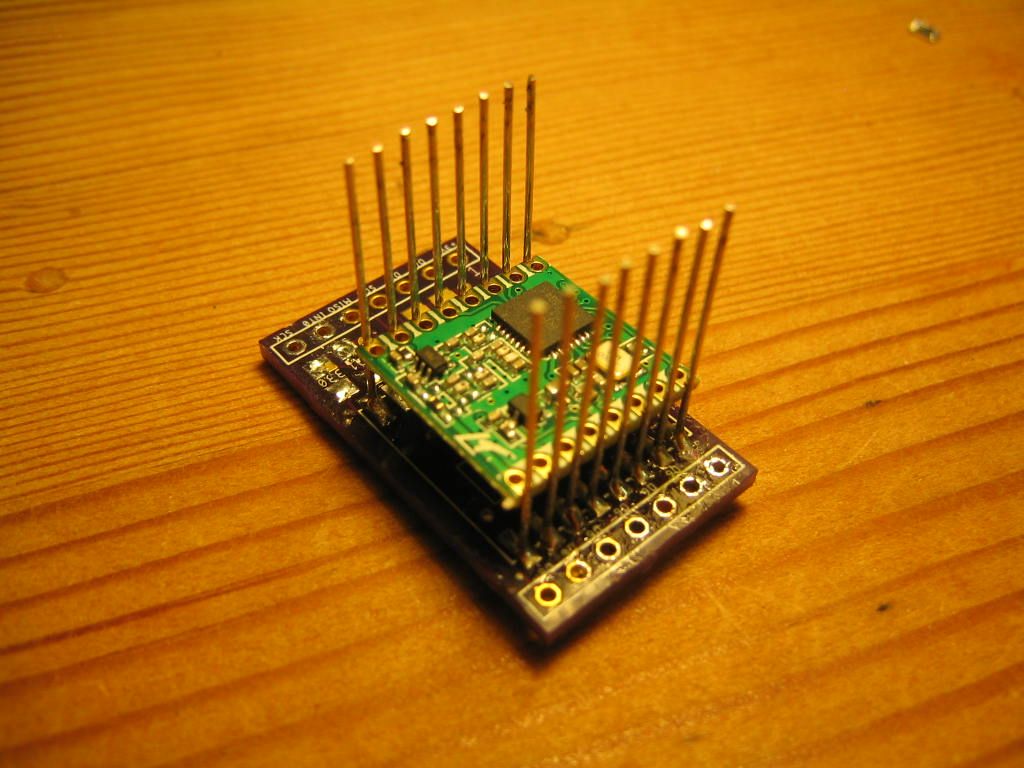
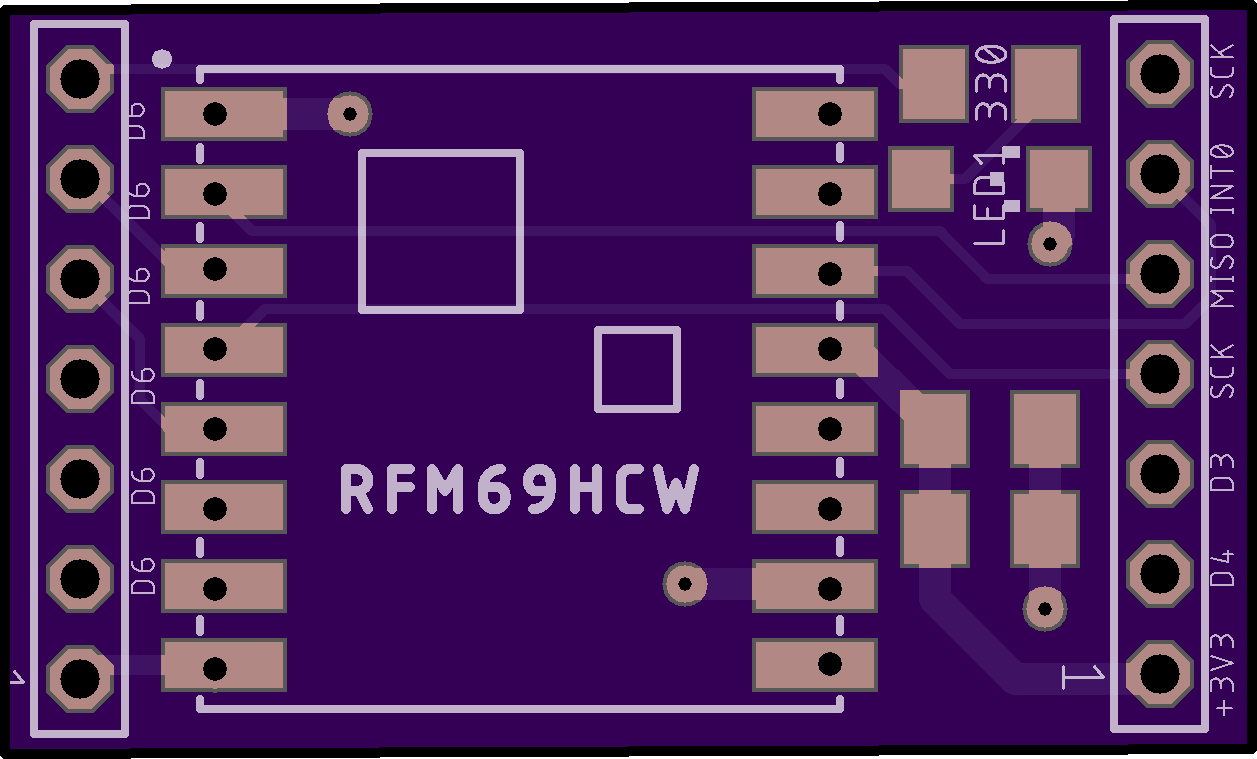
Those castellated notches of the RFM69XXX radios and ESP12 radios appealed to me as an opportunity to use springs in a different way. I think I talked about that in an earlier post. Well, I designed one based on NeverDie's radio boards and the picture below is how it turned out. For the springy things I used high-carbon-wire (guitar strings.) I had to cut the wire with a Dremel grinder because shears would bend the wire at the cut. The springs don't need to be nearly this long, though it does allow for a lot of flex when entering the jig at the top. At the pads on the board I used large via's (about 21 mills, I think) so that I could solder both sides of the board for rigidity. This would all for the rapid testing of dozens of radios if necessary.
As you know, I am having trouble with bootloading so I haven't implemented the idea yet. But I'm really pleased at how the dimensions worked out and the spring tightness. I got this idea from looking at RJ45 connectors and thinking that I could do something like that.
I tried a few pogo-pin designs for ESP programming, and they work... but not easily. This design is a snap. I think I left behind the design files.
-
Clever! Thanks for your post. Exactly which type of guitar strings do you buy that work the best? i.e. do you try to match the castellation diameter with the diameter of the string? Also, regarding your layout for them on the PCB, how do you decide where to position them? i.e. do you use a formula or something, or do you eyeball it and take a WAG? And how do you keep them perpendicular to your PCB while you solder them? Or do you just fit a bunch in, force in the part, and then use the tension to hold them in place while you solder?
-
@alphaHotel Thanks for your post. It reminded me that for one-time programming, all one really needs is just the through-holes on the board. You can then bend the pins on a male header to create a kind of "weave" pattern, and that alone is enough to hold it into place during the programming, after which you can simply remove it. I've confirmed this works at 2.54mm pitch, and so I'll try it at 1.27mm pitch. I expect it should work well with that too.
I did find this video, which makes it seem fairly straightforward to set up a custom bed of nails:
https://www.youtube.com/watch?v=_ILqQ1kpqEQbut he did say during the Q&A that it took him 4 days to design it. However, with the benefit of knowing his solution, I don't think it should take anywhere near that long to design just the PCB part of it. Maybe an hour, give or take? Someday I'm going to try it. His approach to the push-pin alignment seems quite simple and, I would think, should be easy to adapt to a whole range of different targets.
@NeverDie said in Most reliable "best" radio:
Exactly which type of guitar strings do you buy that work the best? i.e. do you try to match the castellation diameter with the diameter of the string?
The brand is D’addario, I think. It measures 22 mills, and yes, I was trying to fit the diameter of the castellation. Looking online I see there are many different types, but I just asked for high carbon steel at the local music store.
@NeverDie said in Most reliable "best" radio:
Also, regarding your layout for them on the PCB, how do you decide where to position them? i.e. do you use a formula or something, or do you eyeball it and take a WAG?
It was a calculated WAG, but it worked. I wanted the rows of vias to be about 10 to 20 mills closer than the radio’s two rows of castellated pockets. The distance between the radio's castellated surfaces measures 616.5 mills. The distance between the via centers is 622.0 mills. Subtracting the 23-mill hole diameter would result in the via surface-to-surface distance on the board of 599 mills. The 17.5 mill difference (616.5 - 599) means the radio would not be able to slide all the way to the bottom. When engaged, the radio slides down within 1/4 inch of the board while the springs tops splay outward slightly.
@NeverDie said in Most reliable "best" radio:
And how do you keep them perpendicular to your PCB while you solder them?
You are asking all the right questions. Since OSH Park gave me 3 boards, I used one at each end of the wire. I think I used some blue-tac under the target board and maybe some blue-tack, or tape, to hold the place-holder board at the other end of the springs. Then I soldered top pads of the target board, flipped the assembly over, remove the target blue-tac, and soldered the bottom via surface.
To do this again, I would add SMD pads on the bottom of the board that would give more soldered rigidity to the spring base. I also had some slight alignment problems as the vias are not exactly straight. It was my first KiCad project; thank you for encouraging me to try. KiCad probably has an alignment tool. The other change I might make is to cut the wires down to about 0.5-inch, or less. The existing 0.9-inch length was helpful for assembly and soldering access, but my fear is that each of these longer wires form a potential antenna. I wouldn't change any of the other dimensions.
You are welcome to 'my' KiCad file based on your design. Is there somewhere that I can drop it. I can't do it here.
-
@NeverDie said in Most reliable "best" radio:
Exactly which type of guitar strings do you buy that work the best? i.e. do you try to match the castellation diameter with the diameter of the string?
The brand is D’addario, I think. It measures 22 mills, and yes, I was trying to fit the diameter of the castellation. Looking online I see there are many different types, but I just asked for high carbon steel at the local music store.
@NeverDie said in Most reliable "best" radio:
Also, regarding your layout for them on the PCB, how do you decide where to position them? i.e. do you use a formula or something, or do you eyeball it and take a WAG?
It was a calculated WAG, but it worked. I wanted the rows of vias to be about 10 to 20 mills closer than the radio’s two rows of castellated pockets. The distance between the radio's castellated surfaces measures 616.5 mills. The distance between the via centers is 622.0 mills. Subtracting the 23-mill hole diameter would result in the via surface-to-surface distance on the board of 599 mills. The 17.5 mill difference (616.5 - 599) means the radio would not be able to slide all the way to the bottom. When engaged, the radio slides down within 1/4 inch of the board while the springs tops splay outward slightly.
@NeverDie said in Most reliable "best" radio:
And how do you keep them perpendicular to your PCB while you solder them?
You are asking all the right questions. Since OSH Park gave me 3 boards, I used one at each end of the wire. I think I used some blue-tac under the target board and maybe some blue-tack, or tape, to hold the place-holder board at the other end of the springs. Then I soldered top pads of the target board, flipped the assembly over, remove the target blue-tac, and soldered the bottom via surface.
To do this again, I would add SMD pads on the bottom of the board that would give more soldered rigidity to the spring base. I also had some slight alignment problems as the vias are not exactly straight. It was my first KiCad project; thank you for encouraging me to try. KiCad probably has an alignment tool. The other change I might make is to cut the wires down to about 0.5-inch, or less. The existing 0.9-inch length was helpful for assembly and soldering access, but my fear is that each of these longer wires form a potential antenna. I wouldn't change any of the other dimensions.
You are welcome to 'my' KiCad file based on your design. Is there somewhere that I can drop it. I can't do it here.
@Larson said in Most reliable "best" radio:
You are welcome to 'my' KiCad file based on your design. Is there somewhere that I can drop it. I can't do it here.
Thanks! No need to share the file as I'm not presently using RFM69 in a manner where I would need it, but your answers told me all I need to know for when any kind of similar need arises in the future. :-)
-
It looks as though that by rotating the TAG-CONNECT footprint a few degrees, I can fit the landing pads onto a coincell size platform without having its holes penetrate into the CR2032 connection pad.
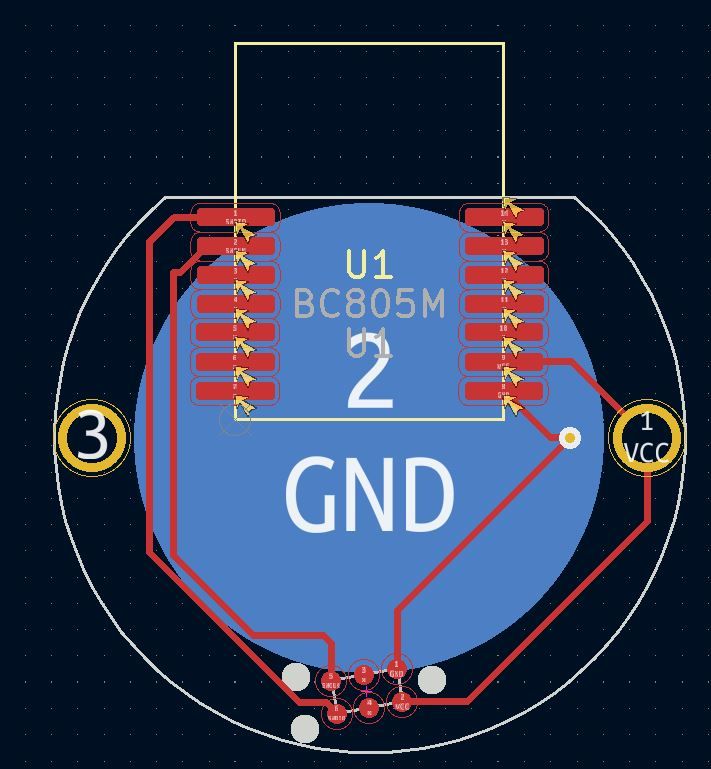
The diameter of the PCB is 24mm. However, one of the three alignment pins might not be well supported, so maybe pushing the footprint up would be the better way to go with this. I don't see that having a hole in the GND pad of the CR2032 will make any meaningful difference. I do think that having it close to the edge, though, is probably a good idea, so that the TAG-CONNECT can hook up without hitting the metal of the coincell holder.
-
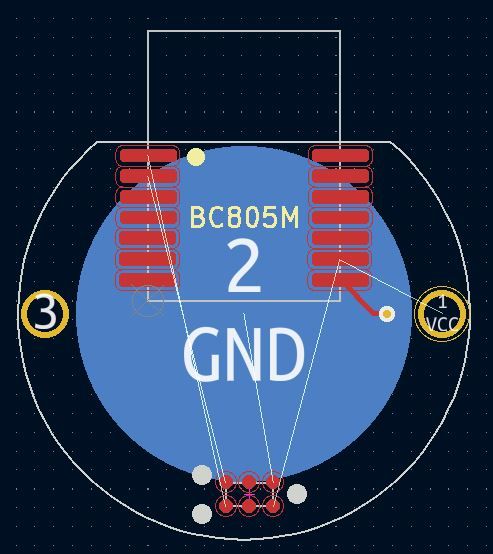
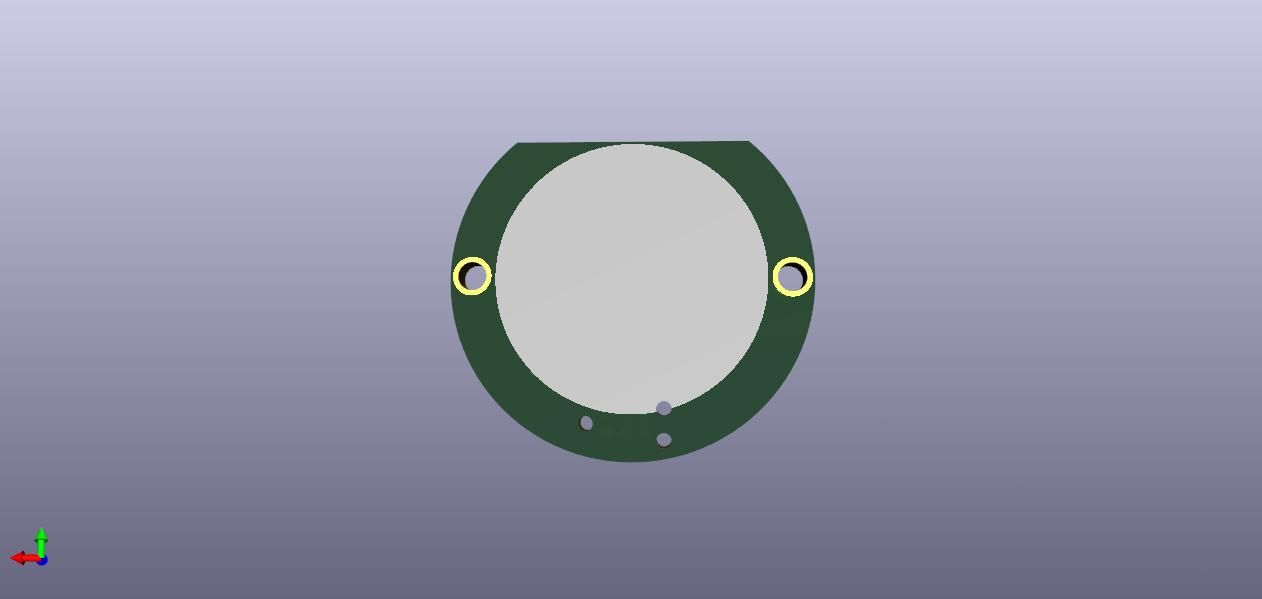
So, I think I'll opt for taking a slight bite out of the GND pad in exchange for having a sturdy connection:
-
Well, having now test driven some of the 70db and 80db buzzers, I just don't think they're loud enough to guarantee being heard under worst case scenarios. So, I found a buzzer that promises a minimum of 100dB...if powered by 150ma at 5v. Argh. So, I guess I'll be using two coincells now, plus some other support chips, in order to guarantee I can find the beacon under even adverse conditions. Maybe it's not so bad after all though, as I perhaps won't have to be concerned as much with the voltage droop that's common in CR2032's. Also, 100dB is darn loud, so that should make finding the thing by ear a lot easier.
I wonder just how long a burst of sound needs to be in order to be heard clearly? At that level of consumption, I only wanting it buzzing for the absolute minimum.
-
I sent a couple boards off to the fab, but it's now more obvious than ever before why the pro's prefer to mount a ceramic disk piezo in the case, and that's because it simply takes up too much space on the PCB. With a loud enough buzzer surface mounted on the PCB, I had to do tons of routing origami to make the parts fit. I could take another stab at it using 0402 instead of 0805 parts, but then soldering will be harder in the trade-off. For that reason, I think the short-term solution may be gluing a large surface mount buzzer to the inside top of an enclosure and then running wires from that to the PCB....except then when I screw on the top, I'd be twisting the wires. Ugh. Maybe I could pre-twist them in the wrong direction so that twisting them during the screw-on makes them untwisted when it's all finished. I'm starting to feel more like a system architect than a hobbyist. :rolling_on_the_floor_laughing: On the other hand, if I could glue the PCB to the buzzer, then it would all rotate together and life would be good. Hmmm.... Yeah, maybe that's the best option.
Another thing: it's not easy finding coincell holders that will stack two CR2032's to yield a 6v voltage. I've been down this path before on a prior occasion, and, IIRC, the solution is to stack the two coincells inside a kind of "drawer", which then slides into a clip cavity on the PCB. That does tend to add some amount of height, but it also avoids the two coincells from slipping apart and/or shorting-out against the metal of the holder. The downside is that it has a slightly bigger footprint than the non-drawer types.
On the other hand, with a flat two-cell design, there would be plenty of room for even a large SMD buzzer. Hmm.... Maybe not a bad idea.
-
OK, I think I may have found a solution that I could mount external to the enclosure:
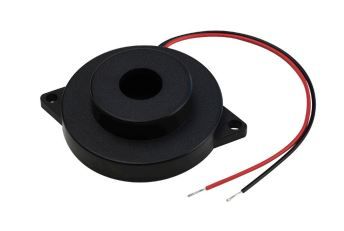
It promises to deliver an ear-splitting minimum of 110dB of sound pressure while drawing no more than 5ma. So, the benefits are:- Plenty loud. Even if buried in some box, I bet this could be heard.
- A voltage range of 1 to 40v, with 9v being nominal.
- Externally mounted, so not muffled by the PCB casing
- Only requires just a couple of solder pads on the PCB, which won't consume much PCB real estate.
Downside: runs at 9v for maximum effect. Datasheet doesn't indicate the sound pressure level at a lower voltage, so I'll have to buy one to test it out. Maybe this changes the form factor to more of a 9v battery size if that's what it takes. Though not ideal, that wouldn't be so bad.
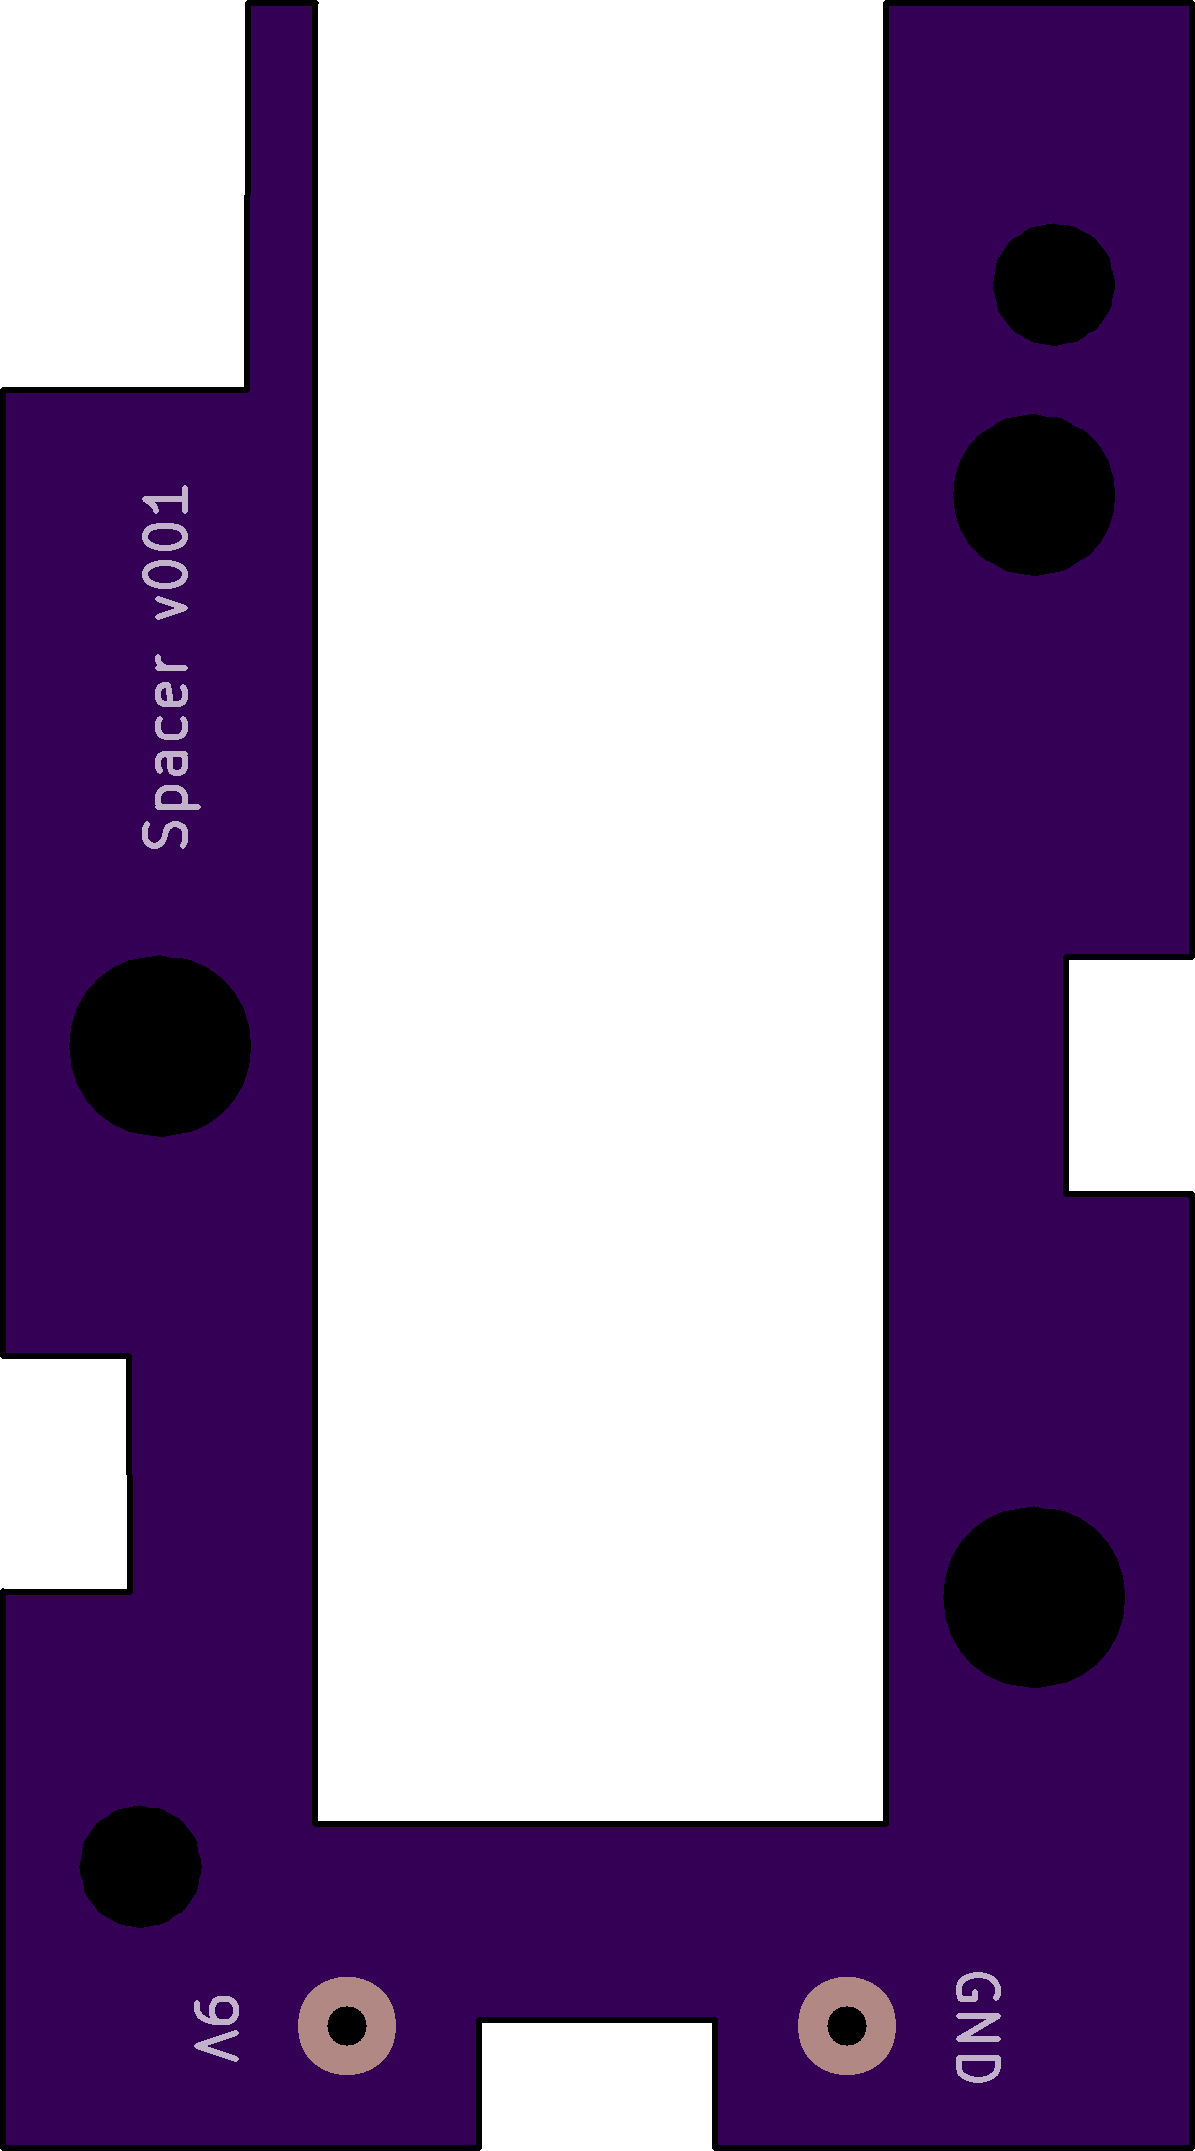
Re-thinking it all now, maybe heatshrink alone would be a "good enough" enclosure that I needn't bother with a rigid enclosure? Or, better yet, since PCB's are so cheap, maybe I build an enclosure out of a stack of custom routed FR4? That would give me a lot of flexibility without having to manually fabricate something. The FR4 could give rigid protection against dings and dents. Then bolt it together through 4 corners and, presto!, a sliced stack enclosure, similar to how some raspberry pi enclosures are fabricated:

or

where FR4 could be used instead of plastic, simply because that's something a PCB house is already good at routing and shipping. Rock bottom PCB's tend to be thin, though, so this might only be economically viable for a small device, such as what I'm attempting to make. Obviously, custom 3D printing something will probably be more economical, but that comes with its own set of hassles and costs, whereas a sliced enclosure might be easy to throw together.[Edit: I just now priced it out at JLPCB, and, for instance, a 50mmx50mmx1.6mm slice with a 30mm diameter hole in the middle would cost about $0.20/slice at quantity 100. i.e. low enough to be interesting. ]
-
Reporting back: I tried it out, and that thing really is ear splitting when powered by 9 volts. It's so loud that even if I completely cover the opening, it's still loud. That's great. That means that even in a worst-case scenario where it's buried inside some sealed container, it's extremely likely I'd still be able to hear it. After all, a locator that can't be found is no good. Although it's probably overkill, when it doubt build it stout. :grinning:
Also, I ordered some PCB slices to try making an enclosure that way (as illustrated in the sliced enclosure photos above), so we'll see how that goes.
-
I discovered by accident that if I place an order with JLCPCB and then place a parts order with LCSC before the JLCPCB order ships, then LCSC will discount the shipping cost for the LCSC parts order, even though they can't actually combine shipping. Huh? This was actually my first time ordering parts from LCSC, so I'm just passing along the finding in case it might benefit anyone who might be reading this.
BTW, Intel recently predicted the chip shortage will last into 2024. :man-facepalming: