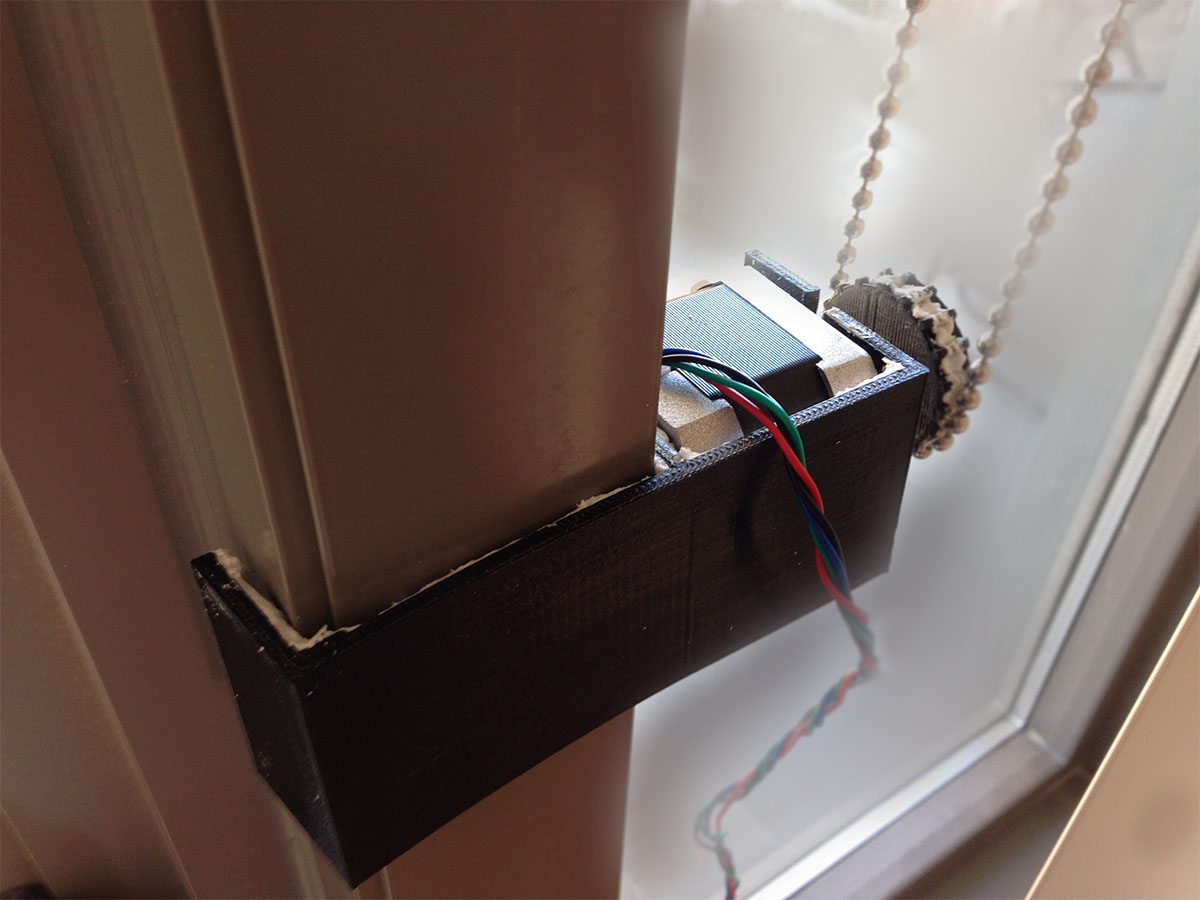
DIY Blind Control Motor
-
and the motor is turning extremely slow using the EasyDriver V4.4 . It says the motor is rated at 12V 1.3A but the EasyDriver is only up to 700mA. The EasyDriver gets very hot as well, could this be the reason? I'm thinking of switching to the Big Easy Driver but I'm not sure if it'll help
@naveen Sorry for the late reply. I think it is safe to use the EasyDriver board on that motor because it has a current limiter. My guess is the EasyDriver board runs hot because you do not put it to sleep when not moving. Basically the EasyDriver board is holding the motor in its current position by feeding full current trough one of the coils. If you do not want it to hold it down by full force so it is impossible to rotate the motor you need to connect the sleep pin.
I have a similar motor also that I plan to use with the EasyDriver but I have not had a chance to wire it yet.
The Big Easy Driver board looks nice, I think I will order one of those to...
-
@naveen Sorry for the late reply. I think it is safe to use the EasyDriver board on that motor because it has a current limiter. My guess is the EasyDriver board runs hot because you do not put it to sleep when not moving. Basically the EasyDriver board is holding the motor in its current position by feeding full current trough one of the coils. If you do not want it to hold it down by full force so it is impossible to rotate the motor you need to connect the sleep pin.
I have a similar motor also that I plan to use with the EasyDriver but I have not had a chance to wire it yet.
The Big Easy Driver board looks nice, I think I will order one of those to...
The speed is also really slow, I can't get past about 400microsteps/second (which is 50 steps * 1.8deg/step = 90deg/sec) - that doesn't seem normal...right? I set the max speed and speed to 8000 and it doesn't seem to help.
Would low current cause low speeds? It does turn the correct amount, though.
-
The speed is also really slow, I can't get past about 400microsteps/second (which is 50 steps * 1.8deg/step = 90deg/sec) - that doesn't seem normal...right? I set the max speed and speed to 8000 and it doesn't seem to help.
Would low current cause low speeds? It does turn the correct amount, though.
@naveen could be that you are right and the 700mA current is just not enough for your motor. Sorry I can't be of more help with your problems.
btw, I have updated my sketch to 1.4b1 and at the same time changed it so that I can basically send the blinds to any position between fully open and closed using the dimmer slider in Vera. And my setup has now performed flawlessly for over 1 month opening/closing twice every day.
I will share the sketch file when I get home if I remember.
-
I've mounted a little Fubata servo motor to my blinds and it works just fine. I drive it directly from my Arduino so no need to an external power supply. I have a button that opens and closes it. Now Im looking forward to connecting a RF Receiver on my Arduino so I can control it from my Veralite.
I like the servo motor better because it's smaller, cheaper and you can tell it exactly how many degrees it should turn (0 - 180). -
@naveen could be that you are right and the 700mA current is just not enough for your motor. Sorry I can't be of more help with your problems.
btw, I have updated my sketch to 1.4b1 and at the same time changed it so that I can basically send the blinds to any position between fully open and closed using the dimmer slider in Vera. And my setup has now performed flawlessly for over 1 month opening/closing twice every day.
I will share the sketch file when I get home if I remember.
@korttoma said:
@naveen could be that you are right and the 700mA current is just not enough for your motor. Sorry I can't be of more help with your problems.
btw, I have updated my sketch to 1.4b1 and at the same time changed it so that I can basically send the blinds to any position between fully open and closed using the dimmer slider in Vera. And my setup has now performed flawlessly for over 1 month opening/closing twice every day.
I will share the sketch file when I get home if I remember.
I pulled some of the pins to ground on the Big EasyDriver and it changed the number of microsteps and I was able to drive it faster, now I've got to find a decent gear to connect it to the blinds!
-
I've mounted a little Fubata servo motor to my blinds and it works just fine. I drive it directly from my Arduino so no need to an external power supply. I have a button that opens and closes it. Now Im looking forward to connecting a RF Receiver on my Arduino so I can control it from my Veralite.
I like the servo motor better because it's smaller, cheaper and you can tell it exactly how many degrees it should turn (0 - 180).@rafael.brasilia said:
I've mounted a little Fubata servo motor to my blinds and it works just fine. I drive it directly from my Arduino so no need to an external power supply. I have a button that opens and closes it. Now Im looking forward to connecting a RF Receiver on my Arduino so I can control it from my Veralite.
I like the servo motor better because it's smaller, cheaper and you can tell it exactly how many degrees it should turn (0 - 180).Servo would be great if you're able to do only 180 degrees to open/close your blinds - like venetian blinds or something
-
@korttoma said:
@naveen could be that you are right and the 700mA current is just not enough for your motor. Sorry I can't be of more help with your problems.
btw, I have updated my sketch to 1.4b1 and at the same time changed it so that I can basically send the blinds to any position between fully open and closed using the dimmer slider in Vera. And my setup has now performed flawlessly for over 1 month opening/closing twice every day.
I will share the sketch file when I get home if I remember.
I pulled some of the pins to ground on the Big EasyDriver and it changed the number of microsteps and I was able to drive it faster, now I've got to find a decent gear to connect it to the blinds!
@naveen said:
I pulled some of the pins to ground on the Big EasyDriver and it changed the number of microsteps and I was able to drive it faster, now I've got to find a decent gear to connect it to the blinds!
Ahh, that explains it I checked the Big Easy Driver user guide and it seems that it is set to "Sixteenth Step" Microstep Resolution by default compared to the EasyDriver that is set to "Eight step". So what did you set it to? I did not try anything else than the default, guess I could sett it to "Full Step" just to see if it would run more quiet.
-
btw, here is the sketch I'm currently running on 1.4b1 will be updateing to 1.4 soon.
-
@naveen said:
I pulled some of the pins to ground on the Big EasyDriver and it changed the number of microsteps and I was able to drive it faster, now I've got to find a decent gear to connect it to the blinds!
Ahh, that explains it I checked the Big Easy Driver user guide and it seems that it is set to "Sixteenth Step" Microstep Resolution by default compared to the EasyDriver that is set to "Eight step". So what did you set it to? I did not try anything else than the default, guess I could sett it to "Full Step" just to see if it would run more quiet.
@korttoma said:
@naveen said:
I pulled some of the pins to ground on the Big EasyDriver and it changed the number of microsteps and I was able to drive it faster, now I've got to find a decent gear to connect it to the blinds!
Ahh, that explains it I checked the Big Easy Driver user guide and it seems that it is set to "Sixteenth Step" Microstep Resolution by default compared to the EasyDriver that is set to "Eight step". So what did you set it to? I did not try anything else than the default, guess I could sett it to "Full Step" just to see if it would run more quiet.
I've got it running on full steps right now and it seems to run pretty good. I might end up running it on half steps in the end.
-
So I finally got the blinds set-up and working. A few tweaks to be made but overall it is working OK. One thing that would be really handy is if I could alter the speed variable through Vera, is there any way to create a custom variable in vera and send it to the Arduino?
-
So I finally got the blinds set-up and working. A few tweaks to be made but overall it is working OK. One thing that would be really handy is if I could alter the speed variable through Vera, is there any way to create a custom variable in vera and send it to the Arduino?
Yes, it is possible! You have a couple of options.
##Poll configuration data from node
- Select one of V_VAR1, V_VAR2, V_VAR3, V_VAR4, V_VAR5 to use for your configuration;
choose from your root or child nodes. You can use all five parameters per each of your root and child device. It is up to you how to design this; - Program your sketch to fetch variable from vera using gw.request(). You will have to take care to get reply later by yourself using in your callback method initialized in gw.setup(). See RelayActuator sketch for an example on how to handle incoming messages.
- First run of your modified sketch to request parameters. Be prepared that you will receive an empty string because at this time we have just created empty variables at vera side;
- Refresh your vera and go to particular child into Advanced Tab. You should be able to see your new variables named Variable1...Variable5. Variable1 corresponds to V_VAR1 inside your sketch etc.;
fill free to change empty field on vera side to the value your needed, Save changes;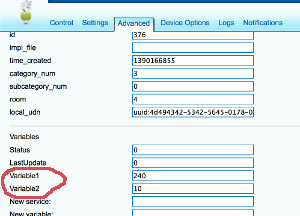
- Check with you Arduino, it should receive correct data at this point;
- You free to use whatever design you want. You can pull/request data at each start of you node or you can pull each 30 minutes like many z-wave devices do if they operate from battery. Other example can be if you need for your to nodes to communicate to each other and you need to tell a radio ID to one/both nodes to establish their communication. But for this one you probably want to use Push...
##Push configuration data from Vera to node
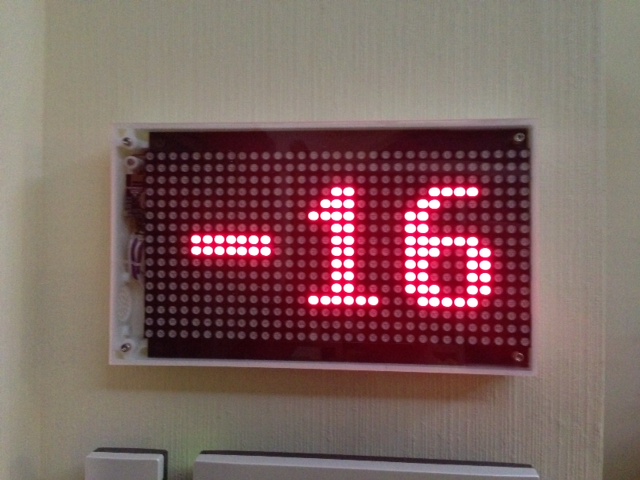
Example: You need to push data from vera on event or using schedule and it should be initiated instantly by vera, not by node. For example you want your clock to show external temperature received by vera from the Weather plugin or from other sensor.
-
Choose from V_VAR1, V_VAR2, V_VAR3, V_VAR4, V_VAR5 to be used for data push
-
Design your sketch to listen for incoming messages with desired variable. See RelayActuator for an example on how to handle incoming data.
-
Create a new scene on vera side. The scene should be run according to your goal. For example each 10 minutes;
-
Use Lua tab while editing scene to provide data for the push. For example this Lua is taking current temperature from Weather (vera id = 61) plugin and pushing it to the node (vera id for root device = 372) using VAR_5:
local temp = luup.variable_get("urn:upnp-org:serviceId:TemperatureSensor1","CurrentTemperature", 61)
temp = temp*10.0
luup.call_action("urn:upnp-arduino-cc:serviceId:arduino1", "SendCommand", {radioId="4;255", variableId="VAR_5", value=temp}, 372)
SendCommand will push a message to your node. You can also call it with static values (without programming) using the Advanced tab in the scene editor.
(This post was updated to 1.4 from from @axillent old tips page on micasaverde)
- Select one of V_VAR1, V_VAR2, V_VAR3, V_VAR4, V_VAR5 to use for your configuration;
-
Yes, it is possible! You have a couple of options.
##Poll configuration data from node
- Select one of V_VAR1, V_VAR2, V_VAR3, V_VAR4, V_VAR5 to use for your configuration;
choose from your root or child nodes. You can use all five parameters per each of your root and child device. It is up to you how to design this; - Program your sketch to fetch variable from vera using gw.request(). You will have to take care to get reply later by yourself using in your callback method initialized in gw.setup(). See RelayActuator sketch for an example on how to handle incoming messages.
- First run of your modified sketch to request parameters. Be prepared that you will receive an empty string because at this time we have just created empty variables at vera side;
- Refresh your vera and go to particular child into Advanced Tab. You should be able to see your new variables named Variable1...Variable5. Variable1 corresponds to V_VAR1 inside your sketch etc.;
fill free to change empty field on vera side to the value your needed, Save changes; - Check with you Arduino, it should receive correct data at this point;
- You free to use whatever design you want. You can pull/request data at each start of you node or you can pull each 30 minutes like many z-wave devices do if they operate from battery. Other example can be if you need for your to nodes to communicate to each other and you need to tell a radio ID to one/both nodes to establish their communication. But for this one you probably want to use Push...
##Push configuration data from Vera to node
Example: You need to push data from vera on event or using schedule and it should be initiated instantly by vera, not by node. For example you want your clock to show external temperature received by vera from the Weather plugin or from other sensor.
-
Choose from V_VAR1, V_VAR2, V_VAR3, V_VAR4, V_VAR5 to be used for data push
-
Design your sketch to listen for incoming messages with desired variable. See RelayActuator for an example on how to handle incoming data.
-
Create a new scene on vera side. The scene should be run according to your goal. For example each 10 minutes;
-
Use Lua tab while editing scene to provide data for the push. For example this Lua is taking current temperature from Weather (vera id = 61) plugin and pushing it to the node (vera id for root device = 372) using VAR_5:
local temp = luup.variable_get("urn:upnp-org:serviceId:TemperatureSensor1","CurrentTemperature", 61)
temp = temp*10.0
luup.call_action("urn:upnp-arduino-cc:serviceId:arduino1", "SendCommand", {radioId="4;255", variableId="VAR_5", value=temp}, 372)
SendCommand will push a message to your node. You can also call it with static values (without programming) using the Advanced tab in the scene editor.
(This post was updated to 1.4 from from @axillent old tips page on micasaverde)
- Select one of V_VAR1, V_VAR2, V_VAR3, V_VAR4, V_VAR5 to use for your configuration;
-
Pretty cool, would it be possible to get a video with audio of the final 'product'?
-
@ServiceXp said:
Pretty cool, would it be possible to get a video with audio of the final 'product'?
Sure! This is with eighth steps - and it seems to be as fast as the motor will go without reducing the microsteps.
-
@ServiceXp said:
Pretty cool, would it be possible to get a video with audio of the final 'product'?
Sure! This is with eighth steps - and it seems to be as fast as the motor will go without reducing the microsteps.
-
@ServiceXp said:
Pretty cool, would it be possible to get a video with audio of the final 'product'?
Sure! This is with eighth steps - and it seems to be as fast as the motor will go without reducing the microsteps.
-
@ServiceXp
A few things I should mention for anyone trying to undertake this project:
-I'm assuming that the choice of stepper motor is important to control noise. It is possible that a different stepper would give an improved speed/noise ratio.
-One of the most important factor in reducing noise is ensuring there is no hard surface for the motor to 'rumble' on. This is especially bad when using full stepping - the motor rumbles like crazy. The more microsteps, the less rumble and the less noise.
-I coated the sprocket and bracket in silicon caulking to reduce noise, it seemed to help a little, but was nothing compared to reducing the microsteps
-If you are looking to have the best of both worlds, you can add some code as follows in order to choose the microsteps based on the desired RPM. This way you can control the speed via vera and the arduino will actively choose the best microstepping mode. The regular EasyDriver has similar pins, but I believe the most microsteps is 8 and there are only two pins to control
-I am using a 8Mhz 3.3V APM and it may be possible to increase the steps/second if you use a more powerful processor (for example, 16Mhz APM) - I will test it with a nano when I get a chance. @hek, the nano used for the gateway is 16Mhz, correct? It says 16M on the eBay page but I just wanted to confirm.void newnMicroSteps(){ if(nMicroSteps==1){ digitalWrite(MS1pin,LOW); digitalWrite(MS2pin,LOW); digitalWrite(MS3pin,LOW); } if(nMicroSteps==2){ digitalWrite(MS1pin,HIGH); digitalWrite(MS2pin,LOW); digitalWrite(MS3pin,LOW); } if(nMicroSteps==4){ digitalWrite(MS1pin,LOW); digitalWrite(MS2pin,HIGH); digitalWrite(MS3pin,LOW); } if(nMicroSteps==8){ digitalWrite(MS1pin,HIGH); digitalWrite(MS2pin,HIGH); digitalWrite(MS3pin,LOW); } if(nMicroSteps==16){ digitalWrite(MS1pin,HIGH); digitalWrite(MS2pin,HIGH); digitalWrite(MS3pin,HIGH); } maxStepperSpeed = maxRPM/60*stepsPerRev*nMicroSteps; fullOpenSteps = fullOpenRevs*stepsPerRev*nMicroSteps; maxStepperAccel = maxAccelRPMPM/60*stepsPerRev*nMicroSteps; stepper1.setMaxSpeed(maxStepperSpeed); stepper1.setAcceleration(maxStepperAccel); }Edit: I just noticed that I calculated acceleration wrong. Here is the correct equation:
maxStepperAccel = maxAccelRPMPM/60/60*stepsPerRev*nMicroSteps;