Multisensor node using Ceech board


  • Here are some pics of my multisensor node, using the Ceech board with lithium battery charger. The stripboard houses - from left to right - a BMP180, HTU21D and BH1750FVI. As you can see, I've soldered radio and connections directly to the board, to reduce height in order to fit the box.

    IMG_1957 copy.jpg
    IMG_1958 copy.jpg
    IMG_1959 copy.jpg
    IMG_1960 copy.jpg

    The box is the same as the one shown here:
    (http://www.ebay.com/itm/85x58x33mm-Waterproof-Cover-Clear-Plastic-Electronic-Project-Box-Enclosure-CASE-/281390875149?hash=item418434020d)

    (but purchased from UK eBay website).

    I had to shave the board down by about 1-2mm on one edge, to fit the box - sorry, Ceech!


  • @MikeF
    Nice project! Do you have the box vented in any way to allow humidity measurement?

    What is the button for on the sensor board?


  • @Dwalt I cut a slot in one end of the box; I intend to use it outdoors, mounted vertically, so that the slot is at the bottom.
    The button is a reset button, wired to the RESET connection on the Ceech board. I made a small hole in the lid (covered with Sellotape!), so that I can insert a pin / paper clip to press it.


  • Hardware Contributor

    I just love to see that you find those boards useful.
    Nice work.


  • Hi,

    Nice work indeed. Could you please share the code?
    I also have a ceech board, and this could be the use for it.

    Thanks,
    Joao


  • Here's the code I've used - it's based on Ceech's sketch for the board, with the addition of code for the BH1750:

    /*
     PROJECT: MySensors / LiON charger board 
     PROGRAMMER: AWI
     DATE: 28 april 2015/ last update: 11 may 2015 / BH1750 added: 5 September 2015
     FILE: MS_Solar_2.ino
     LICENSE: Public domain
    
     Hardware: Ceech - ATmega328p board w/ ESP8266 and NRF24l01+ socket LTC4067 lithium battery charger
    	and MySensors 1.4
    
    	Temp & Humidity - HTU21
    	Barometer & Temp - BMP085
    	Light sensor - BH1750
    	On board EEPROM (I2C)
    	On board Li-On charger with multiple V/A measurements
    	
    Special:
    	program with Arduino Pro 3.3V 8Mhz
    	
    SUMMARY:
    	Reads on-board sensors and send to gateway /controller
     Remarks:
    	On board EEPROM and MOSFET not used in this sketch
    	Fixed node-id
    */
    
    #include <SPI.h>
    #include <MySensor.h>
    #include <Wire.h> 				// I2C
    #include <HTU21D.h>            	// temperature / humidity (i2c, HTU21D, SHT21)
    #include <Adafruit_BMP085.h>  	// barometer / temperature
    #include <BH1750.h>
    
    #define LTC4067_CHRG_PIN	A1		//analog input A1 on ATmega 328 is /CHRG signal from LTC4067
    #define batteryVoltage_PIN	A0		//analog input A0 on ATmega328 is battery voltage ( /2)
    #define solarVoltage_PIN	A2		//analog input A2 is solar cell voltage (/ 2)
    #define solarCurrent_PIN	A6		//analog input A6 is input current ( I=V/Rclprog x 1000 )
    #define batteryChargeCurrent_PIN	A7		//analog input A7 is battery charge current ( I=V/Rprog x 1000 )
    #define LTC4067_SUSPEND_PIN	9		//digital output D9 - drive it high to put LTC4067 in SUSPEND mode
    
    const float VccMin        = 1.0*3.5;  // Minimum expected Vcc level, in Volts. Example for 1 rechargeable lithium-ion.
    const float VccMax        = 1.0*4.2;  // Maximum expected Vcc level, in Volts. 
    
    #define TEMPERATURE_CHILD_ID 2
    #define TEMP_CHILD_ID 3
    #define HUM_CHILD_ID 4
    #define BARO_CHILD_ID 5
    #define BATT_CHILD_ID 10
    #define SOLAR_CHILD_ID 11
    #define LIGHT_CHILD_ID 6
    
    HTU21D SHT21;						// Hum/Temp (SHT12)
    Adafruit_BMP085 bmp;    			// define baro/ temp meter
    BH1750 lightSensor;					// define light sensor
    
    MySensor gw(7,8); 					// Ceech board, 3.3v (pin default 9,10)
    
    unsigned long SLEEP_TIME = 60000;  	//  60 sec sleep time between reads (seconds * 1000 milliseconds)
    
    float lastTempSHT;			// SHT temp/hum
    float lastHumSHT;
    float lastTempBMP;
    float lastPresBMP;
    int altitude = 100; // 330 feet above sealevel
    float lastBattVoltage;
    float lastBattCurrent;
    float lastSolarVoltage;
    float lastSolarCurrent;
    int lastBattPct = 0;
    uint16_t lastLux;
    
    float VccReference = 3.3 ;				// voltage reference for measurement, definitive init in setup
    
    
    MyMessage temperatureMsg(TEMP_CHILD_ID, V_TEMP);			// SHT temp (deg C)
    MyMessage humidityMsg(HUM_CHILD_ID, V_HUM);					// SHT hum (% rh)
    MyMessage pressureMsg(BARO_CHILD_ID, V_PRESSURE);			// BMP pressure (hPa)
    MyMessage batteryVoltageMsg(BATT_CHILD_ID, V_VOLTAGE);		// Battery voltage (V)
    MyMessage batteryCurrentMsg(BATT_CHILD_ID, V_CURRENT);		// Battery current (A)
    MyMessage solarVoltageMsg(SOLAR_CHILD_ID, V_VOLTAGE);		// Solar voltage (V)
    MyMessage solarCurrentMsg(SOLAR_CHILD_ID, V_CURRENT);		// Solar current (A)
    MyMessage luxMsg(LIGHT_CHILD_ID, V_LIGHT_LEVEL);			// Light sensor (lux)
    
    void setup()  
    {
    	gw.begin(NULL, 19);  // fixed node 19
    	// Send the sketch version information to the gateway and Controller
    	gw.sendSketchInfo("AWI Dev THB/batt 19", "1.0");
    	gw.present(TEMP_CHILD_ID, S_TEMP);						// SHT temp
    	gw.present(HUM_CHILD_ID, S_HUM);						// SHT humidity
    	gw.present(BARO_CHILD_ID, S_BARO);						// BMP pressure (temp not used here)
    	gw.present(BATT_CHILD_ID, S_POWER);						// Battery parameters
    	gw.present(SOLAR_CHILD_ID, S_POWER);					// Solar parameters
    	gw.present(LIGHT_CHILD_ID, S_LIGHT_LEVEL);				// Light sensor
    	
    	// use VCC (3.3V) reference
    	analogReference(DEFAULT);								// default external reference = 3.3v for Ceech board
    	VccReference = 3.323 ;									// measured Vcc input (on board LDO)
    	pinMode(LTC4067_SUSPEND_PIN, OUTPUT);					// suspend of Lion charger set
    	digitalWrite(LTC4067_SUSPEND_PIN,LOW);       			//  active (non suspend) at start
    	Wire.begin();											// init I2C
    	SHT21.begin();											// initialize temp/hum										
    	bmp.begin();											// bmp085 temp/ baro
    	lightSensor.begin();									// light sensor
     }
    
    void loop()
    {
    	sendTempHum();
    	Serial.println();
    	sendTempBaro();
    	Serial.println();
    	sendVoltage();
    	Serial.println();
    	sendLight();
    	Serial.println();
    	gw.sleep(SLEEP_TIME);
    }
    
    
    void sendTempHum(void)
    {
        // SHT2x sensor
    	// Temperature and Humidity
    	float humidity = SHT21.readHumidity();
    	// send to MySensor network / only if change
    	if (humidity != lastHumSHT && humidity != 0.00) {
    		lastHumSHT = humidity;
    		gw.send(humidityMsg.set(humidity, 2));  // Send
    		}
    	float temperatureSHT = SHT21.readTemperature();
    	// send to MySensor network / only if change
    	if (temperatureSHT != lastTempSHT && temperatureSHT != 0.00) {
    		lastTempSHT = temperatureSHT;
    		gw.send(temperatureMsg.set(temperatureSHT, 2));  // Send
    		}
    	
    	Serial.print("SHT21 temp: ");
    	Serial.print(temperatureSHT);
    	Serial.print(" SHT21 hum: ");
    	Serial.print(humidity);
    }
    
    void sendTempBaro(void)
    // Send temperature and barometer from baro sensor (temp1)
    {
        float temperature = bmp.readTemperature();
       // send to MySensor network / only if change (not sent here)
    	if (temperature != lastTempBMP) {
    		lastTempBMP = temperature;
    		//gw.send(temperatureMsg.set(temperature, 1));  // Send
    		}
    	float pressure = (float)bmp.readSealevelPressure(altitude)/100;
        // send to MySensor network / only if change
    	if (pressure != lastPresBMP) {
    		lastPresBMP = pressure;
    		gw.send(pressureMsg.set(pressure, 1));  // Send
    		}
    	Serial.print("BMP180 temp: ");
    	Serial.print(temperature);
    	Serial.print(" BMP180 pressure: ");
    	Serial.print(pressure);
    }
    
    void sendVoltage(void)
    // battery and charging values
    {
    	// get Battery Voltage & charge current
    	float batteryVoltage = ((float)analogRead(batteryVoltage_PIN)* VccReference/1024) * 2;	// actual voltage is double
    	Serial.print("Batt: ");
    	Serial.print(batteryVoltage);
    	Serial.print("V ; ");
    	float batteryChargeCurrent = ((float)analogRead(batteryChargeCurrent_PIN) * VccReference/1024)/ 2.5 * 1000; // current(mA) = V/Rprog(kohm)
    	Serial.print(batteryChargeCurrent);
    	Serial.println("mA ");
    
    	// get Solar Voltage & charge current
    	float solarVoltage = ((float)analogRead(solarVoltage_PIN)/1024 * VccReference) * 2 ;		// actual voltage is double
    	Serial.print("Solar: ");
    	Serial.print(solarVoltage);
    	Serial.print("V ; ");
    	// get Solar Current
    	float solarCurrent = ((float)analogRead(solarCurrent_PIN)/1024 * VccReference)/ 2.5 * 1000;		// current(mA) = V/Rclprog(kohm)
    	Serial.print(solarCurrent);
    	Serial.print(" mA; charge: ");
    	Serial.println(digitalRead(LTC4067_CHRG_PIN)?"No":"Yes");
    	
    	// send battery percentage for node
    	int battPct = 1 ;
    	if (batteryVoltage > VccMin){
    		battPct = 100.0*(batteryVoltage - VccMin)/(VccMax - VccMin);
    	}
    	Serial.print("BattPct: ");
    	Serial.print(battPct);
    	Serial.println("% ");
    
    	gw.send(batteryVoltageMsg.set(batteryVoltage, 3));  		// Send (V)
    	gw.send(batteryCurrentMsg.set(batteryChargeCurrent, 6));  	// Send (mA)
    	gw.send(solarVoltageMsg.set(solarVoltage, 3));  			// Send (V)
    	gw.send(solarCurrentMsg.set(solarCurrent, 6));  			// Send (mA)
    	gw.sendBatteryLevel(battPct);
    }
    
    void sendLight(void)
    // Send light level - BH1750
    {
    	uint16_t lux = lightSensor.readLightLevel();
      	if (lux != lastLux) {
          gw.send(luxMsg.set(lux)); // Send
          lastLux = lux;
          }
        Serial.print("BH1750 lux: ");
    	Serial.print(lux);
    }
    
    /* Ceech board specifics for reference:
    It provides power for the circuit and charges the backup single-cell lithium battery while greatly extends battery life. You can monitor the voltages and currents. It has suspend mode, which reduces current consumption to around 40μA. The power source is a small, 5V solar cell. Connections:
    
    analog input A1 on ATmega 328 is /CHRG signal from LTC4067 (indicates fully charged)
    analog input A0 on ATmega328 is battery voltage
    analog input A2 is solar cell voltage
    analog input A6 is input current ( I=V/Rclprog x 1000 )
    analog input A7 is battery charge current ( I=V/Rprog x 1000 )
    digital output D9 - drive it high to put LTC4067 in SUSPEND mode
    All the voltages on analog inputs can be read with an analogRead() command in the Arduino IDE sketch. Those on inputs A0 an A2 represent direct values of the measured voltages divided by 2. The voltages on analog inputs A6 and A7 can be translated to currents. For example:
    
    Let us say that the voltage on A7 is 0.12V. And the trimmer pot on PROG pin is set to 2.5kOhm. This means that the current into the battery equals to 0.12V/2500ohm x 1000, which is 48mA.
    
    voltmeters on both battery and solar cell connections
    They are connected to analog inputs A0 and A2 on the ATmega328p. The voltage dividers resistors are equal, so the measured voltage is double the shown voltage.
    
    NRF24l01+ socket
    with CE and CSN pins connected to digital pins 7 and 8 ( you use RF24 radio(7, 8); in Arduino code). There is a 4.7uF capacitor connected across Vin and GND of the port
    */


  • Great stuff!

    I'll test it during the weekend!

    Thanks!


  • Hi,

    It works great! Thanks!
    Did you tune the potentiometers, or left as they were?

    I'm using 2x 6v, 100mA solar panels in parallel and one 5000mAh Li-ion battery.

    EDIT:
    Now in a sunny day, it seems something is missing (probably some tuning in the potentiometers). Somehow the battery is not charging:

    Batt: 3.73V ; 1.30mA 
    Solar: 6.64V ; 0.00 mA; charge: No
    BattPct: 33% 
    send: 19-19-0-0 s=10,c=1,t=38,pt=7,l=5,st=ok:3.732
    send: 19-19-0-0 s=10,c=1,t=39,pt=7,l=5,st=ok:1.298047
    send: 19-19-0-0 s=11,c=1,t=38,pt=7,l=5,st=ok:6.640
    send: 19-19-0-0 s=11,c=1,t=39,pt=7,l=5,st=ok:0.000000
    send: 19-19-0-0 s=255,c=3,t=0,pt=1,l=1,st=ok:33
    

    ceech.jpg

    Any idea/suggestion?

    Thanks!
    Joao


  • @joaoabs Glad you got it working.

    No, I didn't tune the pots.

    I had similar problems with solar panels: battery didn't seem to be charging. Also, you're getting a high solar voltage (6.64V) on a sunny day, as I did. I was concerned, as the absolute max Vin for the LTC4067 - from the datasheet, if I remember correctly - is 6.2V.

    I gave up using solar cells, and I'll just charge the battery from a USB charger when I need to.


  • Thanks for the feedback.

    I think the key here is in the potentiomenters, so I looked around for some guidance:

    The two trimmer potentiometers are used to determine the current for both the input side - to better match the internal resistance of the solar cell - and for the battery charge current. At shipping they are both set to around half the value ( 2.5kOhm), which set both currents to about 75mA.
    

    I don't know how to measure the internal resistance of the solar cell (shouldn't be as simple as measuring it with a ohmmeter, right?), but I'm assuming that if 75mA is half the value, the maximum should be 150mA. Since my panels in parallel can supply (theoretically) up to 200mA, I'll rotate the potentiomenter to its maximum. Now, wich potentiomenter is it (not identified in the board), and what to tune in the other potentiometer (should be the same mA, what does it depend on)?

    @Ceech, Any guidance on how to overcome this not-charging problem?

    Thanks,
    Joao


  • Hardware Contributor

    @joaoabs Try lowering input voltage. The IC is in overvoltage mode and we don't want to damage it. Next, try with 5V input. See if you get the charge.
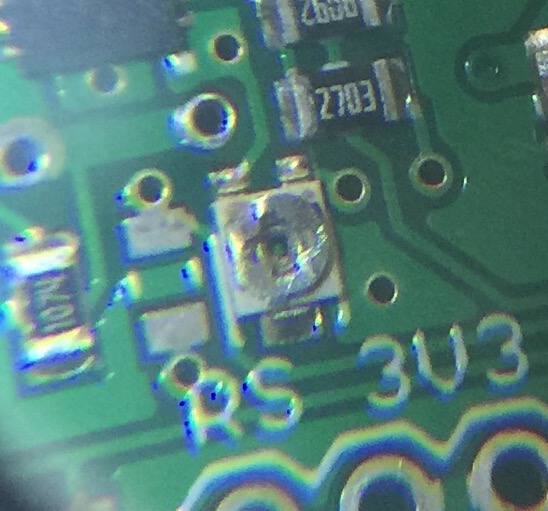
    The trimmer potentiometers:
    03_trimmer_pot.png
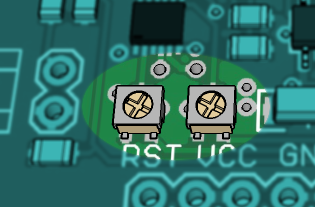
    The left one is battery charge current limit. Turn it to the left in order to maximize charging current.
    And the right one is input current limit. Keep the input current below solar panel maximum current. Turn it left to increase current limit.

    This is a formula to calculate input current: Ilim = 200V/Rclprog , where Rclprog stands for trimmer resistance.
    And this is how you calculate charging current: Ich = 1000V/Rprog, where Rprog stands for trimmer resistance. It is also limited with input current.


  • @ceech I'm using a more recent version of this board, with an LTC4079 charger (instead of the LTC4067).

    Which Arduino pin is the ~CHRG signal brought out on? A2 appears to be Vin (solar cell), whereas if I do analogRead(A7) I get a value around 500 (regardless of whether Vin is connected or not)?


  • Hardware Contributor

    ~CHRG is at ADC A7. It pulls low when the battery is getting charged. It's not always zero, sometimes is stuck around 10 or below. It works in conjunction with ADC A6, which is a battery current pin. Do you get any reports here?


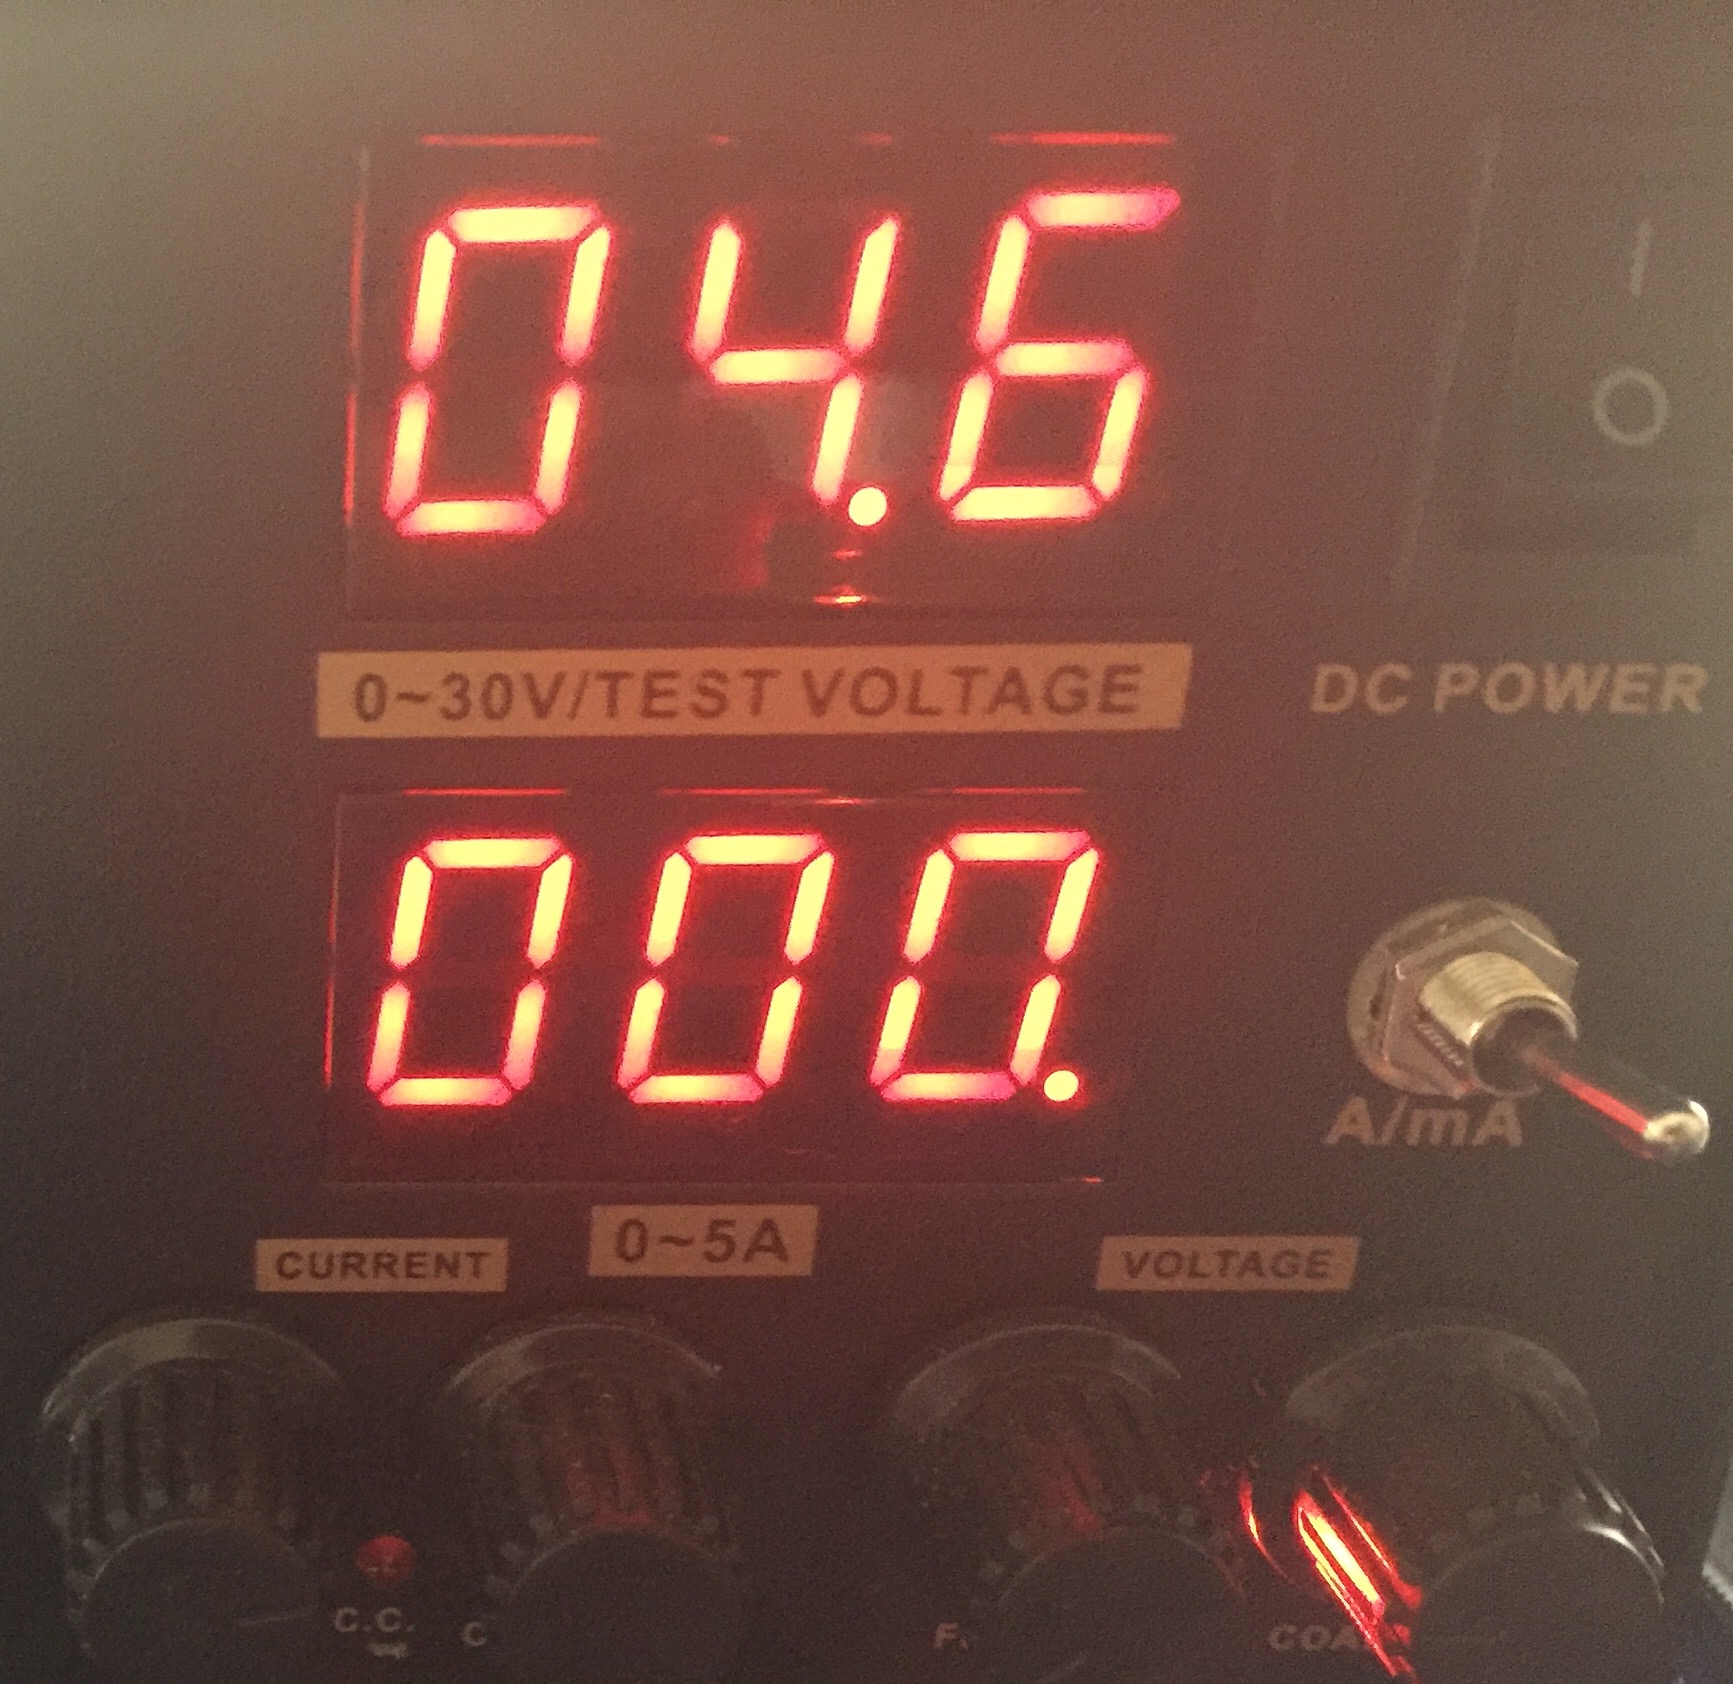
  • @ceech I've connected a 5V USB supply to the solar cell input, and I'm running your example sketch from your eBay web page for this board. I'm seeing a battery voltage of 3.59V (Li-ion), and charge current (monitoring A6) of 0.00mA - suggesting the battery isn't charging? As said before, A7 is showing values around 479.

    Vcc = 3.30V
    Charge current = 0.00mA
    Solar cell voltage = 4.98V
    Battery voltage = 3.59V
    CHRG = 479


  • Hardware Contributor

    Ah, yes. I think i know what the problem is. The LTC4079 has a built-in MPPT power tracking for solar panels and won't charge if the input voltage is below set point. This helps optimizing power extraction from solar panels. If you are using 5V input, then you should adjust the trimmer pot on the board. Like this
    0_1464367270031_hiijeejj.jpg
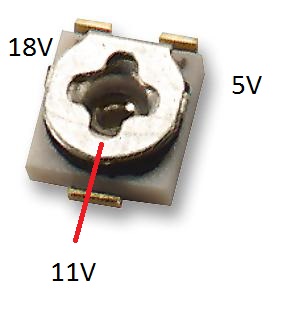
    Turn the top round part of the trimmer to the left so that the wiper reaches 5V mark like on the above picture. In other words reduce trimmer resistance to minimum. The other way around is for 18V solar panels.


  • @ceech That did it - thanks! 😄

    Currently charging at c. 90mA:

    Vcc = 3.30V
    Charge current = 89.93mA
    Solar cell voltage = 4.95V
    Battery voltage = 3.62V
    CHRG = 0


  • @ceech I have the same problem with the LTC4079 board:

    Running a simplified sketch gives the following:

    Vcc = 3.39V
    Charge current = 2.26mA
    Solar cell voltage = 5.40V
    Battery voltage = 4.11V
    CHRG = 502
    
    
    Vcc = 3.42V
    Charge current = 0.25mA
    Solar cell voltage = 5.41V
    Battery voltage = 4.11V
    CHRG = 500
    
    Vcc = 3.35V
    Charge current = 0.00mA
    Solar cell voltage = 5.24V
    Battery voltage = 4.11V
    CHRG = 498
    
    Vcc = 3.33V
    Charge current = 0.00mA
    Solar cell voltage = 5.19V
    Battery voltage = 4.08V
    CHRG = 496
    

    CHRG is never goes to zero or close and the charging current is low or zero. Shall I try to adjust the same potentiometer as above?


  • Hardware Contributor

    If the trimmer is in the same position as when new, then yes. Turn it anti-clockwise to reach its minimum value. Either that or raise the input voltage to 11V.


  • @ceech I cannot supply more than 6V as this is my solar panel maximum voltage.

    How many turns or degrees shall turn it?
    I did one and a half turn, but it still does not charge the battery. This is the current position.

    0_1464621473404_image.jpeg


  • Hardware Contributor

    This is a one turn trimmer. Its minimum value is close to 5V mark on one of the above pictures. And its maximum value is next to 18V mark. Since you've turned it more than once, you have to first determine the current wiper position. If you look closely you can see that the turning top is not quite round. One side is a bit flattened. That is the opposite side of the wiper. Now if you take a look at your picture then I think your wiper position is at around 6 or 7V ( to use the same terminology). I would say 20 more degrees to the left and you'll reach 5V.

    You can also measure the trimmer's resistance. Like so
    0_1464622721379_42262818.jpg
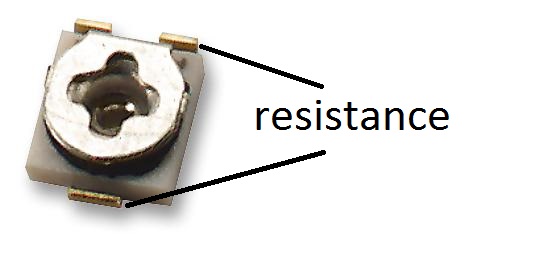
    Find the minimum value between marked points. That is your target resistance value.


  • @ceech - many thanks for above.
    I think I nailed it finally.
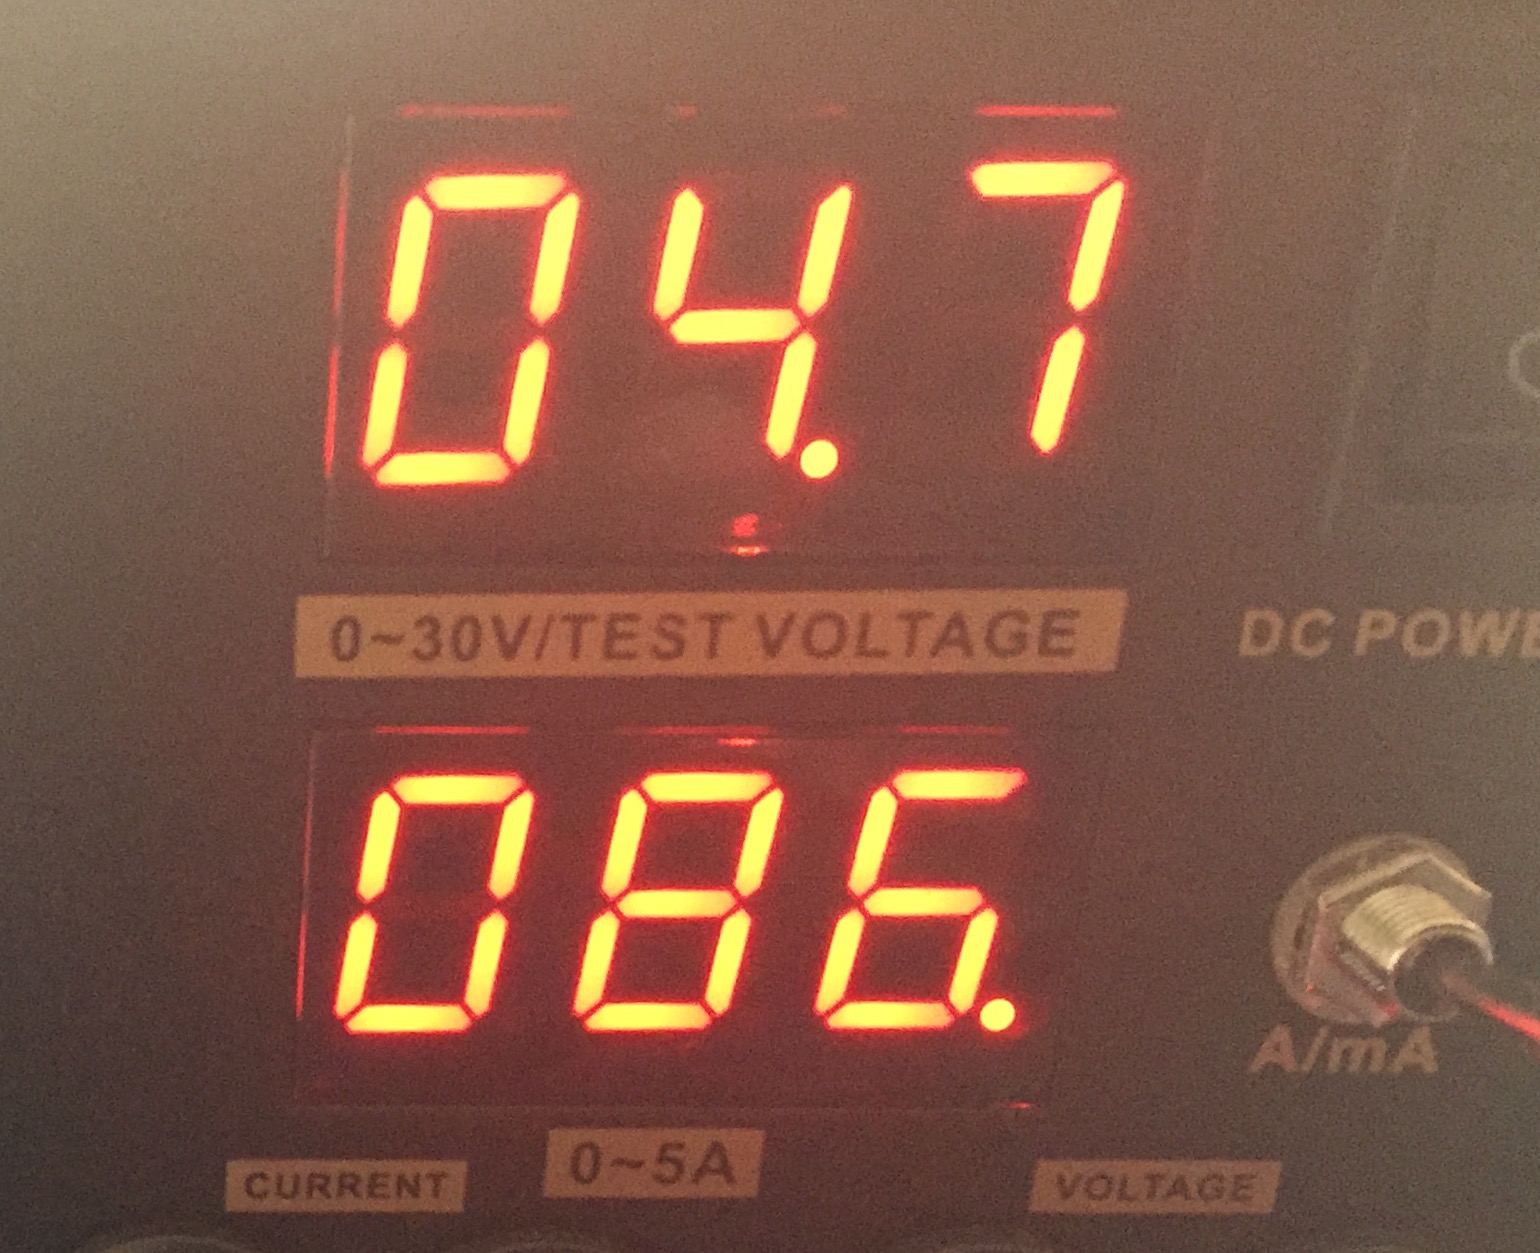
    Is the voltage below normal or can that be adjusted somehow?

    Vcc = 3.35V
    Charge current = 34.22mA
    Solar cell voltage = 4.55V
    Battery voltage = 3.80V
    CHRG = 446
    
    
    Vcc = 3.39V
    Charge current = 31.87mA
    Solar cell voltage = 4.72V
    Battery voltage = 3.78V
    CHRG = 451
    

    When does analogue A7 (CHRG) go down to zero or around zero?


  • Hardware Contributor

    What voltage would you like to adjust?
    The current is a bit low. What is your panel's maximum available current?
    The charger is not operating at its full power. Either you are a bit high with the setting on the trimmer or the panel can't supply enough. Charging current should be around 90mA.


  • @ceech The solar panal is 6V 4.5W, but right now it is used inside under my table lamp hence a lower voltage (4.7V). I'll to put it in the sun once the weather improves to test it.

    EDIT: I have not tested the solar panel before in the sun. Obviously, it provides ~4.8V inside and not sure if it will provide closer to 6v in the sun. I purchased it here http://www.ebay.co.uk/itm/281945297221

    Can I connect 5.5v power supply to the 'solar cell' contacts from a reliable PSU to test the trimmer settings ?


  • @ceech

    Ok, it looks like the trimmer is set to 5.5-6V
    I am feeding it from 5.5V PSU instead of the solar panal

    Charge current = 92.28mA
    Solar cell voltage = 5.54V
    Battery voltage = 3.82V
    CHRG = 467


  • Hardware Contributor

    Sure use your power supply. No problem. If the solar cell is 6V, than leave the trimmer. I think you got it just right.
    And you were getting 30mA INDOORS? That's great. I'm quite pleased with that information.
    This means that this sensor board can also be used as Indoors solar harvester.


  • @ceech yes, 30ma indoor, but it is under a direct light. The cut-off voltage is around 4.7V for charging.

    1_1464625903597_image.jpeg 0_1464625903596_image.jpeg


  • Hardware Contributor

    @alexsh1 You are at the minimum then. The trimmer was calculated for 4.75V minimum voltage. You might want to raise it a little to get 5.5V-6V MPPT.


  • @ceech Ok, but what's the tolerance please? I do want the threashhold to be at the minimum level, but meantime I do not want to damage LTC4079.


  • Hardware Contributor

    @alexsh1 No need to worry about minimum voltage destroying the IC. It is just necessary for the battery to receive full charge that the input voltage is within 4.75V and 20V.


  • @ceech Ok so if I have a sunny day and the solar panel is providing 6V, but I have 4.75V MPPT set as a minimum, there is no problem?


  • Hardware Contributor

    @alexsh1 No problem.


  • @ceech Thanks for your help!


  • I am really impressed with this board. On a very grey day outside, I have 4.7V on the solar cell and around 32mA charging current. Cannot wait for the sun to come out to test it.


  • Hi ceech,

    first things first: I have a really small knowledge about charging batteries.

    Could you give me a hint how to adopt the floating voltage for a NiCd battery?
    By reading the datasheet I only found NiMh with a 3kOhm PROG resistor while yours is 1180Ohm. Do I have to modify him to lower the charge current?
    And how about the timer capacitor. I red, that NiCd shouldn't charged too long. You pulled TIMER to ground, so the device will charge forever?

    Maybe this problem is solved by the sunset itself?

    Again thanks for your contribution!


  • Hardware Contributor

    The float, or better cut-off voltage for NiCd batteries is between 1.5V and 1.6V per cell.
    Programming resistor of 3k equals to 100mA of charging current and 1180 ohm equals to 250mA, which is a maximum value that the LTC4079 can handle (it gets too hot at this value). I equip the boards with 3k resistors.
    Batteries can be charged with different currents. One option is 0.1C (the C rate is the hour capacity of the battery). That is 10% of battery's nominal value. For 1000mAh battery that would mean 100mA.
    I pulled timer to ground which means that the charger will stop charging at C/10 or 10% of programmed current, or 10mA in case where a 3k resistor is used. This works fine for lithium batteries.
    NiCd or NiMH batteries should be charged with timer limit as you mention. It is not absolutelly necessary in our case. Let me explain. If you charge a NiCd battery with a 0.1C, that means that the battery will be fully charged in approximately 14 hours. So the sunset will be the timer that we need. And even if we charge the battery all the time a C/10 termination will reduce the charging current to a value which is close to a battery's self-discharge rate, thus keeping the battery voltage on safe levels.
    There is also battery voltage monitoring circuit on the board which can be used to report whenever the battery voltage is out of bounds.


  • Thank you very much!

    The 1180 ohm value was found in the IoT_pro_04.sch file at https://www.openhardware.io/view/44/Solar-powered-sensor-board#tabs-design. Or isnt it the resistance value? Maybe a smd size?


  • Hardware Contributor

    SMD size of the resistor is 0805.


  • As I understood, there is a buck boost converter that lifts the battery voltage to 3,3V. So I thought, two 1,5V batteries would be sufficient. Am I wrong?

    I've got a 5V solar panel and turned the trimmer clockwise to the end. Correct? (tried counterclockwise also, nothing changed.)

    Vcc = 2.96V
    Charge current = 0.00mA
    Solar cell voltage = 4.89V
    Battery voltage = 2.79V
    CHRG = 0


  • I've got light a bit closer and a current showed up:

    Vcc = 3.01V
    Charge current = 2.23mA
    Solar cell voltage = 4.89V
    Battery voltage = 2.85V
    CHRG = 0
    

    Is Vcc messuring the voltage comming from the usb device?


  • Hardware Contributor

    There are two versions of the board. One with a voltage regulator and one with a buck-boost converter. The first one does not step-up the voltage and the other does.
    Here is how the trimmer potentiometer work:
    0_1469951800535_hiijeejj.jpg
    The viper is on the red line. Turn it counterclockwise till it reaches the 5V mark. This is a 5V setting.
    5V solar cell is fine, just remember that the minimum voltage for the charger to operate is 4.75V. You are already on the minimum, so the solar cell needs to be well lit in order for system to operate.
    Vcc is a voltage rail that powers the microcontroller. It measures its own voltage.
    If you already have the solar cell and the battery connected than the USB voltage must not be applied!


  • In the ebay auction I bought it your text says buck boost converter. On the chip there is a number gnq 666 601, but I cant find him. Board says: 77534K_Y471


  • Hardware Contributor

    The first number from IC is the LTC4079. Board number means that you have one with a voltage regulator. You somehow ended with one. You can send it back and I'll send you replacement if you wish.


  • I am not amused...

    I will buy additonal batteries and a second solar cell.


  • Hardware Contributor

    There are also the appropriate charging voltage and current settings to be made to accommodate for the NiCd batteries. Are you sure you don't want for me to do it for you?


  • I thought, sunset will be enough to terminate charging on NiCd?

    So its easier to take 3,2V LiFePo4, right? And because my board only regulates down, I have to take 2 in series to provide enough voltage to regulate, right?

    All these flat LiPo types provide ~3,7V. Is that enough to feed the regulator (+dropout)?


  • Hardware Contributor

    Proper voltage and current also take effect in charging NiCd batteries.
    And LiFePO4 would also require different charge voltage (3.6V).
    The best option is a single cell LiPo battery with a capacity between 1000mAh and 2500mAh.
    Charge voltage matches (4.2V) and the current as well. Voltage regulator on the board is extremely efficient with just 2uA of consumption and 180mV dropout voltage. At 3V with the battery you still get 2.82V for the microcontroller. That's plenty. And quiescent current is the same in dropout. You'll be well off.


  • Hardware Contributor

    Like that one, yes. Or, if you do not mind doing some soldering yourself, you can choose one from this list:
    http://www.ebay.com/sch/i.html?_from=R40&_sacat=0&_nkw=Li-ion+Replacement+Battery+For+Samsung&_sop=15

    I do it like this:
    0_1470041071125_20160801_103631.jpg


  • I wanted to use it outside for collecting weather data. But the battery which the board is designed for isn't suitable for temperatures below 0°C.

    Is that right so far?

    Or did you successfully used Li-Ion outside below 0°C?


  • Hardware Contributor

    The capacity of LiPo batteries start to decline below 0 degrees Celsius. But that is a fact in all kinds of batteries. You are not going to notice much change till below -20 degrees. I found this post which describes it perfectly ( scroll down a little 😞
    https://backpackinglight.com/forums/topic/84570/


  • Ok, now I've got a 12V 50mA solar cell and a 3,7V 2000mAh LiPo. Potentiometer is at 12 o'clock (flat segment at the single solder pad)

    Can you please try to explain what exactly the potentiometer is adjusting?
    Does the charger only charge if the cell voltage is below the adjusted voltage level?

    Your example sketch is not showing any charging current:

    Vcc = 3.32V
    Charge current = 0.00mA
    Solar cell voltage = 0.24V
    Battery voltage = 3.79V
    CHRG = 424
    
    Vcc = 3.32V
    Charge current = 0.00mA
    Solar cell voltage = 7.44V
    Battery voltage = 3.79V
    CHRG = 409
    
    Vcc = 3.32V
    Charge current = 0.00mA
    Solar cell voltage = 11.72V
    Battery voltage = 3.79V
    CHRG = 0


  • @rollercontainer I would suggest you scroll up and see a few posts above concerning your question. The setting for potentiometer- for you it should be around 6 o'clock (or 12 o'clock where the cut-off mark is).

    Basically what it does is adjusting when your battery is being charged. For example, I have a 5V solar panel and I'd like the LiPO to start being charged at 4.75V therefore I put the potentiometer at the minimum (around 2pm or 8pm cut-off mark). This threshold (in my case 4.75V) can be adjusted by this potentiometer.


  • Hardware Contributor

    @rollercontainer The potentiometer is adjusting the voltage at which the solar panel is operating at its maximum power. It is so called MPPT. Just set it to the solar panel's nominal voltage.
    When the voltage on the solar panel is reduced (is in shade or we want to extract too much from it), the charger reduces the charging current in order to prevent the solar panel from collapsing entirely.


  • D'oh! I thought, the wiper of the trimmer is at the flat side, but its opposite to the flat, got it finally. Now pimatic is showing a current (0.74A).


  • Hi everyone, I'm new to arduino, and I bougth Ceech board.
    Can someone please let me know how to upload sketch on this board? I read it's compatible with arduino but I can't find any wiring schema.
    Also where is A7/CHRG ? Because my board go from analog A0 to A5.
    And I bought the following one :
    http://www.ebay.com/itm/331838940273?_trksid=p2057872.m2749.l2649&ssPageName=STRK%3AMEBIDX%3AIT

    I just want a solar/battery powered sensor. And I have anduino nano.
    Thank


  • @Fraid-DIRON welcome to the forum! This is beginners question and I would suggest you browse www.arduino.cc
    You will find tons of international on that web-site concerning programming Arduino in general. This is how I was learning it.

    Concerning Ceech's board, it is programmed the same way as any Arduino Pro or Arduino Pro Mini - with a help of FTDI USB to TTL converter (there are many on eBay) connected to the 6 angled pins on the board.

    This link is for Pro Mini, but Pro (Ceech's board) is programmed in exactly the same way:
    https://www.arduino.cc/en/Guide/ArduinoProMini


  • @alexsh1 said:

    FTDI
    Ohh thank you @alexsh1 , and my bad, you made me realize that Ceech's board as the ATMega. Now that make more sense the A7 is the analog pin 7 that is linked with the CHRG of LTC4067. Anyway Thanks 😄 !


  • @Fraid-DIRON No worries


  • Can someone explain, why the charger isnt charging all the time or at least earlier? BattVoltage is 3.96V on the right end. Is the cell considered full?

    0_1473780327845_solar.jpg


  • Hardware Contributor

    @rollercontainer For some reason current started to drop. Once it reached C/10 (around 10mA), charger stopped charging. This is a programmed function.
    I can see two reasons why the current started to drop. Voltage readings might be off for one. Or the battery doesn't accept charge above 4V. Its internal resistance might risen.

    Late charge start might indicate wrong voltage readings. If we assume that in the morning the voltage is 4.2V, then at 11 o'clock the voltage dropped just enough for the charger to start charging (also a programmed feature).


  • I've built nodes using two versions of the Ceech board intended for solar cells - one with the LTC4079 charger, the other with the earlier LTC4067 charger.

    I now want to use one of these as a pulse power sensor without sleep (as per MySensors example sketch), so it needs to be on non-battery power, i.e., from a 5V USB charger. If I remove the battery, which input should I connect the 5V to: the battery input or the solar input?


  • @MikeF Definitely the solar input. (Battery max voltage is 4.2V fully charged)


  • Hardware Contributor

    On the board with the LTC4079 there is a voltage regulator behind the input, so you can use battery connector. On the board with the LTC4067 use the VIN pin on the bottom connector.


  • Hello,
    I use a My Sensors 2.0 version of "Multisensor node using @ceech board" but I have this error:

    TSP:MSG:SEND 5-5-0-0 s=255,c=3,t=11,pt=0,l=12,sg=0,ft=1,st=ok:JMP-LightLux
    TSP:MSG:SEND 5-5-0-0 s=255,c=3,t=12,pt=0,l=3,sg=0,ft=0,st=ok:1.0
    TSP:MSG:SEND 5-5-0-0 s=10,c=0,t=13,pt=0,l=0,sg=0,ft=0,st=ok:
    TSP:MSG:SEND 5-5-0-0 s=11,c=0,t=13,pt=0,l=0,sg=0,ft=0,st=ok:
    TSP:MSG:SEND 5-5-0-0 s=1,c=0,t=16,pt=0,l=0,sg=0,ft=0,st=ok:
    Request registration...
    TSP:MSG:SEND 5-5-0-0 s=255,c=3,t=26,pt=1,l=1,sg=0,ft=0,st=ok:2
    TSP:MSG:READ 0-0-5 s=255,c=3,t=27,pt=1,l=1,sg=0:1
    Node registration=1
    Init complete, id=5, parent=0, distance=1, registration=1
    BH1750 lux: 387TSP:MSG:SEND 5-5-0-0 s=1,c=1,t=37,pt=3,l=2,sg=0,ft=0,st=ok:387
    
    Batt: 3.74V ; 414.08mA 
    Solar: 0.00V ; 0.00 mA; charge: Yes
    BattPct: 61% 
    TSP:MSG:SEND 5-5-0-0 s=10,c=1,t=38,pt=7,l=5,sg=0,ft=0,st=ok:3.738
    TSP:MSG:SEND 5-5-0-0 s=10,c=1,t=39,pt=7,l=5,sg=0,ft=0,st=ok:0.414
    TSP:MSG:SEND 5-5-0-0 s=11,c=1,t=38,pt=7,l=5,sg=0,ft=0,st=ok:0.000
    TSP:MSG:SEND 5-5-0-0 s=11,c=1,t=39,pt=7,l=5,sg=0,ft=0,st=ok:0.000
    !TSP:MSG:SEND 5-5-0-0 s=255,c=3,t=0,pt=1,l=1,sg=0,ft=0,st=fail:61
    

    after that the node doesn't send data to gateway.
    Do you have some ideas to solve the problem?
    thanks


Log in to reply
 

Suggested Topics

  • 8
  • 2
  • 29
  • 3
  • 2
  • 90

0
Online

11.2k
Users

11.1k
Topics

112.5k
Posts