Easy/Newbie PCB for MySensors
-
@sundberg84 tnx.
I looked at the FAQ and could not find an explaination how to use the pins TX/RX.The following is now on my build list, but maybe if I can use TX/RX pins it will free something...
- LED RX=A05
- LED TX=D02
- Relay_1=A00
- Relay_2=A01
- Relay_3=A04
- Temp_D03 (total of 4, resistor currently already soldered into the wire)
- Door_Switch=D05
- Leakage_Switch=D06
I tested the sketch on a Arduino Nano and it is working, now I need to convert everything to the Easy/Newbie PCB. ;-)
use the pins TX/RX
what do you mean? You can find the pins on the MysX connector (bottom left on the PCB). Instructions on how to use the pins isnt my cup of tea. You need to google that or you have to look at the arduino homepage.
There isnt anything to convert from nano to EasyPCB (except to find the right pins). The sketch will work just fine as it is.
-
If the battery jumper is opened there is not voltage at the NRF24 module and also not at the 3.3 pin of the MysX pin out. Ist this correct?I thought the NRF24 is powered by the battery booster by default. Or did I get it wrong?
This is correct because you dont want to feed 3.3v from the booster to the radio. The radio is very sensitive to noise (which will be the case with the booster) and since the radio can handle down to 1.9v the pcb is used like the description How?>Battery 3.3v @ https://www.openhardware.io/view/4/EasyNewbie-PCB-for-MySensors. This will feed the vattery voltage only (not from Booster) and therefore not give noise to the radio.
As mentioned above by @gohan its possible but not recommended... unless you got some really good modules you will end up with a 2m range on your radio (or no connection at all)
Maybe an idea for rev 10? Battery booster powered NRF24 module?
This is why Rev 1 and 2 never made it... I have been trying this out since 2014 and it just doesnt work. You might get lucky with 1 or 2 modules that works (or pay alot for low noise boosters which isnt my thought with EasyPCB).
I would instead suggest lowering BOD and/or change bootloader.
-
@sundberg84 my cheap alixpress booster and CDEbyte NRF24 worked fine on my solar powered outdoor sensor
@gohan as I said, I have been doing EasyPCB since 2014 and you might get lucky ;)
You need a great booster and a great radio - this works, but as we all know this combination when shopping from china is pure luck.
-
I had to do it because the supercap can go to lower than 1.9V, but I noticed it wasn't that bad, probably because I was generous on ceramic caps 😀
@gohan - trust me, I have tried all the caps there are on the booster. I also have now recently checked with a oscilloscope but I cant see any major difference (in less noise vs with or without 0,1-10uF cap). I must admit I have more test to do in booster - EasyPCB (cap) so any input is appreciated but im not sure a bigger cap equals less noise. A smaller cap can react quicker than a big one i think and with that it means you have to find a balance with response - capacity. If so, I can see with the booster I have (bad quality) varies a lot on noise, and with that means you should need a different cap on every booster (depending on the noise).
-
I have a 10uF ceramic on both booster output and near nrf24 socket and it has been working well. For battery powered nodes I'm moving to LiFePo4 batteries that have no need for booster and voltage divider. Much less hassle.
@gohan - yea, just as I said above. Moving to another battery or lower BOD/change bootloader is one good way to avoid booster problems. Good to hear its working well for you - lets hope it continues that way.
-
If the battery jumper is opened there is not voltage at the NRF24 module and also not at the 3.3 pin of the MysX pin out. Ist this correct?I thought the NRF24 is powered by the battery booster by default. Or did I get it wrong?
This is correct because you dont want to feed 3.3v from the booster to the radio. The radio is very sensitive to noise (which will be the case with the booster) and since the radio can handle down to 1.9v the pcb is used like the description How?>Battery 3.3v @ https://www.openhardware.io/view/4/EasyNewbie-PCB-for-MySensors. This will feed the vattery voltage only (not from Booster) and therefore not give noise to the radio.
As mentioned above by @gohan its possible but not recommended... unless you got some really good modules you will end up with a 2m range on your radio (or no connection at all)
Maybe an idea for rev 10? Battery booster powered NRF24 module?
This is why Rev 1 and 2 never made it... I have been trying this out since 2014 and it just doesnt work. You might get lucky with 1 or 2 modules that works (or pay alot for low noise boosters which isnt my thought with EasyPCB).
I would instead suggest lowering BOD and/or change bootloader.
@sundberg84 Thanks for clarification! Do you have any idea how long i can power a NRF24 module with two AA batteries until the voltage is to low?
-
@sundberg84 Thanks for clarification! Do you have any idea how long i can power a NRF24 module with two AA batteries until the voltage is to low?
@SolderNewbie - it depends on many factors, but one example I have 2xAA, Pro Mini (Led and Voltage reg removed), DHT22, Voltage divider (for battery measurment), booster and sending temp & humidity + battery status every 15min should last 1-1.5 years.
-
use the pins TX/RX
what do you mean? You can find the pins on the MysX connector (bottom left on the PCB). Instructions on how to use the pins isnt my cup of tea. You need to google that or you have to look at the arduino homepage.
There isnt anything to convert from nano to EasyPCB (except to find the right pins). The sketch will work just fine as it is.
@sundberg84 Got it. In the end it I did not have to use them.
All devices I was looking for to use are working except for my Dallas Temp Sensors.
The resistor is between the wires VCC and DATA in the connectors so not soldered on the board itself.I checked if pin header
D3 had connection with D3 on the arduino (beep),
GND with GND on the arduino (beep),
VCC with VCC on the arduino (beep) at 4,7v.So the connector should be okay (no soldering error this time). If I connect the wire to the old Arduino nano the temp sensors are found... Connect them to the PCB.. Nothing found. Well must be something stupid I am missing here right?.
To check D3, I made an RX tranmission Led attached and it flashed fine. So it should be okay.
-
@sundberg84 Got it. In the end it I did not have to use them.
All devices I was looking for to use are working except for my Dallas Temp Sensors.
The resistor is between the wires VCC and DATA in the connectors so not soldered on the board itself.I checked if pin header
D3 had connection with D3 on the arduino (beep),
GND with GND on the arduino (beep),
VCC with VCC on the arduino (beep) at 4,7v.So the connector should be okay (no soldering error this time). If I connect the wire to the old Arduino nano the temp sensors are found... Connect them to the PCB.. Nothing found. Well must be something stupid I am missing here right?.
To check D3, I made an RX tranmission Led attached and it flashed fine. So it should be okay.
@sincze - that sounds strange.
Is it the same sensor or could the dallas sensor be broken?
Can you see anything in the debug/serial? /(Sometimes you can see -127 and so).Controller: Proxmox VM - Home Assistant
MySensors GW: Arduino Uno - W5100 Ethernet, Gw Shield Nrf24l01+ 2,4Ghz
MySensors GW: Arduino Uno - Gw Shield RFM69, 433mhz
RFLink GW - Arduino Mega + RFLink Shield, 433mhz -
@sincze - that sounds strange.
Is it the same sensor or could the dallas sensor be broken?
Can you see anything in the debug/serial? /(Sometimes you can see -127 and so).@sundberg84 Strange thing is.. If I unplug the temp cable from the PCB and plug it into the NANO the sketch detects the sensor. The exact same sketch on the mini says "0 sensors found" as I just print the number of sensors detected.
For debugging purposes If I would solder the resistor on the PCB and I have a different temp sensor with resistor within the cabling. Would that hurt (double resistors) ?
Would I have to look for a specific voltage between D3 and GND ? -
@sundberg84 Strange thing is.. If I unplug the temp cable from the PCB and plug it into the NANO the sketch detects the sensor. The exact same sketch on the mini says "0 sensors found" as I just print the number of sensors detected.
For debugging purposes If I would solder the resistor on the PCB and I have a different temp sensor with resistor within the cabling. Would that hurt (double resistors) ?
Would I have to look for a specific voltage between D3 and GND ?@sincze - so it sounds like you have issues between pcb connector and A0 pin on the atmega328. You could try to do a continuitytest between that - and check soldering job on the MysX connector and on the back on the pro mini (A0)
Controller: Proxmox VM - Home Assistant
MySensors GW: Arduino Uno - W5100 Ethernet, Gw Shield Nrf24l01+ 2,4Ghz
MySensors GW: Arduino Uno - Gw Shield RFM69, 433mhz
RFLink GW - Arduino Mega + RFLink Shield, 433mhz -
@sincze - so it sounds like you have issues between pcb connector and A0 pin on the atmega328. You could try to do a continuitytest between that - and check soldering job on the MysX connector and on the back on the pro mini (A0)
@sundberg84 Just for the check A0 or D3 (temp sensor)?
As A0 is working, I have a relais attached to it. ;) -
@sundberg84 Just for the check A0 or D3 (temp sensor)?
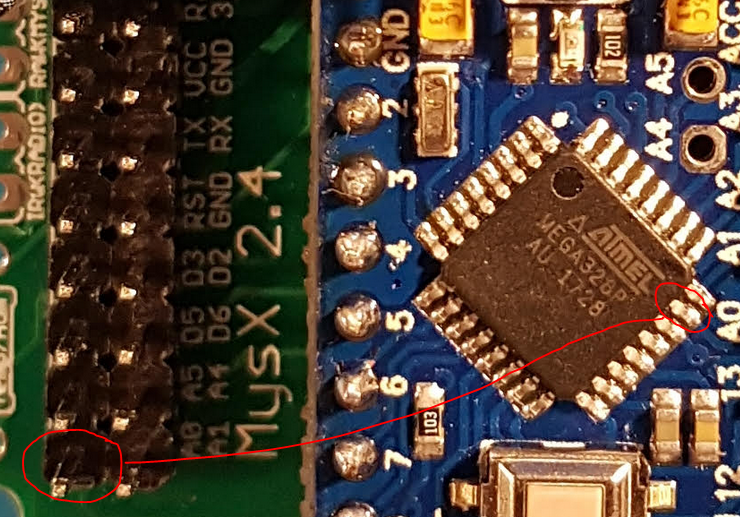
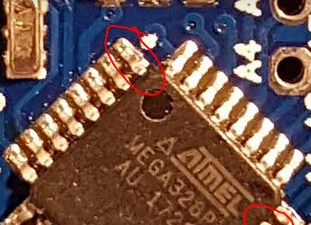
As A0 is working, I have a relais attached to it. ;)@sincze sorry - my misstake, D3 offcourse. You can do if from D3 on the MysX connector to D3 on the atmega chip. D3 on the cjip is the upper left pin on the image.
Controller: Proxmox VM - Home Assistant
MySensors GW: Arduino Uno - W5100 Ethernet, Gw Shield Nrf24l01+ 2,4Ghz
MySensors GW: Arduino Uno - Gw Shield RFM69, 433mhz
RFLink GW - Arduino Mega + RFLink Shield, 433mhz -
@sincze sorry - my misstake, D3 offcourse. You can do if from D3 on the MysX connector to D3 on the atmega chip. D3 on the cjip is the upper left pin on the image.
@sundberg84 yes, I have a 'beep' pffffff would a double resistor hurt ?? 1 on pcb the other one in the cable?
I tried connecting it directly to pin 3 on the arduino, no detection, I tried replacing the resistor. nothing. I tried a different temp sensors.. No detection. I moved the new temp sensor to the nano... detected.
I tried an empty Dallas temp only sketch on the mini... no detection. Well Now I'm lost ;-) -
@sundberg84 yes, I have a 'beep' pffffff would a double resistor hurt ?? 1 on pcb the other one in the cable?
I tried connecting it directly to pin 3 on the arduino, no detection, I tried replacing the resistor. nothing. I tried a different temp sensors.. No detection. I moved the new temp sensor to the nano... detected.
I tried an empty Dallas temp only sketch on the mini... no detection. Well Now I'm lost ;-)@sincze - and you use the right power source on the PCB? (VCC = 5v and 3.3v = Well... 3.3v) Please send pictures of both setup as mentioned.
-
Hi Sundberg84,
I have some v8 and now enough time for playing.
I setup with v3.3 2xAA, booster, NRF24, simple door sensor or DHT.
1-2 week and the batteries are discharged, I hear little buzz from the mini or other components.
This is the 2nd built where I meet this problem.
Do you have any idea what component is the failed ?
thanks
Barna