💬 Sonoff relay using MySensors ESP8266 wifi or mqtt gateway


  • Another I have had these running posts.

    I have had 3 Sonoff relays running on 240v 50Hz for 2-3 months straight.

    2 of them in IP67 outdoor lights with Phillips LED Lamps, switch on and off several times per day, Not a single hardware issue.

    best $6 ever


  • @betonishard ESPeasy I am not sure, but supposedly Tasmota does


  • Hardware Contributor

    @Bryden said in 💬 Sonoff relay using MySensors ESP8266 wifi or mqtt gateway:

    Another I have had these running posts.

    I have had 3 Sonoff relays running on 240v 50Hz for 2-3 months straight.

    2 of them in IP67 outdoor lights with Phillips LED Lamps, switch on and off several times per day, Not a single hardware issue.

    best $6 ever

    Yes over one month and very reliable, but with Domoticz is not integrating very well with my old 433MHz remote controls (that I use for my remaining 433MHz module until they are replaced).
    Making me think about a small plugin board to control the sonoff through serial port, so it would make a real MySensors node for 10$ and avoid all the power supply, relay etc etc soldering and not rely on wifi.


  • Mod

    I remember reading non to connect any other serial device while the Sonoff is connected to mains or it would get damaged.


  • @gohan The only time you would need to connect a serial device is I guess when you are flashing the software. There is no needTheThe only time you need to connect a serial device is when you are flashing the software. There is no need to connect it to the mains grid then. Whether it would damage anything i do not know but it is unnecessary and therefore absolutely not recommended to do it. Avoid working on anything that is connected to mains, especially if there is no need to have it connected


  • Mod

    I was referring to what @Nca78 said about controlling the sonoff through serial port.


  • @warmaniac you might have solved yr problem already. Anyway, I use the github/computourist software for the SonOff. have been using it for many months. very stable


  • @gohan ah ok. Sometimes I lose track of who is reacting to who. Must be old age 🙂


  • Hardware Contributor

    @gohan said in 💬 Sonoff relay using MySensors ESP8266 wifi or mqtt gateway:

    I remember reading non to connect any other serial device while the Sonoff is connected to mains or it would get damaged.

    I supposed that's when you connect your computer to sonoff using serial adapter ?
    I see no reason for damage if both es8266 and atmega are connected to the same VCC/GND.


  • Mod

    I think it's because the gnd on the sonoff is shared with neutral from the mains. I have seen pictures of burned stuff but I actually never wanted to try to see if the computer gets fried or not 😁


  • Hardware Contributor

    @gohan yes with it could happen, but if you just connect a standalone Arduino powered with VCC GND from esp8266 there's no reason to have a problem.


  • Mod

    But why would you want to connect another arduino to the sonoff?


  • @Ed1500 Thanks for your answer. Went for espurna.. Tested tasmota, but compared to espurna it was kind of slow. Works stable for quite some time now.


  • @betonishard Good to know. I was thinking about trying Tasmota for regular Sonoff, but I will keep slowness in mind


  • Hardware Contributor

    @gohan said in 💬 Sonoff relay using MySensors ESP8266 wifi or mqtt gateway:

    But why would you want to connect another arduino to the sonoff?

    To have a real MySensors node that can be directly controlled with another node and not relying on wifi and controller.


  • Mod

    Sorry but I am still missing the point. If you have to make a mysensors node anyway, why not make a classic relay node?


  • Hardware Contributor

    @gohan because when using the sonoff I do not have to care about the power supply/safety, to find a case that is safe for electrical device and I only have a few things to solder.
    And sonoff is cheaper than buying separately the power supply, case, relay etc

    So just solder a few low voltage components on a PCB, plug in the sonoff and get a safe main powered actuator.

    Not 100% sure it's worth it yet, still thinking a out it 😉
    But main advantage is to reuse it in more complex sonoff devices with multiple relays, power measurement, in wall plugs etc etc


  • Mod

    Once you come up with something I'll take a look to better understand what you want to do 😀
    I have seen how to hack some of them to add a couple of wires directly on the esp8266 chip to get an i2c bus.


  • How can I create a new device in Vera for a gateway? Can't seem to get that working 😕


  • @efflon Do you know how I can setup the sonoff gateway on the Vera Edge? I used the MySensors plugin to add the sonoff to the network but can't get the relay to toggle.. 😕 Help is much appreciated!! Thanks!!


  • If someone wants, I create a modification to cooperate with DHT22. Data pin of DHT22 is connected to pin 5 of sonoff.

    /**
     * The MySensors Arduino library handles the wireless radio link and protocol
     * between your home built sensors/actuators and HA controller of choice.
     * The sensors forms a self healing radio network with optional repeaters. Each
     * repeater and gateway builds a routing tables in EEPROM which keeps track of the
     * network topology allowing messages to be routed to nodes.
     *
     * Created by Henrik Ekblad <henrik.ekblad@mysensors.org>
     * Copyright (C) 2013-2015 Sensnology AB
     * Full contributor list: https://github.com/mysensors/Arduino/graphs/contributors
     *
     * Documentation: http://www.mysensors.org
     * Support Forum: http://forum.mysensors.org
     *
     * This program is free software; you can redistribute it and/or
     * modify it under the terms of the GNU General Public License
     * version 2 as published by the Free Software Foundation.
     *
     *******************************
     *
     * REVISION HISTORY
     * Version 1.0 - Henrik EKblad
     * Contribution by a-lurker and Anticimex,
     * Contribution by Norbert Truchsess <norbert.truchsess@t-online.de>
     * Contribution by Ivo Pullens (ESP8266 support)
     *
     * DESCRIPTION
     * The EthernetGateway sends data received from sensors to the WiFi link.
     * The gateway also accepts input on ethernet interface, which is then sent out to the radio network.
     *
     * VERA CONFIGURATION:
     * Enter "ip-number:port" in the ip-field of the Arduino GW device. This will temporarily override any serial configuration for the Vera plugin.
     * E.g. If you want to use the defualt values in this sketch enter: 192.168.178.66:5003
     *
     * LED purposes:
     * - To use the feature, uncomment any of the MY_DEFAULT_xx_LED_PINs in your sketch, only the LEDs that is defined is used.
     * - RX (green) - blink fast on radio message recieved. In inclusion mode will blink fast only on presentation recieved
     * - TX (yellow) - blink fast on radio message transmitted. In inclusion mode will blink slowly
     * - ERR (red) - fast blink on error during transmission error or recieve crc error
     *
     * See http://www.mysensors.org/build/esp8266_gateway for wiring instructions.
     * nRF24L01+  ESP8266
     * VCC        VCC
     * CE         GPIO4
     * CSN/CS     GPIO15
     * SCK        GPIO14
     * MISO       GPIO12
     * MOSI       GPIO13
     * GND        GND
     *
     * Not all ESP8266 modules have all pins available on their external interface.
     * This code has been tested on an ESP-12 module.
     * The ESP8266 requires a certain pin configuration to download code, and another one to run code:
     * - Connect REST (reset) via 10K pullup resistor to VCC, and via switch to GND ('reset switch')
     * - Connect GPIO15 via 10K pulldown resistor to GND
     * - Connect CH_PD via 10K resistor to VCC
     * - Connect GPIO2 via 10K resistor to VCC
     * - Connect GPIO0 via 10K resistor to VCC, and via switch to GND ('bootload switch')
     *
      * Inclusion mode button:
     * - Connect GPIO5 via switch to GND ('inclusion switch')
     *
     * Hardware SHA204 signing is currently not supported!
     *
     * Make sure to fill in your ssid and WiFi password below for ssid & pass.
     */
    
    /**
     * Sonoff specific details (IM15116002)
     * 
     * The sonoff header left to right, relay above, LED below.
     *  [1]  vcc 3v3
     *   2   rx
     *   3   tx
     *   4   gnd
     *   5   
     *   
     * In arduinoIDE 1.6.* choose Generic ESP8226 module.
     * Hold Sonoff button when attaching FTDI to flash.
     */
    
    // Enable debug prints to serial monitor
    #define MY_DEBUG
    
    // Use a bit lower baudrate for serial prints on ESP8266 than default in MyConfig.h
    #define MY_BAUD_RATE 9600
    
    // No radio in Sonoff
    // Enables and select radio type (if attached)
    // #define MY_RADIO_NRF24
    // #define MY_RADIO_RFM69
    
    #define MY_GATEWAY_ESP8266
    
    #define MY_ESP8266_SSID "wifissid"
    #define MY_ESP8266_PASSWORD "wifipassword"
    
    // Enable UDP communication
    //#define MY_USE_UDP
    
    // Set the hostname for the WiFi Client. This is the hostname
    // it will pass to the DHCP server if not static.
    // #define MY_ESP8266_HOSTNAME "sensor-gateway"
    
    // Enable MY_IP_ADDRESS here if you want a static ip address (no DHCP)
    #define MY_IP_ADDRESS 192,168,2,200
    
    // If using static ip you need to define Gateway and Subnet address as well
    #define MY_IP_GATEWAY_ADDRESS 192,168,2,1
    #define MY_IP_SUBNET_ADDRESS 255,255,255,0
    
    // The port to keep open on node server mode
    #define MY_PORT 5003
    
    // How many clients should be able to connect to this gateway (default 1)
    #define MY_GATEWAY_MAX_CLIENTS 1
    
    // Controller ip address. Enables client mode (default is "server" mode).
    // Also enable this if MY_USE_UDP is used and you want sensor data sent somewhere.
    // #define MY_CONTROLLER_IP_ADDRESS 192, 168, 178, 68
    
    /*
    // Enable inclusion mode
    #define MY_INCLUSION_MODE_FEATURE
    
    // Enable Inclusion mode button on gateway
    // #define MY_INCLUSION_BUTTON_FEATURE
    // Set inclusion mode duration (in seconds)
    #define MY_INCLUSION_MODE_DURATION 60
    // Digital pin used for inclusion mode button
    #define MY_INCLUSION_MODE_BUTTON_PIN  3
    
    
    // Set blinking period
    // #define MY_DEFAULT_LED_BLINK_PERIOD 300
    
    // Flash leds on rx/tx/err
    // Led pins used if blinking feature is enabled above
    #define MY_DEFAULT_ERR_LED_PIN 16  // Error led pin
    #define MY_DEFAULT_RX_LED_PIN  16  // Receive led pin
    #define MY_DEFAULT_TX_LED_PIN  16  // the PCB, on board LED
    */
    
    #if defined(MY_USE_UDP)
    #include <WiFiUdp.h>
    #endif
    
    #include <ESP8266WiFi.h>
    #include <MySensors.h>
    #include <Bounce2.h>
    #include <SPI.h>
    #include <DHT.h>
    
    #define BUTTON_PIN 0  // Sonoff pin number for button
    #define RELAY_PIN 12  // Sonoff pin number for relay 
    #define LED_PIN 13    // Sonoff pin number for LED
    #define RELAY_ON 1
    #define RELAY_OFF 0
    #define LED_ON 0
    #define LED_OFF 1
    #define DHT_DATA_PIN 14
    #define SENSOR_TEMP_OFFSET 0
    static const uint64_t UPDATE_INTERVAL = 5000;
    static const uint8_t FORCE_UPDATE_N_READS = 10;
    unsigned long SLEEP_TIME = 5000; // Sleep time between reads (in milliseconds)
    unsigned long lastRefreshTime = 0; // Use this to implement a non-blocking delay function
    
    // Id of the sensor child
    // Set unique id for each sonoff if sub/pub on same mqtt topic
    #define CHILD_ID 0
    #define CHILD_ID_HUM 1
    #define CHILD_ID_TEMP 2
    
    float lastTemp;
    float lastHum;
    uint8_t nNoUpdatesTemp;
    uint8_t nNoUpdatesHum;
    bool metric = true;
    
    MyMessage msg(CHILD_ID,V_STATUS);
    MyMessage msgHum(CHILD_ID_HUM, V_HUM);
    MyMessage msgTemp(CHILD_ID_TEMP, V_TEMP);
    DHT dht;
    
    Bounce debouncer = Bounce(); 
    int oldValue = 0;
    bool state = false;


    void setup()  
    {  
      // Setup the button
      pinMode(BUTTON_PIN, INPUT_PULLUP);
    
      // After setting up the button, setup debouncer
      debouncer.attach(BUTTON_PIN);
      debouncer.interval(5);
    
      // Make sure relays and LED are off when starting up
      digitalWrite(RELAY_PIN, RELAY_OFF);
      digitalWrite(LED_PIN, LED_OFF);
    
      // Then set relay pins in output mode
      pinMode(RELAY_PIN, OUTPUT);
      pinMode(LED_PIN, OUTPUT);
    
      dht.setup(DHT_DATA_PIN); // set data pin of DHT sensor
      if (UPDATE_INTERVAL <= dht.getMinimumSamplingPeriod()) {
        Serial.println("Warning: UPDATE_INTERVAL is smaller than supported by the sensor!");
      }
      // Sleep for the time of the minimum sampling period to give the sensor time to power up
      // (otherwise, timeout errors might occure for the first reading)
      sleep(dht.getMinimumSamplingPeriod());
       
    }
    
    void presentation()  {
      // Send the sketch version information
      sendSketchInfo("Sonoff ethernet DHT22", "1.0");
      // Register sensor
      present(CHILD_ID, S_BINARY);
      present(CHILD_ID_HUM, S_HUM);
      present(CHILD_ID_TEMP, S_TEMP);
      metric = getControllerConfig().isMetric;
      // Send the current state
      send(msg.set(state?true:false));
      // Blink when ready
      blink();
    }
    
    
    void loop()
    {
      debouncer.update();
      // Get the update value
      int value = debouncer.read();
      if (value != oldValue && value==0) {
        // Toggle the state
        state = state?false:true;
        // Change relay state
        digitalWrite(RELAY_PIN, state?RELAY_ON:RELAY_OFF);
        // Change LED state
        digitalWrite(LED_PIN, state?LED_ON:LED_OFF);
        // Send new state
        send(msg.set(state)); 
      }
      oldValue = value;
    
      boolean needRefresh = (millis() - lastRefreshTime) > SLEEP_TIME;
      if (needRefresh)
      {
          lastRefreshTime = millis();
          
      // Force reading sensor, so it works also after sleep()
      dht.readSensor(true);
    
      // Get temperature from DHT library
      float temperature = dht.getTemperature();
      if (isnan(temperature)) {
        Serial.println("Failed reading temperature from DHT!");
      } else if (temperature != lastTemp || nNoUpdatesTemp == FORCE_UPDATE_N_READS) {
        // Only send temperature if it changed since the last measurement or if we didn't send an update for n times
        lastTemp = temperature;
        if (!metric) {
          temperature = dht.toFahrenheit(temperature);
        }
        // Reset no updates counter
        nNoUpdatesTemp = 0;
        temperature += SENSOR_TEMP_OFFSET;
        send(msgTemp.set(temperature, 1));
    
        #ifdef MY_DEBUG
        Serial.print("T: ");
        Serial.println(temperature);
        #endif
      } else {
        // Increase no update counter if the temperature stayed the same
        nNoUpdatesTemp++;
      }
    
      // Get humidity from DHT library
      float humidity = dht.getHumidity();
      if (isnan(humidity)) {
        Serial.println("Failed reading humidity from DHT");
      } else if (humidity != lastHum || nNoUpdatesHum == FORCE_UPDATE_N_READS) {
        // Only send humidity if it changed since the last measurement or if we didn't send an update for n times
        lastHum = humidity;
        // Reset no updates counter
        nNoUpdatesHum = 0;
        send(msgHum.set(humidity, 1));
    
        #ifdef MY_DEBUG
        Serial.print("H: ");
        Serial.println(humidity);
        #endif
      } else {
        // Increase no update counter if the humidity stayed the same
        nNoUpdatesHum++;
      }
    }
      // Sleep for a while to save energy
      //sleep(UPDATE_INTERVAL); 
    }
    
    void receive(const MyMessage &message)
    {
      // We only react on status messages from the controller
      // to this CHILD_ID.
      if (message.type==V_STATUS  && message.sensor==CHILD_ID) {
        // Change relay state
        // Only switch if the state is new
        if (message.getBool() != state) {
          state = message.getBool();
          // Change relay state
          digitalWrite(RELAY_PIN, state?RELAY_ON:RELAY_OFF);
          // Change LED state
          digitalWrite(LED_PIN, state?LED_ON:LED_OFF);
           // Send the current state
          send(msg.set(state));  
        }
      }
    }
    
    void blink()
    {
      digitalWrite(LED_PIN, digitalRead(LED_PIN)?LED_ON:LED_OFF);
      wait(200);
      digitalWrite(LED_PIN, digitalRead(LED_PIN)?LED_ON:LED_OFF);
      wait(200);
      digitalWrite(LED_PIN, digitalRead(LED_PIN)?LED_ON:LED_OFF);
      wait(200);
      digitalWrite(LED_PIN, digitalRead(LED_PIN)?LED_ON:LED_OFF);
    }


  • I think it is an easier and more general solution to use https://github.com/arendst/Sonoff-Tasmota


  • Mod

    @Morten-Mathiasen that is the one I'm using on my sonoff pow


  • @Jonathan-Caes said in 💬 Sonoff relay using MySensors ESP8266 wifi or mqtt gateway:

    Do you know how I can setup the sonoff gateway on the Vera Edge?

    I am using a Vera Plus. I did not go the route of MySensors for my Sonoffs. I use the ESP Easy firmware with a slightly modified Vera plugin. Here is my BLOG post on how to do it.
    https://dan.bemowski.info/2017/07/04/using-a-sonoff-with-espeasy-and-vera/

    You could still go the MySensors route. I just figured I'd show another alternative to this.


  • It's a shame that we cannot have both, mysensors and the ESP Easy stuff. There has been a project for this: https://github.com/letscontrolit/ESPEasyMySensors 😥


  • @Jan-Gatzke It is my understanding that ESP Easy can send and receive MQTT messages, couldn't you just use a MySensors MQTT gateway if you wanted to keep it on the MySensors path?


  • @dbemowsk You cannot because MQTT is just a transport and not a strict data format. You can however use MySenSors MQTT + ESP Easy MQTT + a broker + node red + a controller. Node Red can do data conversions and integrate everything.


  • @Jan-Gatzke I was just speculating. I do not use MQTT, so I am by no means an authority on the subject.


  • Mod

    @Jan-Gatzke said in 💬 Sonoff relay using MySensors ESP8266 wifi or mqtt gateway:

    It's a shame that we cannot have both, mysensors and the ESP Easy stuff. There has been a project for this: https://github.com/letscontrolit/ESPEasyMySensors 😥

    There is no real benefit to have the sonoff running mysensors instead of other firmwares, if your controller is able to communicate over mqtt to switch on/off the relay, you are fine


  • @gohan I know some controller are aware of ESP Easy via MQTT. If you controller does not support this directly, you have to integrate it manually (with node red). In my opinion scenarios, where MySensors with ESP Easy frontend would be of use, do still exist.


  • Hardware Contributor

    @gohan said in 💬 Sonoff relay using MySensors ESP8266 wifi or mqtt gateway:

    There is no real benefit to have the sonoff running mysensors instead of other firmwares, if your controller is able to communicate over mqtt to switch on/off the relay, you are fine

    IMHO there is one, when your controller is down, gateway is down or whatever, you could still have direct control or the light switch from a MySensors button with node to node communication.


  • Mod

    How do you do that if the sonoff is only having wifi?


  • Hardware Contributor

    @gohan said in 💬 Sonoff relay using MySensors ESP8266 wifi or mqtt gateway:

    How do you do that if the sonoff is only having wifi?

    Ah yes in that case you can't and yes there's no benefit 🙂


  • Mod

    A wired button would be a much fail safe option for sonoffs 😀


  • @gohan won't this option miss some features? 😄


  • Mod

    @Jan-Gatzke for a sonoff there aren't many options and also a wired button you are pretty sure it would always work. 😀


  • For the Sonoffs, you could wire an external button directly to the onboard button which is on GPIO 0, or you could wire it to GPIO 14 which is broken out on the programming header on most Sonoffs. Some older Sonoffs didn't have GPIO 14 on that header. Once you have a button or switch wired on, you can then change the code or do some firmware scripting depending which flavor of firmware you use.


  • @dbemowsk Do you know if there is a way to use vera edge / plus with Tasmota firmware instead of EasyESP??


  • @sam9s I have never played with Tasmota, so I have to say that I don't know. A Vera plugin would have to be coded or modified as I did with the HTTP Switch plugin to make it work if there is not one out there already. I am assuming that you looked at my blog post on the ESP Easy way.


  • Mod

    Can the Vera plug in work with mqtt?


  • @gohan Here is a plugin for MQTT using Vera. You would still need to have an MQTT Broker set up though. I am surprised that there is not an active MQTT plugin for Vera in the plugins section. Didn't find anything when I did a search for MQTT.


  • Mod

    I was just asking since tasmota works great on mqtt


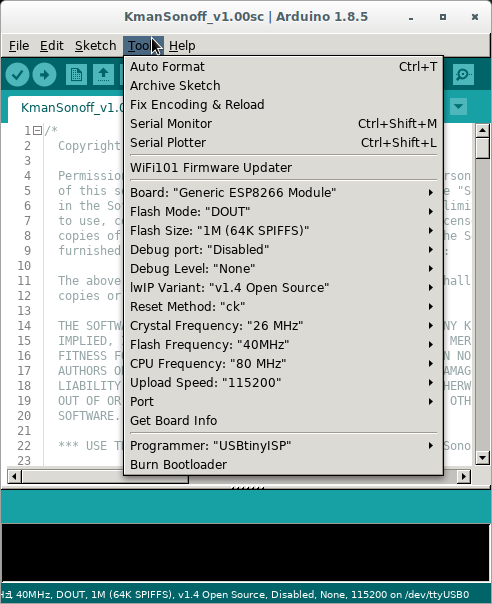
  • I will just leave that here for other like me that wondered for hours why they could flash their sonoff, but it did not react once plugged to the main.

    You need to setup your arduino with DOUT as flash mode.
    Other mode will flash without errors, but the device will appear bricked.
    My settings where:
    0_1517047090707_sonoff flashing settings.png


  • @tripy yes, you are absolute right - you need to set the flash Mode to DOUT for flashing the newer SONOFF generation (the SONOFF's with the hidden green LED).


  • Hello!
    Maybe someone here has a code for Sonoff RF with support 433 MHz receiver?
    alt text

    In my opinion, paired with a wireless wall switch, this will turn out to be quite a cheap and convenient solution for lighting control.
    alt text
    alt text

    The cost of a set of relay and switch about 10 dollars.


  • @electrik Now I just read the description of this firmware. To do this, I need to understand how to work with MQTT. I hoped to find a simpler solution. Ethernet gateway is much easier to connect.🤷‍♂️


  • Mqtt Is really easy to use in fact. Just follow a tutorial to install mosquitto and you're ready to go.
    It also depends on your controller of course


  • @electrik Thanks you! Now I will order everything I need on TaoBao in China. I just yesterday learned about the existence of the Sonoff module with 433 MHz radio support and wall switches for them.


  • Mod

    @vladimir what controller are you using? Most home automation controllers like domoticz and Home Assistant have a quick integration with Tasmota or EspEasy


  • @gohan I use OpenHAB 2. As I understand it, it also integrates well with Tasmota.


  • Mod

    good, give it a try


Suggested Topics

0
Online

11.2k
Users

11.1k
Topics

112.5k
Posts