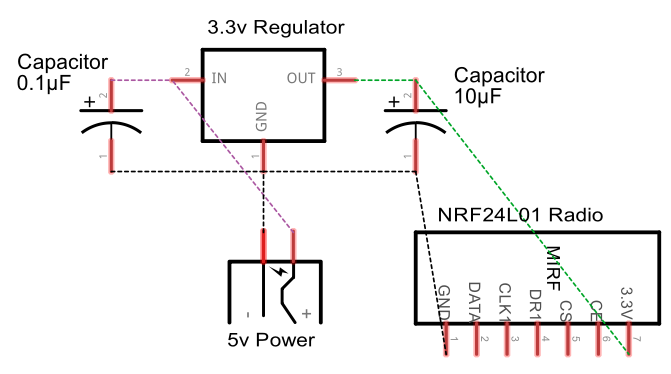
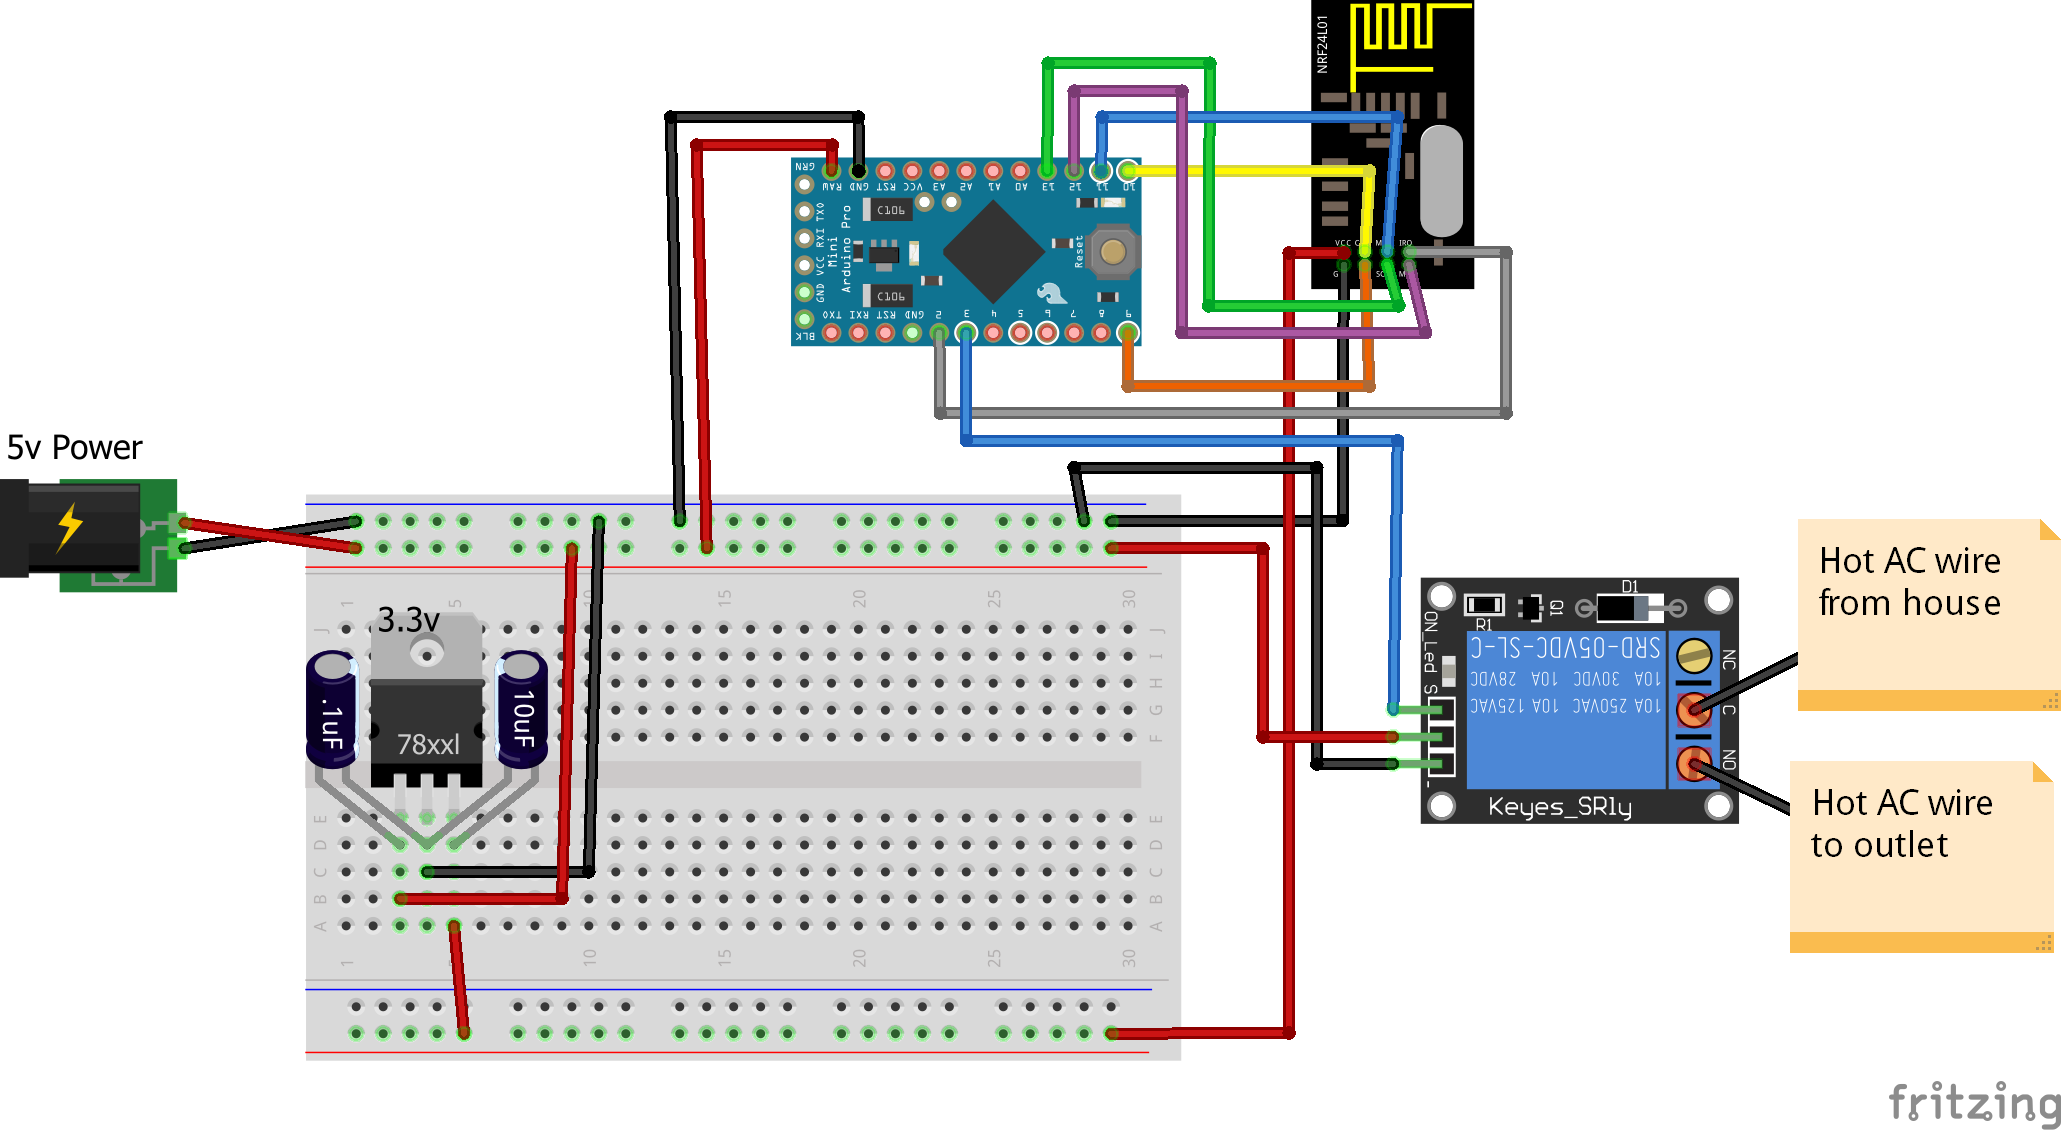
$8 Lamp (Outlet) "Smart Plug" Module


  • Hardware Contributor

    @petewill In my case from VCC from arduino. I try to change incoming to raw and see if that makes any differens.


  • Admin

    @sundberg84 said:

    @petewill In my case from VCC from arduino. I try to change incoming to raw and see if that makes any differens.

    Yeah, let me know. It's been a while, so I don't remember what project I had issues with, but I had issues with power when I was using the Arduino 5V. I always try to pull power from the source (not Arduino) whenever I can now. Hopefully this will help your issue.


  • Hardware Contributor

    Now the relay powers up, and i can switch (led turns on) but no click/coil activation so no 240v power out. Changed the relay but same result. I have 5v relay vcc and 5v on in but nothing... strange.


  • Hero Member

    @sundberg84 try the relay by itself first - connect to 5v and gnd and give it signal (even by just touching a wire to the signal leg). I had a run of several dead relays (was because of non rectified power supply so they switched on and off 50 times a second... one of the best ways to kill a relay I think)


  • Admin

    @sundberg84 said:

    Now the relay powers up, and i can switch (led turns on) but no click/coil activation so no 240v power out. Changed the relay but same result. I have 5v relay vcc and 5v on in but nothing... strange.

    Wow, that is strange. I am using 5 or so different relays all around my house every day and I've never had this issues. I always connect them to 5v directly from the dc transformer (old cell phone chargers).


  • Hi,

    any possibility of including a push button to manually trigger the switch on and off as well?
    And if possible update Vera on the status change.

    This way i can make it Wife safe and not get kicked out of the house...

    I'm not good with coding but if someone can point me in the right direction please...


  • Hardware Contributor

    There is a scetch in mysensors lib doing this. Relayaccuatorwithbutton or something. Download the examplescetches and have a look: http://www.mysensors.org/build/relay#relaywithbuttonactuator-example @Mohsin-Hassan


  • Hardware Contributor

    @petewill @Moshe-Livne . Coil activates when i try with a 9v battery, so either bad/cheap relays or to weak power plug. All measures +5v but its not enough. Ill order some new relays.


  • Hero Member

    @sundberg84 IMHO 9v will fry the relay. max voltage is 5.5v if my failing memory serves. depends on your relay, naturally but this is the most common one. have a look at the datasheet https://www.ghielectronics.com/downloads/man/20084141716341001RelayX1.pdf
    yes it is 5.5v - nominal 5v, max current is 110%. I am sure it can sustain 6 but 9v will be really pushing it IMHO


  • Hardware Contributor

    It was only to test coil failure and see if it was a power issue 🙂


  • Hero Member

    @sundberg84 A self fulfilling prophecy 🙂


  • Admin

    @Mohsin-Hassan said:

    Hi,

    any possibility of including a push button to manually trigger the switch on and off as well?
    And if possible update Vera on the status change.

    This way i can make it Wife safe and not get kicked out of the house...

    I'm not good with coding but if someone can point me in the right direction please...

    We are discussing this over here: http://forum.mysensors.org/topic/1607/safe-in-wall-ac-to-dc-transformers

    You want to be careful you use the right transformer so you don't burn your house down. 🙂 The wife probably wouldn't appreciate that.

    I really want to do this too. I'm just waiting for the experts to weigh in on which transformer is safe.


  • Admin

    @sundberg84 said:

    @petewill @Moshe-Livne . Coil activates when i try with a 9v battery, so either bad/cheap relays or to weak power plug. All measures +5v but its not enough. Ill order some new relays.

    So strange that it's not working. What is the power rating of your 5V transformer? Do you have a picture of your set up?


  • Hardware Contributor

    @petewill @Moshe-Livne

    I dont reallt wants to admit it...
    Well, I ordered the 5v relay from ebay (i have the reciept!) and looking at petewill video it says SRD-05VDC-
    Looking at mine it says SRD-12VDC so probalby the sent me a 12v relay...

    New one will arive soon i hope 🙂 Thank you for the help and sorry for clogging the thread.


  • Hero Member

    @sundberg84 that makes so much sense! And its not even your fault! 🙂


  • Admin

    @sundberg84 That's good news! Unfortunately you have to wait for new one but at least it's an easy fix!


  • @petewill
    Just out of interest: how did You come up with the length for the antenna?
    I remember vaguely that You can calculate the length if You know the
    used frequency but You connect Your wire to an already existing PCB-Antenna...

    Christoph


  • Admin

    @hyla I actually recently did a separate video on how I do this with a little more explanation. If you're interested it's here:

    Cheap DIY NRF24L01 Antenna Modification – 02:48
    — Pete B

    In summary, I measured the length of the existing antenna on the PCB then added additional wire to get it up to the required length for the 2.4GHz range (4.92 in).


  • Thanx 🙂

    Meanwhile I did some research too. The formula (as You all know 🙂 ) is:
    Lambda (m) = c(m/s) / f(1/s) with
    c= 299711000 m/s
    f= 2.400.000.000 hz

    which comes down to 0.1248795833333333 m or roughly 4.92 in
    The 1.64 in that are used on the PCB are actually Lambda/3.

    Nicely done, Pete 🙂

    C.


  • Hardware Contributor

    @petewill
    Now i got three working relays thanks to you, so again, great video!
    Wanted to thank you and also show my sollution.
    I hade some 433mhz cheap (not good working) relays with perfect case i could re-use:
    The case had a status-led and a switch i use as well.
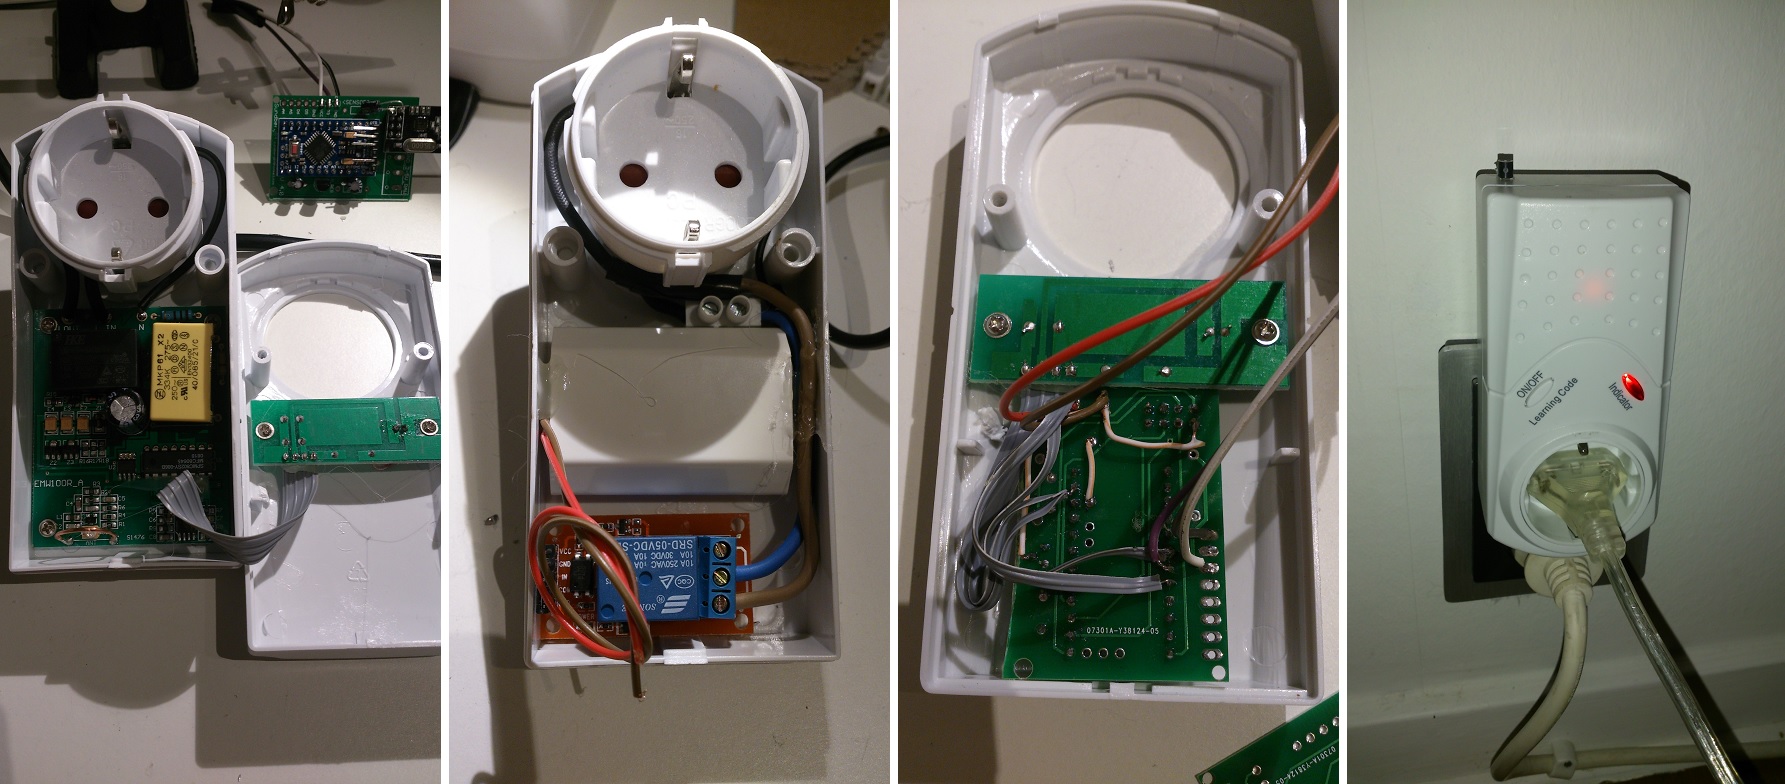
    Relay.jpg


  • Admin

    @sundberg84 Cool! That's nice to have a case like that.


  • Hardware Contributor

    @sundberg84
    Nice! That one deserves its own project thread. I think we're many interested in the details.


  • Hardware Contributor

    This is may realisation
    IMG_6600.JPG
    IMG_6601.JPG


  • Hi @petewill

    I've tried this and had inconclusive results rather then a significant extended rage. Not sure what I'm doing wrong or if it's the quality of my RF module.

    I've used some wire (8.33 cm) I had left over but its not one solid copper wire, its has many "strings" inside. In your experiment did you use one solid copper wire and can this influence this hack?

    Thanks


  • Admin

    @barduino I am using solid copper cat5e wire. I don't know much about antennas but it may change the behavior. Do you have any old cat5 that you can cut and test with?


  • @petewill

    I'm going to try it.

    I'm also using a capacitor on the RF module, not sure if you did combine both techniques.

    On a last note, I've noticed some power setting on the MyConfig.h (1.5 lib) cant remember the values form 1.4.1

    /**********************************
    *  NRF24L01 Driver Defaults
    ***********************************/
    #define RF24_CE_PIN		   9
    #define RF24_CS_PIN		   10
    #define RF24_PA_LEVEL 	   RF24_PA_MAX
    #define RF24_PA_LEVEL_GW   RF24_PA_LOW
    

    So now I'm initializing the gatweway as

    // Instanciate MySersors Gateway
    MyTransportNRF24 transport(RF24_CE_PIN, RF24_CS_PIN, RF24_PA_LEVEL);
    

    instead of

    // Instanciate MySersors Gateway
    MyTransportNRF24 transport(RF24_CE_PIN, RF24_CS_PIN, RF24_PA_LEVEL_GW);
    

    Not sure if there is a significant diference here...

    The results i'm getting now (after removing the antena, but with capacitor and changes on 1.5 MyConfig) are similar to the results I got from lib 1.4.1 with capacitor. I have a repeater about 15 meters from gateway and if i put it 17 meters it doesnt work anymore (there are some walls on the way)

    I'll just add a solid copper antena to see if results change.

    Thanks for the info!

    Cheers


  • Admin

    @barduino Yes, I always use a capacitor to filter power to my radio. I recently have been using 3.3v Pro Mini Arduinos so I have just been putting a 4.7uf cap very close to the radio.

    As far as I know the RF24_PA_LEVEL_GW is only used for the gateway. You can change the power level in the config file for the sensors but it looks like you already had it at the MAX. You can play with the power level depending on your radio model used with the gateway. On my gateway I experimented with an external antenna type radio and if it was set on max it completely wrecked my z-wave communication (there must have been interference like crazy since they are different frequencies). If you are using the PCB type antenna you can probably increase the power level to max without any issues. It's been a while since I did anything with my gateway (it's been working great for months) so I don't remember what settings I'm using. I do know I have the antenna hacked radio instead of the external antenna.


  • Hero Member

    One thing to note is that adding an external antenna extension to the on-PCB antenna moves this into the realm of "RF magic". What I mean is that it becomes a very non-standard sort of hybrid antenna about which we can predict very little. Like receiving television with rabbit ears and aluminum foil, you will mostly have to work by trial and error rather than exact calculations.

    The on-PCB antenna should already be tuned for the RF wavelength, probably near the middle of the band. We can also calculate the appropriate length for a straight wire used INSTEAD OF the on-PCB. But when we solder a wire onto the PCB antenna, we wind up with a very complex antenna which may or may not work very well (but in general it's far easier to make a random antenna work poorly than to make it work well). There are questions of antenna gain (or attenuation), but also of directionality - adding the wire might make it transmit/receive better in some directions and worse in other directions!

    Part of my point is that we cannot necessarily predict the best length of wire to solder to the on-PCB antenna by using the calculations that would apply with no PCB antenna. It may depend where on the PCB antenna trace you solder the extra wire, and perhaps on how the wire gets bent (especially if it comes near electrical conductors).

    So after you have the node placed where you want it (including the orientation), you can try moving the added antenna around in the case for better reception - and you can also try changing the wire length because 8.33 cm is not necessarily optimal for this hybrid antenna. Of course it's easier to shorten a wire by just successively chopping off a little bit at a time; you can solder in a new wire if need be.

    The length does not have to be super precise by the way - a loose wire antenna is not a highly tuned (Hi-Q) antenna and a slightly suboptimal length doesn't dramatically alter the results. Which is good, since the modules operate over a range of frequencies - and because even without the PCB antenna to really complicate things, even the PCB trace between the chip and the wire is part of the tuning as well, not just the bendable wire.

    Stranded wire vs solid should not have a large effect, compared to the many other factors involved here.


  • Contest Winner

    Hi Pete,

    I'm new to this forum, but I wanted to give you a big thumbs up. I really enjoyed watching your videos and I learned a lot from watching them. It's because of people like you that made me decide to start using MySensors.

    I have an old 433Mhx power plug that is broken. I see if I can turn it in to a MySensors power plug 😉


  • Admin

    @Zeph I agree. This is complicated stuff that I don't even begin to grasp. That said it is a cheap and easy hack to try. In my case it has helped every time. Maybe I just got lucky but it helped enough of my nodes that I thought I'd at least tell people about it. If it doesn't work, then just remove the wire and no harm done. Thanks for all your contributions to the site. Your knowledge is helping a lot of people.

    @TheoL Thanks for the kind words! Although, credit really goes to @hek and the team. They are the geniuses that make this all work! Good luck with "mysensoring" the old power plug. But, be careful, it's addicting. 🙂


  • Hero Member

    @petewill just to be clear - I appreciate your posting that adding the loose wire to the on-PCB antenna helped, and I'm not discouraging that. If it works, it works! Mostly I wanted people to understand that it's going to be trial and error, rather than something where they can count on calculating the best length (because it's added to another antenna at an unanticipated point, rather than being a standalone wire antenna). It would not surprise me if somebody found that a 6.5 cm wire worked better than 8.33cm, for their particular case (picking an example length at random). Wiggle those rabbit ears!

    I love the examples you post and your excellent videos. I have modestly good knowledge here and there, with gaps in other places, and your working examples give me confidence/inspiration to build something I haven't before - along with practical (not just theoretical) advice. You even turn your minor mistakes into lessons - how it should have been done, and how you managed to work around it anyway. Keep them coming!


  • Admin

    @Zeph said:

    Mostly I wanted people to understand that it's going to be trial and error, rather than something where they can count on calculating the best length (because it's added to another antenna at an unanticipated point, rather than being a standalone wire antenna). It would not surprise me if somebody found that a 6.5 cm wire worked better than 8.33cm, for their particular case (picking an example length at random). Wiggle those rabbit ears!

    I agree. The more knowledge provided to people the better hopefully it will result in better communicating nodes. Thanks for the posts!


  • Contest Winner

    @petewill Off course I'm very gratefull for what @hek and the team created. I've been playing with mySensors for a week now. And I'm still amazed by it. It's so easy to use. And I haven't had a failure yet. I'm currently promoting MySensors to everyone I know ;-).

    @hek Do you happen to have some small stickers with the MySensors logo? Ik would love to put them on the sensors I create. Something like "Powered by MySensors"?


  • Admin

    @TheoL said:

    Do you happen to have some small stickers with the MySensors logo? Ik would love to put them on the sensors I create. Something like "Powered by MySensors"?

    Good idea. But currently not something we have.


  • Hero Member

    I like the idea of logo stickers. Better in some ways than typical swag like t-shirts and coffee cups, because if it goes on the devices we build that provides useful information, not just advertising. Maybe leave a blank section where a node number could optionally be written in with a sharpie, or a version.

    Maybe "Networked by MySensors.org" rather than powered? ("Telepathy by MySensors"?)


  • Contest Winner

    @Zeph How about Wired by MySensors 😉 Because my experience is that it seems like all sensors and the gateway are wired together because of MySensors.


  • Admin


  • Contest Winner

    @hek they look good to me! Maybe you can start a poll on this forum. Ask the members who would like to buy the stickers. If the majority wants them, we can order them.


  • Hero Member

    The domes are kind of cool for some things, but I think for this purpose I'd actually prefer flat stickers that fit smoothly on any side of a project box, even curved, without protruding and looking like something that should be pressed, or that should light up.

    (OTOH domes atop an illuminated button (assuming translucent backing) would be awesome in some cases)

    And with flat, (re) distribution in small batches is easier - one could get a lot of them in a minimum-postage conventional letter.


  • Hi Pete,

    I'm thinking of using the AMS1117 3.3v regulator. Can I still use the 0.1uF and 10uF capacitors or do I need to use others. Because I run into sites saying I need to use 100uF and 1000uF and I think the difference is pretty big.

    Regards,

    Kenney

    btw: Great video! It helped me a lot!!


  • Admin

    @Kenney-R said:

    I'm thinking of using the AMS1117 3.3v regulator. Can I still use the 0.1uF and 10uF capacitors or do I need to use others.

    Yes, that should be fine. The capacitors are there to help filter the power to the radio (which can be sensitive).


  • Hero Member

    Regarding adding wires to the on-PCB antenna of a nRF24L01+ module, here's someone who used two wires (andcut some traces) to create a dipole. He knew that it was hard to really calculate the appropriate values, so he did empirical testing to find the best lengths, using a test program.

    http://www.instructables.com/id/Enhanced-NRF24L01/

    And is this from the same Pete or another one?
    Cheap DIY NRF24L01 Antenna Modification – 02:48
    — Pete B


  • Hero Member

    Another interesting (albeit long) video testing range of various modules and antennae.

    Ultimate nRF24L01 range comparison – 38:17
    — iforce2d

    The interoperability of different types is somewhat surprising. Some had only a 2/3 packet success ratio even at close range, but retained that for a long distance, for example. He did try cap vs no cap, and with "whip" (really more of a stubby or rubber ducky style) antenna parallel or with one pointing at the other. The unit with PA+LNA and shield was overall pretty good for range.


  • Admin

    @Zeph thanks for sharing. Always better to have more info and hopefully better range!


  • @sundberg84 how are you powering the arduino?


  • Hardware Contributor

    @dayve218
    Im using a USB charger as pete does in the video but mine is a iphone charger instead of a samsung.


  • Nice project, both Petewill and sundberg84.
    I was just wandering if you @sundberg84 know more about what is the device type/model/manufacturer you were moding?

    I've used quite some time and effort to find localy some good case that I can modify, I did manage to hack some of them but they are just not quite reliable (something with power just kills caps too often).

    Thanks in advance, sorry for bringing up old topic (but it is a very good one 🙂 )


  • Hardware Contributor

    @dakipro - Its a low brand 433mhz wall plugs i bought in Sweden called Everflourish emw100r. I dont think they are sold anymore. Its probably some china brand so maybe they are sold in another name.


  • So I have been thinking of building some relay controlled power strip nodes similar to these, but there have been some issues that I have been thinking about. The first is that if I am going to use a relay to turn on an outlet, the relay would need to be powered the entire time that I would want that device on. This would mean that not only am I powering the device that is plugged in, but the power to keep the relay on also. Wouldn't it be smarter to use latching relays? At least with those you don't need to keep power to the relay while your outlet is on. Has anyone ever done a MySensors node with latching relays? If so, how do you manage monitoring the state of the device?


  • out of the curiosity, what is downside of powering the relay entire time?
    that is how (all) wall switches work out of the box, you press the button and they turn on/off by powering the relay (all the time).
    I think that they work quite reliably when it comes to keeping power to the reley


  • @dakipro I wouldn't say that ALL wall switches work that way. And when you say (all) wall switches, what are you referring to? Standard (non automated) wall switches don't use relays. Also, most if not all of the X10 relay modules and wall switches that I have use latching relays.


  • I meant these typical automated/controlled wall switches mentioned in the topic http://www.nexa.se/vara-produkter/system-nexa/mottagare-paav/eycr-2300
    I opened 6-7 different ones to find the right casing for some projects, and they all had "regular" relay that goes back when the power is off (thus being powered the whole time). Of course I didn't open every single one of them, that is why I put (all) in parentheses.
    I am also not the expert on the relay topic, that is why I asked what is the downside 🙂


  • @petewill greetings sir.. Im getting error in your source code.. Maybe imported a wrong library.. Sir can i ask where did u get your MySensors.h library.. I get mine in codebender..

    My error is..

    MySensor gw;

    MySensor does not a nametype


  • Admin

    @Christian-Tollas This code has not yet been updated for MySensors version 2.0. I am still on version 1.5. When I finally upgrade my setup to 2.0 I will post the updated code but I'm not sure when that will be. If you want to go back to 1.5 for the time being that should work for you.


  • Hello,

    I'm newbie at this and I'm trying to make this, but I think my hardware needs to be different sinces my home voltage is arround 220V, does this hardware can handle this voltage or do I need to buy other capacitators ?

    Thanks


  • Admin

    @dseveriano as always you need to be very careful when using these voltages. That being said, this should work without any other hardware except for a phone charger rated for 220 (which I believe most are). The relay I used was rated for 10A 250VAC. I wouldn't go as high as 10A though.


  • @petewill Thank you, just one more question!
    What board is that, the red one where the relay is ? Is that necessary or can I put the relay in the same board ?


  • Admin

    @dseveriano Sorry, I'm not sure what you're asking. What board are you referring to?


  • @petewill Sorry the board I was refering was the relay board!!
    Regarding the current detection module wich one do you recommend ?


  • Admin

    @dseveriano Yes, the red board is the relay board which will control your 220V power.
    I haven't done much with current detecting but the module I was playing with was the ACS712. I found that even when no power was running through it there was still a few watts reported. Maybe that's a simple fix but I never really looked into it.


  • Did you integrate power meter function to your systeme?


  • Admin

    @jeremushka I haven't done it on the smart outlet but I did do it on my "Whole House Fan" project. You can check out the code from that if you're interested. Here is a link to the video if you wanted to check that out: https://youtu.be/KVsUe7sOCPo
    Also, just make sure you check out the specs on the acs712 and don't pass through more current than is safe. I don't remember the specs off the top of my head but I knew my whole house fan was safe because of what it would be drawing


Log in to reply
 

Suggested Topics

  • 8
  • 2
  • 1
  • 44
  • 1
  • 3

52
Online

11.4k
Users

11.1k
Topics

112.6k
Posts