CNC PCB milling


  • Hero Member

    Well, maybe the simplest upgrade would be to upgrade to a higher torque nema 17 motor, such as:
    https://www.aliexpress.com/item/Nema17-stepper-motor-60mm-length-1-7A-0-73Nm-7-3kg-cm-104Oz-in-High-torque/32727142878.html?spm=2114.search0104.3.1.RoU5IE&ws_ab_test=searchweb0_0,searchweb201602_2_10152_10065_5000015_10151_10344_10068_10130_10324_10342_10547_10325_10343_51102_10546_10340_10548_10341_10545_5130015_10084_10083_10307_5920012_10312_10059_10313_10314_10534_5790011_100031_10604_10103_10594_5060015_10142,searchweb201603_2,ppcSwitch_5&algo_expid=31255370-90b4-4695-94c0-997d9d68e388-0&algo_pvid=31255370-90b4-4695-94c0-997d9d68e388&rmStoreLevelAB=5

    or

    https://www.aliexpress.com/item/14-1-Planetary-Gearbox-High-Torque-Nema-17-Stepper-1-68A-CNC-Robot-3D-Printer/32585666715.html?spm=2114.search0104.3.22.RoU5IE&ws_ab_test=searchweb0_0,searchweb201602_2_10152_10065_5000015_10151_10344_10068_10130_10324_10342_10547_10325_10343_51102_10546_10340_10548_10341_10545_5130015_10084_10083_10307_5920012_10312_10059_10313_10314_10534_5790011_100031_10604_10103_10594_5060015_10142,searchweb201603_2,ppcSwitch_5&algo_expid=31255370-90b4-4695-94c0-997d9d68e388-3&algo_pvid=31255370-90b4-4695-94c0-997d9d68e388&rmStoreLevelAB=5

    or perhaps even

    https://www.aliexpress.com/item/High-Torque-NEMA-17-Planetary-Gearbox-Stepper-Motor-25N-m-3472oz-in-100-1-40mm-Motor/32789989913.html?spm=2114.search0104.3.56.RoU5IE&ws_ab_test=searchweb0_0,searchweb201602_2_10152_10065_5000015_10151_10344_10068_10130_10324_10342_10547_10325_10343_51102_10546_10340_10548_10341_10545_5130015_10084_10083_10307_5920012_10312_10059_10313_10314_10534_5790011_100031_10604_10103_10594_5060015_10142,searchweb201603_2,ppcSwitch_5&algo_expid=31255370-90b4-4695-94c0-997d9d68e388-8&algo_pvid=31255370-90b4-4695-94c0-997d9d68e388&rmStoreLevelAB=5

    Not sure what kind of impact it might have on the feedrate....

    The idea is that the higher torque would eliminate missed steps, provided that the feedrate is low enough.


  • @neverdie
    I think you should start by altering the acceleration/Max velocity settings etc in grbl.
    Slow them down a little😀


  • Hero Member

    @rmtucker said in CNC PCB milling:

    I think you should start by altering the acceleration/Max velocity settings etc in grbl.

    I don't see those parameters exposed in flatcam or in chilipeppr either. I guess I have to set them by issuing the grbl commands manually?


  • @neverdie
    Yes or use bCNC to set them.


  • Hardware Contributor

    Would this be something good to do? https://www.youtube.com/watch?v=7rVmiRgsI1M
    Cut a complete flat peace of wood with the cnc machine?


  • Hero Member

    @rmtucker said in CNC PCB milling:

    @neverdie
    I think you should start by altering the acceleration/Max velocity settings etc in grbl.
    Slow them down a little😀

    This was good advice! I arbitrarily reduced both to 50% of their default values, and so far it appears that repositional accuracy has improved.


  • Normally i would turn one up at a time until the motors lose steps,then pull them back 20%.


  • Hero Member

    @rmtucker How are you noticing when the motor skips? Is it from noticing a delta in test probe depths?

    Also, what's a reasonable target for repositioning accuracy? i.e. if I set z to zero after doing a test probe, then move it around a bunch, and then return to the same x and y position and drop another test probe, how far off from zero is the second test probe? Presently I only have a few datapoints, but so far it's suggesting maybe a maximum of 0.025mm after having done the 50% reductions, whereas before the reductions (i.e. default values) it was more than 0.05mm (maybe a lot more), which is just too much.

    alt text


  • @neverdie
    Hmmm how long is a piece of string.😀
    My machine is on a much larger scale but the principal is the same.
    Is this a mechanical inaccuracy or lost steps?
    Make yourself a small program that rapids each axis in turn from one end of the axis to
    the other.
    On my own machine the motors are running pulleys to the leadscrews/ballscrews.
    I place a mark on the pulleys and a pointer (pin and blue tac) when the machine is at 0,0,0.
    I run the program and adjust the accel and velocity returning to 0,0,0 every time and checking the marks always line up.(If they don't lowering the settings 10% and running again).
    Which eventually proves it is not lost steps.


  • @neverdie
    Forget using probe to begin with as this would show lost steps but also any mechanical inaccuracy.
    Just concentrate on the motors to begin with.


  • Hero Member

    @andrew said in CNC PCB milling:

    @neverdie once the assembly is done, you should adjust the stepper drivers' current limiting as well.
    it is pololu a4988, you can find the corresponding details here:
    https://www.pololu.com/product/1182

    Wow, those Pololu directions bear an uncanny resemblance to this:
    https://www.youtube.com/watch?v=lAdvdX88WDs

    Jokes aside, the Jack stepper motors appear to be rated at 1.3A. @andrew Is that what you assumed when calibrating yours? If so, what Vref did you use? Since the motor driver board is a knock-off, it's not obvious what current sense resistor value to use. i.e. 0.050 ohm, 0.068 ohm, or something else?


  • @neverdie said in CNC PCB milling:

    @andrew Are you planning to provide more detail about how to setup and do double sided PCBs, or is it pretty much RTFM at this point? Just wondering. Your earlier posts were very thorough and helped a lot.

    did you manage to create double sided PCB jobs in the meantime based on my suggestion and on flatcam's documentation? it is not a hardcore process, let me know if you stuck at a given step.

    regarding to the mentioned upgrades. I agree with @executivul, it doesn't worth to do that with this machine. feedback from steppers, elevation measuring etc are overkill.

    it's capabilities are more than enough for very precise pcb milling, if you would like to do much more with it, then a different machine could be better instead. if you have issues with the results, then it is configuration / settings / cnc job issue. if you loose steps, then the given stepper driver is not properly adjusted (did you checked the pololu driver configuration from the linked documentation?) or your tool/spindle speed/cutting depth/feed rate is not good for the given job.


  • Hero Member

    @andrew said in CNC PCB milling:

    did you checked the pololu driver configuration from the linked documentation?

    See post immediately above yours.


  • Hero Member

    I guess measuring Vref is moot, because jack's stepper motor driver included in the kit (https://www.aliexpress.com/store/product/board/424291_32807192686.html?spm=2114.12010612.0.0.e009a31x1CJ1s) does not have an exposed via hole for measuring Vref.

    So, that leaves the first Pololu method, which is:

    The A4988 supports such active current limiting, and the trimmer potentiometer on the board can be used to set the current limit. One way to set the current limit is to put the driver into full-step mode and measure the current running through a single motor coil while adjusting the current limit potentiometer. This should be done with the motor holding a fixed position (i.e. without clocking the STEP input). Note that the current you are measuring is only 70% of the actual current limit setting, since both coils are always on and limited to this value in full-step mode, so if you later enable microstepping modes, the current through the coils will be able to exceed this measured full-step current by 40% (1/0.7) on certain steps; please take this into account when using this method to set the current limit. Also, note that you will need to perform this adjustment again if you ever change the logic voltage, Vdd, since the reference voltage that sets the current limit is a function of Vdd.
    

    So, it would appear that in order to put the driver into "single step mode," I must remove the driver board and put it into a test jig (or breadboard) which shorts MS1, MS2, AND MS3 to ground, but otherwise wire up the motor according to this diagram:
    alt text
    but connecting the STEP pin to Vcc on the logic power supply (?) so as to allow a fixed, but continuous, current through a single motor coil, which is what will be measured.

    As to the target current through a single coil that I'll be measuring, I guess it should be (0.7)*1.3=0.91amps?


  • @neverdie said in CNC PCB milling:

    @andrew said in CNC PCB milling:

    did you checked the pololu driver configuration from the linked documentation?

    See post immediately above yours.

    ok, I thought that you already did it, I told it to you long time ago 😉

    my controller has 0.1ohm Rcs. the steppers are rated to 1.3A, I configured the drivers to 0.9V which limits the stepper's current to 1.125A.


  • @neverdie no. you don't have to remove the drivers. you have to measure everything in place.
    in the mentioned pololu doc/demonstration it is also noted that the given Vref could be measured on the top of the potentiometer (video 3:15)


  • Hero Member

    @andrew said in CNC PCB milling:

    ok, I thought that you already did it, I told it to you long time ago

    It's done now. The default voltages had been about 0.6v. I just now raised them to 0.9v, same as yours. 🙂


  • Hero Member

    How many microsteps are being used, anyway? I'm not sure where that's defined. Apparently these drivers support up 1/16 steps, but it might be that larger steps are actually being used (?). If so, then maybe going to smaller steps would help?

    I notice one of the Pololu boards has the potential for doing 1/32 steps: https://www.pololu.com/product/2133
    and might even be drop-in compatible.


  • @neverdie said in CNC PCB milling:

    How many microsteps are being used, anyway? I'm not sure where that's defined. Apparently these drivers support up 1/16 steps, but it might be that fewer are actually being used (?). If so, then maybe going to smaller steps would help?

    I notice one of the Pololu boards has the potential for doing 1/32 steps: https://www.pololu.com/product/2133
    and might even be drop-in compatible.

    this cnc controller board is directly pulls the drivers' MS1,2,3 pins to high, which means that it is "hardcoded" to 1/16 microstep. you really don't need smoother steps than this.


  • Hero Member

    @andrew Great that you're back. Did you alter your max speed and max acceleration values at all from the defaults? You didn't list them in your earlier list of magic numbers.


  • @neverdie I still use my default settings (see below). I re-applied these settings after I flashed the board to grbl 1.1f.
    to be honest, after I found the right parameters for the PCB milling jobs I did not went further to fine tune the CNC settings, due to the lack of time. maybe later of the year, but currently I'm more than happy with the results.

    $0=10 (step pulse, usec)
    $1=25 (step idle delay, msec)
    $2=0 (step port invert mask:00000000)
    $3=5 (dir port invert mask:00000101)
    $4=0 (step enable invert, bool)
    $5=0 (limit pins invert, bool)
    $6=0 (probe pin invert, bool)
    $10=3 (status report mask:00000011)
    $11=0.010 (junction deviation, mm)
    $12=0.002 (arc tolerance, mm)
    $13=0 (report inches, bool)
    $20=0 (soft limits, bool)
    $21=0 (hard limits, bool)
    $22=0 (homing cycle, bool)
    $23=0 (homing dir invert mask:00000000)
    $24=25.000 (homing feed, mm/min)
    $25=500.000 (homing seek, mm/min)
    $26=250 (homing debounce, msec)
    $27=1.000 (homing pull-off, mm)
    $100=800.000 (x, step/mm)
    $101=800.000 (y, step/mm)
    $102=800.000 (z, step/mm)
    $110=800.000 (x max rate, mm/min)
    $111=800.000 (y max rate, mm/min)
    $112=500.000 (z max rate, mm/min)
    $120=10.000 (x accel, mm/sec^2)
    $121=10.000 (y accel, mm/sec^2)
    $122=10.000 (z accel, mm/sec^2)
    $130=200.000 (x max travel, mm)
    $131=200.000 (y max travel, mm)
    $132=200.000 (z max travel, mm)```

  • Hero Member

    @andrew said in CNC PCB milling:

    @neverdie I still use my default settings (see below). I re-applied these settings after I flashed the board to grbl 1.1f.
    to be honest, after I found the right parameters for the PCB milling jobs I did not went further to fine tune the CNC settings, due to the lack of time. maybe later of the year, but currently I'm more than happy with the results.

    $0=10 (step pulse, usec)
    $1=25 (step idle delay, msec)
    $2=0 (step port invert mask:00000000)
    $3=5 (dir port invert mask:00000101)
    $4=0 (step enable invert, bool)
    $5=0 (limit pins invert, bool)
    $6=0 (probe pin invert, bool)
    $10=3 (status report mask:00000011)
    $11=0.010 (junction deviation, mm)
    $12=0.002 (arc tolerance, mm)
    $13=0 (report inches, bool)
    $20=0 (soft limits, bool)
    $21=0 (hard limits, bool)
    $22=0 (homing cycle, bool)
    $23=0 (homing dir invert mask:00000000)
    $24=25.000 (homing feed, mm/min)
    $25=500.000 (homing seek, mm/min)
    $26=250 (homing debounce, msec)
    $27=1.000 (homing pull-off, mm)
    $100=800.000 (x, step/mm)
    $101=800.000 (y, step/mm)
    $102=800.000 (z, step/mm)
    $110=800.000 (x max rate, mm/min)
    $111=800.000 (y max rate, mm/min)
    $112=500.000 (z max rate, mm/min)
    $120=10.000 (x accel, mm/sec^2)
    $121=10.000 (y accel, mm/sec^2)
    $122=10.000 (z accel, mm/sec^2)
    $130=200.000 (x max travel, mm)
    $131=200.000 (y max travel, mm)
    $132=200.000 (z max travel, mm)```
    

    Looks like the only difference is that your default max rates for x and y were 800, whereas mine were 5000, and your max rate for z was 500, whereas my default was 800 before I cut it by 50% to 400.

    In the interest of minimizing differences, I'll adopt your defaults instead.


  • Hero Member

    @andrew said in CNC PCB milling:

    did you manage to create double sided PCB jobs in the meantime based on my suggestion and on flatcam's documentation? it is not a hardcore process, let me know if you stuck at a given step.

    Not sure what kind of pins to use for the alignment.


  • Hero Member

    Even after all this tweaking, the z-axis was off by 0.048mm after the latest set of probing.


  • @neverdie said in CNC PCB milling:

    Even after all this tweaking, the z-axis was off by 0.048mm after the latest set of probing.

    What do you mean by "off"? Afaik grbl doesn't have a M48 equivalent command for probe/machine repeatability... So it can't probe the same place automatically. You have to write your own code for that, based on G32.2 command, take a few measurements and see the difference.
    If you mean across the whole board, depending on the size of the measured area that's not bad at all.


  • @neverdie could you please explain how did you find/measure this? also please let me know the details of the executed job, including the G code generation properties/settings (e.g. feed rate, depth, multiple passes etc.) used in flatcam.


  • Hero Member

    @andrew said in CNC PCB milling:

    could you please explain how did you find/measure this?

    1. Decided upon an origen. Used Chilipeppr to "run test probe" to find the zero z-height. Zeroed x,y,z at that location.
    2. Did an autolevel, at 1mm spacing, over a 20x10mm area.
    3. Following this, returned to x=0, y=0. Ran another test probe. Ideally it would have come back as z=0. Instead, it came back as z=-0.048.

    So, if at that point I were to actually run g-code with a cutting depth of z=-0.05, it would barely scratch the surface. Somehow during the 1mm autolevel probing, z became uncalibrated. If I were to re-zero z based on the second test probe, it would cut, but the cutting depth wouldn't be uniform.

    Anyhow, my new rule is that if I come across a situation like the above, I throw out the auto-leveling and start over rather than executing the g-code. Often, the next autoleveling will have less discrepancy by step 3.


  • @neverdie
    Maybe run step 1
    Then run some g-code but above the job.(for a few mins).
    Then run step 3.
    This could be an autolevel problem.


  • Hero Member

    @rmtucker said in CNC PCB milling:

    Maybe run step 1
    Then run some g-code but above the job.(for a few mins).
    Then run step 3.

    How might that help?


  • @neverdie
    What if you have broken .048 off the end of the tool during autolevel?
    So run some g-code above the job then re-probe so you know you have not twatted the tool.☺


  • Hero Member

    @rmtucker said in CNC PCB milling:

    What if you have broken .048 off the end of the tool during autolevel?

    Good point. I'll have a closer look for that the next time it happens.

    Also, I'll try repeating the test using a dull bit (which presumably won't break) and see whether it still happens or not.

    Thanks!


  • @NeverDie grbl 1.1 probing command is G38.2 Z-10 F25 where Z tells it how low should go before erroring if it doesn't touch and F is the speed.
    You should try manually issuig G38, then G92 Z0 to set new Z0 position and then finally G0 Z10 F100 to lift the probe, rinse and repeat without the G92, how repeatable is the reading, does it stay at 10.00?
    Then do the air job, or some simple moving (G0 X5 Y5 Z5, G0 X0 Y0 Z10 a few times )and retest manually with G38

    LE. The probing command is G38.2, I've edited the post to correct it.


  • @neverdie said in CNC PCB milling:

    @andrew said in CNC PCB milling:

    could you please explain how did you find/measure this?

    1. Decided upon an origen. Used Chilipeppr to "run test probe" to find the zero z-height. Zeroed x,y,z at that location.
    2. Did an autolevel, at 1mm spacing, over a 20x10mm area.
    3. Following this, returned to x=0, y=0. Ran another test probe. Ideally it would have come back as z=0. Instead, it came back as z=-0.048.

    So, if at that point I were to actually run g-code with a cutting depth of z=-0.05, it would barely scratch the surface. Somehow during the 1mm autolevel probing, z became uncalibrated. If I were to re-zero z based on the second test probe, it would cut, but the cutting depth wouldn't be uniform.

    Anyhow, my new rule is that if I come across a situation like the above, I throw out the auto-leveling and start over rather than executing the g-code. Often, the next autoleveling will have less discrepancy by step 3.

    if your probe speed is too fast, then it could push the pcb at the given points and also it could damage your tip's end, as it was mentioned by @rmtucker, which could cause this issue as well.


  • @neverdie said in CNC PCB milling:

    @andrew said in CNC PCB milling:

    did you manage to create double sided PCB jobs in the meantime based on my suggestion and on flatcam's documentation? it is not a hardcore process, let me know if you stuck at a given step.

    Not sure what kind of pins to use for the alignment.

    I missed this reply from you.
    so, you have to define the alignment holes, typically outside of the actual pcb area, in the "frame".
    you have to define two of them, the rest will be calculated automatically.

    the steps are exactly the same as that you can see on http://flatcam.org/manual/procedures.html#side-pcb

    see the pic below. note, that you don't have to write the coordinates to the input boxes manually, once you click on the design area the corresponding coordinates will be copied to the clipboard, so you can use ctrl-v to fill out the settings.

    • click on the picture to define the axis (X in this example)
    • copy the corresponding coordinates to the point/box input filed
    • click on the design area to define the exact location of the first alignment hole (left side of the actual pcb)
    • copy the corresponding coordinates to the alignment holes input filed
    • click on the design area to define the exact location of the first alignment hole (right side of the actual pcb)
    • copy the corresponding coordinates to the alignment holes input filed. the two set of coordinates have to be separated by coma.
    • configure the alignment holes' drill size
    • click on the create align drill button and you're done. back on the project tab you can find a new drill job which you have to further process to create the belonging G code from it.

    alt text


  • Hero Member

    @andrew Are you using male header pins for your alignment? How deep are you drilling the holes them?


  • @neverdie yes, I use male pins, with 0.7mm drill (so it is tight for the pin), 5mm depth. but this is really up to you, choose anything which you have easy access to.


  • Hero Member

    @andrew

    With single sided PCB, I soldered the ground wire (for probing) to the copper cladding, just as the Chilipeppr author did. How are you handling it for two sided? If I do it that way for two sided, the solder bump may prevent the board laying flat on the wasteboard.


  • @neverdie I use a wood screw in the sacrificial board holding a piece of metal as a "clamp" I slide it over the board (1mm overlap) and clip one alligator clip to the screw, the other to the bit. After probing I slide it out of the way. The metal piece is about 10cm long and it's left in place for the life of the wood board.


  • @neverdie said in CNC PCB milling:

    @andrew

    With single sided PCB, I soldered the ground wire (for probing) to the copper cladding, just as the Chilipeppr author did. How are you handling it for two sided? If I do it that way for two sided, the solder bump may prevent the board laying flat on the wasteboard.

    I use some flat metal weight connected to the given wire, placed on top of the pcb.


  • Hero Member

    @andrew said in CNC PCB milling:

    hackaday just released a relevant post:
    https://hackaday.com/2018/01/04/guide-why-etch-when-you-can-mill/

    Interesting that the engraving bits he liked the best were the 30 degree 0.1mm bits. So far, that's been my preference as well.


  • Mod

    @neverdie Possibly too late, but it still might contain some handy tips: https://hackaday.com/2018/01/04/guide-why-etch-when-you-can-mill


  • Hero Member

    @yveaux said in CNC PCB milling:

    @neverdie Possibly too late, but it still might contain some handy tips: https://hackaday.com/2018/01/04/guide-why-etch-when-you-can-mill

    It nicely sums up the biggest challenge of all:

    The biggest challenge in this DIY process is getting a correct and consistent cutting depth. These V-bits yield a wider cut the deeper you go, effectively robbing you of precious engraving resolution. If you do not tune in just the right depth, some traces will come out too thin and frail.

    The results I'm getting seem random. Sometimes it's great. Sometimes it's totally unusable (obliterated traces). Some of the time it's usable, but only just barely.

    So, I'm trying to think of a better approach that might deal with that. Maybe one way might be to start every etching session by running @executivul 's calibration traces. If it's cutting too deep, adjust, and then run again. When it's finally cutting right, then cut the desired PCB traces.

    I don't know what the answer is, but that's where it currently stands with me.

    The alternative is to just make a number of boards. Then cherry pick the good ones and dispose of the rest.


  • Hero Member

    I think I've found at least one reason for the trouble I've been having: sometimes the double sided scotch tape hasn't been holding the board completely flat against the waste board. Instead, during the milling process, which has a lot of vibration, it can pop up in the area being milled. When that happens, it's effectively the same as having the milling go much deeper, and so traces can be obliterated. Hence, I may try the Shurtape GG-200 that was recommended in the Hackaday article.

    It may be that the copper clad boards I'm using just aren't flat enough in the first place. Add to that a waste board that may not be perfectly flat either, and it's not a good formula for keeping everything perfectly flat, which is evidently what it needs to be. The tape itself can't compensate for too large a mismatch.

    So, I'd like to try the earlier idea of milling the waste board flat. Just not sure how to do that.

    I would't be surprised if single sided copper clad boards are inherently prone to warping. If you think about it, the copper can expand/contract with temperature, and if it's on only one side....Unless the substrate has the same coefficient of thermal expansion, the result will inevitably be warping. The same would be true if the substrate is affected by humidity.

    The Hackaday article does mention that it's not necessarily easy to find good copper clad boards. He hints that it has been an ongoing issue over time. He gives a reference for an ebay board vendor in England that he currently likes, but unfortunately that doesn't help me much.

    What blank copper clad boards have folks here found that they like?


  • @neverdie Perhaps surface cleanliness is the problem rather than the tape, just a possibility... When you are dealing with such fine tolerances, any residue will allow the board to twist or warp...
    Not sure to what extent the milling itself would encourage deformation of the substrate, but irrespective, it would again depend on adhesion on the bottom face to resist it...


  • Hero Member

    @zboblamont said in CNC PCB milling:

    @neverdie Perhaps surface cleanliness is the problem rather than the tape, just a possibility... When you are dealing with such fine tolerances, any residue will allow the board to twist or warp...
    Not sure to what extent the milling itself would encourage deformation of the substrate, but irrespective, it would again depend on adhesion on the bottom face to resist it...

    You raise a good point. I suppose ideally the waste board would be covered in melamine or similar so that it can be cleaned of any bond breakers.


  • @neverdie Not sure whether you mean a slab of melamine or a laminated board...
    I'm sure I saw a video clip where a perspex or similar baseplate was mounted on the bedplate to provide a perfectly flat surface. The user released the adhesive tape using wd40 or similar, then cleaned the area afterward with alcohol.
    If I remember correctly, the perspex had locating dowels for the PCB, and always locked into specific location on the frame. If I find the video again will link it...


  • Hero Member

    @zboblamont said in CNC PCB milling:

    Not sure whether you mean a slab of melamine or a laminated board...

    Just laminated. Here, I've already made the switch:
    0_1515187815591_wasteboard2.jpg


  • I've seen people engrave round objects based only on autoleveling, gcode was generated for a flat surface. So autolevel should take care of the board not being perfectly flat. Only issue is to chose a grid step small enough so the matrix can follow the hills and valleys (3-5mm).
    On the other hand autolevel can not compensate for the board moving. Probing force is much lower than milling force. So when milling pcb prefers to move down and you get a shallow engrave where it was probed higher due to being lose.
    Lost steps should add, so a constantly deeper and deeper or shallower and shallower engrave would make me think of lost steps.
    I would try changing the probing speed to 10-15 and z max feedrate to 50, z max accel to 10. Add some grease to z axis components (engine/transmission oil or very light grease), a few drops goes a long way.
    Also make sure you do the z zeroing at 0,0 and don't reprobe at another point after the grid probing.

    LE. Rail bowing under gantry weight is another problem, it would appear as a convex (inverted soup bowl) surface, since in the middle of the rail the gantry goes lower so the surface appears to be higher.

    A dial gauge with a magnetic arm can be had cheaply these days and is a miracle for testing backlash and baseboard flatness. Fix the mag base to the spindle and start moving it back and forth
    Even removing the moving bed and testing against the y rails might yeld some surprise.

    LE2: baseboard/sacrificial layer flatening works only for plastic and mdf, normal wood or big piece wood conglomerate leaves a much worse surface than the original board.

    @NeverDie hope I gave you some ideas to play with, by the way I asked you earlier to do some tests for z axis repeatability, did you manage to do them?

    LE3. God damn it! Now I must haz this https://m.ebay.co.uk/itm/EU-UK-3-Set-2N-m-Nema23-76mm-Hybrid-Closed-Loop-Servo-Motor-3A-HSS57-Driver-CNC/152848151184?_mwBanner=1 and all my problems should be gone!


  • @neverdie As good as any I guess if it's new board...

    Curiously watched some videos, one using a smaller machine where the board was only locked from horizontal movement with pins (no tape under at all), another where MDF had been rebated to lock in a specific board size and taped down.
    In the first case he only set the z-axis in the centre of the board (and a neat way of doing it too by loosening the chuck and dropping the bit then retightening once close to the stop), no surface mapping nothing. The pins were to allow double sided cutting...


  • Hero Member

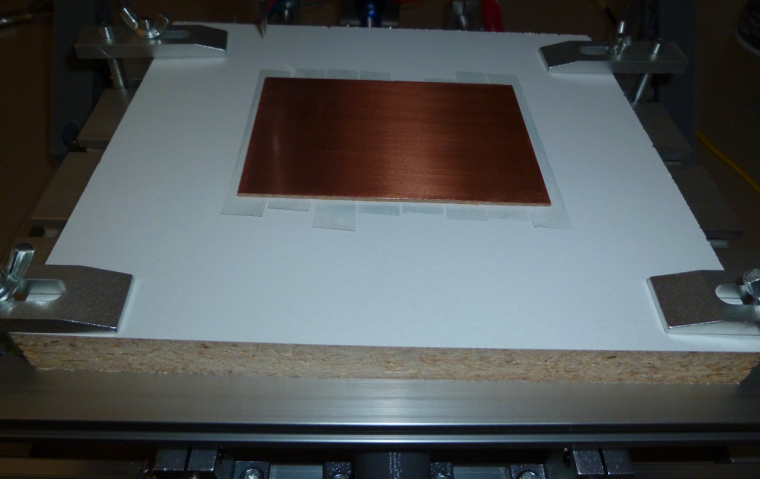
    Tried the new laminated wasteboard, and so far so good:
    0_1515193745297_sneak.jpg
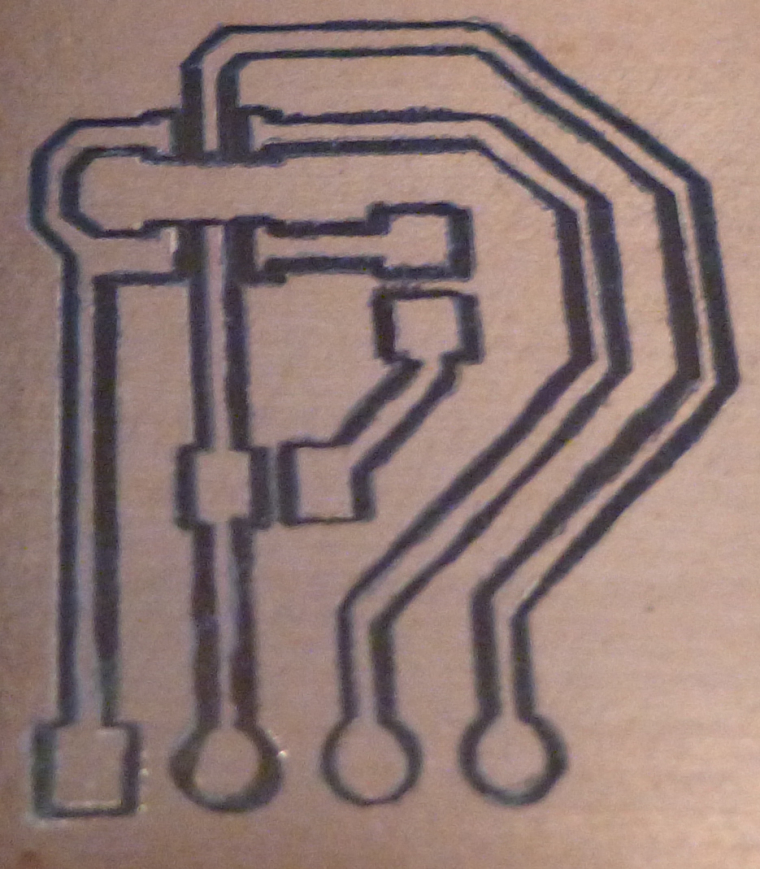
    I got the above result by a method you guys are probably going to hate, but it worked. Namely, I ""sneaked up on" the correct z-depth rather than committing to a single pass at, say, z=-0.05. So, to get the above I first did a pass with z=-0.02. That did manage to cut through in some areas, but not others. So, I increased the cut to z=-0.04 and did a second pass. The result is what you see above. No need to go further to z=-0.05.

    Also, I did the probing (at 4mm) with a blunt used etching bit. Afterward, I switched to a new Model 20 bit, did a test probe to zero it, and then initiated the first pass.


  • Hero Member

    So far this new approach seems to be working. Here I probed every 1mm using a blunt bit before switching to a model 10 to do the cutting at depth z=-0.03 (which was the third pass):
    0_1515201867549_model10_depth0p03.jpg
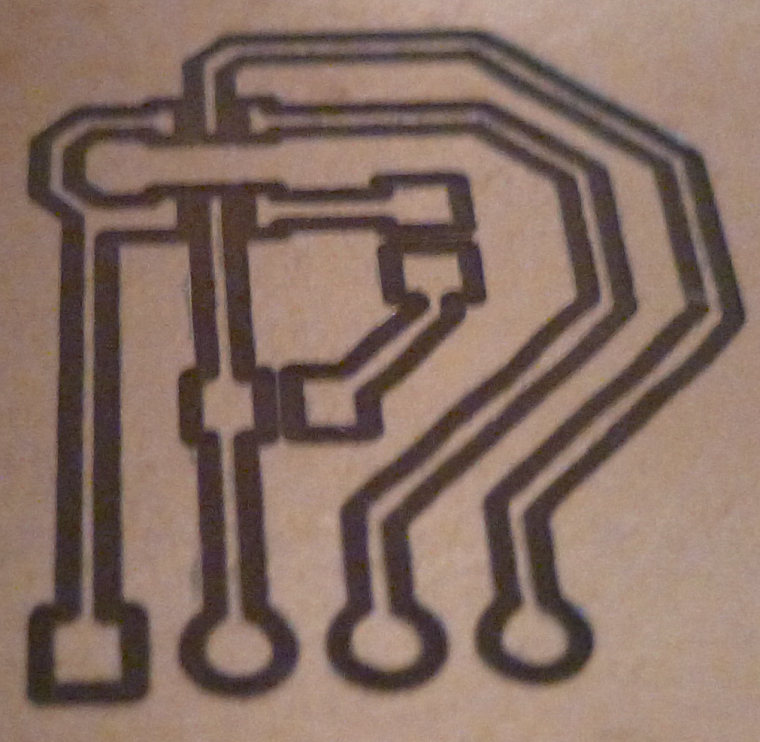
    The first two passes were at z=-0.01 and z=-0.02 respectively.


  • Hero Member

    @executivul said in CNC PCB milling:

    @NeverDie hope I gave you some ideas to play with, by the way I asked you earlier to do some tests for z axis repeatability, did you manage to do them?

    Not as yet. The new "sneak up" method has been working (now 3 times out of 3), so I'm going to stick with that for now.

    LE3. God damn it! Now I must haz this https://m.ebay.co.uk/itm/EU-UK-3-Set-2N-m-Nema23-76mm-Hybrid-Closed-Loop-Servo-Motor-3A-HSS57-Driver-CNC/152848151184?_mwBanner=1 and all my problems should be gone!

    I've noticed that there also exist the same sort of "servo stepper", but with all the electronics built into the stepper motor housing. That might be preferable, if only because it avoids the proliferation of wires that need to be managed. In any case, I don't see how these devices can be bad, and there's at least a chance they may do some good. If you decide to go for it, please do let us know what kind of improvement, if any, that you notice.


  • Hero Member

    I'm now 4 for 4 with the sneak up method. Each time it worked, so I feel comfortable I can rely on it. I now start with a cutting depth of z=-0.03, and then, as needed, I "sneak up" on the final cutting depth from there. That yields the minimum cutting depth, which in turn avoids trace obliteration.

    I'm just glad it works. 🙂


  • Hero Member

    I suspect using a roller, such as the following, might help in flattening the pcb down against the waste board:
    https://www.amazon.com/POWERTEC-71010-Handle-J-Roller-Rubber/dp/B00NFAOCVU/ref=sr_1_1?ie=UTF8&qid=1515463577&sr=8-1&keywords=laminate+roller


  • @neverdie You will get nowhere near the same downward pressure... just using your hands or tapping it down with a rubber mallet is more effective imho....


  • Hero Member

    Argh, the CNC totally died again. Except this time it isn't a bad power supply. Rather, the woodpecker board is non-responsive. Looks as though I'll have to order a replacement woodpecker board. 😞


  • Hero Member


  • Hardware Contributor

    @NeverDie
    too bad! perhaps it's just power supply regulator or a fet which died?? or maybe one of the drivers, just ideas.. I don't know this board.
    Saying this because that was the first things I checked on my 3d printer Ramps board

    • changed ldo (on arduino mega) because I didn't trust clones..
    • a few fets for better rdson (on the Ramps board). then there was no more heat..
    • and of course I calibrated the steppers drivers

    Edit: argh, i misread it's non responsive..then mcu maybe.


  • @neverdie I believe the boards with a removable Arduino Nano are better, if the uC fries you can replace it without replacing the whole board.


  • @executivul similar to the RAMPS boards for 3D printers. It's all modular so if your uC or a stepper driver dies, you can just replace that one part.


  • Hero Member

    @executivul said in CNC PCB milling:

    @neverdie I believe the boards with a removable Arduino Nano are better, if the uC fries you can replace it without replacing the whole board.

    I agree that seems like a far better design, for exactly that reason. I'm hoping this isn't something that happens regularly. If the replacement dies too, then I'll make the switch.


  • @neverdie or you could just mill your own board since now you have the tools 👌


  • Hero Member


  • Hero Member

    @scalz said in CNC PCB milling:

    @NeverDie
    too bad! perhaps it's just power supply regulator or a fet which died?? or maybe one of the drivers, just ideas.. I don't know this board.
    Saying this because that was the first things I checked on my 3d printer Ramps board

    • changed ldo (on arduino mega) because I didn't trust clones..
    • a few fets for better rdson (on the Ramps board). then there was no more heat..
    • and of course I calibrated the steppers drivers

    Edit: argh, i misread it's non responsive..then mcu maybe.

    It's receiving power, because the red LED lights up when I connect to it. The atmega328p also appears to be receiving the characters I send to it, because there's an LED that lights very briefly when I do that. However, I'm not seeing that it is sending any characters back, and I'm guessing there would be yet another LED which would indicate that if there were. So, I'm guessing most likely the mcu is dead. I wouldn't be surprised if it got some kind of electrostatic shock when probing, since the probing circuit appears to be wired directly to one of its pins. Also, I was attaching the probe immediately prior to its dying. That makes it a prime suspect in my mind. I don't want to over-react, but for the future I may try isolating that circuit with an opto-isolator or similar to hopefully prevent a recurrence. On the face of it, the present design seems like a heartache just waiting to happen.


  • @executivul said in CNC PCB milling:

    @neverdie or you could just mill your own board since now you have the tools 👌

    Not if it's broke he doesn't.


  • That's the original designer of that shield :

    https://blog.protoneer.co.nz/arduino-cnc-shield/


  • @neverdie interesting.
    the LEDs are driven by the communication line itself, so if you send a character on serial to the board, then basically your data will flash the MCU's RX LED, not the MCU.

    there should be no problem at all with the touch probe solution/circuit. it equals to a simple button sensing on a common arduino's pin, it cannot cause the MCU's death, if you are connecting everything properly.


  • Hero Member

    Once I find my dragon, I'll burn a new atmega328p with the grbl 1.1 and replace the suspect atmega328p. Hopefully it will work then. If not, then I'm guessing it's the the usb-to-serial chip gone bad. Anyhow, one way or another I'll get to the bottom of it. And if I don't, a replacement board is on its way.


  • @neverdie don't stick to you missing dragon programmer. use an arduino as an isp programmer instead. also, if you burn the bootloader, next time you can use the usb connector for update.


  • Hero Member

    @andrew I found my dragon. What fuse settings should I use? I'm tenatively planning to use Arduino pro mini settings.


  • Hero Member

    I extracted the atmega328p chip that was on the woodpecker and attempted to read it. Fail. Normal voltage is 5v on a fresh chip, but it was reading only 4.8v. Also, it got quite hot. So, I think it is defective.


  • Hero Member

    I've established that the GRBL1.1f firmware assumes it's running at 16Mhz. So, I guess I'll try the following fuse settings, typically used on a 16Mhz Pro Mini:

    pro5v328.bootloader.low_fuses=0xFF  <<< same as 8 MHz
    pro5v328.bootloader.high_fuses=0xDA <<< same as 8 MHz
    pro5v328.bootloader.extended_fuses=0x05 <<< same as 8 MHz
    
    BODLEVEL = 2V7
    RSTDISBL = [ ]
    DWEN = [ ]
    SPIEN = [X]
    WDTON = [ ]
    EESAVE = [ ]
    BOOTSZ = 1024W_3C00
    BOOTRST = [X]
    CKDIV8 = [ ]
    CKOUT = [ ]
    SUT_CKSEL = EXTXOSC_8MHZ_XX_16KCK_14CK_65MS
    
    EXTENDED = 0x05 (valid)
    HIGH = 0xDA (valid)
    LOW = 0xFF (valid)


  • Hero Member

    I soldered in the replacement atmega328p, after burning its firmware with GRBL 1.1f, and Bingo! That fixed it:

    Grbl 1.1f ['$' for help]
    

    Because of the upgraded firmware, I'm actually better off now than I was before. 🙂


  • Hero Member

    @andrew said in CNC PCB milling:

    @neverdie I still use my default settings (see below). I re-applied these settings after I flashed the board to grbl 1.1f.
    to be honest, after I found the right parameters for the PCB milling jobs I did not went further to fine tune the CNC settings, due to the lack of time. maybe later of the year, but currently I'm more than happy with the results.

    $0=10 (step pulse, usec)
    $1=25 (step idle delay, msec)
    $2=0 (step port invert mask:00000000)
    $3=5 (dir port invert mask:00000101)
    $4=0 (step enable invert, bool)
    $5=0 (limit pins invert, bool)
    $6=0 (probe pin invert, bool)
    $10=3 (status report mask:00000011)
    $11=0.010 (junction deviation, mm)
    $12=0.002 (arc tolerance, mm)
    $13=0 (report inches, bool)
    $20=0 (soft limits, bool)
    $21=0 (hard limits, bool)
    $22=0 (homing cycle, bool)
    $23=0 (homing dir invert mask:00000000)
    $24=25.000 (homing feed, mm/min)
    $25=500.000 (homing seek, mm/min)
    $26=250 (homing debounce, msec)
    $27=1.000 (homing pull-off, mm)
    $100=800.000 (x, step/mm)
    $101=800.000 (y, step/mm)
    $102=800.000 (z, step/mm)
    $110=800.000 (x max rate, mm/min)
    $111=800.000 (y max rate, mm/min)
    $112=500.000 (z max rate, mm/min)
    $120=10.000 (x accel, mm/sec^2)
    $121=10.000 (y accel, mm/sec^2)
    $122=10.000 (z accel, mm/sec^2)
    $130=200.000 (x max travel, mm)
    $131=200.000 (y max travel, mm)
    $132=200.000 (z max travel, mm)```
    

    Looks as though GRBL1.1f has exposed some additional registers than GRBL0.9 did:

    $0=10
    $1=25
    $2=0
    $3=5
    $4=0
    $5=0
    $6=0
    $10=3
    $11=0.010
    $12=0.002
    $13=0
    $20=0
    $21=0
    $22=0
    $23=0
    $24=25.000
    $25=500.000
    $26=250
    $27=1.000
    $30=1000
    $31=0
    $32=0
    $100=800.000
    $101=800.000
    $102=800.000
    $110=800.000
    $111=800.000
    $112=500.000
    $120=10.000
    $121=10.000
    $122=10.000
    $130=200.000
    $131=200.000
    $132=200.000
    

    namely, registers 30, 31, and 32. Not sure what their values should be, or if it even matters.

    Interestingly, the stepper motors have a distinctly different sound to them when running Chilipeppr with GRBL1.1f (as contrasted with GRBL0.9).


  • Hero Member

    I am having a serious problem, though, which is that no matter whether I use Chilipeppr to jog the x-axis to the left or to the right, it always veers to the left. It never goes to the right. Y and Z seem to be working OK however.


  • @neverdie
    Is it working correctly if you just issue a G0 x10 then x-10?
    did you switch to the jpadie workspace for v1.1?
    sounds like you have a short on pin 5


  • Hero Member

    @neverdie said in CNC PCB milling:

    namely, registers 30, 31, and 32. Not sure what their values should be, or if it even matters.

    I found out what they mean:

    $30=1000.	Max spindle speed, RPM
    $31=0.	Min spindle speed, RPM
    $32=0	Laser mode, boolean
    

  • Hero Member

    @rmtucker said in CNC PCB milling:

    Is it working correctly if you just issue a G0 x10 then x-10?

    No, it goes left in both instances.

    @rmtucker said in CNC PCB milling:

    did you switch to the jpadie workspace for v1.1?

    yes


  • @neverdie sorry, I'm abroad, with very limited availability, so cannot answer too quickly.

    based on the mentioned facts it seems to me, that the X axis direction pin is sticked to one position, maybe it has a solder bridge to another pin, or vcc / gnd directly.

    alt text


  • Hero Member

    @andrew said in CNC PCB milling:

    @neverdie sorry, I'm abroad, with very limited availability, so cannot answer too quickly.

    based on the mentioned facts it seems to me, that the X axis direction pin is sticked to one position, maybe it has a solder bridge to another pin, or vcc / gnd directly.

    alt text

    Thanks! You nailed it. It turns out the solder connection on the atmega328p pin corresponding to D5 just wasn't good enough. I resoldered it, and now the X-axis works in both directions. 🙂


  • Hero Member

    I'm receiving this error message now:
    0_1516478064369_crowded.png
    However, it's not obvious how to delete the files it's referring to. Anyone know how?


  • Mod

    @neverdie I haven't tried it, but if you are using Chrome you should be able to give ChiliPeppr unlimited storage through https://developer.chrome.com/extensions/declare_permissions


  • Hero Member

    Great news! Grbl1.1f makes all the difference. I tried milling at 6 mil separation using the upgraded grbl1.1f, and it works!
    0_1516480032752_eureka.jpg
    There's a huge difference between being able to evolve a single PCB design to perfect it rather than having to work on a "dumbed down" design (for a CNC or some other DIY etching process) before being able to get "the real deal" from a PCB fabricator. So, I'm very relieved that the first option now seems possible. 🙂


  • @neverdie I told you since the very beginning to make the firmware upgrade! 😉


  • @neverdie as I see from the picture, you can decrease the cutting depth. this could help you to soften the force against the carving bits and it could also help you to use faster feed rates without risking a missing step or bit damage.

    btw, what are your currently used parameters?

    also, for the best results please be sure, that when you set up the tool width in flatcam, then it is originated from the previously mentioned formula, which uses the carving bit properties (end with + angle) and the cutting depth.


  • Hero Member

    @andrew
    In this particular instance I had used a dull bit to do the autoleveling at 4mm and then switched to a Jack bit (nominal 0.1mm, 30 degrees) which I re-zeroed before starting the cutting.
    Cutting depth: 0.03
    Tool width: 0.12mm (just a guess as to the actual width)
    Feedrate:80mm

    It does seem that the actual cutting depth came out deeper than 0.03mm, so I'm not sure what's up with that. My guess is that the re-zeroing with the sharp bit came out wrong.


  • Hero Member

    @executivul said in CNC PCB milling:

    The metal piece is about 10cm long and it's left in place for the life of the wood board.

    Do you have a photo of that?

    Also, are you using double sided tape at all, or is this all that you're doing as far as holding the PCB flat against the sacrificial board?


  • Hero Member

    @andrew
    Trying to create a double sided PCB, but I am currently stuck on step 3:
    0_1516646766540_mirror.png
    I can see that it has created a mirror image which it displays, but I do not see a mirror image gerber object displayed in the project area. That's in contrast to step 4, where when I click "create alignment drill" it does create a drill file that I can see in the project area.

    Without access to a mirror image gerber object, there's nothing I can select to produce the gcode for the mirror image. So, I'm stuck on this step. How do I gain access to the mirror image gerber object? I've followed the given directions, but so far no joy.


  • Hero Member

    Apparently it doesn't produce a newly named gerber object. Instead, you just work with whatever it has in memory.


  • @neverdie

    1. I ise Scotch 665 double sided tape and lately I use a heavy item connected to the ground pin when probing. Put it on the pcb and you get the pcb face grounded. The probe pin clips to the bit. I tend to probe using the same bit used for engraving.
    2. You select the bottom layer in flatcam. I create a bounding box around it first. Then select the box, the x axis. A few alignment drill locations on one side of the flip line. Hit create aligment drills and hit mirror object which mirrors the already loaded bottom layer (GBL) object. If you watch closely you should see the tracks are mirrored. Then select the object and go on with creating iso geometry and cnc paths.

  • Hero Member

    @executivul said in CNC PCB milling:

    You select the bottom layer in flatcam. I create a bounding box around it first. Then select the box, the x axis. A few alignment drill locations on one side of the flip line. Hit create aligment drills and hit mirror object which mirrors the already loaded bottom layer (GBL) object. If you watch closely you should see the tracks are mirrored. Then select the object and go on with creating iso geometry and cnc paths.

    Yes, I think the flatcam's original instructions were faulty. It said to load both the top and bottom layer. Maybe that's fine for selecting pin alignment locations, but there should be only one layer displayed before the mirroring, or else it creates a mess.

    Also, I had thought it would create a new file for the mirrored gerber, but it doesn't. Instead, I just work with the mirrored gerber that's in memory to produce the gcode for the mirrored image. I guess that's good enough.


  • Hero Member

    I drilled the alignment holes with 0.8mm diameter. I'm using regular male header pins for the alignment, and having tried it, I think 0.8mm is really too tight. Not sure how @andrew is using 0.7mm. Different pins I guess? Anyhow, next time I'll try 0.9mm hole diameter.


  • Hero Member

    How do I mill a slot? Do I treat it the same as a regular hole, except use a routing bit rather than a drill bit when it comes time to cut the slot?


  • Hero Member

    @neverdie said in CNC PCB milling:

    How do I mill a slot? Do I treat it the same as a regular hole, except use a routing bit rather than a drill bit when it comes time to cut the slot?

    Couldn't find a good answer to this, so I'm going to approximate it by simply drilling a series of overlapping holes.

    It's needed for the micro-usb connector.


  • Hero Member

    I did the top layer, together with alignment holes, for a real FR4 PCB:
    0_1516726915446_alignment_holes.jpg
    As an experiment, I thought I would standardize on 0.9mm holes for the through-holes, via-holes, and alignment holes, so that there would be fewer tool changes. Looks like it will work, but, meh, I think I'll use smaller via holes in the future.

    Out of time for today, so I plan to etch the flip side tomorrow.


  • @neverdie 0.4-0.5mm for vias using 0.3mm silver plated "wrapping wire". 0.9 for TH and alignment holes.
    Tomorrow redo the alignment holes on the sacrificial layer so you get perfect alignment (if you don't have homing endstops, as I don't) and put the pins in and sick the pcb after that, be careful how you flip the board, I tend to use asymmetric alignment holes so I can only flip it one way (;


  • Hero Member

    Argh, it just occurred to me that I was premature in drilling the TH and via holes, because they may seriously interfere with the autoleveling when I etch the reverse side. This must be why @andrew etches the mirrored bottom side first, so that when it's flipped the top side can be etched and then drilled.


  • Hero Member

    Re-using the alignment holes already drilled, I flipped over the PCB and etched the mirrored bottom. It worked! Some of the traces are only as thick as a hair, but they all conduct and none are broken.

    I guess I'll have to flip it again in order to route the board outline. So, count that as yet another reason to start by etching the bottom first.
    0_1516739748977_bottom_mirror.jpg
    I had to autolevel at 6mm in order to dodge all the holes I had prematurely drilled, so perhaps that's why this particular etching came out so uneven.


  • @neverdie the order of the process should be the following:

    • drilling the alignment holes (through the PCB into the sacrificial layer)
    • fixing the pcb with the alignment pins/headers
    • isolation routing on the bottom layer
    • flipping the pcb
    • isolation routing on the top layer
    • drilling holes on the top layer
    • milling the pcb outline on the top layer

    as I see your results, you could use alignment holes closer to your actual design's border, but it should be definitely out of the pcb's edge + milling tool width area.

    the very thin traces are most probably caused by:

    • moving and not stable pcb
    • improperly calculated tool width
    • improper autoleveling on the given side

Log in to reply
 

Suggested Topics

  • 4
  • 9
  • 2
  • 1
  • 3
  • 5

20
Online

11.2k
Users

11.1k
Topics

112.5k
Posts