Sensor for Vallox DigitSE RS485 ventilation system with integration into FHEM.
-
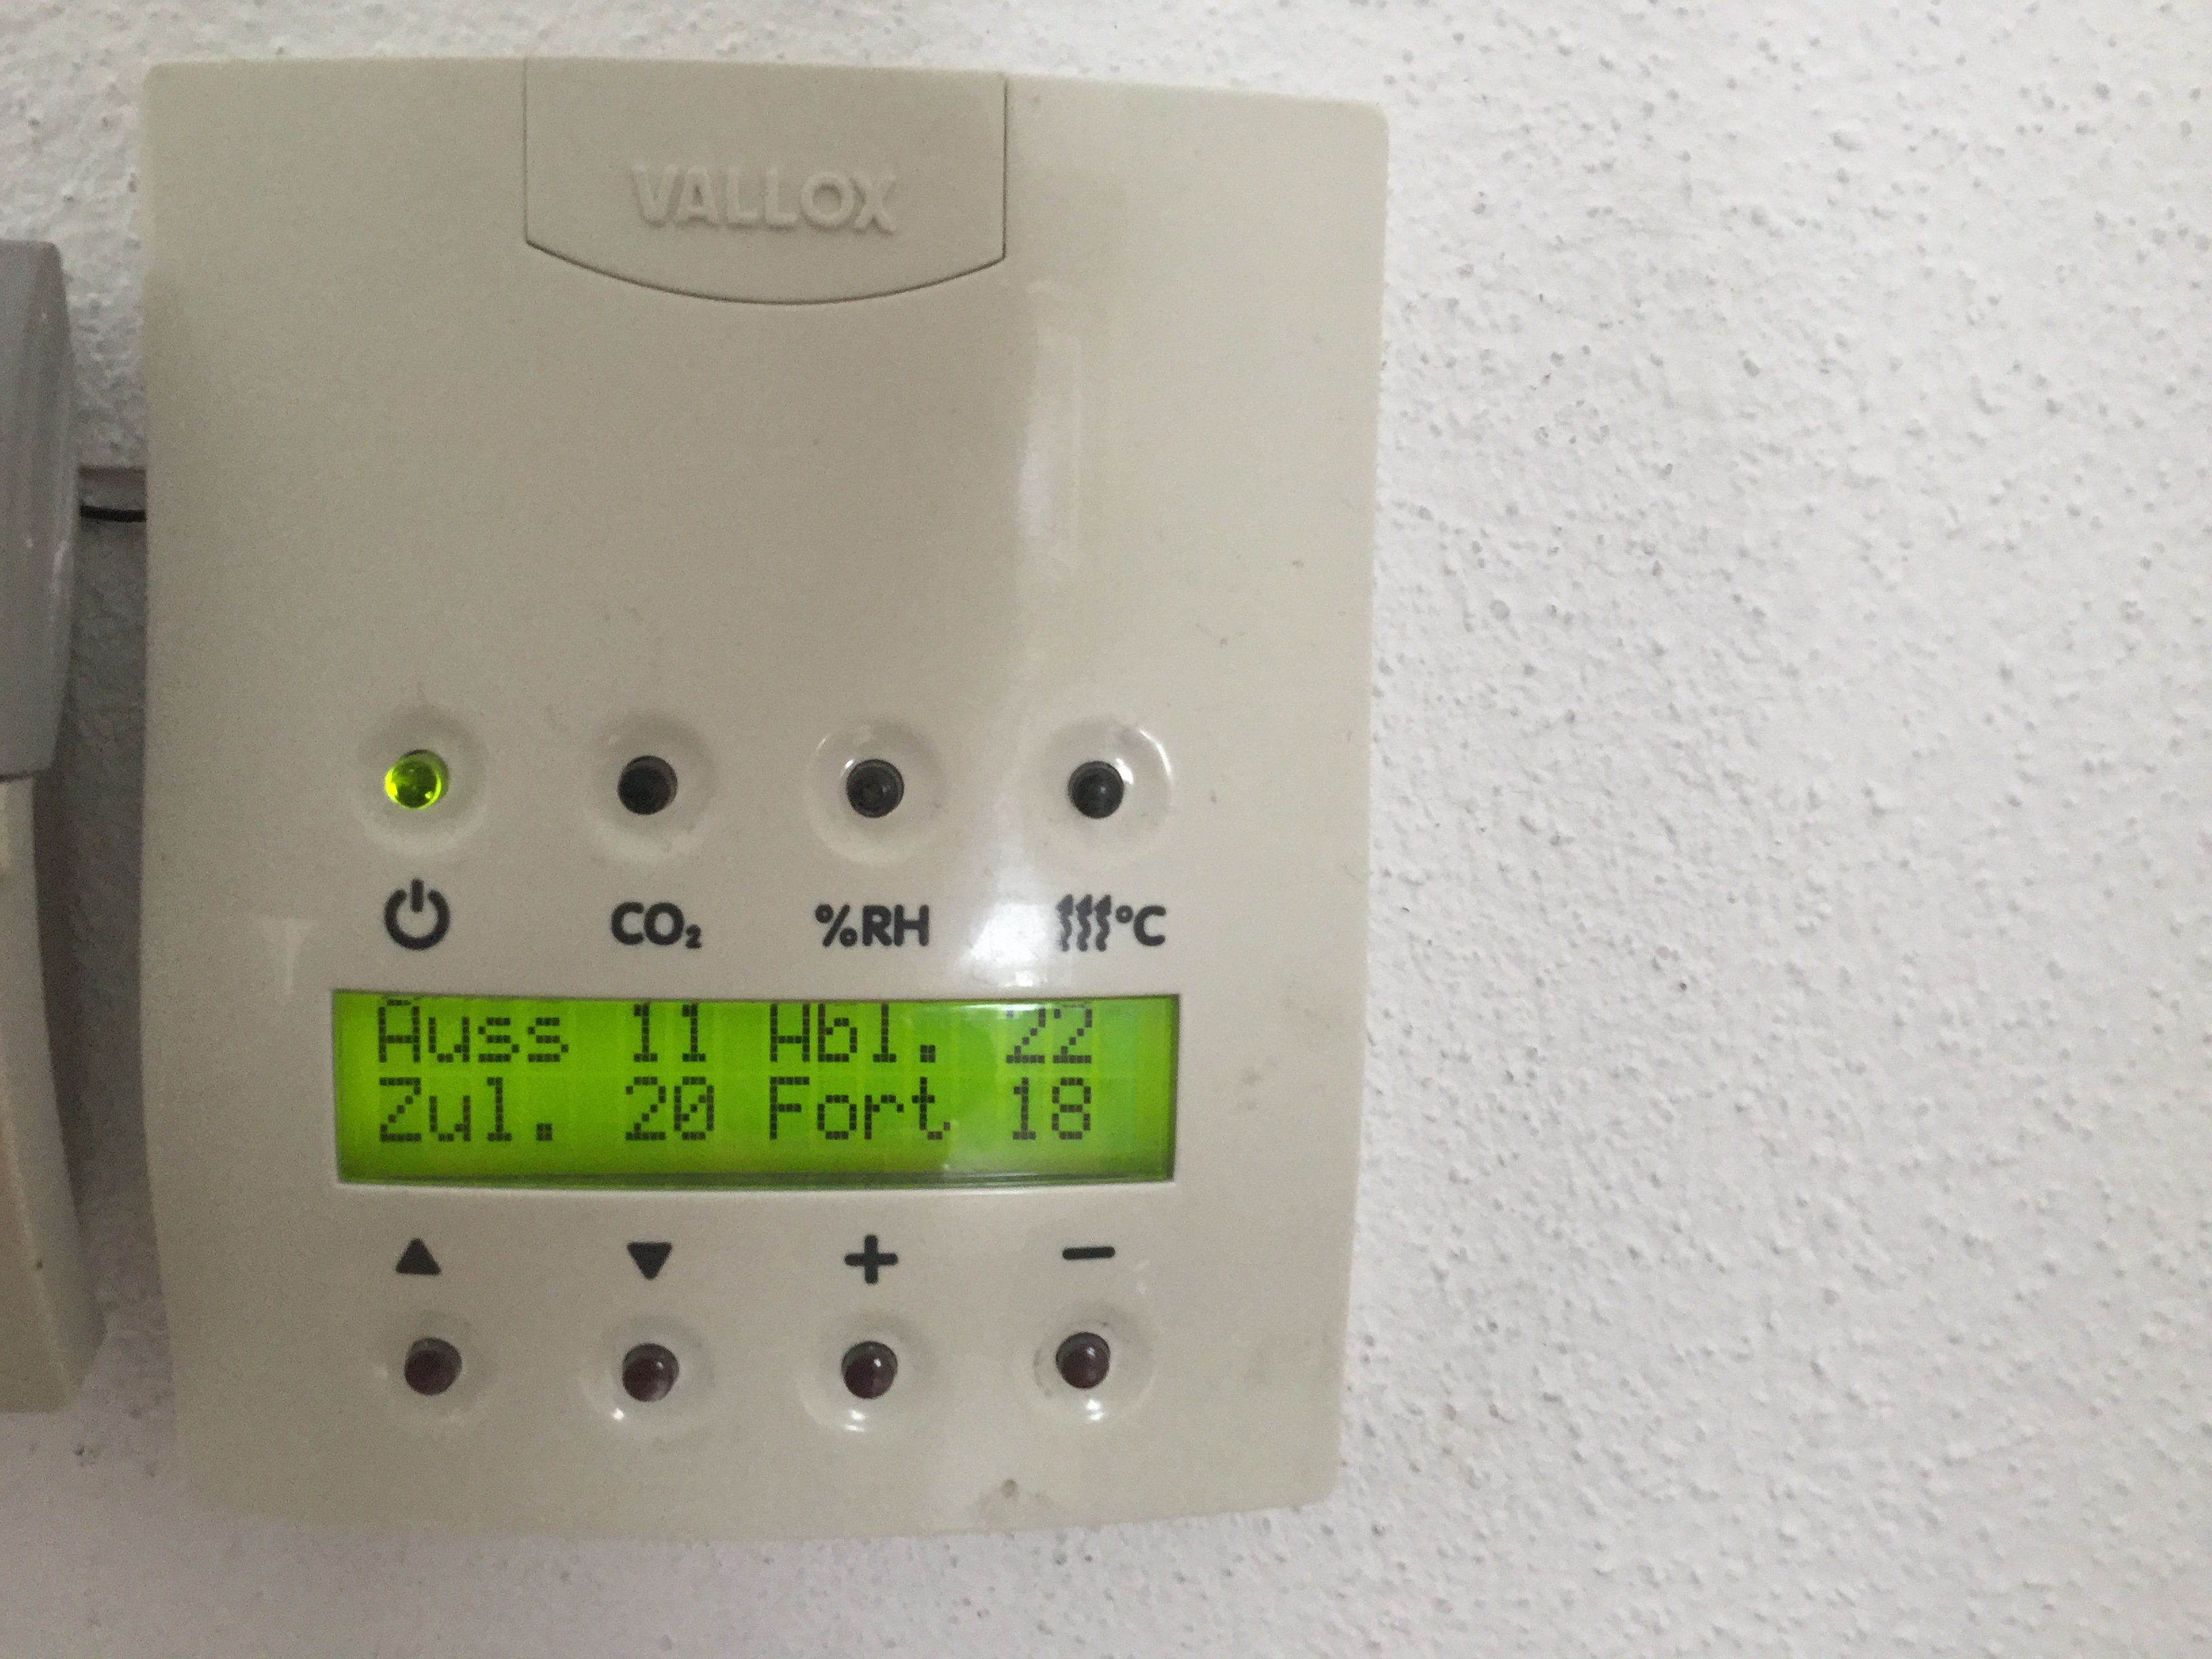
This is the original controller of the ventilation system. It displays the fan speed as well as the 4 temperatures: incomming air, exhaust air, inside temp, outside temp. You can control the fan speed level 1-8 by pressing the up and down buttons.
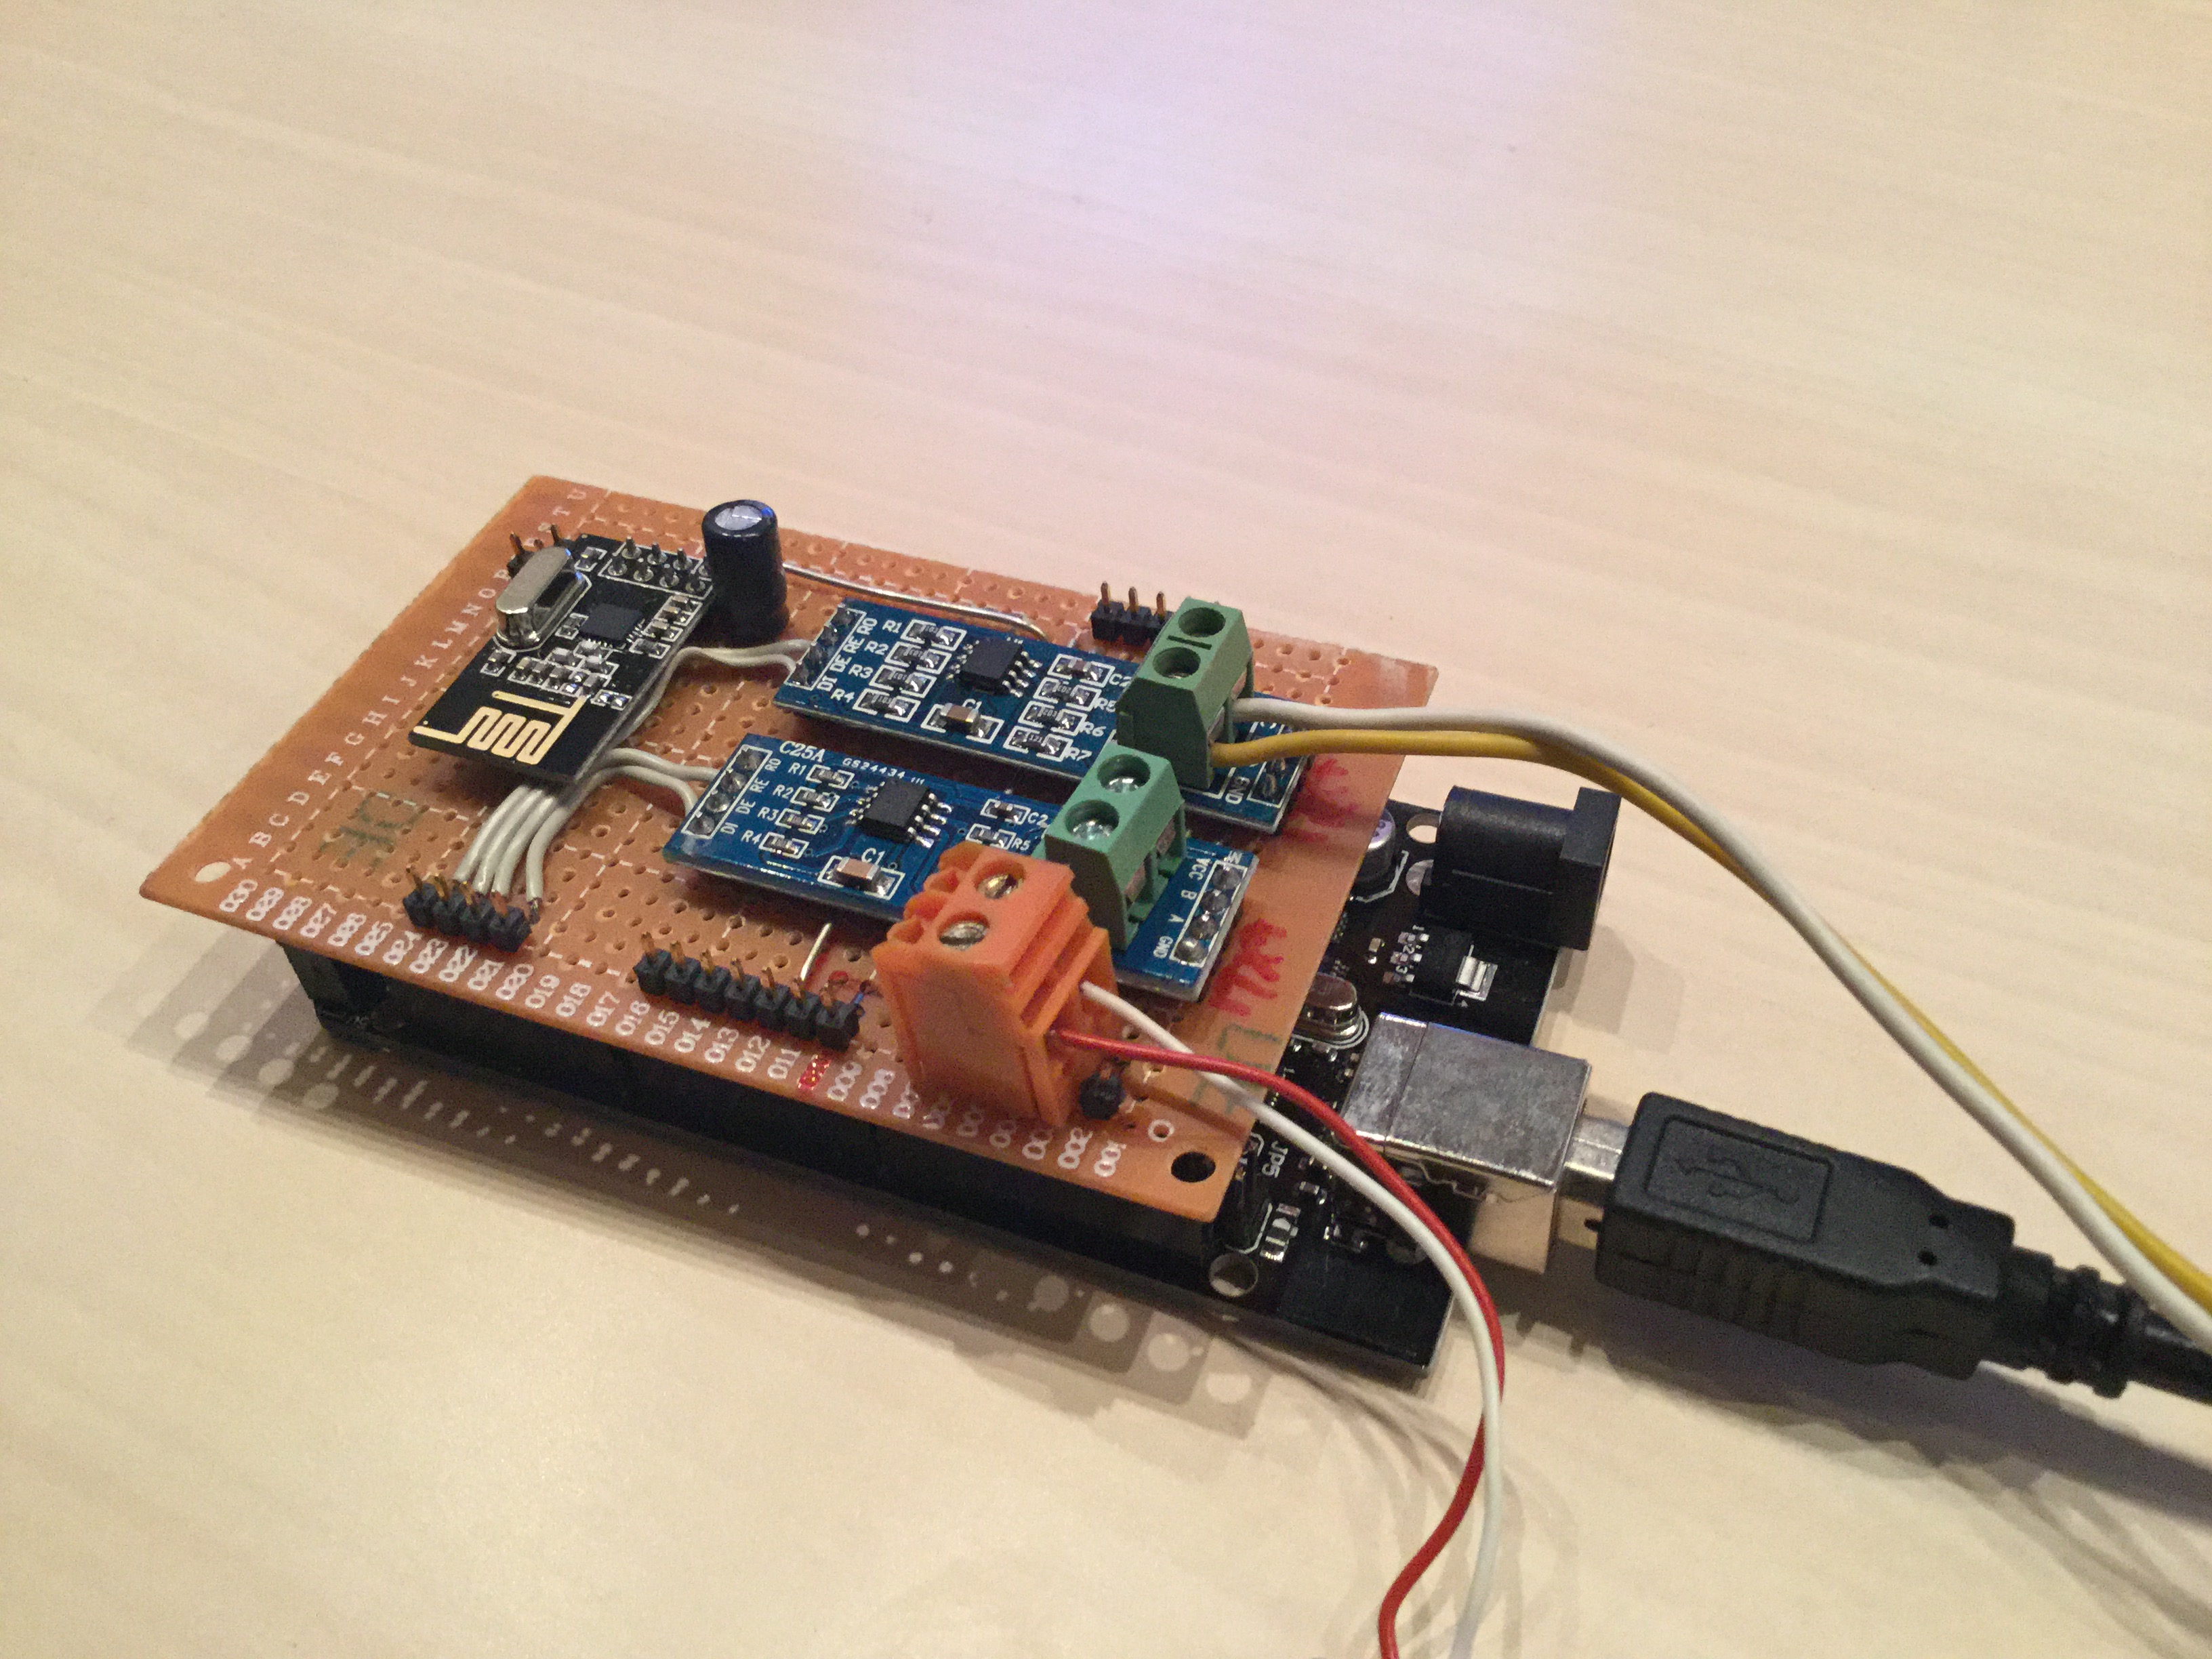
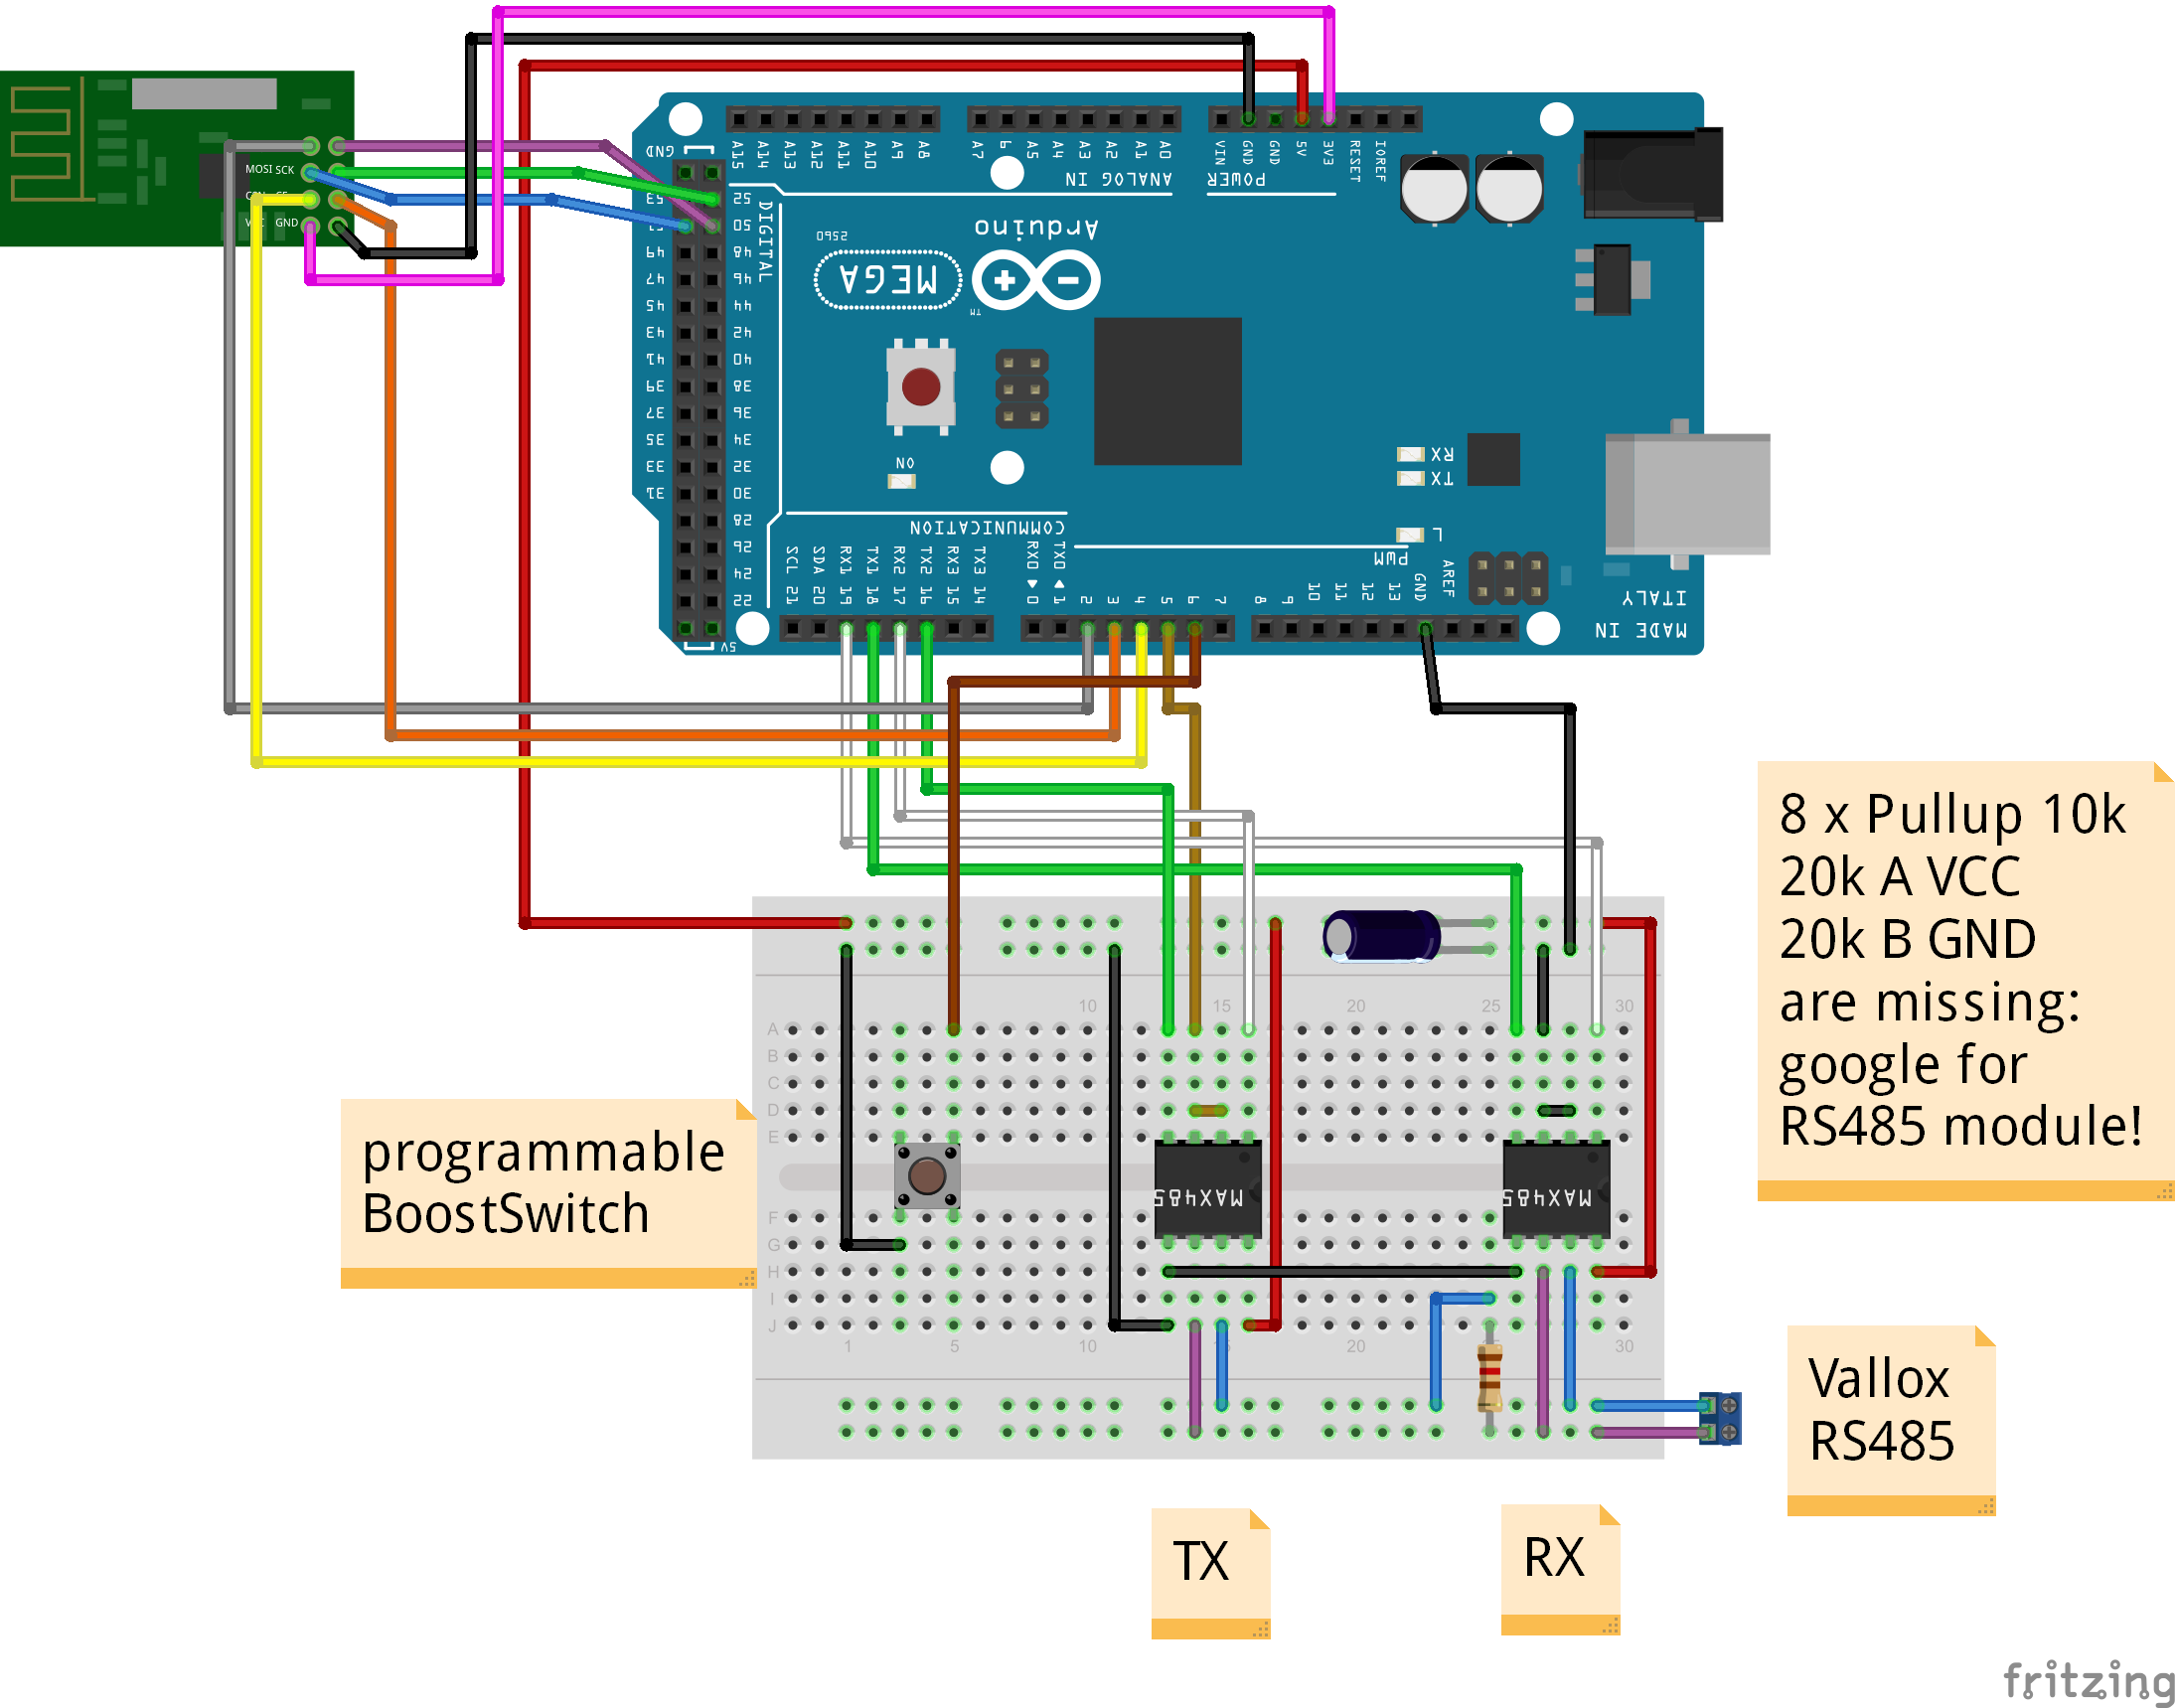
The controller communicates with the main device via a RS485 bus. To read the data sent between both parties I used an arduino mega as it has more than one hardware serial lines. This leads to less corrupt telegrams when communicating via RS485. You need at least one RS485 to TTL converter. As I had two of em I used one for sending and one for receiving telegrams:
I had to develop a serial library that is able to interpret the vallox protocol. The protocol description can be found here:
http://knx-user-forum.de/gebaeudetechnik-ohne-knx-eib/18274-vallox-rs485-schnittstellenbeschreibung.htmlThe library is used by the vallox-sensor-sketch to retrieve the data from the RS485 bus. The variables are send to the mysensors controller as different sensor values (41 different variables!).
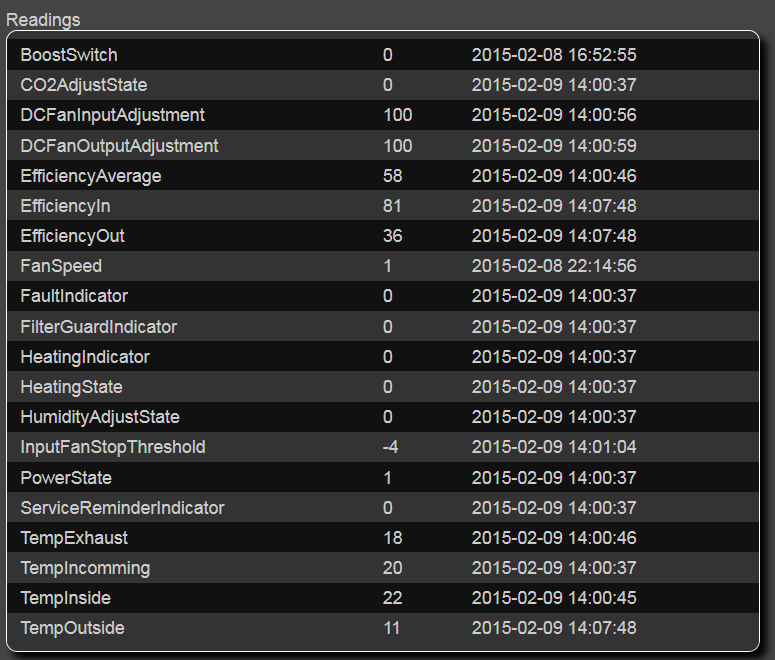
integration into FHEM was very easy. The following picture shows the most important variables and their readings. I did not import the other ones as I do not have any original CO2 Sensor nor humidty sensors attached.
I also added some buttons to FHEM to make controlling of the vallox device easier:
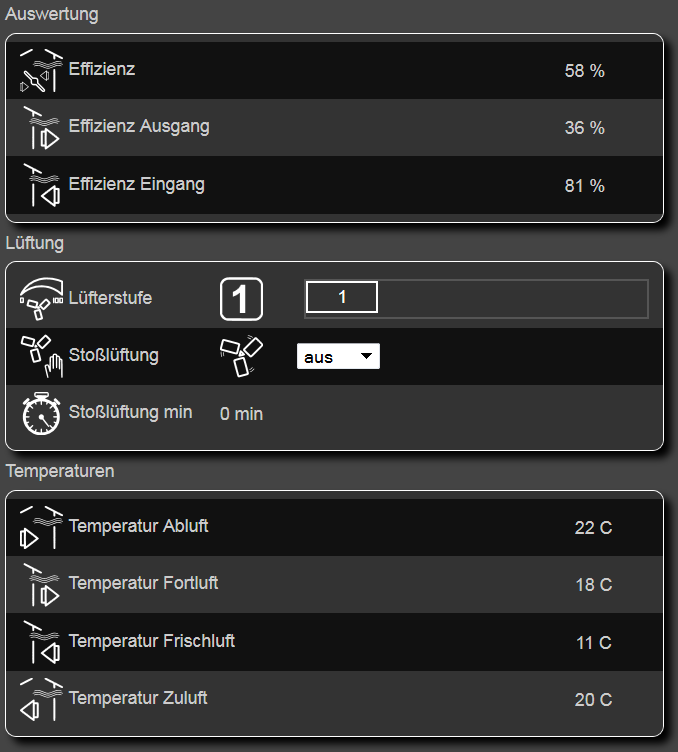
Inspired by samppa I added some calculations for efficiency of the heat exchanger see also
http://forum.mysensors.org/topic/38/measuring-efficiency-of-home-air-ventilation-heat-exchanger-unit/3The fan speed can be controlled by any tablet or phone in my house now. If somebody accidentally pushes the boost switch in the shower in the night it does not bother me any longer. I can easily turn it off using my iPhone ;)
-
Code for integration of the sensor into FHEM:
define MYSENSOR_Vallox MYSENSORS_DEVICE 100
attr MYSENSOR_Vallox IODev MYSENSOR_Gateway
attr MYSENSOR_Vallox alias digitSE
attr MYSENSOR_Vallox group MySensors
attr MYSENSOR_Vallox icon vent_ventilation_control
attr MYSENSOR_Vallox mapReading_BoostSwitch 40 dimmer
attr MYSENSOR_Vallox mapReading_CO2AdjustState 9 value1
attr MYSENSOR_Vallox mapReading_DCFanInputAdjustment 26 dimmer
attr MYSENSOR_Vallox mapReading_DCFanOutputAdjustment 27 dimmer
attr MYSENSOR_Vallox mapReading_EfficiencyAverage 7 value1
attr MYSENSOR_Vallox mapReading_EfficiencyIn 5 value1
attr MYSENSOR_Vallox mapReading_EfficiencyOut 6 value1
attr MYSENSOR_Vallox mapReading_FanSpeed 0 dimmer
attr MYSENSOR_Vallox mapReading_FanSpeedMax 24 dimmer
attr MYSENSOR_Vallox mapReading_FanSpeedMin 25 dimmer
attr MYSENSOR_Vallox mapReading_FaultIndicator 14 value1
attr MYSENSOR_Vallox mapReading_FilterGuardIndicator 12 value1
attr MYSENSOR_Vallox mapReading_HeatingIndicator 13 value1
attr MYSENSOR_Vallox mapReading_HeatingState 11 value1
attr MYSENSOR_Vallox mapReading_HumidityAdjustState 10 value1
attr MYSENSOR_Vallox mapReading_InputFanStopThreshold 28 temperature
attr MYSENSOR_Vallox mapReading_PowerState 8 value1
attr MYSENSOR_Vallox mapReading_ServiceReminderIndicator 15 value1
attr MYSENSOR_Vallox mapReading_TempExhaust 3 temperature
attr MYSENSOR_Vallox mapReading_TempIncomming 4 temperature
attr MYSENSOR_Vallox mapReading_TempInside 1 temperature
attr MYSENSOR_Vallox mapReading_TempOutside 2 temperature
attr MYSENSOR_Vallox mode node
attr MYSENSOR_Vallox room Sensoren
attr MYSENSOR_Vallox setReading_BoostSwitch slider,0,1,60
attr MYSENSOR_Vallox setReading_DCFanInputAdjustment slider,1,1,100
attr MYSENSOR_Vallox setReading_DCFanOutputAdjustment slider,1,1,100
attr MYSENSOR_Vallox setReading_FanSpeed slider,1,1,8
attr MYSENSOR_Vallox setReading_FanSpeedMax slider,1,1,8
attr MYSENSOR_Vallox setReading_FanSpeedMin slider,1,1,8
attr MYSENSOR_Vallox stateFormat {sprintf "Lüfterstufe: %d  Zuluft: %.0f  Abluft: %.0f  Außen: %.0f  Innen: %.0f", ReadingsVal($name,     "FanSpeed", 0), ReadingsVal($name, "TempIncomming", 0), ReadingsVal($name, "TempExhaust", 0), ReadingsVal($name, "TempOutside", 0), ReadingsVal($name, "TempInside", 0)}
attr MYSENSOR_Vallox version 1.4.1

#attr MYSENSOR_Vallox mapReading_Humidity 16 humidity
#attr MYSENSOR_Vallox mapReading_BasicHumidityLevel 17 humidity
#attr MYSENSOR_Vallox mapReading_HumiditySensor1 18 humidity
#attr MYSENSOR_Vallox mapReading_HumiditySensor2 19 humidity

#attr MYSENSOR_Vallox mapReading_CO2High 20 value1
#attr MYSENSOR_Vallox mapReading_CO2Low 21 value1
#attr MYSENSOR_Vallox mapReading_CO2SetPointHigh 22 value1
#attr MYSENSOR_Vallox mapReading_CO2SetPointLow 23 value1

#attr MYSENSOR_Vallox mapReading_HeatingSetPoint 29 temperature
#attr MYSENSOR_Vallox mapReading_PreHeatingSetPoint 30 temperature
#attr MYSENSOR_Vallox mapReading_HrcBypassThreshold 31 temperature
#attr MYSENSOR_Vallox mapReading_CellDefrostingThreshold 32 temperature

#attr MYSENSOR_Vallox mapReading_AdjustmentIntervalMinutes 33 value1
#attr MYSENSOR_Vallox mapReading_AutomaticHumidityLevelSeekerState 34 value1
#attr MYSENSOR_Vallox mapReading_BoostSwitchMode 35 value1
#attr MYSENSOR_Vallox mapReading_RadiatorType 36 value1
#attr MYSENSOR_Vallox mapReading_CascadeAdjust 37 value1
#attr MYSENSOR_Vallox mapReading_MaxSpeedLimitMode 38 value1

#attr MYSENSOR_Vallox mapReading_ServiceReminder 39 value1
You can see that I commented out the CO2 Sensor and the humidity sensor ones.
To control the device you need some further controls:
define MYSENSOR_Vallox_FanSpeed dummy attr MYSENSOR_Vallox_FanSpeed alias Lüfterstufe attr MYSENSOR_Vallox_FanSpeed devStateIcon 1:rc_1 2:rc_2 3:rc_3 4:rc_4 5:rc_5 6:rc_6 7:rc_7 8:rc_8 attr MYSENSOR_Vallox_FanSpeed group Lüftung attr MYSENSOR_Vallox_FanSpeed icon vent_ventilation_control attr MYSENSOR_Vallox_FanSpeed room Lüftung attr MYSENSOR_Vallox_FanSpeed setList state:slider,1,1,8 attr MYSENSOR_Vallox_FanSpeed webCmd state define MYSENSOR_Vallox_FanSpeed_Notify notify MYSENSOR_Vallox:FanSpeed:.* { my $d = ReadingsVal("MYSENSOR_Vallox","FanSpeed", 1);; fhem("set MYSENSOR_Vallox_FanSpeed $d");;} define MYSENSOR_Vallox_FanSpeed_Notify2 notify MYSENSOR_Vallox_FanSpeed set MYSENSOR_Vallox FanSpeed % define MYSENSOR_Vallox_BoostSwitch dummy attr MYSENSOR_Vallox_BoostSwitch alias Stoßlüftung attr MYSENSOR_Vallox_BoostSwitch devStateIcon 0:vent_ventilation_level_0 15:vent_ventilation_level_1 30:vent_ventilation_level_2 45:vent_ventilation_level_3 attr MYSENSOR_Vallox_BoostSwitch eventMap aus:0 kurz:15 mittel:30 lang:45 attr MYSENSOR_Vallox_BoostSwitch group Lüftung attr MYSENSOR_Vallox_BoostSwitch icon vent_ventilation_level_manual_m attr MYSENSOR_Vallox_BoostSwitch room Lüftung attr MYSENSOR_Vallox_BoostSwitch setList state:aus,kurz,mittel,lang attr MYSENSOR_Vallox_BoostSwitch webCmd state define MYSENSOR_Vallox_BoostSwitch_Notify notify MYSENSOR_Vallox_BoostSwitch set MYSENSOR_Vallox BoostSwitch % define MYSENSOR_Vallox_BoostSwitch_Time dummy attr MYSENSOR_Vallox_BoostSwitch_Time alias Stoßlüftung min attr MYSENSOR_Vallox_BoostSwitch_Time group Lüftung attr MYSENSOR_Vallox_BoostSwitch_Time icon time_timer attr MYSENSOR_Vallox_BoostSwitch_Time room Lüftung define MYSENSOR_Vallox_BoostSwitch_Time_Notify notify MYSENSOR_Vallox:BoostSwitch:.* { my $d = sprintf ("%%.0f min", ReadingsVal("MYSENSOR_Vallox","BoostSwitch", 0));; fhem("set MYSENSOR_Vallox_BoostSwitch_Time $d");;} define MYSENSOR_Vallox_TempInside dummy attr MYSENSOR_Vallox_TempInside alias Temperatur Abluft attr MYSENSOR_Vallox_TempInside event-on-change-reading state attr MYSENSOR_Vallox_TempInside group Temperaturen attr MYSENSOR_Vallox_TempInside icon vent_used_air attr MYSENSOR_Vallox_TempInside room Lüftung define MYSENSOR_Vallox_TempInside_Notify notify MYSENSOR_Vallox:TempInside:.* { my $d = sprintf ("%%.0f C", ReadingsVal("MYSENSOR_Vallox","TempInside", 0));; fhem("set MYSENSOR_Vallox_TempInside $d");;} define MYSENSOR_Vallox_TempOutside dummy attr MYSENSOR_Vallox_TempOutside alias Temperatur Frischluft attr MYSENSOR_Vallox_TempOutside event-on-change-reading state attr MYSENSOR_Vallox_TempOutside group Temperaturen attr MYSENSOR_Vallox_TempOutside icon vent_ambient_air attr MYSENSOR_Vallox_TempOutside room Lüftung define MYSENSOR_Vallox_TempOutside_Notify notify MYSENSOR_Vallox:TempOutside:.* { my $d = sprintf ("%%.0f C", ReadingsVal("MYSENSOR_Vallox","TempOutside", 0));; fhem("set MYSENSOR_Vallox_TempOutside $d");;} define MYSENSOR_Vallox_TempExhaust dummy attr MYSENSOR_Vallox_TempExhaust alias Temperatur Fortluft attr MYSENSOR_Vallox_TempExhaust event-on-change-reading state attr MYSENSOR_Vallox_TempExhaust group Temperaturen attr MYSENSOR_Vallox_TempExhaust icon vent_exhaust_air attr MYSENSOR_Vallox_TempExhaust room Lüftung define MYSENSOR_Vallox_TempExhaust_Notify notify MYSENSOR_Vallox:TempExhaust:.* { my $d = sprintf ("%%.0f C", ReadingsVal("MYSENSOR_Vallox","TempExhaust", 0));; fhem("set MYSENSOR_Vallox_TempExhaust $d");;} define MYSENSOR_Vallox_TempIncomming dummy attr MYSENSOR_Vallox_TempIncomming alias Temperatur Zuluft attr MYSENSOR_Vallox_TempIncomming event-on-change-reading state attr MYSENSOR_Vallox_TempIncomming group Temperaturen attr MYSENSOR_Vallox_TempIncomming icon vent_supply_air attr MYSENSOR_Vallox_TempIncomming room Lüftung define MYSENSOR_Vallox_TempIncomming_Notify notify MYSENSOR_Vallox:TempIncomming:.* { my $d = sprintf ("%%.0f C", ReadingsVal("MYSENSOR_Vallox","TempIncomming", 0));; fhem("set MYSENSOR_Vallox_TempIncomming $d");;} define MYSENSOR_Vallox_EfficiencyIn dummy attr MYSENSOR_Vallox_EfficiencyIn alias Effizienz Eingang attr MYSENSOR_Vallox_EfficiencyIn event-on-change-reading state attr MYSENSOR_Vallox_EfficiencyIn group Auswertung attr MYSENSOR_Vallox_EfficiencyIn icon vent_ambient_air attr MYSENSOR_Vallox_EfficiencyIn room Lüftung define MYSENSOR_Vallox_EfficiencyIn_Notify notify MYSENSOR_Vallox:EfficiencyIn:.* { my $d = sprintf ("%%.0f \%%", ReadingsVal("MYSENSOR_Vallox","EfficiencyIn", 0));; fhem("set MYSENSOR_Vallox_EfficiencyIn $d");;} define MYSENSOR_Vallox_EfficiencyOut dummy attr MYSENSOR_Vallox_EfficiencyOut alias Effizienz Ausgang attr MYSENSOR_Vallox_EfficiencyOut event-on-change-reading state attr MYSENSOR_Vallox_EfficiencyOut group Auswertung attr MYSENSOR_Vallox_EfficiencyOut icon vent_exhaust_air attr MYSENSOR_Vallox_EfficiencyOut room Lüftung define MYSENSOR_Vallox_EfficiencyOut_Notify notify MYSENSOR_Vallox:EfficiencyOut:.* { my $d = sprintf ("%%.0f \%%", ReadingsVal("MYSENSOR_Vallox","EfficiencyOut", 0));; fhem("set MYSENSOR_Vallox_EfficiencyOut $d");;} define MYSENSOR_Vallox_EfficiencyAverage dummy attr MYSENSOR_Vallox_EfficiencyAverage alias Effizienz attr MYSENSOR_Vallox_EfficiencyAverage event-on-change-reading state attr MYSENSOR_Vallox_EfficiencyAverage group Auswertung attr MYSENSOR_Vallox_EfficiencyAverage icon vent_bypass attr MYSENSOR_Vallox_EfficiencyAverage room Lüftung define MYSENSOR_Vallox_EfficiencyAverage_Notify notify MYSENSOR_Vallox:EfficiencyAverage:.* { my $d = sprintf ("%%.0f \%%", ReadingsVal("MYSENSOR_Vallox","EfficiencyAverage", 0));; fhem("set MYSENSOR_Vallox_EfficiencyAverage $d");;} -
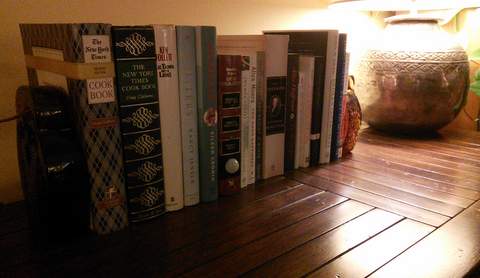
BTW finding an appropriate housing for your sensors is not very easy. Housings should be nice and fit into their environment. Therefore I put my gateway in a sporty metal adidas housing:
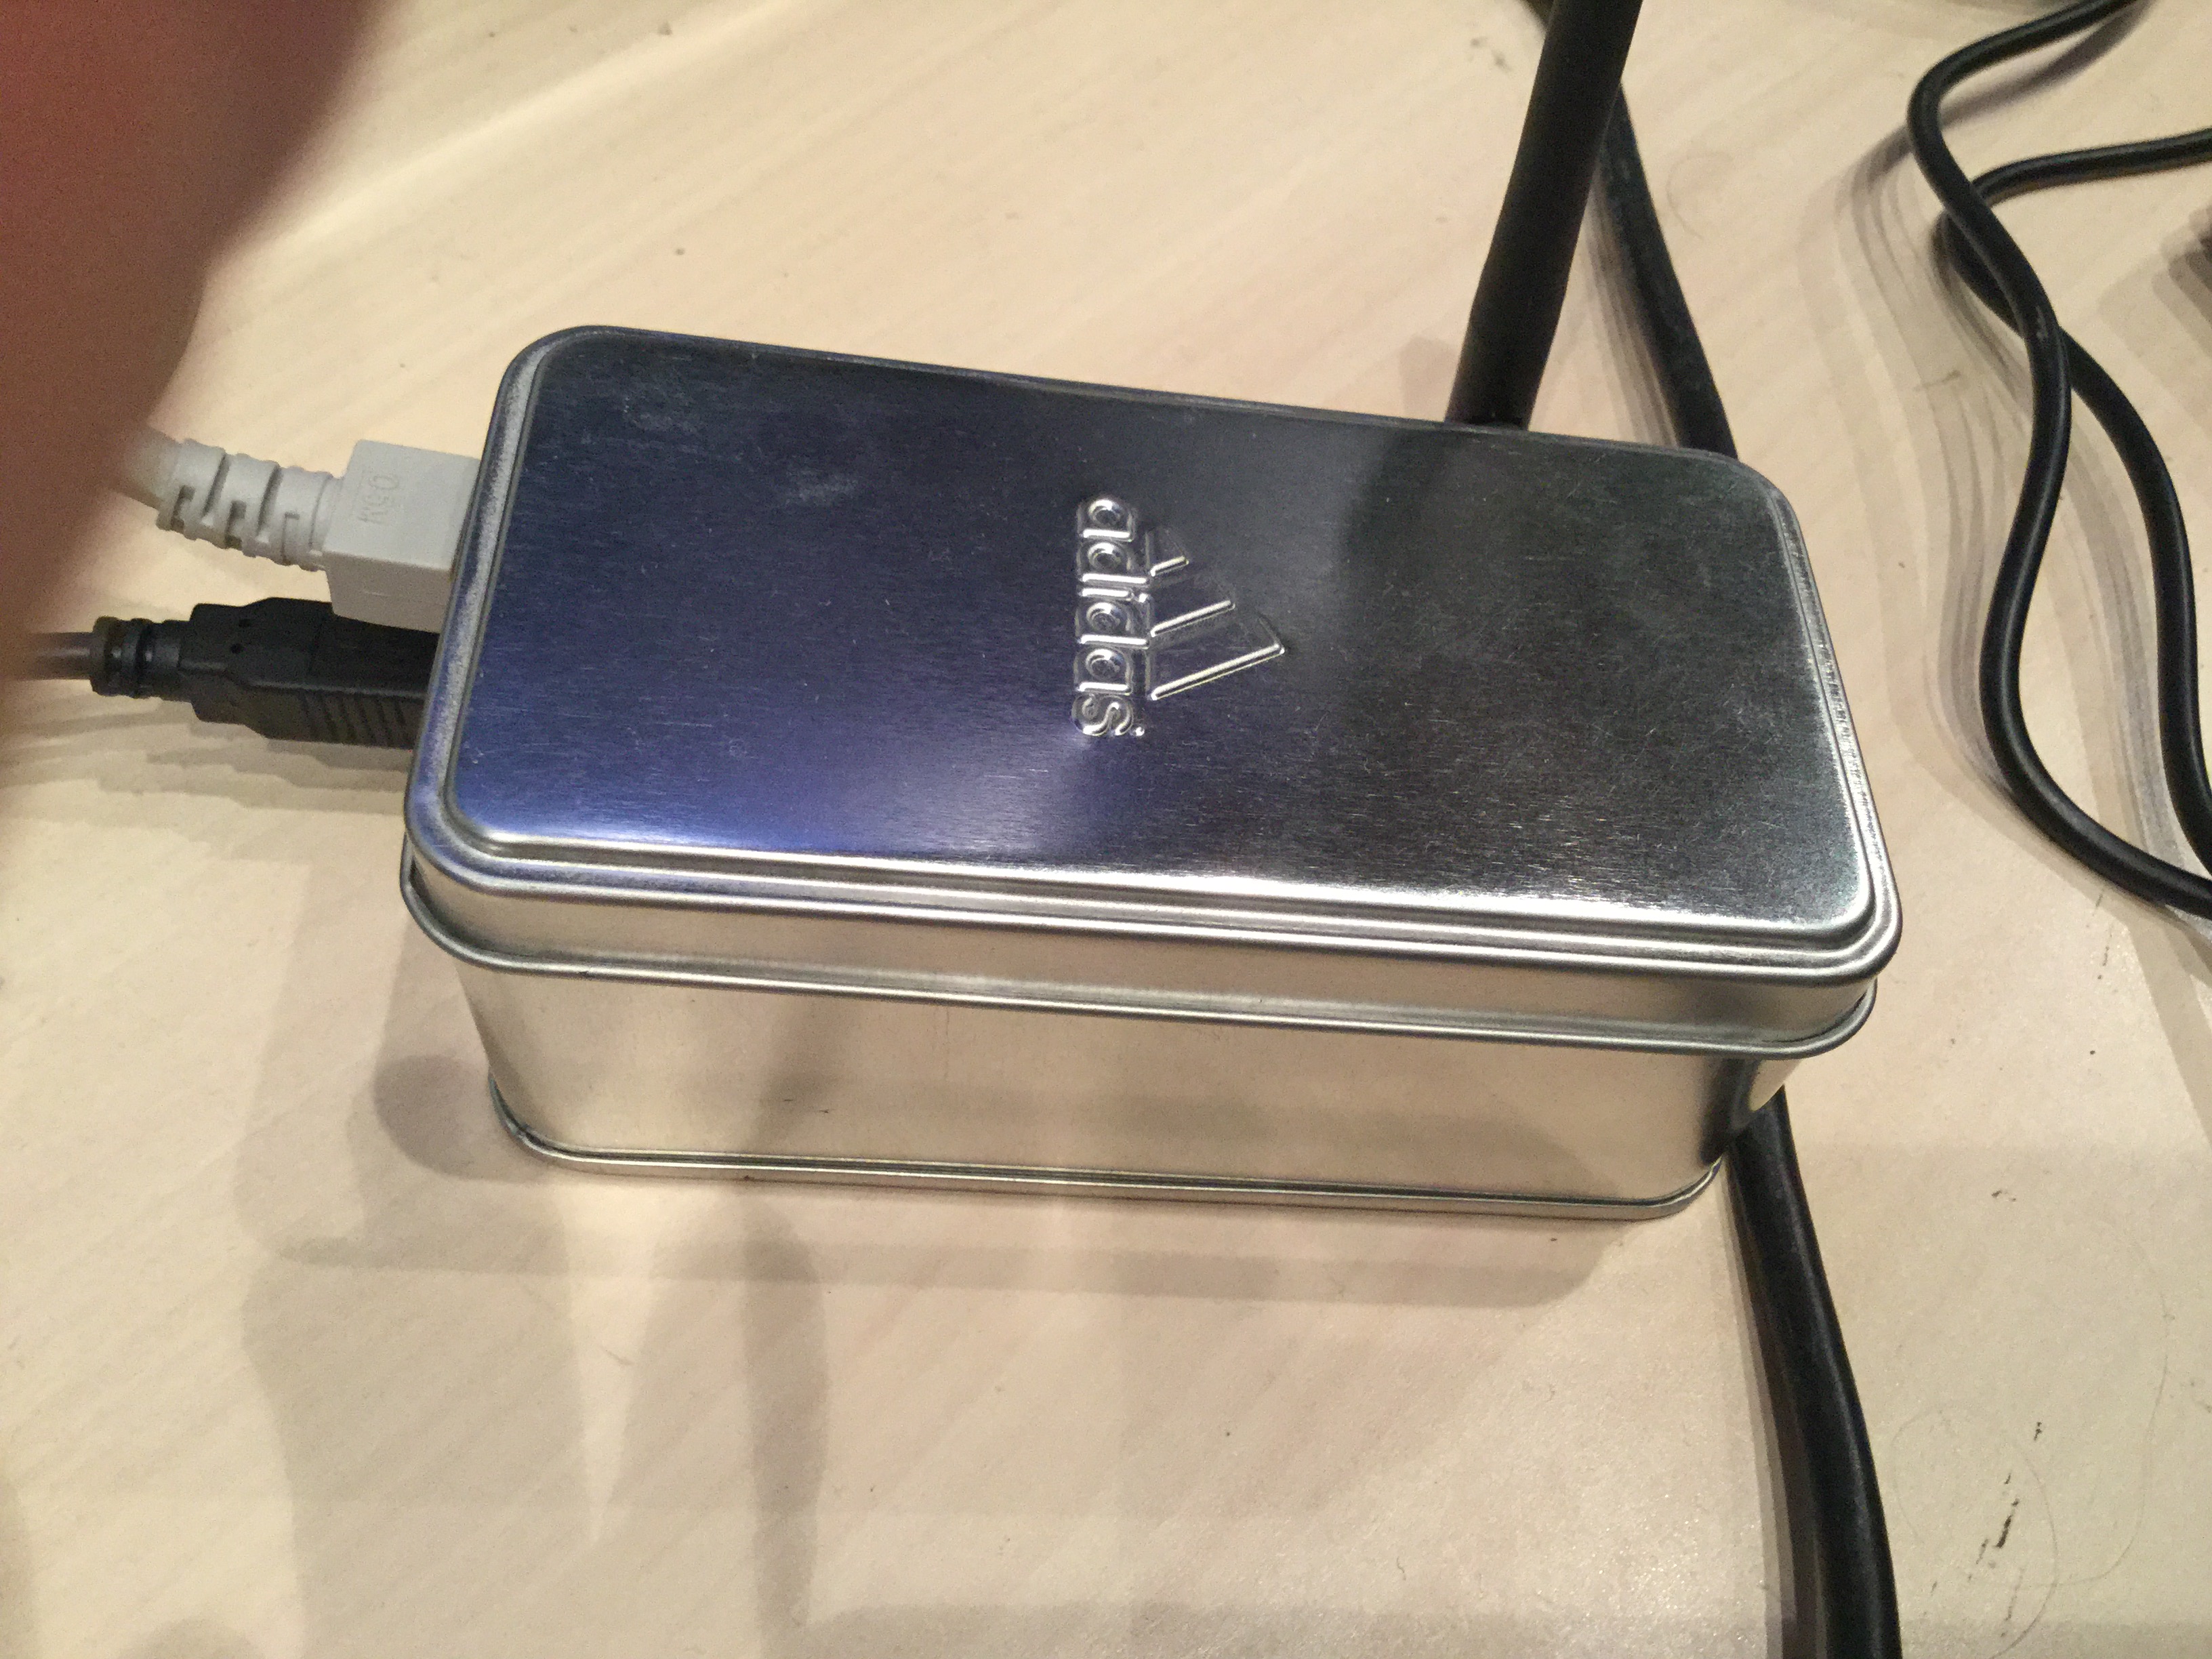
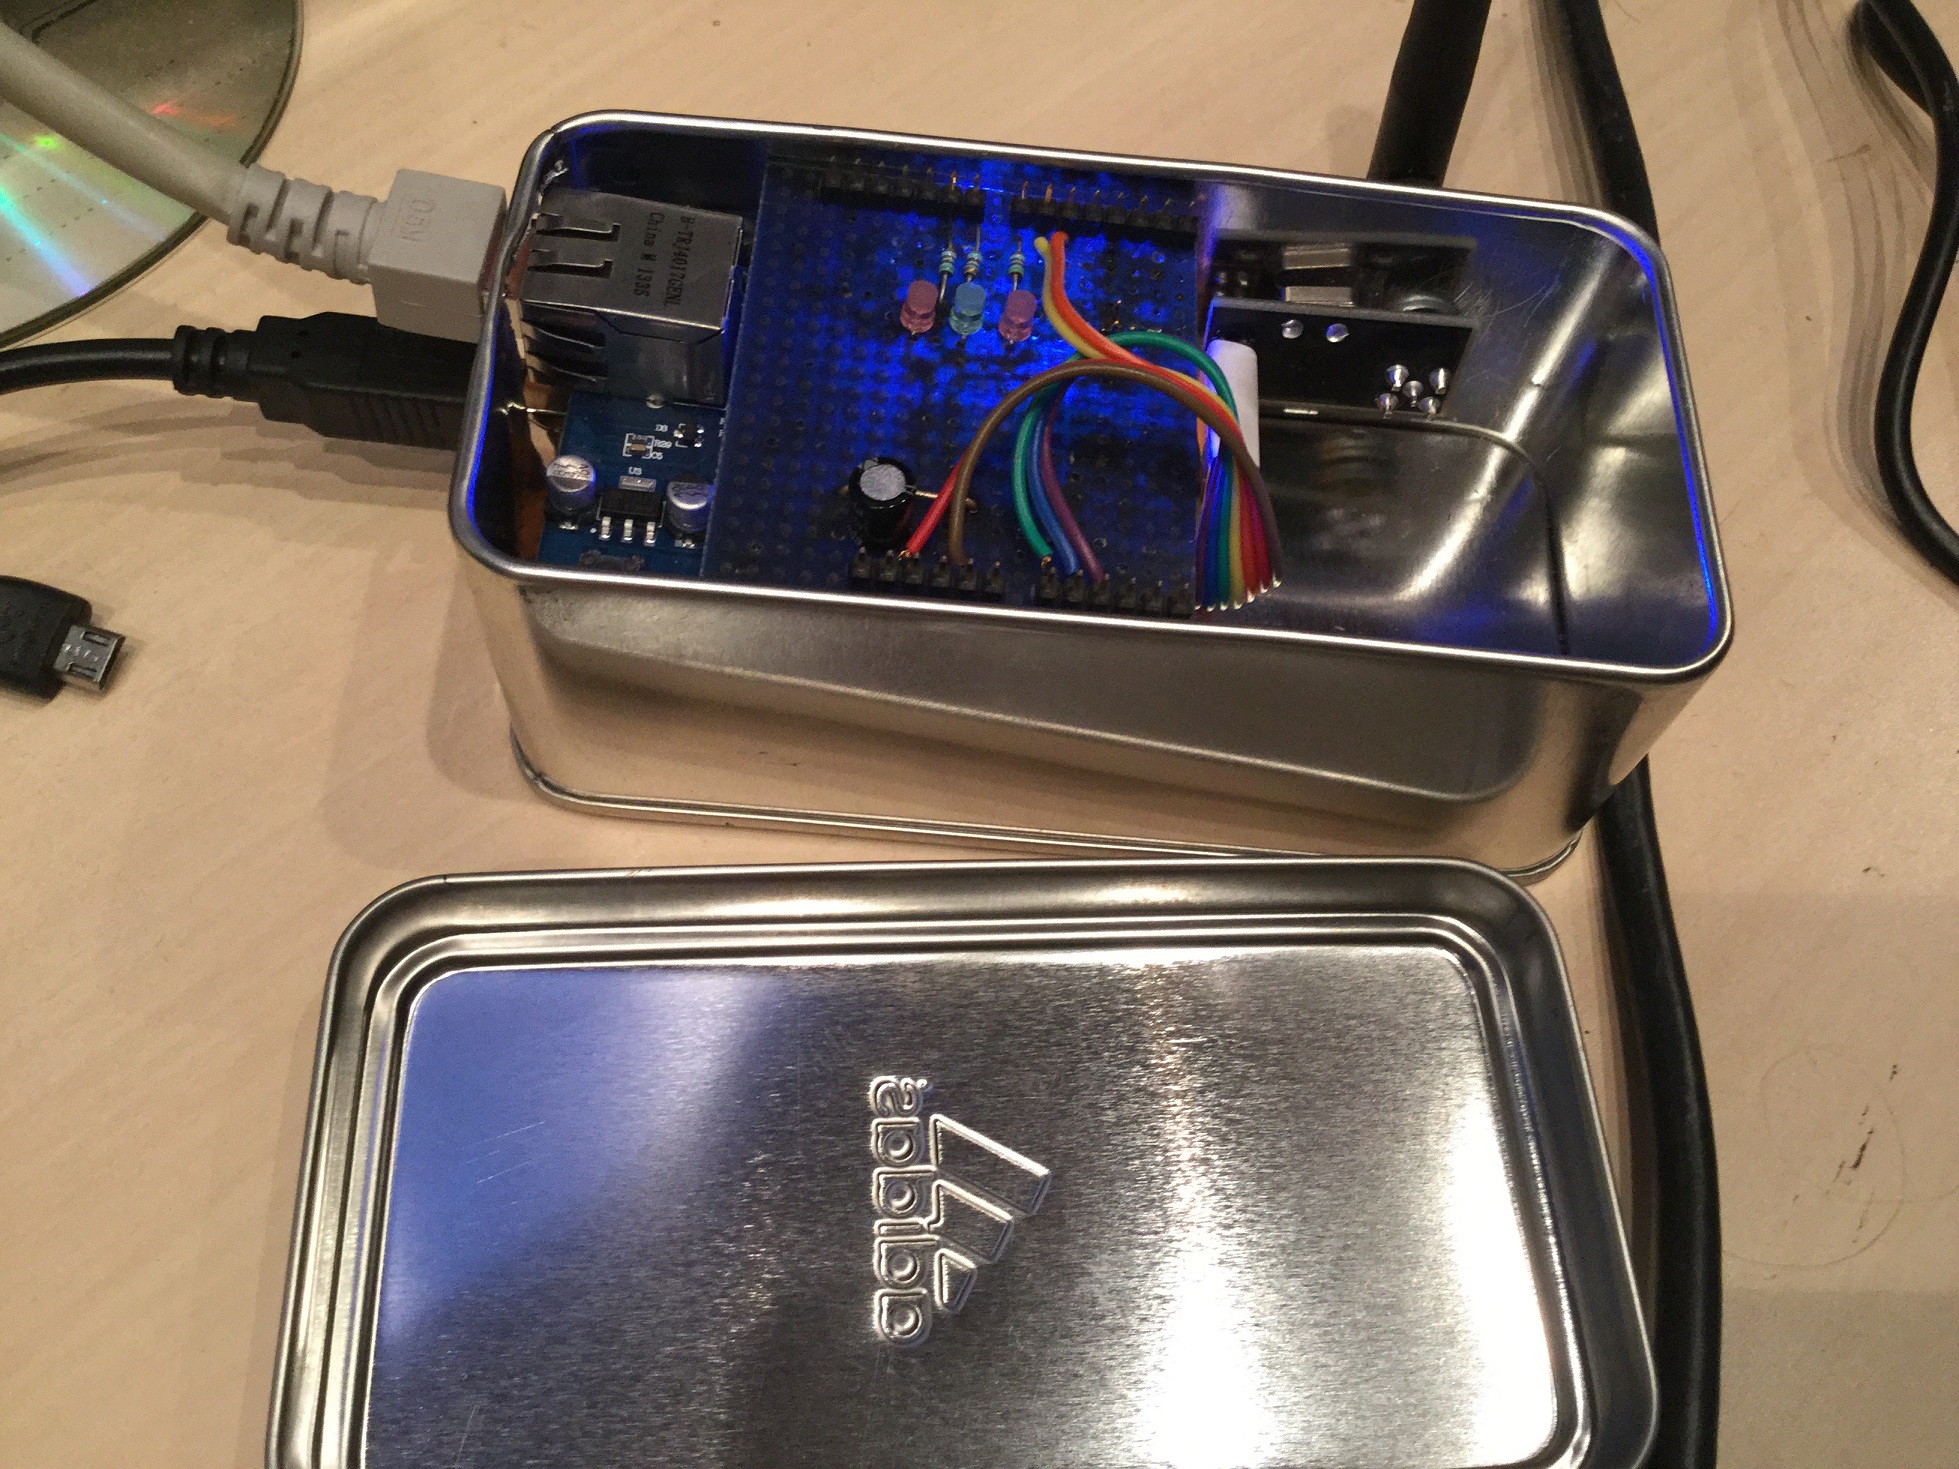
Later if found a sticker at the bottom of the box: "medium impact sports bra"!
Oups! -
BTW finding an appropriate housing for your sensors is not very easy. Housings should be nice and fit into their environment. Therefore I put my gateway in a sporty metal adidas housing:
Later if found a sticker at the bottom of the box: "medium impact sports bra"!
Oups!@Heinz said:
sporty metal adidas housing:
I'd be worried about shorting against the walls of the can, and shielding my RF signals... But if it works and you like it... well there you go!
-
@Heinz
Ha!looked like a cable to me at first glance!!
-
BTW finding an appropriate housing for your sensors is not very easy. Housings should be nice and fit into their environment. Therefore I put my gateway in a sporty metal adidas housing:
Later if found a sticker at the bottom of the box: "medium impact sports bra"!
Oups! -
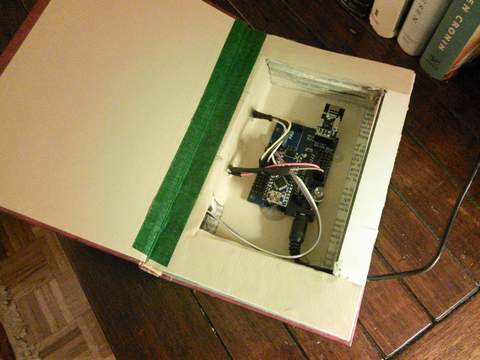
The old book trick... very nice!
-
After some months of testing a little update:
I received some e-mails questioning the so called "heat recovery cell bypass" mode. There is a damper inside the device that can
is switched automatically by the vallox-controller to bypass the heat recovery cell (HRC) to avoid heating up the house during the
summer months. Well, when you open the device on a hot summer day you will probably see the damper in an obvious wrong position:
the air does not bypass the HRC! Huh! whats wrong here?Explanation:
The device tries to cool down the incoming air by leading it through the HRC which is still colder than the temperature outside. If the temperature outside is colder than the air inside the house the damper is switched to the expected position. There are two things to you have to do to make all that work correctly:- turn off heating mode (the LED of the left most button on your control device must be off)
- the HRC bypass temperature must be set to a value below the outside temperature (e.g. 14 degrees)
To illustrate that effect I logged the temperatures in FHEM:
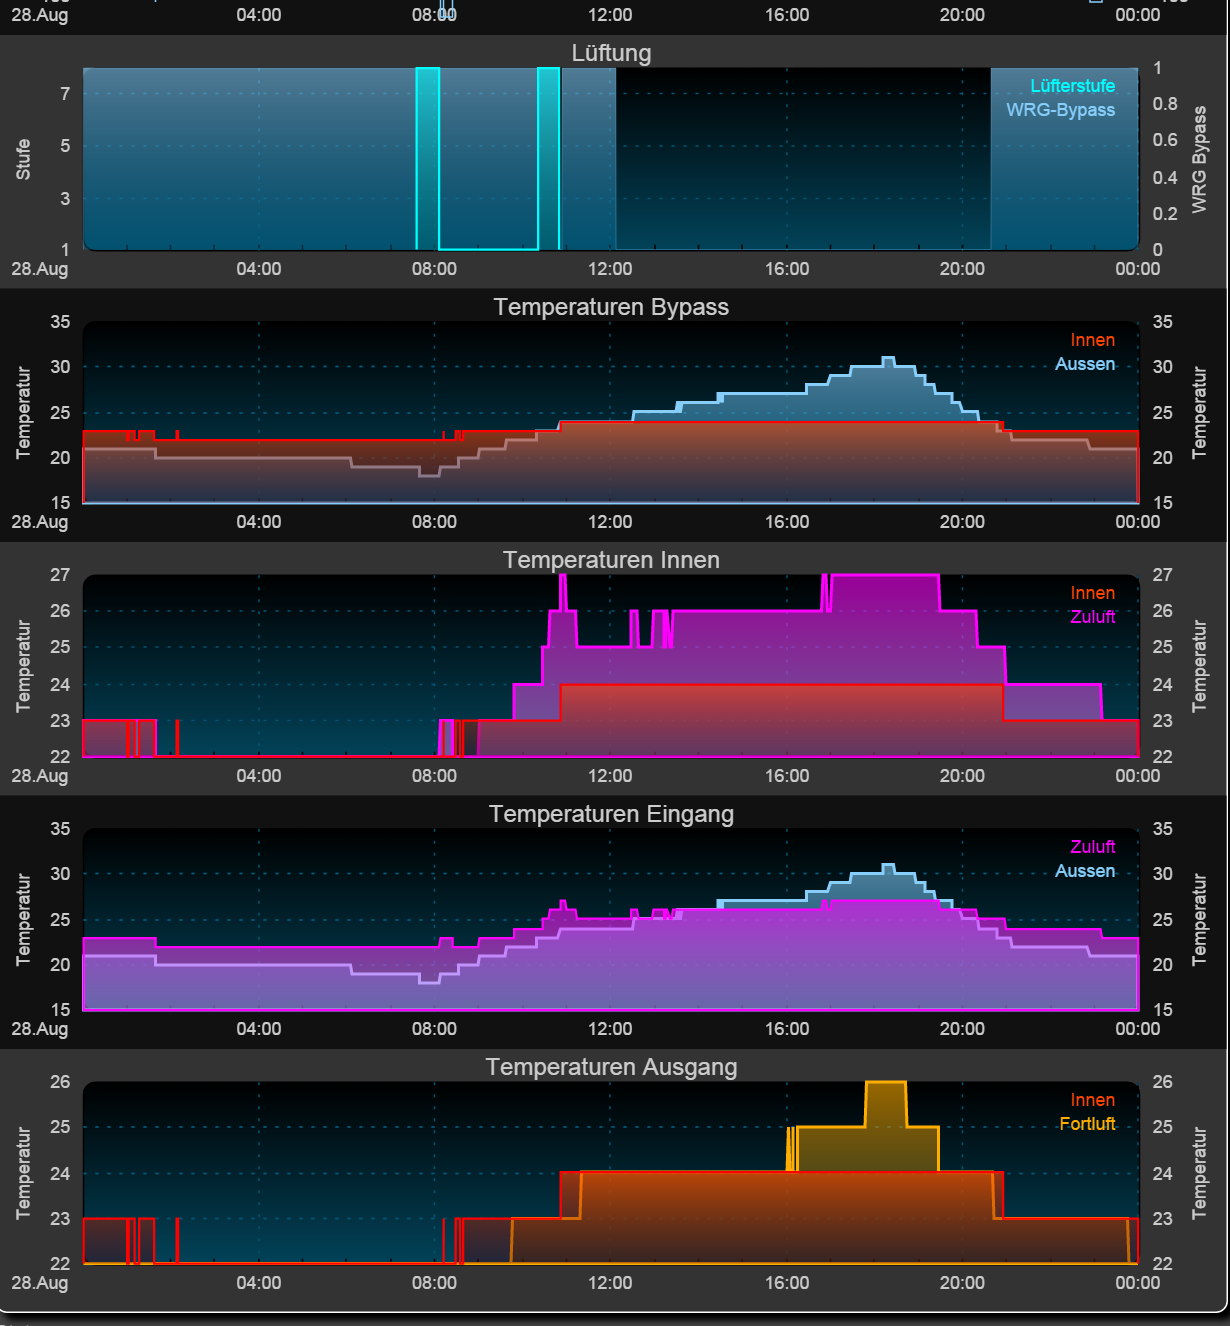
Sorry for the german labels.
The first plot shows the damper position: blue background: HRC bypass is active.
The second plot shows the temperature outside the house (blue) and the temperature inside the house (red)As soon as the temperature outside is greater than the temperature inside the HRC bypass is deactivated to cool the incoming air by leading the air through the "colder" HRC.
The fourth diagram shows the temperature of the air that is entering the rooms (purple) and the temperature outside the house (blue).
You can see that the fresh air entering the rooms is lower than the temperature outside: the cooling effect works (even if it is only few degrees)To all guys thinking about how to control the damper on their own logic from a raspi or arduino. This is not neccessary as the vallox logic works very well.
-
Some people asked if the library is able to control other parameters than the fan speed. The answer is yes. The following screenshot shows my sliders and buttons in FHEM:
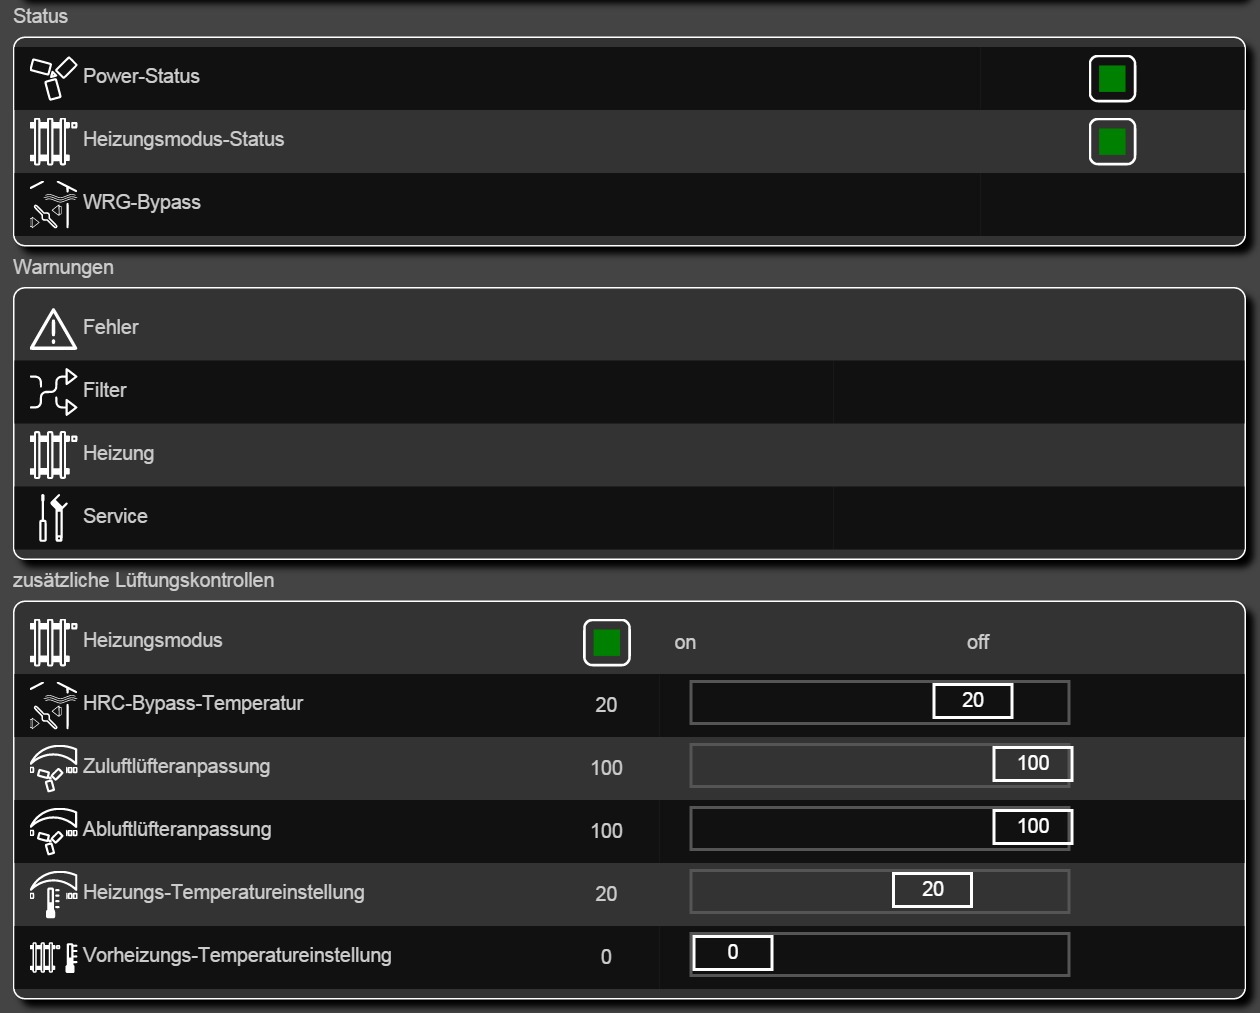
Sorry for the german labels again:
The first group shows the power state (ON/OFF), the heating-state (winter season=ON, summer season=OFF) and the HRC damper position (inactive=OFF). See last post.The second group shows some alerts (none at the moment)
the third group shows a button to switch between summer and winter season. The sliders control some temperature thresholds and other parameters.If you want to have a look at the bus data yourself you can download my sniffer tool which is a .Net port of the serial library described above under valloxserial.net
-
After some months of testing a little update:
I received some e-mails questioning the so called "heat recovery cell bypass" mode. There is a damper inside the device that can
is switched automatically by the vallox-controller to bypass the heat recovery cell (HRC) to avoid heating up the house during the
summer months. Well, when you open the device on a hot summer day you will probably see the damper in an obvious wrong position:
the air does not bypass the HRC! Huh! whats wrong here?Explanation:
The device tries to cool down the incoming air by leading it through the HRC which is still colder than the temperature outside. If the temperature outside is colder than the air inside the house the damper is switched to the expected position. There are two things to you have to do to make all that work correctly:- turn off heating mode (the LED of the left most button on your control device must be off)
- the HRC bypass temperature must be set to a value below the outside temperature (e.g. 14 degrees)
To illustrate that effect I logged the temperatures in FHEM:
Sorry for the german labels.
The first plot shows the damper position: blue background: HRC bypass is active.
The second plot shows the temperature outside the house (blue) and the temperature inside the house (red)As soon as the temperature outside is greater than the temperature inside the HRC bypass is deactivated to cool the incoming air by leading the air through the "colder" HRC.
The fourth diagram shows the temperature of the air that is entering the rooms (purple) and the temperature outside the house (blue).
You can see that the fresh air entering the rooms is lower than the temperature outside: the cooling effect works (even if it is only few degrees)To all guys thinking about how to control the damper on their own logic from a raspi or arduino. This is not neccessary as the vallox logic works very well.
-
@m26872
I modified the dark style. If you need the files I will upload em with a description how to integrate those. -
@m26872
I simply copied the dark style of FHEM and named it dark2:copy the following files to your FHEM subfolder www/pgm2
dark2style.css
dark2svg_defs.svg
dark2svg_style.cssIn your FHEM.cfg select this style for your WEB Frontend e.g.:
define WEB FHEMWEB 8083 global
attr WEB stylesheetPrefix dark2That's it.
If you want to have other plot colours edit the files starting with dark2svg... I think it is self explaining.
-
For those who want to have the FHEM files here they are:
_MYSENSOR_Vallox.cfg
simply place the file in FHEM's subfolder FHEM and include it your fhem.cfg:include ./FHEM/_MYSENSOR_Vallox.cfgAnd here are the plot files which have to be placed in the subfolder www\gplot
SVG_FileLog_Vallox_6.gplot
SVG_FileLog_Vallox_5.gplot
SVG_FileLog_Vallox_4.gplot
SVG_FileLog_Vallox_3.gplot
SVG_FileLog_Vallox_2.gplot
SVG_FileLog_Vallox_1.gplotYou will likely have to adapt the room and group names, and of course the german names, sorry for that.
-
You can use this rs485 to usb adapter to control the vallox device, no problem there. But do you intend to use your windows pc as controller then? Or do you want to use the stick directly with fhem? this would require some software which takes the serial telegrams and imports the values into fhem... or any other homeautomation controller.
-
No, the Windows PC was only for testing and verifying that the RS485 Connection workes well.
My preferred solution would be this stick at the Raspberry Pi which is running the FHEM. Therefor I'd need a module to read the stream and interpret it in the FHEM format. Problem: I've never written a module. It would be possible somehow.. in some month. ;)
The alternate solution would be your mysensor system. Especially because its running and tested. Problem: The Hardware. I have no experience in arduino and absolutly no idea how to build such a board. Thats why I thought I could plug the stick to an arduino and make it magicly work. ;)
EDIT: Ok. It is easier than I thought to write this module. I'm working on it and the main functions should be finished this week. I'll publish it, if it is ready for testing.
Ah ok I see. Probably you can get some help in the fhem forum. I also thought about doing this using a raspi... you could use the library to write a standalone exe which reads the serial stuff from usb and sets the values in fhem using the webinterface.
