2 channel in wall dimmer
-
Any pictures of the assembled board ?
-
Any pictures of the assembled board ?
@ahmedadelhosni Have not started the assembly of these boards yet. Im currently doing assembly of my other project Wirsbo/Uponor thermostat replacement. And those boards seems to be fully functional.
I will post a picture as soon as I get it assembled
-
@ahmedadelhosni Have not started the assembly of these boards yet. Im currently doing assembly of my other project Wirsbo/Uponor thermostat replacement. And those boards seems to be fully functional.
I will post a picture as soon as I get it assembled
Thanks @Denke
-
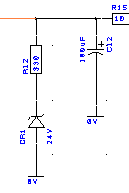
If I am not mistaken, isn't this the bleeding resistor in parallel with the cap ?
Why is there a reverse diode ? Won't this block the current from passing from the + terminal of the capacitor to the resistor then to gnd ? -
If I am not mistaken, isn't this the bleeding resistor in parallel with the cap ?
Why is there a reverse diode ? Won't this block the current from passing from the + terminal of the capacitor to the resistor then to gnd ?@ahmedadelhosni
It's a zener diode which will pass current once voltage is above 24v and then the resistor protects it from complete shorting to ground. -
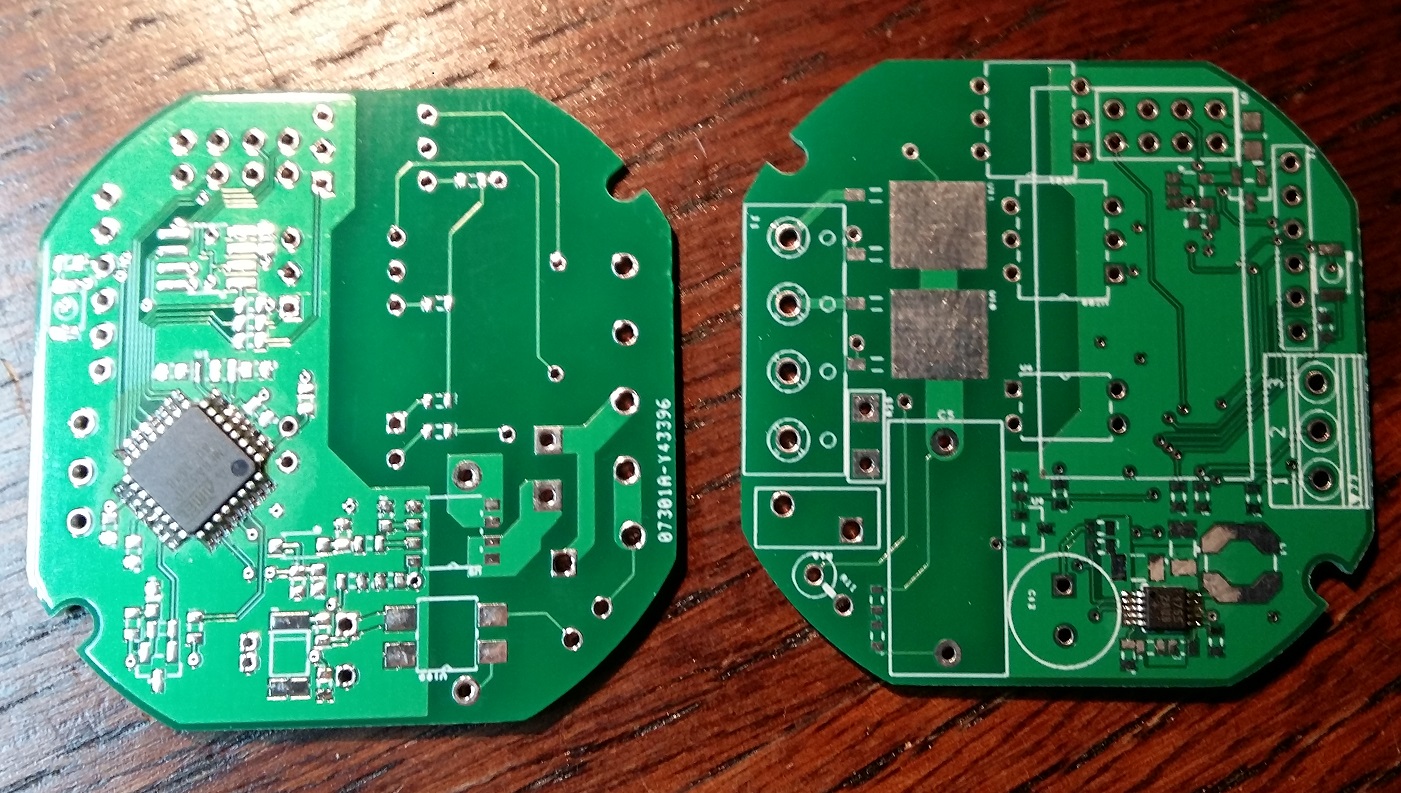
First components added after a visit to the lab at work and some soldering under the microscope
-
Hi just wanted to get an update on this project.
I have assembled 2 pcb (not all components) to start debug the processor platform and surroundings. Unfortunatly i got a bit stuck as i have problems loading the boot loader. I have tried to use the process suggested on arduino.cc using an nano as ISP. I get alot of strange behaviours and are not able to upload.Any tips and tricks is well received if you have any.
Othervise i will rest this project for a couple of weeks to be able to finnish my other thermostat project as well start a new, as the pool season is around the corner. And i really would love to be able to corntol pupm, lghts read temperatures and other stuff.
But if i find some good tricks i will pursue the goal to finnish this in wall dimmer before summer.
-
@Oitzu - why should not burning a bootloader to the atmega work without the nrf24 attached?
-
@sundberg84 in most of my cases it failed due to spi interferences.
-
@Oitzu Ahh, sorry I missunderstood you - the other way around. I read it like you had to have the nrf attached to make it work :)
Hello! It looks like you're interested in this conversation, but you don't have an account yet.
Getting fed up of having to scroll through the same posts each visit? When you register for an account, you'll always come back to exactly where you were before, and choose to be notified of new replies (either via email, or push notification). You'll also be able to save bookmarks and upvote posts to show your appreciation to other community members.
With your input, this post could be even better 💗
Register Login