Skip to content
  • MySensors
  • OpenHardware.io
  • Categories
  • Recent
  • Tags
  • Popular
Skins
  • Light
  • Brite
  • Cerulean
  • Cosmo
  • Flatly
  • Journal
  • Litera
  • Lumen
  • Lux
  • Materia
  • Minty
  • Morph
  • Pulse
  • Sandstone
  • Simplex
  • Sketchy
  • Spacelab
  • United
  • Yeti
  • Zephyr
  • Dark
  • Cyborg
  • Darkly
  • Quartz
  • Slate
  • Solar
  • Superhero
  • Vapor

  • Default (No Skin)
  • No Skin
Collapse
Brand Logo
  1. Home
  2. My Project
  3. 2 channel in wall dimmer

2 channel in wall dimmer

Scheduled Pinned Locked Moved My Project
54 Posts 15 Posters 27.5k Views 26 Watching
  • Oldest to Newest
  • Newest to Oldest
  • Most Votes
Reply
  • Reply as topic
Log in to reply
This topic has been deleted. Only users with topic management privileges can see it.
  • D Denke

    Finally new boards have arrived..

    Assembly will start soon:)
    0_1458579519569_20160321_172537 [297989] (2).jpg

    A Offline
    A Offline
    ahmedadelhosni
    wrote on last edited by
    #42

    @Denke Nice :) I am really excited to see your results.
    Regarding the resistor which is in parallel to act as a bleeder. What value do you think the most suitable ? 100K ? 1M ? and howa much watt ?

    Thanks.

    D 1 Reply Last reply
    0
    • A ahmedadelhosni

      @Denke Nice :) I am really excited to see your results.
      Regarding the resistor which is in parallel to act as a bleeder. What value do you think the most suitable ? 100K ? 1M ? and howa much watt ?

      Thanks.

      D Offline
      D Offline
      Denke
      Hardware Contributor
      wrote on last edited by
      #43

      @ahmedadelhosni
      Hi I have used 1M as bleeder in 0603 size. This resistor should be able to handle around 0.1W.

      If i have calculated right the power in the bleeder resistor should be around 0.05W

      RaspberryPi-Openhab

      1 Reply Last reply
      1
      • A Offline
        A Offline
        ahmedadelhosni
        wrote on last edited by
        #44

        Any pictures of the assembled board ?

        D 1 Reply Last reply
        0
        • A ahmedadelhosni

          Any pictures of the assembled board ?

          D Offline
          D Offline
          Denke
          Hardware Contributor
          wrote on last edited by Denke
          #45

          @ahmedadelhosni Have not started the assembly of these boards yet. Im currently doing assembly of my other project Wirsbo/Uponor thermostat replacement. And those boards seems to be fully functional.

          I will post a picture as soon as I get it assembled

          RaspberryPi-Openhab

          A 1 Reply Last reply
          0
          • D Denke

            @ahmedadelhosni Have not started the assembly of these boards yet. Im currently doing assembly of my other project Wirsbo/Uponor thermostat replacement. And those boards seems to be fully functional.

            I will post a picture as soon as I get it assembled

            A Offline
            A Offline
            ahmedadelhosni
            wrote on last edited by
            #46

            Thanks @Denke

            1 Reply Last reply
            0
            • A Offline
              A Offline
              ahmedadelhosni
              wrote on last edited by
              #47

              0_1459108094968_upload-1fb891ae-8d4b-4987-99e9-f797e2264042

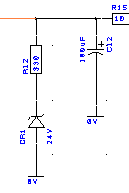
              If I am not mistaken, isn't this the bleeding resistor in parallel with the cap ?
              Why is there a reverse diode ? Won't this block the current from passing from the + terminal of the capacitor to the resistor then to gnd ?

              G 1 Reply Last reply
              0
              • A ahmedadelhosni

                0_1459108094968_upload-1fb891ae-8d4b-4987-99e9-f797e2264042

                If I am not mistaken, isn't this the bleeding resistor in parallel with the cap ?
                Why is there a reverse diode ? Won't this block the current from passing from the + terminal of the capacitor to the resistor then to gnd ?

                G Offline
                G Offline
                GertSanders
                Hardware Contributor
                wrote on last edited by
                #48

                @ahmedadelhosni
                It's a zener diode which will pass current once voltage is above 24v and then the resistor protects it from complete shorting to ground.

                1 Reply Last reply
                0
                • D Offline
                  D Offline
                  Denke
                  Hardware Contributor
                  wrote on last edited by
                  #49

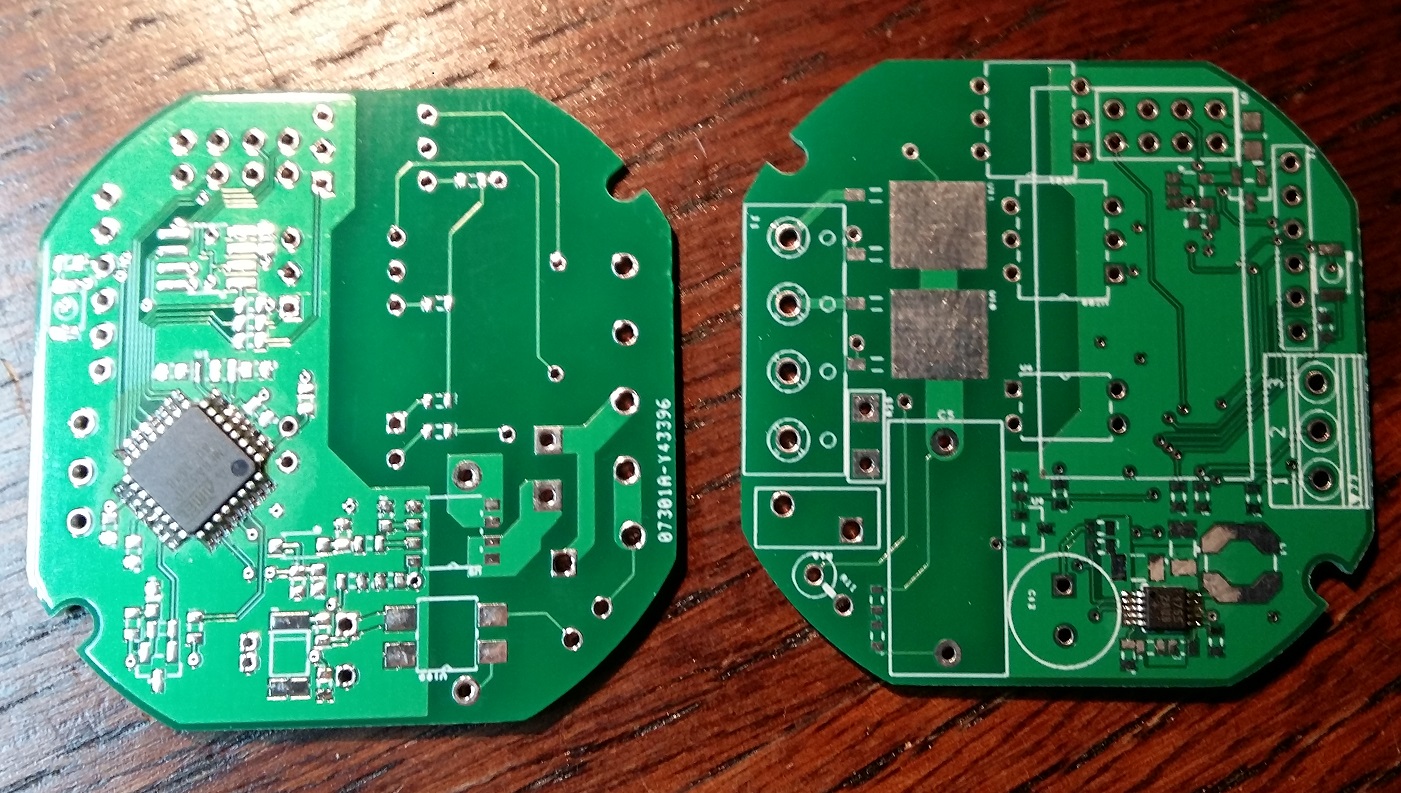
                  First components added after a visit to the lab at work and some soldering under the microscope
                  0_1459367729436_20160330_214502Resized.jpg

                  RaspberryPi-Openhab

                  1 Reply Last reply
                  2
                  • D Offline
                    D Offline
                    Denke
                    Hardware Contributor
                    wrote on last edited by Denke
                    #50

                    Hi just wanted to get an update on this project.
                    I have assembled 2 pcb (not all components) to start debug the processor platform and surroundings. Unfortunatly i got a bit stuck as i have problems loading the boot loader. I have tried to use the process suggested on arduino.cc using an nano as ISP. I get alot of strange behaviours and are not able to upload.

                    Any tips and tricks is well received if you have any.

                    Othervise i will rest this project for a couple of weeks to be able to finnish my other thermostat project as well start a new, as the pool season is around the corner. And i really would love to be able to corntol pupm, lghts read temperatures and other stuff.

                    But if i find some good tricks i will pursue the goal to finnish this in wall dimmer before summer.

                    RaspberryPi-Openhab

                    1 Reply Last reply
                    0
                    • O Offline
                      O Offline
                      Oitzu
                      wrote on last edited by
                      #51

                      @Denke said:

                      I get alot of strange behaviours and are not able to upload.

                      You not yet have added the nrf24, or? With the nrf24 module added the upload via isp will not work.
                      Can you describe any more behaviour? Log output, led flashing...

                      1 Reply Last reply
                      0
                      • S Offline
                        S Offline
                        sundberg84
                        Hardware Contributor
                        wrote on last edited by
                        #52

                        @Oitzu - why should not burning a bootloader to the atmega work without the nrf24 attached?

                        Controller: Proxmox VM - Home Assistant
                        MySensors GW: Arduino Uno - W5100 Ethernet, Gw Shield Nrf24l01+ 2,4Ghz
                        MySensors GW: Arduino Uno - Gw Shield RFM69, 433mhz
                        RFLink GW - Arduino Mega + RFLink Shield, 433mhz

                        1 Reply Last reply
                        0
                        • O Offline
                          O Offline
                          Oitzu
                          wrote on last edited by
                          #53

                          @sundberg84 in most of my cases it failed due to spi interferences.

                          1 Reply Last reply
                          0
                          • S Offline
                            S Offline
                            sundberg84
                            Hardware Contributor
                            wrote on last edited by
                            #54

                            @Oitzu Ahh, sorry I missunderstood you - the other way around. I read it like you had to have the nrf attached to make it work :)

                            Controller: Proxmox VM - Home Assistant
                            MySensors GW: Arduino Uno - W5100 Ethernet, Gw Shield Nrf24l01+ 2,4Ghz
                            MySensors GW: Arduino Uno - Gw Shield RFM69, 433mhz
                            RFLink GW - Arduino Mega + RFLink Shield, 433mhz

                            1 Reply Last reply
                            0

                            Hello! It looks like you're interested in this conversation, but you don't have an account yet.

                            Getting fed up of having to scroll through the same posts each visit? When you register for an account, you'll always come back to exactly where you were before, and choose to be notified of new replies (either via email, or push notification). You'll also be able to save bookmarks and upvote posts to show your appreciation to other community members.

                            With your input, this post could be even better 💗

                            Register Login
                            Reply
                            • Reply as topic
                            Log in to reply
                            • Oldest to Newest
                            • Newest to Oldest
                            • Most Votes


                            24

                            Online

                            12.0k

                            Users

                            11.2k

                            Topics

                            113.4k

                            Posts


                            Copyright 2025 TBD   |   Forum Guidelines   |   Privacy Policy   |   Terms of Service
                            • Login

                            • Don't have an account? Register

                            • Login or register to search.
                            • First post
                              Last post
                            0
                            • MySensors
                            • OpenHardware.io
                            • Categories
                            • Recent
                            • Tags
                            • Popular