Boxes and Enclosures
-
I had a couple of spare LV electrical enclosures from a home remodel, I plan to see about using them for some cheap enclosures. Had not considered using some cheap thin wall PVC pipe or something... That would be an even cheaper solution, just need to find a clean way to cap the ends off and mount stuff inside.
I got the LV boxes for around 1.5-2.00 a piece, no lids though. Thin wall PVC pipe can be had for like 3 bucks/10' from my local hardware store.
Interested to see what others come up with. I finally got most of my stuff in, looking to begin building this weekend.
Would really like a 3d printer for stuff like this!
-
Yes, a 3D printer is on my wish-list also.
-
Mine too :)
@blacey Quick, name someone whose list it isn't on :-)
-
@BulldogLowell Can you tell me what box you are using, what size it is and where it can be bought (hopefully somewhere in the EU)?
I think I like the size of it :)
-
@blacey Quick, name someone whose list it isn't on :-)
@clippermiami my list do not have 3d printer :)))
but it is only because ... i do have one
anyone who need me to share an experience - you are welcome
my thingiverse page http://www.thingiverse.com/axill/designs
gateway box http://www.thingiverse.com/thing:159417 -
@BulldogLowell Can you tell me what box you are using, what size it is and where it can be bought (hopefully somewhere in the EU)?
I think I like the size of it :)
No, sorry... USA.
Radio Shack. $3.00
I'm going to post how I mashed everything into this little box later. I'm on vacation now.
-
OK, thanks @BulldogLowell have a nice vacation!
-
Embedding them is a terrific idea. I have been focused on making them small and putting in strategic places.
I

@BulldogLowell Did you run a USB cable from that wall wort, or disassemble it and solder in wire?
-
@BulldogLowell Did you run a USB cable from that wall wort, or disassemble it and solder in wire?
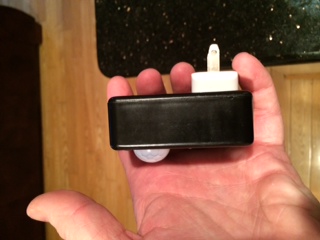
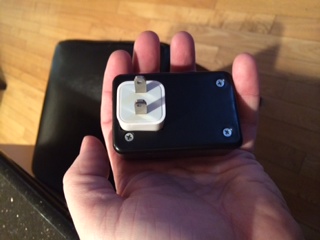
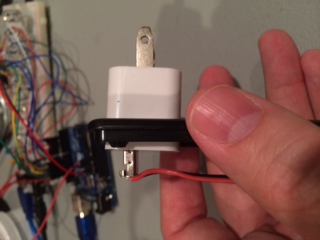
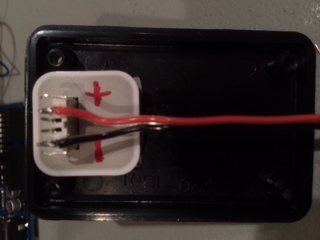
I used a male USB end off of eBay and soldered leads into the typical charger plug.
I recessed the plug into the box to keep it tighter against the wall.
Photos coming, I've just been traveling.
-
@BulldogLowell Did you run a USB cable from that wall wort, or disassemble it and solder in wire?
@NotYetRated
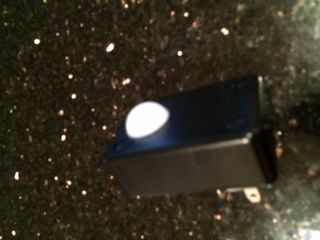
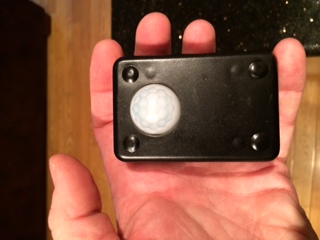
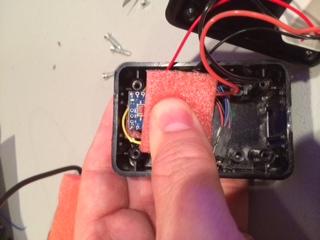
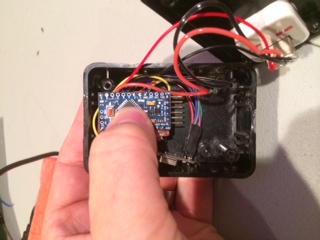
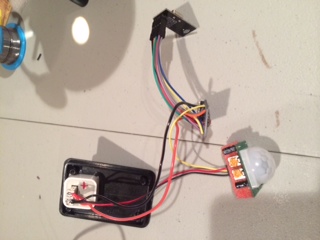
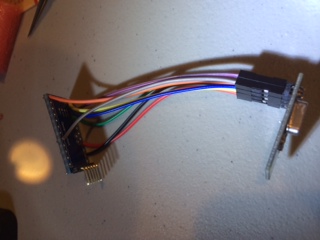
I promised some photos, so here they are.I used a 3.3V Arduino Pro-Mini and connected the sensor to the 5.5V from the plug, along with the 5.5V directly to the Mini using a male USB plug (I bought a bunch from China for this). I did this so that I can also power it on my breadboard. {side note, if you don't have one of those nice little breadboard power supplies with 5 and 3.3V, you are missing out} Remember to use the RAW pin if you are going to furnish anything but regulated 3.3V power to the Mini. I soldered the sensor and the radio's leads direct to the Mini, and I have to say, while nerve-wracking it came out great. Use the asymmetry of the sensor to have the headers on one side and the wires on the other, there is actually plenty of room and then some for all of this stuff.
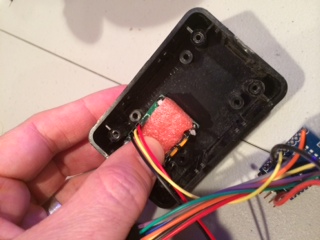
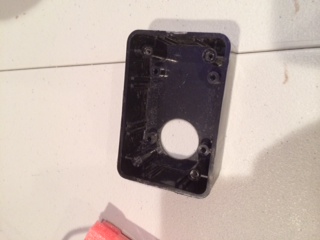
I used a 7/8in spade bit to drill the hole for the sensor's dome to pop out of the enclosure. I didn't use any glue to hold it in, rather I stacked the sensor, some of the orange foam came with the parts from china, then the Mini, then more Foam. Compression holds the parts in place and be cautious not to put foam over the reset button. I though about drilling out the back housing for the button, but it is easy enough to reset it by simply pulling out the plug and reinserting it.
Finally, I pushed the power plug as far in as it would go, after tightening the four screws on the box. I did a pretty hack job of cutting the hole, and man do I want a milling machine, but it actually looks good once assembled. I used a little epoxy to set the power adaptor in place once inserted into the back.
The best part is that is actually works. I am using in a hallway to detect people moving and turning on lights accordingly. It isn't so ugly that my wife has made me take it off the wall and I'm not sure she even noticed it yet.
One noteworthy thing I did was to 'calibrate' the sensor on the bench for time and sensitivity. These darn things can get pretty twitchy so you don't want to be messing with that once it is together. One nice thing is that the adjustment screws are located where you can just drill two holes if you want to access them without opening the sensor. I opted out of that on this one.
Sorry the Photos are not in order, but here they are:
-
Nice, thank you for this!!!
-
@NotYetRated
I promised some photos, so here they are.I used a 3.3V Arduino Pro-Mini and connected the sensor to the 5.5V from the plug, along with the 5.5V directly to the Mini using a male USB plug (I bought a bunch from China for this). I did this so that I can also power it on my breadboard. {side note, if you don't have one of those nice little breadboard power supplies with 5 and 3.3V, you are missing out} Remember to use the RAW pin if you are going to furnish anything but regulated 3.3V power to the Mini. I soldered the sensor and the radio's leads direct to the Mini, and I have to say, while nerve-wracking it came out great. Use the asymmetry of the sensor to have the headers on one side and the wires on the other, there is actually plenty of room and then some for all of this stuff.
I used a 7/8in spade bit to drill the hole for the sensor's dome to pop out of the enclosure. I didn't use any glue to hold it in, rather I stacked the sensor, some of the orange foam came with the parts from china, then the Mini, then more Foam. Compression holds the parts in place and be cautious not to put foam over the reset button. I though about drilling out the back housing for the button, but it is easy enough to reset it by simply pulling out the plug and reinserting it.
Finally, I pushed the power plug as far in as it would go, after tightening the four screws on the box. I did a pretty hack job of cutting the hole, and man do I want a milling machine, but it actually looks good once assembled. I used a little epoxy to set the power adaptor in place once inserted into the back.
The best part is that is actually works. I am using in a hallway to detect people moving and turning on lights accordingly. It isn't so ugly that my wife has made me take it off the wall and I'm not sure she even noticed it yet.
One noteworthy thing I did was to 'calibrate' the sensor on the bench for time and sensitivity. These darn things can get pretty twitchy so you don't want to be messing with that once it is together. One nice thing is that the adjustment screws are located where you can just drill two holes if you want to access them without opening the sensor. I opted out of that on this one.
Sorry the Photos are not in order, but here they are:
Awesome info, thanks! I found the same enclosures as you at my radio shack. Going to be rigging multiple of these up for around the house, but with temp and humidity sensors as well.
Only difference is I got 5.5 volt minis. Had not thought about directly powering the presence sensor off of the input voltage, doh.
I like that style wall adapter you got. I got a slightly different looking one, but should still fit.
-
Awesome info, thanks! I found the same enclosures as you at my radio shack. Going to be rigging multiple of these up for around the house, but with temp and humidity sensors as well.
Only difference is I got 5.5 volt minis. Had not thought about directly powering the presence sensor off of the input voltage, doh.
I like that style wall adapter you got. I got a slightly different looking one, but should still fit.
Yeah, that little trick saves you from having to step down the voltage and leaves more space. You should easily fit the step-down, though. I'd urge you to to not even try to keep the radio wires together on the ribbon, they are quite recalcitrant when joined together.
Noteworthy too is that I had motion sensors working on a 3.3V pin. I know they are rated something like 4V, but yeah they worked. But knowing how flakey they were, and sitting with 5V, well that's how we ended up here.
I didn't do this, but when you are ready to build your sandwich, you may want to tack down the motion sensor with a little hot melt glue; just to hold it while you build the 'foamburger' or whatever you use to hold it in slight compression.
have fun with it and show us your results.
-
a nice to know treat to avoid another component and its associated spaghetti in the world of trying to keep things tiny, unnoticed, but functional.
thanks.
-
Yeah, that little trick saves you from having to step down the voltage and leaves more space. You should easily fit the step-down, though. I'd urge you to to not even try to keep the radio wires together on the ribbon, they are quite recalcitrant when joined together.
Noteworthy too is that I had motion sensors working on a 3.3V pin. I know they are rated something like 4V, but yeah they worked. But knowing how flakey they were, and sitting with 5V, well that's how we ended up here.
I didn't do this, but when you are ready to build your sandwich, you may want to tack down the motion sensor with a little hot melt glue; just to hold it while you build the 'foamburger' or whatever you use to hold it in slight compression.
have fun with it and show us your results.
"recalcitrant" hah, nice word.
Solder gun was acting up so I ordered a new one. Should be here tomorrow, at which time ill finish the build and let you know how things go. Planning to use some silicone caulk to hold things together inside. Non-conductive, and can be pulled apart with relative ease if needed.
-
"recalcitrant" hah, nice word.
Solder gun was acting up so I ordered a new one. Should be here tomorrow, at which time ill finish the build and let you know how things go. Planning to use some silicone caulk to hold things together inside. Non-conductive, and can be pulled apart with relative ease if needed.

Hello! It looks like you're interested in this conversation, but you don't have an account yet.
Getting fed up of having to scroll through the same posts each visit? When you register for an account, you'll always come back to exactly where you were before, and choose to be notified of new replies (either via email, or push notification). You'll also be able to save bookmarks and upvote posts to show your appreciation to other community members.
With your input, this post could be even better 💗
Register Login