implementing multiple sensors


  • Probably not the easiest to look at since it combined a RGB diode and RFID reader. But it works very well.
    https://github.com/wbcode/ham/blob/master/arduino/MySensorRFIDandRGB/RGBandRFID/RGBandRFID.ino

    I should add that I don't use the Vera as a controler.

    WB


  • .zip did not take here are the files

    Servo-Light-Temp-Sensors.ino Servo-Temp-Light-Sensors.jpg vera-blinds.jpg


  • Hero Member

    If i was a programmer... i would write a wizard app/script/webpage that would ask a user a bunch of questions..

    1. What Arduino are they using.
    2. what sensors/actuators they want to have on their sketch
    3. what pins ( showing those available) are they going to connect the sensor to.
    4. What they want to call the sketch
    5. Relay mode?
    6. Sampling times

    etc etc

    if i was a really good programmer, i would produce a schematic/frizing like above 😉

    Unfortunately in not a programmer..really wish i was, and am trying to get there slowly...so if you guys are cool with waiting another 5 years ill get something together...


  • Admin

    We've actually thought about doing a sketch-generator also. It's down there on the list. And it would be a web-thing (hopefully with OTA update) 🙂


  • Hero Member

    @hek Phew... cause you are a great programmer!!!

    OTA!!.... now your showing off 😉


  • A few people have asked about the hardware I used.

    A quick write up on what hardware I used for the blinds-light-temp-servo project.

    My binds are 1” not the 2” that you see in the projects listed in the forums. The standard servos will not fit inside the 1” blinds, so I had to use the mini servos. My concern was that the mini servos would not have the torque necessary to operate the tilt mechanism. But for at least the 45x38 blinds I have the mini servo worked great, not sure about larger size blinds.

    I removed the tilt wand and mechanism completely and connected the servo directly to the hex rod. I used a piece of 2” foam insulation and cut out a cavity for the servo and used it as the mounting bracket.

    I purchased a Nano IO shield from imall.iteadstudio.com, which I plan to use when I assemble the parts into a final enclosure and mount it inside the cabinet. With the Light and Temp sensors mounted inside the window frame.

    I use PLEG to control the blinds.

    Parts used:

    http://www.ebay.com/itm/291084936296?ssPageName=STRK:MEWAX:IT&_trksid=p3984.m1423.l2649 – used to connect the servo to the hex rod. Note I had to cut off some of the hex rod so the servo would sit inside the head rail.

    http://www.ebay.com/itm/SG90-Tower-Pro-mini-servo-Universal-S-type-connector-4-0-to-6-0-volts-/261184708931?pt=Model_Kit_US&hash=item3ccfd26143

    I tried to upload a 5 second video of the binds in operation, but the file is too large.
    Servo-Connection.jpg Test Wiring.jpg


  • Admin

    Cool! Just upload the video to youtube and post the link here (it will be embedded automatically).


  • Two short videos

    1. During development
    2. In production

    http://tinypic.com/r/2dcfn9w/8
    http://tinypic.com/r/w05r21/8


  • Can anyone see if i have missed something here in the code, It was working great before i copy/past the DHT sensor to the code; ande after that
    it will not really work anymore, Its 4 Binary Buttons, 1 relay And 1 DHT sensor Combo

            #include <Relay.h>
            #include <Sensor.h>
            #include <SPI.h>
            #include <EEPROM.h>  
            #include <RF24.h>
            #include <Bounce2.h>
            #include <DHT.h>  
            
            #define RELAY_1  7  // Arduino Digital I/O pin number for first relay (second on pin+1 etc)
            #define NUMBER_OF_RELAYS 2 
            #define RELAY_ON 0
            #define RELAY_OFF 1
            
            #define BUTTON_PIN1  3  // Arduino Digital I/O pin for button/reed switch
            #define BUTTON_PIN2  4  // Arduino Digital I/O pin for button/reed switch
            #define BUTTON_PIN3  5  // Arduino Digital I/O pin for button/reed switch
            #define BUTTON_PIN4  6  // Arduino Digital I/O pin for button/reed switch
            
            #define CHILD_ID_HUM 0
            #define CHILD_ID_TEMP 1
            #define HUMIDITY_SENSOR_DIGITAL_PIN 8
            
            Sensor gw;
            Bounce debouncer1 = Bounce();
            Bounce debouncer2 = Bounce();
            Bounce debouncer3 = Bounce();
            Bounce debouncer4 = Bounce();
            
            int oldValue1=-1;
            int oldValue2=-1;
            int oldValue3=-1;
            int oldValue4=-1;
            
            DHT dht;
            float lastTemp;
            float lastHum;
            boolean metric = true; 
            
            
            void setup()  
            {  
              gw.begin();
            
              pinMode(BUTTON_PIN1,INPUT);
              digitalWrite(BUTTON_PIN1,HIGH);
              pinMode(BUTTON_PIN2,INPUT);
              digitalWrite(BUTTON_PIN2,HIGH);
              pinMode(BUTTON_PIN3,INPUT);
              digitalWrite(BUTTON_PIN3,HIGH);
              pinMode(BUTTON_PIN4,INPUT);
              digitalWrite(BUTTON_PIN4,HIGH);
              
              dht.setup(HUMIDITY_SENSOR_DIGITAL_PIN); 
              
              
              // After setting up the button, setup debouncer
              debouncer1.attach(BUTTON_PIN1);
              debouncer1.interval(5);
              debouncer2.attach(BUTTON_PIN2);
              debouncer2.interval(5);
              debouncer3.attach(BUTTON_PIN3);
              debouncer3.interval(5);
              debouncer4.attach(BUTTON_PIN4);
              debouncer4.interval(5);


              // Register binary input sensor to gw (they will be created as child devices)
              // You can use S_DOOR, S_MOTION or S_LIGHT here depending on your usage.
              // If S_LIGHT is used, remember to update variable type you send in below.
              gw.sendSensorPresentation(BUTTON_PIN1, S_DOOR);  
              gw.sendSensorPresentation(BUTTON_PIN2, S_DOOR);  
              gw.sendSensorPresentation(BUTTON_PIN3, S_DOOR);  
              gw.sendSensorPresentation(BUTTON_PIN4, S_DOOR);  
              
            
              // Send the sketch version information to the gateway and Controller
              gw.sendSketchInfo("4Door2Relay", "1.0");
              
               // Register all sensors to gw (they will be created as child devices)
              gw.sendSensorPresentation(CHILD_ID_HUM, S_HUM);
              gw.sendSensorPresentation(CHILD_ID_TEMP, S_TEMP);
              
              metric = gw.isMetricSystem();
            
              // Register all sensors to gw (they will be created as child devices)
              for (int i=0; i<NUMBER_OF_RELAYS;i++) {
                gw.sendSensorPresentation(RELAY_1+i, S_LIGHT);
              }
              // Fetch relay status
              for (int i=0; i<NUMBER_OF_RELAYS;i++) {
                // Make sure relays are off when starting up
                digitalWrite(RELAY_1+i, RELAY_OFF);
                // Then set relay pins in output mode
                pinMode(RELAY_1+i, OUTPUT);   
                  
                // Request/wait for relay status
                gw.getStatus(RELAY_1+i, V_LIGHT);
                setRelayStatus(gw.getMessage()); // Wait here until status message arrive from gw
              }
              
            }
            
            
            /*
            *  Example on how to asynchronously check for new messages from gw
            */
            void loop() 
            {
               debouncer1.update();
               debouncer2.update();
               debouncer3.update();
               debouncer4.update();


              // Get the update value
              int value = debouncer1.read();
              if (value != oldValue1) {
                 // Send in the new value
                 gw.sendVariable(BUTTON_PIN1, V_TRIPPED, value==HIGH ? "1" : "0");  // Change to V_LIGHT if you use S_LIGHT in presentation above
                 oldValue1 = value;
                }
                
            value = debouncer2.read();
            
            if (value != oldValue2) {
            // Send in the new value
            gw.sendVariable(BUTTON_PIN2, V_TRIPPED, value==HIGH ? "1" : "0"); // Change to V_LIGHT if you use S_LIGHT in presentation above
            oldValue2 = value;
            }
            
            value = debouncer3.read();
            
            if (value != oldValue3) {
            // Send in the new value
            gw.sendVariable(BUTTON_PIN3, V_TRIPPED, value==HIGH ? "1" : "0"); // Change to V_LIGHT if you use S_LIGHT in presentation above
            oldValue3 = value;
            } 
             value = debouncer4.read();
            
            if (value != oldValue4) {
            // Send in the new value
            gw.sendVariable(BUTTON_PIN4, V_TRIPPED, value==HIGH ? "1" : "0"); // Change to V_LIGHT if you use S_LIGHT in presentation above
            oldValue4 = value;
            } 
            
             delay(dht.getMinimumSamplingPeriod());
            
              float temperature = dht.getTemperature();
              if (isnan(temperature)) {
                  Serial.println("Failed reading temperature from DHT");
              } else if (temperature != lastTemp) {
                lastTemp = temperature;
                if (!metric) {
                  temperature = dht.toFahrenheit(temperature);
                }
                gw.sendVariable(CHILD_ID_TEMP, V_TEMP, temperature, 1);
                  Serial.print("T: ");
                  Serial.println(temperature);
              }
              
              float humidity = dht.getHumidity();
              if (isnan(humidity)) {
                  Serial.println("Failed reading humidity from DHT");
              } else if (humidity != lastHum) {
                  lastHum = humidity;
                  gw.sendVariable(CHILD_ID_HUM, V_HUM, humidity, 1);
                  Serial.print("H: ");
                  Serial.println(humidity);
              }
            
            
              if (gw.messageAvailable()) {
                message_s message = gw.getMessage(); 
                setRelayStatus(message);
              }
            }
            
            void setRelayStatus(message_s message) {
              if (message.header.messageType==M_SET_VARIABLE &&
                  message.header.type==V_LIGHT) {
                 int incomingRelayStatus = atoi(message.data);
                 // Change relay state
                 digitalWrite(message.header.childId, incomingRelayStatus==1?RELAY_ON:RELAY_OFF);
                 // Write some debug info
                 Serial.print("Incoming change for relay on pin:");
                 Serial.print(message.header.childId);
                 Serial.print(", New status: ");
                 Serial.println(incomingRelayStatus);
               }
            }

  • Contest Winner

    @Hoffan said:

    #include <Relay.h>
    #include <Sensor.h>
    #include <SPI.h>
    #include <EEPROM.h>
    #include <RF24.h>
    #include <Bounce2.h>
    #include <DHT.h>

        #define RELAY_1  7  // Arduino Digital I/O pin number for first relay (second on pin+1 etc)
        #define NUMBER_OF_RELAYS 2 
        #define RELAY_ON 0
        #define RELAY_OFF 1
    
        #define BUTTON_PIN1  3  // Arduino Digital I/O pin for button/reed switch
        #define BUTTON_PIN2  4  // Arduino Digital I/O pin for button/reed switch
        #define BUTTON_PIN3  5  // Arduino Digital I/O pin for button/reed switch
        #define BUTTON_PIN4  6  // Arduino Digital I/O pin for button/reed switch
    
        #define CHILD_ID_HUM 0
        #define CHILD_ID_TEMP 1
        #define HUMIDITY_SENSOR_DIGITAL_PIN 8
    
        Sensor gw;
        Bounce debouncer1 = Bounce();
        Bounce debouncer2 = Bounce();
        Bounce debouncer3 = Bounce();
        Bounce debouncer4 = Bounce();
    
        int oldValue1=-1;
        int oldValue2=-1;
        int oldValue3=-1;
        int oldValue4=-1;
    
        DHT dht;
        float lastTemp;
        float lastHum;
        boolean metric = true; 
    
    
        void setup()  
        {  
          gw.begin();
    
          pinMode(BUTTON_PIN1,INPUT);
          digitalWrite(BUTTON_PIN1,HIGH);
          pinMode(BUTTON_PIN2,INPUT);
          digitalWrite(BUTTON_PIN2,HIGH);
          pinMode(BUTTON_PIN3,INPUT);
          digitalWrite(BUTTON_PIN3,HIGH);
          pinMode(BUTTON_PIN4,INPUT);
          digitalWrite(BUTTON_PIN4,HIGH);
    
          dht.setup(HUMIDITY_SENSOR_DIGITAL_PIN); 
    
    
          // After setting up the button, setup debouncer
          debouncer1.attach(BUTTON_PIN1);
          debouncer1.interval(5);
          debouncer2.attach(BUTTON_PIN2);
          debouncer2.interval(5);
          debouncer3.attach(BUTTON_PIN3);
          debouncer3.interval(5);
          debouncer4.attach(BUTTON_PIN4);
          debouncer4.interval(5);


          // Register binary input sensor to gw (they will be created as child devices)
          // You can use S_DOOR, S_MOTION or S_LIGHT here depending on your usage.
          // If S_LIGHT is used, remember to update variable type you send in below.
          gw.sendSensorPresentation(BUTTON_PIN1, S_DOOR);  
          gw.sendSensorPresentation(BUTTON_PIN2, S_DOOR);  
          gw.sendSensorPresentation(BUTTON_PIN3, S_DOOR);  
          gw.sendSensorPresentation(BUTTON_PIN4, S_DOOR);  
    
    
          // Send the sketch version information to the gateway and Controller
          gw.sendSketchInfo("4Door2Relay", "1.0");
    
           // Register all sensors to gw (they will be created as child devices)
          gw.sendSensorPresentation(CHILD_ID_HUM, S_HUM);
          gw.sendSensorPresentation(CHILD_ID_TEMP, S_TEMP);
    
          metric = gw.isMetricSystem();
    
          // Register all sensors to gw (they will be created as child devices)
          for (int i=0; i<NUMBER_OF_RELAYS;i++) {
            gw.sendSensorPresentation(RELAY_1+i, S_LIGHT);
          }
          // Fetch relay status
          for (int i=0; i<NUMBER_OF_RELAYS;i++) {
            // Make sure relays are off when starting up
            digitalWrite(RELAY_1+i, RELAY_OFF);
            // Then set relay pins in output mode
            pinMode(RELAY_1+i, OUTPUT);   
    
            // Request/wait for relay status
            gw.getStatus(RELAY_1+i, V_LIGHT);
            setRelayStatus(gw.getMessage()); // Wait here until status message arrive from gw
          }
    
        }
    
    
        /*
        *  Example on how to asynchronously check for new messages from gw
        */
        void loop() 
        {
           debouncer1.update();
           debouncer2.update();
           debouncer3.update();
           debouncer4.update();


          // Get the update value
          int value = debouncer1.read();
          if (value != oldValue1) {
             // Send in the new value
             gw.sendVariable(BUTTON_PIN1, V_TRIPPED, value==HIGH ? "1" : "0");  // Change to V_LIGHT if you use S_LIGHT in presentation above
             oldValue1 = value;
            }
    
        value = debouncer2.read();
    
        if (value != oldValue2) {
        // Send in the new value
        gw.sendVariable(BUTTON_PIN2, V_TRIPPED, value==HIGH ? "1" : "0"); // Change to V_LIGHT if you use S_LIGHT in presentation above
        oldValue2 = value;
        }
    
        value = debouncer3.read();
    
        if (value != oldValue3) {
        // Send in the new value
        gw.sendVariable(BUTTON_PIN3, V_TRIPPED, value==HIGH ? "1" : "0"); // Change to V_LIGHT if you use S_LIGHT in presentation above
        oldValue3 = value;
        } 
         value = debouncer4.read();
    
        if (value != oldValue4) {
        // Send in the new value
        gw.sendVariable(BUTTON_PIN4, V_TRIPPED, value==HIGH ? "1" : "0"); // Change to V_LIGHT if you use S_LIGHT in presentation above
        oldValue4 = value;
        } 
    
         delay(dht.getMinimumSamplingPeriod());
    
          float temperature = dht.getTemperature();
          if (isnan(temperature)) {
              Serial.println("Failed reading temperature from DHT");
          } else if (temperature != lastTemp) {
            lastTemp = temperature;
            if (!metric) {
              temperature = dht.toFahrenheit(temperature);
            }
            gw.sendVariable(CHILD_ID_TEMP, V_TEMP, temperature, 1);
              Serial.print("T: ");
              Serial.println(temperature);
          }
    
          float humidity = dht.getHumidity();
          if (isnan(humidity)) {
              Serial.println("Failed reading humidity from DHT");
          } else if (humidity != lastHum) {
              lastHum = humidity;
              gw.sendVariable(CHILD_ID_HUM, V_HUM, humidity, 1);
              Serial.print("H: ");
              Serial.println(humidity);
          }
    
    
          if (gw.messageAvailable()) {
            message_s message = gw.getMessage(); 
            setRelayStatus(message);
          }
        }
    
        void setRelayStatus(message_s message) {
          if (message.header.messageType==M_SET_VARIABLE &&
              message.header.type==V_LIGHT) {
             int incomingRelayStatus = atoi(message.data);
             // Change relay state
             digitalWrite(message.header.childId, incomingRelayStatus==1?RELAY_ON:RELAY_OFF);
             // Write some debug info
             Serial.print("Incoming change for relay on pin:");
             Serial.print(message.header.childId);
             Serial.print(", New status: ");
             Serial.println(incomingRelayStatus);
           }
        }
    

    can you elaborate on "doesn't work" ?

    do you have sensors on the Vera UI?

    Try to debug putting Serial.print(Something) in places so you can see how the sketch progresses...


  • @BulldogLowell

    Yes all the sensors came up in the Vera UI, And looks like they work for some minutes
    But when i push Ă„ button its looks like all things stop working, and after a reboot on the Arduino its working again for a short time and so on


  • Contest Winner

    This post is deleted!

  • Contest Winner

    @Hoffan said:

    @BulldogLowell

    Yes all the sensors came up in the Vera UI, And looks like they work for some minutes
    But when i push Ă„ button its looks like all things stop working, and after a reboot on the Arduino its working again for a short time and so on

    Try threading in the sensor reads into each block to read and change its state in one block for each sensor/pin.

    I edited you code so it can be read,,, attached.

    Remember AutoFormat under Tools in your arduino menu

    void loop() 
    {
      debouncer1.update();
      // Get the update value
      int value = debouncer1.read();
      if (value != oldValue1) 
      {
        gw.sendVariable(BUTTON_PIN1, V_TRIPPED, value==HIGH ? "1" : "0");
        oldValue1 = value;
      }
      //
      debouncer2.update();
      value = debouncer2.read();
      if (value != oldValue2) 
      {
        gw.sendVariable(BUTTON_PIN2, V_TRIPPED, value==HIGH ? "1" : "0");
        oldValue2 = value;
      }
      //
      debouncer3.update();
      value = debouncer3.read();
      if (value != oldValue3) 
      {
        gw.sendVariable(BUTTON_PIN3, V_TRIPPED, value==HIGH ? "1" : "0"); 
        oldValue3 = value;
      } 
      //
      debouncer4.update();
      value = debouncer4.read();
      if (value != oldValue4) 
      {
        gw.sendVariable(BUTTON_PIN4, V_TRIPPED, value==HIGH ? "1" : "0");
        oldValue4 = value;
      } 
    

    FourSensorTwoRelay.ino


  • So I have created a multi sensor that uses the DHT and motion to get Temp/Hum/Motion. Problem I have though is the update of the hum/temp. I have not been able to figure out a way to get a reliable update on those without blasting the GW/Vera with unneeded announcements (disable sleep function and it keeps updating pretty much every second). So right now the script updates the temp/hum only when motion is seen. I have tried a few things with my limited knowledge of arduino and can't get this to work properly. Can someone please take a look at this sketch and tell me what I am missing? If i change the variables for sleep at the end and try to do an interrupt and a sleep delay, i get an error.
    7-21-2014 1-05-03 PM.png

    Motion_Temp_Sensor13b3.ino


  • Nobody wants to take a crack at this? I figured this to be a common combo and would really like to get it to work properly.


  • I'm coming close to finalising my multisensor sketch. I'll post code once I clean it up a little. I have a newborn at home, so if I forget to put code here then somebody please remind me in a little while 🙂


  • @waynehead99 Here is a sketch I run with DHT and motion support.

    #include <Sleep_n0m1.h>
    #include <SPI.h>
    #include <EEPROM.h>  
    #include <RF24.h>
    #include <Sensor.h>  
    #include <DHT.h>  
    
    #define CHILD_ID_HUM 0
    #define CHILD_ID_TEMP 1
    #define HUMIDITY_SENSOR_DIGITAL_PIN 4
    
    Sensor gw;
    DHT dht;
    Sleep sleep;
    float lastTemp;
    float lastHum;
    boolean lastValue = false;
    boolean metric = false;
    
    #define DIGITAL_INPUT_SENSOR 3   // The digital input you attached your motion sensor.  (Only 2 and 3 generates interrupt!)
    #define INTERRUPT DIGITAL_INPUT_SENSOR-2 // Usually the interrupt = pin -2 (on uno/nano anyway)
    #define CHILD_ID 2   // Id of the sensor child
    
    long previousMillis_T = 0;     // will store last time temp data sent
    unsigned long startTime_T;
    unsigned long sensorInterval = 30000; // change this to desired sensor read interval in milliseconds
    
    void setup()  
    {  
      gw.begin();
    
      // Send the sketch version information to the gateway and Controller
      gw.sendSketchInfo("Motion Sensor and DHT", "1.0");
      dht.setup(HUMIDITY_SENSOR_DIGITAL_PIN); 
      pinMode(DIGITAL_INPUT_SENSOR, INPUT);      // sets the motion sensor digital pin as input
      // Register all sensors to gw (they will be created as child devices)
      gw.sendSensorPresentation(CHILD_ID, S_MOTION);
      gw.sendSensorPresentation(CHILD_ID_HUM, S_HUM);
      gw.sendSensorPresentation(CHILD_ID_TEMP, S_TEMP);
      metric = gw.isMetricSystem();
      startTime_T = millis();
      Serial.println("Setup complete");
    }
    
    void loop()     
    {     
      // Read digital motion value
      boolean tripped = digitalRead(DIGITAL_INPUT_SENSOR) == HIGH; 
      
      if (lastValue != tripped) {
    	gw.sendVariable(CHILD_ID, V_TRIPPED, tripped?"1":"0");  // Send tripped value to gw
    	lastValue=tripped;
    	//Serial.println(tripped);
      }
     
      if (millis() - startTime_T >= sensorInterval) {
    	delay(dht.getMinimumSamplingPeriod());
    	float temperature = dht.getTemperature();
    	if (isnan(temperature)) {
    		Serial.println("Failed reading temperature from DHT");
    	} else if (temperature) {
    	  lastTemp = temperature;
    	  if (!metric) {
    		temperature = dht.toFahrenheit(temperature);
    	  }
    	  gw.sendVariable(CHILD_ID_TEMP, V_TEMP, temperature, 1);
    		Serial.print("T: ");
    		Serial.println(temperature);
    	}
    	
    	//delay(dht.getMinimumSamplingPeriod());
    	float humidity = dht.getHumidity();
    	if (isnan(humidity)) {
    		Serial.println("Failed reading humidity from DHT");
    	} else if (humidity) {
    		lastHum = humidity;
    		gw.sendVariable(CHILD_ID_HUM, V_HUM, humidity, 1);
    		Serial.print("H: ");
    		Serial.println(humidity);
    	}
    	startTime_T = millis();
      }
    
      // Power down the radio.  Note that the radio will get powered back up
      // on the next write() call.
      delay(1000); //delay to allow serial to fully print before sleep
      
    }


  • Thanks that worked... and for my understanding... looks like your not really using interrupts at all? Looking at the code makes complete sense to me, and proves I was over thinking things on mine.

    Thanks again.


  • The sensor is not running on battery power so I did not spend much time with the interrupt/sleep options.


  • is it the same process with the new 1.4 library version?

    Could you please give us a exemple here or on github to have multiple sensor type on the same arduino with the new 1.4 library?

    if it's the same implementation, we could write multiple "gw.present(ID, XXXX);" and send a message for each child ID type?

    Thank's very much.


  • Sorry, I found the new implementation in the "DallasTemperatureSensor" Example


  • Here is a version I'm currently using that makes use of interrupts so might be more suitable for a battery driven DHT/Motion multi sensor. It also includes the battery monitoring. Any feedback or improvements would be appreciated.

    #include <SPI.h>
    #include <MySensor.h>
    #include <DHT.h>
    
    #define CHILD_ID_HUM 0
    #define CHILD_ID_TEMP 1
    #define CHILD_ID_MOTION 2   // Id of the sensor child
    
    #define HUMIDITY_SENSOR_DIGITAL_PIN 4
    #define DIGITAL_INPUT_SENSOR 3   // The digital input you attached your motion sensor.  (Only 2 and 3 generates interrupt!)
    #define INTERRUPT DIGITAL_INPUT_SENSOR-2 // Usually the interrupt = pin -2 (on uno/nano anyway)
    
    unsigned long SLEEP_TIME = F; // Sleep time between reports (in milliseconds)
    
    
    int BATTERY_SENSE_PIN = A0;  // select the input pin for the battery sense point
    int oldValue=-1;
    
    MySensor gw;
    DHT dht;
    float lastTemp;
    float lastHum;
    boolean metric = false;
    
    int oldBatteryPcnt = 0;
    int battLoop =0;
    
    MyMessage msgHum(CHILD_ID_HUM, V_HUM);
    MyMessage msgTemp(CHILD_ID_TEMP, V_TEMP);
    // Initialize motion message
    MyMessage msg(CHILD_ID_MOTION, V_TRIPPED);
    
    boolean pinTriggered=0;//waitTime is number of seconds to hol in while loop
    long lastDebounceTime = 0;  // the last time the output pin was toggled
    long debounceDelay = 50;    // the debounce time; increase if the output flickers
    
    
    void setup()
    {
    
      // use the 1.1 V internal reference
      analogReference(INTERNAL);
    
      gw.begin();
      dht.setup(HUMIDITY_SENSOR_DIGITAL_PIN);
    
      // Send the Sketch Version Information to the Gateway
      gw.sendSketchInfo("Motion Humidity w/ Batt", "1.0");
    
      // Register all sensors to gw (they will be created as child devices)
      gw.present(CHILD_ID_HUM, S_HUM);
      gw.present(CHILD_ID_TEMP, S_TEMP);
      gw.present(CHILD_ID_MOTION, S_MOTION);
    
      pinMode(DIGITAL_INPUT_SENSOR,INPUT);      // sets the motion sensor digital pin as input
      digitalWrite(DIGITAL_INPUT_SENSOR,HIGH);   // Activate internal pull-up
    
      metric = gw.getConfig().isMetric;
    
      check_batt();
    
    }
    
    void loop()
    {
      if (pinTriggered)
      {
    	Serial.println(millis()-lastDebounceTime);
    	// Read digital motion value
    	boolean value = digitalRead(DIGITAL_INPUT_SENSOR);
    	// If the switch changed, due to noise or pressing
    	if (value != oldValue) {
    	  {
    		lastDebounceTime = millis();
    		// Send in the new value
    		gw.send(msg.set(value==HIGH ? 1 : 0));
    		battLoop++;
    		oldValue = value;
    		Serial.print("Mot: ");
    		Serial.println(value);
    	  }
    	}
    
    	pinTriggered=0;
    	// }
      }
      else
      {
    
    	delay(dht.getMinimumSamplingPeriod());
    
    	float temperature = dht.getTemperature();
    	if (isnan(temperature))
    	{
    	  Serial.println("Failed reading temperature from DHT");
    	}
    	else if (temperature != lastTemp)
    	{
    	  lastTemp = temperature;
    	  if (!metric)
    	  {
    		temperature = dht.toFahrenheit(temperature);
    	  }
    	  gw.send(msgTemp.set(temperature, 1));
    	  battLoop++;
    	  Serial.print("T: ");
    	  Serial.println(temperature);
    	}
    
    	float humidity = dht.getHumidity();
    	if (isnan(humidity))
    	{
    	  Serial.println("Failed reading humidity from DHT");
    	}
    	else if (humidity != lastHum)
    	{
    	  lastHum = humidity;
    	  gw.send(msgHum.set(humidity, 1));
    	  battLoop++;
    	  Serial.print("H: ");
    	  Serial.println(humidity);
    	}
    
    
    	if (battLoop > 10)
    	{
    	  check_batt();
    	  battLoop=0;
    	}
      }
    
      // Sleep until interrupt comes in on motion sensor. Send update every two minute.
      pinTriggered = gw.sleep(INTERRUPT, CHANGE, SLEEP_TIME);
    }
    
    
    void check_batt()
    {
      // get the battery Voltage
      int sensorValue = analogRead(BATTERY_SENSE_PIN);
      Serial.println(sensorValue);
    
      // 1M, 470K divider across battery and using internal ADC ref of 1.1V
      // Sense point is bypassed with 0.1 uF cap to reduce noise at that point
      // ((1e6+470e3)/470e3)*1.1 = Vmax = 3.44 Volts
      // 3.44/1023 = Volts per bit = 0.003363075
      float batteryV  = sensorValue * 0.003363075;
      int batteryPcnt = sensorValue / 10;
    
      Serial.print("Battery Voltage: ");
      Serial.print(batteryV);
      Serial.println(" V");
    
      Serial.print("Battery percent: ");
      Serial.print(batteryPcnt);
      Serial.println(" %");
    
      if (oldBatteryPcnt != batteryPcnt) {
    	// Power up radio after sleep
    	gw.sendBatteryLevel(batteryPcnt);
    	oldBatteryPcnt = batteryPcnt;
      }
    }


  • How did you get 3 options for the sleep interrupt? Whenever I would try and add the sleep_time option it would give me compile errors.


  • @mountainman
    Thank you verry much, exactly what i need!

    For child's id, if you have two sensor you have to change the ID in the second?

    Sensor 1 :
    #define CHILD_ID_HUM 0
    #define CHILD_ID_TEMP 1
    #define CHILD_ID_MOTION 2

    Sensor 2:
    #define CHILD_ID_HUM 3
    #define CHILD_ID_TEMP 4
    #define CHILD_ID_MOTION 5


  • @waynehead99 Are you using the new 1.4 Lib?


  • @egbertje Good Question 🙂 It would be nice to learn from existing working sketches..


  • Contest Winner

    @waynehead99 you most likely need 1.4 Lib for the new sleep constructor. I have not used sleep on 1.3 so I do not remember what arguments you had available there.
    I have also extended sleep with an additional constructor which @hek has pulled into the release branch of 1.4 that permits you to use two external interrupts with independent triggers for sleep in addition to a timeout. Great for nodes with multiple sensors that still run on battery.


  • @Mountainman ;

    Im trying your code and its almost what im looking for.
    I have two questions about it:
    1 : Is it possible that the battery info has is own child id?
    2 : Why dont you implement a light sensor like an LDR?

    I think that including LDR/light then you have the ideal multisensor ; light + temp/hum + motion + batt monitoring !
    But for now im playing with your code and try to implement light.


  • @mountainman Is there any instructions on how to wire/setup the hardware to work with your code?


  • @egbertje;

    The battery percentage is associated with the parent Arduino Node in the vera UI.
    I have some LDRs ordered from Ebay so that is the next step. I had previously used the BH1750 I2C sensor in a multi sensor with the 1.3 lib but I want to debug on its own as it seemed to be giving unexpected readings.

    @codenea The instructions are pretty much from the main page although if I get a chance I try to draw it up and post some pics. My setup not very pretty yet with perf board and jumper wires. A dedicated PCB would be nice.


  • Hero Member

    Hello,

    Here is my combo to make a Home Monitoring solution:
    https://github.com/empierre/arduino/blob/master/MQv01dgi_1_4.ino

    It includes (currently on a Mega):

    • Barometer : BMP085
    • Temperature + Humidity DHT11
    • Particle sensor
    • Gas sensors MQ2 MQ6 MQ131 MQ135 TGS2600 2SH12

    To be added when stabilized:

    • Sound level in DB

    Could be added:

    • Light sensor
    • Vibration sensor
    • PIR


  • Hi guys,

    this is a one node with publishing DS temperatures and listening for relay commands I finished and tested yesterday>
    https://github.com/pgo-sk/mysensors/blob/master/arduino/DS_and_Relay.ino
    feel free to comment/use/publish...

    I combined the Dalas and Relay examples together - you have to deactivate the sleep for the relays to listen 100% of time.
    MQTT identification on openHAB:
    MyMQTT/20/0/V_TEMP - DS sensor(s)
    MyMQTT/20/1/V_LIGHT - relay 1
    MyMQTT/20/2/V_LIGHT - relay 2

    If somebody is interested I can post the maps/items files for openHAB

    Regards,
    Pego
    PS I am working on an home automation system with solar hot air panels control/solar hot water panels and all the common stuff like lights/temperatures/weather etc.. More here: https://github.com/pgo-sk/mysensors/wiki/Home-automation-using-mysensors-and-openHAB


  • I'm also following along interested in the Temp, Humidity, and motion sensor.


  • https://github.com/pgo-sk/mysensors/blob/master/arduino/DS_Light_Relay

    • DS18B20 (up to 16 like in original temp sketch)
    • TEMT6000 reporting LUX light values
    • 2x Relays
      running and tested
      Sensor <-> MQTT gateway <-> openHAB/PC

    When interested can post the openHAB items/sitemap(s) settings

    Screenshots - over teamviewer, sorry for the quality.

    Here the TEMT6000 output - in a quite dark room and changing weather today>
    upload-42ac73c1-61cf-4b90-9ec5-14a994a3b50a
    Here the temperature and relays:
    upload-86825c33-2cc2-4018-9e08-2020007af3a9
    Menu:
    upload-adf5c382-2803-49b9-a461-eb25beb572c0


  • Has anyone made ​​RGB LED strip node? I am looking for a working example program ...


  • Admin


  • Hero Member

    Or here is an example I'm using:

    https://codebender.cc/sketch:44740


  • @pgo said:

    When interested can post the openHAB items/sitemap(s) settings

    Hi, I'm interested. 🙂
    Or is this the latest version ?


  • @aquapro said:

    Hi, I'm interested. 🙂
    Or is this the latest version ?

    Yes :), for the sketches mentioned earlier.
    <Comment to myself: Have to switch to some versioning as now I am already deeper in the project including cameras, weather forcasts etc.>


  • I could not decide yet on a platform. OpenHAB should be my next test.


  • test1.items
    test1.sitemap
    test1.rules
    webcam.png
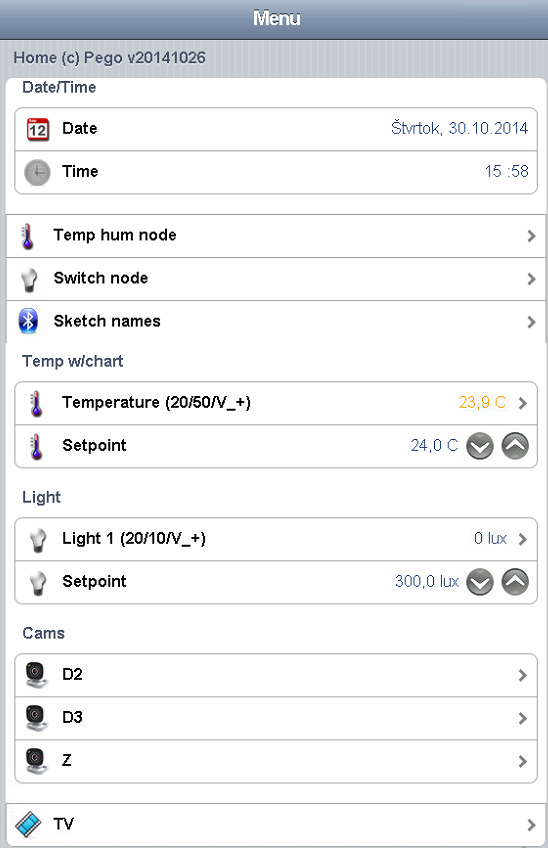
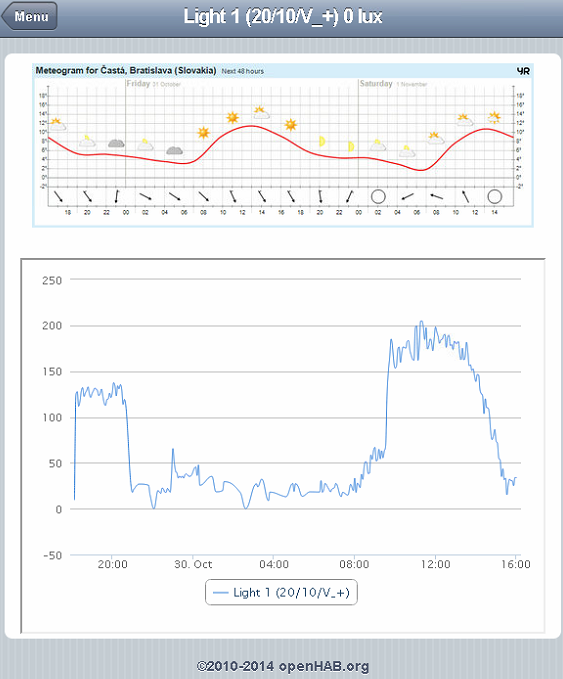
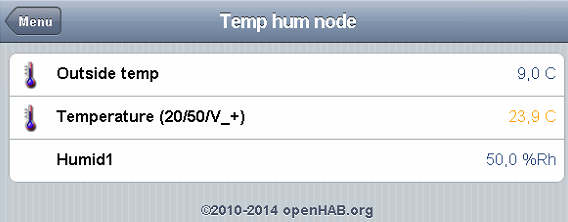
    webcam.png -icon for webcam - put in openhab/webapps/images

    My Current openHAB items/sitemap. 1 multisensor with Temp/Lux/Humidity sensor, 1 ethernet/MQTT gateway.

    Also weather forcast from yr.no and Samsung TV remote controls (Mute working, rest not so much)

    • openHAB v 1.5.1
    • Addons :
      \openhab\addons>
      org.openhab.binding.http-1.5.1.jar
      org.openhab.binding.mqtt-1.6.0-SNAPSHOT.jar
      org.openhab.binding.ntp-1.5.1.jar
      org.openhab.binding.samsungtv-1.6.0-SNAPSHOT.jar
      org.openhab.binding.zwave-1.6.0-SNAPSHOT.jar
      org.openhab.io.habmin-1.6.0-SNAPSHOT.jar
      org.openhab.persistence.exec-1.5.1.jar
      org.openhab.persistence.logging-1.5.1.jar
      org.openhab.persistence.mqtt-1.6.0-SNAPSHOT.jar
      org.openhab.persistence.rrd4j-1.5.1.jar

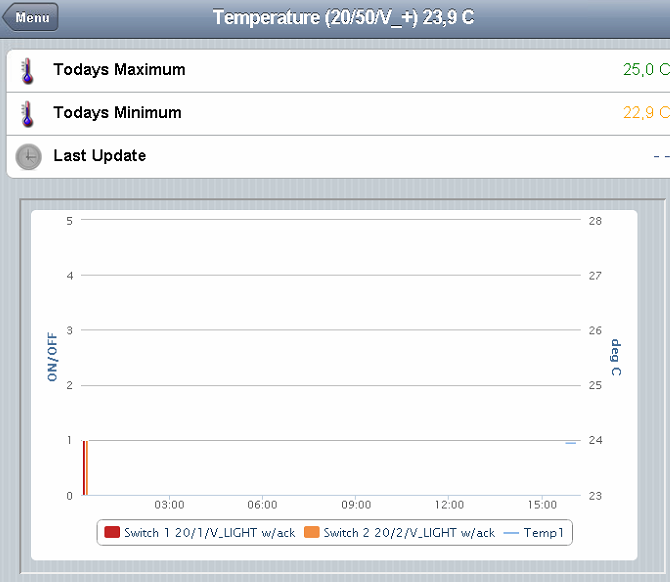
    HABmin conf with graphs:
    charts.xml -put in openhab/etc/habmin

    In habmin.cfg specify the IP of your MQTT arduino and port>
    '#'mqtt:<broker>.clientId=<clientId>
    mqtt:mysensor.url=tcp://192.168.1.234:1883
    mqtt:mysensor.clientId=MQTT
    mqtt:mysensor.qos=0
    mqtt:mysensor.retain=true
    mqtt:mysensor.async=true

    Here some screenshots:
    Menu.PNG
    Light.PNG
    Temp-Hum.PNG
    Temp-chart.PNG
    TV.PNG
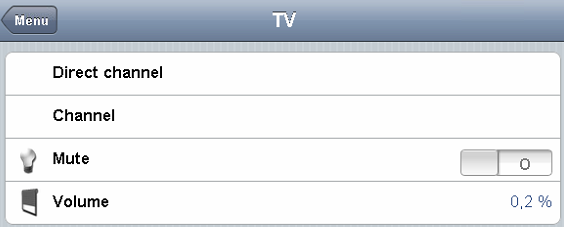
    These (Direct channel/Channel/Volume) does not work yet... Mute is OK and Volume displays only the current TV volume.


  • @aquapro said:

    I could not decide yet on a platform. OpenHAB should be my next test.

    It runs quit stable on my old WinXP64Pro Quadcore w/many virtual machines on it.
    Have still some problems with the syntax of the openHAB settings, but else nice controller 😉


  • @blacey I tried this already. This is a simple dimmer node, not RGB. It's work fine.
    But I would like to use a RGB colorpicker in openhab.


  • @Dany said:

    I would like to use with a RGB colorpicker in openhab.

    I would do that soon too. Would you like to have a node only as rgbw dimmer or maybe with a lux sensor as I like to do to also adjust for constant light/lux in the room?

    In my menu you can see the setpoint for lux under the light sensor.


  • @pgo The RGB Colorpicker works already in openhab.
    I have some problem in arduino side...i tried update the sample DimmerActuator code, but didn't work. I tried korttoma's code, but it didn't works for me, too.

    (e.g. message.header.childId -didn't work)


  • @Dany said:

    @pgo The RGB Colorpicker works already in openhab.
    I have some problem in arduino side...i tried update the sample DimmerActuator code, but didn't work. I tried korttoma's code, but it didn't works for me, too.

    (e.g. message.header.childId -didn't work)

    Can you post the HW connections you use on arduino and the items/sitemap of the dimmer in openHAB? I can then check on my install.


  • I combined Humidity and Lux code. Serial monitor works ok (see below) but for some reason when I try to add node to Vera I get only node, temp and lux (no humidity). I guess something is wrong in combined sketch?

    serial monitor

    sensor started, id 1
    send: 1-1-0-0 s=255,c=0,t=17,pt=0,l=5,st=ok:1.4.1
    send: 1-1-0-0 s=255,c=3,t=6,pt=1,l=1,st=ok:0
    read: 0-0-1 s=255,c=3,t=6,pt=0,l=1:M
    send: 1-1-0-0 s=255,c=3,t=11,pt=0,l=12,st=ok:Humidity/Lux
    send: 1-1-0-0 s=255,c=3,t=12,pt=0,l=3,st=ok:1.0
    send: 1-1-0-0 s=0,c=0,t=7,pt=0,l=5,st=ok:1.4.1
    send: 1-1-0-0 s=1,c=0,t=6,pt=0,l=5,st=ok:1.4.1
    send: 1-1-0-0 s=2,c=0,t=16,pt=0,l=5,st=ok:1.4.1
    send: 1-1-0-0 s=1,c=1,t=0,pt=7,l=5,st=ok:28.6
    T: 28.60
    send: 1-1-0-0 s=0,c=1,t=1,pt=7,l=5,st=ok:61.8
    H: 61.80
    2
    send: 1-1-0-0 s=2,c=1,t=23,pt=3,l=2,st=ok:2
    2
    

    sketch

    #include <SPI.h>
    #include <MySensor.h>  
    #include <DHT.h> 
    #include <BH1750.h>
    #include <Wire.h> 
    
    #define CHILD_ID_HUM 0
    #define CHILD_ID_TEMP 1
    #define CHILD_ID_LIGHT 2
    #define HUMIDITY_SENSOR_DIGITAL_PIN 3
    #define LIGHT_SENSOR_ANALOG_PIN 0
    unsigned long SLEEP_TIME = 30000; // Sleep time between reads (in milliseconds)
    
    BH1750 lightSensor;
    MySensor gw;
    DHT dht;
    float lastTemp;
    float lastHum;
    boolean metric = true; 
    MyMessage msgHum(CHILD_ID_HUM, V_HUM);
    MyMessage msgTemp(CHILD_ID_TEMP, V_TEMP);
    MyMessage msg(CHILD_ID_LIGHT, V_LIGHT_LEVEL);
    uint16_t lastlux;
    
    
    void setup()  
    { 
      gw.begin();
      dht.setup(HUMIDITY_SENSOR_DIGITAL_PIN); 
    
      // Send the Sketch Version Information to the Gateway
      gw.sendSketchInfo("Humidity/Lux", "1.0");
    
      // Register all sensors to gw (they will be created as child devices)
      gw.present(CHILD_ID_HUM, S_HUM);
      gw.present(CHILD_ID_TEMP, S_TEMP);
      gw.present(CHILD_ID_LIGHT, S_LIGHT_LEVEL);
      
      metric = gw.getConfig().isMetric;
      lightSensor.begin();
    }
    
    void loop()      
    {  
      delay(dht.getMinimumSamplingPeriod());
    
      float temperature = dht.getTemperature();
      if (isnan(temperature)) {
          Serial.println("Failed reading temperature from DHT");
      } else if (temperature != lastTemp) {
        lastTemp = temperature;
        if (!metric) {
          temperature = dht.toFahrenheit(temperature);
        }
        gw.send(msgTemp.set(temperature, 1));
        Serial.print("T: ");
        Serial.println(temperature);
      }
      
      float humidity = dht.getHumidity();
      if (isnan(humidity)) {
          Serial.println("Failed reading humidity from DHT");
      } else if (humidity != lastHum) {
          lastHum = humidity;
          gw.send(msgHum.set(humidity, 1));
          Serial.print("H: ");
          Serial.println(humidity);
      }     
      uint16_t lux = lightSensor.readLightLevel();// Get Lux value
      Serial.println(lux);
      if (lux != lastlux) {
          gw.send(msg.set(lux));
          lastlux = lux;
      }
      
    
      gw.sleep(SLEEP_TIME); //sleep a bit
    }


  • @niccodemi Check:
    gw.send(msgTemp.set(temperature, 1));
    gw.send(msgHum.set(humidity, 1));
    gw.send(msg.set(lux)); I miss here ",1"


  • @pgo thanks, all sensors show up now.


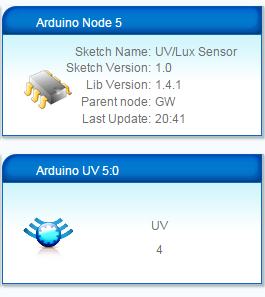
  • One more combined sketch - UV / Light Lux. Everything seems to work ok except only 2 items show up in vera: node and lux sensor. UV sensor is missing.

    serial output

    sensor started, id 6
    send: 6-6-0-0 s=255,c=0,t=17,pt=0,l=5,st=ok:1.4.1
    send: 6-6-0-0 s=255,c=3,t=6,pt=1,l=1,st=ok:0
    read: 0-0-6 s=255,c=3,t=6,pt=0,l=1:M
    send: 6-6-0-0 s=255,c=3,t=11,pt=0,l=13,st=ok:UV/Lux Sensor
    send: 6-6-0-0 s=255,c=3,t=12,pt=0,l=3,st=ok:1.0
    send: 6-6-0-0 s=0,c=0,t=16,pt=0,l=5,st=ok:1.4.1
    send: 6-6-0-0 s=0,c=0,t=11,pt=0,l=5,st=ok:1.4.1
    Lux reading: 48
    send: 6-6-0-0 s=0,c=1,t=23,pt=7,l=5,st=ok:48.0
    Uv reading: 583
    Uv index: 5
    send: 6-6-0-0 s=0,c=1,t=11,pt=7,l=5,st=ok:5.0
    

    sketch code

    /*
      Vera Arduino BH1750FVI Light sensor
      communicate using I2C Protocol
      this library enable 2 slave device addresses
      Main address  0x23
      secondary address 0x5C
      connect the sensor as follows :
      Light sensor
      VCC  >>> 5V
      Gnd  >>> Gnd
      ADDR >>> NC or GND  
      SCL  >>> A5
      SDA  >>> A4
      
      UV sensor
      VCC  >>> 5V
      Gnd  >>> Gnd
      OUT  >>> A3
      Contribution: idefix
     
    */
    
    #include <SPI.h>
    #include <MySensor.h>  
    #include <BH1750.h>
    #include <Wire.h> 
    
    #define CHILD_ID_LIGHT 0
    #define CHILD_ID_UV 0
    #define LIGHT_SENSOR_ANALOG_PIN 0
    #define UV_SENSOR_ANALOG_PIN 3
    unsigned long SLEEP_TIME = 30000; // Sleep time between reads (in milliseconds)
    
    BH1750 lightSensor;
    MySensor gw;
    MyMessage msg(CHILD_ID_LIGHT, V_LIGHT_LEVEL);
    MyMessage uvMsg(CHILD_ID_UV, V_UV);
    uint16_t lastlux;
    int lastUV = -1;
    int uvIndexValue [13] = { 50, 227, 318, 408, 503, 606, 696, 795, 881, 976, 1079, 1170, 3000};
    int uvIndex;
    
    void setup()  
    { 
      gw.begin();
      // Send the sketch version information to the gateway and Controller
      gw.sendSketchInfo("UV/Lux Sensor", "1.0");
      // Register all sensors to gateway (they will be created as child devices)
      gw.present(CHILD_ID_LIGHT, S_LIGHT_LEVEL);
      gw.present(CHILD_ID_UV, S_UV);
      
      lightSensor.begin();
    }
    
    void loop()      
    {     
      uint16_t lux = lightSensor.readLightLevel();// Get Lux value
      Serial.print("Lux reading: ");
      Serial.println(lux);
      if (lux != lastlux) {
          gw.send(msg.set(lux, 1));
          lastlux = lux;
      }
      uint16_t uv = analogRead(0);// Get UV value
      Serial.print("Uv reading: ");
      Serial.println(uv);
      for (int i = 0; i < 13; i++)
      {
        if (uv <= uvIndexValue[i]) 
        {
          uvIndex = i;
          break;
        }
      }
      Serial.print("Uv index: ");
      Serial.println(uvIndex);
    
      if (uvIndex != lastUV) {
          gw.send(uvMsg.set(uvIndex, 1));
          lastUV = uvIndex;
      }
      gw.sleep(SLEEP_TIME);
    }
    

  • Admin

    There is a perfectly good explanation why UV sensor isn't showing up. MySensors does not distribute any device files for it. It might work with the rfx-plugin-device:

    http://code.mios.com/trac/mios_rfxcom/browser


  • Contest Winner

    @hek

    I remember @epierre working on the sensor, I helped him with the little sort logic on the sensor readings to determine the index... I cannot recall what device he used to present the index within Vera...

    In china right now, the Great Firewall preventing a good search on the forum for that project...

    perhaps @epierre can recall for you


  • @hek @BulldogLowell UV sensor works fine as standalone sensor / node. After trying different things I noticed that if I switch order of

    these lines

      gw.present(CHILD_ID_LIGHT, S_LIGHT_LEVEL);
      gw.present(CHILD_ID_UV, S_UV);


    to these below

      gw.present(CHILD_ID_UV, S_UV);
      gw.present(CHILD_ID_LIGHT, S_LIGHT_LEVEL);
    

    then node and UV sensor show up in vera, but lux light is missing. It seems that sensor presented 1st gets recognized but second one omitted. Could it have to do anything with both devices using analog pins?

    lux-uv.jpg


  • Contest Winner

    CHILD_ID_LIGHT and CHILD_ID_UV are defined as two different nonzero numbers, right?

    Sorry I cannot read your sketch here in China!!


  • @BulldogLowell no, they were both defined as 0. I changed them to 1 and 2 and now three devices show up. Thanks.


  • Contest Winner

    Good. You may be able to use zero but certainly not for both!


  • I think my biggest challenge is understanding when to combine the additional sensor in the main loop or when to put it in another. The whole idea of interrupts is baffling to me too.


Log in to reply
 

Suggested Topics

  • 1
  • 2
  • 2
  • 1
  • 2
  • 5

0
Online

11.2k
Users

11.1k
Topics

112.5k
Posts