[Tutorial] How to burn 1Mhz & 8Mhz bootloader using Arduino IDE 1.6.5-r5
-
Hello everyone,
Last week I received my slim node board designed by m26872 and begun the process of burning the 1Mhz bootloader. I faced some problems for a couple of hours and google helped me to successfully burn it and uploading the sketch.
Please correct me if I missed something. I tried to re-do the steps now before writing the post to make sure it works.I am using Arduino IDE 1.6.5-r5 with Arduino UNO board.
I used some photos from arduino.cc
I will explain flashing both 8Mhz and 1Mhz configurations.1- You will need the following
- Arduino UNO ( didn't test using other boards)
- Atmega328p chip ( with preloaded bootloader or without )
- Breadboard
- Wires
- Crystal ( optional )
2-
- Connect your arduino UNO to your laptop.
- Open Arduino IDE.
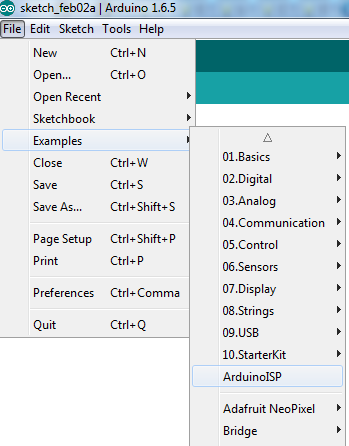
- Go to File > Examples > Arduino ISP
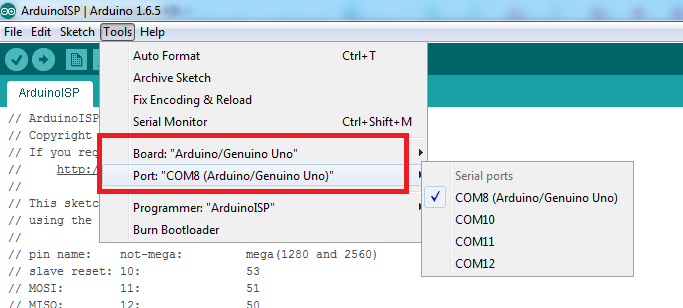
- Go to Tools and make sure you choose Arduino/Genuino Uno and you COM port.
Your COM port may be different than mine
Note: The following step solved my problem when I failed to upload the bootloader at the beginning.
- Go to Tools > Programmer > Arduino as ISP
Make sure to choose "Arduino as ISP" not "ArduinoISP"
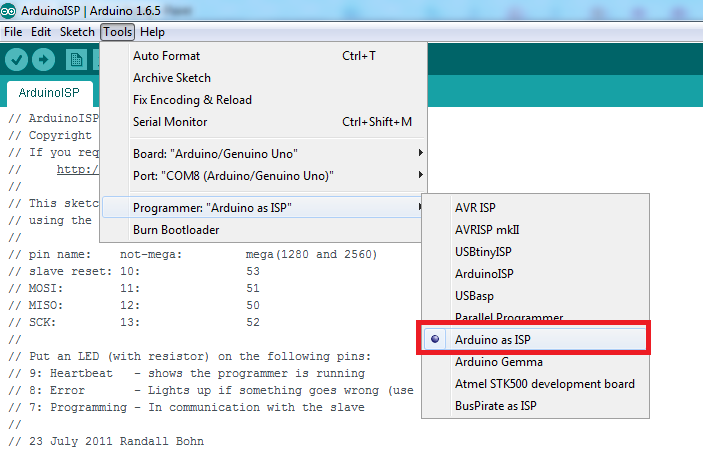
Then upload your ArduinoISP sketch.
- It will take less than a minute.
- Close the sketch ArduinoISP adter uploading successfully.
*********************************** . ***********************************
*********************** Burning the bootloader ***********************
*********************************** . ***********************************3- For burning the bootloader you have to set your environment as shown in the figure below:
Remove the arduino usb cable and begin wiring.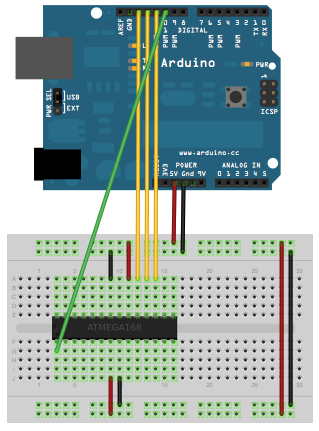
Double check your wires and make sure they are connected in the correct pin.
*********************************** . ***********************************
********************** Burning 8Mhz bootloader **********************
*********************************** . ***********************************Quoted from Arduino.cc :
- Download this hardware configuration archive: breadboard-1-6-x.zip
- Extract the zip file. A folder with name "breadboard" will appear.
- Open your Arduino folder path and move the breadboard folder from the zip archive to the "hardware" folder of your Arduino sketchbook.
- Restart the Arduino software.
You should see "ATmega328 on a breadboard (8 MHz internal clock)" in the Tools > Board menu. - Be sure to select "ATmega328 on a breadboard (8 MHz internal clock)" when burning the bootloader.(If you select the wrong item and configure the microcontroller to use an external clock, it won't work unless you connect one.)
- Once you've done this, you can burn the bootloader and upload programs onto your ATmega328p. To burn the bootloader go to Tools > Burn bootloader
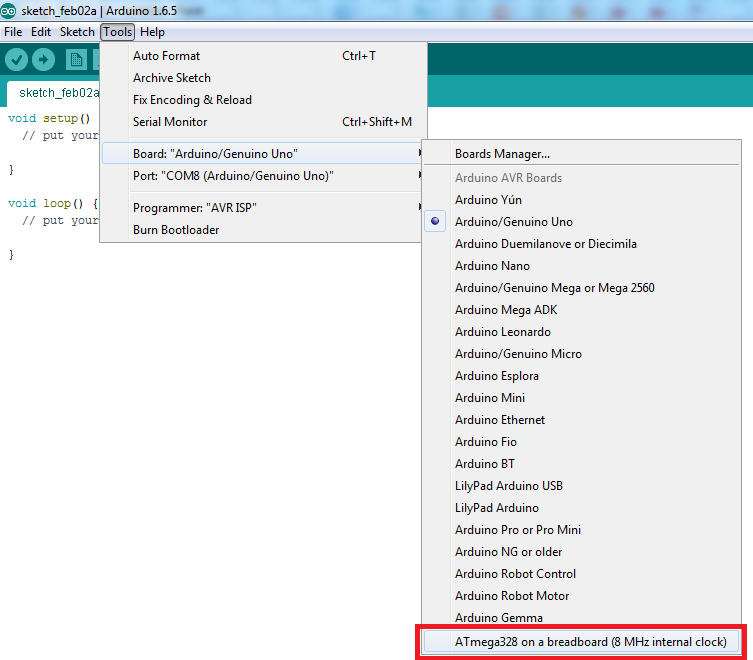
It will take less than a minute and leds will flash. Wait until bootloader is burned.

*********************************** . ***********************************
********************** Burning 1Mhz bootloader **********************
*********************************** . ***********************************-
I followed m26872 guides in his project My Slim 2AA Battery Node to get the 1Mhz bootloader. I'll copy some of his instructions.
-
I use this precompiled bootloader from here. It's an Optiboot with 1MHz internal clock and 9600 baud serial communication. Fuse changed to BOD disable.
-
Rename your .hex to atmega328_1a.hex
-
Move it to "ARDUINO_PATH" > hardware > arduino > avr > bootloaders
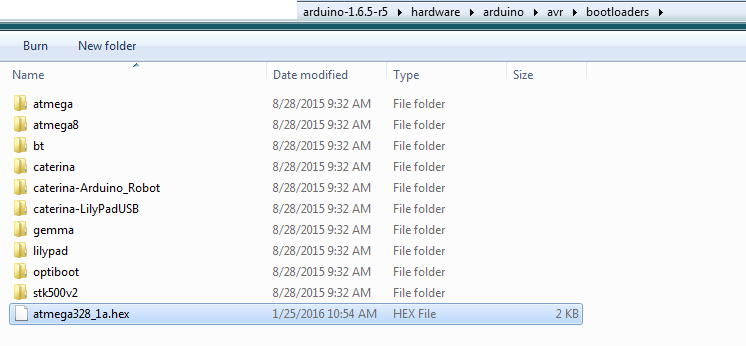
- We need to add the new board to the boards.txt file located at "ARDUINO_PATH" > hardware > arduino > avr
- Open boards.txt
- Go to this link.
- Copy the content of the link and paste it at the end of boards.txt
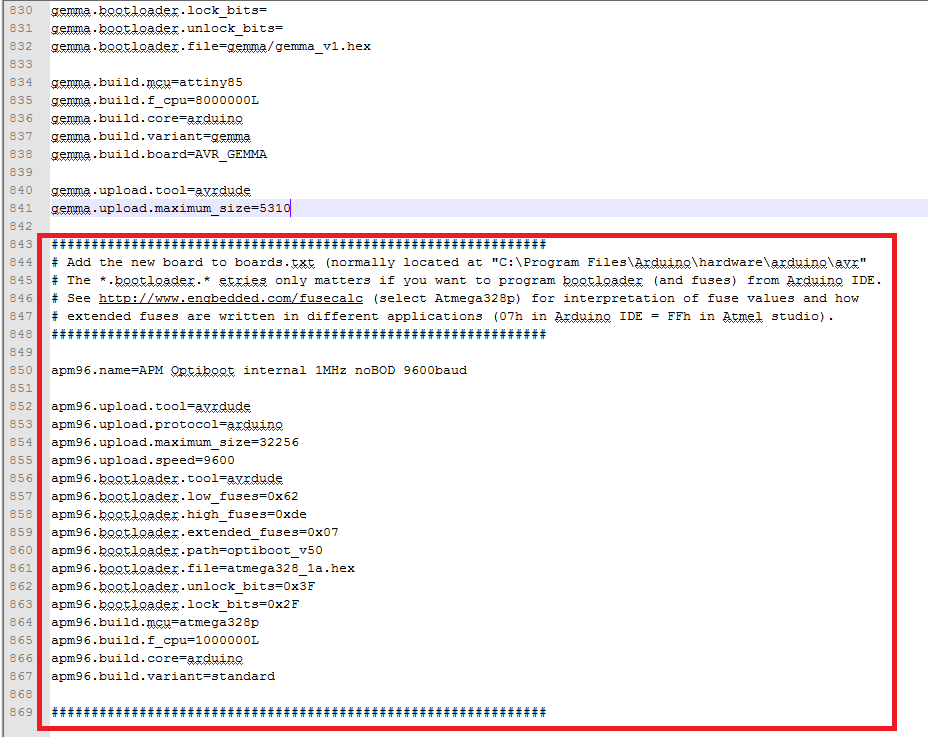
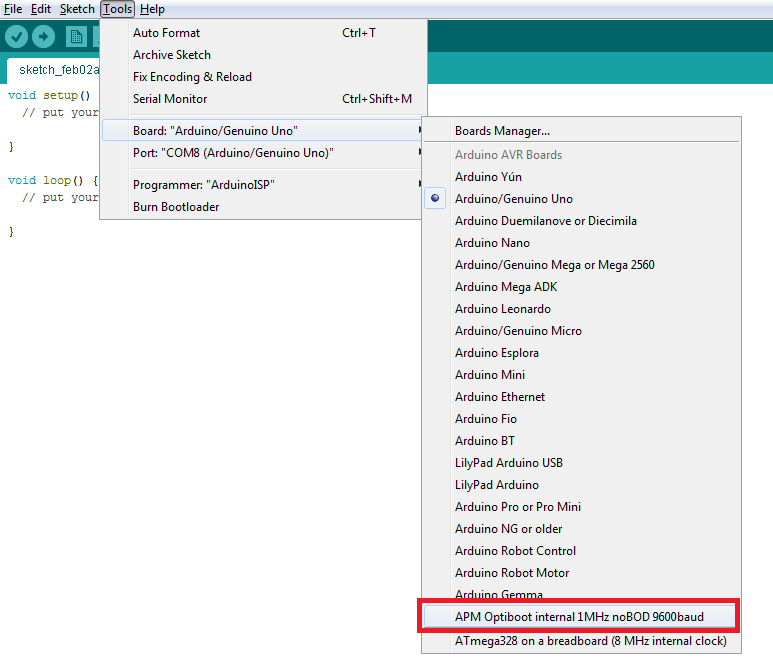
- Restart you Arduino IDE.
- You should see "APM Optiboot internal 1Mhz noBOD 9600baud" in the Tools > Board menu.
- Once you've done this, you can burn the bootloader and upload programs onto your ATmega328p. To burn the bootloader go to Tools > Burn bootloader
Tips about burning the bootloader if it failed:
1- I faced the following issues and was solved as follows:
avrdude: Yikes! Invalid device signature.
Double check connections and try again, or use -F to override- Maybe your chip is configured to run on an external crystal clock. I tested with two values and it succeeded. I used 10Mhz and 20Mhz as I didn't have 16 Mhz.
- Connect the crystal to pin 9 and 10
- Note: You won't need the crystal except for the first time as the new bootloader is configured to run on internal 1Mhz or 8Mhz.
2-
avrdude: Error: Could not find USBtiny device (0x2341/0x49)
Make sure you chose "Arduino as ISP" not "ArduinoISP" from the programmer list. You will find it in Tools menu.
3-
avrdude: can't open input file D:\arduino-1.6.5-r5\hardware\arduino\avr/bootloaders/atmega328_1a.hex: No such file or directory
avrdude: read from file 'D:\arduino-1.6.5-r5\hardware\arduino\avr/bootloaders/atmega328_1a.hex' failed
Error while burning bootloader.Your .hex file is not in the correct path.
- According to the .boards file, the path is configured to be in the default path arduino-1.6.5-r5\hardware\arduino\avr\bootloaders
You can find this configuration in the boards.txt as follows:
apm96.bootloader.file=atmega328_1a.hexIf you wish to put the .hex file in a folder, so you will have to edit the path above in the boards.txt
Example:You put the .hex file in > arduino-1.6.5-r5\hardware\arduino\avr\bootloaders\MyOneMhz
So change the line to this: apm96.bootloader.file=MyOneMhz/atmega328_1a.hex*********************************** . ***********************************
********************** End of burning bootloader **********************
*********************************** . ********************************************************************** . ***********************************
************************ Uploading the sketch *************************
*********************************** . ***********************************4- Once your ATmega328p has the Arduino bootloader on it, you can upload programs to it using the USB-to-serial convertor (FTDI chip) on an Arduino board. To do so, you remove the microcontroller from the Arduino board so the FTDI chip can talk to the microcontroller on the breadboard instead.
- Set the environment as follows:
The picture at the bottom shows how to connect the RX and TX lines from the Arduino UNO board to the ATmega on the breadboard.
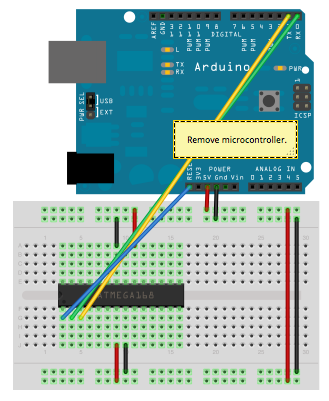
After finishing wiring and recheck connections:
- Choose your desired board which we have added before and burned the atmega328p with it.
- Upload your sketch normally.
- Leds will flash in the Arduino UNO board.
- Sketch will take some time with 1Mhz and it is faster with 8Mhz because of the baud rate chosen in 1Mhz.
*********************************** . ***********************************
*************************** ** References ** **************************
*********************************** . ***********************************- How To Load Bootloader onto Arduino
- Re: Burning bootloader on standalone Atmega328(internal clock 8MHz)
- From Arduino to a Microcontroller on a Breadboard
*********************************** . ***********************************
*************************** ** THE END ** *****************************
*********************************** . ***********************************I hope it was clear enough and doesn't contain mistakes. Please let me know if something was missing.
I encourage you to add your tips and tricks so that we can learn.Thanks.
-
Nice work.... that would have been handy a few days ago :) i had to figure out burn bootloader as well
If its any help to anyone else. the setting bootloader.extended_fuses=0x04 - changes the BOD to 4.3v
Had to use it on a 5v board as the original 2.7v caused lockups when had low voltage (was running board off solar panel)
-
Here are all the possible values:
bootloader.extended_fuses=0x04 -> BOD at 4.3V
bootloader.extended_fuses=0x05 -> BOD at 2.7V
bootloader.extended_fuses=0x06 -> BOD at 1.8V
bootloader.extended_fuses=0x07 -> BOD disabled -
Here are all the possible values:
bootloader.extended_fuses=0x04 -> BOD at 4.3V
bootloader.extended_fuses=0x05 -> BOD at 2.7V
bootloader.extended_fuses=0x06 -> BOD at 1.8V
bootloader.extended_fuses=0x07 -> BOD disabled@GertSanders said:
Here are all the possible values:
bootloader.extended_fuses=0x04 -> BOD at 4.3V
bootloader.extended_fuses=0x05 -> BOD at 2.7V
bootloader.extended_fuses=0x06 -> BOD at 1.8V
bootloader.extended_fuses=0x07 -> BOD disabledHow low(volt) can you go when BOD disabled?
-
@flopp The atmega seems to function down to 1.6V (lowest I measured it). Depends on the working frequency. Check the datasheet. There are variations in each production batch.
The NRF24L01+ can only go down to 1.9V. My guess is that some modules do work at lower voltages at 250KBit rates, but then more transmission errors are possible.
With two AA batteries in series, going from 3V down to 1.9V and a node with an average consumption of les then 10 uA, I think you can get more then 1 year life out of it.
@GertSanders
Wow 1 year. I will try this tut in the weekend. -
@flopp Not with a standard Arduino board, but with a Sensebender Micro or any board with power consumption below 10uA. An atmega328p on a breadboard is the simplest case. For a very good tutorial go here: http://www.gammon.com.au/breadboard
If you need an assembled board: https://www.openhardware.io/view/1/Sensebender-Micro.
It is the officially supported board for MySensors library. On OpenHardware.io you will find more options.
Have fun !
-
@flopp Not with a standard Arduino board, but with a Sensebender Micro or any board with power consumption below 10uA. An atmega328p on a breadboard is the simplest case. For a very good tutorial go here: http://www.gammon.com.au/breadboard
If you need an assembled board: https://www.openhardware.io/view/1/Sensebender-Micro.
It is the officially supported board for MySensors library. On OpenHardware.io you will find more options.
Have fun !
@GertSanders
Ok, I have read somewhere that a Pro Mini can go down to 1.8v, not possible? -
@flopp A pro-mini can do this if the fuses are set properly (when powering via Vcc for instance). If you power the Pro Mini via the "raw" pin, then power passes through the on board power regulator first, and this one will not allow 1.8V as far as I know.
-
@flopp A pro-mini can do this if the fuses are set properly (when powering via Vcc for instance). If you power the Pro Mini via the "raw" pin, then power passes through the on board power regulator first, and this one will not allow 1.8V as far as I know.
@GertSanders
Good to hear. I will reply how it went -
@flopp look for messages on power saving on pro mini on this forum.
-
Thank you for the tutorial. Quick question: Is it possible to just take the Atmega 328 chip with the freshly flashed bootloader, and just stick in in the Arduino Uno to program a sketch?
-
Thank you for the tutorial. Quick question: Is it possible to just take the Atmega 328 chip with the freshly flashed bootloader, and just stick in in the Arduino Uno to program a sketch?
@drock1985 I think I have done just that. It only needs to have a bootloader (you could just flash one there though).
-
Awesome @LastSamurai thanks.
One other question: Is it possible to just use a standard USB to FTDI converter to flash the sketch? Ex: flash bootloader using an Uno, then install in a SlimNode and use the FTDI connector there to flash?
-
Awesome @LastSamurai thanks.
One other question: Is it possible to just use a standard USB to FTDI converter to flash the sketch? Ex: flash bootloader using an Uno, then install in a SlimNode and use the FTDI connector there to flash?
@drock1985 Yes once it has a bootloader that should be possible (you need to use the right settings though ;) )
-
@drock1985 Yes once it has a bootloader that should be possible (you need to use the right settings though ;) )
What settings would those be? Would they be things outside of the tutorial?
Sorry to ask so many questions. Never flashed an Arduino before outside of connecting a USB cable to an Uno or Nano
-
What settings would those be? Would they be things outside of the tutorial?
Sorry to ask so many questions. Never flashed an Arduino before outside of connecting a USB cable to an Uno or Nano
@drock1985 Mainly the baudrate but if you just burn the standard e.g. Arduino Uno bootloader and then use the IDE with the Uno settings everything should work fine. If you encounter errors you can still check your settings ;) They are in the boards.txt file of the IDE.
Just try it though, it really isn't that hard ;)
-
Hi there, and thanks for the tutorial. I'm trying this for the first time (the ATmega is going to be used in a slim temp node), and I'm receiving this message you mentioned:
avrdude: Yikes! Invalid device signature. Double check connections and try again, or use -F to overrideYou mention we should try the following:
Maybe your chip is configured to run on an external crystal clock. I tested with two values and it succeeded. I used 10Mhz and 20Mhz as I didn't have 16 Mhz.
Connect the crystal to pin 9 and 10
Note: You won't need the crystal except for the first time as the new bootloader is configured to run on internal 1Mhz or 8Mhz.
I don't quite follow what this means? Do I need a 10mhz, 16mhz or 20mhz crystal attached to the breadboard like you show in the video? If so, is that the only change I would need to make?
FYI I'm using an Arduino clone (Buono uno r3, set at 5V)
