Slim Node Si7021 sensor example


  • Hardware Contributor

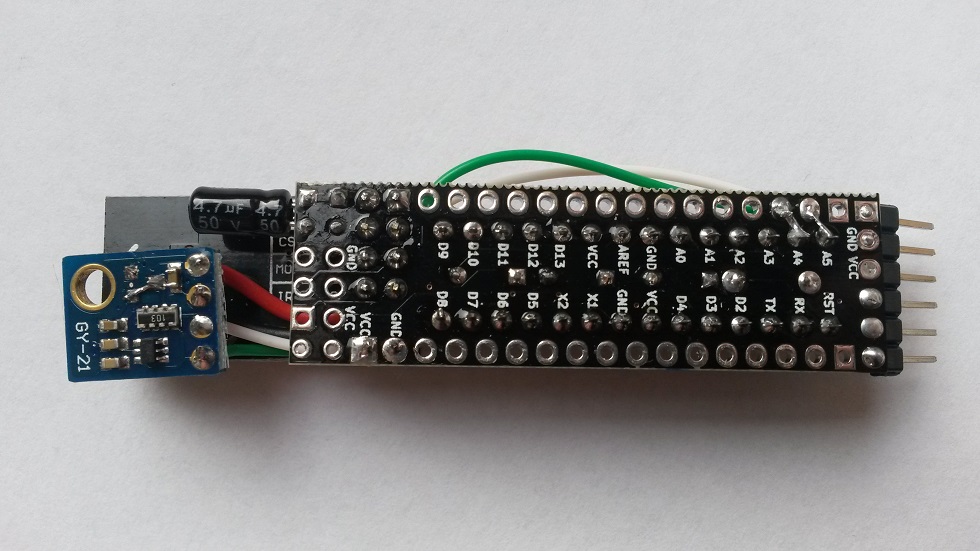
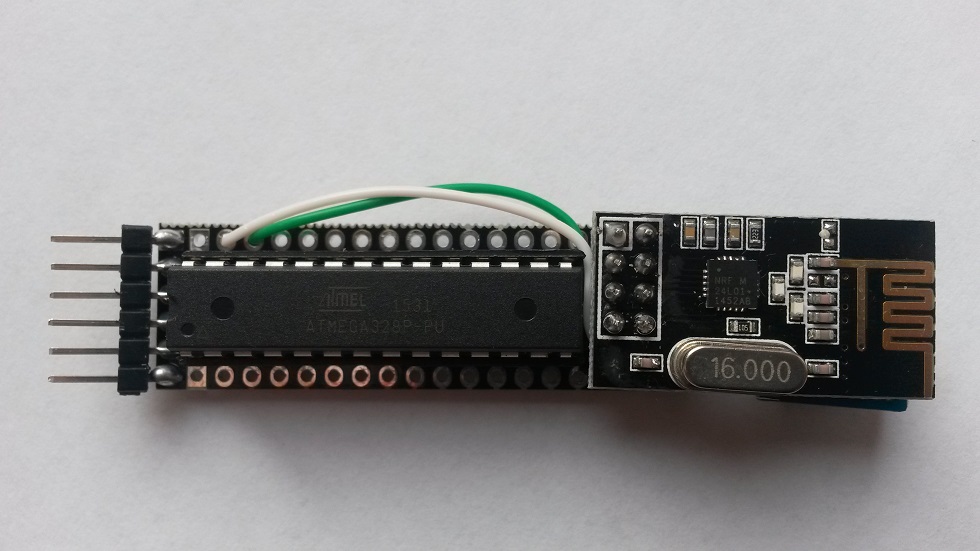
    I've tried to post some sensor examples in the main Slim Node thread. It's continuously growing and I think it's better to start new threads for as much as possible. Here's one. I used this Si7021 (GY-21 board).

    0_1454701237885_20160205_115230_bottom.jpg
    0_1454701249276_20160205_115440_top.jpg
    0_1454701293649_20160205_115016_caps.jpg

    Sketch
    Apologize for still not having cleaned up the sketch yet ...

    /* Sketch with Si7021 and battery monitoring.
    by m26872, 20151109 
    */
    #include <MySensor.h>  
    #include <Wire.h>
    #include <SI7021.h>
    #include <SPI.h>
    #include <RunningAverage.h>
    
    //#define DEBUG
    
    #ifdef DEBUG
    #define DEBUG_SERIAL(x) Serial.begin(x)
    #define DEBUG_PRINT(x) Serial.print(x)
    #define DEBUG_PRINTLN(x) Serial.println(x)
    #else
    #define DEBUG_SERIAL(x)
    #define DEBUG_PRINT(x) 
    #define DEBUG_PRINTLN(x) 
    #endif
    
    #define NODE_ID 132             // <<<<<<<<<<<<<<<<<<<<<<<<<<<   Enter Node_ID
    #define CHILD_ID_TEMP 0
    #define CHILD_ID_HUM 1
    // #define SLEEP_TIME 15000 // 15s for DEBUG
    #define SLEEP_TIME 300000   // 5 min
    #define FORCE_TRANSMIT_CYCLE 36  // 5min*12=1/hour, 5min*36=1/3hour 
    #define BATTERY_REPORT_CYCLE 2880   // Once per 5min   =>   12*24*7 = 2016 (one report/week)
    #define VMIN 1900
    #define VMAX 3300
    #define HUMI_TRANSMIT_THRESHOLD 3.0  // THRESHOLD tells how much the value should have changed since last time it was transmitted.
    #define TEMP_TRANSMIT_THRESHOLD 0.5
    #define AVERAGES 2
    
    int batteryReportCounter = BATTERY_REPORT_CYCLE - 1;  // to make it report the first time.
    int measureCount = 0;
    float lastTemperature = -100;
    int lastHumidity = -100;
    
    RunningAverage raHum(AVERAGES);
    SI7021 humiditySensor;
    
    MySensor gw;
    MyMessage msgTemp(CHILD_ID_TEMP,V_TEMP); // Initialize temperature message
    MyMessage msgHum(CHILD_ID_HUM,V_HUM);
    
    void setup() {
      DEBUG_SERIAL(115200);    // <<<<<<<<<<<<<<<<<<<<<<<<<< Note BAUD_RATE in MySensors.h
      DEBUG_PRINTLN("Serial started");
      
      DEBUG_PRINT("Voltage: ");
      DEBUG_PRINT(readVcc()); 
      DEBUG_PRINTLN(" mV");
    /*
      delay(500);
      DEBUG_PRINT("Internal temp: ");
      DEBUG_PRINT(GetInternalTemp()); // Probably not calibrated. Just to print something.
      DEBUG_PRINTLN(" *C");
    */  
      delay(500); // Allow time for radio if power useed as reset
      gw.begin(NULL,NODE_ID);
      gw.sendSketchInfo("EgTmpHumBat5min", "1.0 151106"); 
      gw.present(CHILD_ID_TEMP, S_TEMP);   // Present sensor to controller
      gw.present(CHILD_ID_HUM, S_HUM);
      DEBUG_PRINT("Node and "); DEBUG_PRINTLN("2 children presented.");
      
      raHum.clear();
      
    }
    
    void loop() { 
    
      measureCount ++;
      batteryReportCounter ++;
      bool forceTransmit = false;
      
      if (measureCount > FORCE_TRANSMIT_CYCLE) {
    	forceTransmit = true; 
      }
      sendTempHumidityMeasurements(forceTransmit);
    /*
      // Read and print internal temp
      float temperature0 = static_cast<float>(static_cast<int>((GetInternalTemp()+0.5) * 10.)) / 10.;
      DEBUG_PRINT("Internal Temp: "); DEBUG_PRINT(temperature0); DEBUG_PRINTLN(" *C");        
    */
      // Check battery
      if (batteryReportCounter >= BATTERY_REPORT_CYCLE) {
    	long batteryVolt = readVcc();
    	DEBUG_PRINT("Battery voltage: "); DEBUG_PRINT(batteryVolt); DEBUG_PRINTLN(" mV");
    	uint8_t batteryPcnt = constrain(map(batteryVolt,VMIN,VMAX,0,100),0,255);   
    	DEBUG_PRINT("Battery percent: "); DEBUG_PRINT(batteryPcnt); DEBUG_PRINTLN(" %");
    	gw.sendBatteryLevel(batteryPcnt);
    	batteryReportCounter = 0;
      }
      
      gw.sleep(SLEEP_TIME);
    }
    
    // function for reading Vcc by reading 1.1V reference against AVcc. Based from http://provideyourown.com/2012/secret-arduino-voltmeter-measure-battery-voltage/
    // To calibrate reading replace 1125300L with scale_constant = internal1.1Ref * 1023 * 1000, where internal1.1Ref = 1.1 * Vcc1 (per voltmeter) / Vcc2 (per readVcc() function) 
    long readVcc() {
      // set the reference to Vcc and the measurement to the internal 1.1V reference
      ADMUX = _BV(REFS0) | _BV(MUX3) | _BV(MUX2) | _BV(MUX1);
      delay(2); // Wait for Vref to settle
      ADCSRA |= _BV(ADSC); // Start conversion
      while (bit_is_set(ADCSRA,ADSC)); // measuring
      uint8_t low  = ADCL; // must read ADCL first - it then locks ADCH  
      uint8_t high = ADCH; // unlocks both
      long result = (high<<8) | low;
      result = 1125300L / result; // Calculate Vcc (in mV); 1125300 = 1.1*1023*1000
      return result; // Vcc in millivolts
    }
    // function for reading internal temp. From http://playground.arduino.cc/Main/InternalTemperatureSensor 
    double GetInternalTemp(void) {  // (Both double and float are 4 byte in most arduino implementation)
      unsigned int wADC;
      double t;
      // The internal temperature has to be used with the internal reference of 1.1V. Channel 8 can not be selected with the analogRead function yet.
      ADMUX = (_BV(REFS1) | _BV(REFS0) | _BV(MUX3));   // Set the internal reference and mux.
      ADCSRA |= _BV(ADEN);  // enable the ADC
      delay(20);            // wait for voltages to become stable.
      ADCSRA |= _BV(ADSC);  // Start the ADC
      while (bit_is_set(ADCSRA,ADSC));   // Detect end-of-conversion
      wADC = ADCW;   // Reading register "ADCW" takes care of how to read ADCL and ADCH.
      t = (wADC - 88.0 ) / 1.0;   // The default offset is 324.31.
      return (t);   // The returned temperature in degrees Celcius.
    }
    
    /*********************************************
     * * Sends temperature and humidity from Si7021 sensor
     * Parameters
     * - force : Forces transmission of a value (even if it's the same as previous measurement)
     *********************************************/
    void sendTempHumidityMeasurements(bool force) {
      bool tx = force;
    
      si7021_env data = humiditySensor.getHumidityAndTemperature();
      
      float temperature = data.celsiusHundredths / 100.0;
      DEBUG_PRINT("T: ");DEBUG_PRINTLN(temperature);
      float diffTemp = abs(lastTemperature - temperature);
      DEBUG_PRINT(F("TempDiff :"));DEBUG_PRINTLN(diffTemp);
      if (diffTemp > TEMP_TRANSMIT_THRESHOLD || tx) {
    	gw.send(msgTemp.set(temperature,1));
    	lastTemperature = temperature;
    	measureCount = 0;
    	DEBUG_PRINTLN("T sent!");
      }
      
      int humidity = data.humidityPercent;
      DEBUG_PRINT("H: ");DEBUG_PRINTLN(humidity);
      raHum.addValue(humidity);
      humidity = raHum.getAverage();  // MA sample imply reasonable fast sample frequency
      float diffHum = abs(lastHumidity - humidity);  
      DEBUG_PRINT(F("HumDiff  :"));DEBUG_PRINTLN(diffHum); 
      if (diffHum > HUMI_TRANSMIT_THRESHOLD || tx) {
    	gw.send(msgHum.set(humidity));
    	lastHumidity = humidity;
    	measureCount = 0;
    	DEBUG_PRINTLN("H sent!");
      }
    
    }
    

    Notes
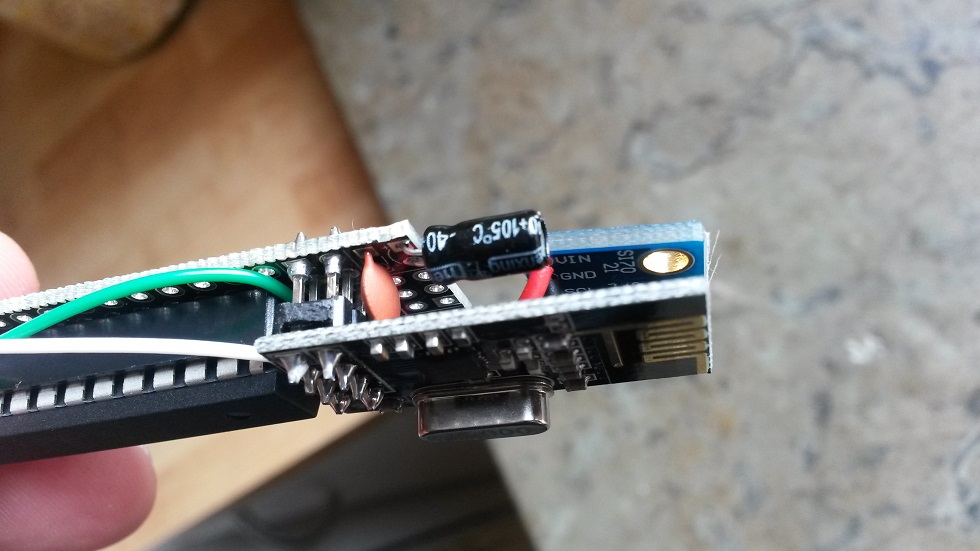
    Here (and often in other projects as well) the GY-21 board is used to provide the Si7021 sensor . I'm not sure about the identity of components on it, but apart from the sensor the board also includes a small 3.3V-regulator (LDO), mosfets for logic level convertion, supporting capacitors and pull-up resistors.

    The voltage regulator is desoldered and bypassed in pictures above. This gained a node sleep current reduction from 10.7uA to ~6uA. This is the only modification necessary to do on the GY-21.

    The GY-21 board is obviously designed for 5V-projects, but removing-/bypassing the v-reg is enough for using it in our low power 3.3-1.9V applications. @riataman was the first to show the mod of the GY-21 board in this post. There's also a link to a board without the v-reg and level converter. If you design you own pcb you'll probably use the Si7021 bare chip instead of the GY-21 board.

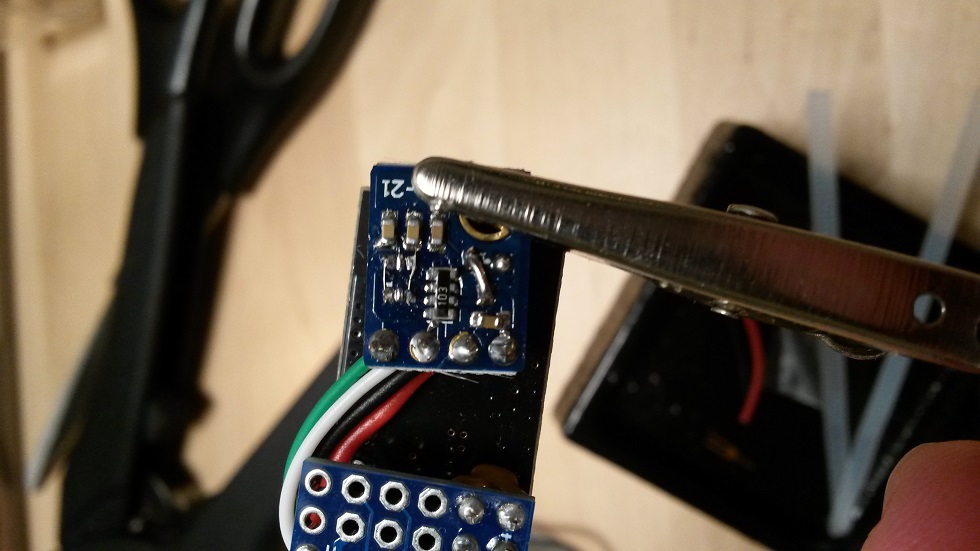
    I had some thoughts about voltage dropout level and the level converter. In the end I still have thoughts, but my experiments show no issues. Here's a description of the level converter working principle. Remember that I don't know if these specs are equivalent, but looking at the mosfet datasheet, it says "Diode forward voltage drop 0.85-1.5V" and "Gate threshold voltage 1.0-2.5V". It's also an "Enhancment mode" FET, where the threshold voltage is important according to this. All together makes me worried about the High side capability to pull down Low side when High side volt is <2V instead of 5V. My tests show differently though. There are no real issues with this. The Si7021 worked down to ~1.7-1.8V with no significant difference whether the level converter was bypassed or not. Comparing one node with bypassed level converter to one without, showed ~1uA lower sleep mode current. But I assume it could just as well be a matter of the individual variations. If anyone like to bypass their level converter, here's a picture.

    0_1454768184528_20160201_205055_convbypass.jpg


  • Thanks! I asked in the main thread, but what ceramic capacitor are you using there? I see the 4.7uf, can you confirm what the other is?

    If I get the orange capacitor and the black one, are those the only capacitors I need for a si7021 temp node?

    Thanks


  • Hardware Contributor

    @rsachoc
    The capacitors are part of the Slim Node design, they have nothing to do with this particular sensor. It's C4 and C5 if you look in the BOM. The one you asked about earlier was just a bad example by me where I had put what had at the time, which was the "C1,2,3" type of cap.

    The caps are sort of belt and braces here. Your node would probably work without them (ie C4,C5), but maybe with a little worse performance.


  • @m26872 thanks, I've now ordered the missing parts, so hopefully once they arrive I'll be good to go.


  • Hardware Contributor

    UPDATE
    Added the "Notes" part in the first post.


  • Hello @m26872 !

    I really loved your slim node ! Nice job !
    I will probably copy your design and replace the NRF by a RFM69. Actually I work with mini pro but as I don't want to desolder the LED and the regulator it's time to come-back with DIP format 😉

    The power consumption seems the same with the SI7021 and a DHT22 ?

    David.


  • Hardware Contributor

    @carlierd You're welcome! It's "licensed" Public Domain, so use it as you wish. But of course - please make it open hardware if you come up with something.

    I only measure the sensor nodes total sleep mode consumption and since the DHT22 requires a 3.3V booster (Iq ~90uA) it's hard to tell if it's exactly the same.


  • @m26872 : I don't use booster. You think it's necessary ? 90uA is really important for battery operation.

    For the design off course I will make it open hardware 🙂

    David.


  • Hardware Contributor

    @carlierd What's your setup then? The DHT22 is for 3.3-5.5V.


  • @m26872 I have built the Slim Node described above and i am using your exact sketch given above but when i look at the serial monitor, it is printing junk characters i tried different baud rates on the serial monitor but nothing works.

    I am connected to the slim node using FTDI board.

    Any thoughts?

    Thanks for your help.


  • Hardware Contributor

    @ar91 Did you change baud rate in MySensors config too?


  • Hardware Contributor

    @m26872 There is another version of the SI7021 board without voltage regulator. This evening I will look up the link on Aliexpress. The boards are smaller then the GY-21 variant.


  • Thanks @m26872, I changed the baud rate on MyConfig.h and it started working.


  • @m26872 My nodes are working correctly for the moment. Actually one is at 2.8v. Perhaps I will have problem when voltage will be lower !

    David.


  • Hardware Contributor

    @carlierd Probably. That's why I ask what you use. DHT22 connected straight to 2AA will not utilize battery capacity. Higher battery voltage with step down regulator would be better - or maybe without, but with like 3AAs or so.


  • @carlierd With Slim Node running at 1Mhz even with or without booster i am having hardtime making DHT22 work. I even tried different libraries but none of them works at 1Mhz. How did you get it work?


  • Hardware Contributor

    @ar91 I don't think there's a good reason to go below 8MHz if DHT22 doesn't work much below 3.3V ?


  • @m26872 Perhaps that with a caps I can go very low. I want to have at least one year on 2 AA. Wait and see !


  • @ar91 Hello. I am using the arduino playground lib. No issue with it ! I can post a sketch if necessary.

    David.


  • @carlierd If you could share your code that will be great.


  • @ar91 Please find the code I used in 3 different nodes. The good thing with the playground lib is that there is error message if dialog with DHT22 failed.

    /**
     * The MySensors Arduino library handles the wireless radio link and protocol
     * between your home built sensors/actuators and HA controller of choice.
     * The sensors forms a self healing radio network with optional repeaters. Each
     * repeater and gateway builds a routing tables in EEPROM which keeps track of the
     * network topology allowing messages to be routed to nodes.
     *
     * Created by Henrik Ekblad <henrik.ekblad@mysensors.org>
     * Copyright (C) 2013-2015 Sensnology AB
     * Full contributor list: https://github.com/mysensors/Arduino/graphs/contributors
     *
     * Documentation: http://www.mysensors.org
     * Support Forum: http://forum.mysensors.org
     *
     * This program is free software; you can redistribute it and/or
     * modify it under the terms of the GNU General Public License
     * version 2 as published by the Free Software Foundation.
     *
     */
    
    /**************************************************************************************/
    /* Temperature, humidity and luminosity measurements.                                 */
    /*                                                                                    */
    /* Version     : 1.1.6                                                                */
    /* Date        : 10/01/2016                                                           */
    /* Modified by : David Carlier                                                        */
    /**************************************************************************************/
    /*                                ---------------                                     */
    /*                            RST |             |  A5                                 */
    /*                            RX  |             |  A4                                 */
    /*                            TX  |   ARDUINO   |  A3                                 */
    /*     RFM69 (DIO0) --------- D2  |     UNO     |  A2                                 */
    /*            DHT22 --------- D3  |             |  A1                                 */
    /*            Power --------- D4  | ATMEGA 328p |  A0 --------- Light dep. resistor   */
    /*              +3v --------- VCC |             | GND --------- GND                   */
    /*              GND --------- GND |  8MHz int.  | REF                                 */
    /*                            OSC |             | VCC --------- +3v                   */
    /*                            OSC |             | D13 --------- RFM69 (SCK)           */
    /*                            D5  |             | D12 --------- RFM69 (MISO)          */
    /*                            D6  |             | D11 --------- RFM69 (MOSI)          */
    /*                            D7  |             | D10 --------- RFM69 (NSS)           */
    /*                            D8  |             |  D9                                 */
    /*                                ---------------                                     */
    /*                                                                                    */
    /* Power = Vcc for LDR.                                                               */
    /* +3v = 2*AA                                                                         */
    /*                                                                                    */
    /**************************************************************************************/
    
    #include <SPI.h>
    #include <MySensor.h>
    #include <dht.h>
    #include <MyTransportRFM69.h>
    #include <MySigningAtsha204Soft.h>
    
    #define CHILD_ID_HUM 0
    #define CHILD_ID_TEMP 1
    #define CHILD_ID_LIGHT 2
    #define CHILD_ID_VOLTAGE 3
    #define LIGHT_SENSOR_ANALOG_PIN 0
    #define HUMIDITY_SENSOR_DIGITAL_PIN 3
    #define POWER_PIN 4
    //unsigned long SLEEP_TIME = 850000; // Sleep time between reads (in milliseconds) (close to 15')
    unsigned long SLEEP_TIME = 275000; // Sleep time between reads (in milliseconds) (close to 5')
    
    //Construct MySensors library
    MySigningAtsha204Soft signer;
    MyHwATMega328 hw;
    MyTransportRFM69 transport;
    MySensor gw(transport, hw, signer);
    dht DHT;
    MyMessage msgHum(CHILD_ID_HUM, V_HUM);
    MyMessage msgTemp(CHILD_ID_TEMP, V_TEMP);
    MyMessage msgLum(CHILD_ID_LIGHT, V_LEVEL);
    MyMessage msgVolt(CHILD_ID_VOLTAGE, V_VOLTAGE);
    
    /**************************************************************************************/
    /* Initialization                                                                     */
    /**************************************************************************************/
    void setup()
      {
      //Get time (for setup duration)
      #ifdef DEBUG
        unsigned long startTime = millis();
      #endif
    
      //Start MySensors
      gw.begin();
    
      //Send the Sketch Version Information to the Gateway
      gw.sendSketchInfo("GHAS sensor", "1.1.5");
    
      //Register all sensors to gw (they will be created as child devices)
      gw.present(CHILD_ID_HUM, S_HUM);
      gw.present(CHILD_ID_TEMP, S_TEMP);
      gw.present(CHILD_ID_LIGHT, S_LIGHT_LEVEL);
      gw.present(CHILD_ID_VOLTAGE, S_MULTIMETER);
    
      //Delay for DHT22
      delay(1500);
    
      //Print setup debug
      #ifdef DEBUG
        int duration = millis() - startTime;
        Serial.print("[Setup duration: "); Serial.print(duration, DEC); Serial.println(" ms]");
      #endif
      }
    
    /**************************************************************************************/
    /* Main loop                                                                          */
    /**************************************************************************************/
    void loop()
      {
      //Get time (for a complete loop)
      #ifdef DEBUG
        unsigned long startTime = millis();
      #endif
    
      //Power on
      powerOnPeripherals();
    
      //Get DHT22 data
      int dht22Result = DHT.read22(HUMIDITY_SENSOR_DIGITAL_PIN);
      switch (dht22Result)
        {
        case DHTLIB_OK:  
                    //Serial.println("OK,\t");
                    break;
        case DHTLIB_ERROR_CHECKSUM:
                    #ifdef DEBUG
                      Serial.println("Checksum error,\t");
                    #endif
                    break;
        case DHTLIB_ERROR_TIMEOUT:
                    #ifdef DEBUG
                      Serial.println("Time out error,\t");
                    #endif
                    break;
        case DHTLIB_ERROR_CONNECT:
                    #ifdef DEBUG
                      Serial.println("Connect error,\t");
                    #endif
                    break;
        case DHTLIB_ERROR_ACK_L:
                    #ifdef DEBUG
                      Serial.println("Ack Low error,\t");
                    #endif
                    break;
        case DHTLIB_ERROR_ACK_H:
                    #ifdef DEBUG
                      Serial.println("Ack High error,\t");
                    #endif
                    break;
        default:
                    #ifdef DEBUG
                      Serial.println("Unknown error,\t");
                    #endif
                    break;
        }
    
      //Get temperature and humidity
      float temperature = 0;
      float humidity = 0;
      if (dht22Result == DHTLIB_OK)
        {
        temperature = DHT.temperature;
        humidity = DHT.humidity;
        }
    
      //Get power before luminosity to use real voltage
      float realVoltage = getVoltage() / 100.0;
      int batteryPcnt = realVoltage * 100 / 3.0;
      if (batteryPcnt > 100) {batteryPcnt = 100;}
      int lux = computeIlluminance(realVoltage);
    
      //Power off
      powerOffPeripherals();
    
      //Send data to gateway
      gw.send(msgHum.set(humidity, 1));
      gw.send(msgTemp.set(temperature, 1));
      gw.send(msgLum.set(lux));
      gw.send(msgVolt.set(realVoltage, 2));
      gw.sendBatteryLevel(batteryPcnt);
    
      //Print debug
      #ifdef DEBUG
        Serial.print(temperature, 1);
        Serial.print(" degC");
        Serial.print("   ");
        Serial.print(humidity, 1);
        Serial.print(" %");
        Serial.print("   ");
        Serial.print(lux);
        Serial.print(" lx");
        Serial.print("   ");
        Serial.print(realVoltage);
        Serial.print(" v");
        int duration = millis() - startTime;
        Serial.print("   ");
        Serial.print("["); Serial.print(duration, DEC); Serial.println(" ms]");
        Serial.flush();
      #endif
    
      //Sleep
      gw.sleep(SLEEP_TIME);
      }
    
    /**************************************************************************************/
    /* Allows to compute illuminance (in LUX) from LIGHT_SENSOR_ANALOG_PIN.               */
    /**************************************************************************************/
    int computeIlluminance(float realVoltage)
      {
      //Get luminosity
      int luminosity = analogRead(LIGHT_SENSOR_ANALOG_PIN);
      //Calculating the voltage in the input of the ADC
      double voltage = realVoltage * ((double)luminosity / 1024.0);
      //Calculating the resistance of the photoresistor in the voltage divider
      double resistance = (10.0 * realVoltage) / voltage - 10.0;
      //Calculating the intensity of light in lux and return it
      int illuminance = 255.84 * pow(resistance, -10/9);
      return illuminance;
      }
    
    /**************************************************************************************/
    /* Allows to get the real Vcc (return value * 100).                                   */
    /**************************************************************************************/
    int getVoltage()
      {
      const long InternalReferenceVoltage = 1056L;
      ADMUX = (0<<REFS1) | (1<<REFS0) | (0<<ADLAR) | (1<<MUX3) | (1<<MUX2) | (1<<MUX1) | (0<<MUX0);
      delay(50);  // Let mux settle a little to get a more stable A/D conversion
      //Start a conversion  
      ADCSRA |= _BV( ADSC );
      //Wait for it to complete
      while (((ADCSRA & (1<<ADSC)) != 0));
      //Scale the value
      int result = (((InternalReferenceVoltage * 1023L) / ADC) + 5L) / 10L;
      return result;
      }
    
    /**************************************************************************************/
    /* Allows to power ON peripherals.                                                    */
    /**************************************************************************************/
    void powerOnPeripherals()
      {
      //Power-up
      pinMode (POWER_PIN, OUTPUT);
      digitalWrite (POWER_PIN, HIGH);
      delay(1);
      }
    
    /**************************************************************************************/
    /* Allows to power OFF peripherals.                                                   */
    /**************************************************************************************/
    void powerOffPeripherals()
      {
      //Power off
      digitalWrite (HUMIDITY_SENSOR_DIGITAL_PIN, LOW);
      digitalWrite (POWER_PIN, LOW);
      pinMode (HUMIDITY_SENSOR_DIGITAL_PIN, INPUT);
      pinMode (POWER_PIN, INPUT);
      }
    

    Hope it helps !

    David.


  • @carlierd Thank you very much. I really like your comment on the top 👍


  • Progress!

    http://imgur.com/zRvXvrN
    http://imgur.com/KpB7daz

    A question though. To get to this point, I copied the pictures posted above, but where do I now add these resistors?

    http://imgur.com/6mKJcgE

    Also, if I want to add a 2AA battery cage, where do I connect the red and black wires to?

    Thanks! And sorry for the newb questions!


  • Hardware Contributor

    @rsachoc What you show are not resistors, they look like capacitors. 104 means 100nF (I think). Can you measure their value ?


  • @carlierd Are you running your Atmega at 1Mhz, Because I tried to use your sketch and i am getting "Checksum Error".


  • @GertSanders indeed they are capacitors (silly me) - apparently they are 0.1uf - the black one I have already soldered is 4.7uf


  • @ar91 said:

    @carlierd Are you running your Atmega at 1Mhz, Because I tried to use your sketch and i am getting "Checksum Error".

    No, I am working at 8 MHz (internal). Perhaps your DHT is out of order ? You try with another one ?

    David.


  • Bump, can anyone advise on how I got about finding out where I need to solder the resistors on? So far I've just soldered the 4.7uf capacitor, as can be seen from the pics. But I'm struggling to find out where I need to solder the other capacitor's I have (from the BOM).


  • Hardware Contributor

    @rsachoc C1,C2,C3 are clearly marked at top layer silkscreen. You'll see them in the middle of the uC socket if you look at your 2nd picture in you last post above. C5 is visible next to the 4.7u cap, in the 3rd picture of my first post in this thread.


  • Hardware Contributor

    @rsachoc said:

    Also, if I want to add a 2AA battery cage, where do I connect the red and black wires to?

    First picture in first post of this thread should be enough. Connect (+) to Vcc and (-) to Gnd.


  • Thanks, apologies, I really should have looked at my board, I was searching for the answer in the main slim node thread and I think i was looking at older boards and couldn't for the life of me find where C3 is!


  • Hardware Contributor

    @rsachoc I'm sorry, I know I need to update those old pictures.


  • @m26872 no problem, not your fault at all, mine for being a newbie. So much so that my first attempt resulted in me soldering the capacitor to the wrong hole, so I've had to abandon my first attempt. You live, you learn, next time I'll double check.


  • Hardware Contributor

    @rsachoc Yes. Double check polarity of the 4.7uF cap.


  • Hi all, again.

    I have now successfully built (I think) the slim node, but without the 7021 temp sensor. Because this is the most expensive part of the device and because I find desoldering a challenge, but mainly because I'm waiting for it to arrive from China, can I try and upload the bootloader and sketch without the sensor attached?

    If so, I had a couple questions from reading through this thread and the slim node thread. Firstly, uploading the bootloader, can this be done with the FTDI adaptor or do I need to follow the bit described in the slim node thread and attempt it using AVR studio? Secondly, once that is done, is it just a matter of uploading the sketch provided above?

    Also, I wanted to confirm a few things on attaching the si7021 temp sensor. From what I can see, SOA (SDA) on the si7021 goes to A4 and SCL goes to A5. Also, GND goes to GND on the board (rightmost set on pins bottom right when FTDI is at the top) and VIN goes to VCC (just next to GND on the board)?

    Thanks in advance.


  • Hardware Contributor

    @rsachoc said:

    can I try and upload the bootloader and sketch without the sensor attached?

    Yes, you should be able to get far without the sensor. Send something over MySensors net and view debug prints. Or make some simple sensor like a reed switch.

    uploading the bootloader, can this be done with the FTDI adaptor or do I need to follow the bit described in the slim node thread and attempt it using AVR studio?

    Yes, Avr Studio or Uno as ISP.

    Secondly, once that is done, is it just a matter of uploading the sketch provided above?

    Yes, but if you don't connect a Si7021 I would go for some other simple test sketch to avoid any Si7021 library startup issues.

    Also, I wanted to confirm a few things on attaching the si7021 temp sensor. From what I can see, SOA (SDA) on the si7021 goes to A4 and SCL goes to A5. Also, GND goes to GND on the board (rightmost set on pins bottom right when FTDI is at the top) and VIN goes to VCC (just next to GND on the board)?

    Yes.


  • Folks, a word of caution, for people that are attempting this for the first time, please burn the bootloader before you solder everything, as silly me, I built the entire thing (without the si7021) and now I'll need to bin it because the ATMega is soldered to the board and I've no way to load the bootloader soldered to the board!

    Ah, the life of a newbie 😁

    I think what I'll do is once I've actually got a working board, I'll do a newbie writeup so that people don't make the same mistakes as me.


  • Mod

    First Attempt In Learning 🙂 A writeup would be awesome.


  • Hardware Contributor

    @rsachoc Why don't you just solder some wires to pins you need ? The "in cicuit serial programming" concept would let you do it with almost anything attached.


  • @m26872 said:

    @rsachoc Why don't you just solder some wires to pins you need ? The "in cicuit serial programming" concept would let you do it with almost anything attached.

    I might as well attempt that! I'm waiting for a breadboard, so I'll try and attempt it when that arrives.


  • Some of my tips (noob alert) that I've gathered in my travels so far for this temp Slim node

    1. Burn the bootloader onto the ATMega328 first! (here is a guide for Arduino as ISP)
    2. Check the capacitor polarity before you solder it (the 4.7uF electrolytic capacitor, the others don't matter)
    3. I prefer using strips for the Atmega (see here) as you'll have more clearance for the capacitors which sit underneath (there is a caveat to this however, in that if you're not sure if you've got/burnt a bootloader onto the ATMega, using strips there is no going back, whereas with the chip socket, you can remove the ATMega). Update I think, for me anyway, if you're confident that the ATMega has been bootloaded successfully, I still prefer strips, however if you're unsure what you can do is use the socket and just sit it higher in it's position to get a decent clearance.
    4. The bill of materials (BOM) is here and also helps with figuring out which pieces go where
    5. Solder the capacitors, wires for Si7021 (with si7021 attached) and FTDI pins to the board first, then the strips + AtMega328p (see below), then the NRF last to the board. I found that the FTDI pins facing straight up were best for the box I was going to put it in
    6. Solder the strips to the ATMega first, then to the board
    7. Check the size of the box/fitting you are going to mount this in before you do all the above!
    8. Check that you are putting the ATMega chip the right way on the board, the notch should be facing the pins for the FTDI.
    9. Check continuity of the pins from the ATMega to the board pins underneath, I found the ATMega to strips were the most difficult to solder, and after I tested continuity I found a single pin which didn't have connection, so I added some more solder to this pin.
    10. Don't forget the resistor at R1 (I soldered this to the underside of the board, less by choice and more by the fact that I forgot about it, but I guess the preference would be the same side as the capacitors)
    11. I strongly advise buying the 3.3v ready si7021 temp sensor (here) as the modification to the 5v version is quite difficult for a newbie (the components are quite small) and you'll probably mess it up like I did.

    General soldering tips
    12) Practice soldering first, some of the joins are a little challenging and it took me a few attempts to get the hang of it
    13) Get a decent size tip, my first was a bit large


  • Hardware Contributor

    @rsachoc As a great man once said: "most bananas grow bent, and yet everyone loves them. There is nothing strange about the diversity of routes to success"


  • Thanks all, I'm sure I will be adding to it, as I'm now trying to compile and upload the sketch. However, I'm getting the following error:

       #error No forward link or gateway feature activated. This means nowhere to send messages! Pretty pointless.
    
        ^
    
    exit status 1
    Error compiling.
    

    I'm using the W5100 MQTT gateway sketch (which I believe is on the development branch), so I'm not sure if that's what's causing the error? I've tried deleting the Arduino IDE, the mysensors development branch from my PC, and reinstalling and redownloading the mysensors dev branch, but the same thing happens?


  • OK, so it seems that it was because I was using the dev branch that I'm getting that error. I switched over to stable and the sketch compiles, although I do get a warning.

    WARNING: Category '' in library UIPEthernet is not valid. Setting to 'Uncategorized'
    

    But I also can't upload the sketch above:

    avrdude: stk500_recv(): programmer is not responding
    avrdude: stk500_getsync() attempt 1 of 10: not in sync: resp=0x18
    

    I noted above that something needed to be changed in terms of the baud rate, mine is set at 115200 in myconfig.h and I can't seem to find a reference in mysensor.h


  • Hardware Contributor

    @rsachoc I sorry, but there seems to be an error in the sketch in the first post. Baud rate should be 9600 everywhere if you use the common Slim Node fuses and bootloader. Upload (board.txt), MyConfig.h (not MySensor.h since v1.5), Debug-prints and Arduino IDE serial monitor.


  • Thanks, I've updated the sketch that I downloaded, also myconfig.h so that should be good. What do I need to select in the Arduino IDE for board type? I searched in the slim node thread and didn't see a reference to any changes?


  • Hardware Contributor

    @rsachoc No changes. It is that boards.txt entry you should use.


  • Hmmm ok, that's what I thought...still no luck, I've modified the boards.txt with the text from the slim node thread, and now it still has the same error message.

    To confirm, my FTDI adaptor is attached to the board pins as follows:

    FTDI <-> board
    GND <-> first pin (i.e bottom left of board when looking at board laying long side horizontal and NRF radio on the other side)
    CTS <-> board marked GND
    PWR <-> board marked VCC
    TXO <-> next up i.e. 4th pin
    RXI <-> next up i.e. 5th pin
    DTR <-> next up i.e. last pin

    Other than that, I guess it may be something wrong with the way I made the board? If so, what's the best way to troubleshoot? Could it be a bad bootloader flash? Is there a way to check if the ATMega has a bootloader?

    edit in fact, it could be because I don't have the Si7021 connected? Could this be the reason a sketch is not uploading successfully? 😟


  • Hardware Contributor

    @rsachoc Start simple. Try on a board without nRF and sensors. Remove everything in the sketch and make it to just print "Hello world" back to serial monitor.


  • Thanks, I haven't actually built a new node, but have been double checking everything on my current node. One thing I wanted to confirm, the 4.7uf capacitor, does the negative leg have to be on the corner of the board, as this is the way I have it currently? I think looking at the board layout in the main slim node thread, it should be the positive leg on the corner and the negative leg on the side of the board (the short side of the board)?


  • Hardware Contributor

    @rsachoc I don't have it in front of me rigth now... but, there should be an arc and a super-small "+"-sign next to the positive pad. Maybe it just look like a dot.


  • Ok so that may be the problem then! Let me solder it the right way and see if that helps otherwise I'm going to create a bare bones slim mode as suggested

    edit to confirm the positive leg of the capacitor goes to the positive marked plus sign hole on the board?


  • OK so I changed the polarity of the 4.7uf capacitor and I'm still receiving the same error. So I built a barebones one without sensor and without NRF. I am still getting the same error when uploading the sketch via the FTDI adaptor. I tried uploading a sketch to a Sensebender I have and it worked fine, so that rules out the FTDI adaptor.

    Some pics in case someone can spot something obvious.

    http://i.imgur.com/1SV0qO2.jpg

    http://i.imgur.com/mUp87hB.jpg

    http://i.imgur.com/oCqcDpo.jpg

    So I can only think that it must be related to the ATMega bootloader? In the how to burn a bootloader thread, I received the following when trying to burn the bootloader, so I assumed it uploaded correctly?

    C:\Users\James\Desktop\RPi Openhab\arduino-1.6.7-windows\hardware\tools\avr/bin/avrdude -CC:\Users\James\Desktop\RPi Openhab\arduino-1.6.7-windows\hardware\tools\avr/etc/avrdude.conf -v -patmega328p -cstk500v1 -PCOM5 -b19200 -e -Ulock:w:0x3F:m -Uefuse:w:0x05:m -Uhfuse:w:0xDE:m -Ulfuse:w:0xFF:m 
    
    avrdude: Version 6.0.1, compiled on Apr 15 2015 at 19:59:58
             Copyright (c) 2000-2005 Brian Dean, http://www.bdmicro.com/
             Copyright (c) 2007-2009 Joerg Wunsch
    
             System wide configuration file is "C:\Users\James\Desktop\RPi Openhab\arduino-1.6.7-windows\hardware\tools\avr/etc/avrdude.conf"
    
             Using Port                    : COM5
             Using Programmer              : stk500v1
             Overriding Baud Rate          : 19200
             AVR Part                      : ATmega328P
             Chip Erase delay              : 9000 us
             PAGEL                         : PD7
             BS2                           : PC2
             RESET disposition             : dedicated
             RETRY pulse                   : SCK
             serial program mode           : yes
             parallel program mode         : yes
             Timeout                       : 200
             StabDelay                     : 100
             CmdexeDelay                   : 25
             SyncLoops                     : 32
             ByteDelay                     : 0
             PollIndex                     : 3
             PollValue                     : 0x53
             Memory Detail                 :
    
                                      Block Poll               Page                       Polled
               Memory Type Mode Delay Size  Indx Paged  Size   Size #Pages MinW  MaxW   ReadBack
               ----------- ---- ----- ----- ---- ------ ------ ---- ------ ----- ----- ---------
               eeprom        65    20     4    0 no       1024    4      0  3600  3600 0xff 0xff
               flash         65     6   128    0 yes     32768  128    256  4500  4500 0xff 0xff
               lfuse          0     0     0    0 no          1    0      0  4500  4500 0x00 0x00
               hfuse          0     0     0    0 no          1    0      0  4500  4500 0x00 0x00
               efuse          0     0     0    0 no          1    0      0  4500  4500 0x00 0x00
               lock           0     0     0    0 no          1    0      0  4500  4500 0x00 0x00
               calibration    0     0     0    0 no          1    0      0     0     0 0x00 0x00
               signature      0     0     0    0 no          3    0      0     0     0 0x00 0x00
    
             Programmer Type : STK500
             Description     : Atmel STK500 Version 1.x firmware
             Hardware Version: 2
             Firmware Version: 1.18
             Topcard         : Unknown
             Vtarget         : 0.0 V
             Varef           : 0.0 V
             Oscillator      : Off
             SCK period      : 0.1 us
    
    avrdude: AVR device initialized and ready to accept instructions
    
    Reading | ################################################## | 100% 0.02s
    
    avrdude: Device signature = 0x1e950f
    avrdude: erasing chip
    avrdude: reading input file "0x3F"
    avrdude: writing lock (1 bytes):
    
    Writing | ################################################## | 100% 0.01s
    
    avrdude: 1 bytes of lock written
    avrdude: verifying lock memory against 0x3F:
    avrdude: load data lock data from input file 0x3F:
    avrdude: input file 0x3F contains 1 bytes
    avrdude: reading on-chip lock data:
    
    C:\Users\James\Desktop\RPi Openhab\arduino-1.6.7-windows\hardware\tools\avr/bin/avrdude -CC:\Users\James\Desktop\RPi Openhab\arduino-1.6.7-windows\hardware\tools\avr/etc/avrdude.conf -v -patmega328p -cstk500v1 -PCOM5 -b19200 -Uflash:w:C:\Users\James\Desktop\RPi Openhab\arduino-1.6.7-windows\hardware\arduino\avr/bootloaders/optiboot/optiboot_atmega328.hex:i -Ulock:w:0x0F:m 
    Reading | ################################################## | 100% 0.01s
    
    avrdude: verifying ...
    avrdude: 1 bytes of lock verified
    avrdude: reading input file "0x05"
    avrdude: writing efuse (1 bytes):
    
    Writing | ################################################## | 100% 0.01s
    
    avrdude: 1 bytes of efuse written
    avrdude: verifying efuse memory against 0x05:
    avrdude: load data efuse data from input file 0x05:
    avrdude: input file 0x05 contains 1 bytes
    avrdude: reading on-chip efuse data:
    
    Reading | ################################################## | 100% 0.01s
    
    avrdude: verifying ...
    avrdude: 1 bytes of efuse verified
    avrdude: reading input file "0xDE"
    avrdude: writing hfuse (1 bytes):
    
    Writing | ################################################## | 100% 0.01s
    
    avrdude: 1 bytes of hfuse written
    avrdude: verifying hfuse memory against 0xDE:
    avrdude: load data hfuse data from input file 0xDE:
    avrdude: input file 0xDE contains 1 bytes
    avrdude: reading on-chip hfuse data:
    
    Reading | ################################################## | 100% 0.01s
    
    avrdude: verifying ...
    avrdude: 1 bytes of hfuse verified
    avrdude: reading input file "0xFF"
    avrdude: writing lfuse (1 bytes):
    
    Writing | ################################################## | 100% 0.01s
    
    avrdude: 1 bytes of lfuse written
    avrdude: verifying lfuse memory against 0xFF:
    avrdude: load data lfuse data from input file 0xFF:
    avrdude: input file 0xFF contains 1 bytes
    avrdude: reading on-chip lfuse data:
    
    Reading | ################################################## | 100% 0.01s
    
    avrdude: verifying ...
    avrdude: 1 bytes of lfuse verified
    
    avrdude done.  Thank you.
    
    
    avrdude: Version 6.0.1, compiled on Apr 15 2015 at 19:59:58
             Copyright (c) 2000-2005 Brian Dean, http://www.bdmicro.com/
             Copyright (c) 2007-2009 Joerg Wunsch
    
             System wide configuration file is "C:\Users\James\Desktop\RPi Openhab\arduino-1.6.7-windows\hardware\tools\avr/etc/avrdude.conf"
    
             Using Port                    : COM5
             Using Programmer              : stk500v1
             Overriding Baud Rate          : 19200
             AVR Part                      : ATmega328P
             Chip Erase delay              : 9000 us
             PAGEL                         : PD7
             BS2                           : PC2
             RESET disposition             : dedicated
             RETRY pulse                   : SCK
             serial program mode           : yes
             parallel program mode         : yes
             Timeout                       : 200
             StabDelay                     : 100
             CmdexeDelay                   : 25
             SyncLoops                     : 32
             ByteDelay                     : 0
             PollIndex                     : 3
             PollValue                     : 0x53
             Memory Detail                 :
    
                                      Block Poll               Page                       Polled
               Memory Type Mode Delay Size  Indx Paged  Size   Size #Pages MinW  MaxW   ReadBack
               ----------- ---- ----- ----- ---- ------ ------ ---- ------ ----- ----- ---------
               eeprom        65    20     4    0 no       1024    4      0  3600  3600 0xff 0xff
               flash         65     6   128    0 yes     32768  128    256  4500  4500 0xff 0xff
               lfuse          0     0     0    0 no          1    0      0  4500  4500 0x00 0x00
               hfuse          0     0     0    0 no          1    0      0  4500  4500 0x00 0x00
               efuse          0     0     0    0 no          1    0      0  4500  4500 0x00 0x00
               lock           0     0     0    0 no          1    0      0  4500  4500 0x00 0x00
               calibration    0     0     0    0 no          1    0      0     0     0 0x00 0x00
               signature      0     0     0    0 no          3    0      0     0     0 0x00 0x00
    
             Programmer Type : STK500
             Description     : Atmel STK500 Version 1.x firmware
             Hardware Version: 2
             Firmware Version: 1.18
             Topcard         : Unknown
             Vtarget         : 0.0 V
             Varef           : 0.0 V
             Oscillator      : Off
             SCK period      : 0.1 us
    
    avrdude: AVR device initialized and ready to accept instructions
    
    Reading | ################################################## | 100% 0.02s
    
    avrdude: Device signature = 0x1e950f
    avrdude: NOTE: "flash" memory has been specified, an erase cycle will be performed
             To disable this feature, specify the -D option.
    avrdude: erasing chip
    avrdude: reading input file "C:\Users\James\Desktop\RPi Openhab\arduino-1.6.7-windows\hardware\arduino\avr/bootloaders/optiboot/optiboot_atmega328.hex"
    avrdude: writing flash (32768 bytes):
    
    Writing | ################################################## | 100% 0.00s
    
    avrdude: 32768 bytes of flash written
    avrdude: verifying flash memory against C:\Users\James\Desktop\RPi Openhab\arduino-1.6.7-windows\hardware\arduino\avr/bootloaders/optiboot/optiboot_atmega328.hex:
    avrdude: load data flash data from input file C:\Users\James\Desktop\RPi Openhab\arduino-1.6.7-windows\hardware\arduino\avr/bootloaders/optiboot/optiboot_atmega328.hex:
    avrdude: input file C:\Users\James\Desktop\RPi Openhab\arduino-1.6.7-windows\hardware\arduino\avr/bootloaders/optiboot/optiboot_atmega328.hex contains 32768 bytes
    avrdude: reading on-chip flash data:
    
    Reading | ################################################## | 100% -0.00s
    
    avrdude: verifying ...
    avrdude: 32768 bytes of flash verified
    avrdude: reading input file "0x0F"
    avrdude: writing lock (1 bytes):
    
    Writing | ################################################## | 100% 0.02s
    
    avrdude: 1 bytes of lock written
    avrdude: verifying lock memory against 0x0F:
    avrdude: load data lock data from input file 0x0F:
    avrdude: input file 0x0F contains 1 bytes
    avrdude: reading on-chip lock data:
    
    Reading | ################################################## | 100% 0.01s
    
    avrdude: verifying ...
    avrdude: 1 bytes of lock verified
    
    avrdude done.  Thank you.
    

  • Hardware Contributor

    @rsachoc Looks like you're missing the R1 resistor?


  • @m26872 well that is probably it! I didn't even realise I needed that, oops! Sorry 😞 ! Let me try and get one (I think I have some already) and get soldering


  • It lives! Well the one node I created does at least! I'll troubleshoot it, but the problem was the R1 resistor, which I (noobishly) forgot about! But very pleased, and thanks to m26872 especially and everyone else who helped.

    I've updated the lessons learn post too!


  • I just received my non-3.3v Si7021, and have now updated the lessons learnt post, as this board is tiny and I managed to mess up the soldering completely. Ordered the 3.3 ready version now, another month wait...


  • @carlierd said:

    @ar91 Please find the code I used in 3 different nodes. The good thing with the playground lib is that there is error message if dialog with DHT22 failed.

    /**
     * The MySensors Arduino library handles the wireless radio link and protocol
     * between your home built sensors/actuators and HA controller of choice.
     * The sensors forms a self healing radio network with optional repeaters. Each
     * repeater and gateway builds a routing tables in EEPROM which keeps track of the
     * network topology allowing messages to be routed to nodes.
     *
     * Created by Henrik Ekblad <henrik.ekblad@mysensors.org>
     * Copyright (C) 2013-2015 Sensnology AB
     * Full contributor list: https://github.com/mysensors/Arduino/graphs/contributors
     *
     * Documentation: http://www.mysensors.org
     * Support Forum: http://forum.mysensors.org
     *
     * This program is free software; you can redistribute it and/or
     * modify it under the terms of the GNU General Public License
     * version 2 as published by the Free Software Foundation.
     *
     */
    
    /**************************************************************************************/
    /* Temperature, humidity and luminosity measurements.                                 */
    /*                                                                                    */
    /* Version     : 1.1.6                                                                */
    /* Date        : 10/01/2016                                                           */
    /* Modified by : David Carlier                                                        */
    /**************************************************************************************/
    /*                                ---------------                                     */
    /*                            RST |             |  A5                                 */
    /*                            RX  |             |  A4                                 */
    /*                            TX  |   ARDUINO   |  A3                                 */
    /*     RFM69 (DIO0) --------- D2  |     UNO     |  A2                                 */
    /*            DHT22 --------- D3  |             |  A1                                 */
    /*            Power --------- D4  | ATMEGA 328p |  A0 --------- Light dep. resistor   */
    /*              +3v --------- VCC |             | GND --------- GND                   */
    /*              GND --------- GND |  8MHz int.  | REF                                 */
    /*                            OSC |             | VCC --------- +3v                   */
    /*                            OSC |             | D13 --------- RFM69 (SCK)           */
    /*                            D5  |             | D12 --------- RFM69 (MISO)          */
    /*                            D6  |             | D11 --------- RFM69 (MOSI)          */
    /*                            D7  |             | D10 --------- RFM69 (NSS)           */
    /*                            D8  |             |  D9                                 */
    /*                                ---------------                                     */
    /*                                                                                    */
    /* Power = Vcc for LDR.                                                               */
    /* +3v = 2*AA                                                                         */
    /*                                                                                    */
    /**************************************************************************************/
    
    #include <SPI.h>
    #include <MySensor.h>
    #include <dht.h>
    #include <MyTransportRFM69.h>
    #include <MySigningAtsha204Soft.h>
    
    #define CHILD_ID_HUM 0
    #define CHILD_ID_TEMP 1
    #define CHILD_ID_LIGHT 2
    #define CHILD_ID_VOLTAGE 3
    #define LIGHT_SENSOR_ANALOG_PIN 0
    #define HUMIDITY_SENSOR_DIGITAL_PIN 3
    #define POWER_PIN 4
    //unsigned long SLEEP_TIME = 850000; // Sleep time between reads (in milliseconds) (close to 15')
    unsigned long SLEEP_TIME = 275000; // Sleep time between reads (in milliseconds) (close to 5')
    
    //Construct MySensors library
    MySigningAtsha204Soft signer;
    MyHwATMega328 hw;
    MyTransportRFM69 transport;
    MySensor gw(transport, hw, signer);
    dht DHT;
    MyMessage msgHum(CHILD_ID_HUM, V_HUM);
    MyMessage msgTemp(CHILD_ID_TEMP, V_TEMP);
    MyMessage msgLum(CHILD_ID_LIGHT, V_LEVEL);
    MyMessage msgVolt(CHILD_ID_VOLTAGE, V_VOLTAGE);
    
    /**************************************************************************************/
    /* Initialization                                                                     */
    /**************************************************************************************/
    void setup()
      {
      //Get time (for setup duration)
      #ifdef DEBUG
        unsigned long startTime = millis();
      #endif
    
      //Start MySensors
      gw.begin();
    
      //Send the Sketch Version Information to the Gateway
      gw.sendSketchInfo("GHAS sensor", "1.1.5");
    
      //Register all sensors to gw (they will be created as child devices)
      gw.present(CHILD_ID_HUM, S_HUM);
      gw.present(CHILD_ID_TEMP, S_TEMP);
      gw.present(CHILD_ID_LIGHT, S_LIGHT_LEVEL);
      gw.present(CHILD_ID_VOLTAGE, S_MULTIMETER);
    
      //Delay for DHT22
      delay(1500);
    
      //Print setup debug
      #ifdef DEBUG
        int duration = millis() - startTime;
        Serial.print("[Setup duration: "); Serial.print(duration, DEC); Serial.println(" ms]");
      #endif
      }
    
    /**************************************************************************************/
    /* Main loop                                                                          */
    /**************************************************************************************/
    void loop()
      {
      //Get time (for a complete loop)
      #ifdef DEBUG
        unsigned long startTime = millis();
      #endif
    
      //Power on
      powerOnPeripherals();
    
      //Get DHT22 data
      int dht22Result = DHT.read22(HUMIDITY_SENSOR_DIGITAL_PIN);
      switch (dht22Result)
        {
        case DHTLIB_OK:  
                    //Serial.println("OK,\t");
                    break;
        case DHTLIB_ERROR_CHECKSUM:
                    #ifdef DEBUG
                      Serial.println("Checksum error,\t");
                    #endif
                    break;
        case DHTLIB_ERROR_TIMEOUT:
                    #ifdef DEBUG
                      Serial.println("Time out error,\t");
                    #endif
                    break;
        case DHTLIB_ERROR_CONNECT:
                    #ifdef DEBUG
                      Serial.println("Connect error,\t");
                    #endif
                    break;
        case DHTLIB_ERROR_ACK_L:
                    #ifdef DEBUG
                      Serial.println("Ack Low error,\t");
                    #endif
                    break;
        case DHTLIB_ERROR_ACK_H:
                    #ifdef DEBUG
                      Serial.println("Ack High error,\t");
                    #endif
                    break;
        default:
                    #ifdef DEBUG
                      Serial.println("Unknown error,\t");
                    #endif
                    break;
        }
    
      //Get temperature and humidity
      float temperature = 0;
      float humidity = 0;
      if (dht22Result == DHTLIB_OK)
        {
        temperature = DHT.temperature;
        humidity = DHT.humidity;
        }
    
      //Get power before luminosity to use real voltage
      float realVoltage = getVoltage() / 100.0;
      int batteryPcnt = realVoltage * 100 / 3.0;
      if (batteryPcnt > 100) {batteryPcnt = 100;}
      int lux = computeIlluminance(realVoltage);
    
      //Power off
      powerOffPeripherals();
    
      //Send data to gateway
      gw.send(msgHum.set(humidity, 1));
      gw.send(msgTemp.set(temperature, 1));
      gw.send(msgLum.set(lux));
      gw.send(msgVolt.set(realVoltage, 2));
      gw.sendBatteryLevel(batteryPcnt);
    
      //Print debug
      #ifdef DEBUG
        Serial.print(temperature, 1);
        Serial.print(" degC");
        Serial.print("   ");
        Serial.print(humidity, 1);
        Serial.print(" %");
        Serial.print("   ");
        Serial.print(lux);
        Serial.print(" lx");
        Serial.print("   ");
        Serial.print(realVoltage);
        Serial.print(" v");
        int duration = millis() - startTime;
        Serial.print("   ");
        Serial.print("["); Serial.print(duration, DEC); Serial.println(" ms]");
        Serial.flush();
      #endif
    
      //Sleep
      gw.sleep(SLEEP_TIME);
      }
    
    /**************************************************************************************/
    /* Allows to compute illuminance (in LUX) from LIGHT_SENSOR_ANALOG_PIN.               */
    /**************************************************************************************/
    int computeIlluminance(float realVoltage)
      {
      //Get luminosity
      int luminosity = analogRead(LIGHT_SENSOR_ANALOG_PIN);
      //Calculating the voltage in the input of the ADC
      double voltage = realVoltage * ((double)luminosity / 1024.0);
      //Calculating the resistance of the photoresistor in the voltage divider
      double resistance = (10.0 * realVoltage) / voltage - 10.0;
      //Calculating the intensity of light in lux and return it
      int illuminance = 255.84 * pow(resistance, -10/9);
      return illuminance;
      }
    
    /**************************************************************************************/
    /* Allows to get the real Vcc (return value * 100).                                   */
    /**************************************************************************************/
    int getVoltage()
      {
      const long InternalReferenceVoltage = 1056L;
      ADMUX = (0<<REFS1) | (1<<REFS0) | (0<<ADLAR) | (1<<MUX3) | (1<<MUX2) | (1<<MUX1) | (0<<MUX0);
      delay(50);  // Let mux settle a little to get a more stable A/D conversion
      //Start a conversion  
      ADCSRA |= _BV( ADSC );
      //Wait for it to complete
      while (((ADCSRA & (1<<ADSC)) != 0));
      //Scale the value
      int result = (((InternalReferenceVoltage * 1023L) / ADC) + 5L) / 10L;
      return result;
      }
    
    /**************************************************************************************/
    /* Allows to power ON peripherals.                                                    */
    /**************************************************************************************/
    void powerOnPeripherals()
      {
      //Power-up
      pinMode (POWER_PIN, OUTPUT);
      digitalWrite (POWER_PIN, HIGH);
      delay(1);
      }
    
    /**************************************************************************************/
    /* Allows to power OFF peripherals.                                                   */
    /**************************************************************************************/
    void powerOffPeripherals()
      {
      //Power off
      digitalWrite (HUMIDITY_SENSOR_DIGITAL_PIN, LOW);
      digitalWrite (POWER_PIN, LOW);
      pinMode (HUMIDITY_SENSOR_DIGITAL_PIN, INPUT);
      pinMode (POWER_PIN, INPUT);
      }
    

    Hope it helps !

    David.

    So the DHT22 works at 1MHz with 2 AAs and your code you´ve posted? No physical differnces?


  • So I think I've finally got everything up and running! This is what I'm getting at the serial monitor in the IDE:

    Serial started
    Voltage: 3359 mV
    send: 132-132-0-0 s=255,c=3,t=15,pt=2,l=2,sg=0,st=ok:0
    send: 132-132-0-0 s=255,c=0,t=17,pt=0,l=5,sg=0,st=ok:1.5.4
    send: 132-132-0-0 s=255,c=3,t=6,pt=1,l=1,sg=0,st=ok:0
    read: 0-0-132 s=255,c=3,t=15,pt=0,l=2,sg=0:
    sensor started, id=132, parent=0, distance=1
    send: 132-132-0-0 s=255,c=3,t=11,pt=0,l=15,sg=0,st=ok:EgTmpHumBat5min
    send: 132-132-0-0 s=255,c=3,t=12,pt=0,l=10,sg=0,st=ok:1.0 151106
    send: 132-132-0-0 s=0,c=0,t=6,pt=0,l=0,sg=0,st=ok:
    send: 132-132-0-0 s=1,c=0,t=7,pt=0,l=0,sg=0,st=ok:
    Node and 2 children presented.
    

    What I'm trying to figure out is where the temp and humidity reading are so I can get them into MQTT/OpenHab. Looking at the output, I can't see which one is the temp, humidity or battery level?


  • Hardware Contributor

    @rsachoc Is that all you get? Please also set sleep_time to 15000 for debug, if you haven't already done it.


  • @m26872 thanks, I've set that, no change even after more than 15seconds and debug set.

    Could it be the way I've connected the si7021? I've got it as follows:

    1. A4 to SDA
    2. A5 to SCL
    3. GND to GND
    4. VCC to 3.3v


  • Maybe I need to add that I'm running the 2.0 MQTT controller? Not sure if that makes a difference? GatewayW5100MQTTClient

    Just had a look what's going on on the controller side, this is what I see

    0;255;3;0;9;Starting gateway (RNNGA-, 2.0.0-beta)
    0;255;3;0;9;Radio init successful.
    0;255;3;0;9;Init complete, id=0, parent=0, distance=0
    0;255;3;0;9;Attempting MQTT connection...
    0;255;3;0;9;MQTT connected
    0;255;3;0;9;read: 132-132-0 s=255,c=3,t=15,pt=2,l=2,sg=0:0
    0;255;3;0;9;send: 0-0-132-132 s=255,c=3,t=15,pt=0,l=2,sg=0,st=ok:
    0;255;3;0;9;read: 132-132-0 s=255,c=0,t=17,pt=0,l=5,sg=0:1.5.4
    0;255;3;0;9;Sending message on topic: mygateway1-out/132/255/0/0/17
    0;255;3;0;9;read: 132-132-0 s=255,c=3,t=6,pt=1,l=1,sg=0:0
    0;255;3;0;9;Sending message on topic: mygateway1-out/132/255/3/0/6
    0;255;3;0;9;read: 132-132-0 s=255,c=3,t=11,pt=0,l=15,sg=0:EgTmpHumBat5min
    0;255;3;0;9;Sending message on topic: mygateway1-out/132/255/3/0/11
    0;255;3;0;9;read: 132-132-0 s=255,c=3,t=12,pt=0,l=10,sg=0:1.0 151106
    0;255;3;0;9;Sending message on topic: mygateway1-out/132/255/3/0/12
    0;255;3;0;9;read: 132-132-0 s=0,c=0,t=6,pt=0,l=0,sg=0:
    0;255;3;0;9;Sending message on topic: mygateway1-out/132/0/0/0/6
    0;255;3;0;9;read: 132-132-0 s=1,c=0,t=7,pt=0,l=0,sg=0:
    0;255;3;0;9;Sending message on topic: mygateway1-out/132/1/0/0/7

  • Hardware Contributor

    @rsachoc
    My initial guess would be that you get stuck at this line:

     si7021_env data = humiditySensor.getHumidityAndTemperature();
    

    Did you try your Si7021 on some plain arduino first? Just with some simple example code.


  • @m26872 thanks, yes, I guessed that something might be wrong with the sensor, I checked continuity between the board and the sensor and all seemed fine.

    To test on an Arduino, I've honestly very little clue how to do this. Could I utilise the breadboard and Arduino I used to flash the AtMega?


  • Hardware Contributor

    @rsachoc The "very little clue" is a good reason to play around and learn some. 😃
    You should not use a 5V Uno directly to sensor without voltage regulator and logic level converter. The Si7021 spec is 1.9-3.6V.
    If you don't have a Arduino Pro Mini 3.3V, I suppose your best option is the SlimNode you already got. Try it at least at 8MHz (use suitable fuse settings, bootloader and baud rate), of course external crystal if you have.


  • The most SI7021 coming from ebay are with voltage regulator and level shifter. I searched for a raw version and there are only very few... If you are not sure, post a link or a foto.


  • Hardware Contributor

    @rollercontainer Thanks! You're absolutely right. I feel rather stupid not thinking of this. 😞

    So @rsachoc, if you're have some GY-21 like boards still not yet modded like described in first post of this thread, then they should work excellent with your Uno.


  • Thanks both, I have the "pre-modded" si7021, so it's the one that should operate at between the 1.9 and 3.3v. I the Arduino I used to burn the Atmega is a knockoff, so it has both 3.3v and 5v. Let me do some research and see if I can test the si7021 using it.


  • Some pictures anyway!

    alt text

    alt text

    alt text

    alt text


  • Hardware Contributor

    @rsachoc Great with pictures! It looks like you haven't enabled the pull-up resistors by filling the solder jumpers in the middle of the board? Like this: https://cdn.sparkfun.com/assets/3/f/6/5/a/52855764757b7f06478b4567.jpg


  • @m26872 oh! I didn't realise I needed to do that, could that be the problem? Do I just need to fill with solder the bit just below where the DA and "-" is?


  • Hardware Contributor

    @rsachoc It's probably it. And yes, it's rigth there. Make sure all of the three small pads interconnect.


  • @m26872 thanks! No time tonight, but a job for testing tomorrow.


  • You could also use the 328 pullups! I had an unwilling Chinese light sensor (MAX44099) that drew a lot of power either with the VCC on or off. Since it's battery powered that is undesireable.

    I used digitalWrite(SDA, LOW); digitalWrite(SCL, LOW); to tie the bus to ground. When the sensor wakes up, it writes HIGH to those pins and the bus is back online. Used a 500ms wait after this to let the sensors stabilise.

    That sensor is now on a 6µA sleep current and a average 128µA over 2 hours measured with a 2 minute sleep cycle.


  • Tried it this evening, still no luck, let me see what I can get up to over the weekend.


  • Hardware Contributor

    @DavidZH True, internal pull-ups (20k?) should probably be enough for the normal i2c use (short wires, low speed, etc). But I wonder if pull-ups are consuming any significant power during passive state like sleeping sensor. Of course it's a good solution in case there're issues preventing the bus from beeing silent. Or worse, pulled down continuously.
    What was your current before the change?
    I think 500ms awake is a lot.


  • Hardware Contributor

    @rsachoc Crap. Maybe it's something else then.😞


  • I switch them off with a LOW write before the sensor goes to sleep and you're absolutely right about the wait time being very long. In this case I didn't mind because the sensor is powered by a solar panel.
    I can't really remember what the exact value but it was an order of magnitude... I also used the voltage divider way to measure voltage because the Moteino has a regulator on board, so that upped the sleep current a little (10M resistor to keep the current low).

    I went searching because the current went UP when I switched the power to the sensor off before sleep. Gammon.co.au is a very useful source, but I can't remember where I dug this hack up.
    I will be making other battery sensors for inside with a HTU21d and I will post more on those in a 'My Project' mega gallery including measurements. (And dig around in the HTU datasheet for the start up time....)


  • According to the datasheet the absolute maximum time to get ready is 80ms.


  • Thanx! Saves me a trip! 😁


  • Ok, so I messed up my previous sensor trying to solder the bridge (don't ask...) I have now (I think) soldered it and reconnected it, am now getting the following:

    Serial started
    Voltage: 3359 mV
    send: 132-132-0-0 s=255,c=3,t=15,pt=2,l=2,sg=0,st=fail:0
    send: 132-132-0-0 s=255,c=0,t=17,pt=0,l=5,sg=0,st=fail:1.5.4
    send: 132-132-0-0 s=255,c=3,t=6,pt=1,l=1,sg=0,st=fail:0
    sensor started, id=132, parent=0, distance=1
    send: 132-132-0-0 s=255,c=3,t=11,pt=0,l=15,sg=0,st=fail:EgTmpHumBat5min
    send: 132-132-0-0 s=255,c=3,t=12,pt=0,l=10,sg=0,st=fail:1.0 151106
    send: 132-132-0-0 s=0,c=0,t=6,pt=0,l=0,sg=0,st=fail:
    find parent
    send: 132-132-255-255 s=255,c=3,t=7,pt=0,l=0,sg=0,st=bc:
    send: 132-132-0-0 s=1,c=0,t=7,pt=0,l=0,sg=0,st=fail:
    Node and 2 children presented.
    

    I'm going to try get everything on a breadboard, but now I see fails, what's that all about?

    PS will upload some pics of the soldered bridge...


  • Hardware Contributor

    @rsachoc google "mysensors st fail"


  • Hardware Contributor

    I am currently trying to use that red 3.3v module too and it doesn't seem to work. I have the sketch from above running with the "normal" blue module where I remove the voltage converter so that it works at 3.3V without a problem.
    Then I switched to the red one (with these small 3 solderpads connected) and the scl/sda lines switched (the order is different form the blue one) but the program gets stuck at the same position as above (without the st=fail's though). So I assume that

    si7021_env data = humiditySensor.getHumidityAndTemperature();
    

    fails. Does anyone have one of these sensors up and running? Any ideas where the error is? Otherwise I guess I have to stick with the blue ones.


  • Hardware Contributor

    @LastSamurai
    The red ones are HTU21D and need another library (they are different from the SI7021).
    Use the Adafruit library for this module (look on their site for HTU21D).


  • @GertSanders hmmm I think I'm using that same one as @LastSamurai so I suspect that's the issue? It's the one linked in the first post

    I guess if that's the problem it should have been obvious to me, it even says HTU21D on mine! Silly me!


  • Hardware Contributor

    @rsachoc
    Either one of these libraries will work with the HTU21D modules.

    0_1463432234134_Screen Shot 2016-05-16 at 22.55.51.png

    Both modules do the same, but have different I2C adresses so you can actually use both at the same time (of you like to compare them), but you need different libraries to call each one.


  • Hardware Contributor

    @GertSanders Thanks, I don't know why I didn't realize that 😉
    I will try that out tomorrow.


  • @LastSamurai I'm having a go as well at updating the .ino file with the different library, but I'm not a coder so I'm "having a hack" - if you have any luck could you post your code?


  • Hardware Contributor

    @rsachoc Yes, I actually just tried it out and its working.
    Here is my code for now (just for testing):
    I basically just switched libraries

    /* Sketch with Si7021 and battery monitoring.
    by m26872, 20151109 
    Changed by LastSamurai
    15052016
    */
    #include <MySensor.h>  
    #include <Wire.h>
    #include <SPI.h>
    #include <SparkFunHTU21D.h>
    #include <RunningAverage.h>
    
    //#define DEBUG
    
    #ifdef DEBUG
    #define DEBUG_SERIAL(x) Serial.begin(x)
    #define DEBUG_PRINT(x) Serial.print(x)
    #define DEBUG_PRINTLN(x) Serial.println(x)
    #else
    #define DEBUG_SERIAL(x)
    #define DEBUG_PRINT(x) 
    #define DEBUG_PRINTLN(x) 
    #endif
    
    #define NODE_ID 100             // <<<<<<<<<<<<<<<<<<<<<<<<<<<   Enter Node_ID
    #define CHILD_ID_TEMP 0
    #define CHILD_ID_HUM 1
    // #define SLEEP_TIME 15000 // 15s for DEBUG
    #define SLEEP_TIME 300000   // 5 min
    #define FORCE_TRANSMIT_CYCLE 36  // 5min*12=1/hour, 5min*36=1/3hour 
    #define BATTERY_REPORT_CYCLE 2016   // Once per 5min   =>   12*24*7 = 2016 (one report/week)
    #define VMIN 1900
    #define VMAX 3300
    #define HUMI_TRANSMIT_THRESHOLD 3.0  // THRESHOLD tells how much the value should have changed since last time it was transmitted.
    #define TEMP_TRANSMIT_THRESHOLD 0.5
    #define AVERAGES 2
    
    int batteryReportCounter = BATTERY_REPORT_CYCLE - 1;  // to make it report the first time.
    int measureCount = 0;
    float lastTemperature = -100;
    int lastHumidity = -100;
    
    RunningAverage raHum(AVERAGES);
    HTU21D humiditySensor;
    
    MySensor gw;
    MyMessage msgTemp(CHILD_ID_TEMP,V_TEMP); // Initialize temperature message
    MyMessage msgHum(CHILD_ID_HUM,V_HUM);
    
    void setup() {
      DEBUG_SERIAL(9600);    // <<<<<<<<<<<<<<<<<<<<<<<<<< Note BAUD_RATE in MySensors.h
      DEBUG_PRINTLN("Serial started");
      
      DEBUG_PRINT("Voltage: ");
      DEBUG_PRINT(readVcc()); 
      DEBUG_PRINTLN(" mV");
    
      delay(500);
      DEBUG_PRINT("Internal temp: ");
      DEBUG_PRINT(GetInternalTemp()); // Probably not calibrated. Just to print something.
      DEBUG_PRINTLN(" *C");
    
      delay(500); // Allow time for radio if power useed as reset
      gw.begin(NULL, NODE_ID);
      gw.sendSketchInfo("TempHumTest2", "1.0 17052016"); 
      gw.present(CHILD_ID_TEMP, S_TEMP);   // Present sensor to controller
      gw.present(CHILD_ID_HUM, S_HUM);
      DEBUG_PRINT("Node and "); DEBUG_PRINTLN("2 children presented.");
      
      raHum.clear();
      humiditySensor.begin();  
    }
    
    void loop() { 
    
      measureCount ++;
      batteryReportCounter ++;
      bool forceTransmit = false;
      
      if (measureCount > FORCE_TRANSMIT_CYCLE) {
        forceTransmit = true; 
      }
      sendTempHumidityMeasurements(forceTransmit);
    /*
      // Read and print internal temp
      float temperature0 = static_cast<float>(static_cast<int>((GetInternalTemp()+0.5) * 10.)) / 10.;
      DEBUG_PRINT("Internal Temp: "); DEBUG_PRINT(temperature0); DEBUG_PRINTLN(" *C");        
    */
      // Check battery
      if (batteryReportCounter >= BATTERY_REPORT_CYCLE) {
        long batteryVolt = readVcc();
        DEBUG_PRINT("Battery voltage: "); DEBUG_PRINT(batteryVolt); DEBUG_PRINTLN(" mV");
        uint8_t batteryPcnt = constrain(map(batteryVolt,VMIN,VMAX,0,100),0,255);   
        DEBUG_PRINT("Battery percent: "); DEBUG_PRINT(batteryPcnt); DEBUG_PRINTLN(" %");
        gw.sendBatteryLevel(batteryPcnt);
        batteryReportCounter = 0;
      }
      
      gw.sleep(SLEEP_TIME);
    }
    
    // function for reading Vcc by reading 1.1V reference against AVcc. Based from http://provideyourown.com/2012/secret-arduino-voltmeter-measure-battery-voltage/
    // To calibrate reading replace 1125300L with scale_constant = internal1.1Ref * 1023 * 1000, where internal1.1Ref = 1.1 * Vcc1 (per voltmeter) / Vcc2 (per readVcc() function) 
    long readVcc() {
      // set the reference to Vcc and the measurement to the internal 1.1V reference
      ADMUX = _BV(REFS0) | _BV(MUX3) | _BV(MUX2) | _BV(MUX1);
      delay(2); // Wait for Vref to settle
      ADCSRA |= _BV(ADSC); // Start conversion
      while (bit_is_set(ADCSRA,ADSC)); // measuring
      uint8_t low  = ADCL; // must read ADCL first - it then locks ADCH  
      uint8_t high = ADCH; // unlocks both
      long result = (high<<8) | low;
      result = 1125300L / result; // Calculate Vcc (in mV); 1125300 = 1.1*1023*1000
      return result; // Vcc in millivolts
    }
    // function for reading internal temp. From http://playground.arduino.cc/Main/InternalTemperatureSensor 
    double GetInternalTemp(void) {  // (Both double and float are 4 byte in most arduino implementation)
      unsigned int wADC;
      double t;
      // The internal temperature has to be used with the internal reference of 1.1V. Channel 8 can not be selected with the analogRead function yet.
      ADMUX = (_BV(REFS1) | _BV(REFS0) | _BV(MUX3));   // Set the internal reference and mux.
      ADCSRA |= _BV(ADEN);  // enable the ADC
      delay(20);            // wait for voltages to become stable.
      ADCSRA |= _BV(ADSC);  // Start the ADC
      while (bit_is_set(ADCSRA,ADSC));   // Detect end-of-conversion
      wADC = ADCW;   // Reading register "ADCW" takes care of how to read ADCL and ADCH.
      t = (wADC - 88.0 ) / 1.0;   // The default offset is 324.31.
      return (t);   // The returned temperature in degrees Celcius.
    }
    
    /*********************************************
     * * Sends temperature and humidity from Si7021 sensor
     * Parameters
     * - force : Forces transmission of a value (even if it's the same as previous measurement)
     *********************************************/
    void sendTempHumidityMeasurements(bool force) {
      bool tx = force;
      
      float temperature = humiditySensor.readTemperature();
      DEBUG_PRINT("T: ");DEBUG_PRINTLN(temperature);
    
      float diffTemp = abs(lastTemperature - temperature);
      DEBUG_PRINT(F("TempDiff :"));DEBUG_PRINTLN(diffTemp);
    
      if (diffTemp > TEMP_TRANSMIT_THRESHOLD || tx) {
        gw.send(msgTemp.set(temperature,1));
        lastTemperature = temperature;
        measureCount = 0;
        DEBUG_PRINTLN("T sent!");
      }
      
      int humidity = humiditySensor.readHumidity();
      DEBUG_PRINT("H: ");DEBUG_PRINTLN(humidity);
    
      raHum.addValue(humidity);
      humidity = raHum.getAverage();  // MA sample imply reasonable fast sample frequency
      float diffHum = abs(lastHumidity - humidity);
      DEBUG_PRINT(F("HumDiff  :"));DEBUG_PRINTLN(diffHum); 
    
      if (diffHum > HUMI_TRANSMIT_THRESHOLD || tx) {
        gw.send(msgHum.set(humidity));
        lastHumidity = humidity;
        measureCount = 0;
        DEBUG_PRINTLN("H sent!");
      }
    
    }


  • @LastSamurai thanks, progress, I'm getting this now, which means it's working! Finally, a working node from a complete rookie like me!

    Serial started
    Voltage: 3389 mV
    Internal temp: 266.00 *C
    send: 100-100-0-0 s=255,c=3,t=15,pt=2,l=2,sg=0,st=ok:0
    send: 100-100-0-0 s=255,c=0,t=17,pt=0,l=5,sg=0,st=ok:1.5.4
    send: 100-100-0-0 s=255,c=3,t=6,pt=1,l=1,sg=0,st=ok:0
    read: 0-0-100 s=255,c=3,t=15,pt=0,l=2,sg=0:
    sensor started, id=100, parent=0, distance=1
    send: 100-100-0-0 s=255,c=3,t=11,pt=0,l=12,sg=0,st=fail:TempHumTest2
    send: 100-100-0-0 s=255,c=3,t=12,pt=0,l=12,sg=0,st=fail:1.0 17052016
    send: 100-100-0-0 s=0,c=0,t=6,pt=0,l=0,sg=0,st=fail:
    send: 100-100-0-0 s=1,c=0,t=7,pt=0,l=0,sg=0,st=fail:
    Node and 2 children presented.
    T: 998.00
    TempDiff :1098.00
    send: 100-100-0-0 s=0,c=1,t=0,pt=7,l=5,sg=0,st=fail:998.0
    T sent!
    H: 118
    HumDiff  :218.00
    send: 100-100-0-0 s=1,c=1,t=1,pt=2,l=2,sg=0,st=ok:118
    H sent!
    Battery voltage: 3359 mV
    Battery percent: 104 %
    send: 100-100-0-0 s=255,c=3,t=0,pt=1,l=1,sg=0,st=ok:104
    

    I think that the readings are not accurate though, not sure why, but I'll have a go at figuring our why anyway!


  • Hardware Contributor

    @rsachoc
    Congrats !!!


  • Hardware Contributor

    @GertSanders Thx a lot for your help! I had no clue about the HTU21D lib.


  • This post is deleted!


  • so with the correct library there is no need to solder those 3 spots together!?


  • Hardware Contributor

    @siod
    The "spots" are there to connect the pullup resistors to the SDA and SCL lines. This is always needed, regardless of the library of the board onto which you connect the sensor board does not provide pullup resistors itself. On a minimal board like the one in this thread, this is not the case, so the pull up resistors are needed.


  • ok, thanks for making it clear for me Gert!!

    update:

    finally found time to build my sensor and it seems to work fine, will do more testing but for now my results are:

    7.5 uA when sleeping, 15,3 mA when working (every 15 minutes for about 2seconds, but I think my cheap multimeter gives bad readings on those spikes, I guess it´s only around 1 mA)

    seems to be okay, isn´t it?

    edit:

    I have 2 reed switches attached. I recognized that I have +0,10 mA for each reed switch when activated. So when reed switches are both touching their counterpart I have a sleeping consumption of 0,20 mA. Why is that??


  • Hello,

    I'm trying to convert existing Si7021 sensor code from 1.5 to 2.0.0 library. I change the code and then I was getting an error which said:

    Si7021_sensor_MySensors_2.0.0:158: error: 'si7021_env' has no member named 'humidityPercent'
       int humidity = data.humidityPercent;
                           ^
    exit status 1
    'si7021_env' has no member named 'humidityPercent'
    

    Then I chech the Si7021 library, and how I saw there wasn't member 'humidityPercent', but there was a member 'humidityBasisPoints'.

    So I change line from:

      int humidity = data.humidityPercent;
    

    ...to:

      int humidity = data.humidityBasisPoints;
    

    Then code compiles and I upload it to Slim Node Si7021. I leave sensor and today I checked it log on Domoticz. I have this:
    0_1471539568477_chart.jpeg

    Temperature looks ok, but Humidity value jumping a lot, thats why I don't want to believe it is true.

    Could someone, who has a 2.0.0 library and Si7021 sensor chech is it same situation? Becose I have only one Si7021 sensor.
    Maybe someone could look also on the code and say if I convert it right?

    Converted code:

    /* Sketch with Si7021 and battery monitoring.
    by m26872, 20151109 
    */
    
    #define MY_DEBUG
    #define MY_RADIO_NRF24
    #define MY_NODE_ID 5             // <<<<<<<<<<<<<<<<<<<<<<<<<<<   Enter Node_ID
    #define MY_BAUD_RATE 115200
    
    #include <MySensors.h>  
    #include <Wire.h>
    #include <SI7021.h>
    #include <SPI.h>
    #include <RunningAverage.h>
    
    //#define DEBUG
    
    #ifdef DEBUG
    #define DEBUG_SERIAL(x) Serial.begin(x)
    #define DEBUG_PRINT(x) Serial.print(x)
    #define DEBUG_PRINTLN(x) Serial.println(x)
    #else
    #define DEBUG_SERIAL(x)
    #define DEBUG_PRINT(x) 
    #define DEBUG_PRINTLN(x) 
    #endif
    
    #define CHILD_ID_TEMP 0
    #define CHILD_ID_HUM 1
    // #define SLEEP_TIME 15000 // 15s for DEBUG
    #define SLEEP_TIME 300000   // 5 min
    #define FORCE_TRANSMIT_CYCLE 36  // 5min*12=1/hour, 5min*36=1/3hour 
    #define BATTERY_REPORT_CYCLE 2880   // Once per 5min   =>   12*24*7 = 2016 (one report/week)
    #define VMIN 1900
    #define VMAX 3300
    #define HUMI_TRANSMIT_THRESHOLD 3.0  // THRESHOLD tells how much the value should have changed since last time it was transmitted.
    #define TEMP_TRANSMIT_THRESHOLD 0.5
    #define AVERAGES 2
    
    int batteryReportCounter = BATTERY_REPORT_CYCLE - 1;  // to make it report the first time.
    int measureCount = 0;
    float lastTemperature = -100;
    int lastHumidity = -100;
    
    RunningAverage raHum(AVERAGES);
    SI7021 humiditySensor;
    
    MyMessage msgTemp(CHILD_ID_TEMP,V_TEMP); // Initialize temperature message
    MyMessage msgHum(CHILD_ID_HUM,V_HUM);
    
    
    void presentation()  
    { 
      sendSketchInfo("EgTmpHumBat5min", "1.0 151106");
      present(CHILD_ID_TEMP, S_TEMP);   // Present sensor to controller
      present(CHILD_ID_HUM, S_HUM);
    }
    
    
    void setup() {
      DEBUG_SERIAL(115200);    // <<<<<<<<<<<<<<<<<<<<<<<<<< Note BAUD_RATE in MySensors.h
      DEBUG_PRINTLN("Serial started");
      
      DEBUG_PRINT("Voltage: ");
      DEBUG_PRINT(readVcc()); 
      DEBUG_PRINTLN(" mV");
    /*
      delay(500);
      DEBUG_PRINT("Internal temp: ");
      DEBUG_PRINT(GetInternalTemp()); // Probably not calibrated. Just to print something.
      DEBUG_PRINTLN(" *C");
    */  
      delay(500); // Allow time for radio if power useed as reset
      DEBUG_PRINT("Node and "); DEBUG_PRINTLN("2 children presented.");
      
      raHum.clear();
      
    }
    
    void loop() { 
    
      measureCount ++;
      batteryReportCounter ++;
      bool forceTransmit = false;
      
      if (measureCount > FORCE_TRANSMIT_CYCLE) {
        forceTransmit = true; 
      }
      sendTempHumidityMeasurements(forceTransmit);
    /*
      // Read and print internal temp
      float temperature0 = static_cast<float>(static_cast<int>((GetInternalTemp()+0.5) * 10.)) / 10.;
      DEBUG_PRINT("Internal Temp: "); DEBUG_PRINT(temperature0); DEBUG_PRINTLN(" *C");        
    */
      // Check battery
      if (batteryReportCounter >= BATTERY_REPORT_CYCLE) {
        long batteryVolt = readVcc();
        DEBUG_PRINT("Battery voltage: "); DEBUG_PRINT(batteryVolt); DEBUG_PRINTLN(" mV");
        uint8_t batteryPcnt = constrain(map(batteryVolt,VMIN,VMAX,0,100),0,255);   
        DEBUG_PRINT("Battery percent: "); DEBUG_PRINT(batteryPcnt); DEBUG_PRINTLN(" %");
        sendBatteryLevel(batteryPcnt);
        batteryReportCounter = 0;
      }
      
      sleep(SLEEP_TIME);
    }
    
    // function for reading Vcc by reading 1.1V reference against AVcc. Based from http://provideyourown.com/2012/secret-arduino-voltmeter-measure-battery-voltage/
    // To calibrate reading replace 1125300L with scale_constant = internal1.1Ref * 1023 * 1000, where internal1.1Ref = 1.1 * Vcc1 (per voltmeter) / Vcc2 (per readVcc() function) 
    long readVcc() {
      // set the reference to Vcc and the measurement to the internal 1.1V reference
      ADMUX = _BV(REFS0) | _BV(MUX3) | _BV(MUX2) | _BV(MUX1);
      delay(2); // Wait for Vref to settle
      ADCSRA |= _BV(ADSC); // Start conversion
      while (bit_is_set(ADCSRA,ADSC)); // measuring
      uint8_t low  = ADCL; // must read ADCL first - it then locks ADCH  
      uint8_t high = ADCH; // unlocks both
      long result = (high<<8) | low;
      result = 1125300L / result; // Calculate Vcc (in mV); 1125300 = 1.1*1023*1000
      return result; // Vcc in millivolts
    }
    // function for reading internal temp. From http://playground.arduino.cc/Main/InternalTemperatureSensor 
    double GetInternalTemp(void) {  // (Both double and float are 4 byte in most arduino implementation)
      unsigned int wADC;
      double t;
      // The internal temperature has to be used with the internal reference of 1.1V. Channel 8 can not be selected with the analogRead function yet.
      ADMUX = (_BV(REFS1) | _BV(REFS0) | _BV(MUX3));   // Set the internal reference and mux.
      ADCSRA |= _BV(ADEN);  // enable the ADC
      delay(20);            // wait for voltages to become stable.
      ADCSRA |= _BV(ADSC);  // Start the ADC
      while (bit_is_set(ADCSRA,ADSC));   // Detect end-of-conversion
      wADC = ADCW;   // Reading register "ADCW" takes care of how to read ADCL and ADCH.
      t = (wADC - 88.0 ) / 1.0;   // The default offset is 324.31.
      return (t);   // The returned temperature in degrees Celcius.
    }
    
    /*********************************************
     * * Sends temperature and humidity from Si7021 sensor
     * Parameters
     * - force : Forces transmission of a value (even if it's the same as previous measurement)
     *********************************************/
    void sendTempHumidityMeasurements(bool force) {
      bool tx = force;
    
      si7021_env data = humiditySensor.getHumidityAndTemperature();
      
      float temperature = data.celsiusHundredths / 100.0;
      DEBUG_PRINT("T: ");DEBUG_PRINTLN(temperature);
      float diffTemp = abs(lastTemperature - temperature);
      DEBUG_PRINT(F("TempDiff :"));DEBUG_PRINTLN(diffTemp);
      if (diffTemp > TEMP_TRANSMIT_THRESHOLD || tx) {
        send(msgTemp.set(temperature,1));
        lastTemperature = temperature;
        measureCount = 0;
        DEBUG_PRINTLN("T sent!");
      }
      
      int humidity = data.humidityPercent;
      DEBUG_PRINT("H: ");DEBUG_PRINTLN(humidity);
      raHum.addValue(humidity);
      humidity = raHum.getAverage();  // MA sample imply reasonable fast sample frequency
      float diffHum = abs(lastHumidity - humidity);  
      DEBUG_PRINT(F("HumDiff  :"));DEBUG_PRINTLN(diffHum); 
      if (diffHum > HUMI_TRANSMIT_THRESHOLD || tx) {
        send(msgHum.set(humidity));
        lastHumidity = humidity;
        measureCount = 0;
        DEBUG_PRINTLN("H sent!");
      }
    
    }
    

    Thank You!


  • Hero Member

    @jacikaas where did you get the si7021 library? Take a look at the sensebender sketch for a good reference.


  • @AWI
    I download Si7021 library from here: https://github.com/LowPowerLab/SI7021

    I was heard about Sensbender node, but never look deeper what is in it. I will look at it and try to understand whats in there. I just learning about all that stuff, so it will be good practice 😊


Log in to reply
 

Suggested Topics

  • 8
  • 44
  • 29
  • 90
  • 2
  • 2

24
Online

11.2k
Users

11.1k
Topics

112.5k
Posts