💬 Various bootloader files based on Optiboot 6.2
-
@Samuel235
Resolved
I have try with sketc j gammon https://www.gammon.com.au/forum/?id=11497
And the problem are pir input (model hrc-501)
Are ever high and the cpu dont go in sleep.
I have remove pir and all ok the atmega run 20 uah very good.
Can you advise a good pir wich run to 3,3 V for my project?
Tanks@mar.conte
im not sure why pir with simple test like this http://playground.arduino.cc/Code/PIRsense is ok
but with my sketch the cpu reset forever#include <Arduino.h> // assumes Arduino IDE v1.0 or greater #include <avr/sleep.h> #include <avr/wdt.h> #include <avr/power.h> #include <avr/io.h> ISR (PCINT2_vect) { // handle pin change interrupt for D0 to D7 here } // end of PCINT2_vect const unsigned long WAIT_TIME = 4000; const byte LED =8 ; const byte LED2 =9 ; int wakepin =3 ; unsigned long lastSleep; volatile boolean motionDetected=false; float batteryVolts = 5; char BATstr[10]; //longest battery voltage reading message = 9chars char sendBuf[32]; byte sendLen; void checkBattery(void); #include <RFM69.h> //get it here: https://www.github.com/lowpowerlab/rfm69 #include <SPI.h> //********************************************************************************************* // *********** IMPORTANT SETTINGS - YOU MUST CHANGE/ONFIGURE TO FIT YOUR HARDWARE ************* //********************************************************************************************* #define NETWORKID 100 // The same on all nodes that talk to each other #define NODEID 2 // The unique identifier of this node #define RECEIVER 1 // The recipient of packets //Match frequency to the hardware version of the radio on your Feather //#define FREQUENCY RF69_433MHZ //#define FREQUENCY RF69_868MHZ #define FREQUENCY RF69_868MHZ #define ENCRYPTKEY "sampleEncryptKey" //exactly the same 16 characters/bytes on all nodes! #define IS_RFM69HW true // set to 'true' if you are using an RFM69HCW module //********************************************************************************************* #define SERIAL_BAUD 115200 #define RFM69_CS 10 #define RFM69_IRQ 2 #define RFM69_IRQN 0 // Pin 2 is IRQ 0! #define RFM69_RST 9 int16_t packetnum = 0; // packet counter, we increment per xmission RFM69 radio = RFM69(RFM69_CS, RFM69_IRQ, IS_RFM69HW, RFM69_IRQN); void setup () { pinMode (wakepin,INPUT); pinMode(LED, OUTPUT); pinMode(LED2, OUTPUT); digitalWrite(wakepin,HIGH); char buff[50]; Serial.begin(SERIAL_BAUD); Serial.println("Arduino RFM69HCW Transmitter"); // Hard Reset the RFM module pinMode(RFM69_RST, OUTPUT); digitalWrite(RFM69_RST, HIGH); delay(100); digitalWrite(RFM69_RST, LOW); delay(100); // Initialize radio radio.initialize(FREQUENCY,NODEID,NETWORKID); if (IS_RFM69HW) { radio.setHighPower(); // Only for RFM69HCW & HW! } radio.setPowerLevel(31); // power output ranges from 0 (5dBm) to 31 (20dBm) radio.encrypt(ENCRYPTKEY); pinMode(LED, OUTPUT); Serial.print("\nTransmitting at "); Serial.print(FREQUENCY==RF69_433MHZ ? 433 : FREQUENCY==RF69_868MHZ ? 868 : 915); Serial.println(" MHz"); } uint16_t batteryReportCycles=0; void loop () { //rf(); sleepNow(); rf(); //radio.sleep(); // sleep function called here radio.sleep(); } void wake () { // cancel sleep as a precaution //sleep_disable(); // precautionary while we do other stuff detachInterrupt (1); } // end of wake void sleepNow() { if (millis () - lastSleep >= WAIT_TIME) { lastSleep = millis (); byte old_ADCSRA = ADCSRA; // disable ADC ADCSRA = 0; // pin change interrupt (example for D0) PCMSK2 |= bit (PCINT16); // want pin 0 PCIFR |= bit (PCIF2); // clear any outstanding interrupts PCICR |= bit (PCIE2); // enable pin change interrupts for D0 to D7 set_sleep_mode (SLEEP_MODE_PWR_DOWN); power_adc_disable(); power_spi_disable(); power_timer0_disable(); power_timer1_disable(); power_timer2_disable(); power_twi_disable(); //PORTB = 0x00; UCSR0B &= ~bit (RXEN0); // disable receiver UCSR0B &= ~bit (TXEN0); // disable transmitter sleep_enable(); noInterrupts (); attachInterrupt (1, wake,HIGH); digitalWrite (LED, LOW); interrupts (); sleep_cpu (); digitalWrite (LED, HIGH); sleep_disable(); power_all_enable(); ADCSRA = old_ADCSRA; PCICR &= ~bit (PCIE2); // disable pin change interrupts for D0 to D7 UCSR0B |= bit (RXEN0); // enable receiver UCSR0B |= bit (TXEN0); // enable transmitter } // end of time to sleep } void rf() { char radiopacket[20] = "Hello World #"; itoa(packetnum++, radiopacket+13, 10); Serial.print("Sending "); Serial.println(radiopacket); if (!radio.sendWithRetry(RECEIVER, radiopacket, strlen(radiopacket))) { //target node Id, message as string or byte array, message length Serial.println("OK"); } radio.receiveDone(); //put radio in RX mode Serial.flush(); //make sure all serial data is clocked out before sleeping the MCU } -
Firstly, i can't read the structure the way you have posted your sketch. You should use the code function in the reply, the icon looks like "</>" above where you make your reply. Put your code in there for us to have any chance of reading it at all.
Secondly, I don't think that this is the place to be posting this issue. For a start, this isn't an issue relevant to the bootloader in this thread and secondly, it doesn't even have anything to do with MySensors.
-
@alexsh1
I have only voltmeter extec, can i mesure ua?
Can you send simple sketch for deep sleep ?@mar.conte yes, you can measure consumption (should be in uA) while sleeping with a good voltmeter.
However, I really fail to understand what has Nick's sketch you mentioned to do with MySensors? I suppose some people here may be aware of sleeping issues, but again your problem has nothing to do with MySensors.
Please see the following - it may help you troubleshoot your issue
https://www.mysensors.org/build/battery -
Firstly, i can't read the structure the way you have posted your sketch. You should use the code function in the reply, the icon looks like "</>" above where you make your reply. Put your code in there for us to have any chance of reading it at all.
Secondly, I don't think that this is the place to be posting this issue. For a start, this isn't an issue relevant to the bootloader in this thread and secondly, it doesn't even have anything to do with MySensors.
@Samuel235
I wanted to build my projects with mysensors, first of all I started with bootloader found in this section to try them with examples that I know because I do not know yet mysensors, I wanted to learn it so I took the liberty to insert code in your section. if you can figure out my problem thank you or I apologize for the trouble thanks -
I get why you done it, but i don't understand why. You don't need to 'know' mysensors.... There is a getting started page, i suggest you take a few hours and read through everything. I'm not helping with an issue that is completely not related to mysensors while on the mysensors forum. Just simply for future readers of this thread that come here to solve their issue, if this thread is bloated out with over 10/20 replies that is not related to the question at hand its much harder for them to find their resolution here. I suggest contacting the author of the code himself as i'm pretty sure that your issue is not the bootloader.
MySensors 2.1.1
Controller - OpenHAB (Virtual Machine)
Gateway - Arduino Mega MQTT Gateway W5100 -
I get why you done it, but i don't understand why. You don't need to 'know' mysensors.... There is a getting started page, i suggest you take a few hours and read through everything. I'm not helping with an issue that is completely not related to mysensors while on the mysensors forum. Just simply for future readers of this thread that come here to solve their issue, if this thread is bloated out with over 10/20 replies that is not related to the question at hand its much harder for them to find their resolution here. I suggest contacting the author of the code himself as i'm pretty sure that your issue is not the bootloader.
Thanks anyway, this section introduced me to some very interesting bootloader, at least with these bootloader I can get a few microamperes for my projects, I will take note of your good day and thank you tips
-
Hi guys,
I am getting an errror when trying to burn the bootloader, any idea what´s wrong? Im using Arduino IDE 1.6.10 and these settings:
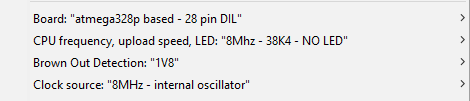
and that´s the error:
avrdude: Version 6.3, compiled on Jun 22 2016 at 16:05:21
         Copyright (c) 2000-2005 Brian Dean, http://www.bdmicro.com/
         Copyright (c) 2007-2014 Joerg Wunsch

         System wide configuration file is "T:\Programme\Arduino 1.6.10\hardware\tools\avr/etc/avrdude.conf"

         Using Port                    : COM10
         Using Programmer              : stk500v1
         Overriding Baud Rate          : 19200
         AVR Part                      : ATmega328P
         Chip Erase delay              : 9000 us
         PAGEL                         : PD7
         BS2                           : PC2
         RESET disposition             : dedicated
         RETRY pulse                   : SCK
         serial program mode           : yes
         parallel program mode         : yes
         Timeout                       : 200
         StabDelay                     : 100
         CmdexeDelay                   : 25
         SyncLoops                     : 32
         ByteDelay                     : 0
         PollIndex                     : 3
         PollValue                     : 0x53
         Memory Detail                 :

                                  Block Poll               Page                       Polled
           Memory Type Mode Delay Size  Indx Paged  Size   Size #Pages MinW  MaxW   ReadBack
           ----------- ---- ----- ----- ---- ------ ------ ---- ------ ----- ----- ---------
           eeprom        65    20     4    0 no       1024    4      0  3600  3600 0xff 0xff
           flash         65     6   128    0 yes     32768  128    256  4500  4500 0xff 0xff
           lfuse          0     0     0    0 no          1    0      0  4500  4500 0x00 0x00
           hfuse          0     0     0    0 no          1    0      0  4500  4500 0x00 0x00
           efuse          0     0     0    0 no          1    0      0  4500  4500 0x00 0x00
           lock           0     0     0    0 no          1    0      0  4500  4500 0x00 0x00
           calibration    0     0     0    0 no          1    0      0     0     0 0x00 0x00
           signature      0     0     0    0 no          3    0      0     0     0 0x00 0x00

         Programmer Type : STK500
         Description     : Atmel STK500 Version 1.x firmware
         Hardware Version: 2
         Firmware Version: 1.18
         Topcard         : Unknown
         Vtarget         : 0.0 V
         Varef           : 0.0 V
         Oscillator      : Off
         SCK period      : 0.1 us

avrdude: AVR device initialized and ready to accept instructions

Reading | ################################################## | 100% 0.06s

avrdude: Device signature = 0x1e950f (probably m328p)
avrdude: erasing chip
avrdude: reading input file "0x3F"
avrdude: writing lock (1 bytes):

Writing | ################################################## | 100% 0.03s

avrdude: 1 bytes of lock written
avrdude: verifying lock memory against 0x3F:
avrdude: load data lock data from input file 0x3F:
avrdude: input file 0x3F contains 1 bytes
avrdude: reading on-chip lock data:

Reading | ################################################## | 100% 0.02s

avrdude: verifying ...
avrdude: 1 bytes of lock verified
avrdude: reading input file "0x06"
avrdude: writing efuse (1 bytes):

Writing |  ***failed;
################################################## | 100% 0.16s

avrdude: 1 bytes of efuse written
avrdude: verifying efuse memory against 0x06:
avrdude: load data efuse data from input file 0x06:
avrdude: input file 0x06 contains 1 bytes
avrdude: reading on-chip efuse data:

Fehler beim Brennen des Bootloaders.
Reading | ################################################## | 100% 0.02s

avrdude: verifying ...
avrdude: verification error, first mismatch at byte 0x0000
         0xfe != 0x06
avrdude: verification error; content mismatch

avrdude done.  Thank you.
still learning...
-
Hi guys,
I am getting an errror when trying to burn the bootloader, any idea what´s wrong? Im using Arduino IDE 1.6.10 and these settings:
and that´s the error:
avrdude: Version 6.3, compiled on Jun 22 2016 at 16:05:21 Copyright (c) 2000-2005 Brian Dean, http://www.bdmicro.com/ Copyright (c) 2007-2014 Joerg Wunsch System wide configuration file is "T:\Programme\Arduino 1.6.10\hardware\tools\avr/etc/avrdude.conf" Using Port : COM10 Using Programmer : stk500v1 Overriding Baud Rate : 19200 AVR Part : ATmega328P Chip Erase delay : 9000 us PAGEL : PD7 BS2 : PC2 RESET disposition : dedicated RETRY pulse : SCK serial program mode : yes parallel program mode : yes Timeout : 200 StabDelay : 100 CmdexeDelay : 25 SyncLoops : 32 ByteDelay : 0 PollIndex : 3 PollValue : 0x53 Memory Detail : Block Poll Page Polled Memory Type Mode Delay Size Indx Paged Size Size #Pages MinW MaxW ReadBack ----------- ---- ----- ----- ---- ------ ------ ---- ------ ----- ----- --------- eeprom 65 20 4 0 no 1024 4 0 3600 3600 0xff 0xff flash 65 6 128 0 yes 32768 128 256 4500 4500 0xff 0xff lfuse 0 0 0 0 no 1 0 0 4500 4500 0x00 0x00 hfuse 0 0 0 0 no 1 0 0 4500 4500 0x00 0x00 efuse 0 0 0 0 no 1 0 0 4500 4500 0x00 0x00 lock 0 0 0 0 no 1 0 0 4500 4500 0x00 0x00 calibration 0 0 0 0 no 1 0 0 0 0 0x00 0x00 signature 0 0 0 0 no 3 0 0 0 0 0x00 0x00 Programmer Type : STK500 Description : Atmel STK500 Version 1.x firmware Hardware Version: 2 Firmware Version: 1.18 Topcard : Unknown Vtarget : 0.0 V Varef : 0.0 V Oscillator : Off SCK period : 0.1 us avrdude: AVR device initialized and ready to accept instructions Reading | ################################################## | 100% 0.06s avrdude: Device signature = 0x1e950f (probably m328p) avrdude: erasing chip avrdude: reading input file "0x3F" avrdude: writing lock (1 bytes): Writing | ################################################## | 100% 0.03s avrdude: 1 bytes of lock written avrdude: verifying lock memory against 0x3F: avrdude: load data lock data from input file 0x3F: avrdude: input file 0x3F contains 1 bytes avrdude: reading on-chip lock data: Reading | ################################################## | 100% 0.02s avrdude: verifying ... avrdude: 1 bytes of lock verified avrdude: reading input file "0x06" avrdude: writing efuse (1 bytes): Writing | ***failed; ################################################## | 100% 0.16s avrdude: 1 bytes of efuse written avrdude: verifying efuse memory against 0x06: avrdude: load data efuse data from input file 0x06: avrdude: input file 0x06 contains 1 bytes avrdude: reading on-chip efuse data: Fehler beim Brennen des Bootloaders. Reading | ################################################## | 100% 0.02s avrdude: verifying ... avrdude: verification error, first mismatch at byte 0x0000 0xfe != 0x06 avrdude: verification error; content mismatch avrdude done. Thank you.@siod what board are you using? Windows or Mac?
I would suggest update Arduino IDE - you are running an old versionMany people experience similar issues when using a wrong version of IDE:
-
I have been using version 1.8.x (at 1.8.2 now) for quite a while now, so no experience with 1.6.10
Best is indeed to update the IDE, as this will also bring new versions of GCC (the compiler) and I thought also of AVRDUDE (transfertool). Not sure about that last bit though.
Gert
-
Hi guys,
thx for your quick reply. I could upload the bootloader using ver 1.6.5 of the Arduino IDE. After that I realized ther is already a 1.8.2 version released which is closing the gaps between arduino.cc and arduino.org.
I havent tested this version now, but I guess it was just an IDE error, so everything´s fine now... -
I have copy the file over the existing files and then I get this error with burning:
java.io.IOException: Cannot run program "{runtime.tools.avrdude.path}/bin/avrdude": CreateProcess error=2, The system cannot find the file specified
I am using Arduino IDE 1.8.2
-
I'm probably a rare case but I successfully burn the bootloader (atmel 328p stand alone with slimeNode board) using atmel studio7 with an AVRMK2ISP, flash the mySensors code using arduino IDE and the "nodeManager" libraries succesfully too and everythings appear properly in my HomeAssistant, very nice, I've just give a paypal tips ;o)
But I have no idea why I use this bootloader ??? If I used a nano, I wont change the bootloader ? Is there something better ? It could look stupid but their is no real explain about WHY I must change my bootloader on this page...
-
Found these bootloaders and using the 1MHz for some low power experiments. I did get this error message when burning the bootloader (using USBASP programmer) :
"avrdude: WARNING: invalid value for unused bits in fuse "efuse", should be set to 1 according to datasheet
This behaviour is deprecated and will result in an error in future version
You probably want to use 0xfd instead of 0x05 (double check with your datasheet first)."
The bootloader woas succesfully burned so the message was informational. I did look into this and made the following changes in boards.txt :
I changed all the lines containing "......bootloader.extended_fuses="
There are multiples sections in the file that have these lines.old value -> new value
0x04 0xFC
0x05 0xFD
0x06 0xFE
0x07 0xFFI used this site link text
for calculating the new values for the extended fuse.
Now the error message is gone. Maybe this is of any help when using these bootloaders. -
I can probably package this in a directory structure you could add to the Hardware folder in the Arduino files, but I do not have the time for it right now. I know that has been done for the original Optiboot 6.2 files already (including a pinout file for the various processor variants):
https://github.com/Optiboot/optibootFor the moment I have added my boards.txt file as I use it in my Arduino IDE (common), it shows some fuse settings, but you are right: a document describing the fuse settings to use, and their effect on a bootloader would be a nice reference for many people.
This post is deleted!