Reflow Oven
-
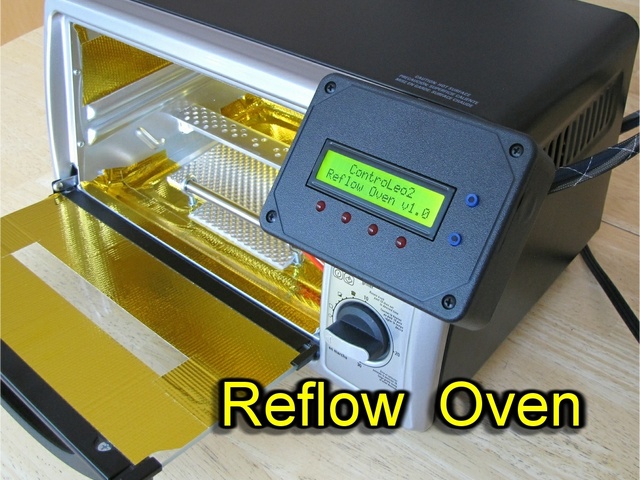
With all these SMT boards being offered, I decided to build a Reflow Oven, and in my research I ran across the ControLeo on Ebay, Contacted the designer and discovered that he has a ControLeo2 coming out on Kicker-starter..
-
@Hangaround I built a reflow oven based upon the original ControLEO about 8 months ago and it works great. Peter Easton, the inventor, is a great guy who was helpful and resourceful. You can't go wrong with him or the ControLeo oven controller.
-
Here are some of the results that I achieved with a built-from-scratch reflow oven and Peter's ControLeo.
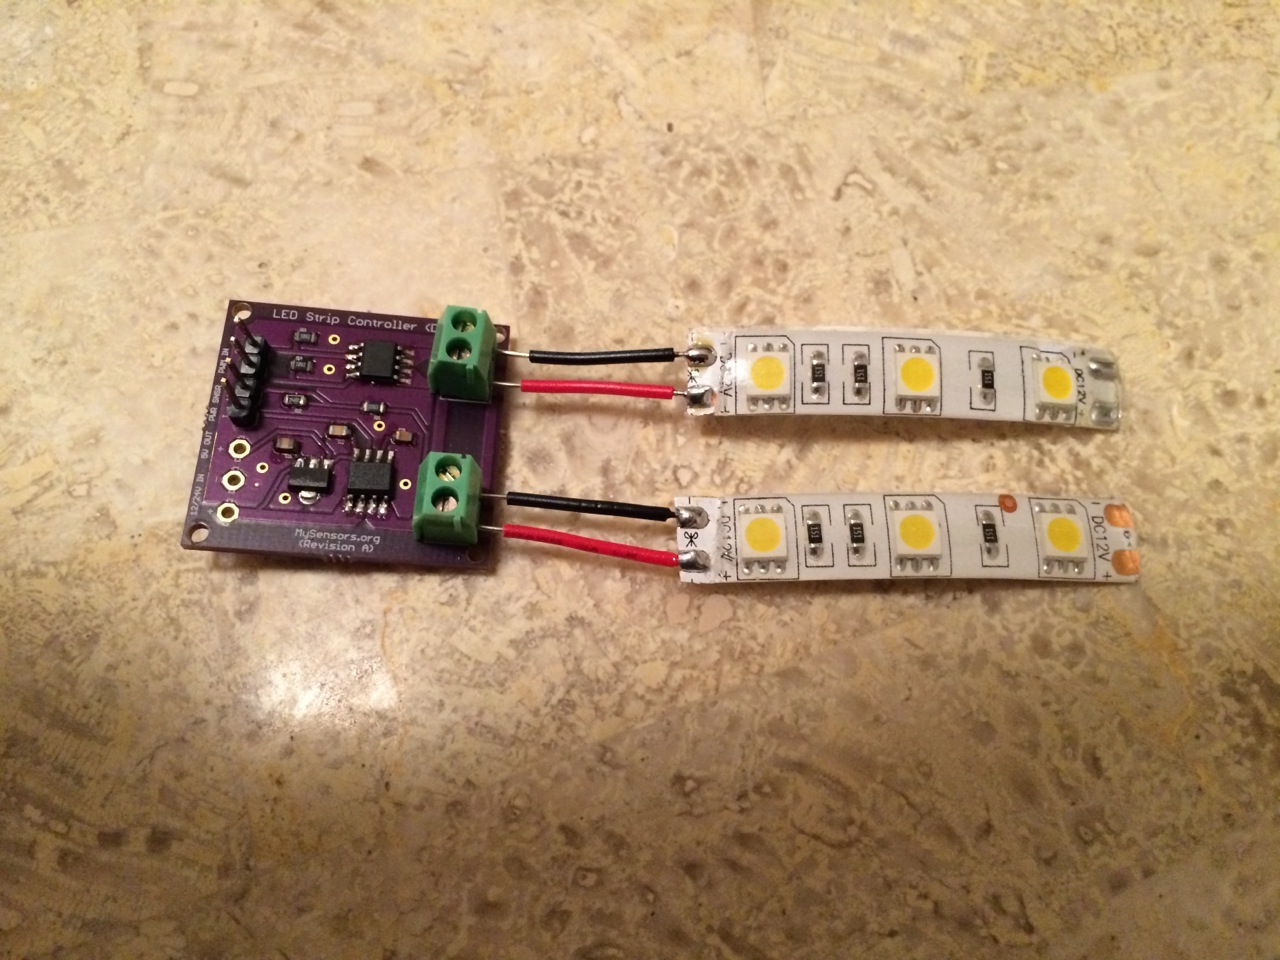
MySensors.org Dual Channel LED Strip PWD Dimmer with current sensing (voltage, amperes with computed wattage):
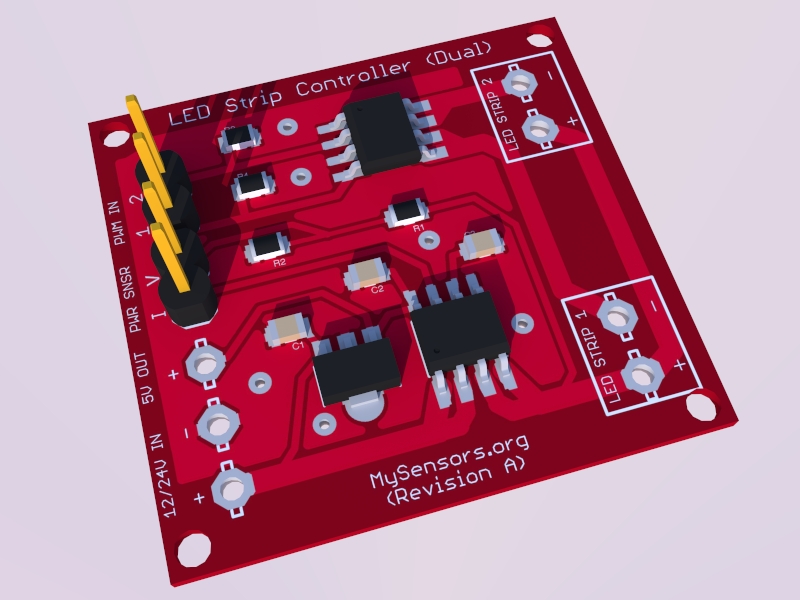
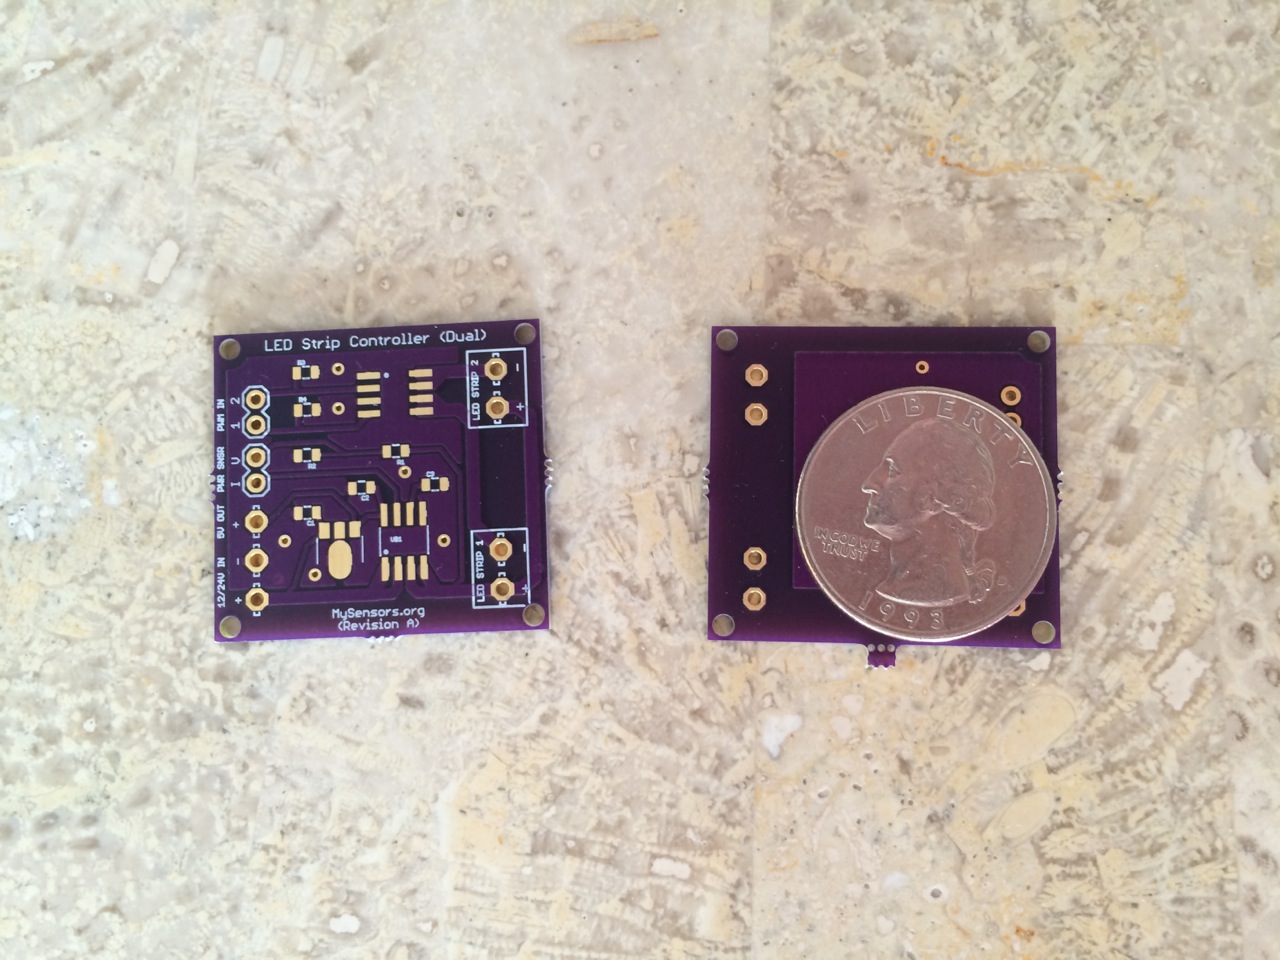
Proto-boards from OSHPark
Oven build images...
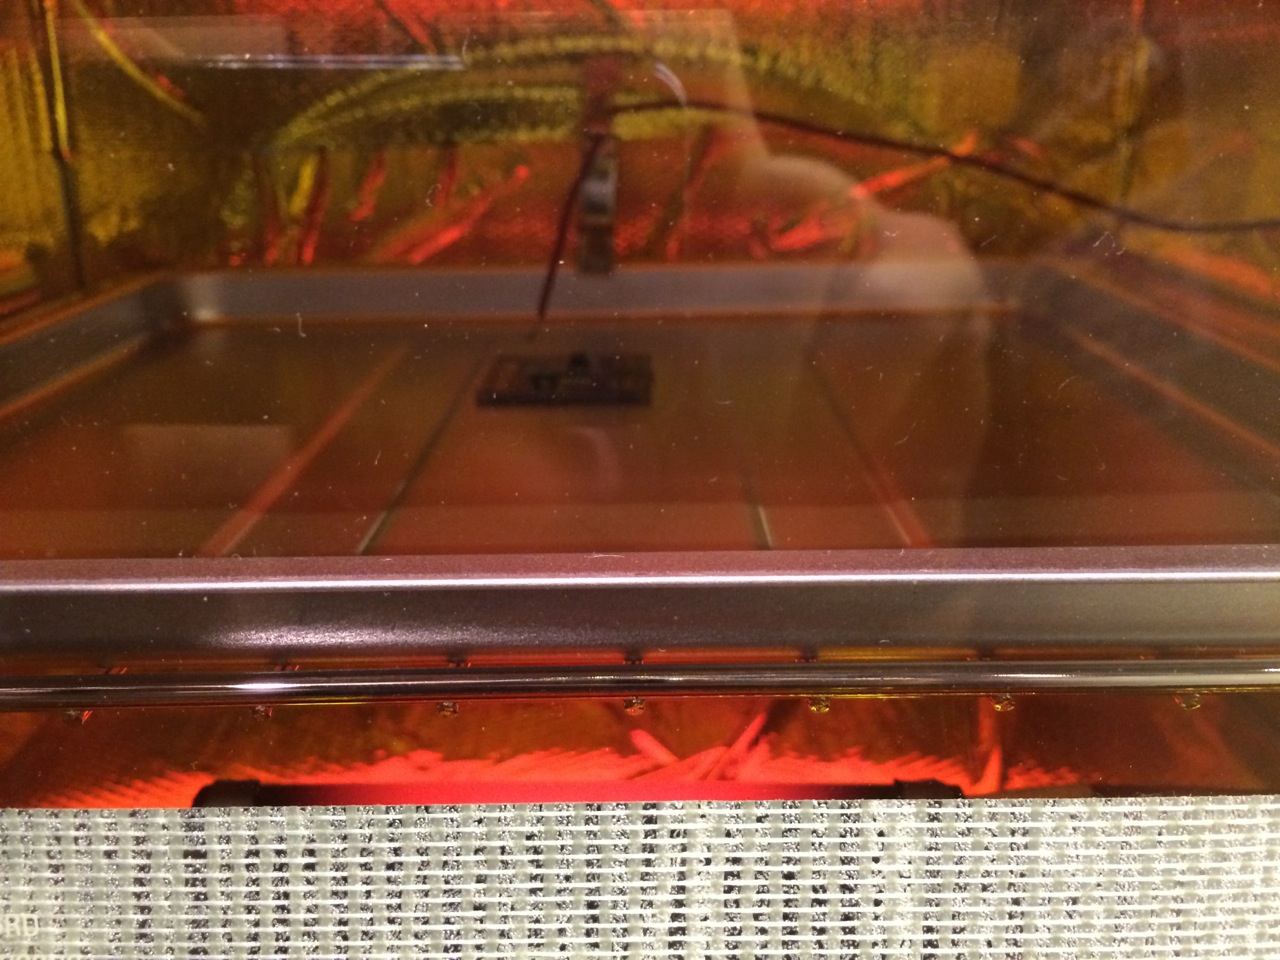
First board baking...
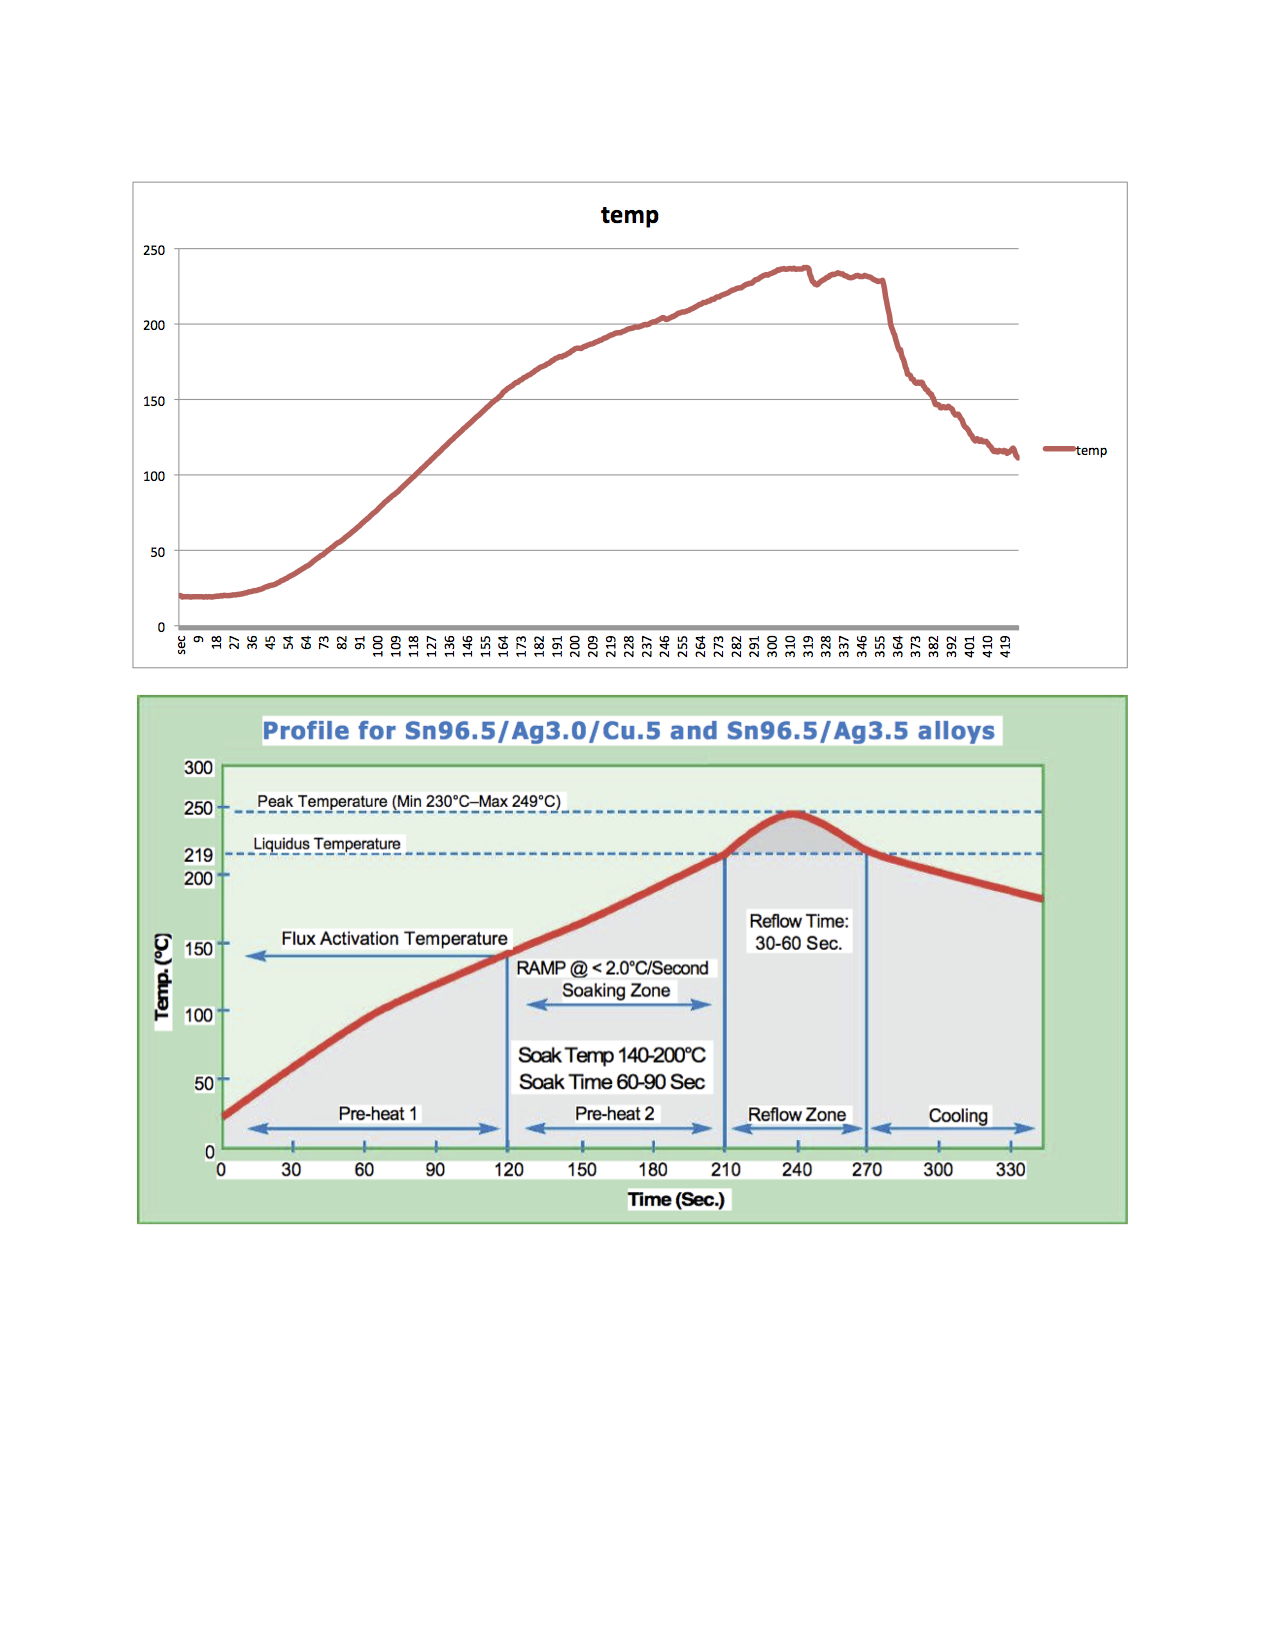
Temperature profile I achieved for first board.
Fully functional test board.
This final product will be refined and will vary slightly but @hek, @axillent and I plan to make boards like this and more available, once the designs are fully baked so to speak. In the mean time, these simple reflow ovens based upon the ControLeo work very well.
-
Here are some of the results that I achieved with a built-from-scratch reflow oven and Peter's ControLeo.
MySensors.org Dual Channel LED Strip PWD Dimmer with current sensing (voltage, amperes with computed wattage):
Proto-boards from OSHPark
Oven build images...
First board baking...
Temperature profile I achieved for first board.
Fully functional test board.
This final product will be refined and will vary slightly but @hek, @axillent and I plan to make boards like this and more available, once the designs are fully baked so to speak. In the mean time, these simple reflow ovens based upon the ControLeo work very well.
@blacey, @ServiceXp This is a fantastic project. Thanks for the inspiration. I never really considered reflow ovens as they seemed far too expensive.
Finding a suitable oven might be tricky though. These mini ovens seem to have gone out of fashion and are increasingly hard to find it seems. Plus the output on many of the cheaper models can be as low as 600-800W nowadays. Since there is no need for the existing controller circuit, a second hand or even scrap-heap unit might do I suppose. An older model may even have more W.
-
@blacey
Thank you for sharing your experience with ControLeo. and the pictures.. Question. how did you capture the data for the graph?@bjornhallberg This is the Oven I'm going to use, and in my testing seems like it's going to work well it's a little pricey though...
Robert
-
I didn't realize when I made my last comment that there were so many different sizes and watt outputs on these ovens. Perhaps my initial complaint about seemingly low watt ovens was premature. I.e:
http://www.rocketscream.com/blog/2011/06/19/toaster-convection-or-infrared-oven/
TLDR: The 800w 9L oven heated up the fastest and still managed a solid 260C. Bigger 19L ovens didn't stand a chance, would have needed an unrealistic amount of power presumably (1600-1700+W?). Sure, modding is always a possibility but it is nice when something works out of the box.Also saw another controller designer who used an infrared oven (george foreman model bought at walmart I think) despite a lot of people being wary of this sort of heat propagation. A non issue I guess since IR ovens are hard to find anyway.
Still haven't gone dumpster diving but it wouldn't surprise me if people were (foolishly) discarding these ovens en masse.
-
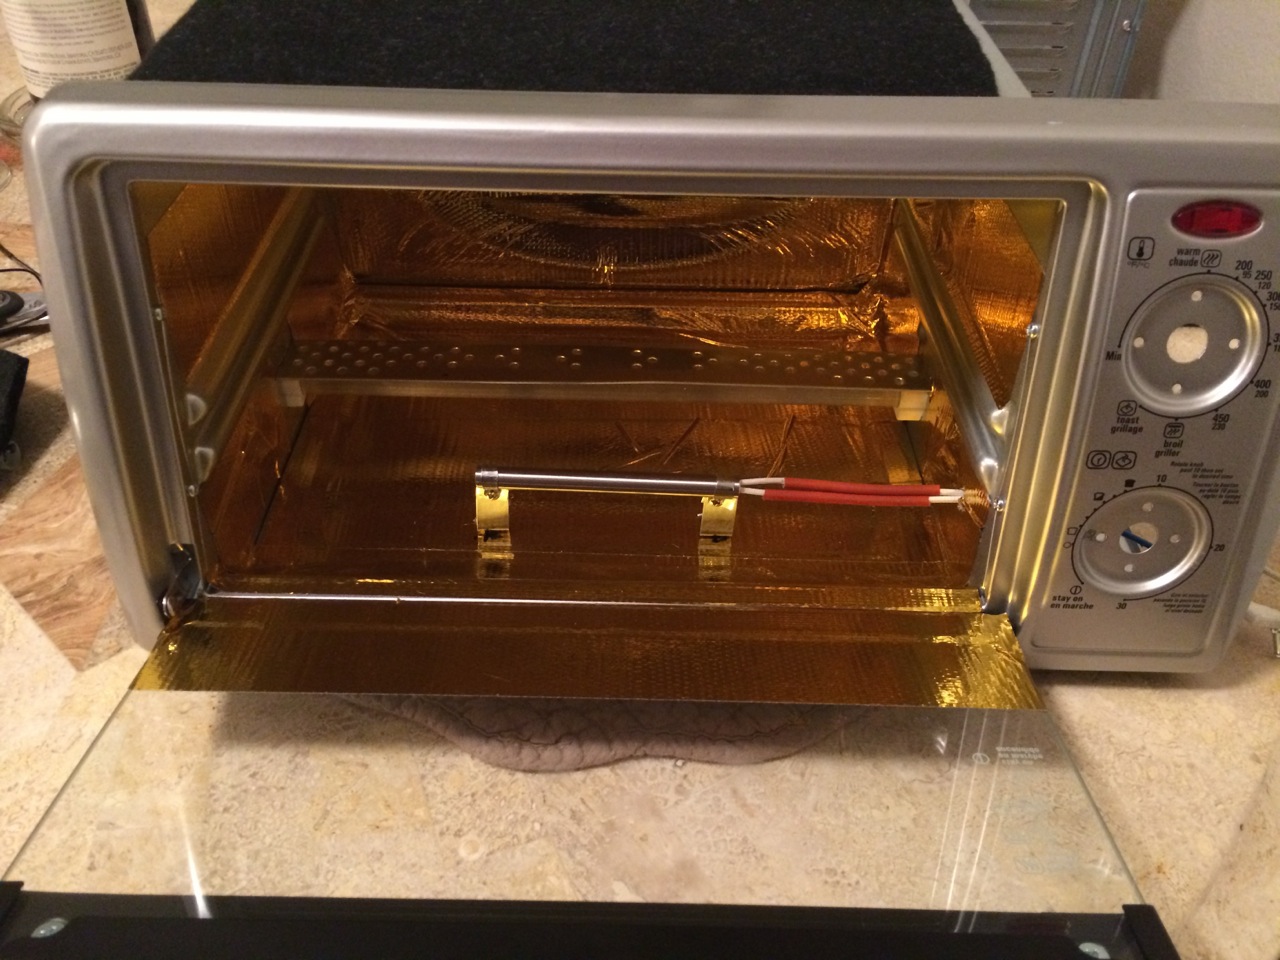
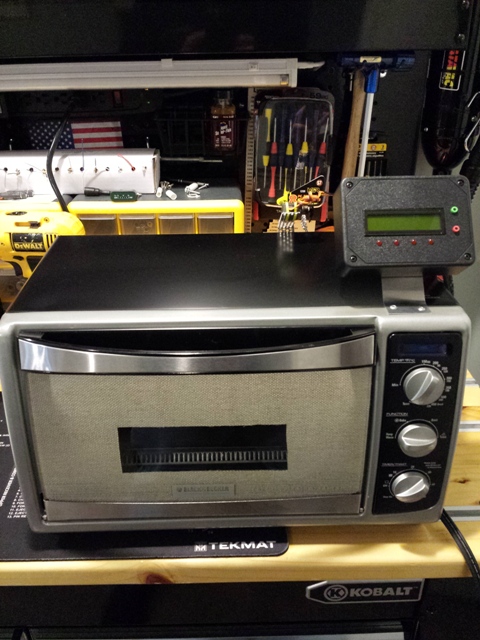
Ok;.... so I received my oven kit from Peter Monday, and built it up yesterday.. I still have to work out the coding for the auto door opening and 2nd lower thermocouple (I think that one will be much later), but here is the hardware setup..
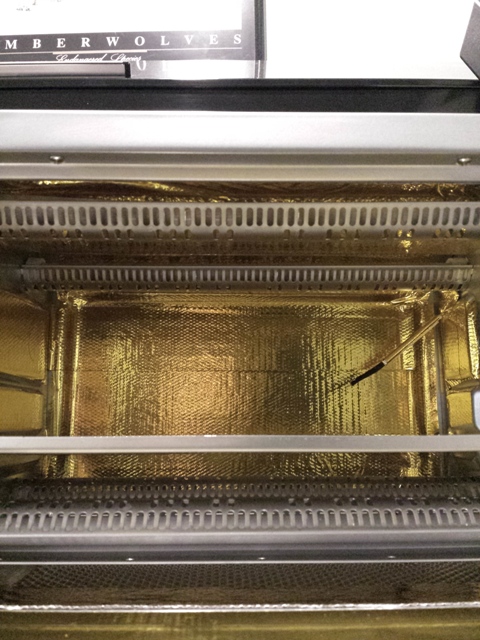
There were only 2 items on this build that were somewhat difficult.. The most difficult by leaps and bounds is installing the gold reflective tape. It's was a nightmare, and if I every build a 2nd one I will completely dismantle the toaster and apply the tape with the elements and element guards out of the way next time... The 2nd item was the ControLeo's mounting box, I think reversing the mounting (mount board to front panel) of the PCB would make it much easier. I do however understand that having custom enclosures would probably add too much to the cost..
I wind up over building everything, so some of the stuff I did is probably not necessary... For instance, I forgot to get some pictures, but I insulated the entire outer jacket with this stuff.. It added expense, but wow, the differences in temps from where that stuff is, and where it's not is amazing..
Ok.... enough of that.. On to the pictures...
BOM: (Much of this stuff you probably have laying around)
- ControLeo2 Oven Kit Or ControLeo2 Plain.
- This Oven
- Jacket Insulation
- Control Wall Insulation
- 12vdc 1.5a power supply.
- Music Wire
- Servo (Door Opener Rod)
- Stainless Steel 300x3mm Round Rod (D00r Opener Rod)
- 3mm collar (Door Opener Rod)
- Perforated Aluminum Sheet
- 12vdc 60mm Cooling Fan
- DC-DC Converter (set at 5vdc)
- 2a SSR (For Cooling Fan)
- High Temp Wire12-10 Gauge
- High Temp Loom
- Heat Shrink
- Thermocouple Breakout Board (for 2nd lower thermocouple)
- Lower Thermocouple
- 2 Sided Foam Tape
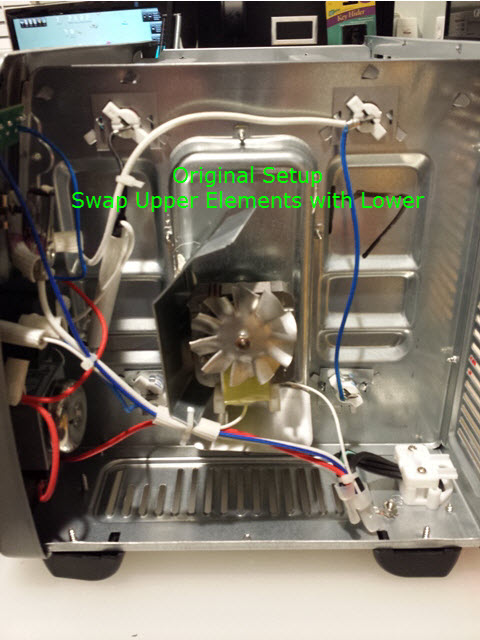
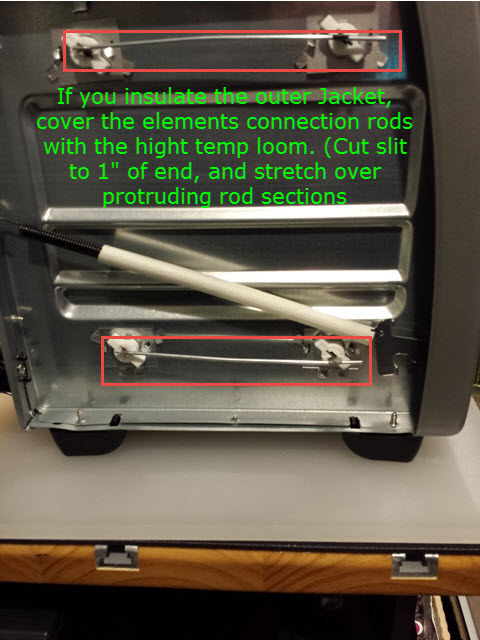
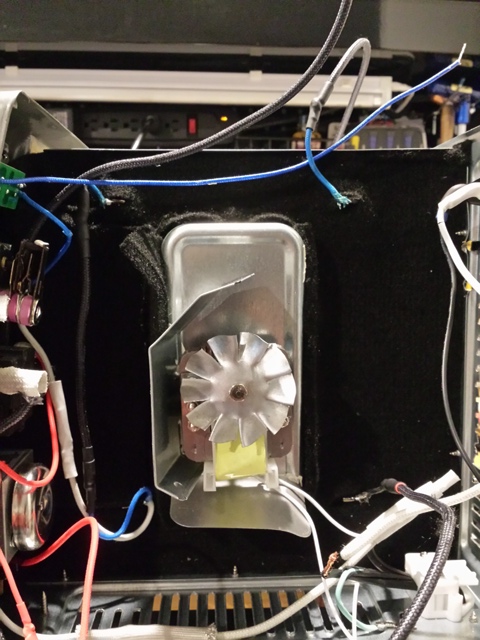
Removed oven jacket and feet and swap the upper and lower elements. (Take your time, the elements and spot welds are very fragile) While the jacket is off, I Insulated it. (Optional)
Removed all unnecessary wiring (I choose to keep the thermostat and switches in the circuit for some over temp protection)
Drilled a 3mm hole in front and rear of oven for door opener.
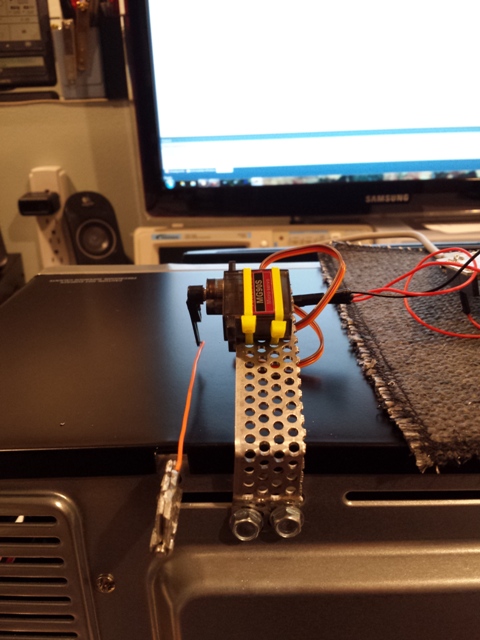
Built mount and install the door servo.
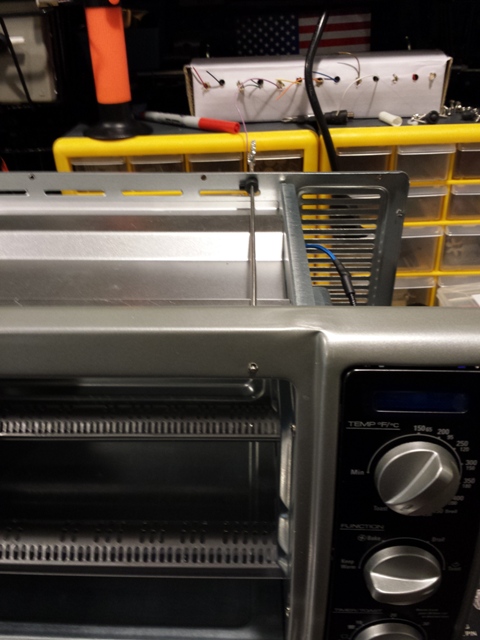
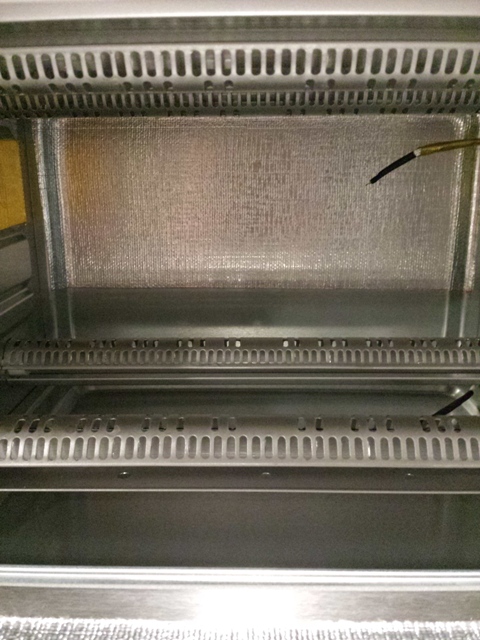
Installed Insulation on component wall. I was able to get this in there pretty tight, so I only had to use two rivets at the very top (not seen in this pic)
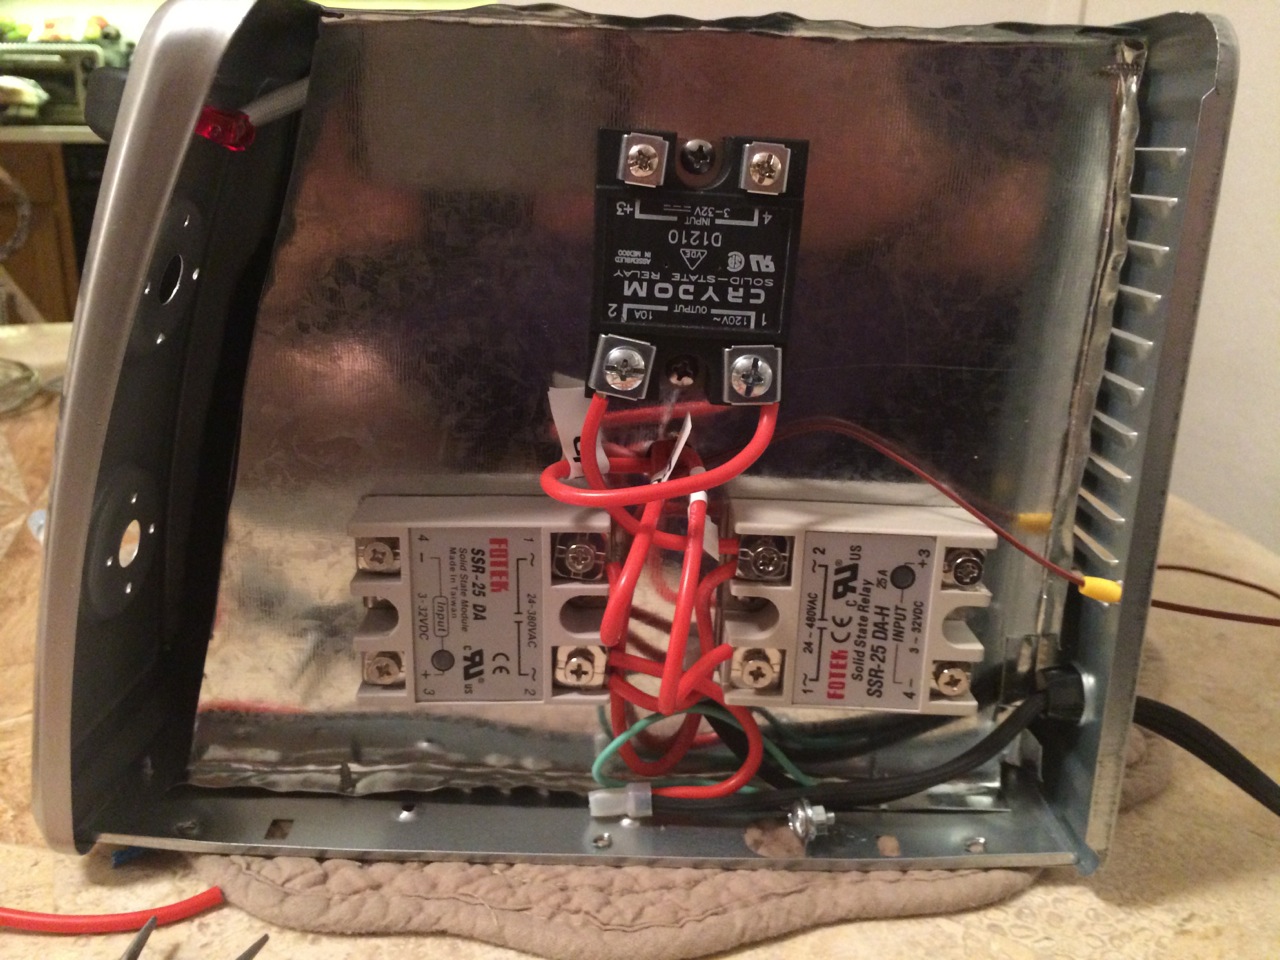
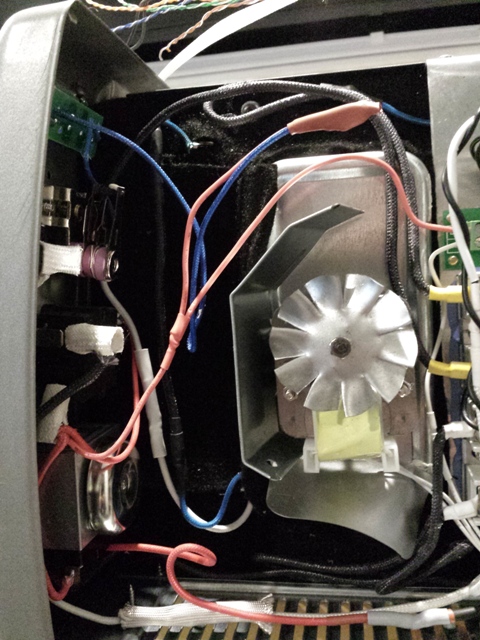
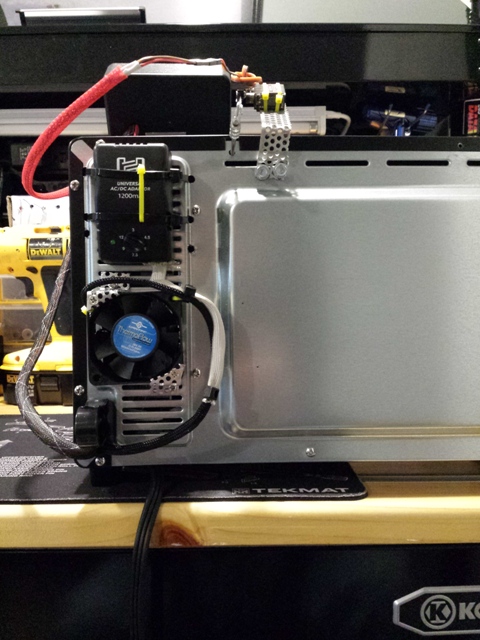
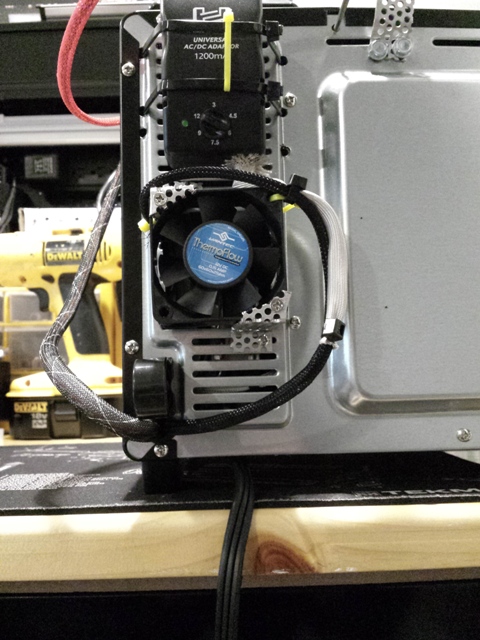
Fitted the aluminum that comes in ControLeo's 2 oven kit to "hang" off the top of the cavity seam. I also installed the SSR's, DC to DC converter. I Also cut out and installed power supply and cooling fan (air entering control space)
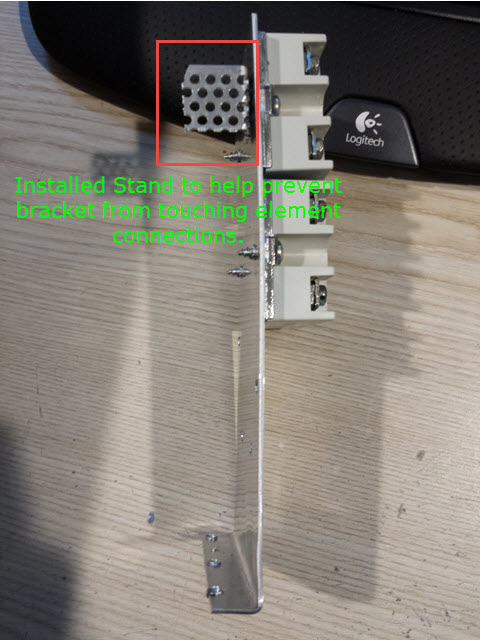
Very Important!
I drilled 5 more holes. (3) 3/8" (two for ControLeo2 Case and one underneath oven rear wall spacer) and the other 2 were for the sensors, upper and lower rear of oven cavity.
Fished all wire through lower grommet and loom. (it was VERY tight, but it all fit)
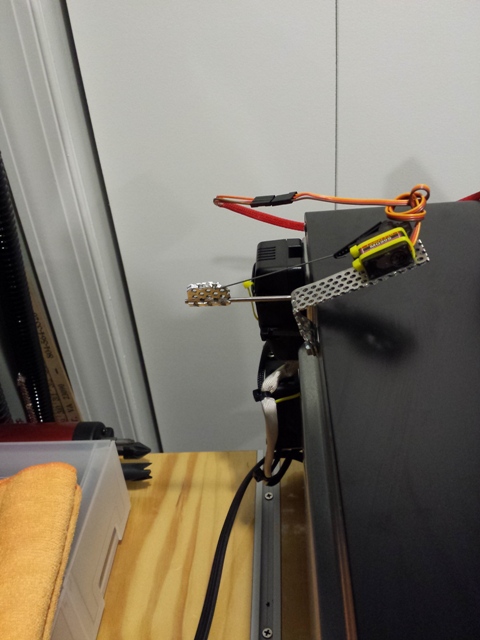
Here is a picture with everything installed. (The bracket is mounted underneath the oven cavity seem (in the pic it looks like it's on top, but it's not))
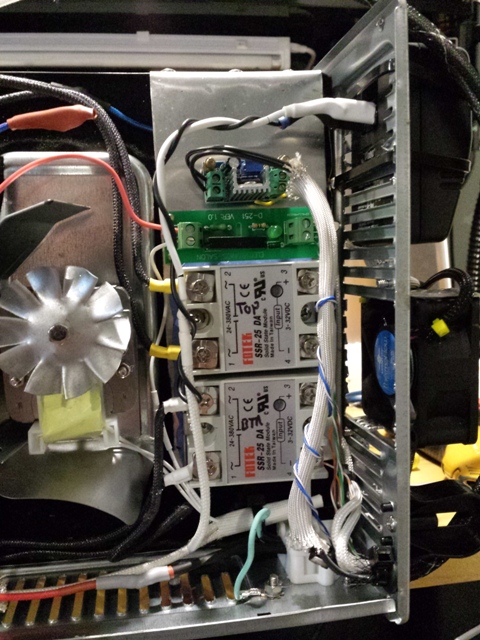
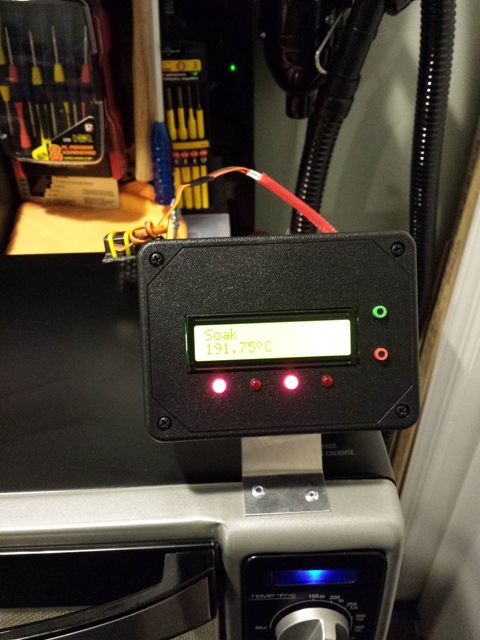
The ControLeo2 all wired up with 2nd thermocouple breakout board and servo connection. (2 sided foam tape worked well for mounting the breakout board onto the ControLeo2 board.

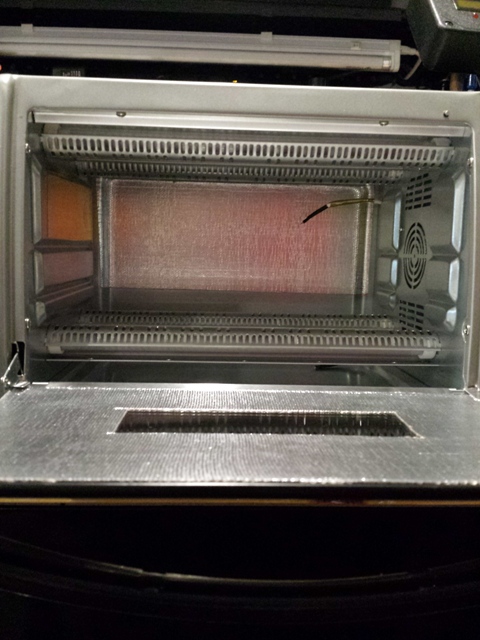
Installed interior Gold tape and Insulation. (Man this was the hardest part of this entire build..... )
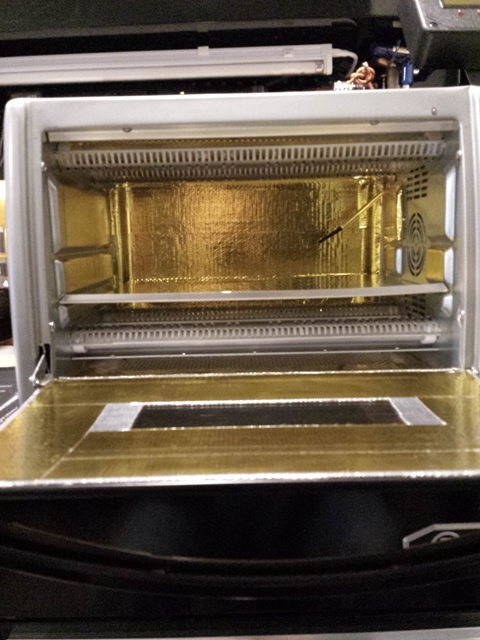
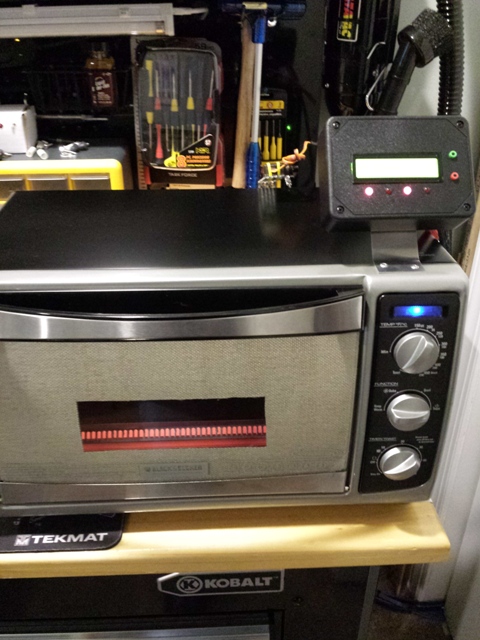
And the completed oven....
I'm sure I missed something but I hope you found this interesting...
Until next time......
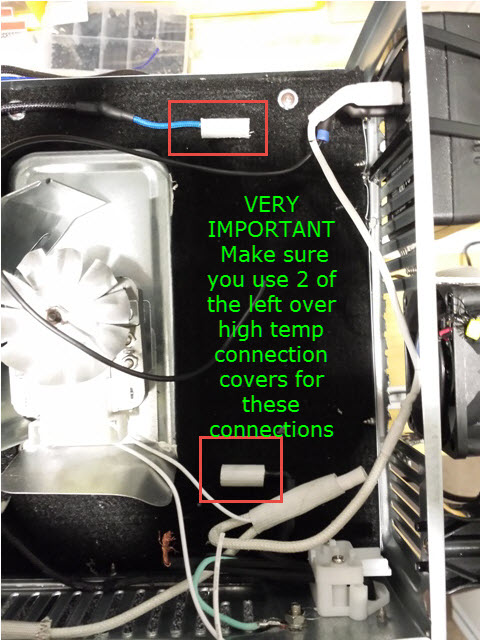
Updated: Forgot to show the use of the left-over high temp. connection covers on elements behind SSR bracket.
-
One thing to note. I was getting worried after the 6th time it failed on learning, not reaching soak time fast enough...
The aluminum tray I had was a perfect fit, I mean perfect. Turns out is was so perfect that it was blocking a lot heat. After trimming the tray and notching the back corners out, its has worked perfect since..
@ServiceXp
Very nice... you hardware guys have all the fun!
So the question is what's next for me... Surface Mount or 3D printing?
-
@ServiceXp
Very nice... you hardware guys have all the fun!
So the question is what's next for me... Surface Mount or 3D printing?
Why not build your own pick and place? :)
http://hackaday.io/project/963-300-pick-and-place-3d-printer -
Ok;.... so I received my oven kit from Peter Monday, and built it up yesterday.. I still have to work out the coding for the auto door opening and 2nd lower thermocouple (I think that one will be much later), but here is the hardware setup..
There were only 2 items on this build that were somewhat difficult.. The most difficult by leaps and bounds is installing the gold reflective tape. It's was a nightmare, and if I every build a 2nd one I will completely dismantle the toaster and apply the tape with the elements and element guards out of the way next time... The 2nd item was the ControLeo's mounting box, I think reversing the mounting (mount board to front panel) of the PCB would make it much easier. I do however understand that having custom enclosures would probably add too much to the cost..
I wind up over building everything, so some of the stuff I did is probably not necessary... For instance, I forgot to get some pictures, but I insulated the entire outer jacket with this stuff.. It added expense, but wow, the differences in temps from where that stuff is, and where it's not is amazing..
Ok.... enough of that.. On to the pictures...
BOM: (Much of this stuff you probably have laying around)
- ControLeo2 Oven Kit Or ControLeo2 Plain.
- This Oven
- Jacket Insulation
- Control Wall Insulation
- 12vdc 1.5a power supply.
- Music Wire
- Servo (Door Opener Rod)
- Stainless Steel 300x3mm Round Rod (D00r Opener Rod)
- 3mm collar (Door Opener Rod)
- Perforated Aluminum Sheet
- 12vdc 60mm Cooling Fan
- DC-DC Converter (set at 5vdc)
- 2a SSR (For Cooling Fan)
- High Temp Wire12-10 Gauge
- High Temp Loom
- Heat Shrink
- Thermocouple Breakout Board (for 2nd lower thermocouple)
- Lower Thermocouple
- 2 Sided Foam Tape
Removed oven jacket and feet and swap the upper and lower elements. (Take your time, the elements and spot welds are very fragile) While the jacket is off, I Insulated it. (Optional)
Removed all unnecessary wiring (I choose to keep the thermostat and switches in the circuit for some over temp protection)
Drilled a 3mm hole in front and rear of oven for door opener.
Built mount and install the door servo.
Installed Insulation on component wall. I was able to get this in there pretty tight, so I only had to use two rivets at the very top (not seen in this pic)
Fitted the aluminum that comes in ControLeo's 2 oven kit to "hang" off the top of the cavity seam. I also installed the SSR's, DC to DC converter. I Also cut out and installed power supply and cooling fan (air entering control space)
Very Important!
I drilled 5 more holes. (3) 3/8" (two for ControLeo2 Case and one underneath oven rear wall spacer) and the other 2 were for the sensors, upper and lower rear of oven cavity.
Fished all wire through lower grommet and loom. (it was VERY tight, but it all fit)
Here is a picture with everything installed. (The bracket is mounted underneath the oven cavity seem (in the pic it looks like it's on top, but it's not))
The ControLeo2 all wired up with 2nd thermocouple breakout board and servo connection. (2 sided foam tape worked well for mounting the breakout board onto the ControLeo2 board.
Installed interior Gold tape and Insulation. (Man this was the hardest part of this entire build..... )
And the completed oven....
I'm sure I missed something but I hope you found this interesting...
Until next time......
Updated: Forgot to show the use of the left-over high temp. connection covers on elements behind SSR bracket.
@ServiceXp
Hi,
I really appreciate your comments and build-notes, both here and on the KS thread, too.
Like you, I find the B&D TO1675B an attractive model for turning into a reflow oven.
A few questions (don't worry most are Yes/No, or short answer!):
How well does your larger oven work?
Does it have <some reasonable amount> of excess up-slope heating capacity? Meaning, does it have any trouble getting up to temp, quickly enough? (My concern is 'barely' being able to run a lead-free profile. Like you, I would insulate the shell).Do you remember the size/dimensions of PCB support plate you made (so I can get one made-to-order)?
Was one roll of the Reflect-A-Gold tape enough? I get that this is a labor-intensive step!
Ever done several boards at once? Any consistency or 'even-heating' problems?
Do you have any real feel for whether having a convection-type oven makes a difference... is the heating any more uniform?Thanks again for any insights you can offer.
Ken
-
@ServiceXp
Hi,
I really appreciate your comments and build-notes, both here and on the KS thread, too.
Like you, I find the B&D TO1675B an attractive model for turning into a reflow oven.
A few questions (don't worry most are Yes/No, or short answer!):
How well does your larger oven work?
Does it have <some reasonable amount> of excess up-slope heating capacity? Meaning, does it have any trouble getting up to temp, quickly enough? (My concern is 'barely' being able to run a lead-free profile. Like you, I would insulate the shell).Do you remember the size/dimensions of PCB support plate you made (so I can get one made-to-order)?
Was one roll of the Reflect-A-Gold tape enough? I get that this is a labor-intensive step!
Ever done several boards at once? Any consistency or 'even-heating' problems?
Do you have any real feel for whether having a convection-type oven makes a difference... is the heating any more uniform?Thanks again for any insights you can offer.
Ken
I built a reflow oven using a ControLeo2 a few months ago, and I used a larger Farberware convection oven I got from Walmart for $40.
It seems to work well so far, but I still need to capture the data from it on a run and see how it compares to the ideal profile. It seems to be a bit slow to me, but the ControLeo2 isn't complaining. It does seem like it's not that easy to find ovens which are both on the small side and come with a convection fan, which to me was essential. I reflow a lot of boards at once and I need uniform heating throughout the oven, and this oven does that.
One roll of Reflect-a-Gold was not enough. I used one sheet of Thermo-Tec heat barrier, cut in half, for the top and bottom. This was the perfect size for this oven, and the top part hasn't had any trouble with the adhesive. However, despite only needing to cover the back, sides, and door, I needed a second roll of the Reflect-A-Gold.
My next two projects are to capture the data from a run, and to add a servo to open the door. I've got the servo now, I just need to find a pushrod and figure out how to hook it up.
-
@ServiceXp
Hi,
I really appreciate your comments and build-notes, both here and on the KS thread, too.
Like you, I find the B&D TO1675B an attractive model for turning into a reflow oven.
A few questions (don't worry most are Yes/No, or short answer!):
How well does your larger oven work?
Does it have <some reasonable amount> of excess up-slope heating capacity? Meaning, does it have any trouble getting up to temp, quickly enough? (My concern is 'barely' being able to run a lead-free profile. Like you, I would insulate the shell).Do you remember the size/dimensions of PCB support plate you made (so I can get one made-to-order)?
Was one roll of the Reflect-A-Gold tape enough? I get that this is a labor-intensive step!
Ever done several boards at once? Any consistency or 'even-heating' problems?
Do you have any real feel for whether having a convection-type oven makes a difference... is the heating any more uniform?Thanks again for any insights you can offer.
Ken
Ken,
Man I'm sorry, somehow I missed your post... :-(1 The setup above works very well, I have no complaints, I would like a little more flexibility in profile options, but outside of that works well.
2 I can use this oven with the oven at 10F outside. No problems getting to the target profile temps.
3 8.5"x 11-7/8"
4 1 Roll was "just enough".
5 No, single only
6 I would NOT build one of these oven without the convection fan. That said I don't have any experience with a standard oven ;-)
@Kenski said:
@ServiceXp
Hi,
I really appreciate your comments and build-notes, both here and on the KS thread, too.
Like you, I find the B&D TO1675B an attractive model for turning into a reflow oven.
A few questions (don't worry most are Yes/No, or short answer!):
How well does your larger oven work?
Does it have <some reasonable amount> of excess up-slope heating capacity? Meaning, does it have any trouble getting up to temp, quickly enough? (My concern is 'barely' being able to run a lead-free profile. Like you, I would insulate the shell).Do you remember the size/dimensions of PCB support plate you made (so I can get one made-to-order)?
Was one roll of the Reflect-A-Gold tape enough? I get that this is a labor-intensive step!
Ever done several boards at once? Any consistency or 'even-heating' problems?
Do you have any real feel for whether having a convection-type oven makes a difference... is the heating any more uniform?Thanks again for any insights you can offer.
Ken
-
These ovens are killing me here. No matter where I look I can't seem to find a convection oven at a reasonable price with quartz elements. It's either one or the other, or crazy prices or ridiculously large volumes that will take ages to heat without the addition of extra heating elements.
Here are my candidates so far:
http://www.amazon.it/Ariete-Cousine-Petit-Forno-Elettrico/dp/B004JLN2EW
10 litres, 1000w. Quartz. High W for the volume if it checks out.http://www.amazon.co.uk/gp/product/B00K22YJEY
9 litres, 800w. Quartz. Looks a lot like the one Rocketscream used with great success.http://www.harald-nyborg.se/wasco-miniugn-18l-1380w.html
18 litres, 1380W. Not quartz? But can be found locally. A bit low wattage for the volume. -
Not sure you need quarts elements
-
Hi, here is another ControLeo2 reflow oven for european users :)
https://www.youtube.com/watch?v=dAqJej8u2kY
Regards,
StaringL -
Hi, here is another ControLeo2 reflow oven for european users :)
https://www.youtube.com/watch?v=dAqJej8u2kY
Regards,
StaringL@Staringlizard Cool! Is it this oven you're using? 14L, 1200W? Are you happy with the temperature ramp-up time?
Hello! It looks like you're interested in this conversation, but you don't have an account yet.
Getting fed up of having to scroll through the same posts each visit? When you register for an account, you'll always come back to exactly where you were before, and choose to be notified of new replies (either via email, or push notification). You'll also be able to save bookmarks and upvote posts to show your appreciation to other community members.
With your input, this post could be even better 💗
Register Login