MH-Z19 CO2 sensor
-
@daniel-oliveira said in MH-Z19 CO2 sensor:
TX, RX, GND and Vin
I can confirm only TX, RX, GND and Vin are needed. I've setup the device with a Wemos D1 Mini using the code found here https://github.com/jehy/arduino-esp8266-mh-z19-serial/
It's not MySensors related though, I've yet to try MySensors myself but registered to this forum to reply as I found this conversation while looking for code samples for the sensor. :)
-
I just tried using this code on an different board and got some weird output from the sensor (FFFFFF instead of FF as the starting byte). I found some mumbo-jumbo explanations of what Arduino is doing here. But the short of it is, is that this code fixes that issue (by wrapping the output in byte() functions).
/* * The MySensors Arduino library handles the wireless radio link and protocol * between your home built sensors/actuators and HA controller of choice. * The sensors forms a self healing radio network with optional repeaters. Each * repeater and gateway builds a routing tables in EEPROM which keeps track of the * network topology allowing messages to be routed to nodes. * * Created by Henrik Ekblad <henrik.ekblad@mysensors.org> * Copyright (C) 2013-2015 Sensnology AB * Full contributor list: https://github.com/mysensors/Arduino/graphs/contributors * * Documentation: http://www.mysensors.org * Support Forum: http://forum.mysensors.org * * This program is free software; you can redistribute it and/or * modify it under the terms of the GNU General Public License * version 2 as published by the Free Software Foundation. * ******************************* * * DESCRIPTION * * MH-Z19 CO2 sensor * * It communicates with your board over serial at 9600 speed. * * * */ //------------------------------------------------------------------------------ // if you uncomment this, you can get test and debug updates about the sensor' wireless connection by using the serial monitor tool. //#define MY_DEBUG // Enable and select radio type attached #define MY_RADIO_NRF24 // A 2.4Ghz transmitter and receiver, often used with MySensors. // #define MY_RF24_PA_LEVEL RF24_PA_MIN // This sets a low-power mode for the radio. Useful if you use the verison with the bigger antenna, but don't want to power that from a separate power source. It can also fix problems with fake Chinese versions of the radio. // #define MY_RADIO_RFM69 // 433Mhz transmitter and reveiver. // Choose if you want this sensor to also be a repeater. // #define MY_REPEATER_FEATURE // Just remove the two slashes at the beginning of this line to also enable this sensor to act as a repeater for other sensors. If this node is on battery power, you probably shouldn't enable this. // Libraries #include <MySensors.h> #include <SoftwareSerial.h> // This can be changed: unsigned long co2MeasurementInterval = 30000; // Time to wait between reads (in milliseconds). SoftwareSerial mySerial(3, 4); // RX, TX . You can choose other pins if you prefer. Remember: TX (transmit) on the sensor must be connected to RX (receive) on the Arduino. // Mysensors settings #define CHILD_ID_CO2 0 // The Co2 sensor' ID on this node. MyMessage msgCo2(CHILD_ID_CO2, V_LEVEL); MyMessage msgCo2b(CHILD_ID_CO2, V_UNIT_PREFIX); void presentation() { // Send the sketch version information to the gateway and Controller sendSketchInfo("AIQ Sensor CO2 MH-Z19", "1.1"); // Register attached sensor(s) to gateway present(CHILD_ID_CO2, S_AIR_QUALITY); send(msgCo2b.set("ppm")); } void setup() { delay(1000); Serial.begin(9600); delay(1000); mySerial.begin(9600); delay(2000); while (mySerial.read()!=-1) {}; //clear Co2 buffer. Serial.println("hello world, I am a sensor."); } void loop() { // You should not change this variable: static unsigned long previousCo2Millis = 0; // Used to remember the time of the last temperature measurement. unsigned long currentMillis = millis(); // The time since the sensor started, counted in milliseconds. This script tries to avoid using the Sleep function, so that it could at the same time be a MySensors repeater. if (currentMillis - previousCo2Millis >= co2MeasurementInterval) { // this only gets triggered when enough time has passed. Serial.println("CO2 - Sending data request to sensor."); previousCo2Millis = currentMillis; long co2ppm = readCO2(); Serial.println("Co2 - PPM = " + String(co2ppm)); send(msgCo2.set((long)ceil(co2ppm))); Serial.print("Co2 - zzzzZZZZzzzzZZZZzzzz\n"); } } // Main function that gets the Co2 data int readCO2() { while (mySerial.read()!=-1) {}; //clear serial buffer char response[9]; // for answer byte cmd[9] = {0xFF, 0x01, 0x86, 0x00, 0x00, 0x00, 0x00, 0x00, 0x79}; // command to ask for data mySerial.write(cmd, 9); //request PPM CO2 mySerial.readBytes(response, 9); Serial.print(byte(response[0]), HEX) ; Serial.print(" - "); Serial.print(byte(response[1]), HEX) ; Serial.print(" - "); Serial.print(byte(response[2]), HEX); Serial.print(" - "); Serial.print(byte(response[3]), HEX); Serial.print(" - "); Serial.print(byte(response[4]), HEX); Serial.print(" - "); Serial.print(byte(response[5]), HEX); Serial.print(" - "); Serial.print(byte(response[6]), HEX); Serial.print(" - "); Serial.print(byte(response[7]), HEX); Serial.print(" - "); Serial.print(byte(response[8]), HEX); Serial.println(" - END"); if (byte(response[0]) != 0xFF) { Serial.println("Wrong starting byte from co2 sensor! (should be FF)"); return -1; } if (byte(response[1]) != 0x86) { Serial.println("Wrong command from co2 sensor! (should be 86)"); return -1; } int responseHigh = (int) byte(response[2]); int responseLow = (int) byte(response[3]); int ppm = (256 * responseHigh) + responseLow; return ppm; } -
Hello,
I finally got this sensor to work but instead I use this lib: https://github.com/nara256/mhz19_uart
Another very useful source of information is this: https://revspace.nl/MHZ19#command_0x62_.28device_name_.2F_id.29Take note that is the MH-Z19B the methods isWarming() and getStatus() do not work.
Can you please share the values that you are getting? I'm getting around 1500ppm and it is alarming by these website standards:
https://www.engineeringtoolbox.com/co2-comfort-level-d_1024.html
https://www.kane.co.uk/knowledge-centre/what-are-safe-levels-of-co-and-co2-in-roomsI didn't have the opportunity yet to get the sensor outdoors.
Thank you in advance
-
I get values between 300 and 1500 I believe.
-
Hi there,
I'm currently trying to make it work (on an arduino pro mini 3.3), but won't succeed.
I keep having the following output :CO2 - Sending data request to sensor. 1 - 40 - 1 - 0 - 1 - 21 - 3 - 15 - 0 - END Wrong starting byte from co2 sensor! (should be FF) Co2 - PPM = -1 Co2 - zzzzZZZZzzzzZZZZzzzzSometimes the second value is different but the first one is always 1. And obviously 1 is not FF :) . However I don't understand what's wrong in there.
I have to mention I'm using the MH-Z19B, and powering it with 5V, as opposed to the 3.3v of the arduino.
I also tried with the mhz19_uart lib, but didn't go further with it as the samples where not working out of the box with the z19B. Will probably give it another try, though... -
Thank you for posting this..... I tried it today and it works well! :)
To test it I wondered where to get a source of co2 from, then an idea hit me......So I opened a beer :)
I tipped it into a pint glass and drank most of it. Then, when I remembered the reason for opening the beer, I dangled the sensor into the glass, well above the liquid, placed my hand on top to seal it and swirled the beer around to release the co2 that makes it fizzy - result?Well in the room I was getting a constant reading of 395, but in the beer glass it went to 1711, 3055, 5000 !!! - So it works!
Removing the sensor back to normal room air and it dropped back to 396 within 90 seconds.
So quite impressed at the moment. So far this it the most expensive sensor I have used. About $18 for the 'B' version.
-
@skywatch you're welcome. Did you use a 5v or 3.3v Arduino? I still have to figure out if this sensor's serial port is 5v tolerant. The MH-Z14 is.
@alowhum said in MH-Z19 CO2 sensor:
@skywatch you're welcome. Did you use a 5v or 3.3v Arduino? I still have to figure out if this sensor's serial port is 5v tolerant. The MH-Z14 is.
Datasheet (for model B) says "3.3 V(Compatible with 5V)"
-
I know I'm resurrecting an ancient topic here...
How have these sensors worked? I need the ability to monitor CO2 and evacuate it when it get's too high. This isn't super mission critical stuff here but I would like to use a sensor like this to get a better idea of how much air I need to evacuate.
I'm looking at building something to interface with a MQTT broker to control other IoT devices on my hub. How hard would it be to add that capability to an arduino type solution like this one here?
I'm more familiar with RPi's but am interested in this because of the "simplicity".
Thanks!
Cheers,
Joe
@Joseph-Gill My sensor has taken a few knocks but still works really well. I have got another one now to use in the car (when I get around MYSing the car that is).
The last readings from my sensor.....
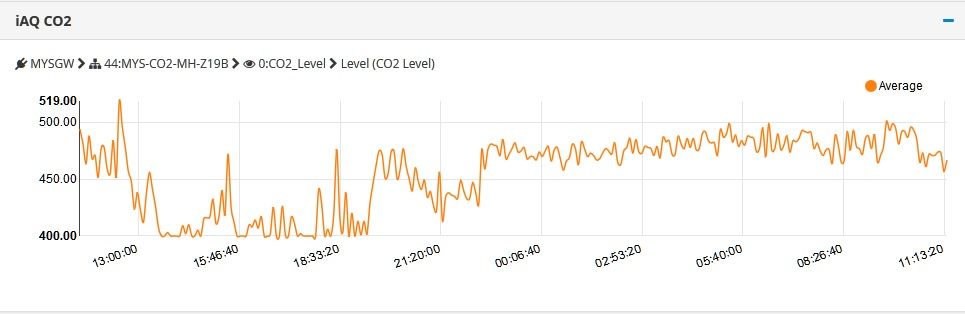
Readings are high as the sensor is currently too low to the ground. I will attend to this when I have time to make it into a cased unit.
-
I know I'm resurrecting an ancient topic here...
How have these sensors worked? I need the ability to monitor CO2 and evacuate it when it get's too high. This isn't super mission critical stuff here but I would like to use a sensor like this to get a better idea of how much air I need to evacuate.
I'm looking at building something to interface with a MQTT broker to control other IoT devices on my hub. How hard would it be to add that capability to an arduino type solution like this one here?
I'm more familiar with RPi's but am interested in this because of the "simplicity".
Thanks!
Cheers,
Joe
@Joseph-Gill said in MH-Z19 CO2 sensor:
"simplicity"
Welcome to the forums, Joseph.
I am glad to see you put "simplicity" in quotes. Personally, I think that the level of difficulty that is portrayed towards new people (i.e., "it's easy!") is a little misleading. It is easy if you have "The Knack" but perhaps not so for everyone.
@Joseph-Gill said in MH-Z19 CO2 sensor:
How hard would it be
I think this depends mostly on an honest evaluation of your own skills. You will need to have at least basic understanding of the technologies involved: radio propagation, electronics, coding, etc...
Now, all of this can be learned of course, especially if you have interest, and time...
So another part of it is also your expectations. If you need something "right now" then you might be happier to go buy something "off the shelf."
OTOH, if you enjoy tinkering, learning, and want to eventually be able to build all different sort of devices exactly to your specifications and needs, then MySensors might be the right thing for you.
IMO, I think the best approach is to take this as a hobby, slowly acquiring parts (the least expensive ones take a long time to come from China!) as well as knowledge, and eventually increasing your capabilities over a long period of time. And you will learn (IMO) very valuable skills in the process...
Hello! It looks like you're interested in this conversation, but you don't have an account yet.
Getting fed up of having to scroll through the same posts each visit? When you register for an account, you'll always come back to exactly where you were before, and choose to be notified of new replies (either via email, or push notification). You'll also be able to save bookmarks and upvote posts to show your appreciation to other community members.
With your input, this post could be even better 💗
Register Login