CNC PCB milling
-
Well, now that I found this pulldown in Chilipeppr, I might stick with it a while longer:
-
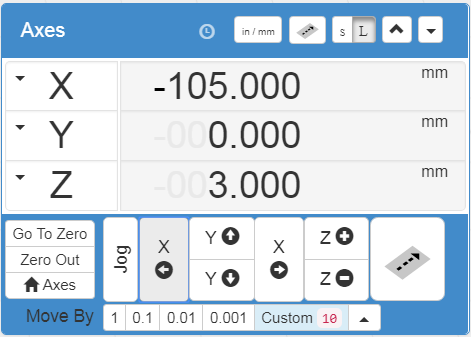
The strange thing is that the Chilipeppr demo seems to mill at z=0.000. So, if I were to try to etch the pattern for real, I would have to "zero" z at an actual z value of, say, z=-0.5 or something (whatever depth I wanted it to etch at).
Is that normal?
Anyhow, I've been through multiple trial iterations with no bit installed and with the spindle disabled, and during all that the X and Y couplers have not come loose. So, I think that the Locktite has lived up to its name and solved the problem I was having earlier. :)
-
The strange thing is that the Chilipeppr demo seems to mill at z=0.000. So, if I were to try to etch the pattern for real, I would have to "zero" z at an actual z value of, say, z=-0.5 or something (whatever depth I wanted it to etch at).
Is that normal?
Anyhow, I've been through multiple trial iterations with no bit installed and with the spindle disabled, and during all that the X and Y couplers have not come loose. So, I think that the Locktite has lived up to its name and solved the problem I was having earlier. :)
@neverdie said in CNC PCB milling:
The strange thing is that the Chilipeppr demo seems to mill at z=0.000. So, if I were to try to etch the pattern for real, I would have to "zero" z at an actual z value of, say, z=-0.5 or something (whatever depth I wanted it to etch at).
Is that normal?
Anyhow, I've been through multiple trial iterations with no bit installed and with the spindle disabled, and during all that the X and Y couplers have not come loose. So, I think that the Locktite has lived up to its name and solved the problem I was having earlier. :)
yes, the chilipeppr demo works like this. but keep in mind, that for "real" isolation milling, the milling depth which you used during the g code generation will be calculate from the relative z zero, so in that case you really have to set z0 to the pcb surface.
-
Disaster. Out of the blue, it suddenly just stopped working. Now I can't get it to spin the spindle or move in any x, y, or z direction. Gcode appears to be sent to it, and it does respond to me if I send it a '$" through the Chilipeppr console window. Just no movement whatsoever.
I removed the heatsinks, as a possible culprit, but still no go.
Suggestions on how to diagnose it?
-
I found the problem: bad power supply brick. It is supplying no voltage at all. :(
The power brick that came as part of the kit says it is rated at 24v dc 5.62amp. Is that enough, or should I get something that can do more amps?
-
I found the problem: bad power supply brick. It is supplying no voltage at all. :(
The power brick that came as part of the kit says it is rated at 24v dc 5.62amp. Is that enough, or should I get something that can do more amps?
@neverdie oh :( if you have a chance to power the cnc from a variable current power supply, then check the current it drains by starting from low to higher current. if it eats lot, maybe there is a short somewhere. you could also try to open the power supply and find a fuse.
good luck! -
I found the problem: bad power supply brick. It is supplying no voltage at all. :(
The power brick that came as part of the kit says it is rated at 24v dc 5.62amp. Is that enough, or should I get something that can do more amps?
-
I don't have much optimism that the cheap-ass power supply that came with the kit can be repaired (well, not by me anyway).
I ordered a 6amp one as a replacement, just to have a little more headroom:
https://www.amazon.com/gp/product/B01AJQ9G2C/ref=oh_aui_detailpage_o01_s00?ie=UTF8&psc=1It may turn out to be cheap-ass also, but I can get it tomorrow, so I'm rolling the dice.
If that burns out too, then there's this one, which looks more beefy and would be my first choice, but will take a week to receive it:
https://www.amazon.com/gp/product/B01J19G00E/ref=oh_aui_detailpage_o00_s00?ie=UTF8&psc=1 -
Dang. I cancelled the order, as I'm not sure whether its 5.5mmx2.1mm barrel jack will fit or whether a 5.5mm x2.5mm is required.
Looks as though the barrel on the woodpeck is 2.5mm inside diameter....
-
Powering it from a variable power supply, it apparently works. Here's the etching on a piece of plywood:
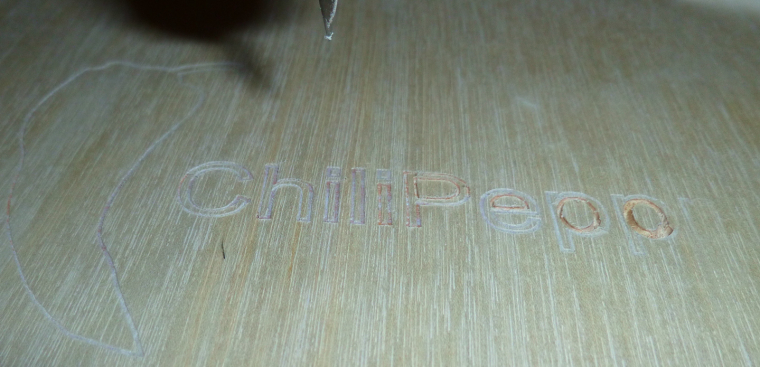
I watched the current being drawn, and it appeared to always be below 1 amp. The variable power supply can supply up to 5 amps, so no problem there as far as I can see.The etching that it did was a bit weird: deep cuts in the inside diameter of the P's, but only faint cuts just outside. The R was barely even touched at all. The surface doesn't feel sufficiently non-flat to account for that.
Ideas as to what's going wrong there?
-
Here is a contextual photo:
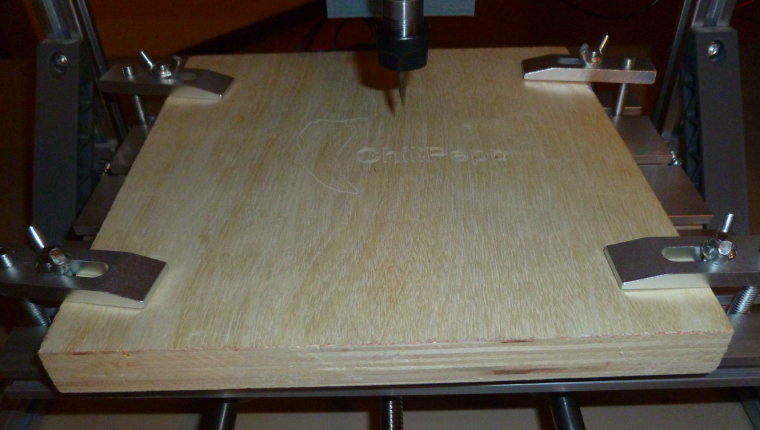
The clamps are holding the board very securely. -
After thinking about it, my hypothesis is that the feedrate is too high. I have it set to 1 in ChilliPeppr. I think maybe it comes down rapidly to the programmed height, but if it meets resistance then it skips some motor steps. Since it's open loop, it doesn't know. Then it dwells at that depth until it picks up the bit and relocates. I'll try a slower feedrate and see if it makes a difference.
-
Maybe the bit is too dull as well. It's one of the freebies that came with the kit.
-
Also, what is the preferred way to tighten the ER11 chuck? So far, I did it just by hand, which seems to have been good enough. However, maybe a better practice is to give it a 1/4 turn further tightening using wrenches after that? How are others here approaching that?
-
Also, what is the preferred way to tighten the ER11 chuck? So far, I did it just by hand, which seems to have been good enough. However, maybe a better practice is to give it a 1/4 turn further tightening using wrenches after that? How are others here approaching that?
@neverdie for er11 fastening you should use two wrenches.
if you loose steps during the milling, then with the given feed rate / depth / spindle speed combination the cnc / spindle / steppers are not powerful enough.
if you wood milling depth is not constant then:
- the wood is not flat
- the cnc bad is not flat
- the cnc x axis is not horizontal
my availability for the next couple of days will be quite limited, so I wish you good luck for experiencing the router and for the first PCBs!
-
Also, what is the preferred way to tighten the ER11 chuck? So far, I did it just by hand, which seems to have been good enough. However, maybe a better practice is to give it a 1/4 turn further tightening using wrenches after that? How are others here approaching that?
@neverdie said in CNC PCB milling:
Also, what is the preferred way to tighten the ER11 chuck? So far, I did it just by hand, which seems to have been good enough. However, maybe a better way is to give it a 1/4 turn further tightening using wrenches after that? How are others here approaching that?
+1 for the wrench, mostly because of vibrations that could unscrew it. No need to pull a muscle on it as it is tapered and has big contact surface
-
Also, what is the preferred way to tighten the ER11 chuck? So far, I did it just by hand, which seems to have been good enough. However, maybe a better practice is to give it a 1/4 turn further tightening using wrenches after that? How are others here approaching that?
@neverdie If it is anyway similar to a Router, it should have a locking pin to hold the spindle, or a second nut against which you tighten the collet. Do not overtighten, just enough to bite the shaft, otherwise you either damage the shaft or more seriously shatter the collet, it should be just enough to be a firm clamp to ensure grip, the collet will do the rest.
Not a user of these CNCs but I would guess the same principles apply... Just my 2c... -
@neverdie for er11 fastening you should use two wrenches.
if you loose steps during the milling, then with the given feed rate / depth / spindle speed combination the cnc / spindle / steppers are not powerful enough.
if you wood milling depth is not constant then:
- the wood is not flat
- the cnc bad is not flat
- the cnc x axis is not horizontal
my availability for the next couple of days will be quite limited, so I wish you good luck for experiencing the router and for the first PCBs!
Have a Merry Christmas!
Also, I'm not going to dwell on etching wood . It was just my first attempt at etching anything, and I thought wood might be a little softer.
I suppose the next step is to have a go at auto-leveling on a PCB rather than perfect the machine's etching of plywood. Indeed, PCB's may turn out to be easier, as the resistance to downward motion (especially after auto-levelling) should be more uniform.
-
Meh, I think I know what happened now. If the z-axis ever skips a step in downward motion--for whatever reason--then the rest of the etching is screwed from that point forward, because the higher height then becomes the new "zero" for the entire remainder of the etching since the depth control is completely open loop. So, the first spot in the sequence that isn't at proper depth would be where the error occurred, creating a persistence of the error from that point forward in the etching sequence.