SMD Reflow Oven / PID
-
A bit off-topic, but as per the suggestions earlier in this topic I managed to get a toaster oven working with an OSPId reflow controller, and got some test boards with 0603, 0805, 1206 and SOT23 stuff reflowed with 4 year old AIM solder paste (no flux, lead free of course).
Learned a lot. Now should get my hands dirty with some nRF52832 (ebyte E73) modules / PCB's to produce something useful ;-)
I see so much nice designs here with that module!
@mars-warrior That's cool that you got lead free paste to work. How difficult was it?
-
@mars-warrior That's cool that you got lead free paste to work. How difficult was it?
@neverdie No idea if this was difficult as I never worked with leaded solder paste :laughing:
I used OSPID's RoHS reflow profile to reflow a test board

The test board looks like this. I was surprised that I managed to place the 0603 (imperial) with a pincet on the board (and magnifying glasses).
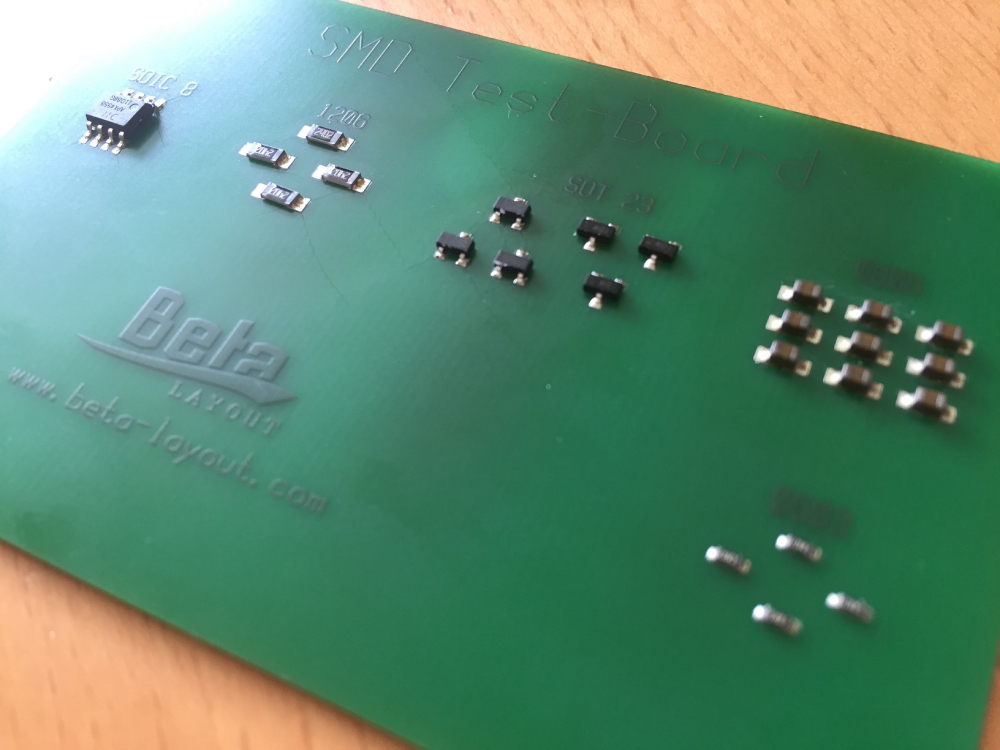
No idea how good the connections really are with 4 year old solderpaste. I guess I should not use that for real boards :sunglasses:
-
A bit off-topic, but as per the suggestions earlier in this topic I managed to get a toaster oven working with an OSPId reflow controller, and got some test boards with 0603, 0805, 1206 and SOT23 stuff reflowed with 4 year old AIM solder paste (no flux, lead free of course).
Learned a lot. Now should get my hands dirty with some nRF52832 (ebyte E73) modules / PCB's to produce something useful ;-)
I see so much nice designs here with that module!
-
There's starting to be some interesting solder paste dispensors on thingiverse, such as:
https://www.thingiverse.com/thing:384680
or
https://www.thingiverse.com/thing:2123259I'd probably need a tool like one of those. I didn't have good enough technique dispensing manually directly from a solder paste syringe, and I never really warmed up to the idea of using stencils. Well, not yet anyway. Using non-leaded solder paste would make the whole thing more appealing. Since nobody seemed to be doing it, I just assumed it was too hard to get it to work...until you came along!
-
@toyman said in nRF5 action!:
@mars-warrior said in nRF5 action!:
OSPId reflow controller
where did you get it?
I bought it from someone else, but he bought it from Rocketstream
..
In the mean time I learned how a PID controller works (approx) as described here with this nice GIF from Wikipedia:
And managed to get a very good implementation by OSPid of my (slightly modified) reflow profile for lead free solderpaste (max of 245 degrees):
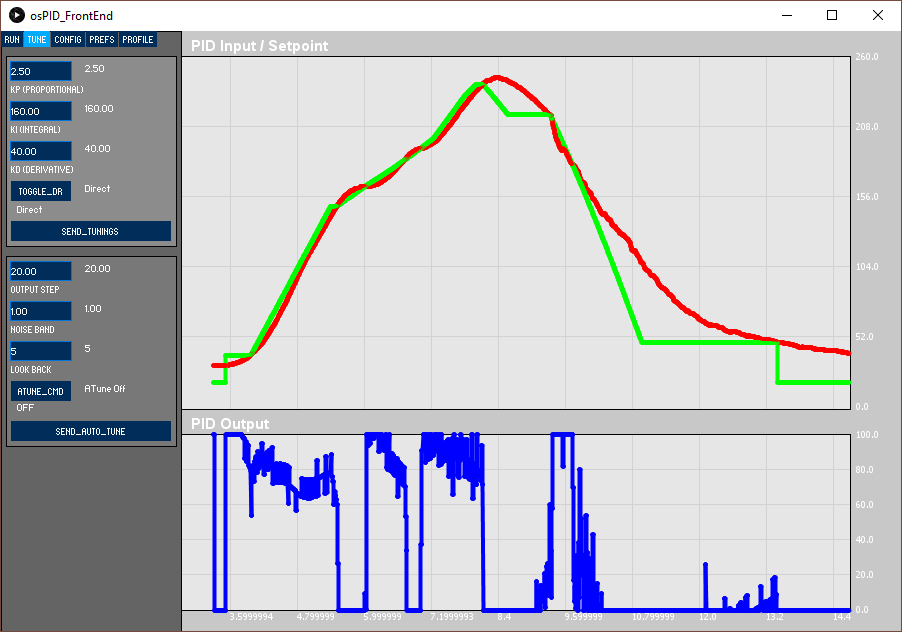
As you can see much better than my previous posted picture. Note that green = profile, and red is the actual temperature measurements.
The original OOTB PID settings where 2/0.5/2 and I'm now using 2.5/160/40 which gives a very nice result!
I increased the P value a bit. Made I much higher to make it follow the profile much, much, much better and used 40 for the D value to smoothen the temperature and prevent to much overshoot at 240 degrees.The only weird thing is that the oven is spec'd at max 230 degrees, but I already got it to 280 degrees (that was before I understood PID settings, I entered completely wrong ones) and burning the test PCB with the attached temperature sensor inside it:
So now I have to make a real PCB and see if all this learning (using a stencil, applying solder paste, placing components, reflowing) can produce a working product :grinning:
Since nobody seemed to be doing it, I just assumed it was too hard to get it to work...until you came along!
:innocent:
-
Maybe this, or one like it? There are a ton of them on ebay.
https://www.ebay.com/itm/AC-110-240-Digital-PID-Temperature-controller-40A-SSR-K-thermocouple-Sensor/371134791350?epid=918051785&hash=item56695b7eb6:g:yRAAAOSwVFlUBBap
Ah, but of course, I don't suppose they would follow a temperature profile.... -
Maybe this, or one like it? There are a ton of them on ebay.
https://www.ebay.com/itm/AC-110-240-Digital-PID-Temperature-controller-40A-SSR-K-thermocouple-Sensor/371134791350?epid=918051785&hash=item56695b7eb6:g:yRAAAOSwVFlUBBap
Ah, but of course, I don't suppose they would follow a temperature profile....@neverdie Yup, cheap but no (adjustable) temperature profile...
I just found it easier to use a reflow controller, as I had no idea how not using a profile would impact the soldering results.
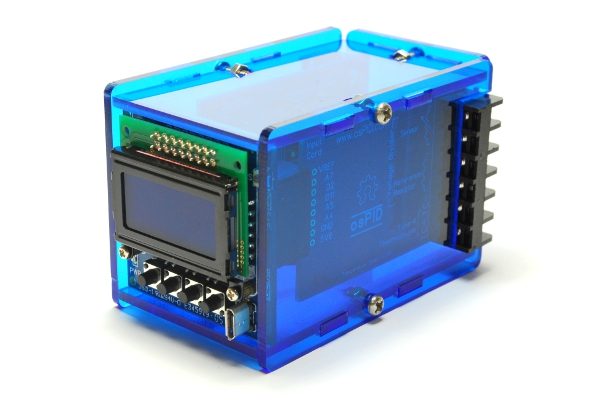
I bought a new, fairly cheap but good €70 oven, and the rest is second hand stuff for around €50; an OMRON SSR (40A), which gets barely warm during a reflow session, an osPID controller and a temperature sensor.
I'm happy with the combination as it gives me reproducible results.
Of course I have no results yet with real boards, but I'm confident that the reflow setup can be adjusted (longer pre-heat and soak times for instance) to meet the PCB, reflow paste and component requirements.
As you can see below, the osPID profile is very easy to setup:
RoHS24X //first row is Profile Name with different crossings 3, 40, 0 //Step Setpoint to 40, wait 0 seconds 2, 0, 0 //Wait for PID Input to cross setpoint 127, 0, 1 //buzz for 1 second as a signal that the oven is starting to heat 1, 150, 100 //PRE-HEAT: ramp setpoint to 150 degrees over the course of 100 seconds 2, 5, 5 //Wait for PID Input to cross setpoint 1, 200, 120 //SOAK: ramp setpoint to 200 degrees over the course of 120 seconds 2, 5, 5 //Wait for PID Input to cross setpoint 1, 240, 45 //REFLOW: ramp setpoint to 240 degrees over the course of 45 seconds 2, 0, 0 //Wait for PID Input to cross setpoint 1, 218, 30 //ramp setpoint to 218 (TAL) over the course of 30 seconds 2, 5, 5 //Wait for PID Input to cross setpoint --> within 5 degrees, 5 seconds 127, 0, 1 //buzz for 2 seconds as a signal to open the oven door 1, 50, 150 //ramp setpoint to 50 over the course of 150 seconds 2, 0, 0 //Wait for PID Input to cross setpoint 127, 0, 2 //buzz for 2 seconds 3, 20, 0 //Step Setpoint to 20, full cooldown!``` -
Have look here: http://www.whizoo.com/
and source code: https://github.com/engineertype/ControLeo/tree/master/ControLeo/examples/ReflowWizard -
@toyman said in nRF5 action!:
@mars-warrior said in nRF5 action!:
OSPId reflow controller
where did you get it?
I bought it from someone else, but he bought it from Rocketstream
..
In the mean time I learned how a PID controller works (approx) as described here with this nice GIF from Wikipedia:
And managed to get a very good implementation by OSPid of my (slightly modified) reflow profile for lead free solderpaste (max of 245 degrees):
As you can see much better than my previous posted picture. Note that green = profile, and red is the actual temperature measurements.
The original OOTB PID settings where 2/0.5/2 and I'm now using 2.5/160/40 which gives a very nice result!
I increased the P value a bit. Made I much higher to make it follow the profile much, much, much better and used 40 for the D value to smoothen the temperature and prevent to much overshoot at 240 degrees.The only weird thing is that the oven is spec'd at max 230 degrees, but I already got it to 280 degrees (that was before I understood PID settings, I entered completely wrong ones) and burning the test PCB with the attached temperature sensor inside it:
So now I have to make a real PCB and see if all this learning (using a stencil, applying solder paste, placing components, reflowing) can produce a working product :grinning:
Since nobody seemed to be doing it, I just assumed it was too hard to get it to work...until you came along!
:innocent:
@mars-warrior said in nRF5 action!:
In the mean time I learned how a PID controller
Thanks!
I have to admit I've acquired pretty decent understanding of PID while working on my sous-vide machine :-) -
There's starting to be some interesting solder paste dispensors on thingiverse, such as:
https://www.thingiverse.com/thing:384680
or
https://www.thingiverse.com/thing:2123259I'd probably need a tool like one of those. I didn't have good enough technique dispensing manually directly from a solder paste syringe, and I never really warmed up to the idea of using stencils. Well, not yet anyway. Using non-leaded solder paste would make the whole thing more appealing. Since nobody seemed to be doing it, I just assumed it was too hard to get it to work...until you came along!
-
@neverdie said in nRF5 action!:
I didn't have good enough technique dispensing manually directly from a solder paste syringe,
what did you have issues with?
@toyman said in nRF5 action!:
@neverdie said in nRF5 action!:
I didn't have good enough technique dispensing manually directly from a solder paste syringe,
what did you have issues with?
It was very hard to extrude it, so I always seemed to either underextrude or overstrude. I found it very hard to get the right amount exactly where it should go by just manually pressing the plunger on the solder paste syringe that the material came in.
-
@neverdie
two hypothesis:
a) old paste
b) wrong needle gaugeI use Mechanic XG paste, works perfect
-
@neverdie yes, although I use the one in small cans and reload small amount into 1 ml syringe (with proper gauge needle!)
This bottle contains all the needles conviniently cut
-
@neverdie yes, although I use the one in small cans and reload small amount into 1 ml syringe (with proper gauge needle!)
This bottle contains all the needles conviniently cut
@toyman What about the syringes? Do you have a link for those as well?
I suppose a syringe gun might be handy, if no stepper motor operated one is available:
https://www.aliexpress.com/item/New-Arrival-Manual-Syringe-Gun-Dispenser-10cc-Glue-Dispensing-Gun/32555533165.html?spm=2114.search0604.8.44.58b37fcbKvXPej&priceBeautifyAB=0 -
@toyman What about the syringes? Do you have a link for those as well?
I suppose a syringe gun might be handy, if no stepper motor operated one is available:
https://www.aliexpress.com/item/New-Arrival-Manual-Syringe-Gun-Dispenser-10cc-Glue-Dispensing-Gun/32555533165.html?spm=2114.search0604.8.44.58b37fcbKvXPej&priceBeautifyAB=0@neverdie c'mon, you don't need any special syringe. Ordinary BD will do
Regarding the motor operated one, I actually printed out a full set of 3d parts for the motor oerated syringe but never assembled as there is no need.
If I ever decide to automate the process, I'll make an air driven station with 2 valves. Mechanic solder syringes are supposed to be used with this type of dispensers. -
So I gave it a try today with a solder paste syringe from AliExpress (not perempted like the paste I got from my local shop before). I used a normal syringe pusher (after removing the rubber end) and it went relatively smoothly with a green colored needle (don't know the diameter). I guess I'll try the small syringe technique as it must be easier to have regular flow, but it was good enough.
Without much training I managed to solder my ESP32 module (and 2 buttons) to the adapter board. I used my small 10*10cm hotplate, remotely following the reflow profile for this solder type and all connections are good. -
So I gave it a try today with a solder paste syringe from AliExpress (not perempted like the paste I got from my local shop before). I used a normal syringe pusher (after removing the rubber end) and it went relatively smoothly with a green colored needle (don't know the diameter). I guess I'll try the small syringe technique as it must be easier to have regular flow, but it was good enough.
Without much training I managed to solder my ESP32 module (and 2 buttons) to the adapter board. I used my small 10*10cm hotplate, remotely following the reflow profile for this solder type and all connections are good.
Hello! It looks like you're interested in this conversation, but you don't have an account yet.
Getting fed up of having to scroll through the same posts each visit? When you register for an account, you'll always come back to exactly where you were before, and choose to be notified of new replies (either via email, or push notification). You'll also be able to save bookmarks and upvote posts to show your appreciation to other community members.
With your input, this post could be even better 💗
Register Login