@mfalkvidd That would be great!
Your test Module for the Gateway was an Wemos, an NodeMcu or something else?
regards
@mfalkvidd That would be great!
Your test Module for the Gateway was an Wemos, an NodeMcu or something else?
regards
is there a chance to get your library Folder?
dont know, it is not working anyway
Wich Arduino IDE Version are you using? (Last Idea)
I have No Reply, don't know what i do wrong :(
/**
 * The MySensors Arduino library handles the wireless radio link and protocol
 * between your home built sensors/actuators and HA controller of choice.
 * The sensors forms a self healing radio network with optional repeaters. Each
 * repeater and gateway builds a routing tables in EEPROM which keeps track of the
 * network topology allowing messages to be routed to nodes.
 *
 * Created by Henrik Ekblad <henrik.ekblad@mysensors.org>
 * Copyright (C) 2013-2015 Sensnology AB
 * Full contributor list: https://github.com/mysensors/Arduino/graphs/contributors
 *
 * Documentation: http://www.mysensors.org
 * Support Forum: http://forum.mysensors.org
 *
 * This program is free software; you can redistribute it and/or
 * modify it under the terms of the GNU General Public License
 * version 2 as published by the Free Software Foundation.
 *
 *******************************
 *
 * REVISION HISTORY
 * Version 1.0 - Henrik EKblad
 * Contribution by tekka,
 * Contribution by a-lurker and Anticimex,
 * Contribution by Norbert Truchsess <norbert.truchsess@t-online.de>
 * Contribution by Ivo Pullens (ESP8266 support)
 *
 * DESCRIPTION
 * The EthernetGateway sends data received from sensors to the WiFi link.
 * The gateway also accepts input on ethernet interface, which is then sent out to the radio network.
 *
 * VERA CONFIGURATION:
 * Enter "ip-number:port" in the ip-field of the Arduino GW device. This will temporarily override any serial configuration for the Vera plugin.
 * E.g. If you want to use the defualt values in this sketch enter: 192.168.178.66:5003
 *
 * LED purposes:
 * - To use the feature, uncomment WITH_LEDS_BLINKING in MyConfig.h
 * - RX (green) - blink fast on radio message recieved. In inclusion mode will blink fast only on presentation recieved
 * - TX (yellow) - blink fast on radio message transmitted. In inclusion mode will blink slowly
 * - ERR (red) - fast blink on error during transmission error or recieve crc error
 *
 * See http://www.mysensors.org/build/esp8266_gateway for wiring instructions.
 * nRF24L01+  ESP8266
 * VCC        VCC
 * CE         GPIO4
 * CSN/CS     GPIO15
 * SCK        GPIO14
 * MISO       GPIO12
 * MOSI       GPIO13
 * GND        GND
 *
 * Not all ESP8266 modules have all pins available on their external interface.
 * This code has been tested on an ESP-12 module.
 * The ESP8266 requires a certain pin configuration to download code, and another one to run code:
 * - Connect REST (reset) via 10K pullup resistor to VCC, and via switch to GND ('reset switch')
 * - Connect GPIO15 via 10K pulldown resistor to GND
 * - Connect CH_PD via 10K resistor to VCC
 * - Connect GPIO2 via 10K resistor to VCC
 * - Connect GPIO0 via 10K resistor to VCC, and via switch to GND ('bootload switch')
 *
  * Inclusion mode button:
 * - Connect GPIO5 via switch to GND ('inclusion switch')
 *
 * Hardware SHA204 signing is currently not supported!
 *
 * Make sure to fill in your ssid and WiFi password below for ssid & pass.
 */

#include <ArduinoOTA.h>

// Enable debug prints to serial monitor
#define MY_DEBUG

// Use a bit lower baudrate for serial prints on ESP8266 than default in MyConfig.h
#define MY_BAUD_RATE 9600

// Enables and select radio type (if attached)
#define MY_RADIO_RFM69
#define MY_RFM69_IRQ_NUM D2
#define MY_RFM69_IRQ_PIN D2

#define MY_RFM69_CS_PIN D8
#define MY_RFM69_FREQUENCY RFM69_433MHZ


#define MY_GATEWAY_ESP8266

#define MY_ESP8266_SSID "N3tw0rk.NET"
#define MY_ESP8266_PASSWORD "123456"

// Set the hostname for the WiFi Client. This is the hostname
// it will pass to the DHCP server if not static.
#define MY_ESP8266_HOSTNAME "RFM69-Gateway"

// Enable UDP communication
//#define MY_USE_UDP  // If using UDP you need to set MY_CONTROLLER_IP_ADDRESS below

// Enable MY_IP_ADDRESS here if you want a static ip address (no DHCP)
//#define MY_IP_ADDRESS 192,168,178,87

// If using static ip you can define Gateway and Subnet address as well
//#define MY_IP_GATEWAY_ADDRESS 192,168,178,1
//#define MY_IP_SUBNET_ADDRESS 255,255,255,0

// The port to keep open on node server mode
#define MY_PORT 5003

// How many clients should be able to connect to this gateway (default 1)
#define MY_GATEWAY_MAX_CLIENTS 2

// Controller ip address. Enables client mode (default is "server" mode).
// Also enable this if MY_USE_UDP is used and you want sensor data sent somewhere.
//#define MY_CONTROLLER_IP_ADDRESS 192, 168, 178, 68

// Enable inclusion mode
#define MY_INCLUSION_MODE_FEATURE

// Enable Inclusion mode button on gateway
// #define MY_INCLUSION_BUTTON_FEATURE
// Set inclusion mode duration (in seconds)
#define MY_INCLUSION_MODE_DURATION 60
// Digital pin used for inclusion mode button
//#define MY_INCLUSION_MODE_BUTTON_PIN  3

// Set blinking period
// #define MY_DEFAULT_LED_BLINK_PERIOD 300

// Flash leds on rx/tx/err
// Led pins used if blinking feature is enabled above
//#define MY_DEFAULT_ERR_LED_PIN 16  // Error led pin
//#define MY_DEFAULT_RX_LED_PIN  16  // Receive led pin
//#define MY_DEFAULT_TX_LED_PIN  16  // the PCB, on board LED

#if defined(MY_USE_UDP)
#include <WiFiUDP.h>
#else
#include <ESP8266WiFi.h>
#endif

#include <MySensors.h>

void setup()
{
  // Setup locally attached sensors
	ArduinoOTA.onStart([]() {
		debug("ArduinoOTA start\n");
	});
	ArduinoOTA.onEnd([]() {
		debug("\nArduinoOTA end\n");
	});
  ArduinoOTA.setPassword((const char *)"123");
	ArduinoOTA.onProgress([](unsigned int progress, unsigned int total) {
		debug("OTA Progress: %u%%\r", (progress / (total / 100)));
	});
	ArduinoOTA.onError([](ota_error_t error) {
		debug("Error[%u]: ", error);
		if (error == OTA_AUTH_ERROR) {
			debug("Auth Failed\n");
		} else if (error == OTA_BEGIN_ERROR) {
			debug("Begin Failed\n");
		} else if (error == OTA_CONNECT_ERROR) {
			debug("Connect Failed\n");
		} else if (error == OTA_RECEIVE_ERROR) {
			debug("Receive Failed\n");
		} else if (error == OTA_END_ERROR) {
			debug("End Failed\n");
		}
	});
	ArduinoOTA.begin();
}

void presentation()
{
  // Present locally attached sensors here
}

void loop()
{
  // Send locally attech sensors data here
	ArduinoOTA.handle();
}
Ok, i delete the eeprom from both, gateway and node and flash the old scripts with additional definiton of Num IRQ for the gateway?
seems that this is the problem...
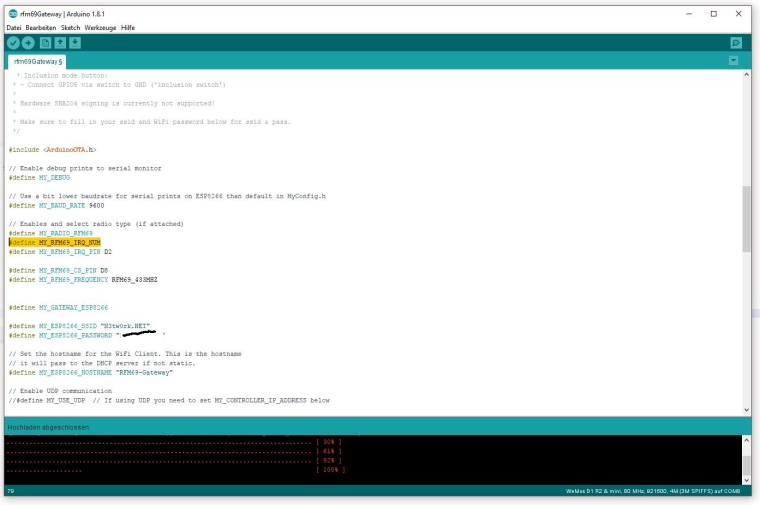
When it is gray, the define is not found, am i right?
What would you think? Arduino IDE reinstalling or what could be the problem?
It is grey, uploads it and same thing as before.
Sensor cant get the gateway, gateway stops at "pm open,type:2 0".
Don't know where the problem is :/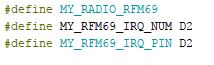
i cant declare
#define MY_RFM69_IRQ_NUM
Is that ok for the Gateway?
@mfalkvidd said in RFM69CW Gateway and Nodes are not working with Api newer then 2.0.0:
commit 3e75b52c33b06c70d60eb691bd127e2f585a0c87
Date: Fri Jul 7 14:36:14 2017 +0200
The same commit as i used, freshly downloaded yesterday.
2.0.0 also not running?
I think FHEM hands it out, yes, because you can configure the ID's in the Mysensors Module.
...with nRF24 the beta is no Problem with FHEM.
Oh you mean which System uses the Data?
I use Fhem.
Gateway: Wemos D1 Mini
Nodes: Arduino Pro Mini
@sundberg84 said in RFM69CW Gateway and Nodes are not working with Api newer then 2.0.0:
A nano will fry your radio (5v SPI/data lines) but maybe you wrote the wrong mcu?
whoops, i forget that, but it still works ^^
@sundberg84 said in RFM69CW Gateway and Nodes are not working with Api newer then 2.0.0:
I can comfirm that a RFM69w and Pro Mini 3.3v 8mhz works great on dev branch.
Seems to be an Gateway problem, because the Sensor waits for the gateway...
@sundberg84 said in RFM69CW Gateway and Nodes are not working with Api newer then 2.0.0:
im using this code: https://github.com/sundberg84/MySensors2.0.0/blob/master/RFM69gw/Rfm69gw.ino
@mfalkvidd doublechecked my script, tht should not be the Problem :(
I have researched and have found out that an arduino nano as a serial gateway also does not seem to work (same log as above).
I hope this helps you a bit.
Ok, i know what you mean, that is true.
...on 2.0.0 or on 2.2.0?
I use this Module...
https://www.openhardware.io/view/386/Minimalist-RFM69CW-WeMos-D1-Mini-Shield
IRQ=DIO0= GPIO4=D2
CS=NSS=GPIO15=D8
Oh, of course, i wrote Nano, my mistake :(
I use Arduino PRO MINI's 3.3v for my Nodes.
GW 2.0.0
Ê$OH˜KlK
ùið¤0;255;3;0;9;Starting gateway (RRNGE-, 2.0.0)
0;255;3;0;9;TSM:INIT
0;255;3;0;9;TSM:RADIO:OK
0;255;3;0;9;TSM:GW MODE
0;255;3;0;9;TSM:READY
scandone
state: 0 -> 2 (b0)
state: 2 -> 3 (0)
state: 3 -> 5 (10)
add 0
aid 4
cnt
f r0, scandone
connected with N3tw0rk.NET, channel 1
dhcp client start...
..ip:192.168.178.118,mask:255.255.255.0,gw:192.168.178.1
.IP: 192.168.178.118
0;255;3;0;9;No registration required
0;255;3;0;9;Init complete, id=0, parent=0, distance=0, registration=1
pm open,type:2 0
0;255;3;0;9;TSP:MSG:READ 100-100-255 s=255,c=3,t=7,pt=0,l=0,sg=0:
0;255;3;0;9;TSP:MSG:BC
0;255;3;0;9;TSP:MSG:FPAR REQ (sender=100)
0;255;3;0;9;TSP:CHKUPL:OK
0;255;3;0;9;TSP:MSG:GWL OK
0;255;3;0;9;TSP:MSG:SEND 0-0-100-100 s=255,c=3,t=8,pt=1,l=1,sg=0,ft=0,st=ok:0
0;255;3;0;9;TSP:MSG:READ 100-100-0 s=255,c=3,t=24,pt=1,l=1,sg=0:1
0;255;3;0;9;TSP:MSG:PINGED (ID=100, hops=1)
0;255;3;0;9;TSP:MSG:SEND 0-0-100-100 s=255,c=3,t=25,pt=1,l=1,sg=0,ft=0,st=ok:1
0;255;3;0;9;TSP:MSG:READ 100-100-0 s=255,c=3,t=15,pt=6,l=2,sg=0:0100
0;255;3;0;9;!TSP:MSG:SEND 0-0-100-100 s=255,c=3,t=15,pt=6,l=2,sg=0,ft=0,st=fail:0100
0;255;3;0;9;TSP:MSG:READ 100-100-0 s=255,c=3,t=6,pt=1,l=1,sg=0:0
0;255;3;0;9;TSP:MSG:READ 100-100-0 s=255,c=3,t=11,pt=0,l=22,sg=0:TemperatureAndHumidity
0;255;3;0;9;TSP:MSG:READ 100-100-0 s=0,c=0,t=7,pt=0,l=0,sg=0:
0;255;3;0;9;TSP:MSG:READ 100-100-0 s=1,c=0,t=6,pt=0,l=0,sg=0:
0;255;3;0;9;TSP:MSG:READ 100-100-0 s=255,c=3,t=26,pt=1,l=1,sg=0:2
0;255;3;0;9;TSP:MSG:SEND 0-0-100-100 s=255,c=3,t=27,pt=1,l=1,sg=0,ft=0,st=ok:1
0;255;3;0;9;TSP:MSG:READ 100-100-0 s=1,c=1,t=0,pt=7,l=5,sg=0:22.8
0;255;3;0;9;TSP:MSG:READ 100-100-0 s=0,c=1,t=1,pt=7,l=5,sg=0:80.7
0;255;3;0;9;TSP:SANCHK:OK
SENSOR 2.0.0

Starting sensor (RRNNA-, 2.0.0)
TSM:INIT
TSM:RADIO:OK
TSP:ASSIGNID:OK (ID=100)
TSM:FPAR
TSP:MSG:SEND 100-100-255-255 s=255,c=3,t=7,pt=0,l=0,sg=0,ft=0,st=bc:
TSP:MSG:READ 0-0-100 s=255,c=3,t=8,pt=1,l=1,sg=0:0
TSP:MSG:FPAR RES (ID=0, dist=0)
TSP:MSG:PAR OK (ID=0, dist=1)
TSM:FPAR:OK
TSM:ID
TSM:CHKID:OK (ID=100)
TSM:UPL
TSP:PING:SEND (dest=0)
TSP:MSG:SEND 100-100-0-0 s=255,c=3,t=24,pt=1,l=1,sg=0,ft=0,st=ok:1
TSP:MSG:READ 0-0-100 s=255,c=3,t=25,pt=1,l=1,sg=0:1
TSP:MSG:PONG RECV (hops=1)
TSP:CHKUPL:OK
TSM:UPL:OK
TSM:READY
TSP:MSG:SEND 100-100-0-0 s=255,c=3,t=15,pt=6,l=2,sg=0,ft=0,st=ok:0100
!TSP:MSG:SEND 100-100-0-0 s=255,c=0,t=17,pt=0,l=5,sg=0,ft=0,st=fail:2.0.0
!TSP:MSG:SEND 100-100-0-0 s=255,c=3,t=6,pt=1,l=1,sg=0,ft=1,st=fail:0
TSP:MSG:READ 0-0-100 s=255,c=3,t=15,pt=6,l=2,sg=0:0100
TSP:MSG:SEND 100-100-0-0 s=255,c=3,t=11,pt=0,l=22,sg=0,ft=2,st=ok:TemperatureAndHumidity
!TSP:MSG:SEND 100-100-0-0 s=255,c=3,t=12,pt=0,l=3,sg=0,ft=0,st=fail:1.1
TSP:MSG:SEND 100-100-0-0 s=0,c=0,t=7,pt=0,l=0,sg=0,ft=1,st=ok:
TSP:MSG:SEND 100-100-0-0 s=1,c=0,t=6,pt=0,l=0,sg=0,ft=0,st=ok:
Request registration...
TSP:MSG:SEND 100-100-0-0 s=255,c=3,t=26,pt=1,l=1,sg=0,ft=0,st=ok:2
TSP:MSG:READ 0-0-100 s=255,c=3,t=27,pt=1,l=1,sg=0:1
Node registration=1
Init complete, id=100, parent=0, distance=1, registration=1
TSP:MSG:SEND 100-100-0-0 s=1,c=1,t=0,pt=7,l=5,sg=0,ft=0,st=ok:22.8
T: 22.80
TSP:MSG:SEND 100-100-0-0 s=0,c=1,t=1,pt=7,l=5,sg=0,ft=0,st=ok:80.8
H: 80.80
Gateway 2.2.0


ÈDpÈtAhÀD´ðCXXüü0;255;3;0;9;238 MCO:BGN:INIT GW,CP=RRNGE---,VER=2.2.0-beta
0;255;3;0;9;299 TSF:LRT:OK
0;255;3;0;9;327 TSM:INIT
0;255;3;0;9;353 TSF:WUR:MS=0
scandone
state: 0 -> 2 (b0)
state: 2 -> 3 (0)
state: 3 -> 5 (10)
add 0
aid 4
cnt
0;255;3;0;9;470 TSM:INIT:TSP OK
0;255;3;0;9;502 TSM:INIT:GW MODE
0;255;3;0;9;537 TSM:READY:ID=0,PAR=0,DIS=0
0;255;3;0;9;582 MCO:REG:NOT NEEDED

connected with N3tw0rk.NET, channel 1
dhcp client start...
f r0, scandone
.....ip:192.168.178.118,mask:255.255.255.0,gw:192.168.178.1
.IP: 192.168.178.118
0;255;3;0;9;3682 MCO:BGN:STP
0;255;3;0;9;3735 MCO:BGN:INIT OK,TSP=1
pm open,type:2 0
Sensor 2.2.0


0 MCO:BGN:INIT NODE,CP=RRNNA---,VER=2.2.0-beta
4 TSM:INIT
4 TSF:WUR:MS=0
8 TSM:INIT:TSP OK
10 TSM:FPAR
1228 TSF:MSG:SEND,255-255-255-255,s=255,c=3,t=7,pt=0,l=0,sg=0,ft=0,st=OK:
3237 !TSM:FPAR:NO REPLY
3239 TSM:FPAR
4468 TSF:MSG:SEND,255-255-255-255,s=255,c=3,t=7,pt=0,l=0,sg=0,ft=0,st=OK:
6477 !TSM:FPAR:NO REPLY
6479 TSM:FPAR
7698 TSF:MSG:SEND,255-255-255-255,s=255,c=3,t=7,pt=0,l=0,sg=0,ft=0,st=OK:
9707 !TSM:FPAR:NO REPLY
9709 TSM:FPAR
10928 TSF:MSG:SEND,255-255-255-255,s=255,c=3,t=7,pt=0,l=0,sg=0,ft=0,st=OK:
12937 !TSM:FPAR:FAIL
12939 TSM:FAIL:CNT=1
12941 TSM:FAIL:DIS
12943 TSF:TDI:TSL
22947 TSM:FAIL:RE-INIT
22949 TSM:INIT
22951 TSM:INIT:TSP OK
22956 TSM:FPAR
24174 TSF:MSG:SEND,255-255-255-255,s=255,c=3,t=7,pt=0,l=0,sg=0,ft=0,st=OK:
26183 !TSM:FPAR:NO REPLY
26185 TSM:FPAR
27404 TSF:MSG:SEND,255-255-255-255,s=255,c=3,t=7,pt=0,l=0,sg=0,ft=0,st=OK:
29413 !TSM:FPAR:NO REPLY
29415 TSM:FPAR
30633 TSF:MSG:SEND,255-255-255-255,s=255,c=3,t=7,pt=0,l=0,sg=0,ft=0,st=OK:
32643 !TSM:FPAR:NO REPLY
32645 TSM:FPAR
33867 TSF:MSG:SEND,255-255-255-255,s=255,c=3,t=7,pt=0,l=0,sg=0,ft=0,st=OK:
35876 !TSM:FPAR:FAIL
35878 TSM:FAIL:CNT=2
35880 TSM:FAIL:DIS
35883 TSF:TDI:TSL
45887 TSM:FAIL:RE-INIT
45889 TSM:INIT
45891 TSM:INIT:TSP OK
45895 TSM:FPAR
47114 TSF:MSG:SEND,255-255-255-255,s=255,c=3,t=7,pt=0,l=0,sg=0,ft=0,st=OK:
49123 !TSM:FPAR:NO REPLY
49125 TSM:FPAR
50370 TSF:MSG:SEND,255-255-255-255,s=255,c=3,t=7,pt=0,l=0,sg=0,ft=0,st=OK:
52379 !TSM:FPAR:NO REPLY
52381 TSM:FPAR
53600 TSF:MSG:SEND,255-255-255-255,s=255,c=3,t=7,pt=0,l=0,sg=0,ft=0,st=OK:
55609 !TSM:FPAR:NO REPLY
55611 TSM:FPAR
56829 TSF:MSG:SEND,255-255-255-255,s=255,c=3,t=7,pt=0,l=0,sg=0,ft=0,st=OK:
58839 !TSM:FPAR:FAIL
58841 TSM:FAIL:CNT=3
58843 TSM:FAIL:DIS
58845 TSF:TDI:TSL
68849 TSM:FAIL:RE-INIT
68851 TSM:INIT
68853 TSM:INIT:TSP OK
68857 TSM:FPAR
70076 TSF:MSG:SEND,255-255-255-255,s=255,c=3,t=7,pt=0,l=0,sg=0,ft=0,st=OK:
72085 !TSM:FPAR:NO REPLY
72087 TSM:FPAR
73306 TSF:MSG:SEND,255-255-255-255,s=255,c=3,t=7,pt=0,l=0,sg=0,ft=0,st=OK:
75315 !TSM:FPAR:NO REPLY
75317 TSM:FPAR
76535 TSF:MSG:SEND,255-255-255-255,s=255,c=3,t=7,pt=0,l=0,sg=0,ft=0,st=OK:
78546 !TSM:FPAR:NO REPLY
78548 TSM:FPAR
79767 TSF:MSG:SEND,255-255-255-255,s=255,c=3,t=7,pt=0,l=0,sg=0,ft=0,st=OK:
81776 !TSM:FPAR:FAIL
81778 TSM:FAIL:CNT=4
81780 TSM:FAIL:DIS
81782 TSF:TDI:TSL
91785 TSM:FAIL:RE-INIT
91787 TSM:INIT
91789 TSM:INIT:TSP OK
91793 TSM:FPAR
93011 TSF:MSG:SEND,255-255-255-255,s=255,c=3,t=7,pt=0,l=0,sg=0,ft=0,st=OK:
95021 !TSM:FPAR:NO REPLY
95023 TSM:FPAR
96241 TSF:MSG:SEND,255-255-255-255,s=255,c=3,t=7,pt=0,l=0,sg=0,ft=0,st=OK:
98250 !TSM:FPAR:NO REPLY
98252 TSM:FPAR
99471 TSF:MSG:SEND,255-255-255-255,s=255,c=3,t=7,pt=0,l=0,sg=0,ft=0,st=OK:
101480 !TSM:FPAR:NO REPLY
101482 TSM:FPAR
102703 TSF:MSG:SEND,255-255-255-255,s=255,c=3,t=7,pt=0,l=0,sg=0,ft=0,st=OK:
104712 !TSM:FPAR:FAIL
104714 TSM:FAIL:CNT=5
104716 TSM:FAIL:DIS
104718 TSF:TDI:TSL
114722 TSM:FAIL:RE-INIT
114724 TSM:INIT
114728 TSM:INIT:TSP OK
114731 TSM:FPAR
115951 TSF:MSG:SEND,255-255-255-255,s=255,c=3,t=7,pt=0,l=0,sg=0,ft=0,st=OK:
117960 !TSM:FPAR:NO REPLY
117962 TSM:FPAR
119183 TSF:MSG:SEND,255-255-255-255,s=255,c=3,t=7,pt=0,l=0,sg=0,ft=0,st=OK:
121192 !TSM:FPAR:NO REPLY
121194 TSM:FPAR
122443 TSF:MSG:SEND,255-255-255-255,s=255,c=3,t=7,pt=0,l=0,sg=0,ft=0,st=OK:
124452 !TSM:FPAR:NO REPLY
124454 TSM:FPAR
125673 TSF:MSG:SEND,255-255-255-255,s=255,c=3,t=7,pt=0,l=0,sg=0,ft=0,st=OK:
127682 !TSM:FPAR:FAIL
127684 TSM:FAIL:CNT=6
127686 TSM:FAIL:DIS
127688 TSF:TDI:TSL
137691 TSM:FAIL:RE-INIT
137693 TSM:INIT
137697 TSM:INIT:TSP OK
137699 TSM:FPAR
138919 TSF:MSG:SEND,255-255-255-255,s=255,c=3,t=7,pt=0,l=0,sg=0,ft=0,st=OK:
140929 !TSM:FPAR:NO REPLY
140931 TSM:FPAR
142151 TSF:MSG:SEND,255-255-255-255,s=255,c=3,t=7,pt=0,l=0,sg=0,ft=0,st=OK:
144160 !TSM:FPAR:NO REPLY
144162 TSM:FPAR
145381 TSF:MSG:SEND,255-255-255-255,s=255,c=3,t=7,pt=0,l=0,sg=0,ft=0,st=OK:
The Config is the Standard Config which comes with the Package on Github.
The Scripts from above are used to flash the devices.
The Gateway on 2.2.0-beta gives only these lines as in Codebox, then, nothing else happens.
I have cleaned the EEPROM from the devices with the eeprom clean example in mysensors examples