Most reliable "best" radio


  • @NeverDie said in Most reliable "best" radio:

    Regarding the antenna extensions, you raise some good points. The people who posted them seem like they thought it genuinely helped, but maybe I was gullible and was wrong to post the links. If so, I'm sorry.

    We are all here to share and learn and help each other out - I was only adding my thoughts on the matter for all to consider.

    On the other hand, it might take only 5 minutes to try them out and see whether or not they work. A simple trial experiment would maybe settle it one way or the other pretty quickly.

    Yes it would, but positioning needs to be carefully maintained to avoid false results.

    @skywatch said in Most reliable "best" radio:
    Thanks. What was it you were wanting me to notice about the e32 library? If it was about the FHSS, that was an e34 module in the youtube video.

    Oh darn it! - I got it mixed up - I am sorry for posting the wrong lib!


  • Hero Member

    @skywatch said in Most reliable "best" radio:

    Yes it would, but positioning needs to be carefully maintained to avoid false results.

    I think for a gateway it could make sense to use two nRF24L01 modules spaced a half wavelength apart. Then for reception you'd get all the benefits of antenna diversity, and for transmission to a particular node you could simply pick the module that receives the most packets out of the two from that node, which should give the better signal path. That could cut down on the sensitivity to positioning by better avoiding null zones.


  • @skywatch said in Most reliable "best" radio:

    That 'antenna modification' just looks crazy to me,

    And that is why it will be fun to test. I corrected my post above and made comments on testing.

    [Edit: It was my bad for drawing people down this dark alley of antenna modifications. I’ve learned much from dark allies and only been beaten-up a few times. Yet, I still go there… to learn. Therefore, I will test it and reply.]


  • Hero Member

    I just now did a current measurement, and, unfortunately, the allegedly smd NRF24L01's on amazon do not appear to be either nRF24L01's nor si24R1's, because the max Tx current is not a match for either:
    Tx_current_smd_nRF24L01.png
    The Tx current is too high to be an nRF24L01, and it's too low to be an si24R1. I'll have to look at some of the alternative datasheets to determine just what it is.


  • @NeverDie I've been playing with KiCAD and working with your BareBones_2AA_Arduino. Given the disucssion on the "Anyone using..." thread about ground planes it jumped out at me that your design uses no ground plane. Of course there isn't any room left either. Does that matter? I see that your radio boards, like the RFM69_900 have solid ground planes.

    To look at further, I looked at the ProMini design by Sparkfun. Pictures are attached of the grounded fills they used. These pictures are of only the top and bottom copper for illustration. I'm thinking this would bother Eric Bogatin and he would say to throw in another layer dedicated to ground signal. Again, do you think it matters?
    TopCu.png BottomCu.png


  • Hero Member

    @Larson I think it probably does matter, but that a dipole antenna may be a good workaround to not having an optimal ground plane. I say that because a number of years ago a group of us on the lowpowerlab forum found that adding a dipole antenna to the rfm69 module resulted in a significant range improvement.

    Part of the problem is that an optimally sized ground plane is actually quite large relative to an otherwise small mote, especially at sub-gigahertz frequencies. So, if you were to build an optimally sized ground plane into your PCB, your mote wouldn't be small anymore. Even a dipole antenna can be so large as to be cumbersome. This antenna: https://lowpowerlab.com/shop/product/193?search=dipole
    was an outgrowth of the discussion and work that the group did, and, as you can see, it's not tiny. However, it might be feasible on a gateway, where size may not matter as much.

    So, short of that, should I try to add more ground plane? I really don't know. More is probably better, but I'm not smart enough to tell you how much difference a marginal increase would make. Adding a dipole antenna very definitely did make a noticeable difference though.

    Maybe somebody reading this who knows more than me can comment.

    Also, part of the reason I didn't add more groundplane was that it would negatively affect the current layout for the two 2.4Ghz horizontal trace antenna readios, which aren't supposed to be mounted over a ground plane. That could be rectified by moving the antenna module to the end of the board, where the trace antenna could hang off the end in empty space, but that's a version 2.0 design. Version 1.0 was just trying to get something ordered from a fab as quickly as possible, and the adapter board placement is something I would change for a v2.0. With that change, there'd be no reason not to do a copper pour and have a nice ground plane--well, within the mote's size constraints.

    There's also more to it than just ground plane. There's the whole matter of impedance, which is hugely important. Smith charts, etc. I don't have more than a superficial grasp on how antennas are supposed to be designed, so I'm really the wrong person to ask about everything that's involved. From what I've read, even the particular dielectric that's used in your PCB can make a meaningful difference. Andreas Speiss did do an episode on how you can use a VNA to tune your antenna better. It might be worth a look. To me it looks like a very deep rabbit hole, and a very steep and very challenging learning curve, so it just depends how far down the rabbit hole you're willing to go. The way I see it, and maybe this is just me, I would hit diminishing returns almost immediately for the amount of effort that's required. That isn't to say that you shouldn't do it though. 😉


  • Hero Member

    @Larson Here's the list of nRF24L01 clones and variants: https://sigrok.org/wiki/Protocol_decoder:Nrf24l01


  • @NeverDie said in Most reliable "best" radio:

    so it just depends how far down the rabbit hole you're willing to go.

    I'm deep in the rabbit hole already and its getting colder and darker. Thank you for your detailed discussion - especially the diminishing-return comment. Yea, I should focus on doing and reporting back - something to show for all I have learned. I remember the 6" dia ground plane idea. Yes, that is a deal-killer. I'd opt for sheet metal befoe building a PCB that big.

    Again, Thank You!


  • Hero Member

    Not completely sure yet, but going down the list of clones/variants datasheets, but it looks as though the amazon smd "nRF24L01" modules may be using the XN297 chip:

    XN297_tx_rx_current_datasheet.png

    I suppose additional measurements, like sleep current and standby current, may either confirm it or not. Also, if it can't support 250kbps, that might also give it away.
    According to the datasheet, it may go as high as 8dBm on Tx, so at least that would be consistent with the "enhanced power mode" advertising in the amazon.com listing.


  • Hero Member

    Well, I checked, and the mystery modules can do 250kbps, so evidently it is not the XN297. That was my best guess, and now I have no idea what it is. The sigrok list of clones and variants hasn't been updated in many years.


  • @NeverDie said in Most reliable "best" radio:

    The sigrok list of clones and variants hasn't been updated in many years.

    Yes, I saw the list of 2 originals and I counted 12 clone/variants. And that list was from 2015 and it is still instructive. If the chips are compatible and deliver value, then it is sufficent for those on the learning curve, like me. Probably not sufficient for market tested commercial products.

    Fun to see the Nordic employee comment about a datasheet error that ended up in a clone. I remember that paper roadmap makers from 50-years ago, like Rand, used to deliberately make mapping errors to catch clones. Times have changed and methods haven't. The die comparisons referenced in links to your link are, again, mind blowing.


  • Hero Member

    @Larson said in Most reliable "best" radio:

    If the chips are compatible and deliver value, then it is sufficent for those on the learning curve, like me

    I think that's the right attitude. The main difference, aside from differences in how they handle ACK (which most software now accommodates for) is that most clones/variants are not as energy efficient as the original. For instance, this particular clone, whatever it is, has a sleep current of something like 1.5ua-1.8ua, as opposed to Nordic's 0.7ua. So, that's worse, but it may not be a deal breaker.

    The newer Nordic nRF5x series chips are definitely a lot more efficient at listening, with receive currents down in the 2.6ma-~5ma range when DCDC conversion is turned on. That compares very favorably to the 15ma and up of the nRF24L01/clones. Of course, a tradeoff is cost and, these days, availability. nRF52805 is "cheap" at around $4, and it's available, so at 4.6ma in RX, it's maybe not a bad choice, considering it includes an RTC and MCU. Its sleep current with RAM retention and RTC is an improvement over the prior nRF52840 flagship. The nRF52805's native Tx power is weak, but for listening it might be adequate. I think I'll order some to try.

    The current flagship is the nRF5340, which is the one that has the 2.6ma Rx current. Presently it is the only one in the nRF53x series.


  • @Larson Will be interested in your results!! 🙂


  • @NeverDie I know what you mean, but "half a wavelength apart would have them in very close proximity with risk of interference. Better if the were 300mm+half a wavelenght apart. But can mysensors cope with 2 gateways on the same frequency? I didn't think that would be possible... Or were you thinking one gateway node with 2x RF modules? Now that would be interesting!


  • Hero Member

    @skywatch said in Most reliable "best" radio:

    @NeverDie I know what you mean, but "half a wavelength apart would have them in very close proximity with risk of interference. Better if the were 300mm+half a wavelenght apart. But can mysensors cope with 2 gateways on the same frequency? I didn't think that would be possible... Or were you thinking one gateway node with 2x RF modules? Now that would be interesting!

    Either way, I suppose.

    Anyway, I ordered the last 10 of the nRF52805's modules from a supplier at just $2.50 each. At that price I would have bought more, but that's all they had. I think that for that price it's a very convenient integrated MCU + radio package for Rx listening and very short-range communication. I look forward to seeing whether the arduino software for the nRF52x arduino library support has noticeably improved since the last time I tried the nRF52x series. I have fond memories of programming it then, and it can only have gotten better since then. Yes? Hopefully? Funny enough a $1 si24R1 will beat it on transmission oomph, but, meh, the nRF52805 wins with 1/3 the Rx current and decently low sleep current, even with built in RTC turned on and full RAM retention.


  • @skywatch Will be interested in your results!

    Here is my proposal for a test of antenna modifications that I will attempt:

    1. Keep it fun, light and fast.
    2. Use ESP8266's (ESP01's or ESP12's) because I've got some to burn.
    3. Antenna modifications only on either receive or transmit (recommendations?)
    4. Based on ESP-NOW protocol - my comfort zone.
    5. Report on RSSI and SNR.
    6. Pick one fixed range so I can keep this close to home and limited in scope.
    7. Most importantly, follow the hack of Pete B. and record
      A. base case original
      B. the 1.0, 0.75, 0.5, 0.25 wave length options
      C. finally test the base case again.

    Any suggestions on other points? I really don't want to burden/distract NeverDie's fine thread here, though I fear I have already. I've never hosted a thread and really don't want to. Perhaps I can post a spreadsheet somewhere.


  • Hero Member

    @Larson said in Most reliable "best" radio:

    I really don't want to burden/distract NeverDie's fine thread here, though I fear I have already.

    No worries. I welcome it. Literally, any content is good content as far as I'm concerned.


  • @NeverDie said in Most reliable "best" radio:

    No worries. I welcome it. Literally, any content is good content as far as I'm concerned.

    You remind me of my favorite teachers/professors. I was lucky to have many.


  • Hero Member

    @Larson Anything that brings more people to the party is a good thing. The more brains brought to bear on any given topic, the better.


  • Hero Member

    @Larson This is kinda bluesky, but I was thinking it would be nice to have not just different radio modules to be pluggable into a test platform, but maybe even different MCU's to be similarly pluggable That way when moving from one version of the test platform to the next, you wouldn't necessarily have to desolder mcu's and other parts. I guess what I'm saying is that maybe the test platform could be either mainly or entirely a backplane that things get plugged into. Especially these days, when finding available MCU's is kinda hit or miss, and you might have to switch to a different MCU because of either price or availability. Anyhow, just putting the idea out there. I'm not at all sure what the best form of such a thing would be, but something that revolves around 2xAA batteries as the form factor makes sense to me.


  • @NeverDie I like the idea. What other mcu's were you thinking of? My limited experience, and supply, is with Atmega328P, Atmega328PB, Attiny 85, Attiny 45, ESP01, and ESP12s. I do have an assortment of PIC chips but can't claim relevant experience as I left that Microchip avenue long ago once I met the easy ArduinoIDE. The downside to multiple mcu’s is, of course, scope creep and even more infinite variations.

    Pluggable? Are you thinking of making a commitment to positions for VCC, GND, several digital pins, maybe an analog pin or two like your Barebones design? Then build PCB's to that footprint for different MCU's? That sounds interesting. Kind of like a MCU/PCB/Radio sandwich.

    I've been studying your Barebones board and enjoy the versatility of the pin locations' multi-functional slots for different projects. Very clever. What brought me to this was that I'm building a radio PCB for yet another radio, the RFM69HCW; the footprint is different than your RFM69HW design. The reason why is that I have 10 HCW's on hand already. I'll share it after I verify that it works. Yesterday, 4 DRF1262's arrived so I'm about to make multiple OSH Park orders. Once they arrive, I'm ready to fab since the flux, the Chipquick, the Keystone AA connectors have all arrived. I've never soldered, or desoldered, a QFN before so I'm anxious about the scavenging of the 328 from a promini. Here we go!

    I am going to have to take a break from my present intensity/study. I’ve got some eldercare things coming up that will dominate my schedule. But I’ll keep in touch.


  • Hero Member

    @Larson said in Most reliable "best" radio:

    What other mcu's were you thinking of?

    Well, that's the thing: not really sure. But tentatively maybe the attiny3224 or the atmega4808/4809. Attiny3324 is very low priced, and presently available, and atmega4808 is more capable than the atmega328p. atmega4808 is same mcu as the atmega4809 (used in the Arduino Nano Every), but with a lower pincount (same as the atmega328p). A counter-argument is to just stick with the atmega328p, since everybody is already familiar with it, and just pay inflated prices for it if you don't already have spares. After all, for a test platform, you don't need many anyway. And scope creep is a very good point.

    [Edit: I just now did a draft. It gives up compactness, because the 14 radio pins have to be run outside of the MCU module to connect with the radio module. Well, it was worth a shot I suppose. To keep it compact, It would need a way to make connections in a very compact way, maybe like the way some of the press-fit connectors on the Pebble watch work. Yet another thing to look into. ]


  • @NeverDie said in Most reliable "best" radio:

    press-fit connectors

    I had to look that up. https://www.connectpositronic.com/en/press-fit-connectors/
    Very interesting. Way too advanced for my Flinstone ways.

    Just today I completed my first KiCAD PCB. It is every bit as challenging as Eagle. Though it does offer some advantages in 'clickability' (my term).


  • Hero Member

    @Larson said in Most reliable "best" radio:

    I had to look that up. https://www.connectpositronic.com/en/press-fit-connectors/

    EEVblog shows an example of one here at time index 6:50:
    EEVblog #761 - Pebble Time Smartwatch Teardown – 32:40
    — EEVblog

    It looks way cool. There must exist something like that which doesn't need ribbon cable, where you can just press two boards together.


  • @NeverDie said in Most reliable "best" radio:

    There must exist something like that which doesn't need ribbon cable, where you can just press two boards together.

    Oh yea, that reminds me of a few teardowns of my own with malfunctioning displays in commercial products like temperature displays. There is some kind of foam boards that are pressed into the display contacts. I figured that they (manufacturers) were doing some complicated LCD pulsing to achieve what was needed much like the POV thing with 7-segment LED displays. Just looked: there are 20 connectors on the ribbon cable, and it was a pretty simple screen on a cheap device. I wanted to dig into it further but there were other shiny-objects that kept getting in the way.


  • Hero Member

    @Larson said in Most reliable "best" radio:

    @NeverDie said in Most reliable "best" radio:

    There must exist something like that which doesn't need ribbon cable, where you can just press two boards together.

    Oh yea, that reminds me of a few teardowns of my own with malfunctioning displays in commercial products like temperature displays. There is some kind of foam boards that are pressed into the display contacts. I figured that they (manufacturers) were doing some complicated LCD pulsing to achieve what was needed much like the POV thing with 7-segment LED displays. Just looked: there are 20 connectors on the ribbon cable, and it was a pretty simple screen on a cheap device. I wanted to dig into it further but there were other shiny-objects that kept getting in the way.

    I think those may be called zebra connectors, if it's what I think you're referring to. I never could re-align those things. Once they're off, it seems like you need some kind of jig to realign them with enough precision. They appear to be pure electrical connectors. You need something else to provide mechanical regidity and hold everything in place.


  • @NeverDie said in Most reliable "best" radio:

    It looks way cool.

    Having a bit more time I watched the entire Dave Jones teardown. Very stunning review. I was feeling quite fancy after my KiCAD design but this 2015 video reminds me who I am. I am Fred Flinstone. only with Youtube. And happy enough with that!


  • Hero Member

    @Larson said in Most reliable "best" radio:

    @NeverDie said in Most reliable "best" radio:

    It looks way cool.

    Having a bit more time I watched the entire Dave Jones teardown. Very stunning review. I was feeling quite fancy after my KiCAD design but this 2015 video reminds me who I am. I am Fred Flinstone. only with Youtube. And happy enough with that!

    Why go half-way? Let's light up some Winston's while we're at it. 😉 Yabba Dabba Doo!


  • @NeverDie said in Most reliable "best" radio:

    I've looked for tiny piezo's that could maybe do this, but they all seem to be different degrees of large. I know it should be possible to be tiny, becaue, for example, a digital wristwatch is able to make audible beeps. On the other hand, after looking at some teardowns, I guess digital watches uses piezo disks that are at least 1/2" in diameter. Hmmmm.... Is that really as small as it gets? Anyone here know? What about hearing aids? Surely they have something smaller. The smallest thing I've found so far has been this: https://owolff.com/page140.aspx?recordid140=534&output=pdf&delay=3000&margin=1cm which is 5mm in diameter. So, I guess forget mounting anything directly to the PCB board: wired discs are the way it's done apparently and then just tuck it somewhere inside the project enclosure.

    I found these recently: https://www.cuidevices.com/micro-buzzers. Digikey seems to carry them but the smallest was listed as "0 quantity in stock" (https://www.digikey.ca/en/product-highlight/c/cui/micro-buzzers). The 4mm square version was available but of course that's just my local digikey, YMMV.


  • @NeverDie said in Most reliable "best" radio:

    As a result, I just now ordered some of these E01-2G4M27D

    Please let us know if they arrive with or without antennas. I've been eyeing them recently but haven't pulled the trigger yet.


  • @NeverDie said in Most reliable "best" radio:

    It does already have 100n (=0.1uF) across the DC power line, extremely near the inputs to the nRF24L01

    Add a 10uF cap there. I found these radios are more stable with enough power to draw on during transmission.


  • @Larson said in Most reliable "best" radio:

    To extract the *.rar in Windows 10, I downloaded a utility program (WinZip 21-day trial).

    7-Zip is an open-source alternative that will do the job equally as well. https://www.7-zip.org/


  • @skywatch said in Most reliable "best" radio:

    @skywatch said in Most reliable "best" radio:
    Thanks. What was it you were wanting me to notice about the e32 library? If it was about the FHSS, that was an e34 module in the youtube video.

    Oh darn it! - I got it mixed up - I am sorry for posting the wrong lib!

    At about 3:12 in the video, he references the Lora E32 and says the pinout is the same and that "the software is compatible". I don't know if he means the library, the code (the module does the frequency hopping) or the Ebyte software for configuring the modules but it would be good to know more about it.


  • Hero Member

    @alphaHotel said in Most reliable "best" radio:

    @NeverDie said in Most reliable "best" radio:

    I've looked for tiny piezo's that could maybe do this, but they all seem to be different degrees of large. I know it should be possible to be tiny, becaue, for example, a digital wristwatch is able to make audible beeps. On the other hand, after looking at some teardowns, I guess digital watches uses piezo disks that are at least 1/2" in diameter. Hmmmm.... Is that really as small as it gets? Anyone here know? What about hearing aids? Surely they have something smaller. The smallest thing I've found so far has been this: https://owolff.com/page140.aspx?recordid140=534&output=pdf&delay=3000&margin=1cm which is 5mm in diameter. So, I guess forget mounting anything directly to the PCB board: wired discs are the way it's done apparently and then just tuck it somewhere inside the project enclosure.

    I found these recently: https://www.cuidevices.com/micro-buzzers. Digikey seems to carry them but the smallest was listed as "0 quantity in stock" (https://www.digikey.ca/en/product-highlight/c/cui/micro-buzzers). The 4mm square version was available but of course that's just my local digikey, YMMV.

    Thanks! Looks as though mouser will be getting some in July: https://www.mouser.com/ProductDetail/CUI-Devices/CMT-322-65-SMT-TR?qs=pBJMDPsKWf2bBoY6kPbMAw%3D%3D


  • Hero Member

    @alphaHotel said in Most reliable "best" radio:

    @NeverDie said in Most reliable "best" radio:

    It does already have 100n (=0.1uF) across the DC power line, extremely near the inputs to the nRF24L01

    Add a 10uF cap there. I found these radios are more stable with enough power to draw on during transmission.

    Yup, already got a 10uF cap on it on the adapter board posted to openhardware.io: https://www.openhardware.io/view/22656/nRF24L01-adapter-board


  • Hero Member

    @alphaHotel said in Most reliable "best" radio:

    @skywatch said in Most reliable "best" radio:

    @skywatch said in Most reliable "best" radio:
    Thanks. What was it you were wanting me to notice about the e32 library? If it was about the FHSS, that was an e34 module in the youtube video.

    Oh darn it! - I got it mixed up - I am sorry for posting the wrong lib!

    At about 3:12 in the video, he references the Lora E32 and says the pinout is the same and that "the software is compatible". I don't know if he means the library, the code (the module does the frequency hopping) or the Ebyte software for configuring the modules but it would be good to know more about it.

    I think what he's saying there is that since the FHSS E34 has a built-in mcu and is operated using AT commands over UART, the comparable UART E32 module uses the same AT commands--which is about the only way I can imagine an E34 could be drop-in compatible as a replacement for the E32. These particular types of modules are advertised and sold as "wireless UARTs", and so the underlying technology is more or less transparent to that kind of solution.


  • Hero Member

    @alphaHotel said in Most reliable "best" radio:

    E01-2G4M27D

    I'm fairly certain the ones I ordered won't be arriving with antennas (as none were pictured in the aliexpress posting), but, no problem, I'll let you know for sure after they arrive. Most likely if you have an old wi-fi router that you no longer use, you could probably unscrew those antennas and use them, since they'd also be 2.4Ghz.


  • @NeverDie

    I think what he's saying there is that since the FHSS E34 has a built-in mcu and is operated using AT commands over UART, the comparable UART E32 module uses the same AT commands--which is about the only way I can imagine an E34 could be drop-in compatible as a replacement for the E32. These particular types of modules are advertised and sold as "wireless UARTs", and so the underlying technology is more or less transparent to that kind of solution.

    Thanks for that explanation. It makes more sense now.

    Yup, already got a 10uF cap on it on the adapter board posted to openhardware.io: https://www.openhardware.io/view/22656/nRF24L01-adapter-board

    I saw that picture after I posted and smacked my head, of course, you did. On a related note, would it be possible to get the Kicad files for the nRF24L01 adapter board? I'd like to take a stab at building a couple of these but I want to put most of the face-down silkscreen on the face-up side too.


  • Hero Member

    @alphaHotel said in Most reliable "best" radio:

    @NeverDie

    I think what he's saying there is that since the FHSS E34 has a built-in mcu and is operated using AT commands over UART, the comparable UART E32 module uses the same AT commands--which is about the only way I can imagine an E34 could be drop-in compatible as a replacement for the E32. These particular types of modules are advertised and sold as "wireless UARTs", and so the underlying technology is more or less transparent to that kind of solution.

    Thanks for that explanation. It makes more sense now.

    Yup, already got a 10uF cap on it on the adapter board posted to openhardware.io: https://www.openhardware.io/view/22656/nRF24L01-adapter-board

    I saw that picture after I posted and smacked my head, of course, you did. On a related note, would it be possible to get the Kicad files for the nRF24L01 adapter board? I'd like to take a stab at building a couple of these but I want to put most of the face-down silkscreen on the face-up side too.

    Sure thing. I'm in the middle of something else at the moment, but I can post it later tonight.


  • Hero Member

    @alphaHotel said in Most reliable "best" radio:

    On a related note, would it be possible to get the Kicad files for the nRF24L01 adapter board?

    Done. Posted the .rar file to the project files. Let me know if you have any difficulty with it.

    There was an error in the original: it didn't identify the IRQ pin on the backside silkscreen. I fixed that on the next (experimental) version (which is also wider), which I haven't yet received from the fab. However, the silkscreen images are here:
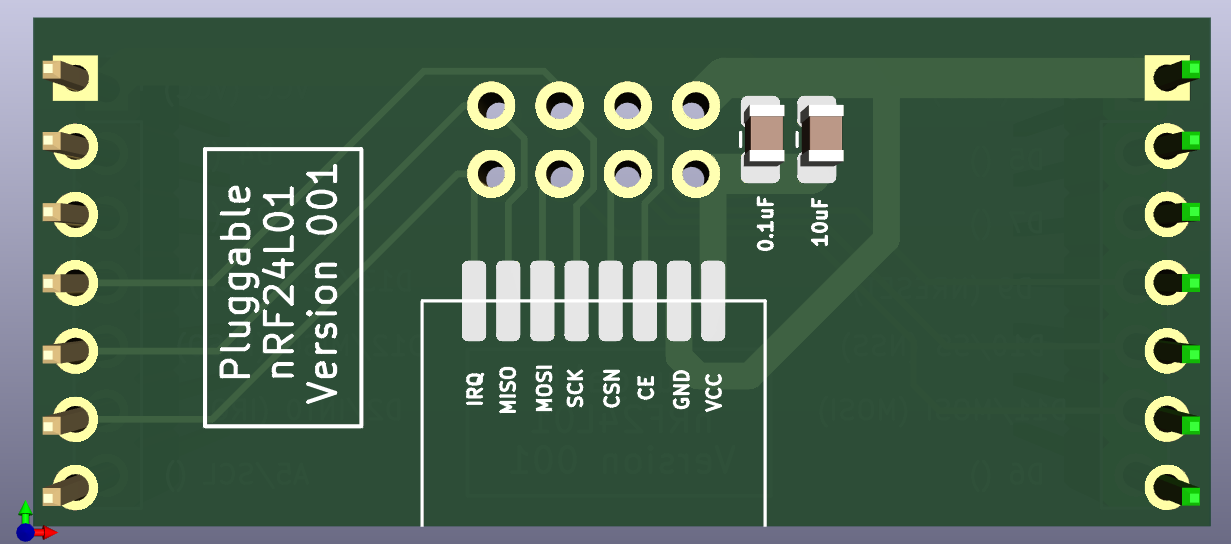
    front_v002.png

    back_v002.png

    Hope that helps!

    P.S. In case you're wondering, the possible next version has not only pluggable radios (as the original version had), but also pluggable MCU's, to make it easier to try different MCU's. I'm not sure yet whether or not it's a good idea, but since it's not rocket surgery I figure it is just easier to try the idea out than to overthink it.


  • @alphaHotel Thanks for asking for the program files. I was too shy.

    @NeverDie You do fine work! Thanks for the NRF24 updates to openhardware.io.

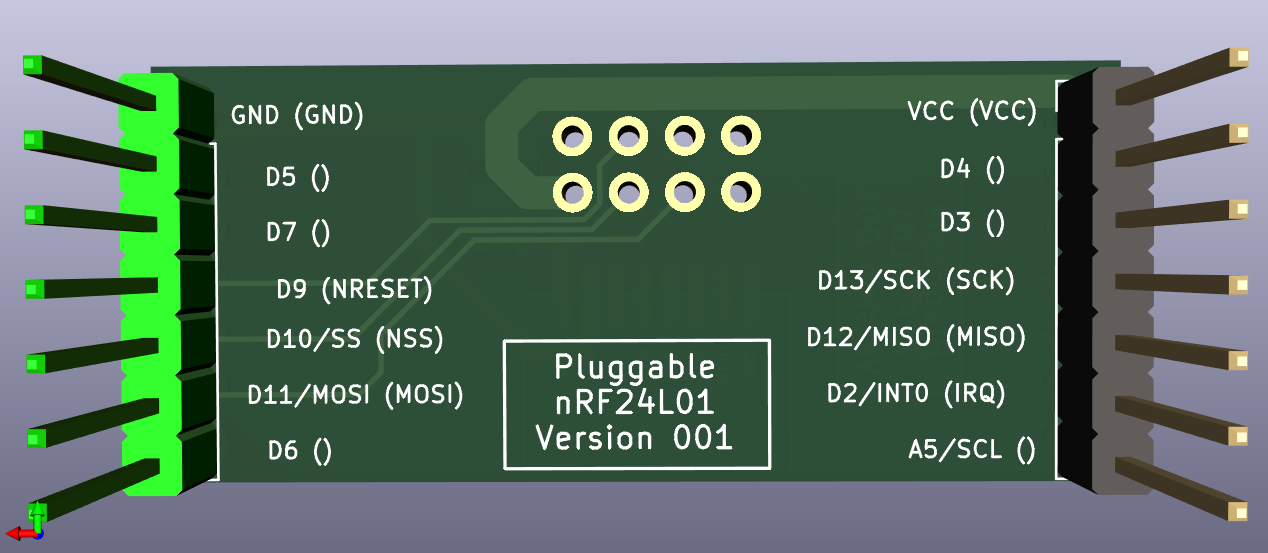
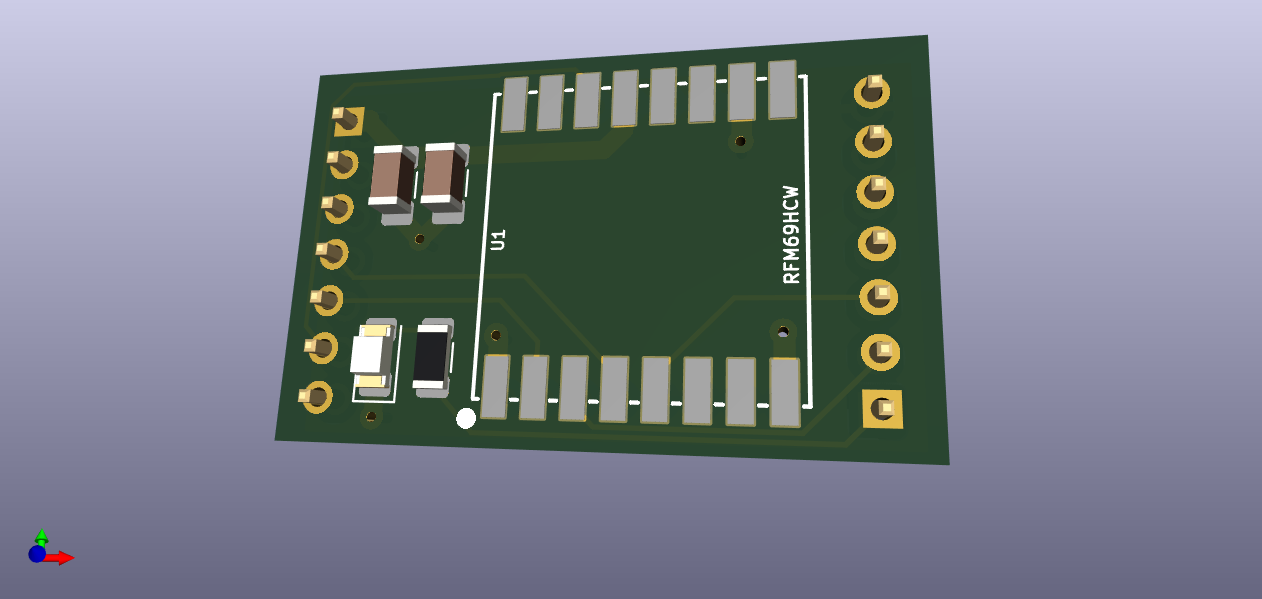
    Today I placed a bundle of orders for your boards and one of mine (RFM69HCW) at OSH Park. I wanted to send you the RFM69HCW board on this forum. But, I just learned that I can't send a zip, nor sch, nor board files through MySensors. That is very smart and prudent of them. I'll do as you do and am sending the jpg files that I derived from KiCAD. You will notice my plagerism of your broad power traces and narrow signal lines. So very fine. Let me know if there is a way to share the files with you, if you are interested. I'm not ready for an openhardware.io account just yet. Back.png
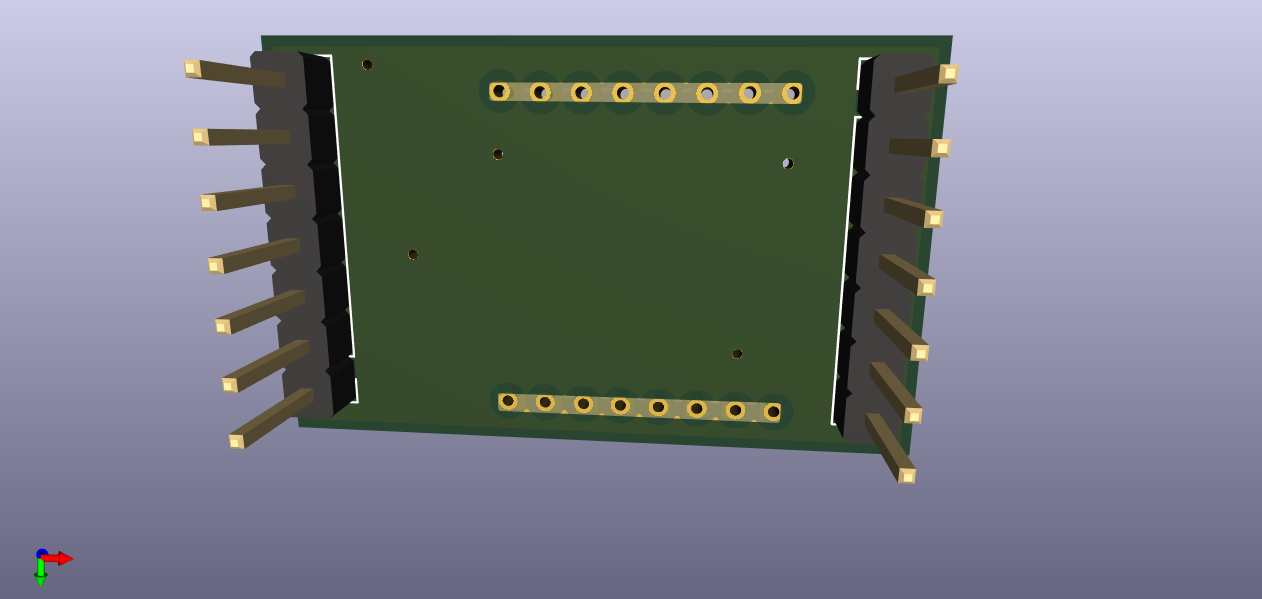
    Front.png


  • @NeverDie said in Most reliable "best" radio:

    Yabba Dabba Doo!

    You were there! What a great cartoon. It was a shame they didn't have stone PCB's. They would have used mica.


  • Hero Member

    @Larson Congrats on finishing your first KiCAD PCB. Once you're over that hump, it just keeps getting easier.

    I don't think there's any harm to posting to openhardware.io. It's' pretty well designed so that people who just want to buy stuff can look at finished projects and not be bothered by work in progress. To the extent you can eventually finish a project, then it helps mysensors. As for me, I think I'm pretty much done with RFM69, but maybe someone else would be interested.


  • Hero Member

    This is what I came up with for a platform that has both pluggable MCU's and pluggable radios:
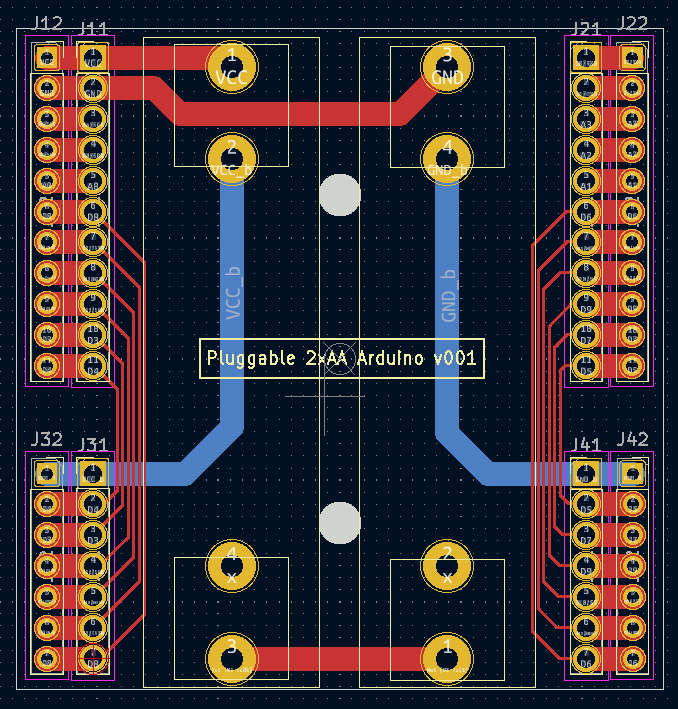
    pluggable.png

    It's a bit wider than the previous test platform to give enough space between both the two AA batteries themselves and between those batteries and the pin headers. It also has a separate row of pins along the outside in case you want to have any shields that go on top. I did away with the switch entirely. Now if you want to power it off, you just remove a battery. So, doing all that renders the backplane/power-source very simple. Also, I included two mounting holes so that the whole thing can be mounted inside a project box. Yesterday I ordered this PCB along with a pluggable atmega328p MCU board and a pluggable radio board from a fab, so nothing physical to show-and-tell just yet.


  • @NeverDie said in Most reliable "best" radio:

    Done. Posted the .rar file to the project files. Let me know if you have any difficulty with it.

    Thank you. I didn't have any issues with the files though it did warn that the footprints for the radio modules are in MyGlobalLibrary, which I don't have. See the screenshot below. If they could be put into a library within the project, it would be more portable than it already is but I was able to work with it as is.

    Screenshot 2022-06-21 093950.png

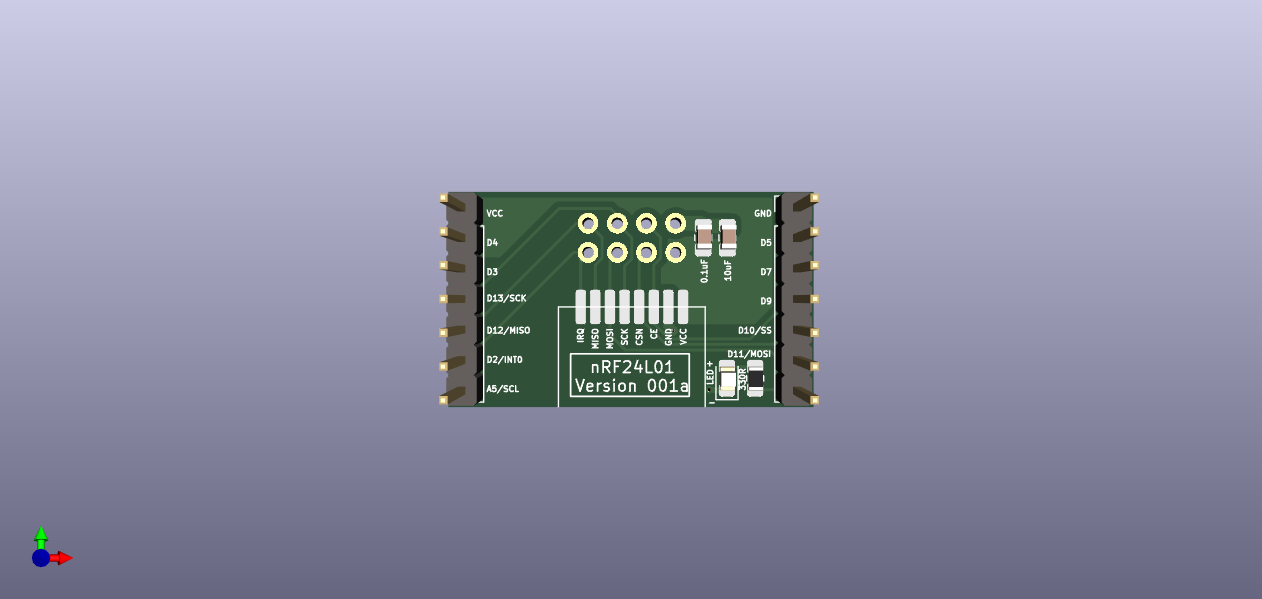
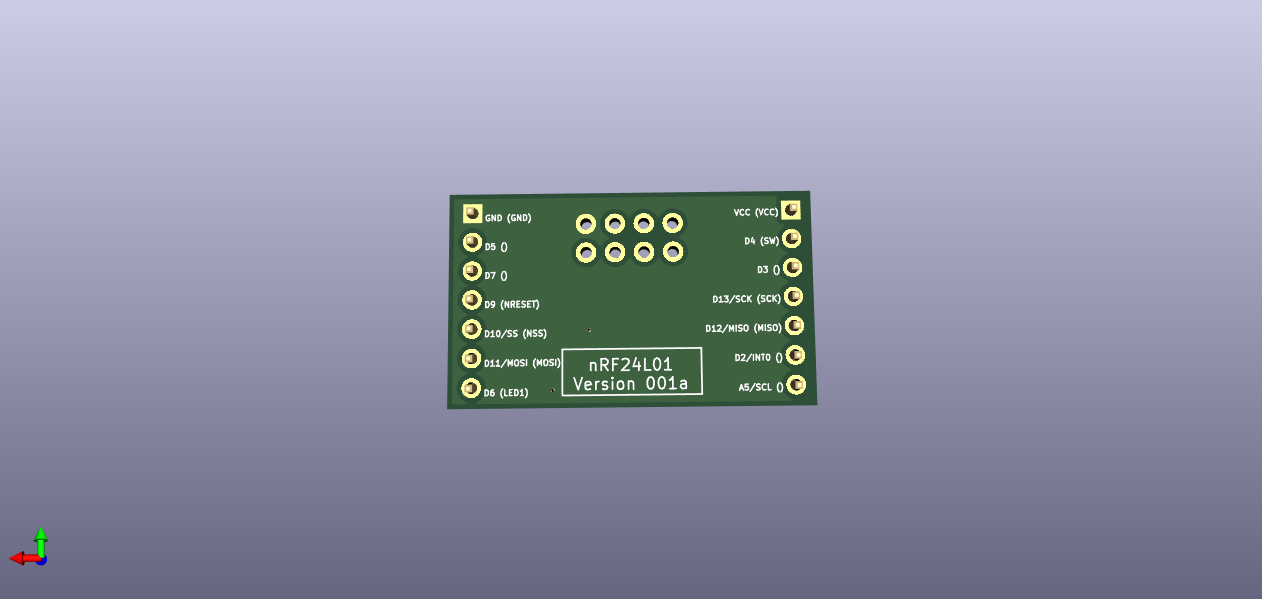
    I made a few mods including adding a ground plane and I'll try to get a repo on GitHub up and running for it tonight after work. With a new version in the works, perhaps I'll hold off getting some of these boards fabricated. In the interim, here's a view of my 3D model.
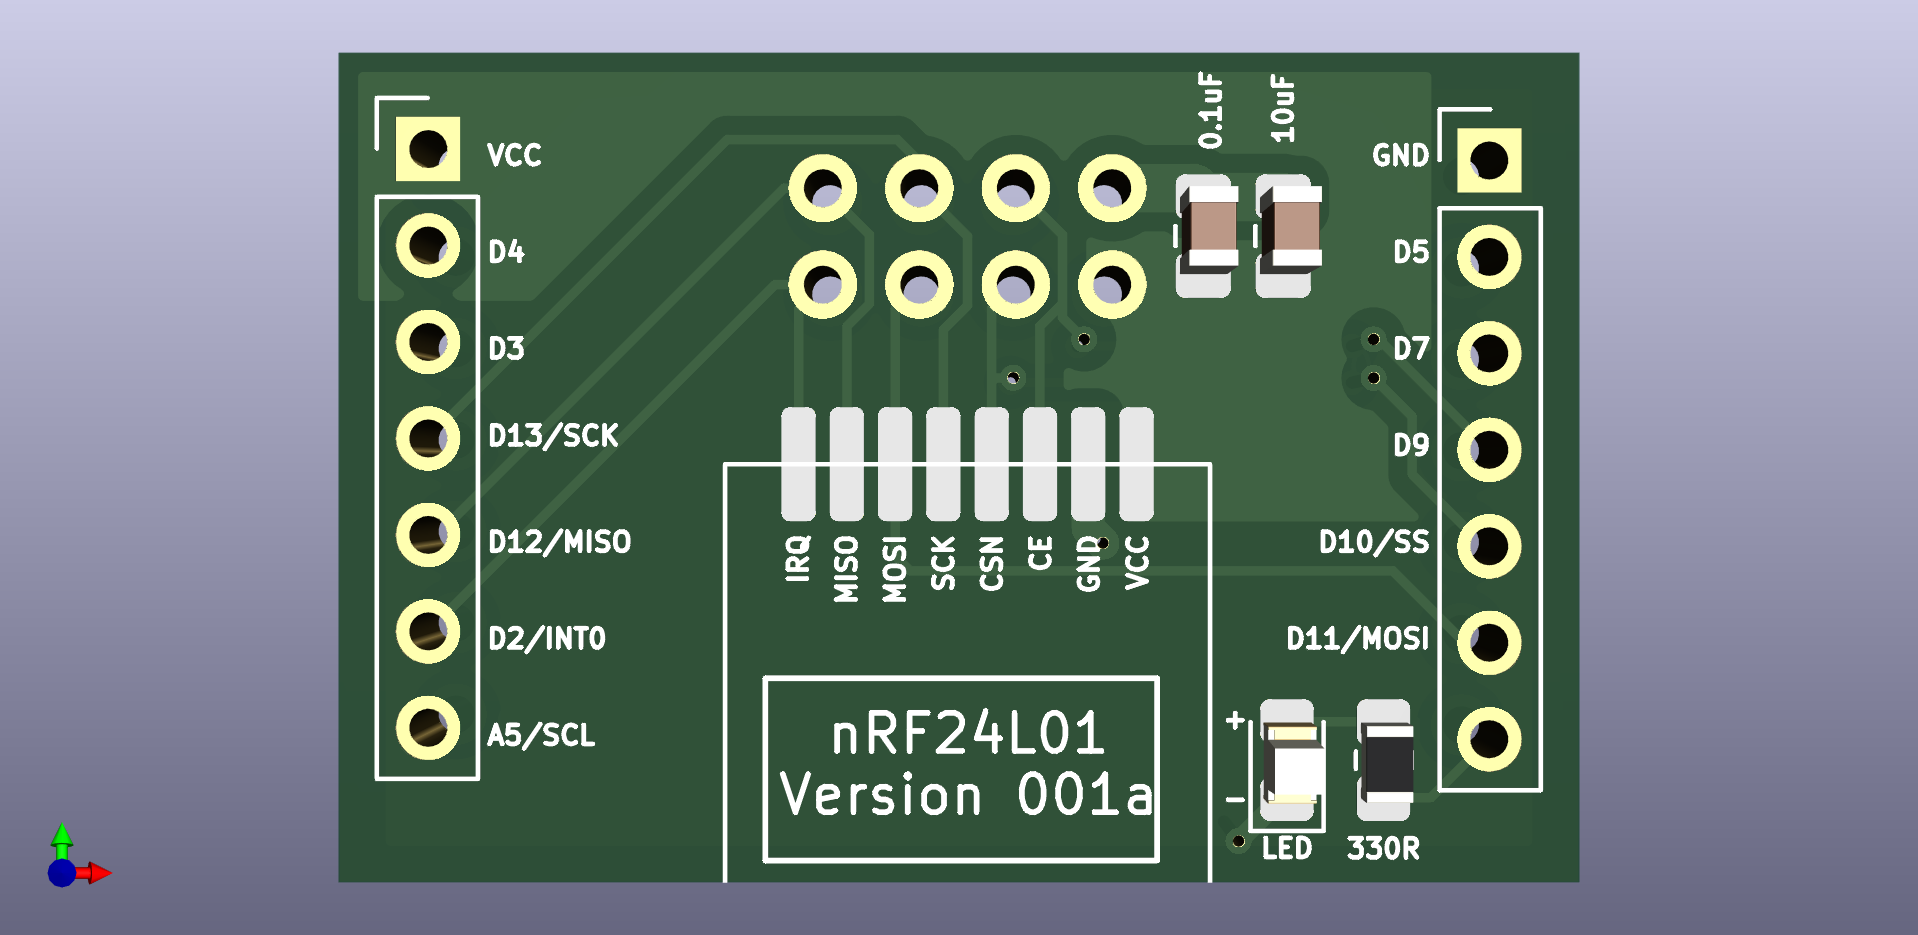
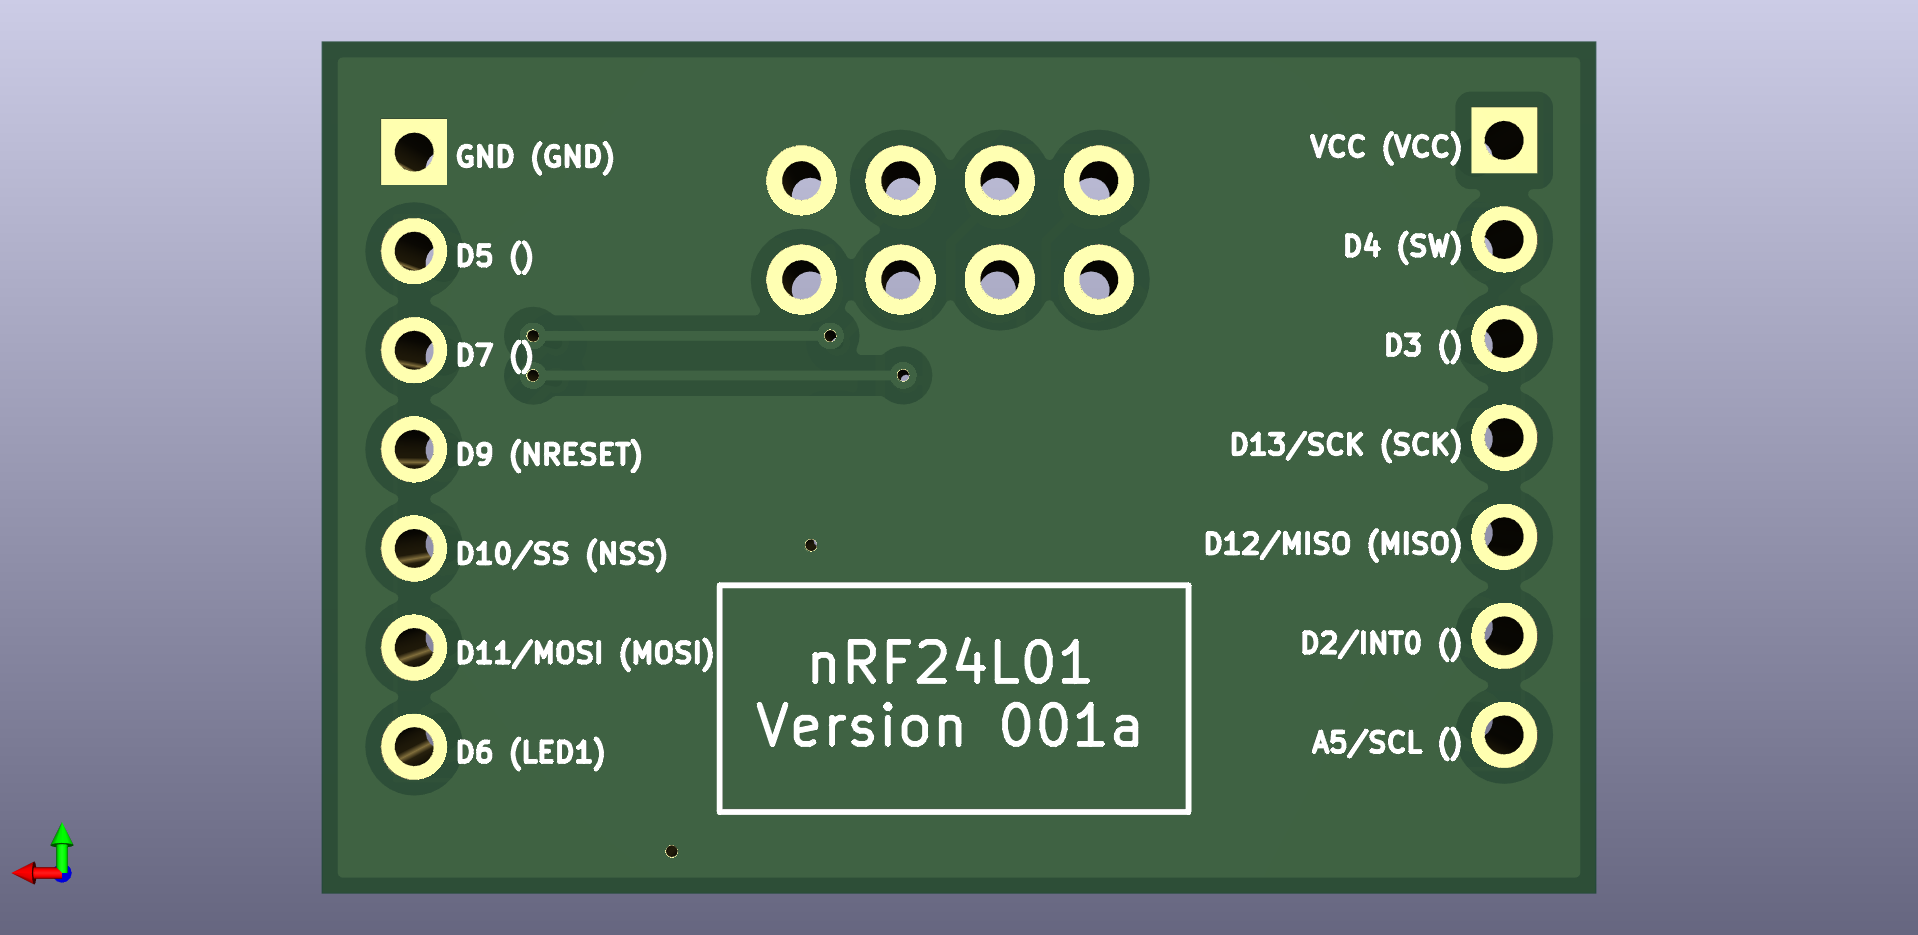
    nRF24L01_shield_v001a-top.png
    nRF24L01_shield_v001a-bottom.png

    P.S. In case you're wondering, the possible next version has not only pluggable radios (as the original version had), but also pluggable MCU's, to make it easier to try different MCU's. I'm not sure yet whether or not it's a good idea, but since it's not rocket surgery I figure it is just easier to try the idea out than to overthink it.

    At one point in this thread, I marvelled at the battery shield and wondered about having it separated from the MCU. Just conditioned power on the first shield then MCU, then radio. The complexity of it though is beyond my current level as I don't have as much experience with alternative MCU's (though I've been thinking we need to start looking at something with more program memory, like the ATmega4808/9). On the other hand, it should be just a matter of defining what needs to be passed from shield to shield (layer to layer?). Power, ground, SPI signals, perhaps I2C signals and a few other GPIO signals. Please do though consider lining up the pins such that they would also fit a breadboard layout.


  • @NeverDie With the first version of the battery/MCU board, you lamented running traces directly under the batteries. You have the space now to re-route them but choose not to. Did you find a way to resolve the issue it caused?


  • Hero Member

    @alphaHotel said in Most reliable "best" radio:

    @NeverDie With the first version of the battery/MCU board, you lamented running traces directly under the batteries. You have the space now to re-route them but choose not to. Did you find a way to resolve the issue it caused?

    Actually, I fixed it on the new version (pictured above). The red traces run on top, so they're adequately isolated from the battery holder metal, which is on the back side except for the through-holes where it sticks through the board. Where I ran into trouble was running traces on the back side, beneath the battery holder metal. If the battery holder metal was pressed up hard against the board, some shorts resulted on some of the boards. The workaround was to not press the battery holder metal hard up against the board, but the new version removes that concern entirely.


  • Hero Member

    @alphaHotel said in Most reliable "best" radio:

    On the other hand, it should be just a matter of defining what needs to be passed from shield to shield (layer to layer?). Power, ground, SPI signals, perhaps I2C signals and a few other GPIO signals.

    Yup, you got it. That's all there is to it. Power, ground, SPI, chip enable, chip select, maybe RX/TX enable (on some radios), and enough interrupt pins to take advantage of whatever interrupt or DIO pins the radio has to offer up. Looking back on it, I probably should have kept A5 off of the radio module, since that's used by I2C, and used some other pin instead. So... it's still a work in progress, but getting better.


  • Hero Member

    @alphaHotel said in Most reliable "best" radio:

    I didn't have any issues with the files though it did warn that the footprints for the radio modules are in MyGlobalLibrary, which I don't have. See the screenshot below. If they could be put into a library within the project, it would be more portable than it already is but I was able to work with it as is.

    Thanks for the feedback. I really would like it to be both portable and standalone, so I'll look into setting up a standalone library to include into the .rar that will make for a better KiCAD 6 project archive.


  • @NeverDie said in Most reliable "best" radio:

    @alphaHotel said in Most reliable "best" radio:

    @NeverDie With the first version of the battery/MCU board, you lamented running traces directly under the batteries. You have the space now to re-route them but choose not to. Did you find a way to resolve the issue it caused?

    Actually, I fixed it on the new version (pictured above). The red traces run on top, so they're adequately isolated from the battery holder metal, which is on the back side except for the through-holes where it sticks through the board. Where I ran into trouble was running traces on the back side, beneath the battery holder metal. If the battery holder metal was pressed up hard against the board, some shorts resulted on some of the boards. The workaround was to not press the battery holder metal hard up against the board, but the new version removes that concern entirely.

    Okay, I see now. I misunderstood the original issue and also didn't think about the top/bottom side orientation in relation to those traces vis-a-vis the battery holders. Thanks for clarifying.


  • Hero Member

    @alphaHotel said in Most reliable "best" radio:

    I didn't have any issues with the files though it did warn that the footprints for the radio modules are in MyGlobalLibrary, which I don't have. See the screenshot below. If they could be put into a library within the project, it would be more portable than it already is but I was able to work with it as is.

    OK, I updated the project archive to include nRF24L01 symbol and footprint libraries which include those symbols and footprints. Let me know if it works out OK.

    Apparently best practice is to put literally every single symbol and footprint that gets used on a project into project-specific libraries so that they can be freely shared. At least for now I just put in the unique nRF24L01 symbols and footprints that aren't part of the generic KiCAD 6 build.


  • Hero Member

    @alphaHotel said in Most reliable "best" radio:

    Please do though consider lining up the pins such that they would also fit a breadboard layout.

    Yes, agreed. Unless I made an error, this should already be true.


  • @NeverDie said in Most reliable "best" radio:

    OK, I updated the project archive to include nRF24L01 symbol and footprint libraries which include those symbols and footprints

    Awesome! Thank you.


  • UPDATE:

    I've done it this way partly as a test as it ties back to this thread about sharing a complete set of KiCad design files. I'd appreciate any feedback on being able to open and edit the files. Also, feel free to submit a pull request as a test of collaborating with Github and KiCad but only if you're interested in the results too.

    Edit: OpenHardware.io project is now available publicly.


  • @Larson A bit late as the dry weather has me doing outdoors work and I'm knackered!

    But yes, I agree with your thoughts and method as a good solid starting point. I would clamp the modules in place so they cannot move at all and do first test, then solder wire to one module in situ and do test 2, then finally solder wire to second module and do test 3.

    This way you get to cover all possibilities in the shortest steps and time with minimal messing.


  • @skywatch said in Most reliable "best" radio:

    @Larson A bit late as the dry weather has me doing outdoors work and I'm knackered!

    But yes, I agree with your thoughts and method as a good solid starting point. I would clamp the modules in place so they cannot move at all and do first test, then solder wire to one module in situ and do test 2, then finally solder wire to second module and do test 3.

    This way you get to cover all possibilities in the shortest steps and time with minimal messing.

    Great. Thanks for your review. It may take me a couple of weeks to get to it.


  • @alphaHotel said in Most reliable "best" radio:

    UPDATE:

    I've created a Github repo for my version of the nRF24L01 adapter board.

    Thanks for the version. I have made a few tweaks to your version. I don't have an openhardware account, yet, but will make one when I have the time. In the meanwhile below are the pictures of my changes. In words:

    • I shrank the frame of the board to minimize the interference with the TestPlatform neighboring pins
    • rerouted two traces to make the ground plane cleaner
    • moved some components as needed
      Front.png Back.png

  • Hero Member

    @alphaHotel said in Most reliable "best" radio:

    @NeverDie said in Most reliable "best" radio:

    I've looked for tiny piezo's that could maybe do this, but they all seem to be different degrees of large. I know it should be possible to be tiny, becaue, for example, a digital wristwatch is able to make audible beeps. On the other hand, after looking at some teardowns, I guess digital watches uses piezo disks that are at least 1/2" in diameter. Hmmmm.... Is that really as small as it gets? Anyone here know? What about hearing aids? Surely they have something smaller. The smallest thing I've found so far has been this: https://owolff.com/page140.aspx?recordid140=534&output=pdf&delay=3000&margin=1cm which is 5mm in diameter. So, I guess forget mounting anything directly to the PCB board: wired discs are the way it's done apparently and then just tuck it somewhere inside the project enclosure.

    I found these recently: https://www.cuidevices.com/micro-buzzers. Digikey seems to carry them but the smallest was listed as "0 quantity in stock" (https://www.digikey.ca/en/product-highlight/c/cui/micro-buzzers). The 4mm square version was available but of course that's just my local digikey, YMMV.

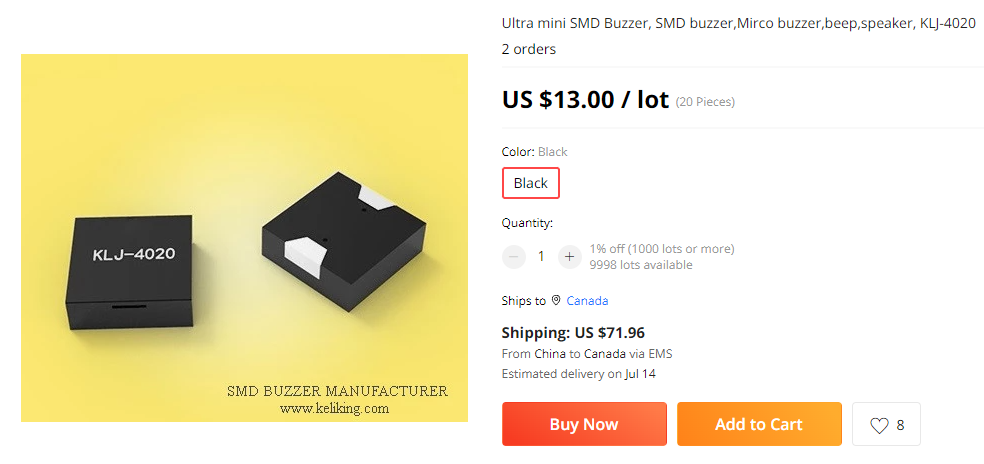
    Adafruit's Clue device uses the KLJ-5030, which is 5mmx5mmx3mm: https://www.aliexpress.com/item/2251832675250640.html?spm=a2g0o.productlist.0.0.4ef473807sKXlG&algo_pvid=a8ed0732-081a-414b-8b9a-5745c9f7e7ff&algo_exp_id=a8ed0732-081a-414b-8b9a-5745c9f7e7ff-1&pdp_ext_f={"sku_id"%3A"65468584514"}&pdp_npi=2%40dis!USD!!47.0!47.0!!!!%402101e9d016559352842771526eafc4!65468584514!sea

    At higher cost I notice that there also exists a KLJ-4020, which is 4mmx4mmx2mm: https://www.aliexpress.com/item/2251832613970385.html?spm=a2g0o.detail.1000060.1.58582227hEwQ40&gps-id=pcDetailBottomMoreThisSeller&scm=1007.13339.274681.0&scm_id=1007.13339.274681.0&scm-url=1007.13339.274681.0&pvid=6e57d5b5-3669-4301-96cd-4254603eb5f8&_t=gps-id:pcDetailBottomMoreThisSeller,scm-url:1007.13339.274681.0,pvid:6e57d5b5-3669-4301-96cd-4254603eb5f8,tpp_buckets:668%232846%238110%231995&pdp_ext_f={"sku_id"%3A"66402727672"%2C"sceneId"%3A"3339"}&pdp_npi=2%40dis!USD!!13.0!13.0!!!!%40210323b116559355333711431e5503!66402727672!rec


  • @NeverDie said in Most reliable "best" radio:

    Adafruit's Clue device uses the KLJ-5030, which is 5mmx5mmx3mm:
    At higher cost I notice that there also exists a KLJ-4020, which is 4mmx4mmx2mm

    Yikes! 😳 Watch out for those shipping costs. Check my math, 4mm x 4mm x 2mm x 20 pcs = 640 cubic mm = 0.640 cubic cm = 0.0391 cubic inches, from China for $72 shipping? They must weigh a ton (or a tonne). LOL! 😂

    Seriously though, good find! I think I'll keep shopping around for a better price though. 😀

    e854f6f9-86b4-4813-8a5f-ac95452a973c-image.png


  • @Larson said in Most reliable "best" radio:

    I shrank the frame of the board to minimize the interference with the TestPlatform neighboring pins

    Nice! How wide is that VCC trace/plane at its narrowest point now?

    If you got it from Github, are you able to send me a pull request?


  • Hero Member

    @alphaHotel said in Most reliable "best" radio:

    @NeverDie said in Most reliable "best" radio:

    Adafruit's Clue device uses the KLJ-5030, which is 5mmx5mmx3mm:
    At higher cost I notice that there also exists a KLJ-4020, which is 4mmx4mmx2mm

    Yikes! 😳 Watch out for those shipping costs. Check my math, 4mm x 4mm x 2mm x 20 pcs = 640 cubic mm = 0.640 cubic cm = 0.0391 cubic inches, from China for $72 shipping? They must weigh a ton (or a tonne). LOL! 😂

    Seriously though, good find! I think I'll keep shopping around for a better price though. 😀

    e854f6f9-86b4-4813-8a5f-ac95452a973c-image.png

    Yeah, the price is awful. I only linked it as an example. Looking a bit harder, I see they can be had for $1.53 each from a more reliable source: https://www.lcsc.com/product-detail/Buzzers_KELIKING-KLJ-4020_C556936.html The other thing to be wary regarding it is that the manufactures website says is only audible within a 0.5 to 1m range, which, if true, would be pathetically weak.
    klj_4020.png
    So, it has me thinking "close but no cigar."

    In comparison, having heard it myself, the KLJ-5030 is reasonably loud I would say.


  • Hero Member

    Looks as though FUET has some good low-priced alternative buzzers:
    fuet_buzzers.png
    It must be something about the physics of buzzers that the thinnner they get in these small packages, the quieter they are.


  • @alphaHotel said in Most reliable "best" radio:

    Nice! How wide is that VCC trace/plane at its narrowest point now?

    KiCad tells me the narrowest VCC trace is about 0.045" (1.1 mm). I think the conventional 0.5 oz. copper is the common underlayment thickness. Is it too narrow? The return path is much narrower (Pin 1 nRF24L01). Does that matter?

    @alphaHotel said in Most reliable "best" radio:

    If you got it from Github, are you able to send me a pull request?

    Yes, I think I got your version from Github. I will learn how to send a pull request. Cool, so this is how collaboration works? I'm new to this.


  • @NeverDie said in Most reliable "best" radio:

    It must be something about the physics of buzzers that the thinnner they get in these small packages, the quieter they are.

    I'm thinking of speakers of the 1970's: the drivers, midrange and tweeters would be nothing without the cabinet boxes. Does that apply here? In the 2010's these "soundbars" come into the picture. But there is still a box involved. Yes, it is probably about the physics of sonics... I'm thinking.


  • @Larson said in Most reliable "best" radio:

    Yes, I think I got your version from Github. I will learn how to send a pull request. Cool, so this is how collaboration works? I'm new to this.

    Please don't add to your personal learning curve to create a pull request. It's not that important, at all.


  • Hero Member

    @NeverDie said in Most reliable "best" radio:

    This is what I came up with for a platform that has both pluggable MCU's and pluggable radios:

    pluggable.png

    It's a bit wider than the previous test platform to give enough space between both the two AA batteries themselves and between those batteries and the pin headers. It also has a separate row of pins along the outside in case you want to have any shields that go on top. I did away with the switch entirely. Now if you want to power it off, you just remove a battery. So, doing all that renders the backplane/power-source very simple. Also, I included two mounting holes so that the whole thing can be mounted inside a project box. Yesterday I ordered this PCB along with a pluggable atmega328p MCU board and a pluggable radio board from a fab, so nothing physical to show-and-tell just yet.

    In terms of having "plugable" compute modules, I'm thinking that maybe edge connectors might be a good way to go. I say that because I've lately been looking at expansion slots for the Adafruit CLUE, which has a similar pinout to the BBC micro:bit. Even though those modules have only a little more than 20 pins to expose, some of the edge connectors on the market that are compatible with them can support as many as 80 pins! For a plugable compute module, the more pinouts the better. That way, if you need access to a lot more pins, you would simply plug the same compute module into a backplane that gives you access to a lot more pins to, for example, directly drive an LCD display instead of having to do it all (more slowly) using an SPI interface.

    Well, that's all I've learned so far. I guess in the absence of any better ideas, maybe picking one of those 80 pin edge connectors that's compatible with micro:bit would perhaps be a worthwhile experiment to build a plugable backplane around. Especially for mcu's that come with a switchable fabric that can re-assign which logical pins are assigned to which physical pins, it would perhaps open up a lot of options for exploiting much more capable MCU's while still keeping the real estate small.

    Here's an example of one of those 80 pin edge connectors that's micro:bit compatible: https://www.amazon.com/gp/product/B08HS27D51/ref=ox_sc_saved_title_3?smid=A22NPL1KB8AOV0&psc=1
    80_pin_edge_connector.jpg
    as well as a PCB showing how it is wired for a micro:bit:
    80pin_pcb.jpg
    As you can see, lots of room to grow! The downside is that it's not small. Maybe an edge connector that's half as long would work well enough (though obviously sacrifice micro:bit compatability) and still keep things small. If there were a smaller, much higher connection density connector, that would obviously be better. Maybe @Larson 's idea of using zebra strips as connectors is more practical. Not sure. I suppose in a way the little aliexpress modules, with their array of contacts on the back of their little PCB's, are a type of connector, just not a plugable/unplugable one.Anyhow, I don't have the time to pursue it further at this juncture, so those are just some notes to either future self or to anyone who might want to tackle it.


  • Hero Member

    I was thinking of trying out the nRF52805, but it turns out making the nRF5 jump now isn't much easier than it was 5 years ago when I last looked into the nRF52 series. The main improvement in the interim is that certain popular chips, like the nRF52840 are now better supported, because they are baked into things like the Adafruit CLUE and have at least some familiar Arduino support.


  • @NeverDie said in Most reliable "best" radio:

    Maybe @Larson 's idea of using zebra strips as connectors is more practical.

    I learned about zebra strips from you - thank you very much. I was unable to re-establish connections for an existing commercial products and I don't know why. My thought was that zebra strips were some technology and complex signaling that is beyond my capacity. The device is probably over 20 years old. Therefore, I would not recommend zebra strips because I don't know enough about them.

    This pic from your link is more telling of the capability of your referenced connectors. 9f5492d7-b994-4cd1-9d05-9c9769eeff88-image.png For now, I don't know why these are called edge-connectors. I thought edge-connectors were flat male blades with double-sided contacts that were fitted in sloted female gaps. The ones I think I've seen have an index slot for, I suspected, polarity protection and alignment. Maybe I've got this all wrong and they are called something else - like card connectors.


  • Hero Member

    @Larson said in Most reliable "best" radio:

    don't know why these are called edge-connectors.

    @Larson I think they're called edge connectors because they mate with the edge of a PCB.


  • @NeverDie Yes, I think we are surfing the same wave. I'm thinking of a PCB mount that will recieve a perpendicular PCB board with double sided connectors like this: https://www.ebay.com/itm/122943051785?hash=item1c9ffa1809:g:daAAAOSwd4tTxdNW

    Maybe there is an application of these for the radio modules that have the single row SMD mounting pads? One would need to ignore the opposing connectors. Better yet, maybe there are radio boards (?) that could be designed to slot in... just thinking. The NRF24’s would require double-sided 1x4 board and receivers. That would be cool and compact.

    But then there is the ground-plane to think about?


  • @NeverDie said in Most reliable "best" radio:

    CORRECTION: Earlier I said that Adafruit's TPL5110 breakout board appeared to use a 1M pulldown resistor on DONE. I remeasured today and that's wrong. It's actually a 10K resistor.

    Thanks for redirecting me to this thread. I think you were right on your original 1M Ohm assertion. Since I'm playing with my new TPL5110,s I took it on to make my own MM measurements. While my Harbor Freight MM might not be the most accurate instrument, I did show the resistance between DONE and GND to be 900 K'ish. Next, I got out the magnifying glass to spy the resistor in-line with said pins to have a marking of 1004. Google affirmed that that means 1 M ohm. So, your 5K, or 10K would be a big change – and if it comes at no cost for the quiescent current AND enables ESP action, then perfect!


  • Hero Member

    @Larson said in Most reliable "best" radio:

    @NeverDie said in Most reliable "best" radio:

    CORRECTION: Earlier I said that Adafruit's TPL5110 breakout board appeared to use a 1M pulldown resistor on DONE. I remeasured today and that's wrong. It's actually a 10K resistor.

    Thanks for redirecting me to this thread. I think you were right on your original 1M Ohm assertion. Since I'm playing with my new TPL5110,s I took it on to make my own MM measurements. While my Harbor Freight MM might not be the most accurate instrument, I did show the resistance between DONE and GND to be 900 K'ish. Next, I got out the magnifying glass to spy the resistor in-line with said pins to have a marking of 1004. Google affirmed that that means 1 M ohm. So, your 5K, or 10K would be a big change – and if it comes at no cost for the quiescent current AND enables ESP action, then perfect!

    I just now checked the adafruit schematic for the TPL5110, and you're right: it does show a 1 megaohm resistor. I guess I must have measured it wrong. https://github.com/adafruit/Adafruit-TPL5110-Power-Timer-Breakout-PCB


  • Hero Member

    @NeverDie said in Most reliable "best" radio:

    @alphaHotel said in Most reliable "best" radio:

    E01-2G4M27D

    I'm fairly certain the ones I ordered won't be arriving with antennas (as none were pictured in the aliexpress posting), but, no problem, I'll let you know for sure after they arrive. Most likely if you have an old wi-fi router that you no longer use, you could probably unscrew those antennas and use them, since they'd also be 2.4Ghz.

    @alphaHotel Reporting back: I received them, and mine did not come with any antennas.


  • @NeverDie said in Most reliable "best" radio:

    @alphaHotel Reporting back: I received them, and mine did not come with any antennas.

    That's as I expected too because of the lack of any photos in the listings. Thanks for confirming, it's good to know. I do have a handful lying around from old WiFi routers as you mentioned.


  • Hero Member

    I've had success getting the nRF24L01 to listen once per second for packets at an average current drain for just the nRF24L01 of 5.35ua. Not bad! The snag I'm running into though is that the listen window, encompassing power-up of the nRF24L01 through Rx mode is 1.6ms. However, if I use the atmega328p to time that 1.6ms, it raises the average current drain to 45ua, which is worse than my keyfinder keyfob's current drain (about 30ua on average). So....I need to find some way to sleep the atmega328p for 1.6ms in order to keep the total current drain low. However, how to do that? The TPL5111 has a minimum period of 100ms, so that's out. The atmega328p's WDT has a minimum period of 16ms, so that's out too. Unfortunately, the atmega328p has no built-in RTC. Even if I were to add an external RTC, I don't know of any that would let me dial-in 1.6ms.

    Presently I can think of only two solutions:

    1. Add some kind of external oscillator and feed it to Timer2 in asymchronous timer mode while sleeping the atmega328p. However, I can't seem to find from the datasheet what the current drain of that configuration would be, so it seems like a shot in the dark.

    2. or, possibly use a GPIO pin to charge up an external capacitor and somehow calibrate the charging time so that when the capacitor discharges via some RC time constant it triggers a falling edge interrupt on the atmega328p to wake it up from sleeping after 1.6ms (the sleep time begins after it charges the capacitor). I haven't tried this, but it might actually work. It would notionally be kinda/sorta similar to how one can use an atmega328p to charge up a capacitor in order to determine the capacitor's capacitance value: https://www.norwegiancreations.com/2019/08/using-a-simple-arduino-to-measure-capacitor-value/.

    If anyone has any other ideas on how to sleep an atmega328p for 1.6ms, please do post.

    [Edit: Regarding #1, I suppose I could try measuring the sleep current with external asynchronous mode engaged but nothing connected to it. If it's acceptably low, I could then hook up an ultra low current 32.768K external crystal at an additional 500na or so. Hopefully there's some way tot turn everything off on the atmega328p except for the asynchronous counter. I'm doubtful as to whether I can apply such fine grained control like that to one of the sleep states (POWER_SAVE MODE), but maybe....? Here's some reason to be hopeful:

    Power-save: is similar to the power-down mode, but the Timer2 is still awake and could be operated via an external clock.
    https://wolles-elektronikkiste.de/en/sleep-modes-and-power-management

    Ugh. Except Timer2 is an 8 bit counter...., but that's OK: 1.6ms would be 53 ticks on a 32.768k oscillator, so at least that part should work if the mcu sets timer2 to overflow in 53 ticks and then go to sleep and if that overflow will trigger an interrupt to subsequently wake the mcu back up after 1.6ms.

    Well, it's a plausible theory. Just need to test it!

    Is it worth the effort though? Even if it worked, an nRF52 module would outperform this type of setup, would be more compact, would be easier/faster to assemble, and would (probably) be lower cost as well. Hmmmmm..... And the nRF53 will be even better hardware still, though the nRF53 does come with the extra overhead of an RTOS....]


  • @NeverDie

    Strikethrough
    [Would 15 mseconds be close enough?
    #include <LowPower.h>
    LowPower.powerDown(0, ADC_OFF, BOD_OFF); //0 gives SLEEP_15MS,] Strikethrough

    [Edit - Sorry - on rereading is see the objective is 1.6 mS not 16 mS. I like your Timer suggestions - that is what they are for.]


  • Hero Member

    I never realized you can send/receive BLE data using an nRF24L01:
    use NRF as a BLE Module | Arduino NRF24L01 Bluetooth Low Energy Tutorial – 12:17
    — electronic GURU

    Unrelated to that,I found a nice introductory tutorial series on then nRF52:
    https://www.youtube.com/c/SumairsEmbeddedEngineering/videos

    Most of the nRF52 stuff on youtube only considers either just the hardware or just the bluetooth aspects, but this series covers much more than just that. Lately Nordic's development has embraced the Zephyr RTOS, but this youtube series does not rely on Zephyr, which may (?) be good if you want tight control over the hardware without the overhead of an RTOS.


  • Hero Member

    @alphaHotel said in Most reliable "best" radio:

    @NeverDie said in Most reliable "best" radio:

    @alphaHotel said in Most reliable "best" radio:

    @NeverDie With the first version of the battery/MCU board, you lamented running traces directly under the batteries. You have the space now to re-route them but choose not to. Did you find a way to resolve the issue it caused?

    Actually, I fixed it on the new version (pictured above). The red traces run on top, so they're adequately isolated from the battery holder metal, which is on the back side except for the through-holes where it sticks through the board. Where I ran into trouble was running traces on the back side, beneath the battery holder metal. If the battery holder metal was pressed up hard against the board, some shorts resulted on some of the boards. The workaround was to not press the battery holder metal hard up against the board, but the new version removes that concern entirely.

    Okay, I see now. I misunderstood the original issue and also didn't think about the top/bottom side orientation in relation to those traces vis-a-vis the battery holders. Thanks for clarifying.

    I received the PCB today, and I think I see now the source of your confusion: I had put the silkscreen outline for the battery and its clips on the FRONT instead of on the BACK where it belongs. I'll correct it on the next iteration. On this first iteration I'm mainly just testing for fit and to make sure the space is such that the battery clips don't short against either themselves or against the headers. I'll also be adding polarity markers as a reminder for the correct way to insert the batteries.


  • Hero Member

    Here's the first pass on the new version:
    backplane_v001.JPG

    The good news:

    • I widened the separation between the batteries, and now the clips aren't at risk of shorting against one another.

    • list itemThe machine pins now sit nice and low against the PCB. The idea is that this way a shield can arch overhead without having to add much to the overall height. That's why I have regular headers on the outside part.

    Not so great: as a guard against shorting against the clips, I maybe overcompensated by overwidening the headers as well. I think I can probably narrow the overall board width by 3 to 6mm and still have adequate clearance. I'll do some more iterations until I zero in.

    Also, unlike the earlier test platform, this board lacks a way to separate out current measurement to the radio vs to the mcu. Since I already have the test platform for that, I don't think I care, but maybe someone else would want that? It could be added to the backplane, or it could be added to the plug-in modules themselves.

    Lastly, I'm noticing that the battery clips fit so tightly against the PCB holes that you probably don't even need to solder them! 😉


  • @NeverDie said in Most reliable "best" radio:

    I widened the separation between the batteries, and now the clips aren't at risk of shorting against one another.

    It's looking good! I'm curious, how far apart are the battery clips now (center-center)? I noted on the original board layout it was 15.62mm. I'm guessing it's about an extra 3mm based on the lines of the silkscreen and the size of the mounting holes you added.

    ff86fd60-4de9-4129-aad3-08bf203766fc-image.png

    Also, an off-topic question for you - I believe I read in a thread somewhere recently (not sure which one though) that when adding a USB port you prefer USB Mini. Which footprint do you like to use and where do you source them from?


  • Hero Member

    @alphaHotel said in Most reliable "best" radio:

    It's looking good! I'm curious, how far apart are the battery clips now (center-center)?

    Most likely it will be either 16.75mm or 17.75mm. 17.75mm is plenty wide. I have some test boards coming at 16.75mm to see if losing 1mm still guarantees adequate separation.

    As for which USB connector, it depends on context. If size is not an issue, then lately I'm liking USB-B more than USB-mini. It's the same USB connector commonly found on the classic Arduino Uno. Super robust. I recently sourced 10 of them from mouser: https://www.mouser.com/ProductDetail/490-UJ2-BH-2-TH at close to 50 cents each.


  • @NeverDie, Thank you.


  • Hero Member

    @alphaHotel The 17.75mm separation is as close as they can get and still use an M3 on the mounting holes. For the 16.75mm boards I have on order, I reduced the mounting holes to M2 sizing.

    The long turnaround time when ordering PCB's is a frustration. I should get my cheap CNC PCB etching machine up and working again to resolve these silly dimensioning issues without having to send off to a fab somewhere.


  • @NeverDie I thought your turnaround time was decent compared to mine. It has been taking up to 3 weeks for me to get mine from OSHpark. The last fab I ordered, I priced it out at PCBway but they were $29 versus OSHpark's $16. I do find though that within days of sending it off for fabrication, I'm making improvements to the design and kicking myself for placing the order too soon.


  • @alphaHotel said in Most reliable "best" radio:

    I thought your turnaround time was decent compared to mine.

    My latest OSH Park order was 9 days inclusive (ordered 6/20/22, delivered on 6/28/22). I find that pretty remarkable. I've read, somewhere, that the timing is at risk of your position in the panel queue; if you are early on the panel, then it is slower. There is a “super swift” service from OSH for a charge. Free-shipping moves faster than I can, so I can wait. The price can't be beat and the quality is great (except for the errors that I make!!!)

    @NeverDie
    The silkscreen markings for the AA mount posts on your Test Platform V001 are on the right side for me. Mine arrived last week! Sure, the markings are on the reverse side, but once the batteries are installed, that side is invisible. I’m still fretting the moment when I need to solder the Atmega 328P chip.

    To follow-up on earlier posts: the speed of delivery from China has dramatically improved. Most of the orders I’ve place in early June have arrived. Even the hard-to-get Atmega 328P chips have arrived so I don’t have to desolder my old Nano’s or ProMini’s. And the Chinese packaging is efficient - less trash for my conscience. Digi-Key leaves me wondering how such little can arrive in a box that is so big. But... Digi-Key is so fast.


  • Hero Member

    I'm finding that some of the basic UART example programs in Segger Embedded System's IDE no longer even compile for the nRF52-DK without encountering obscure errors that, judging from some youtube videos, didn't exist a year ago. Did Segger fail to maintain their example code during covid? I couldn't get to the bottom of it, so I'm punting on SES and will be switching to gcc, which I hope won't have the same issues. Fingers crossed.

    Looks as though I'll be sticking with SES a bit longer, because it does contain at least one example shell for the nRF52805, and as long as I can hollow out and fill that shell with bare metal code, then (so far) it all seems to compile and upload and the code works on the nRF52805. At the moment I've confirmed that the bare metal UART code I put together from just the datasheet alone (which has far more ambiguity in it than I remember it having) is now properly working inside the nRF52805, which was (is?) probably the hardest thing to get going, but now that it's in place (for debugging purposes) I feel more comfortable moving ahead like this. One thing I do like about SES is that compared to GCC the compile and upload cycle happens very, very quickly. That alone may not by itself be a deciding factor in what to toolchain to choose, but it is a nice luxury that I truly enjoy.

    Next up: getting some bare metal proprietary radio code to work on the nRF52805. Ignoring the PCB antenna, the rest of the module looks as though it is smaller than the size of a dime! I don't yet fully grasp the details of how Nordic crippled it, so I hope I won't be tripping across any nasty gotcha's. 😉 Apparently one of the benefits of the crippling it is that it is more power efficient (as, for instance, it has less memory to retain while sleeping). Compared to its siblings, it has "only" 24KB of RAM and 192K of flash, but that is nonetheless hugely more than what the atmega328p has, so from that perspective it should have more than enough for doing most Arduino-type things. It's biggest cramping limitation seems to be its very small number of GPIO pins (technically 10 pins, but really more like 9 pins since one of the ten pins serves as a RESET pin).


  • Hero Member

    I have nRF52805's and nRF52832's talking to one another using the proprietary radio, and I obviously have nRF2401's talking to one another, but getting the two groups to talk to each other? It's not obvious how to do that: Enhanced Shockburst of the nRF24L01 has a weird 9 bit section called PCN in the middle of it, and it's not clear how to get an nRF2 to receive that kind of oddball frame without rejecting it. That said, I think it probably can be done, but it would maybe turn into a long detour that I'd rather not take right now. It turns out there does still exist regular, non-enhanced Shockburst which the nRF24L01 can still use and which doesn't have the oddball 9-bit PCN, but then the maximum transmit speed of an nRF24L01 is limited to 1mbps. That's no good, because I want to use the faster 2mbps, which is almost the entire allure of using Nordic chips instead of something else. So, in the interest of not getting detoured, when it comes to 2.4Ghz, I guess I'll just plow ahead using just nRF52 chips and see how low I can drive the energy consumption on an nRF52805 and still be able to wake it up with a radio packet. Since a lot of the energy goes toward just waking up the radio and getting it up to speed before it can receive anything, it may yet turn out that accepting a 1mbps on-air bitrate won't be too big a compromise, but I'd rather make that decision based on actual measurements rather than guesswork alone.

    Between now and then I need to confirm that the BC805M has functioning DCDC circuitry in it, and I also need to measure the sleep current on the BC805M to make sure it won't be worse than expected with the integrated RTC running, which I'd like to use instead of a TPL5111 if the current drain will allow. If I need little to no external circuitry, then, aside from batteries, this whole thing could literally fit on a dime.

    By the way, and unrelated to all that I just wrote, I finally came across a nice articulate introduction to the stm32 and its toolchain:

    #1 Say NO to ARDUINO! New ARM STM32 Microcontroller Programming and Circuit Building Series – 12:02
    — BuildYourCNC

    He had already done one introductory series, but now he's re-doing it to make it current and more polished. So far I like his approach of starting with the simplest possible thing and then building up from there. STM has some pretty cool looking tools that I haven't seen before in other toolchains. For instance, one of the tools has Node Red built right into it! In addition to that, there's a debugging tool that not only allows you to inspect the value of a variable, but plot its value over time. Like I said, nifty cool stuff. That said, the whole thing looks like a surprisingly PITA to install, which is where this video series comes to the rescue by holding your hand through all that. If you ask me, STM should add this guy to their payroll, because he clearly "get's it" far more than the ST product managers do. For instance, he shows that if you follow the ST installation instructions to a T, then you run into dead links that have evidently gone stale. So, he walks you through what the instructions should have been to avoid that.


  • @NeverDie Just checking in. I've received lots of different radios and built two of your bare-bones kits. Soldering the Atmega328P chips were easier than I thought – first time ever on pins that small. My MM showed many, many solder bridges existed. Solder-wick helped fix that. Hope I didn’t burn the chip.

    Before I start running tests on the different radio’s as you have, I’ve been getting a GPS functioning which has been fun. After collecting data around the perimeter of our small property, I figured out how to do a XYZ 3-D plot in Excel – not easy.

    In the GPS process I’ve been watching this video (https://www.youtube.com/watch?v=gtM832Z0ujE&t=219s ) and he has a conclusion that you might be interested in: locating the transmitting radio (nrf24L01) close to the MCU was limiting the packet/per/second performance, and limiting range. With this in mind, I hope to test your radio carrier boards on a Dupont wire extension raising it off the bare-bones board. Then test with and without and see how it does. Again, I’m hoping all that wire doesn’t inadvertently create unwanted antennae interference.

    But, obviously, I’m on the slow road still.


  • Hero Member

    @Larson said in Most reliable "best" radio:

    @NeverDie Just checking in. I've received lots of different radios and built two of your bare-bones kits. Soldering the Atmega328P chips were easier than I thought – first time ever on pins that small. My MM showed many, many solder bridges existed. Solder-wick helped fix that. Hope I didn’t burn the chip.

    When I encounter hard-to-rid solder bridges, I ladle on gobs of that resin that I linked for you earlier on amazon. Use tons of the stuff, such that the whole area is submerged in it. Then when you hit the area with a hot soldering iron, the solder bridges all magically separate like Moses parting the Red Sea. Not all resins are equally effective in that regard, which is why I pointed you to a resin that seems to work really well. There are also some "hoof" soldering tips that help pull off excess solder onto the tip via capillary action, which you can then wipe off onto brass wool or a sponge. Those tips are a definite nice-to-have, but not strictly necessary. With the right resin, the resin will do most of the work for you. If you're still having trouble, then you may want to raise the heat on your soldering iron. When I want to deliberately create solder bridges, I lower the temperature on my soldering iron to make it closer to the melting point.


  • Hero Member

    I'm using my "proto-board" to prototype a basic nRF52805:
    alt text
    It's working fine, except for the reset pin. Apparently Nordic has introduced new "advanced protection" that's preventing me from assigning and enabling P0.21 to be the RESET without some sort of complicated obscure sequence to disable the advanced protection.


  • @NeverDie Thanks for the tip. I went as far as dipping my solder wick in my new SRA Flus #135 (yes, your recommendation; thank you again). That may have been the trick because ... it worked! Actually, I didn’t dip it but smooged the stuff onto the wick using a toothpick as a trowel. Yea, it was a mess afterwards. I used a foil tray as an alcohol bath before cleaning with a toothbrush.

    My problem today is bootloading the brand new 328's with my old USBASP. The IDE says something about “cannot set SCK period” and then “initialization failed”. I’ve been here before and it just takes time to relearn. I made ReadMe notes but I can’t find them. I’ll try again tomorrow.


  • Hero Member

    @Larson I use an AVR Dragon. I don't think they are even manufactured anymore, but it still works and it makes burning bootloaders and setting fuses a snap from within what is now called Microchip Studio (what used to be called Atmel studio). It's also a "high voltage" programmer to resurrect chips that low voltage programmers cannot. It turns out I've never had a reason to use the high voltage feature, but it was a selling point at the time.

    Anyhow, I meantion it because if you can find a programmer that does dance with Microchip Studio, it's a fairly easy interface to learn and to use. You just go to menu Tools....Device Programming... and it's all right there. Microchip Studio is free so if you want to preview what it might look like, just download it and give it a squiz. I don't actually use Microchip Studio for anything other than just this particular feature


  • @NeverDie said in Most reliable "best" radio:

    Anyhow, I meantion it because if you can find a programmer that does dance with Microchip Studio, it's a fairly easy interface to learn and to use. You just go to menu Tools....Device Programming... and it's all right there. Microchip Studio is free so if you want to preview what it might look like, just download it and give it a squiz. I don't actually use Microchip Studio for anything other than just this particular feature

    Thanks for another tip/reminder. I still have the Atmel Studio 7, Microchip Studio predecessor, loaded and I think that played a role for me in the past in this hurdle – you reminded me of that. I’ll give it another go. I remember the strength of AS7 was that one could debug code (see registers) a command at a time – pretty cool.


  • @Larson said in Most reliable "best" radio:

    My problem today is bootloading the brand new 328's with my old USBASP. The IDE says something about “cannot set SCK period” and then “initialization failed”.

    If you have a second USBASP or an Arduino of some sore lying around, you could try to update the firmware on the USBASP. I recommend this edition, latest release and a Google search for "how to update usbasp firmware". You may see that with release v1.06 of that repository, there was an improvement that "Includes automatic SCK slowing".

    Of course, the problem may be more rudimentary. Can you read the fuses? Are they set to use an external oscillator that doesn't exist?


  • @alphaHotel I'll try the firmware update. Thanks. I suspect my problem is the SCK speed. I get immediate failure. I don't think I can reach the fuses if the 'target' chip doesn't have a bootloader. Do I have that wrong? The wierd thing is that I used my USBasp to bootload an extra Nano I have on hand. That worked fine. On the bare bones board, I've double/triple checked the connections and I've rechecked the 328 chip for solder bridges & solid connections with pins. I have downloaded your recommended link. The 2011-05-28 Thomas Fischl Readme.txt file looks complicated. I'll see if I can manage that. Thanks again.


  • Hero Member

    BTW, I had previously failed to notice that an nRF52840 can be powered from up to 5.5v because it has a built-in buck regulator designed to manage that higher input voltage. That might make a 3 or possibly even 4 battery configuration, depending on battery chemistry, pretty compelling, because it would extend battery life so much longer.


  • @alphaHotel Still working on getting my USBASP reprogrammed. After googling I found this site: https://www.electronics-lab.com/project/usbasp-firmware-update-guide. That program says to create a new programmer; I used a Nano and uploaded the ArduinoISP successfully. Next I combine the avrdude.conf, avrdude.exe, and the update hex file in one file as suggested. I used your latest release link to find the update hex file to be main.hex for the Atmega8 that lives on my USBASP. The readme files in your link lead me to that conclusion.
    After connecting everything together I enter “avrdude -C avrdude.conf -P COM9 -p m8 -c avrisp -b 19200 -U flash:w:usbasp.atmega8.main.hex:I” in the windows command line.

    I get these errors:
    avrdude: error at avrdude.conf:1133: programmer type jtagice3_updi not found
    avrdude: error reading system wide configuration file "avrdude.conf"

    I found jtagice3 in the config file to be a defined programmer. I feel that I’m close. Any ideas? I continue to work on it.


  • @Larson said in Most reliable "best" radio:

    I don't think I can reach the fuses if the 'target' chip doesn't have a bootloader. Do I have that wrong?

    You can reach (read/write) the fuses with a USBASP regardless of whether there is a bootloader. If you have any troubles, shoot me a message in the chat or start a new thread somewhere and I'll help you through it.


  • @alphaHotel Chat sent. My apologies to NeverDie for the distractions to a very fine thread.


  • Hero Member

    @Larson No worries. I'm glad you're finding the help you need.


Log in to reply
 

Suggested Topics

  • 4
  • 2
  • 9
  • 3
  • 20
  • 2

0
Online

11.4k
Users

11.1k
Topics

112.7k
Posts