Skip to content
  • MySensors
  • OpenHardware.io
  • Categories
  • Recent
  • Tags
  • Popular
Skins
  • Light
  • Brite
  • Cerulean
  • Cosmo
  • Flatly
  • Journal
  • Litera
  • Lumen
  • Lux
  • Materia
  • Minty
  • Morph
  • Pulse
  • Sandstone
  • Simplex
  • Sketchy
  • Spacelab
  • United
  • Yeti
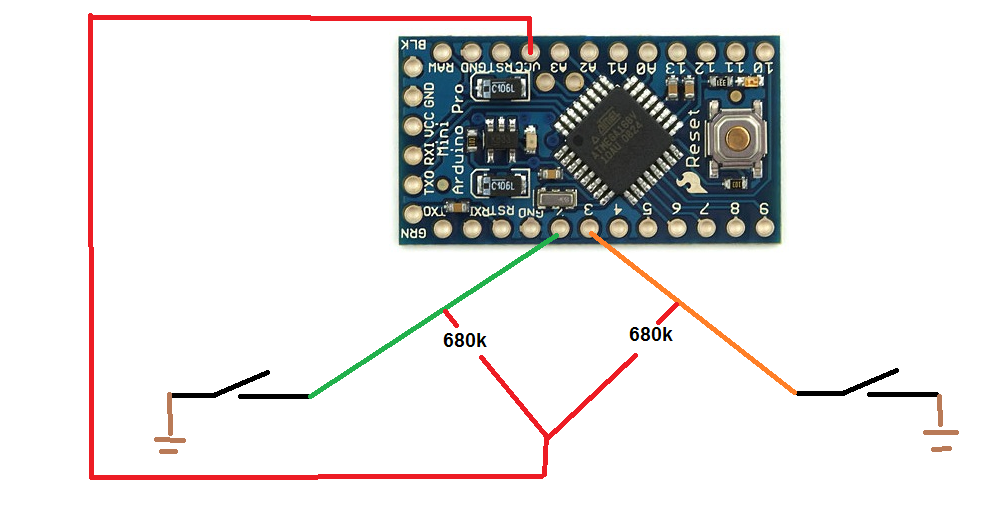
  • Zephyr
  • Dark
  • Cyborg
  • Darkly
  • Quartz
  • Slate
  • Solar
  • Superhero
  • Vapor

  • Default (No Skin)
  • No Skin
Collapse
Brand Logo
  1. Home
  2. My Project
  3. Mailbox/Postbox Alert

Mailbox/Postbox Alert

Scheduled Pinned Locked Moved My Project
31 Posts 8 Posters 17.7k Views 7 Watching
  • Oldest to Newest
  • Newest to Oldest
  • Most Votes
Reply
  • Reply as topic
Log in to reply
This topic has been deleted. Only users with topic management privileges can see it.
  • n3roN Offline
    n3roN Offline
    n3ro
    wrote on last edited by
    #14

    it is fixed :) changed internal pullup to an external with 680k. now its 32uA with both opened and 47uA with both closed :)

    pimatic + MySensors + Homeduino + z-way
    https://github.com/n3roGit/MySensors_n3ro

    Moshe LivneM 1 Reply Last reply
    2
    • n3roN n3ro

      it is fixed :) changed internal pullup to an external with 680k. now its 32uA with both opened and 47uA with both closed :)

      Moshe LivneM Offline
      Moshe LivneM Offline
      Moshe Livne
      Hero Member
      wrote on last edited by
      #15

      @n3ro how do you do that?

      n3roN 1 Reply Last reply
      0
      • F Offline
        F Offline
        f1dev
        wrote on last edited by
        #16

        Hi!
        I+m trying to do a similar mailbox sensor, but I get different power consumptions hen I ground (pulling down) input pin 2 and 3.

        I´m using a pro mini, 3.3v standard boot loader with removed LED and 470k resistors as external pull-ups.

        In sleep mode with it draws about 65uA
        Roughly the same with input pin 3 -grounded (state 0)
        But when I ground pin 2 it draws 7mA

        Any ideas whats wrong?

        1 Reply Last reply
        0
        • Moshe LivneM Moshe Livne

          @n3ro how do you do that?

          n3roN Offline
          n3roN Offline
          n3ro
          wrote on last edited by
          #17

          @Moshe-Livne just deactivate the this lines:
          //digitalWrite(MAILBOX_FRONT_PIN, HIGH);
          //digitalWrite(MAILBOX_BACK_PIN, HIGH);

          and solder two resistor from 3.3v to pin 2 and 3.

          pimatic + MySensors + Homeduino + z-way
          https://github.com/n3roGit/MySensors_n3ro

          F 1 Reply Last reply
          0
          • n3roN n3ro

            @Moshe-Livne just deactivate the this lines:
            //digitalWrite(MAILBOX_FRONT_PIN, HIGH);
            //digitalWrite(MAILBOX_BACK_PIN, HIGH);

            and solder two resistor from 3.3v to pin 2 and 3.

            F Offline
            F Offline
            f1dev
            wrote on last edited by
            #18

            Ok, so I found that it is the radio that draws about 7mA when I ground input pin 2, it is connected to IRQ-pin on the radio.
            @n3ro Have you connected the radio as described on the build-page? [http://www.mysensors.org/build/connect_radio](link url)

            n3roN 1 Reply Last reply
            0
            • F f1dev

              Ok, so I found that it is the radio that draws about 7mA when I ground input pin 2, it is connected to IRQ-pin on the radio.
              @n3ro Have you connected the radio as described on the build-page? [http://www.mysensors.org/build/connect_radio](link url)

              n3roN Offline
              n3roN Offline
              n3ro
              wrote on last edited by
              #19

              @f1dev yes. But you don't need irq on a node :)

              pimatic + MySensors + Homeduino + z-way
              https://github.com/n3roGit/MySensors_n3ro

              1 Reply Last reply
              0
              • BulldogLowellB BulldogLowell

                @n3ro

                I'm guessing that your repeat() function is wearing out the battery.

                By the way you can take advantage of the return of sleep( ) here:

                gw.sleep(MAILBOX_FRONT_PIN - 2, CHANGE, MAILBOX_BACK_PIN - 2, CHANGE, 0);
                

                like this (untested):

                #include <MySensor.h>
                #include <SPI.h>
                #include <readVcc.h>
                
                
                #define NODE_ID 21                      // ID of node
                #define CHILD_ID 1                      // Id of the sensor child
                
                #define MAILBOX_FRONT_PIN 2             // Arduino Digital I/O pin for button/reed switch
                #define MAILBOX_BACK_PIN 3              // Arduino Digital I/O pin for button/reed switch
                
                #define MIN_V 1900 // empty voltage (0%)
                #define MAX_V 3200 // full voltage (100%)
                
                
                MySensor gw;
                
                MyMessage msg(CHILD_ID, V_TRIPPED);
                
                boolean post = false;
                boolean lastpost = false;
                int oldBatteryPcnt;
                int repeat = 20;
                
                int trigger = -1;
                unsigned long goToSleepTime;
                
                void setup()
                {
                  gw.begin(NULL, NODE_ID, false);
                  pinMode(MAILBOX_FRONT_PIN, INPUT);
                  pinMode(MAILBOX_BACK_PIN, INPUT);
                  digitalWrite(MAILBOX_FRONT_PIN, HIGH);
                  digitalWrite(MAILBOX_BACK_PIN, HIGH);
                  gw.sendSketchInfo("Mailbox Alert", "1.0");
                  gw.present(CHILD_ID, S_MOTION);
                  Serial.println("---------- set Mailbox empty");
                  msg.set(0);
                }
                
                void loop()
                {
                  if (millis() - goToSleepTime > 10UL) //debounce
                  {
                    switch (trigger) {
                      case 0:
                        post = true;
                        Serial.println("---------- New Mail");
                        break;
                      case 1:
                        post = false;
                        Serial.println("---------- Mailbox emptied"); 
                        break;
                      default:
                        Serial.println("---------- I just woke up");
                    }
                  }
                  trigger = -1;
                  if (post != lastpost)
                  {
                    Serial.print("---------- Send Mailboxstate ");
                    Serial.println(post ? "full" : "empty");
                    msg.set(post);
                    lastpost = post;
                    sendBattery();
                  }
                  // Sleep until something happens with the sensor
                  goToSleepTime = millis();
                  trigger = gw.sleep(MAILBOX_FRONT_PIN - 2, CHANGE, MAILBOX_BACK_PIN - 2, CHANGE, 0);
                }
                
                void sendBattery() // Measure battery
                {
                  int batteryPcnt = min(map(readVcc(), MIN_V, MAX_V, 0, 100), 100);
                  if (batteryPcnt != oldBatteryPcnt) 
                  {
                    gw.sendBatteryLevel(batteryPcnt); // Send battery percentage
                    oldBatteryPcnt = batteryPcnt;
                  }
                  Serial.print("---------- Battery: ");
                  Serial.println(batteryPcnt);
                }
                
                n3roN Offline
                n3roN Offline
                n3ro
                wrote on last edited by
                #20

                @BulldogLowell could you please explain your changes? I don't understand everything of this :sweat:

                pimatic + MySensors + Homeduino + z-way
                https://github.com/n3roGit/MySensors_n3ro

                1 Reply Last reply
                0
                • F Offline
                  F Offline
                  f1dev
                  wrote on last edited by
                  #21

                  @n3ro Ok, thanks! Then I learned something new today.. IRQ is only needed for receiving nodes then, like repeaters and gateways, right?
                  Strange though that my circuit draws so much more current than yours. I have tested different setups, different arduinos and different radios from different suppliers with same result.
                  Well, at least my mailbox are mysensored now! :smiley:

                  1 Reply Last reply
                  0
                  • n3roN Offline
                    n3roN Offline
                    n3ro
                    wrote on last edited by
                    #22

                    I think you need the irq only for the gw. I have a receive node without irq.

                    Do you have changed fuses on your arduino?

                    And remember. All this stuff is cheap China electronic.The devices can vary consume a lot of electricity.

                    pimatic + MySensors + Homeduino + z-way
                    https://github.com/n3roGit/MySensors_n3ro

                    1 Reply Last reply
                    0
                    • F Offline
                      F Offline
                      f1dev
                      wrote on last edited by
                      #23

                      Nope, havent done that yet. It´s a "stock" 3v3 pro mini. Still reading up on how to do that and how to change to MYS-bootloader, curious on how OTA-update works.
                      Big thanks for your respons! :smile:

                      n3roN 1 Reply Last reply
                      0
                      • F f1dev

                        Nope, havent done that yet. It´s a "stock" 3v3 pro mini. Still reading up on how to do that and how to change to MYS-bootloader, curious on how OTA-update works.
                        Big thanks for your respons! :smile:

                        n3roN Offline
                        n3roN Offline
                        n3ro
                        wrote on last edited by
                        #24

                        @f1dev sweebe wrote a very good howto:

                        http://forum.pimatic.org/topic/383/tips-battery-powered-sensors

                        pimatic + MySensors + Homeduino + z-way
                        https://github.com/n3roGit/MySensors_n3ro

                        Moshe LivneM 1 Reply Last reply
                        0
                        • F Offline
                          F Offline
                          f1dev
                          wrote on last edited by
                          #25

                          @n3ro - Thanks, that was really helpfull!:smile:

                          1 Reply Last reply
                          0
                          • n3roN n3ro

                            @f1dev sweebe wrote a very good howto:

                            http://forum.pimatic.org/topic/383/tips-battery-powered-sensors

                            Moshe LivneM Offline
                            Moshe LivneM Offline
                            Moshe Livne
                            Hero Member
                            wrote on last edited by
                            #26

                            @n3ro Brilliant! He recommends to take out the voltage regulator. it is easier (and works better) just to snip off one leg as described here http://www.mysensors.org/build/battery. I'll try his other mods.... hopefully now my nodes will last forever!!!!

                            1 Reply Last reply
                            0
                            • Ashley SavageA Offline
                              Ashley SavageA Offline
                              Ashley Savage
                              wrote on last edited by
                              #27

                              quality project, been having a tinker with mixed results. used sketch from original post, but would it be possible to get a circuit diagram showing pull up locations??? bit of a beginner, but have had a few success with rolling out some power operated sensors , this is my first battery operated sensor...

                              n3roN 1 Reply Last reply
                              0
                              • n3roN Offline
                                n3roN Offline
                                n3ro
                                wrote on last edited by
                                #28

                                No problem. I make one :) give me a day

                                pimatic + MySensors + Homeduino + z-way
                                https://github.com/n3roGit/MySensors_n3ro

                                1 Reply Last reply
                                0
                                • Ashley SavageA Ashley Savage

                                  quality project, been having a tinker with mixed results. used sketch from original post, but would it be possible to get a circuit diagram showing pull up locations??? bit of a beginner, but have had a few success with rolling out some power operated sensors , this is my first battery operated sensor...

                                  n3roN Offline
                                  n3roN Offline
                                  n3ro
                                  wrote on last edited by
                                  #29

                                  @Ashley-Savage plan.png

                                  pimatic + MySensors + Homeduino + z-way
                                  https://github.com/n3roGit/MySensors_n3ro

                                  1 Reply Last reply
                                  0
                                  • Ashley SavageA Offline
                                    Ashley SavageA Offline
                                    Ashley Savage
                                    wrote on last edited by
                                    #30

                                    thanks for the diagram, much appreciated...

                                    1 Reply Last reply
                                    0
                                    • M Offline
                                      M Offline
                                      mathieu44444
                                      wrote on last edited by
                                      #31

                                      Hello,
                                      Does this code still work?
                                      Thank you

                                      1 Reply Last reply
                                      0
                                      Reply
                                      • Reply as topic
                                      Log in to reply
                                      • Oldest to Newest
                                      • Newest to Oldest
                                      • Most Votes


                                      17

                                      Online

                                      11.7k

                                      Users

                                      11.2k

                                      Topics

                                      113.1k

                                      Posts


                                      Copyright 2025 TBD   |   Forum Guidelines   |   Privacy Policy   |   Terms of Service
                                      • Login

                                      • Don't have an account? Register

                                      • Login or register to search.
                                      • First post
                                        Last post
                                      0
                                      • MySensors
                                      • OpenHardware.io
                                      • Categories
                                      • Recent
                                      • Tags
                                      • Popular