Gesture controlled Floor Lamp
-
After playing around with my first Arduino, a couple of years ago, I knew I wanted to use it to create a Gesture controlled Japanese Floor lamp. Like one on this picture.
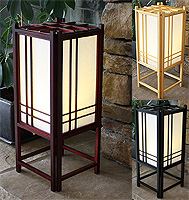
At the time I knew little to nothing about how to design the schematics or how I'd would be able to hook that lamp in to a Home Automation system. Hence I didn't even know what a Home Automation was at the time. Well luckily thanx to MySensors I don't need to know it. I just have to hookup an antenna, and add the correct code into my sketch.
So that problem was tackled. I think it was about a year ago, that I came across this little gesture sensor. It's sparkfun's APDS-9960. It's a rather expensive sensor used in the Samsung galaxy S5. Now I know that there are cheaper alternatives, but at the time I bought one and it ended up in one of my desk drawers.
Since I can't do my woodworking during winters, I design the electronics I use in my woodworking projects in the winter. And embed them in my woodworking projects when the temperature is high enough. When I begin thinking about the woodworking projects I want to build this woodworking season, I remembered the little gesture sensor.
So much for the intro. But if you're still reading, you're probably interested in the real deal. I had a hard time using the APDS-9960. So it took me a lot of hours the get it to work. But I'll share my workarounds with you. The MySensors community has done a lot for me, so I think it's about time to do something back.
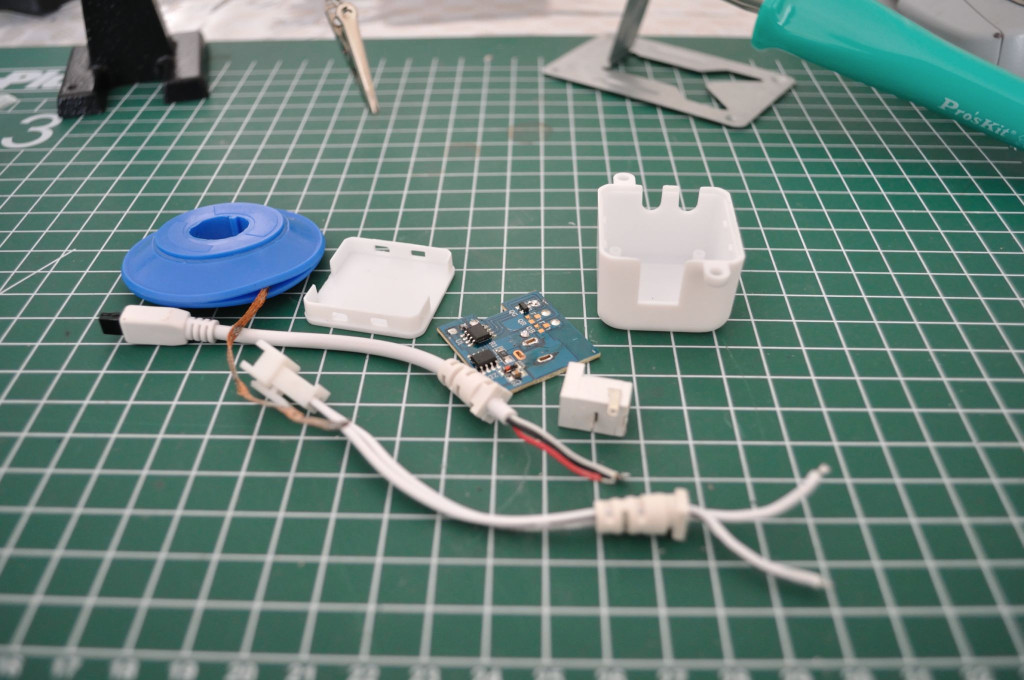
I started with adjusting the cheap white strip I specially bought for this project. It contained a 5 meter white LED strip, a power adapter and some reusable parts.
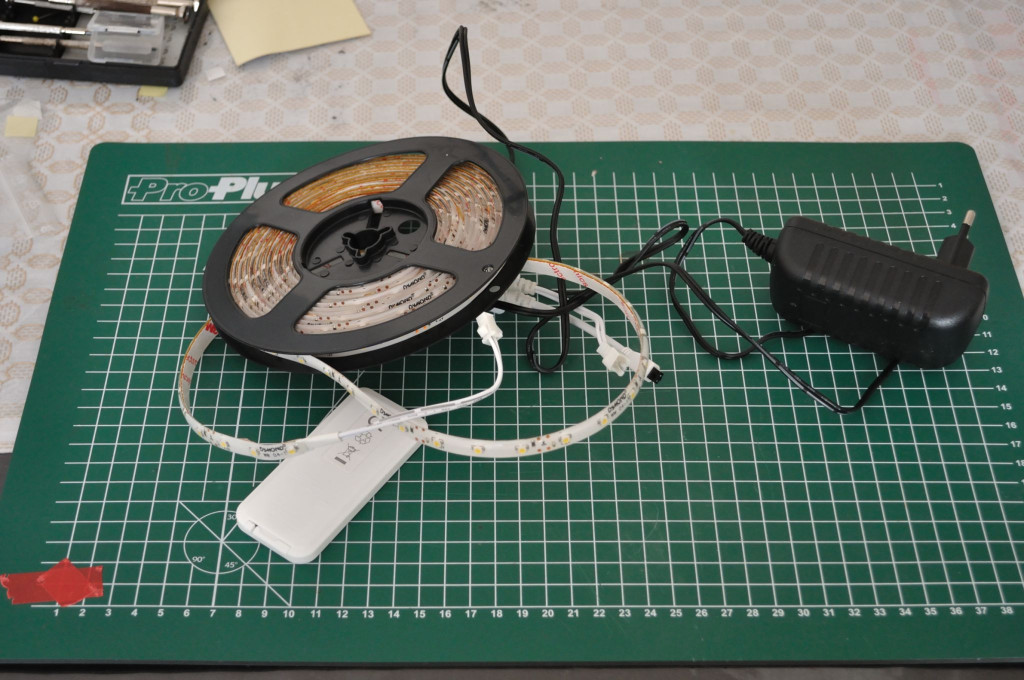
The tine plastic housing can easily be opened with a small screw driver.
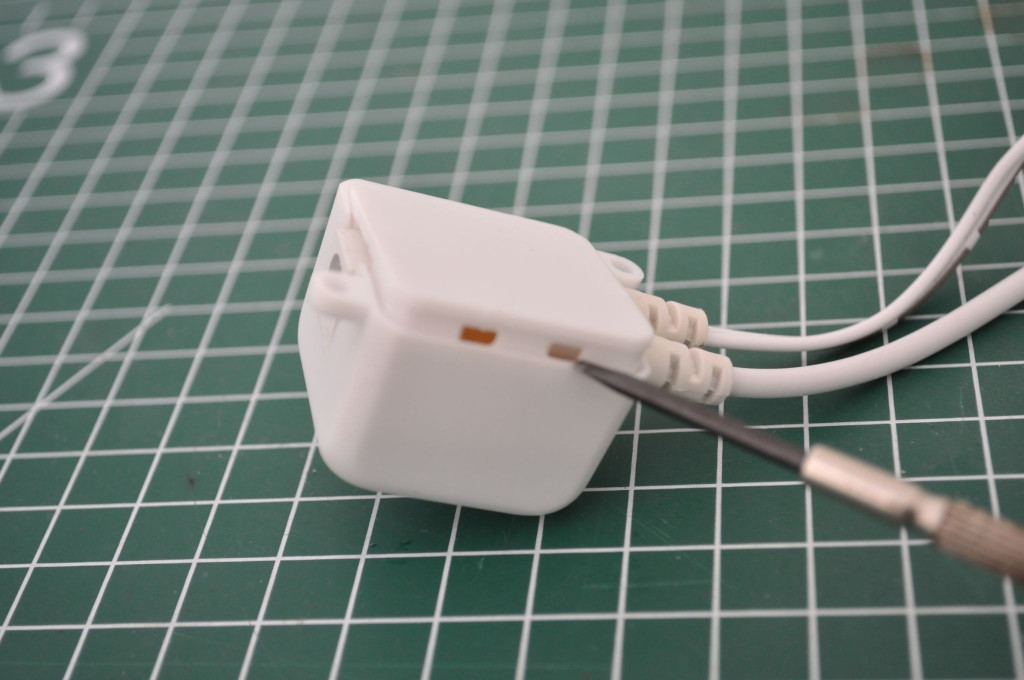
And now I have acces to some goodies (IR receiver - allways useful, the power plug I'll be using in the final product, and a connector for connecting the LED strip ;-))
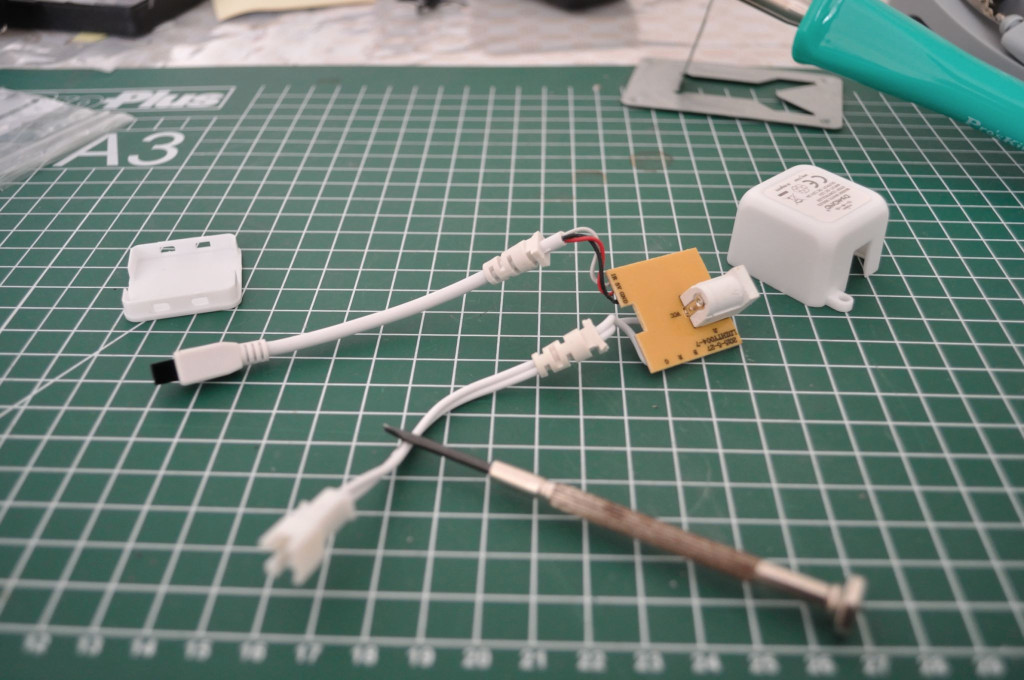
It took a just a couple of minutes to desolder all the parts.
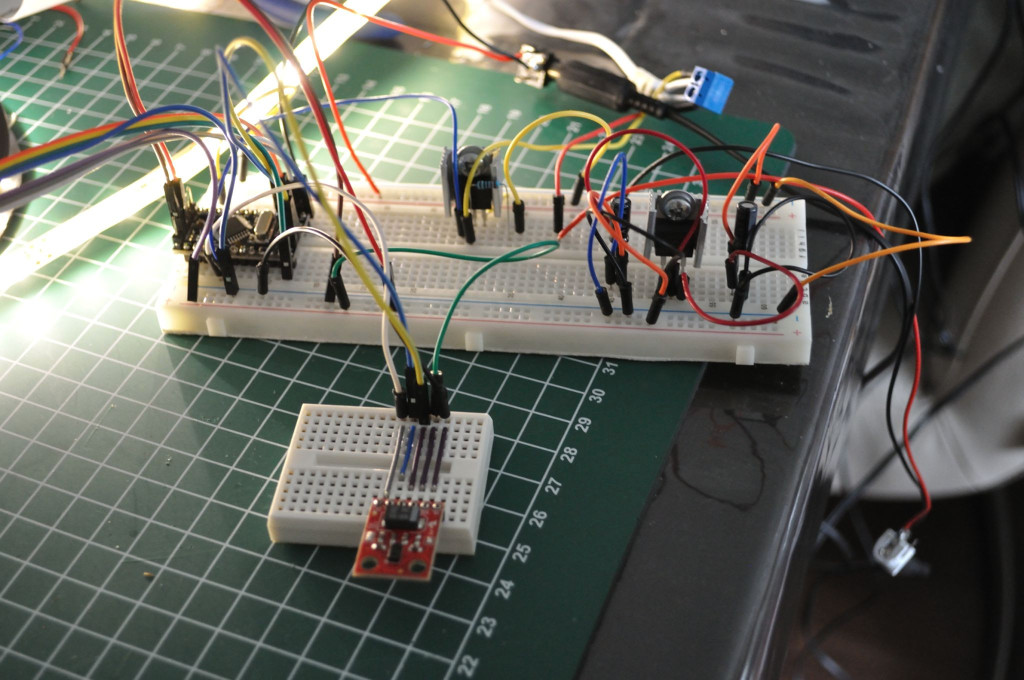
And the complete circuit looks like this on my breadboard (small note the 7805CV is not mounted on this picture. I'm using two power adapters during development. One 5V for powering the Arduino circuit and one 12V for powering the LED strip).
Since most project descriptions don't go in much details about the schematics, some of them are just out of my league. That's why I decided to add everything in this post. This project was really complex for me, because the circuit uses 12V, 5V and 3.3V. But besides for the part that I don't think that I use the right capacitors (it works though) the completed circuit looks like this.
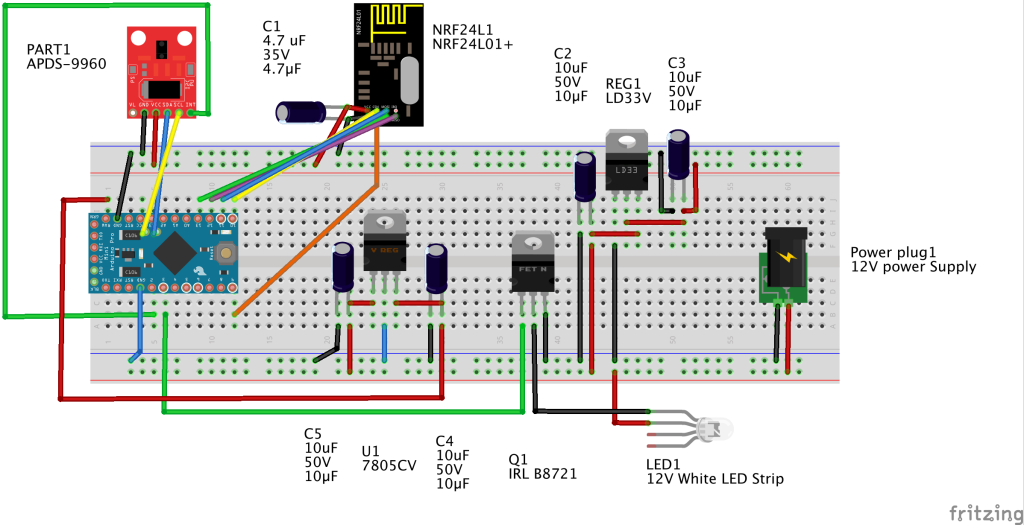
There are a couple of things I want to point out. According to Sparkfun the Pro Mini 3.3V can be fed with 12V. But I blew up my raw pin during the design that's why I added the 7805CV power regulator. I'm using a Wite LED strip, which came with a 12V 1500 milli amp power adapter. At the moment I'm able to use that adapter for feeding both the Arduino circuit and the LED strip. But the adapter gets warm. For me that's okay. I'll be using one meter of the 5 meter led strip at the most. So I'm pretty confident that the original power adapter will provide enough amperage for the complete circuit.
I've measured the usage of the arduino circuit and it uses about 380 milli amps. Which is stable until the circuit communicates with the gateway - sending new brightness level to the gateway. At that point the circuits absorbs about above 500 milli amp. Again measured without the LED strip consumption.
I use an N channel Mosfet for controlling the LED strip. That is necessary because LED strips share a common anode. This regarding to most RGB Led's that share a common cathode. (But I'm not an electronics specialist so correct me if I'm wrong.)
Here's the shopping list:
Amount Part Type
1 Electrolytic Capacitor 35V; 4.7µF;
4 Electrolytic Capacitor 50V; 10µF;
1 12V White LED strip with power Adapter ( you can use an RGB led strip, but you'll be needing 2 extra MOSFETS in that case)
1 NRF24L01+
1 Pro Mini 3.3V (You can use Pro Mini 5V, but you'll have to use a logical level converter, the APDS can only handle 3.3V)
1 APDS-9960 RGB (you can use the cheaper APSD-9930 you can find on e-bay, but you'll need an altered library!)
1 Power plug (I salvaged mine from the, from the LED strip package I bought)
1 IRL B8721 N-channel mosfet (when using a short piece of led strip, a 2N2222 might do. But I had this one lying around and it's able to control high amperage (6 Amp if I'm not mistaken)
1 LD33 Low-Dropout Voltage Regulator
1 7805CV Voltage Regulator - 5V (other types of 7805 might do, but I have this ones on spare)For the Sketch you'll be needing the Spark fun APDS-9960 library. It can be downloaded here. It's not the best library I've ever used though. But I couldn't find another one.
After you've hooked up all the electronics the real fun starts (we'll actually it doesn't, playing with the final project is even more fun). One note. The original author of Spark fun, probably had a less sensitive sensor than the one I have. After a long search I've found the solution to get my sensor the work which is:
apds.setGestureGain( 1 );You might need to change that value to your sensor. Valid values can be found in the library, but for convenience they are in the range of 0-3. 0 is very sensitive and 3 is less sensitive.
The lamp can be controlled from your Home Automation system, as well with gestures. The gestures are:
- Left swipe turns the lamp off
- Right swipe turns the lamp on
- Up swipe raises brightness. If the brightness is already at the max it will indicate this by turning the lamp of for a short moment and back on again.
- Down swipe lowers the brightness. If the brightness can't be lowered it'll turn the lamp off.
You can use the gesture sensor in a stand alone sketch as well. After playing with the gesture controlled Lamp I've discovered some use cases in which a gesture controlled lamp or switch is really handy:
- Controlling lights under kitchen cabinets. When preparing a meal it's not hygienic to turn on/off a normal switch. With a gesture controlled switch you don't have to touch the switch.
- Mount one in your workshop. When working on your car or motor cycle, it'll be certain that you get grease or oil on your hands. When needing light you don't have to touch the switch just use a gesture and you can turn on or off your lighting. That way you don't have to clean the switch after you're done working on your car or whatever it is you are working on.
If you've reached this point. My appologies for this long post. Thank you that you've found it worth reading. I'll post a follow up after the Japanse Lamp is finished - incl. the mounting of the electronics.
Here's the Sketch.
/**************************************************************** Gesture controlled lamp MySensors enabled, gesture controlled lamp. March 2016 by Theo This lamp can be turned on/off, and dimmed by gestures. And it can be controlled by any Home Automation system, that can talk with MySensors. The gesture sensor used in this Sketch is an APDS-9960 RGB and Gesture Sensor, sold by SparkFun. This Sketch is based upon the GestureTest exampl developped by, Shawn Hymel @ SparkFun Electronics on May 30, 2014. See https://github.com/sparkfun/APDS-9960_RGB_and_Gesture_Sensor Hardware Connections (APDS-9960): IMPORTANT: The APDS-9960 can only accept 3.3V! Arduino Pin APDS-9960 Board Function 3.3V VCC Power GND GND Ground A4 SDA I2C Data A5 SCL I2C Clock 2 INT Interrupt The lamp itself is a white LED strip, controlled by an N channel MOSFET. ****************************************************************/ #include <SPI.h> #include <MySensor.h> #include <Wire.h> #include <SparkFun_APDS9960.h> // Pins #define APDS9960_INT 2 // Needs to be an interrupt pin #define LED_PIN 3 // The led PWM pin, that drives the LED strip #define MAXDIMLEVELS 100 // The maximum number of dim levels #define BRIGHTNESS_INCREMENT 15 // Dimmer increment for gesture(s) #define MAX_LEVEL_REACHED_DELAY 150 // Short blinking delay when increasing the dimmer while the dimmer is already at max #define MAX_LEVEL_REACHED_SIGNAL_COUNT 1 // The amount of blinks, when the max dim level already has been reached #define CHILD_ID_LIGHT 1 // The child id of the Node. Only one Node on this sensor though. #define LIGHT_OFF 0 // Constant indicating the lamp on state #define LIGHT_ON 1 // cConstant indicationg light off state #define SN "Gesture controlled lamp" // Description of this sketch. #define SV "1.1" // The version of the Sketch // Global Variables SparkFun_APDS9960 apds = SparkFun_APDS9960(); int isr_flag = 0; // interrupt flag, triggered when a gesture has been dectected int LastLightState=LIGHT_OFF; int LastDimValue=100; int dimlevels[ MAXDIMLEVELS ] = // PWM values used for translating home automation dimmer levels. This gives smoother transations { 0, 1, 2, 3, 4, 5, 6, 7, 8, 9, 10, 11, 12, 13, 14, 15, 16, 17, 18, 19, 20, 21, 22, 23, 24, 25, 26, 27, 28, 29, 30, 31, 32, 35, 39, 42, 46, 49, 52, 56, 59, 62, 66, 69, 73, 76, 79, 83, 86, 89, 93, 96, 100, 103, 106, 110, 113, 116, 120, 123, 126, 130, 133, 137, 140, 144, 147, 150, 154, 157, 160, 164, 167, 171, 174, 177, 181, 184, 187, 191, 194, 197, 201, 204, 208, 211, 215, 218, 221, 225, 228, 231, 235, 238, 242, 245, 246, 250, 251, 255 }; MySensor gw; MyMessage lightMsg(CHILD_ID_LIGHT, V_LIGHT); MyMessage dimmerMsg(CHILD_ID_LIGHT, V_DIMMER); void setup() { gw.begin(incomingMessage, AUTO, false); // Send the Sketch Version Information to the Gateway gw.sendSketchInfo(SN, SV); gw.present(CHILD_ID_LIGHT, S_DIMMER, "floor lamp", true ); // declare output pin for PWM control of the MOSFET pinMode( LED_PIN, OUTPUT ); // Set interrupt pin as input pinMode(APDS9960_INT, INPUT); // Initialize interrupt service routine attachInterrupt(0, interruptRoutine, FALLING); // Initialize APDS-9960 (configure I2C and initial values) if ( apds.init() ) { // original value is two. But it looks like the modern gesture sensor or more sensitive. 1 does it for me apds.setGestureGain( 1 ); } // Start running the APDS-9960 gesture sensor engine if ( apds.enableGestureSensor(true) ) { LastLightState=LIGHT_OFF; LastDimValue=0; analogWrite( LED_PIN, 0 ); gw.request( CHILD_ID_LIGHT, V_PERCENTAGE ); gw.request( CHILD_ID_LIGHT, V_STATUS ); } //Here you actualy switch on/off the light with the last known dim level } // The Sketh's main loop void loop() { if( isr_flag == 1 ) { detachInterrupt(0); handleGesture(); isr_flag = 0; attachInterrupt(0, interruptRoutine, FALLING); } gw.process(); } // interrupt handler. Is being traggerd by the gesture sensor whenever a gesture has been detected. void interruptRoutine() { isr_flag = 1; } // Determine gesture and handle accordingly. void handleGesture() { if ( apds.isGestureAvailable() ) { switch ( apds.readGesture() ) { case DIR_UP: if ( LastDimValue + BRIGHTNESS_INCREMENT > ( MAXDIMLEVELS - 1 ) ) { for ( int i = 0; i < MAX_LEVEL_REACHED_SIGNAL_COUNT; i++ ) { analogWrite( LED_PIN, dimlevels[ 0 ] ); gw.wait( MAX_LEVEL_REACHED_DELAY ); analogWrite( LED_PIN, dimlevels[ MAXDIMLEVELS - 1 ] ); gw.wait(MAX_LEVEL_REACHED_DELAY ); } LastDimValue = ( MAXDIMLEVELS - 1 ); } else { LastDimValue += BRIGHTNESS_INCREMENT; } LastLightState = LIGHT_ON; SetCurrentState2Hardware(); break; case DIR_DOWN: if ( LastDimValue - BRIGHTNESS_INCREMENT <= 0 ) { LastDimValue = 0; } else { LastDimValue -= BRIGHTNESS_INCREMENT; } if ( LastDimValue == 0 ) { LastLightState = LIGHT_OFF; } else { LastLightState = LIGHT_ON; } SetCurrentState2Hardware(); break; case DIR_LEFT: LastLightState = LIGHT_OFF; SetCurrentState2Hardware(); break; case DIR_RIGHT: LastLightState = LIGHT_ON; SetCurrentState2Hardware(); break; } } } void incomingMessage(const MyMessage &message) { if (message.type == V_LIGHT) { int lstate= atoi( message.data ); if ((lstate<0)||(lstate>1)) { return; } LastLightState=lstate; if ((LastLightState==LIGHT_ON)&&(LastDimValue==0)) { //In the case that the Light State = On, but the dimmer value is zero, //then something (probably the controller) did something wrong, //for the Dim value to 100% LastDimValue=100; } //When receiving a V_LIGHT command we switch the light between OFF and the last received dimmer value //This means if you previously set the lights dimmer value to 50%, and turn the light ON //it will do so at 50% } else if (message.type == V_DIMMER) { int dimvalue= atoi( message.data ); if ((dimvalue<0)||(dimvalue>100)) { return; } if (dimvalue==0) { LastLightState=LIGHT_OFF; } else { LastLightState=LIGHT_ON; LastDimValue=dimvalue; } } //Here you set the actual light state/level SetCurrentState2Hardware(); } void SetCurrentState2Hardware() { if (LastLightState==LIGHT_OFF) { analogWrite( LED_PIN, dimlevels[0] ); } else { analogWrite( LED_PIN, dimlevels[ LastDimValue - 1 ] ); } //Send current state to the controller SendCurrentState2Controller(); } void SendCurrentState2Controller() { if ((LastLightState==LIGHT_OFF)||(LastDimValue==0)) { gw.send(dimmerMsg.set(0)); } else { gw.send(dimmerMsg.set(LastDimValue)); } } -
@TheoL excellent :) I have 9960 and 9930 eval board too. I think 9960 is better. 9960 chip itself is not so much expensive but eval board is.
So, I have made a small board for this gesture chip (for apds9960). And making my own board is almost same price as the eval board ;)
I will use it for actuator too and added optional MEMS, RGB led, lipo charger, atsam+usb...Sort of fixed actuator (no need of MEMS) or mobile (with MEMS + gesture and atsam memory it's possible to do cool things I guess :)
I will post pics as soon as I have received few components missing. (preview it's the right top corner one http://forum.mysensors.org/uploads/files/1457300128047-2016-03-06_21-14-17.png . And if I have no connection errors, maybe I could send one to you @tbowmo as you are the mysensors atsam guru :)Thx for share Theo, I will look at your project
-
Great! Very timely, I just received my Gesture thingies!
Please consider adding your project to openhardware.io, I'm trying to bring some order to all great projects here (and eventually add them to the main site).
-
@TheoL excellent :) I have 9960 and 9930 eval board too. I think 9960 is better. 9960 chip itself is not so much expensive but eval board is.
So, I have made a small board for this gesture chip (for apds9960). And making my own board is almost same price as the eval board ;)
I will use it for actuator too and added optional MEMS, RGB led, lipo charger, atsam+usb...Sort of fixed actuator (no need of MEMS) or mobile (with MEMS + gesture and atsam memory it's possible to do cool things I guess :)
I will post pics as soon as I have received few components missing. (preview it's the right top corner one http://forum.mysensors.org/uploads/files/1457300128047-2016-03-06_21-14-17.png . And if I have no connection errors, maybe I could send one to you @tbowmo as you are the mysensors atsam guru :)Thx for share Theo, I will look at your project
@scalz I'm interested in your design. At the moment there is one chip on the board that is slightly higher than the sensor. Since they're both on the same size of the PCB, I'll be needing all of my woodworking skills to mount the sensor in the final lamp.
I'd be really happy with a sensor board where the sensor is mounted on one side and the rest of the electronics on the other side. That will help embedding the sensors into final products. Would be great if you'd be able to do that!
-
No, no... you can use openhardware.io for breadboard projects as well! A fritzing is excellent and more than enough.
-
@Theol I hope my boards will work well. woodworking, so cool, can't wait to see :) I like wood too but that's not my job, and good tools is so expensive!
For fun ( it's ot) if you are curious here a little wood project (my first serious lol) I did some times ago. I practise wing chun so I needed a mook jong to train alone...
The first I made, body was a strong swimming pool pipe (really hard) but arms were pine :flushed: and I broke one! http://www.hostingpics.net/viewer.php?id=18471320130507155634.jpg
And my dream was a true oak one. I found some free oak. I am pretty happy now it's very strong :) Handmade with planer and sanding machine.
Started from this (ugly!) : http://www.hostingpics.net/viewer.php?id=71705320131208203751.jpg
After lot of work! http://www.hostingpics.net/viewer.php?id=57934620140121172848.jpg
Finally, after some treatment, (not perfect but looks better in real)http://www.hostingpics.net/viewer.php?id=79499520140131115703.jpg
It costs me nothing else than my time! a beautiful oak one is expensive! -
No, no... you can use openhardware.io for breadboard projects as well! A fritzing is excellent and more than enough.
-
@Theol I hope my boards will work well. woodworking, so cool, can't wait to see :) I like wood too but that's not my job, and good tools is so expensive!
For fun ( it's ot) if you are curious here a little wood project (my first serious lol) I did some times ago. I practise wing chun so I needed a mook jong to train alone...
The first I made, body was a strong swimming pool pipe (really hard) but arms were pine :flushed: and I broke one! http://www.hostingpics.net/viewer.php?id=18471320130507155634.jpg
And my dream was a true oak one. I found some free oak. I am pretty happy now it's very strong :) Handmade with planer and sanding machine.
Started from this (ugly!) : http://www.hostingpics.net/viewer.php?id=71705320131208203751.jpg
After lot of work! http://www.hostingpics.net/viewer.php?id=57934620140121172848.jpg
Finally, after some treatment, (not perfect but looks better in real)http://www.hostingpics.net/viewer.php?id=79499520140131115703.jpg
It costs me nothing else than my time! a beautiful oak one is expensive!@scalz woodworking is the hobby I do when the weather allows me too. Have to do most of it outside. And yes the tools can get expensive. But if you have the time, you can achieve a lot with hand tools. I enjoy hand tools more than power tools. It's just more satisfying when you've build something completely with your own hands ;-)
You did a great job with your project! I don't know where you live. But in the USA some harder red woods are really cheap and they can stand the time without a finish. I believe it's red cedar. In Europe there aren't really cheap woods that can be used outside without a finish. I think some inland fir types are pretty good.
-
Hello. I found the library. how to convert a sketch? make everything work.
APDS9930
https://github.com/Davideddu/APDS9930 -
Hello. I found the library. how to convert a sketch? make everything work.
APDS9930
https://github.com/Davideddu/APDS9930@vampircik I'm waiting for my APDS9930 sensors to arrive. Which should be in a couple of days. Once I've them, I'll make a second version of the sketch for you. I'm curious if these cheaper version will work just as good.
Hopefully you're patient enough to wait ;-)
