Solar Powered Soil Moisture Sensor
-
Updated electric sketch with Connectors. This is useful if the battery gets empty then you need to disconnect Arduino so the battery can get charged.
@flopp Maybe i miss something but I think the connector should be mounted between the battery and the Vin on the step-up. You mounted it on the A0, it´s just the voltage check port.
In the original lamp there was what i think is a charge regulator between the solar cell and the batteri, did you keep that one or you just put the solar cell to the battery ?
Thanks for a nice idé to use this lamp.
-
@flopp Maybe i miss something but I think the connector should be mounted between the battery and the Vin on the step-up. You mounted it on the A0, it´s just the voltage check port.
In the original lamp there was what i think is a charge regulator between the solar cell and the batteri, did you keep that one or you just put the solar cell to the battery ?
Thanks for a nice idé to use this lamp.
@pettib said:
@flopp Maybe i miss something but I think the connector should be mounted between the battery and the Vin on the step-up. You mounted it on the A0, it´s just the voltage check port.
Thanks, I was to quick when adding the connectors
In the original lamp there was what i think is a charge regulator between the solar cell and the batteri, did you keep that one or you just put the solar cell to the battery ?
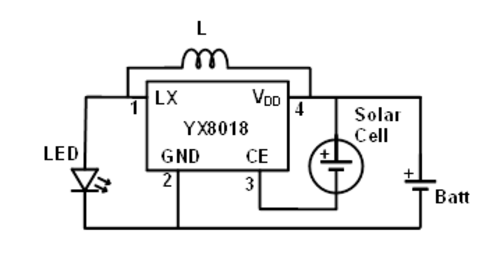
I removed the small IC, YX8108. Below is a schematic for YX8108
-
@pettib said:
@flopp Maybe i miss something but I think the connector should be mounted between the battery and the Vin on the step-up. You mounted it on the A0, it´s just the voltage check port.
Thanks, I was to quick when adding the connectors
In the original lamp there was what i think is a charge regulator between the solar cell and the batteri, did you keep that one or you just put the solar cell to the battery ?
I removed the small IC, YX8108. Below is a schematic for YX8108
@flopp Is it the led or the solar cell that is working as light sensor ? If i remove the led and measure on the pins there is always power, even if it´s in daylight. So it should be possible to get the power to the step-up Vin from the LED pin, This way we can keep the on/off switch and the (YX8018) Mine is marked HW012.
-
@flopp I found this link. https://ez.analog.com/community/university-program/blog/2014/11/14/hacking-an-led-solar-garden-light
The strange thing is that i can´t get the power on the led pin to go low. But i will remove the IC anyway. I made one light 2 days ago but the battery was empty just the day after and i was not able to get it fully charged again. Maybe some bad connection. I will try a new one today. -
@flopp I found this link. https://ez.analog.com/community/university-program/blog/2014/11/14/hacking-an-led-solar-garden-light
The strange thing is that i can´t get the power on the led pin to go low. But i will remove the IC anyway. I made one light 2 days ago but the battery was empty just the day after and i was not able to get it fully charged again. Maybe some bad connection. I will try a new one today.@pettib
Did you remove the power from battery to Arduino when you tried to charge it again?
I tried to charge r battery for 1-2 days when I had arduino connected, didn't work. After I removed it and out the "lamp" in the sun for 5 hours I could connect the Arduino again and then I was on track again. -
@pettib
Did you remove the power from battery to Arduino when you tried to charge it again?
I tried to charge r battery for 1-2 days when I had arduino connected, didn't work. After I removed it and out the "lamp" in the sun for 5 hours I could connect the Arduino again and then I was on track again. -
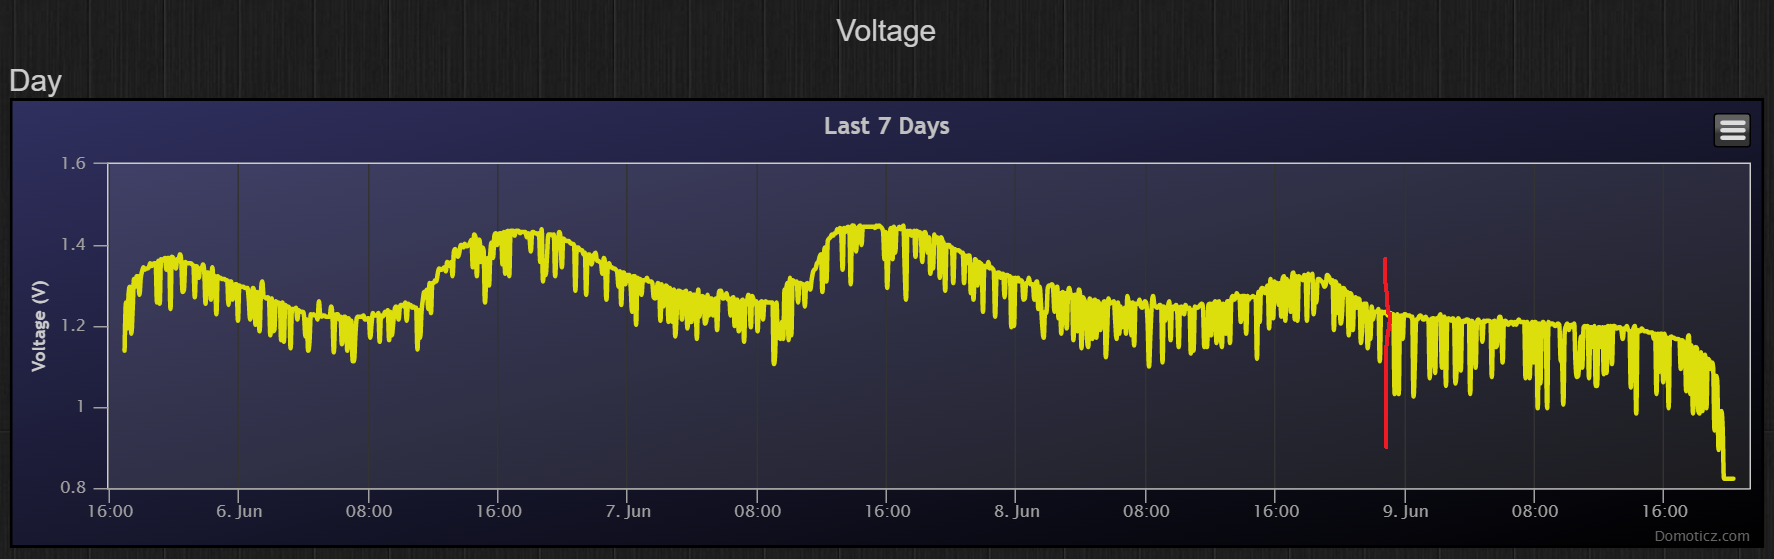
update
I've let it be outdoor in the sun during 2-3 days now and it works well.
yesterday I took one of them and placed it in the garage, totally black whole day not even a lamp.
red line is when I moved it to the garage.
it is sending every 10 second. After ~20 hours the battery was to low to be able to run Pro Mini
-
-
side thought
why not write your sleep setting as a variable on the arduino side that is dependent on battery voltage?
if v>(full charge) sleep x hours
if v>(half charge) sleep for y hours
if v<(close to terminal voltage) sleep for z hours/days@punter9 said:
side thought
why not write your sleep setting as a variable on the arduino side that is dependent on battery voltage?
if v>(full charge) sleep x hours
if v>(half charge) sleep for y hours
if v<(close to terminal voltage) sleep for z hours/days
I don't see that it is needed. It will be no problem to send data every 30 min even when the sun is not shining. During a grey day I had vintage around 1.0-1.2.The idea is useful if you think/know that the solar will not charge your battery
-
@punter9 said:
side thought
why not write your sleep setting as a variable on the arduino side that is dependent on battery voltage?
if v>(full charge) sleep x hours
if v>(half charge) sleep for y hours
if v<(close to terminal voltage) sleep for z hours/days
I don't see that it is needed. It will be no problem to send data every 30 min even when the sun is not shining. During a grey day I had vintage around 1.0-1.2.The idea is useful if you think/know that the solar will not charge your battery
@flopp
sure is, It looks like this sketch already has already picked a set single point sleep time that achieved the discharge gradient being less than the charge gradient looking at the angles on the 7 day graph.My question is why wouldn't you write an algorithm for your sleep setting so you don't have to mess with it if you get a cloudy week etc? You have variable charge gradients depending on weather so why not have a simple variable discharge gradient?
A simple one would be case A - sunny day discharge gradient B- very cloudy day discharge gradient C- emergency charge/top off battery
you could write an equation based off your existing data but honestly you probably wouldn't get much out of it past the simple set listed above that cover 99% of conditions you will see.
-
@flopp
sure is, It looks like this sketch already has already picked a set single point sleep time that achieved the discharge gradient being less than the charge gradient looking at the angles on the 7 day graph.My question is why wouldn't you write an algorithm for your sleep setting so you don't have to mess with it if you get a cloudy week etc? You have variable charge gradients depending on weather so why not have a simple variable discharge gradient?
A simple one would be case A - sunny day discharge gradient B- very cloudy day discharge gradient C- emergency charge/top off battery
you could write an equation based off your existing data but honestly you probably wouldn't get much out of it past the simple set listed above that cover 99% of conditions you will see.
@punter9 said:
@flopp
sure is, It looks like this sketch already has already picked a set single point sleep time that achieved the discharge gradient being less than the charge gradient looking at the angles on the 7 day graph.My question is why wouldn't you write an algorithm for your sleep setting so you don't have to mess with it if you get a cloudy week etc? You have variable charge gradients depending on weather so why not have a simple variable discharge gradient (or complex if you want to make an algorithm off the charted data) ?
At the moment I don't need it. But if I see that the battery gets drained to much, because of bad weather, I may be use your idea.
-
The "lamp"(silver) that I run out of battery seems to be damaged, two days ago it stopped sending data, last reported voltage was 1.13V which is good enough to work.
Maybe the battery got damaged, it is a NiMh and I think they have some kind of memory?
But why doesn't it get damage when you use the lamp as a lamp?
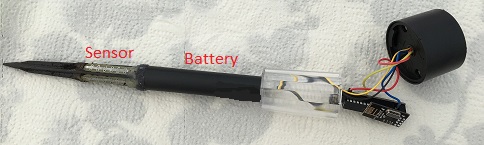
Normally the lamp is charging the battery during the day and when it is dark it power on a LED which will lit until the battery is empty or maybe until the IC(YX8018) measure a low voltage.Today I change my second "lamp"(black) to a 1.2v AAA NiMh2 800mAh. I think this will help to not getting to low voltage during night.
The battery that was included was mounted in the lid, I removed it and placed the new battery in the stick.
I also made the stick little bit shorter, but don't make it too short because then you will measure the moisture at the top of the soil.
The black round stick is 9 cm and the whole thing, when put togehter, is 28 cm from top(solar) to bottom(tip)
-
To have in mind
If you use the lamp with silver stick, it is metal, then remember to protect the battery if you but the battery in the stick.
Use hot glue at the top around the solar otherwise rain will stay between the solar and the place where it is mounted. I don't get water inside where the electronics are but you never know what will happen after a few month.
I have some problem with my black lamp it is rust on the positive connection, today it stopped working because if this, I had to remove the connection and put it back.
Recommend to solder the cable instead of using connectors, which I do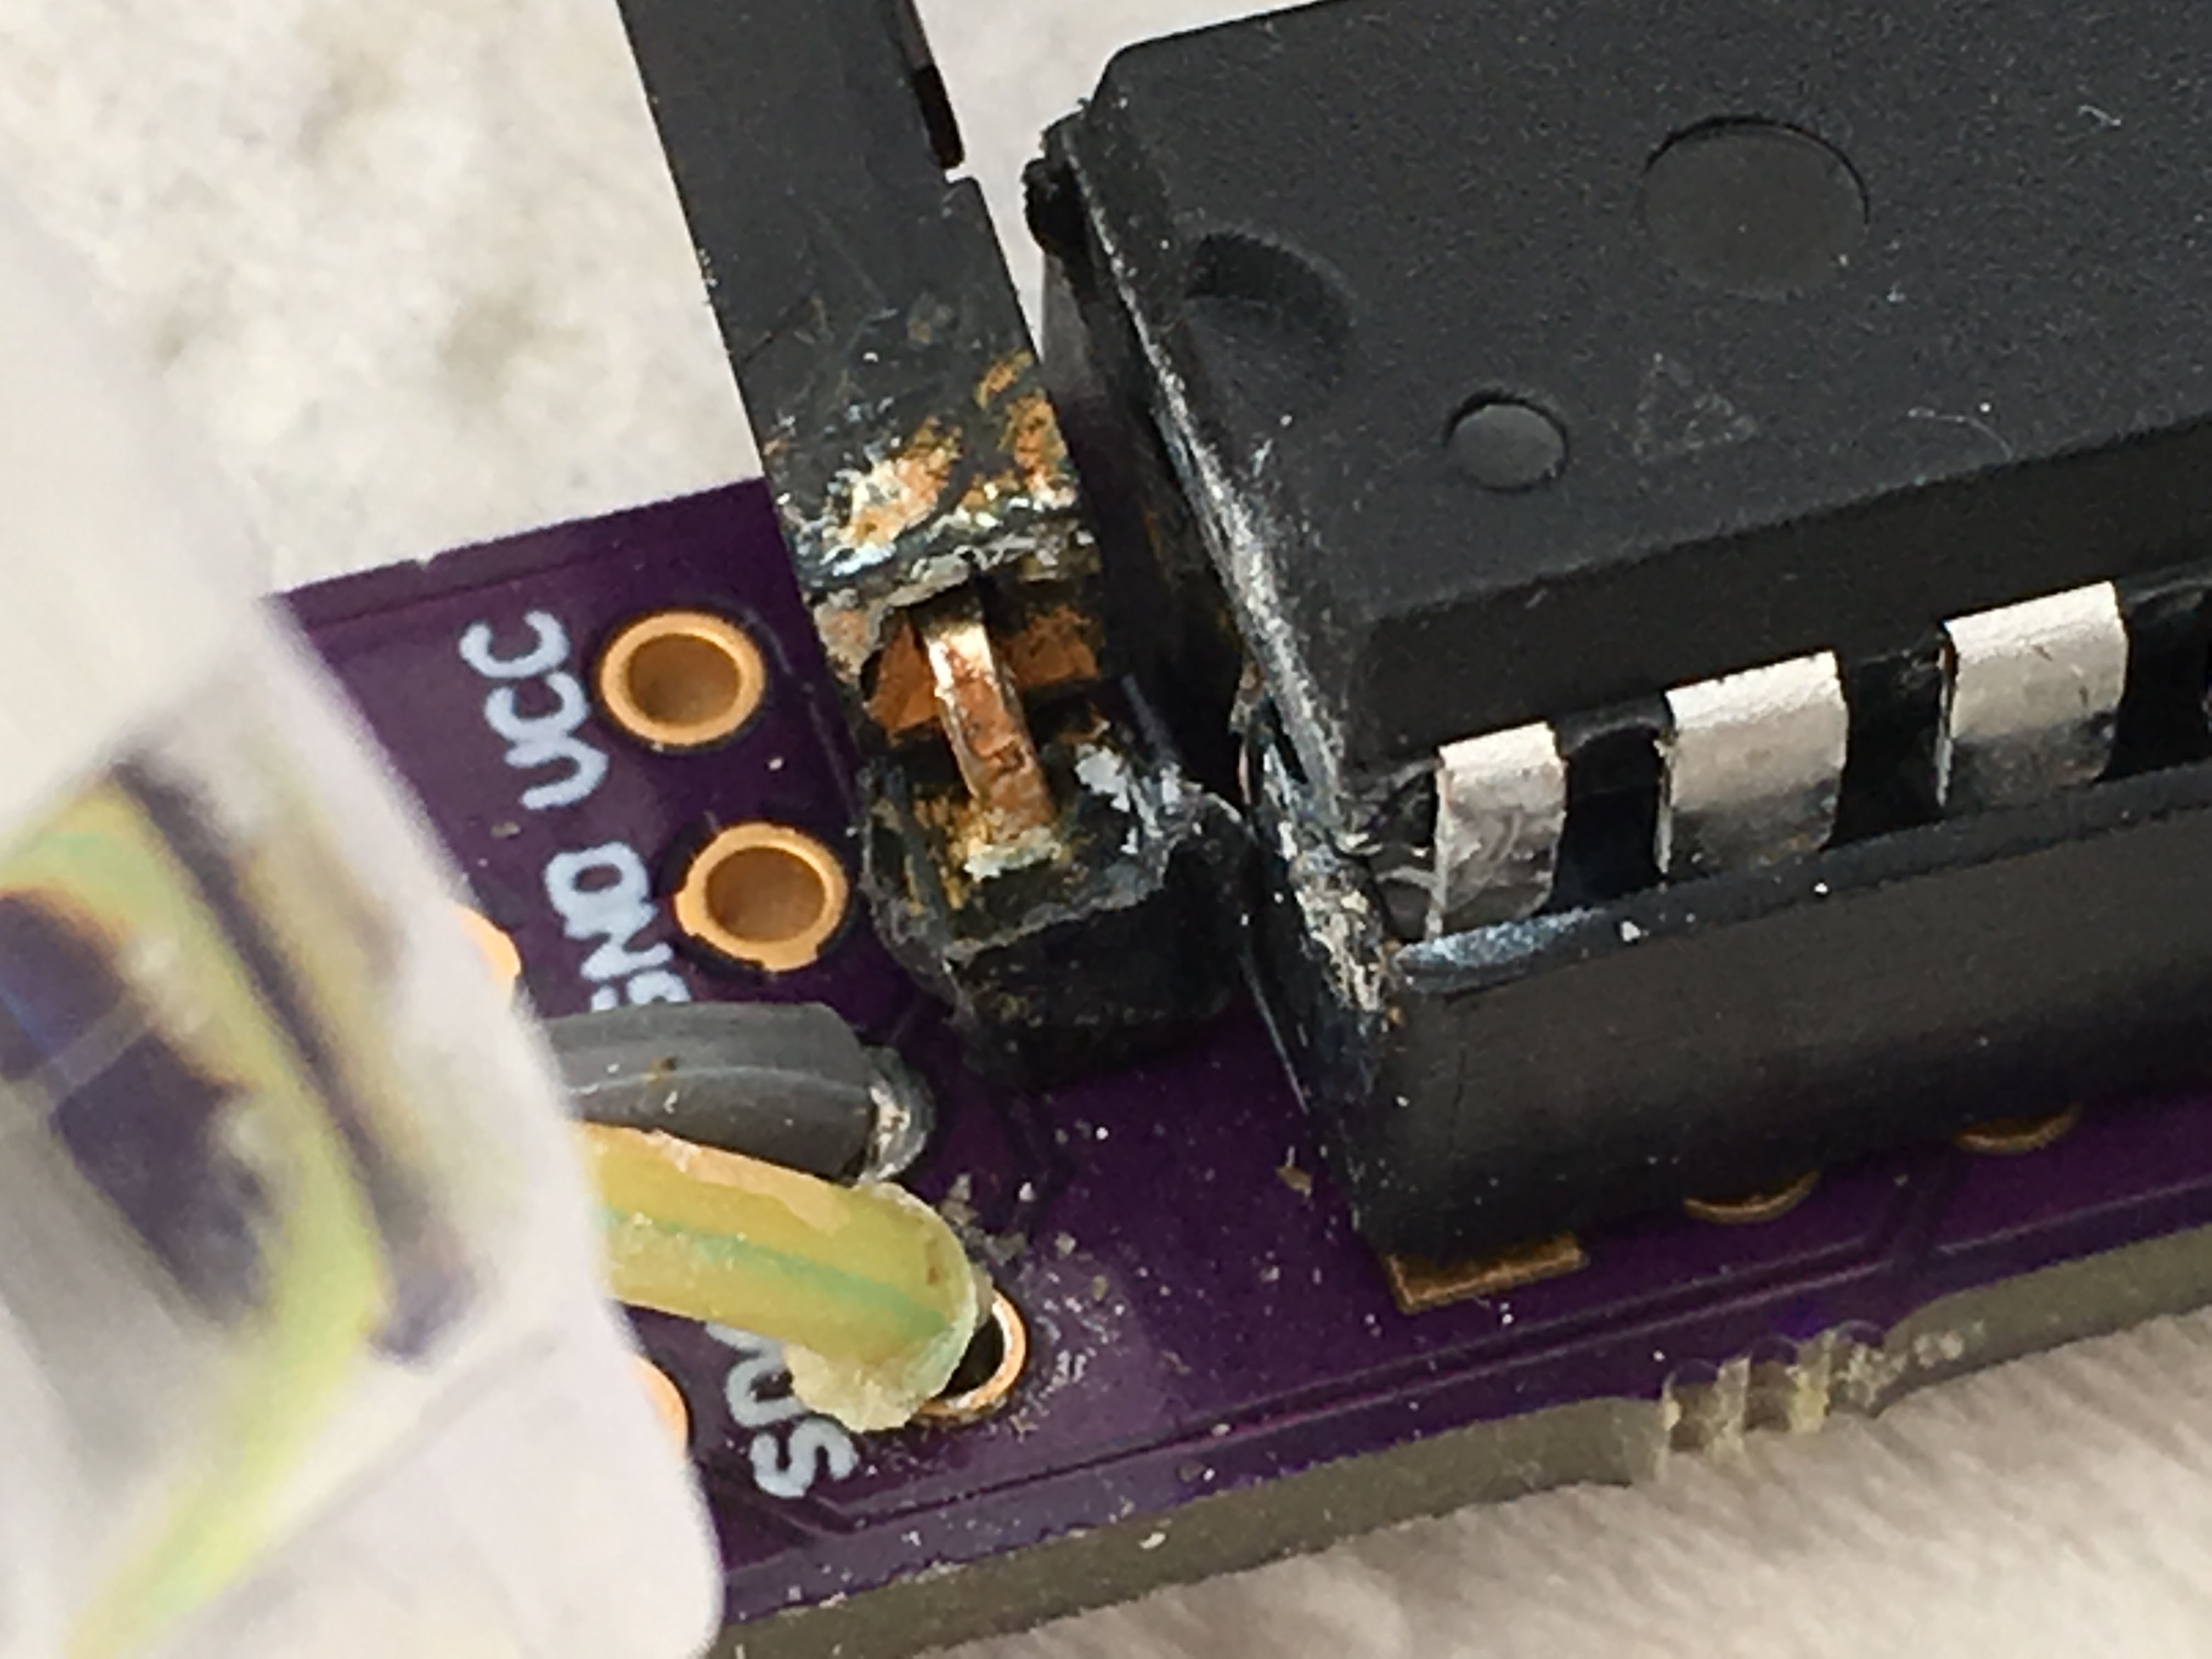
-
To have in mind
If you use the lamp with silver stick, it is metal, then remember to protect the battery if you but the battery in the stick.
Use hot glue at the top around the solar otherwise rain will stay between the solar and the place where it is mounted. I don't get water inside where the electronics are but you never know what will happen after a few month.
I have some problem with my black lamp it is rust on the positive connection, today it stopped working because if this, I had to remove the connection and put it back.
Recommend to solder the cable instead of using connectors, which I doFirst, thank you very much for making these tests, I found some similar garden lamps in a local store and thought they were cheap so I bought one to have a look. Seems they were not so cheap as I paid nearly 3$ despite living in a developing country :D
I will make a test with it as soon as I find a step up accepting the 1.xV of the battery, but I'm not sure if it will really work as the battery inside mine is a tiny V80h with a very limited 60mAh capacity, not sure if it will survive the sending of data...@flopp said:
I have some problem with my black lamp it is rust on the positive connection, today it stopped working because if this, I had to remove the connection and put it back.
Recommend to solder the cable instead of using connectors, which I do!I would put some hot glue there too, no ? When all connections are checked and the board is running fine you could even sink the whole electronic in hot glue to solve these problems "forever" ?
-
First, thank you very much for making these tests, I found some similar garden lamps in a local store and thought they were cheap so I bought one to have a look. Seems they were not so cheap as I paid nearly 3$ despite living in a developing country :D
I will make a test with it as soon as I find a step up accepting the 1.xV of the battery, but I'm not sure if it will really work as the battery inside mine is a tiny V80h with a very limited 60mAh capacity, not sure if it will survive the sending of data...@flopp said:
I have some problem with my black lamp it is rust on the positive connection, today it stopped working because if this, I had to remove the connection and put it back.
Recommend to solder the cable instead of using connectors, which I do!I would put some hot glue there too, no ? When all connections are checked and the board is running fine you could even sink the whole electronic in hot glue to solve these problems "forever" ?
@Nca78 said:
First, thank you very much for making these tests, I found some similar garden lamps in a local store and thought they were cheap so I bought one to have a look. Seems they were not so cheap as I paid nearly 3$ despite living in a developing country :D
Thank you. $3 is not bad but expensive compared to mine :)
I will make a test with it as soon as I find a step up accepting the 1.xV of the battery, but I'm not sure if it will really work as the battery inside mine is a tiny V80h with a very limited 60mAh capacity, not sure if it will survive the sending of data...
This is what I use as step-up, search for that product you will find cheaper than $1.49
http://www.ebay.com/itm/DC-DC-0-8-3V-to-3-3V-Step-UP-Boost-Power-Board-Module-Converter-Voltage-RF-/282029936915?hash=item41aa4b5113:g:3GAAAOSw1DtXLS7QI would put some hot glue there too, no ? When all connections are checked and the board is running fine you could even sink the whole electronic in hot glue to solve these problems "forever" ?
Yes, why not, sounds like a good idea. But keep TX, RX, RESET and GND available to be able to update the sketch
-
The "lamp"(silver) that I run out of battery seems to be damaged, two days ago it stopped sending data, last reported voltage was 1.13V which is good enough to work.
Maybe the battery got damaged, it is a NiMh and I think they have some kind of memory?
But why doesn't it get damage when you use the lamp as a lamp?
Normally the lamp is charging the battery during the day and when it is dark it power on a LED which will lit until the battery is empty or maybe until the IC(YX8018) measure a low voltage.Today I change my second "lamp"(black) to a 1.2v AAA NiMh2 800mAh. I think this will help to not getting to low voltage during night.
The battery that was included was mounted in the lid, I removed it and placed the new battery in the stick.
I also made the stick little bit shorter, but don't make it too short because then you will measure the moisture at the top of the soil.
The black round stick is 9 cm and the whole thing, when put togehter, is 28 cm from top(solar) to bottom(tip)
Hello! It looks like you're interested in this conversation, but you don't have an account yet.
Getting fed up of having to scroll through the same posts each visit? When you register for an account, you'll always come back to exactly where you were before, and choose to be notified of new replies (either via email, or push notification). You'll also be able to save bookmarks and upvote posts to show your appreciation to other community members.
With your input, this post could be even better 💗
Register Login