
[SOLVED] W5100 Ethernet gateway with RFM69 Radio fails at init
-
Perfect, thank you.
That solved all issues! Now working super fine. -
Hi, Frédéric Grandjean
I'm also trying to build an ethernet gateway with the rfm69 radio's. But also have some errors when testing the code. Also I'm not sure I connected everything the right way, because there's not that info about those modules.
Since you have this al working now, is it possible for me to take a look at your code and maybe show me how you connected everything?Thank you!
Jonathan -
Hi Jonathan,
Before I show my code, please check:- Connect W5100 and radio like this
Arduino - Radio - Ethernet
13      - SCK   - SCK
12      - MISO  - MISO/SO
11      - MOSI  - MOSI/SI
10      - NSS (CS)
7       -       - SS/CS
2       - DIO0  -
Be sure to power the W5100 with 5V and the radio with 3v3!
Then, you need to modify the w5100.h file to disable radio interruption during SPI use:
Find#else inline static void initSS() { DDRB |= _BV(2); }; inline static void setSS() { PORTB &= ~_BV(2); }; inline static void resetSS() { PORTB |= _BV(2); }; #endifand replace with
#elif defined(W5100SPIPATCH)
  inline static void initSS()    { DDRD  |=  _BV(7); };
  inline static void setSS()     { cli(); PORTD &= ~_BV(7); };
  inline static void resetSS()   { PORTD |=  _BV(7); sei(); };
#endif
Then, downgrade the board manager "Arduino AVR boards" to version 1.6.11 and rebuild.
Finally, here is my working code:
/**
 * The MySensors Arduino library handles the wireless radio link and protocol
 * between your home built sensors/actuators and HA controller of choice.
 * The sensors forms a self healing radio network with optional repeaters. Each
 * repeater and gateway builds a routing tables in EEPROM which keeps track of the
 * network topology allowing messages to be routed to nodes.
 *
 * Created by Henrik Ekblad <henrik.ekblad@mysensors.org>
 * Copyright (C) 2013-2015 Sensnology AB
 * Full contributor list: https://github.com/mysensors/Arduino/graphs/contributors
 *
 * Documentation: http://www.mysensors.org
 * Support Forum: http://forum.mysensors.org
 *
 * This program is free software; you can redistribute it and/or
 * modify it under the terms of the GNU General Public License
 * version 2 as published by the Free Software Foundation.
 *
 *******************************
 *
 * REVISION HISTORY
 * Version 1.0 - Henrik EKblad
 * Contribution by a-lurker and Anticimex,
 * Contribution by Norbert Truchsess <norbert.truchsess@t-online.de>
 * Contribution by Tomas Hozza <thozza@gmail.com>
 *
 *
 * DESCRIPTION
 * The EthernetGateway sends data received from sensors to the ethernet link.
 * The gateway also accepts input on ethernet interface, which is then sent out to the radio network.
 *
 * The GW code is designed for Arduino 328p / 16MHz.  ATmega168 does not have enough memory to run this program.
 *
 * LED purposes:
 * - To use the feature, uncomment MY_DEFAULT_xxx_LED_PIN in the sketch below
 * - RX (green) - blink fast on radio message recieved. In inclusion mode will blink fast only on presentation recieved
 * - TX (yellow) - blink fast on radio message transmitted. In inclusion mode will blink slowly
 * - ERR (red) - fast blink on error during transmission error or recieve crc error
 *
 * See http://www.mysensors.org/build/ethernet_gateway for wiring instructions.
 *
 */

// Enable debug prints to serial monitor
#define MY_DEBUG

// Enable and select radio type attached
#define MY_RADIO_RFM69
#define MY_RFM69_FREQUENCY RF69_433MHZ

// La définition des PIN ci dessous n'est pas nécessaire, car c'est celle de base
//#define MY_RF69_IRQ_PIN 2
//#define MY_RF69_SPI_CS 10

// Enable gateway ethernet module type
#define MY_GATEWAY_W5100

#define MY_IP_ADDRESS 192,168,0,22
#define MY_IP_SUBNET_ADDRESS 255,255,255,0
// The port to keep open on node server mode / or port to contact in client mode
#define MY_PORT 5003

// The MAC address can be anything you want but should be unique on your network.
// Newer boards have a MAC address printed on the underside of the PCB, which you can (optionally) use.
// Note that most of the Ardunio examples use  "DEAD BEEF FEED" for the MAC address.
#define MY_MAC_ADDRESS 0xDE, 0xAD, 0xBE, 0xEF, 0xFE, 0xED

// Enable inclusion mode
#define MY_INCLUSION_MODE_FEATURE
// Enable Inclusion mode button on gateway
//#define MY_INCLUSION_BUTTON_FEATURE
// Set inclusion mode duration (in seconds)
#define MY_INCLUSION_MODE_DURATION 60
// Digital pin used for inclusion mode button
//#define MY_INCLUSION_MODE_BUTTON_PIN  3


// Flash leds on rx/tx/err
#define MY_LEDS_BLINKING_FEATURE
// Set blinking period
#define MY_DEFAULT_LED_BLINK_PERIOD 300
#define MY_DEFAULT_ERR_LED_PIN 4  // Error led pin
#define MY_DEFAULT_RX_LED_PIN  5  // Receive led pin
#define MY_DEFAULT_TX_LED_PIN  6  // Transmit led pin


#if defined(MY_USE_UDP)
  #include <EthernetUdp.h>
#endif
#include <Ethernet.h>
#include <MySensors.h>


void setup() {
}

void presentation() {
}

void loop() {
 }
}
Hope it helped
Fred -
Hi Jonathan,
Before I show my code, please check:- Connect W5100 and radio like this
Arduino - Radio - Ethernet
13      - SCK   - SCK
12      - MISO  - MISO/SO
11      - MOSI  - MOSI/SI
10      - NSS (CS)
7       -       - SS/CS
2       - DIO0  -
Be sure to power the W5100 with 5V and the radio with 3v3!
Then, you need to modify the w5100.h file to disable radio interruption during SPI use:
Find#else inline static void initSS() { DDRB |= _BV(2); }; inline static void setSS() { PORTB &= ~_BV(2); }; inline static void resetSS() { PORTB |= _BV(2); }; #endifand replace with
#elif defined(W5100SPIPATCH)
  inline static void initSS()    { DDRD  |=  _BV(7); };
  inline static void setSS()     { cli(); PORTD &= ~_BV(7); };
  inline static void resetSS()   { PORTD |=  _BV(7); sei(); };
#endif
Then, downgrade the board manager "Arduino AVR boards" to version 1.6.11 and rebuild.
Finally, here is my working code:
/**
 * The MySensors Arduino library handles the wireless radio link and protocol
 * between your home built sensors/actuators and HA controller of choice.
 * The sensors forms a self healing radio network with optional repeaters. Each
 * repeater and gateway builds a routing tables in EEPROM which keeps track of the
 * network topology allowing messages to be routed to nodes.
 *
 * Created by Henrik Ekblad <henrik.ekblad@mysensors.org>
 * Copyright (C) 2013-2015 Sensnology AB
 * Full contributor list: https://github.com/mysensors/Arduino/graphs/contributors
 *
 * Documentation: http://www.mysensors.org
 * Support Forum: http://forum.mysensors.org
 *
 * This program is free software; you can redistribute it and/or
 * modify it under the terms of the GNU General Public License
 * version 2 as published by the Free Software Foundation.
 *
 *******************************
 *
 * REVISION HISTORY
 * Version 1.0 - Henrik EKblad
 * Contribution by a-lurker and Anticimex,
 * Contribution by Norbert Truchsess <norbert.truchsess@t-online.de>
 * Contribution by Tomas Hozza <thozza@gmail.com>
 *
 *
 * DESCRIPTION
 * The EthernetGateway sends data received from sensors to the ethernet link.
 * The gateway also accepts input on ethernet interface, which is then sent out to the radio network.
 *
 * The GW code is designed for Arduino 328p / 16MHz.  ATmega168 does not have enough memory to run this program.
 *
 * LED purposes:
 * - To use the feature, uncomment MY_DEFAULT_xxx_LED_PIN in the sketch below
 * - RX (green) - blink fast on radio message recieved. In inclusion mode will blink fast only on presentation recieved
 * - TX (yellow) - blink fast on radio message transmitted. In inclusion mode will blink slowly
 * - ERR (red) - fast blink on error during transmission error or recieve crc error
 *
 * See http://www.mysensors.org/build/ethernet_gateway for wiring instructions.
 *
 */

// Enable debug prints to serial monitor
#define MY_DEBUG

// Enable and select radio type attached
#define MY_RADIO_RFM69
#define MY_RFM69_FREQUENCY RF69_433MHZ

// La définition des PIN ci dessous n'est pas nécessaire, car c'est celle de base
//#define MY_RF69_IRQ_PIN 2
//#define MY_RF69_SPI_CS 10

// Enable gateway ethernet module type
#define MY_GATEWAY_W5100

#define MY_IP_ADDRESS 192,168,0,22
#define MY_IP_SUBNET_ADDRESS 255,255,255,0
// The port to keep open on node server mode / or port to contact in client mode
#define MY_PORT 5003

// The MAC address can be anything you want but should be unique on your network.
// Newer boards have a MAC address printed on the underside of the PCB, which you can (optionally) use.
// Note that most of the Ardunio examples use  "DEAD BEEF FEED" for the MAC address.
#define MY_MAC_ADDRESS 0xDE, 0xAD, 0xBE, 0xEF, 0xFE, 0xED

// Enable inclusion mode
#define MY_INCLUSION_MODE_FEATURE
// Enable Inclusion mode button on gateway
//#define MY_INCLUSION_BUTTON_FEATURE
// Set inclusion mode duration (in seconds)
#define MY_INCLUSION_MODE_DURATION 60
// Digital pin used for inclusion mode button
//#define MY_INCLUSION_MODE_BUTTON_PIN  3


// Flash leds on rx/tx/err
#define MY_LEDS_BLINKING_FEATURE
// Set blinking period
#define MY_DEFAULT_LED_BLINK_PERIOD 300
#define MY_DEFAULT_ERR_LED_PIN 4  // Error led pin
#define MY_DEFAULT_RX_LED_PIN  5  // Receive led pin
#define MY_DEFAULT_TX_LED_PIN  6  // Transmit led pin


#if defined(MY_USE_UDP)
  #include <EthernetUdp.h>
#endif
#include <Ethernet.h>
#include <MySensors.h>


void setup() {
}

void presentation() {
}

void loop() {
 }
}
Hope it helped
Fred@Frédéric-Grandjean
Thank you for replying so quickly!
I`m going to try this as quickly as possible and let you know how it went.
Thanks! -
Hi Jonathan,
Before I show my code, please check:- Connect W5100 and radio like this
Arduino - Radio - Ethernet
13      - SCK   - SCK
12      - MISO  - MISO/SO
11      - MOSI  - MOSI/SI
10      - NSS (CS)
7       -       - SS/CS
2       - DIO0  -
Be sure to power the W5100 with 5V and the radio with 3v3!
Then, you need to modify the w5100.h file to disable radio interruption during SPI use:
Find#else inline static void initSS() { DDRB |= _BV(2); }; inline static void setSS() { PORTB &= ~_BV(2); }; inline static void resetSS() { PORTB |= _BV(2); }; #endifand replace with
#elif defined(W5100SPIPATCH)
  inline static void initSS()    { DDRD  |=  _BV(7); };
  inline static void setSS()     { cli(); PORTD &= ~_BV(7); };
  inline static void resetSS()   { PORTD |=  _BV(7); sei(); };
#endif
Then, downgrade the board manager "Arduino AVR boards" to version 1.6.11 and rebuild.
Finally, here is my working code:
/**
 * The MySensors Arduino library handles the wireless radio link and protocol
 * between your home built sensors/actuators and HA controller of choice.
 * The sensors forms a self healing radio network with optional repeaters. Each
 * repeater and gateway builds a routing tables in EEPROM which keeps track of the
 * network topology allowing messages to be routed to nodes.
 *
 * Created by Henrik Ekblad <henrik.ekblad@mysensors.org>
 * Copyright (C) 2013-2015 Sensnology AB
 * Full contributor list: https://github.com/mysensors/Arduino/graphs/contributors
 *
 * Documentation: http://www.mysensors.org
 * Support Forum: http://forum.mysensors.org
 *
 * This program is free software; you can redistribute it and/or
 * modify it under the terms of the GNU General Public License
 * version 2 as published by the Free Software Foundation.
 *
 *******************************
 *
 * REVISION HISTORY
 * Version 1.0 - Henrik EKblad
 * Contribution by a-lurker and Anticimex,
 * Contribution by Norbert Truchsess <norbert.truchsess@t-online.de>
 * Contribution by Tomas Hozza <thozza@gmail.com>
 *
 *
 * DESCRIPTION
 * The EthernetGateway sends data received from sensors to the ethernet link.
 * The gateway also accepts input on ethernet interface, which is then sent out to the radio network.
 *
 * The GW code is designed for Arduino 328p / 16MHz.  ATmega168 does not have enough memory to run this program.
 *
 * LED purposes:
 * - To use the feature, uncomment MY_DEFAULT_xxx_LED_PIN in the sketch below
 * - RX (green) - blink fast on radio message recieved. In inclusion mode will blink fast only on presentation recieved
 * - TX (yellow) - blink fast on radio message transmitted. In inclusion mode will blink slowly
 * - ERR (red) - fast blink on error during transmission error or recieve crc error
 *
 * See http://www.mysensors.org/build/ethernet_gateway for wiring instructions.
 *
 */

// Enable debug prints to serial monitor
#define MY_DEBUG

// Enable and select radio type attached
#define MY_RADIO_RFM69
#define MY_RFM69_FREQUENCY RF69_433MHZ

// La définition des PIN ci dessous n'est pas nécessaire, car c'est celle de base
//#define MY_RF69_IRQ_PIN 2
//#define MY_RF69_SPI_CS 10

// Enable gateway ethernet module type
#define MY_GATEWAY_W5100

#define MY_IP_ADDRESS 192,168,0,22
#define MY_IP_SUBNET_ADDRESS 255,255,255,0
// The port to keep open on node server mode / or port to contact in client mode
#define MY_PORT 5003

// The MAC address can be anything you want but should be unique on your network.
// Newer boards have a MAC address printed on the underside of the PCB, which you can (optionally) use.
// Note that most of the Ardunio examples use  "DEAD BEEF FEED" for the MAC address.
#define MY_MAC_ADDRESS 0xDE, 0xAD, 0xBE, 0xEF, 0xFE, 0xED

// Enable inclusion mode
#define MY_INCLUSION_MODE_FEATURE
// Enable Inclusion mode button on gateway
//#define MY_INCLUSION_BUTTON_FEATURE
// Set inclusion mode duration (in seconds)
#define MY_INCLUSION_MODE_DURATION 60
// Digital pin used for inclusion mode button
//#define MY_INCLUSION_MODE_BUTTON_PIN  3


// Flash leds on rx/tx/err
#define MY_LEDS_BLINKING_FEATURE
// Set blinking period
#define MY_DEFAULT_LED_BLINK_PERIOD 300
#define MY_DEFAULT_ERR_LED_PIN 4  // Error led pin
#define MY_DEFAULT_RX_LED_PIN  5  // Receive led pin
#define MY_DEFAULT_TX_LED_PIN  6  // Transmit led pin


#if defined(MY_USE_UDP)
  #include <EthernetUdp.h>
#endif
#include <Ethernet.h>
#include <MySensors.h>


void setup() {
}

void presentation() {
}

void loop() {
 }
}
Hope it helped
Fred@Frédéric-Grandjean Have to wait untill my level converters are arriving.. also don't have enough transistors laying around to make one my self.. did you use a level converter, probably you did?
-
Yes of course I used a level converter. Ordered the one proposed on the radio page. Works well!
-
Yes of course I used a level converter. Ordered the one proposed on the radio page. Works well!
@Frédéric-Grandjean
Hey, I'm finally working on the gateway.
But the problem is that I can't seem to find the w5100.h file.. :s
Can you maybe tell me where I can find it?Greetings
-
Yes of course I used a level converter. Ordered the one proposed on the radio page. Works well!
@Frédéric-Grandjean
Hi again, because I'm a mac user didn't find the w5100.h file. after I took my laptop and searched for the file I found it.
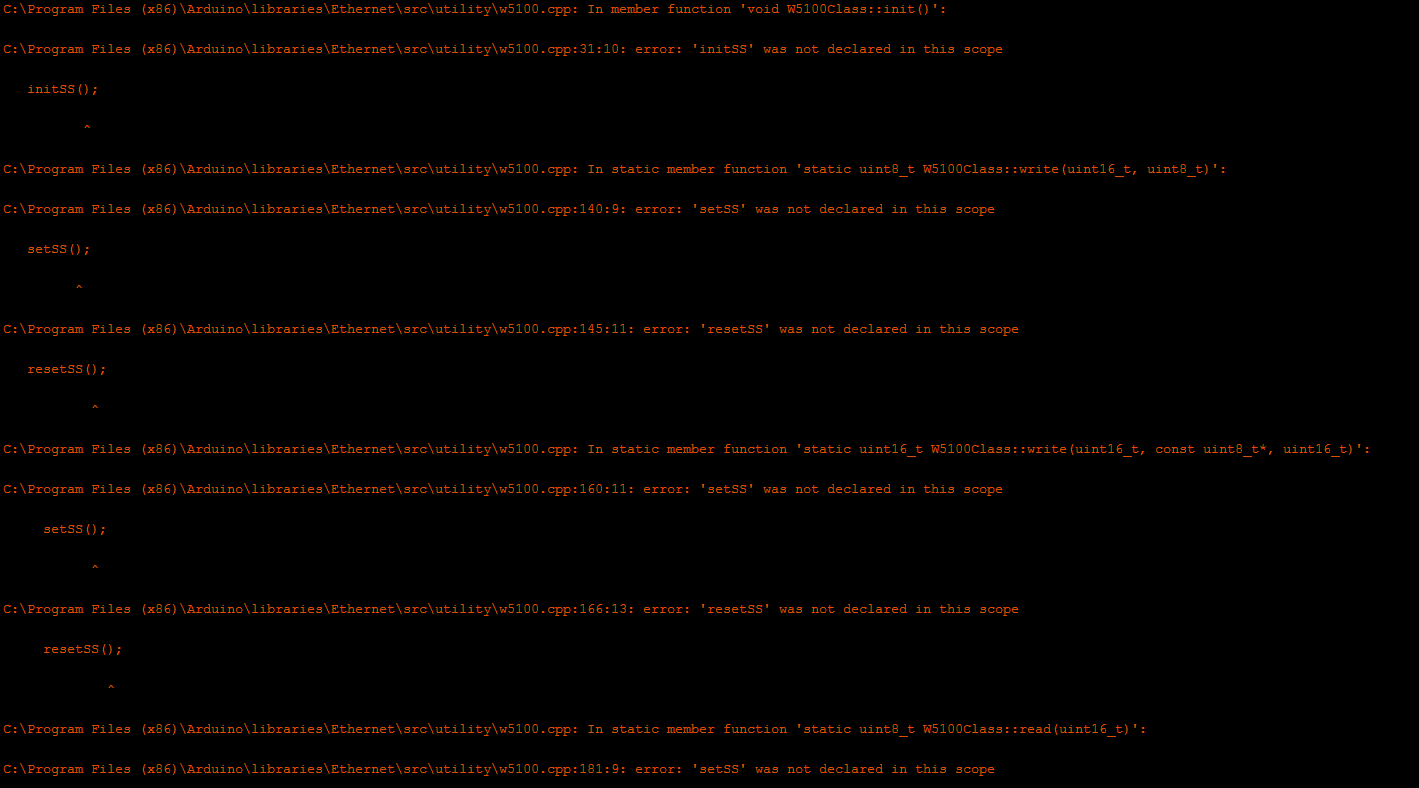
after I replaced the code in the w5100.h file and changed the gateway code and complied I got these errors:
and it went on.but when I changed the code in the w5100.h file from this:
#elif defined(W5100SPIPATCH)
      inline static void initSS()    { DDRD  |=  _BV(7); };
      inline static void setSS()     { cli(); PORTD &= ~_BV(7); };
      inline static void resetSS()   { PORTD |=  _BV(7); sei(); };
    #endif
To this:
#else	//This doesn't work => elif defined(W5100SPIPATCH)
      inline static void initSS()    { DDRD  |=  _BV(7); };
      inline static void setSS()     { cli(); PORTD &= ~_BV(7); };
      inline static void resetSS()   { PORTD |=  _BV(7); sei(); };
    #endif
it compiled without any errors.
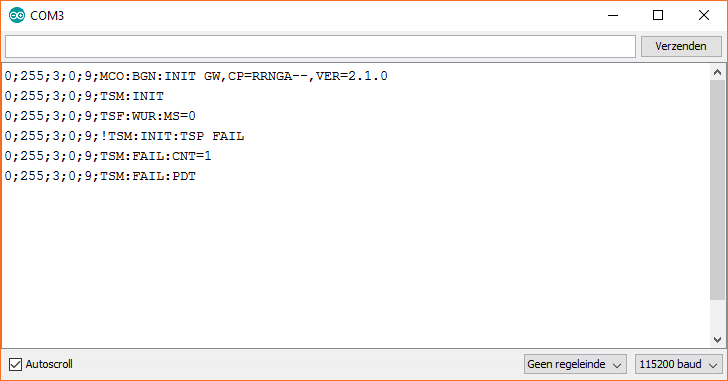
So I uploaded the code and opened the serial debugging window in which I get this:
I don't know how to fix this, do you know maybe?Thanks!!
Greetings! -
Jonathan Caes - i used your amended #else code in W5100.h file, along with wiring/pinout from Frédéric Grandjean, and example Mysensors MQTTClientGateway sketch and got a ProMiniMQTTW5100Gateway working.
You are trying Ethernet gateway (not MQTT like me), but i think you may have a radio problem - i used 10uF and 1uF caps for the RFM69 radio and separate 3.3V supply (havent tried powering radio directly from ProMini VCC though. -
@Frédéric-Grandjean
Hi again, because I'm a mac user didn't find the w5100.h file. after I took my laptop and searched for the file I found it.
after I replaced the code in the w5100.h file and changed the gateway code and complied I got these errors:
and it went on.but when I changed the code in the w5100.h file from this:
#elif defined(W5100SPIPATCH)
      inline static void initSS()    { DDRD  |=  _BV(7); };
      inline static void setSS()     { cli(); PORTD &= ~_BV(7); };
      inline static void resetSS()   { PORTD |=  _BV(7); sei(); };
    #endif
To this:
#else	//This doesn't work => elif defined(W5100SPIPATCH)
      inline static void initSS()    { DDRD  |=  _BV(7); };
      inline static void setSS()     { cli(); PORTD &= ~_BV(7); };
      inline static void resetSS()   { PORTD |=  _BV(7); sei(); };
    #endif
it compiled without any errors.
So I uploaded the code and opened the serial debugging window in which I get this:
I don't know how to fix this, do you know maybe?Thanks!!
Greetings!@Jonathan-Caes @Frédéric-Grandjean
if i use w5100 shield on uno - so i cant connect the pins how i want - means w5100 cs stays on pin 10.
what should i do? -
For W5100 shield on Uno with RF69 as a Gateway, i used:
DI00 - Pin 2
NSS - Pin 4 (3.3v level shifter)
MOSI - Pin A1 (3.3v level shifter)
MISO - Pin A2
SCK - Pin A0 (3.3v level shifter)Leave as pins 14/15/16 in MyConfig.h file - the Uno uses digital pins 14-16 physically as A0-A3.
Using a level shifter makes the ProMini more viable as it is 3.3v and you dont need a shifter.
-
For W5100 shield on Uno with RF69 as a Gateway, i used:
DI00 - Pin 2
NSS - Pin 4 (3.3v level shifter)
MOSI - Pin A1 (3.3v level shifter)
MISO - Pin A2
SCK - Pin A0 (3.3v level shifter)Leave as pins 14/15/16 in MyConfig.h file - the Uno uses digital pins 14-16 physically as A0-A3.
Using a level shifter makes the ProMini more viable as it is 3.3v and you dont need a shifter.
-
Jonathan Caes - i used your amended #else code in W5100.h file, along with wiring/pinout from Frédéric Grandjean, and example Mysensors MQTTClientGateway sketch and got a ProMiniMQTTW5100Gateway working.
You are trying Ethernet gateway (not MQTT like me), but i think you may have a radio problem - i used 10uF and 1uF caps for the RFM69 radio and separate 3.3V supply (havent tried powering radio directly from ProMini VCC though.@Tris But I don't necessarily have to use the mqttw5100gateway, do I? Because I don't really know what you can do with mqtt, what the advantage is of that.
I'm also using seperate 3.3V and a 4.7µF capacitor for the radio.
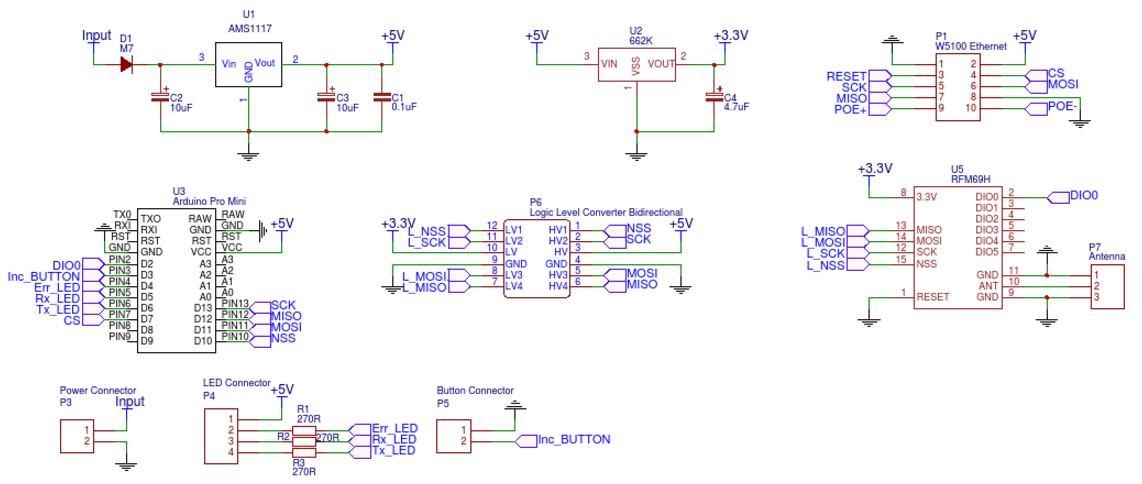
Here is my schematic I used. I etched my own pcb for this and I think everything looks correct.
-
The Ethernet and MQTT wiring is the same (according to main MySesnors instructions).
As far as protocols go, I choose the MQTT route because its simple and lightwieght, tipped to be a big player in IoT.
Im not a Mysensors expert, more of a hardware guy, but briefly looking at your diagram - i havent grounded the reset pin on the RFM69 like you have.
Try cutting that track so it floats -
The Ethernet and MQTT wiring is the same (according to main MySesnors instructions).
As far as protocols go, I choose the MQTT route because its simple and lightwieght, tipped to be a big player in IoT.
Im not a Mysensors expert, more of a hardware guy, but briefly looking at your diagram - i havent grounded the reset pin on the RFM69 like you have.
Try cutting that track so it floats@Tris That can indeed be the fault, because i was looking at the hoop up page from sparfun (https://learn.sparkfun.com/tutorials/rfm69hcw-hookup-guide#hardware-overview) and thought I read that you have to connect the reset to ground, but that might be not true after reading it again. So i'll try doing that and see what happens.
Thanks!!
-
The Ethernet and MQTT wiring is the same (according to main MySesnors instructions).
As far as protocols go, I choose the MQTT route because its simple and lightwieght, tipped to be a big player in IoT.
Im not a Mysensors expert, more of a hardware guy, but briefly looking at your diagram - i havent grounded the reset pin on the RFM69 like you have.
Try cutting that track so it floats@Tris Cut the reset connection and tried again, did not work.. still getting the same debugging info.. :(
-
The Ethernet and MQTT wiring is the same (according to main MySesnors instructions).
As far as protocols go, I choose the MQTT route because its simple and lightwieght, tipped to be a big player in IoT.
Im not a Mysensors expert, more of a hardware guy, but briefly looking at your diagram - i havent grounded the reset pin on the RFM69 like you have.
Try cutting that track so it floats@Tris I also get the same debugging when using the MQTTclientgateway..
-
Only thing i can think of, is quite basic but i do it myself quite often.
Remember to put the // lines back infront of the soft spi line in MyConfig.h file.
You only need that for NRF24 W5100 setupAlso define the new MI/MO/SCK pins in the sketch
#define MY_SOFT_SPI_SCK_PIN 13
#define MY_SOFT_SPI_MISO_PIN 12
#define MY_SOFT_SPI_MOSI_PIN 11```

Hello! It looks like you're interested in this conversation, but you don't have an account yet.
Getting fed up of having to scroll through the same posts each visit? When you register for an account, you'll always come back to exactly where you were before, and choose to be notified of new replies (either via email, or push notification). You'll also be able to save bookmarks and upvote posts to show your appreciation to other community members.
With your input, this post could be even better 💗
Register Login