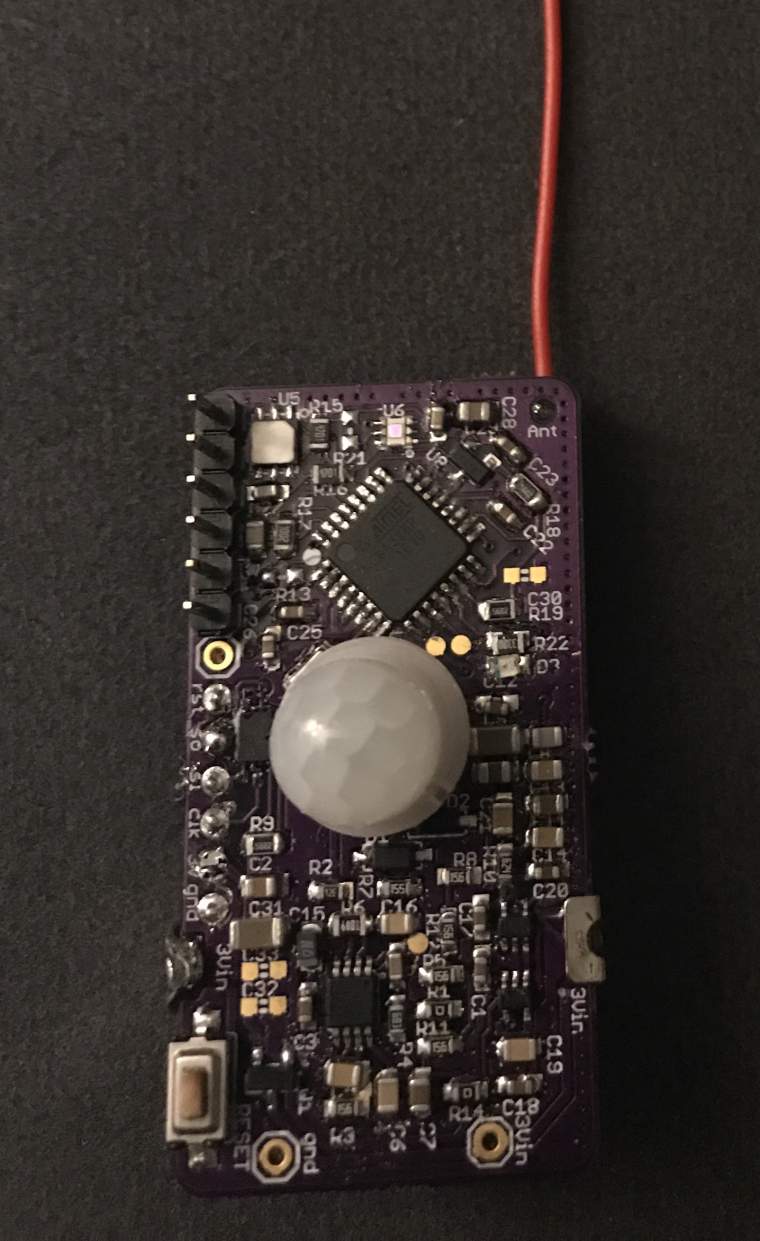
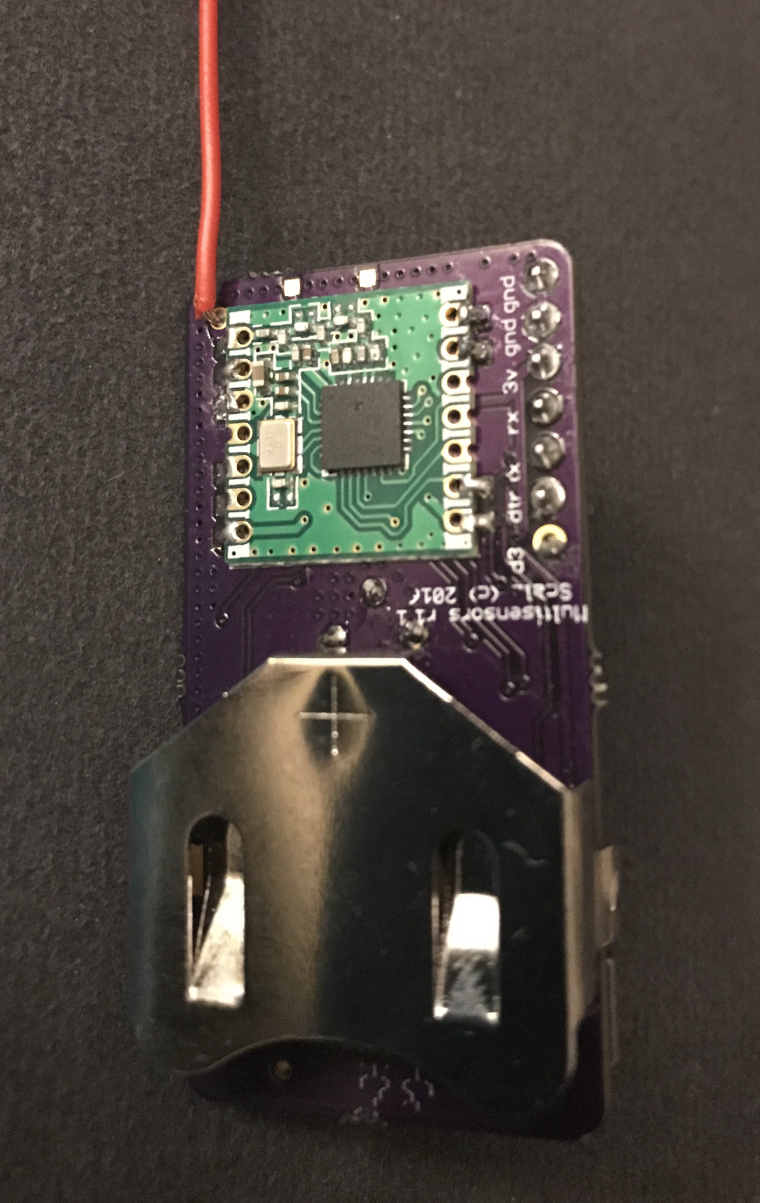
💬 MyMultisensors


  • Hardware Contributor

    @scalz Thx a lot ! I tried to replace the transmitter myself but the routing is too hard for me.

    I'll try to check the schema before order the board 😉


  • This looks like an awesome unit! Is there a way to buy this with components assembled? Looks like a lot of work to solder all those smds..


  • I also wish I could buy assembled ones.


  • Likewise, to be able to buy assembled would be great


  • @scalz hi, excellent sensor! Do you know if the atmega328 memory is enough? You must have a large sketch for all sensors + signin


  • Hardware Contributor

    @alexsh1 thx 🙂
    memory ok if sketch optimized (radio driver footprint too) and without much debug msg.
    V2 will improve memory, cost and device size (will be 9in1 this time so i needed more mem) but for nrf24 networks only. i should release it soon if i can get rid of a little sw bug..


  • How long can you get these running on a single battery?


  • Hero Member

    @scalz Would also be very interested in buying assembled modules. But why no more RFM69?


  • @mpp I suppose depends on which battery and what sensors - there are a few options here.


  • @scalz atmega328 is only good for simple sketches nowadays. I am struggling with a simple temp/hum/baro sensor with signing and debug as It runs on low memory and the sensor freezes after a few hours. I suppose we have to move to SAMD.
    Do you have the STL file for the box please?


  • Contest Winner

    @alexsh1 regarding low memory problems, debug is intended for just that; debug. Once deployed, you can disable debug to ensure the longevity of your program. Probably the sketch eventually dies due to stack shortage.


  • @Anticimex Completely agree. Having said that I have a few nodes where I left debug purely for convenience. I do not want to re-flash the node to debug it in case need be. Right now I am in the process of changing the GW and may need to see node's debug.


  • Hardware Contributor

    @alexsh1
    I agree with you about 328 and 8bits. And that's a while i've done a board for these 😉
    I won't use it in v2 though, tiny 9in1... not possible!
    I also have custom SAMD boards, missing time to release those one too, but imho these mcu are not ultra low power (SAML is).

    I'll publish stl this week..


  • @scalz ATSAM D21 is already compatible with MySensors, whereas ATSAM L21 may be in the pipeline. So for now, we all are stuck with SAMD.

    Looking forward to your stl


  • Phenomenal!

    I have a stupid question.. clicking buy on the page.. what exactly does that buy you>?


  • @Konrad-Walsh You buy PCBs (10 0r 15 of them).


  • I am sorry.. I should have been more clear...
    When you say PCB.. Is that a fully assembled product with all the mentioned sensors? Or is it a board and you add sensors to it..

    Please excuse my ignorance


  • @Konrad-Walsh Click on the link and see it yourself 😉
    PCB means a bare board and not a ready product. You have to procure parts and assemble it.


  • @alexsh1 Thank you


  • @Konrad-Walsh said in 💬 MyMultisensors:

    you

    No problem.

    @scalz There is a lot of interest from others to have an assembled sensor. Maybe as a suggestion, you would be interested talking to Itead or similar guys to get it arranged?
    Personally, I am comfortable assembling an SMD board down to 0605 (though it is more difficult with the fan). My preference would be 0805 and up


  • Hardware Contributor

    thx for the interest though 🙂
    for the moment, the quotation i got was not so great imho.. oki i'll try again with other fabhouse for this one 😉 as v2 will cover nrf only


  • Hardware Contributor

    @scalz could you give an idea of the price ? I'm curious 🙂


  • Where might I find the source code?


  • @Carywin a source code for what? There are many combinations of sensors.
    I am sure @scalz can help 🙂


  • Hero Member

    Still very much interested in buying the board with RFM69 footprint! Just saying!


  • @scalz do you mind me asking where you bought PIR lens, eeprom, and most important that fancy small antenna??? Thanks


  • Hardware Contributor

    sorry to be so quiet actually 🙂
    I buy most of my ic at electronic suppliers like Mouser, Digikey, Arrow etc.


  • @scalz Thank you. I do shopping at those sites as well if I do a large order, but delivery charge is just killing if I need to order 1-3 items.

    I am going to try 2450 with your board. It has 600mAh so I am hoping that using eeprom is fine with this coincell. Regarding 2032, I agree with you. I have a node, which consumes 5-6uA (with watchdog) and I had to disable the LED to use it with coincell. It just drains too much energy from a low capacity battery.

    Yes, simple wire would work fine, but ANT-868-USP is just looking very tidy.


  • Just waiting for some components to finalise it

    0_1496745207972_IMG_5142.JPG


  • Hardware Contributor

    @alexsh1
    nice assembly 👍 oshpark i guess ??
    I agree too, for PIR use, CR2450 is a minimum.
    Well, with my tinkering and some stock in case, i usually get very quickly the free shipping..
    but you can find these flash at Arrow for instance, they just need 20€ min order.
    I guess you already have those, but for example,, coincell holders etc are not really cheaper at aliexpress etc..
    Time to do some stock for stuff you need perhaps 🙂


  • @scalz yes, it is oshpark- I usually use them as the quality is exceptional. And typically I only need 3-4 pcbs anyway.
    Unfortunately, I do not have oven and do not use smd stencil, which means the process is very long and manual. A lot of hot air fan work under the magnifying glass, but given this is not a board with too many components, it works.

    You should get some commission from Arrow. I have just placed my order for eeprom and some parts ;))


  • Good job! Looking forward for a assembled version for buying. (NRF, of course 😀 )


  • @scalz I ordered some boards and components which are on the way, but I can't find the source code anywhere?


  • @scalz - I forgot to burn a bootloader onto a blank atmega328p tqfl. Can I burn it using your pogo pads? The only problem is that it my Adruino ISP is running at 5V. I do not have radio soldered. I am not going to damage anything connecting 5V to VCC3?


  • Hardware Contributor

    @alexsh1 pogopads are there for this. But SI7021, and others sensors are not 5v tolerant 😬 You'll need to use a regulator, and perhaps get a cheap 3v/5v programmer

    @Carywin source code depends what you need. you can also use some examples from MySensors website. when i'll get more time (actually busy), i'll upload mine (need to check if it needs some polishing) or some examples.


  • @scalz I did manage with 5V. Just de-soldered SI7021 and uploaded DualOptiboot. Other components are 5V tolerant. Having said that, I recall I did upload a different bootloader at 5V to Sensebender Micro (without nrf24l01+) without damaging SI7021.

    R22 has to be changed for 330 Ohm as 1.5k was way too dark and not visible. I like bright LEDs you know :-))


  • Hardware Contributor

    @alexsh1 i can see the led with 1k5 😆 i'm using it only for debug on my side. But you're right, if you want more brightness. just be careful to not drain too much if you're using a coincell 😉


  • @scalz I am with you on the battery. I completely switched it off on another node running on 2032. The node is reporting very hour and has got about 4uA consumption while sleeping. 🙂 Probably will stay alive for a few years. However, when debugging, I like bright LEDs.

    By the way, I tested the node - OPT3001 and SI7021 are working fine. Cannot test LHI968 as I still do not have some resistors. I am very satisfied. The only issue is that assembling the board is very tedious - but it is compensated by its size


  • Hardware Contributor

    @alexsh1 i'm very glad to hear that 👍 I'll try to upload an example for PIR pinchange with my helper lib for blindtime etc asap


  • @scalz I know you are currently developing a similar board on SAMD. Do you have any problems with atmega328p memory? Unfortunately, with signing and a few sensors, I'm running out of memory. On your node, I can have PIR, light, temp/hum and reed. I may struggle to combine all of them under 32kb with signing. Given that I have dualoptiboot (1.5k less) for OTA, it does not help either.

    I can see your PIR setup is complex. What is it you are trying to achieve?


  • Hardware Contributor

    @alexsh1 my next board won't be for SAMD.
    I need to check my code and what's the compil results, i don't remember exactly. but that was tight, 90% perhaps, i usually don't want to go above..
    What do you mean by PIR setup is complex?


  • @scalz I can see you created MyPirHelper.h - not sure what your trying to achieve. Could you explain maybe a bit more?


  • Hardware Contributor

    @alexsh1 this is a lib for helping to use PIR, could be integrated in nodemanager though, but i generally prefer to keep hands on my code, also because C code is usually more memory optimized.
    So this is for handling PIR like some controllers ic do, and pinchange, with weak functions for users functions etc.
    How looks my flow:

    /* *******************************************************************************************************************
     * PIR Sensor State Machine
     * 
     * Flow : sensitivity of pir sensor for noisy environment, limits tx, power saving..
     * 1) NODE_SETUP  : settle for PIR_SETTLE_TIME. Then 2)
     * 2) PIR_START   : Wait/sleep for the first pulse. Then 3)
     * 3) PIR_SCAN    : If One trigger, wait/sleep for PIR_DEFAULT_PULSES during the PIR_DEFAULT_WINDOWTIME. 
     *                  If so, the motion is validated. Then 4)
     *                  Else 2)
     * 4) PIR_CANCEL  : PIR is disabled for PIR_DEFAULT_CANCELTIME. After, this period it reports new changed state 
     *                  If LOW, then 5)
     *                  Else 4)
     * 5) PIR_IS_BLIND: Keep PIR sensor insensitive for PIR_DEFAULT_BLINDTIME before 2)
     * 
     * ******************************************************************************************************************** */


  • @scalz this is exactly what I do not understand. For me PIR is very simple - 1 or 0, HIGH or LOW. Why treating it differently? Maybe this is very Noobs, but this is how I treat my PIRs. I may introduce 10-30 secs delay for it to settle or 30sec sleep after it has been triggered (I do not want to have extra PIR messages to my GW and controller)


  • Hardware Contributor

    @alexsh1
    sure PIR state is 0 or 1. I'm not changing anything to this. But you can fine tune this.

    Do you mean you'll update each time there is a CHANGE ?? No intermediate state ??
    If so, you'll waste a lot of power in useless radio TX, mcu processing, depending on days and traffic. and your batteries won't last for long!

    When there are people for an hour in same room, do you update each time it triggers? That can be a lot of waste!
    Also why not allowing a blindtime before redecting?
    In days with lot of traffic at home for example. If you already know (or the controllers could adjust this dynamically too by custom commands) that a room will be busy. It's useless and will consumes power again, to send 0 if it will retrigger in just a few seconds.

    So i've done sort of helper for creating intermediate states with timeouts and counters, with user defines etc.


  • I would only update each time there is a first HIGH. Then the node goes to unconditional sleep for 30-60 sec - there is no need to send HIGH again or LOW. After 1 min the status in Domoticz for the PIR is cleared (LOW) and the PIR is ready to send another "HIGH" if triggered.

    Can Domoticz really adjust PIRs dynamically?
    There is blockly stript, which helps to process "HIGH" from a PIR, but I'm not aware how this can done dynamically.

    Clearly, you approached this as a programmer. I have a much more simplified approach. Maybe because I'm noobs when it comes to PIRs

    @scalz said in 💬 MyMultisensors:

    @alexsh1
    sure PIR state is 0 or 1. I'm not changing anything to this. But you can fine tune this.

    Do you mean you'll update each time there is a CHANGE ?? No intermediate state ??
    If so, you'll waste a lot of power in useless radio TX, mcu processing, depending on days and traffic. and your batteries won't last for long!

    When there are people for an hour in same room, do you update each time it triggers? That can be a lot of waste!
    Also why not allowing a blindtime before redecting?
    In days with lot of traffic at home for example. If you already know (or the controllers could adjust this dynamically too by custom commands) that a room will be busy. It's useless and will consumes power again, to send 0 if it will retrigger in just a few seconds.

    So i've done sort of helper for creating intermediate states with timeouts and counters, with user defines etc.


  • @alexsh1
    My domoticz installation does not resets Pirs after a minute or whenever. Are you using the PIR lua scripts or any other?
    By default it doesn't do such thing.


  • Hardware Contributor

    @alexsh1 i have this option too (ctrl clearing pir state) i thought it could depend on the controller used, so i've tried to make something independant. And i like adding features like setting triggers max for a motion etc. But i agree, your way works too 😉


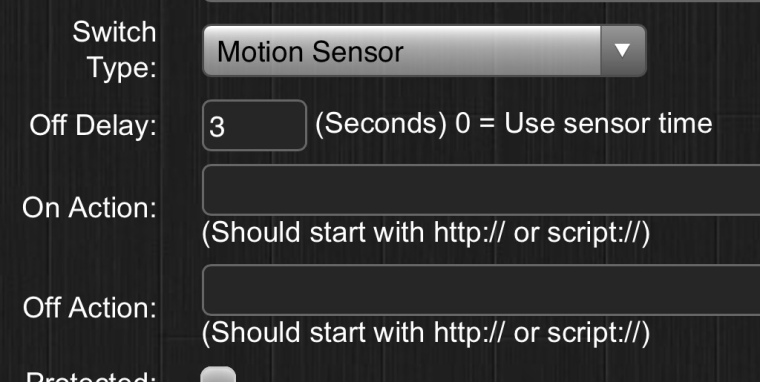
  • @Sergio-Rius either you have to use lua or there is a much simpler way to do it in Domoticz. Change type to "motion sensor" and then you have an option "off delay". Setup it to 60 seconds and PIR sensor will be off in 60 seconds. Very useful option and yes it is not enabled by default.0_1497139322273_IMG_5170.PNG


  • @scalz can your controller adjust PIRs dynamically?
    What controller are you using please?


  • Hardware Contributor

    @alexsh1 i just said i have same option as you in my controller 🙂 My controller is jeedom (french ctrlr)
    I've not done it yet (missing time), but i would use some script and scenario if i would like to dynamically adjust this vs some parameters.


  • @scalz How are you dealing with PIR? It is connected to D6 and D7, but sleep(digitalPinToInterrupt(DIGITAL_INPUT_SENSOR), CHANGE, SLEEP_TIME); can only be used with D2 and D3 or I am mistaken? Maybe you can share your motion sketch please?


  • Hardware Contributor

    @alexsh1 I'm using pinchange interrupts. It is not supported in Mysensors out of box regarding sleep, if i remember, i made some change to my functions, but the lib has changed a bit. that would need i check the code and i have no time for the moment, and don't want to release something not up to date. will take a look later, don't know when yet.

    But if that can help, below is some parts of code, for enabling your irqs, and the interrupts routine. I think if you're using sleep from MySensors, it will return -1 if triggered by the pinchange, that's all. you'll just need to handle that in your sketch.

    ISR (PCINT1_vect) 
    {
      if (digitalRead(AMBIANT_LIGHT_PIN)) 
        irqLight = false;  
      else 
        irqLight = true; 
    }  
    
    ISR (PCINT2_vect) 
    {
      if((PIND & (1 << PIND6)) == 0x40 ) {  
    	  myPirSensor.pirhCount++;  
    		myPirSensor.irqPir = true;  
    	}
      if((PIND & (1 << PIND7)) == 0x80 ) {  
    	  myPirSensor.pirlCount++;  
    		myPirSensor.irqPir = true;  
    	}        
    } 
    
    /* ======================================================================
    Function: pirIntEnable
    Purpose : Enable pin change for PIR interrupt
    Input   : -
    Output  : -
    Comments:  
    ====================================================================== */ 
    void pirIntEnable() 
    {
      // Enable pin change for D6, D7
      PCMSK2 |= bit (PCINT22);  
      PCMSK2 |= bit (PCINT23);  
      PCIFR  |= bit (PCIF2);   // clear any outstanding interrupts
      PCICR  |= bit (PCIE2);   // enable pin change interrupts for D0 to D7 
    }
    /* ======================================================================
    Function: pirIntDisable
    Purpose : Disable pin change for PIR interrupt
    Input   : -
    Output  : -
    Comments:  
    ====================================================================== */ 
    void pirIntDisable() 
    {
      // Disable pin change for D6, D7
      PCICR  ^= bit (PCIE2);   // disable pin change interrupts for D0 to D7 
    }
    /* ======================================================================
    Function: lightIntEnable
    Purpose : Enable pin change for OPT3001 interrupt
    Input   : -
    Output  : -
    Comments:  
    ====================================================================== */ 
    void lightIntDisable() 
    {
      PCMSK1 |= bit (PCINT9);  
      PCIFR  |= bit (PCIF1);   // clear any outstanding interrupts
      PCICR  |= bit (PCIE1);   // enable pin change interrupts for A0 to A5   
    }
    /* ======================================================================
    Function: Light_IntDisable
    Purpose : Disable pin change for OPT3001 interrupt
    Input   : -
    Output  : -
    Comments:  
    ====================================================================== */ 
    void lightIntDisable() 
    {
      PCICR  ^= bit (PCIE1);   // disable pin change interrupts 
    }


  • @scalz said in 💬 MyMultisensors:

    Thank you for sharing it.
    I must admit, it does look Chinese to me. I have never come across pinchange interrupts so have to dive in to understand it.


  • My sensor is now fully completed with all sensors and flash. I decided to go for 2450 battery

    0_1498299022820_IMG_5438.JPG

    0_1498299079412_IMG_5440.JPG


  • Hardware Contributor

    @alexsh1
    beautiful !
    about pin change interrupt, that would be too bad, to be restricted to D2, D3 only 🙂
    there are multiple howtos which show how to use them. mcu datasheet section is also interesting. not that hard, don't worry.
    you'll need to clean the code above a bit to fit your sketch (variables etc). the counters on pinh and pinl were for tests, you can factorize a bit pir isr and use only one volatile variable for your trigger etc.

    Have fun


  • Here's my first 5 multi-sensors assembled and they've passed simple hardware tests. Although I think I have 2 that have PIRs that won't settle down. Thanks for the design scalz!
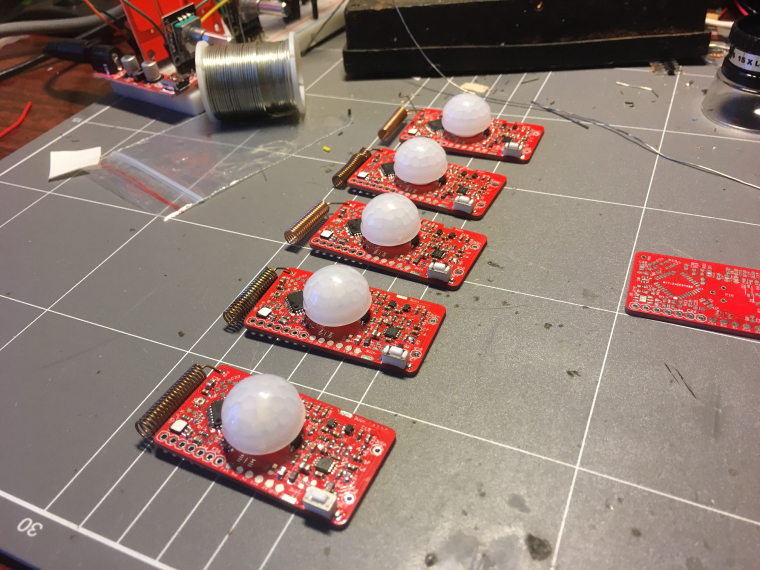
    0_1500541753297_Photo 20-7-17, 16 56 10.jpg
    Now to write some firmware for them... Any hints?


  • @Carywin Wow, those look really great, please keep us posted on your progress.


  • I've been slowly poking at these boards and I'm getting somewhere with the firmware, I should have something ready to put out there soon.

    In the meantime though I designed a quick snap-together enclosure that I'm sending off for "Dirty" 3D printing:
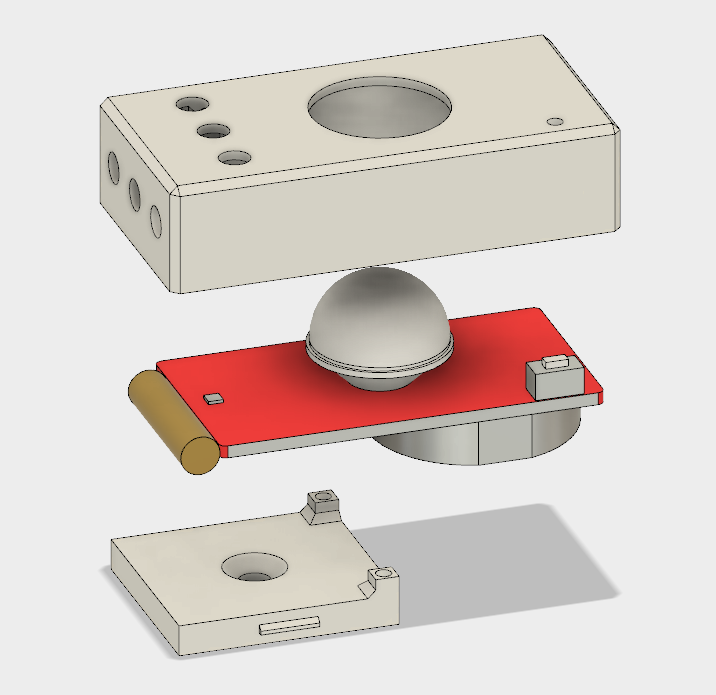
    0_1501094332438_render.png

    This is my first time using Fusion 360 and designing something for 3D printing, hopefully it goes okay.

    I wanted it to snap together in two halves around the board and be as low-profile as possible, hence why the base plate only covers half of the PCB and is mounted by one screw only. I designed it around using a CR2450 battery. I might also see if I can find a small lens or light pipe to put over the lux sensor so it gets a better read on the light level in the room.


  • Okay, so here's some firmware I wrote for these multi-sensors: https://github.com/carywin/MySensors/tree/master/MyS_MultiSensor_revB

    Note that I'm currently using MySensors 2.2-beta from the development branch, to solve the some other problems I was having in my RFM69-based gateway. This sketch should still work fine with the released version of MySensors but I haven't tested it.I'm still testing and refining things here and there, but it should be a working base for people to build from. Of course you will need to change the MySensors #defines to match your network and radio settings.

    You'll probably notice that all of the sensors report under the same Child ID as a "Custom Sensor". This is because I'm using OpenHAB via an MQTT broker, so I don't really care if a certain sensor type matches with its provided variable types. If you're using a different controller, you may have to re-jig the Child ID/Variable types to match the known-working sensors on your controller.

    PIR Sensor:
    The PIR sensor is interrupt driven and will send a message when it receives more than 5 pulses in less than 5 seconds. After triggering, the interrupt is disabled for 60 seconds. If it receives fewer than 5 pulses then approx. 5 seconds after the last pulse it will reset the pulse counter. For the first 30 seconds after power-on, the PIR interrupts are disabled to allow the signal conditioning circuit time to settle. All of these values are configurable in the sketch. Note that I'm using GreyGnome's EnableInterrupt library, which you'll need to get from their Github.

    Lux Sensor:
    The lux level sensor will send a new reading to the controller when the lux reading moves outside a window threshold from the current reading, which is configurable in the sketch. It also takes a new reading after a certain period with no changes in lux, which is also configurable in the sketch.
    Note that you'll need the specific version of the OPT3001 library from the above link copied into your libraries folder. I modified the library to spit out raw values and allow the setting of thresholds, so the lux sensor can do most of the heavy lifting with regards to monitoring light levels and flagging an interrupt when it changes. Note that when the lux readings are very low, such as around sunrise and sunset, the threshold values are fixed to prevent excessive lux sensor messages.

    Door Sensor:
    The D3 pin input is set to trigger an interrupt on state change, which will send its new state to the controller on each change. It's pulled high by an on-board resistor so the input pullup is disabled to save energy.

    Temp & Humidity Sensor:
    Temperature and humidity are read at regular intervals (default 10 min), and new values only sent if the they have changed by 0.1 degC or 1% RH. If a certain number of intervals pass with no change (default 3 hours) they will send new values anyway. This way the controller can expire their readings after 3 hours and ignore stale values, and you can get an indication that maybe your sensor has failed. The interval times are configurable in the sketch. I'm using the Adafruit SI7021 library which you can get from their Github.

    Battery:
    Once a day by default the sensor will report battery voltage as a sensor, and remaining capacity as a percentage using the in-built reporting function. The full and empty thresholds as well as reporting interval are configurable in the sketch. Note that the method used to measure battery voltage has a large margin for error, but that this can mostly be calibrated out. For this reason you'll see a VCC calibration value that you should set by measuring each sensor's battery voltage with a multimeter, and comparing with its reported battery volts.

    WDT:
    I'm using the WDT during the time when the code isn't asleep, with a timeout of 2 seconds. This should be more than enough to send all of the sensor messages needed each cycle, but I haven't extensively tested that. I included it because in revision A I was suffering some kind of unknown lock up that would keep the MC awake and drain the coin cell battery in just a few hours. Of course the WDT is used by the library for timing the sleep intervals, so it gets re-enabled each wake up.

    Because timing how long an Arduino has been asleep is difficult without a RTC, the sleep time may vary somewhat depending on how many interrupts the sensor receives. Each time the MC is woken from sleep by an interrupt, it reduces the amount of time it will sleep next time by 25%. In addition to this, if more than 25 interrupts occur before a new round of sensor readings are taken, then the interval will be declared over and the sensors read again. These are crude methods for timing but so far it seem to be reliable in that the sensor neither sleeps forever nor spams excessively when receiving realistic rates of interrupt.

    I welcome any input people have on this project and ways that this might be improved.


  • Hardware Contributor

    @Carywin
    Good work 👍
    I will take a look when i'll have more time.


  • I was wondering why didn't you use a open drain comparator and you could have or-ed your outputs using only one MCU pin ?


  • Hardware Contributor

    because there was already enough parts on board, for power consumption and wanted to save as much as i could with this design.
    The prototype had it though, but i removed it because that was useless as there are more than enough pins for this on mcu.


  • good answer ! it's not a good one for those of us that are less 'code gifted'. but anyway good work for the design.i would have to study how i can get it to work in code.


  • Does anybody know of a neat way to get this board to operate below 2.7V?

    From some reading it seems like the Atmega328 chip doesn't like running a crystal oscillator below 2.7V, but should be happy running from internal clock source. It seems like this might cause problems with libraries or serial comms though. Does anyone have experience with this or can point me towards a bootloader that might work?

    So far I've had a couple of these sensors fail after 2 months or so with battery volts around 2.65V. I was hoping for at least 12 months from a CR2450, but some of these sensors are sending >150 messages a day so I'd understand if it was shorter than that. Still, 2 months is not enough I think, and I hope I can tweak something to get it to work down to at least 2.0V, which might squeeze some more time out of it.


  • Hardware Contributor

    @Carywin hello.

    By default the BOD is set at 2.7V so the atmega will enter a boot loop when reaching this voltage.

    You need to update the fuses to set BOD at 1.8V or remove it (but it's better to keep one, o
    In some rare case it could write data in the wrong place and mess with the bootloader code).
    It's also necessary to update fuses if you want to use internal oscillator, it is less precise but you just need to use a lower baud rate when transferring sketches or debugging and you will be fine.
    I also suggest you run at 1MHz as long as you have no heavy computing to do. From it humble experience with CR batteries I always have better battery life at 1MHz compared to 8MHz.

    Look for tutorials about updating bootloader, there's a topic somewhere here called "various optiboot bootloader's" with précompilés bootloaders at different frequencies.
    You just need to put the file in the right directory after updating you boards.txt file and you can write bootloader from arduino interface. Fuses will be updated at the same time.

    To write bootloader don't worry about a programmer, just go the easy way with Arduino ISP sketch (in examples menu) on a nano, connect as explained in the many tutorials on the web (but use 3.3V for VCC to protect your radio), select "Arduino as ISP" as programmer and you're good to go 🙂


  • Hardware Contributor

    I usually use the MySensors Sensebender bootloader. It's 1.8V BOD and internal 8Mhz.
    else like nca78 said there is this topic:
    https://www.openhardware.io/view/33/Various-bootloader-files-based-on-Optiboot-62


  • Thanks!
    I should have mentioned that I already set the BOD to 1.8V, but that doesn't help when the XTAL oscillator stops working at 2.6.
    I'll try one of those other bootloaders and see what flies.


  • Okay I played around with this tonight and had some struggles. I couldn't get serial uploading working on any of the Gert Sanders bootloaders, so I had to use Arduino as ISP and Upload via Programmer.
    However since I have encryption enabled, I need the AES key in EEPROM before my nodes will work.
    So I had to enable the fuse that prevents EEPROM being erased when programming.

    I experimented with using the 1 MHz oscillator option, but the sketch didn't run properly. It was sending 5-8 copies of every message at a very slow rate.

    So now I'm trying the 8 MHz internal oscillator with BOD at 1.8 V to see if that works at a lower voltage than the crystal.

    If anyone knows if MySensors works at 1 MHz, or what might cause it to send multiple copies of the same message, speak up please!


  • Hardware Contributor

    @Carywin I don't have any problem at 1MHz, all my battery nodes run perfectly at that frequency.
    But at 1MHz with internal oscillator the only speed you can safely use is 9600bauds.


  • @scalz Can you please enlighten me re PIR? There are two inputs D6 and D7. I cannot understand why and how to manage them in a sketch? Previously, I only used one digital input.


  • Hardware Contributor

    @alexsh1
    You need to use pinchange interrupts. I won't reinvent a howto, there are multiple on google, like the one from Gammon here
    https://gammon.com.au/forum/?id=11488&reply=6#reply6

    pinchange can only detect toggle. it's up to you to detect the pin state in the interrupt routine.
    Mysensors sleep() doesn't handle pinchange. so in this case, just use sleep(ms). and test for the irq flag when it wakes up

    In a previous post, I extracted and showed you the few functions needed for this. I thought it was enough documented!

    ISR (PCINT1_vect) 
    {
      if (digitalRead(AMBIANT_LIGHT_PIN)) 
        irqLight = false;  
      else 
        irqLight = true; 
    }  
    
    ISR (PCINT2_vect) 
    {
      if((PIND & (1 << PIND6)) == 0x40 ) {  
    	  myPirSensor.pirhCount++;  
    		myPirSensor.irqPir = true;  
    	}
      if((PIND & (1 << PIND7)) == 0x80 ) {  
    	  myPirSensor.pirlCount++;  
    		myPirSensor.irqPir = true;  
    	}        
    } 
    
    /* ======================================================================
    Function: pirIntEnable
    Purpose : Enable pin change for PIR interrupt
    Input   : -
    Output  : -
    Comments:  
    ====================================================================== */ 
    void pirIntEnable() 
    {
      // Enable pin change for D6, D7
      PCMSK2 |= bit (PCINT22);  
      PCMSK2 |= bit (PCINT23);  
      PCIFR  |= bit (PCIF2);   // clear any outstanding interrupts
      PCICR  |= bit (PCIE2);   // enable pin change interrupts for D0 to D7 
    }
    /* ======================================================================
    Function: pirIntDisable
    Purpose : Disable pin change for PIR interrupt
    Input   : -
    Output  : -
    Comments:  
    ====================================================================== */ 
    void pirIntDisable() 
    {
      // Disable pin change for D6, D7
      PCICR  ^= bit (PCIE2);   // disable pin change interrupts for D0 to D7 
    }
    /* ======================================================================
    Function: lightIntEnable
    Purpose : Enable pin change for OPT3001 interrupt
    Input   : -
    Output  : -
    Comments:  
    ====================================================================== */ 
    void lightIntDisable() 
    {
      PCMSK1 |= bit (PCINT9);  
      PCIFR  |= bit (PCIF1);   // clear any outstanding interrupts
      PCICR  |= bit (PCIE1);   // enable pin change interrupts for A0 to A5   
    }
    /* ======================================================================
    Function: Light_IntDisable
    Purpose : Disable pin change for OPT3001 interrupt
    Input   : -
    Output  : -
    Comments:  
    ====================================================================== */ 
    void lightIntDisable() 
    {
      PCICR  ^= bit (PCIE1);   // disable pin change interrupts 
    }
    

    So if we add this, in the MySensors Motion example, as a very basic example, this should look like this:
    (untested, no time, but it should be close or maybe working)

    // Enable debug prints
    // #define MY_DEBUG
    
    // Enable and select radio type attached
    #define MY_RADIO_NRF24
    //#define MY_RADIO_NRF5_ESB
    //#define MY_RADIO_RFM69
    //#define MY_RADIO_RFM95
    
    #include <MySensors.h>
    
    uint32_t SLEEP_TIME = 120000; // Sleep time between reports (in milliseconds)
    
    #define PIR_SETTLE_TIME 300000
    
    #define PIR_INT_PINH 6   // The digital input you attached your motion sensor. 
    #define PIR_INT_PINL 7   // The digital input you attached your motion sensor.
    #define CHILD_ID 1   // Id of the sensor child
    
    // Initialize motion message
    MyMessage msg(CHILD_ID, V_TRIPPED);
    
    volatile bool irqPirHigh = false;
    
    /* ======================================================================
    Pin change Interrupt Service Routine for D0 to D7
    ====================================================================== */
    ISR (PCINT2_vect) 
    {
      // Pin change interrupt!  
      // if one of the PIR pins is HIGH, we have a pulse
      if((PIND & (1 << PIND6)) == 0x40 || (PIND & (1 << PIND7)) == 0x80 ) {   
         irqPirHigh = true; 
      }    
    } 
    /* ======================================================================
    Function: pirIntEnable
    Purpose : Enable pin change for PIR interrupt
    Comments:  
    ====================================================================== */ 
    void pirIntEnable() 
    {  
      // Enable pin change for D6, D7
      PCMSK2 |= bit (PCINT22);  
      PCMSK2 |= bit (PCINT23);  
      PCIFR  |= bit (PCIF2);   // clear any outstanding interrupts
      PCICR  |= bit (PCIE2);   // enable pin change interrupts for D0 to D7 
    }
    /* ======================================================================
    Function: pirIntDisable
    Purpose : Disable pin change for PIR interrupt
    Comments:  
    ====================================================================== */ 
    void pirIntDisable() 
    {
      // Disable pin change for D6, D7
      PCICR  ^= bit (PCIE2);   // disable pin change interrupts for D0 to D7 
    }
    /* ======================================================================
      Function: before
      Purpose : set pin states
      Comments: before setup Mysensors init
      ====================================================================== */
    void before()
    {
      hwDigitalWrite(PIR_INT_PINH, LOW);
      hwPinMode(PIR_INT_PINH, INPUT);      // sets the motion sensor digital pinH as input
      hwDigitalWrite(PIR_INT_PINH, LOW);
      hwPinMode(PIR_INT_PINL, INPUT);      // sets the motion sensor digital pinL as input  
    }
    
    void setup()
    {
      // do setup stuff like waiting for pir to settle, send states at init etc.
      sleep(PIR_SETTLE_TIME);
      
      // enable pin change interrupt to enable PIR/motion detection
      pirIntEnable();   
        
    }
    
    void presentation()
    {
    	// Send the sketch version information to the gateway and Controller
    	sendSketchInfo("Motion Sensor", "1.0");
    
    	// Register all sensors to gw (they will be created as child devices)
    	present(CHILD_ID, S_MOTION);
    }
    
    void loop()
    {    
      // irq ?
      if (irqPirHigh) {
        // We got a HIGH pulse on PIR pins!! 
        // increment a pulse counter, etc.
        // test pulse counter then send or not
        send(msg.set("1"));     
        irqPirHigh = false; 
      }
      else {  
        // increment timer counters, to reset motion state etc 
        // do stuff    
      }
    
      // Sleep until timer or a pin change interrupt
      sleep(SLEEP_TIME);     
      Serial.println("Wake up!");  
    }
    

    Remember it detect pin change, so it will wake up at each pin change state.
    I can't make this example more noob and simple. then add all your variables for states, timers, improve power consumption etc, as you wish.

    Or, it's perhaps easier to use the example from carywinn above. he posted his sketch which use a lib to handle pinchange. (on my side I don't need a lib for this, and it also saves memory).

    I hope it's clear about pinchange, so I'm done at explaining it 😉


  • @scalz said in 💬 MyMultisensors:

    uint32_t SLEEP_TIME = 120000; // Sleep time between reports (in milliseconds)

    You are a star - I must admit that setting it up is a bit more fiddly. This is the first time I come across pinchange interrupts and excellent link you provided. Thank you


  • Did anyone manage to find a good case for this sensor? Maybe 3D printed one?


  • I will gladly design a nice 3D printable case if someone can donate a board. I see that there are multiple battery options, so I would design a case that would fit all battery options.


  • @dbemowsk Thanks for volunteering!
    I can probably order new boards (they come in batches of 3) from oshpark and send you one or two. They are 1.93 x 1.00 inch (49.0 x 25.4 mm).
    Unfortunately, the boards I have with CR2450 battery holders and these are extremely fragile to be posted (they are soldered to little pads may come off easily).


  • @scalz I did just notice that I have about 30-32uA sleep consumption, which is too high. This is very consistent through 3 sensors. Any ideas why I have such high consumption? Obviously, there is a chance my multimeter is not giving me correct reading, but so far my Brymen BM869S has been very much spot on!


  • Hardware Contributor

    @alexsh1 looks weird, because there is nothing special on the board which could consumes like that, all parts are ultra low power..I tested mine with uCurrent gold device.
    so I would say if it's consistent on 3sensors boards, it could be:

    • software
    • bad caps, out of specs parts..(I usually order my parts at Mouser, arrow etc..)

    what do you get when using sketch J from gammon for example + shutdown sensors in case, no serial connected.


  • @scalz Sketch J is giving 1.5mA consumption.


  • Hardware Contributor

    @alexsh1
    so you get 1.5mA with sketch J but 35uA with your code ?? something is wrong..you may have forgotten to shutdown some peripherals.
    with sketch J, you need to shutdown everything on your board in case peripherals are not well initialized. So that implies you include libs for radio etc in sketch J. Then disconnect your ftdi for power consumption tests. the PIR sensor itself won't consume more than 2-3uA, I tested it too.
    On other side, sketch J is just a basic test, because almost same code is used in MySensors lib for sleep()

    Sometimes I read people saying they have x uA power consumption for 328p standalone in deep sleep mode, but this is strange because here, on different 328p design, I have always been able to confirm the current consumption from the datasheet which is nA range. But I always used uCurrent..and reliable capa (X7R etc), hopefully I never got one capa extra leaking so far.
    There is no magics, especially for this board, you should get what datasheets say..
    When I made this board, I started by soldering only 328p circuit and checked power consumption, then tested step by step additional peripheral.


  • @scalz No, I copied and pasted sketch J so no radio peripherals included.
    Strange that I have the same consumption on both boards - I think caps may be the reason! I'll try to desolder a few and test it again.


  • Hardware Contributor

    @alexsh1
    where did you source your passive parts like capa, especially the bigger like 100uF ? (for curiosity)
    I guess you sourced others ic like opamp and comparator from a known source.


  • @scalz different sources - arrow.com for opamp.
    For caps and resistors it is Aliexpress :))


  • Hardware Contributor

    oki maybe try removing some of the big capa to see if it improves, use a simpler sketch where you just powerdown everything. there is no reason you don't get the low power consumption.
    regarding sketch J, yes, for sure you got 1.5ma because others peripherals were not initialized/shutdown


  • @scalz I have desoldered all caps down to 1uF. Tried a different bootloader. However, I cannot get consumption down. I have opt3001 + atsha204a + AT25DF512C (all obtained from a good source). All resistor values are correct (resistor tolerance is 1%). Not sure what else I can do...


  • @scalz I managed to narrow down the problem. Consumption (no radio attached) with Si7021 and opt3001 is 4.8uA, but with flash it goes up to 29uA while sleeping. This is a batch of AT25DF512C-MAHN-T I received from the US so quality is not an issue here. Seems to me that flash is not sleeping?

    My tests are showing that CJ2305 MOSFET consumption is negligible


  • @scalz said in 💬 MyMultisensors:

    @alexsh1 looks weird, because there is nothing special on the board which could consumes like that, all parts are ultra low power..I tested mine with uCurrent gold device.
    so I would say if it's consistent on 3sensors boards, it could be:

    • software
    • bad caps, out of specs parts..(I usually order my parts at Mouser, arrow etc..)

    what do you get when using sketch J from gammon for example + shutdown sensors in case, no serial connected.

    @scalz
    Here we go - you said "software" and I tested SPIFlash lib modified by lowpowerlab and consumption has gone down to 15uA with flash onboard vs 30uA with Mysensors SPIFlash. For whatever season, the default MySensors SPIFlash (drivers\SPIFlash) is giving a higher consumption with flash.initialize() and flash.sleep(). @tbowmo Thomas, any ideas please?

    @scalz What lib are you using for flash to get such a low uA?


  • Admin

    @alexsh1

    It's been a while (a couple of years now) since I looked at the first sensebender micro.. (other than the data that they submit to my gateway 🙂 )

    So I'm not entirely sure what is going on..


  • Hardware Contributor

    @alexsh1
    yes the mosfet power consumption is negligeable (nA), else there would be a problem 😉

    I had to make some changes to get such low power, I agree (including spiflash lib you're right). actually i have too much work, rather 'lazy' and no time to sort my libs.sorry.

    Note: Spiflash lib from lowpowerlab (mysensors too i guess..) doesn't use the lowest power mode in sleep function.

    Does the sensebender micro have a spiflash too?? then that would explain some posts I read..

    As usual datasheets to the rescue, did you take a look? would have saved you time.
    Easy one, in datasheet you can read:

    • 200nA Ultra Deep Power Down current (Typical)
    • 5μA Deep Power-Down Current (Typical)
    • 25uA Standby current (Typical)
    • 4.5mA Active Read Current (Typical

    why don't you get this super low <uA ??
    section 12-5 of the datasheet is what you need, use the right opcode (command) which is 0x79 for ultra deep powerdown. create your own or tweak sleep function in lib
    So now you can save at least 5uA + (other sensors not optimized maybe) + multimeter imprecision
    I hope this helps!


  • @scalz Yes, sensebender micro does have flash and using spiflash from mysensors. I never managed to get it below 20uA in the deep sleep, but then I never looked into the libs. My sensebender micro is running from two AA batteries and 20uA is just fine. It does make difference though if running on a coin cell.

    When you say ultra deep power down, which mode are you referencing?
    There are six sleep modes: Idle, ADC Noise Reduction, Power-save, Power-down, Standby, and Extended Standby.

    The datasheet - yes, I am referencing to it from time to time. I guess I'll have to dive in if I want to get it sorted. I would need to get Ucurrent Gold or get one built to measure such a low current.

    EDIT: For CR2032 3uA would be a self-discharge current (1% a month)


  • @tbowmo I meant SPIFlash lib


  • Hardware Contributor

    @alexsh1
    I'm not talking about the mcu sleep modes. I mentioned the spiflash sleep modes (or I don't get what you asked previously regarding spiflash..)
    datasheet see here, ic can go <uA, if you do what i said above, you'll get the better power consumption you want,
    https://www.adestotech.com/wp-content/uploads/DS-AT25DF512C_030.pdf


  • @scalz Sorry, yes, I thought you were talking about mcu.
    No, I did not check the datasheet for the chip. Thanks for the link. I'll see what can be done to save some power here ✌


  • Hardware Contributor

    oki, i think you now have the solution to what happened in your other post here 😉
    https://forum.mysensors.org/topic/6846/sensebender-micro-rfm69w-consumption/14


  • @scalz Yes, I think I mentioned sensebender micro, didn't I?
    20+ uA is not too bad and given the power source is 2xAA, I never bothered to spend too much time troubleshooting it, but now things are different as I know what causes such high consumption.

    BTW - Sketch J in my case was giving me 1.5mA as radio was not sleeping.


  • @scalz Voalá! 5.2uA consumption with flash in Ultra Deep Power-Down!
    Will have to test OTA functionality though (waking up from Ultra Deep Power-Down), but in my experience this is going to be very hard on a coin battery.


  • This sensor looks pretty promising with its capabilities, size and low power consumption. Currently the only way to get it seems to be to order PCBs and then solder everything manually, correct?

    I know this has been asked before, but is there progress in ordering this assembled? I might be interested, but have to say that this will be competing with other commercially available solutions like Aquara.


  • Hardware Contributor

    @clel
    sure it was fun to make, I mean when you design your devices you can choose the best parts, try to get the best perf.., even if it's a bit more expensive than a very cheap commercial product, in the end, you know what you put in.
    If I remember it cost me 15-20$ when I assembled it, not that expensive, vs versatility, sensors, and possibility to change fw.

    It's a quite old project, I wouldn't really advise to use 328p nowadays, it could be limited in future, says if mysensors someday get more advanced features, who knows.. it's really just my opinion. Still, I understand it's maybe easier to get started with it.
    I made more modern projects, but miss time for release etc

    No, I'm still not selling anything. No enough time for the moment. I think it wouldn't be worth my time. Same about compete with commercial products, like a topchef or a craftsman, I prefer to focus on other aspects when designing (quality, verstatility, perf).

    If your HA is cost driven, then maybe you're right to go for Aquara. Imho diy for sensors like you mentioned will often cost the same or more than the cheapest commercial products, vs time&learning curve, parts&tools in diy.

    Are these commercial products as low power, better range etc as a good care diy device, not sure.. But like I said "premium" has a cost. Pros and cons.
    I think for the moment, you can't compare the range of rfm69 module vs 2.4ghz aquara. afaik aqara/zigbee needs more repeaters.


  • @scalz Thanks for your answer. Assembling a sensor by my own is not really what I want (or am able to achieve). So buying assembled sensor is the only option for me. Thus probably commercially available sensors will fit better, since they can use the scaling factor of assembling a huge amount of sensors. My HA is driven by cost to performance ratio, where cost also include somewhat the amount of time to invest and performance also covers things like the ease of use, appearance etc.

    Interesting to hear though that those commercial sensors might be less premium regarding the part quality, battery life etc.


  • @scalz I have just updated to MySensors 2.3.2 and the sketch with interrupts stopped working. Any changes in any lib?


Suggested Topics

54
Online

11.5k
Users

11.1k
Topics

112.7k
Posts