nRF5 action!
-
@rmtucker said in nRF5 Bluetooth action!:
Is that a bare board with nothing connected (Not even serial)?
Yes. It's the bare Ebyte nRF52832 module. The only connections are Vcc and GND.
-
Interestingly, I just now tried the same measurement with one of these nRF52832 modules instead of the Ebyte module:
https://www.aliexpress.com/item/nRF52832-Bluetooth-4-1-BLE-Module-M4-Transparent-Transmission-SMA-512K-FLASH-64K-RAM-pass-through/32798522093.html?spm=a2g0s.9042311.0.0.KKA3PF
and during sleep it measured 6uA. Quite a bit lower!Anyone know of a module which tests even lower than that?
@NeverDie said in nRF5 Bluetooth action!:
Interestingly, I just now tried the same measurement with one of these nRF52832 modules instead of the Ebyte module:
https://www.aliexpress.com/item/nRF52832-Bluetooth-4-1-BLE-Module-M4-Transparent-Transmission-SMA-512K-FLASH-64K-RAM-pass-through/32798522093.html?spm=a2g0s.9042311.0.0.KKA3PF
and during sleep it measured 6uA. Quite a bit lower!Anyone know of a module which tests even lower than that?
Did you use the same board definition in the IDE and the same script ?
-
@NeverDie said in nRF5 Bluetooth action!:
Interestingly, I just now tried the same measurement with one of these nRF52832 modules instead of the Ebyte module:
https://www.aliexpress.com/item/nRF52832-Bluetooth-4-1-BLE-Module-M4-Transparent-Transmission-SMA-512K-FLASH-64K-RAM-pass-through/32798522093.html?spm=a2g0s.9042311.0.0.KKA3PF
and during sleep it measured 6uA. Quite a bit lower!Anyone know of a module which tests even lower than that?
Did you use the same board definition in the IDE and the same script ?
@Nca78 said in nRF5 Bluetooth action!:
Did you use the same board definition in the IDE and the same script ?
Yes.
-
@Nca78 said in nRF5 Bluetooth action!:
Did you use the same board definition in the IDE and the same script ?
Yes.
-
@NeverDie
Have you tried sleep and wait for an external interrupt instead of sleep and wake on timer?
Just in case it is the lfxtl that is causing the problem.@rmtucker said in nRF5 Bluetooth action!:
@NeverDie
Have you tried sleep and wait for an external interrupt instead of sleep and wake on timer?
Just in case it is the lfxtl that is causing the problem.Haven't tried that yet. Is there a library functional call for that, or do I need to start addressing the registers directly? With this new mpu, I feel like I'm learning to walk all over again.
-
@rmtucker said in nRF5 Bluetooth action!:
Try
sleep(digitalPinToInterrupt(10), FALLING,0);Unexpected result: using that as the sleep invocation, the infor-link module measures at 14ua while sleeping. i.e. worse, not better, compared to the 6ua measured earlier.
-
Looks as though the infor-link is using an A620N crystal:
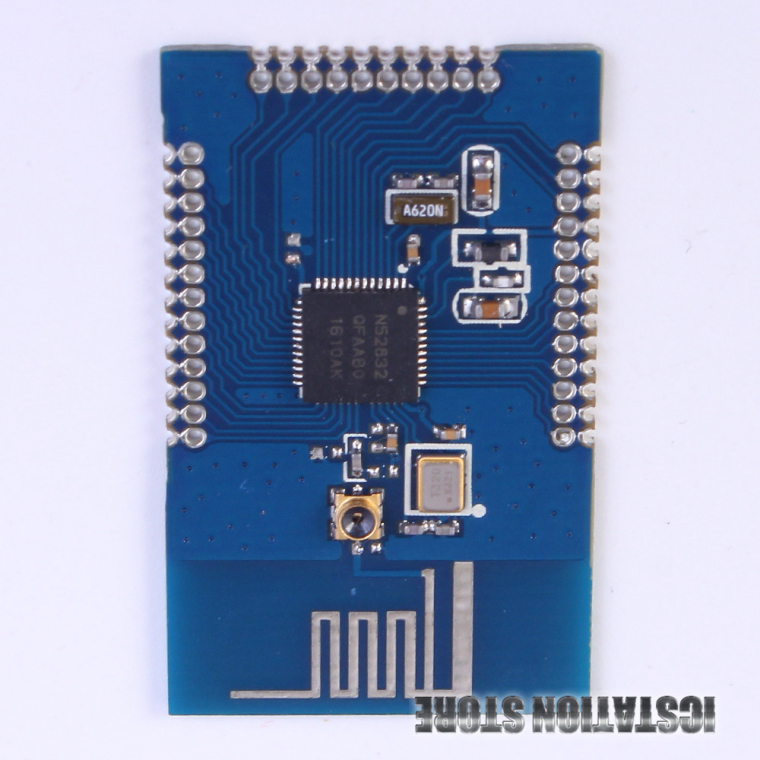
I tried to see if I could find a datasheet for it, in the hope of learning what its current consumption is (or, at least, should be). Unfortunately, though, I couldn't find a datasheet for an A620N. -
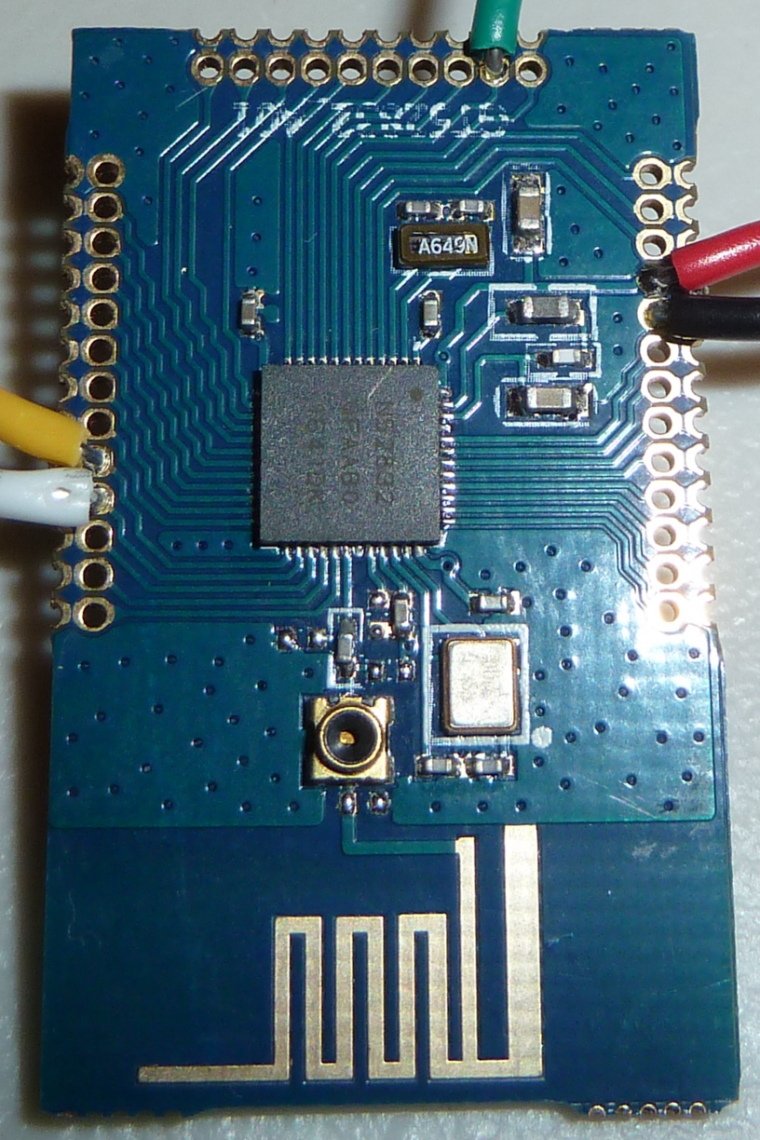
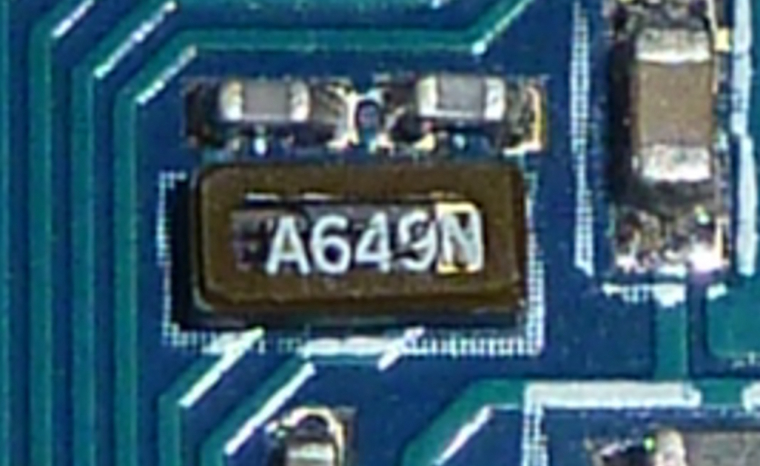
Maybe it doesn't matter, because in looking at the actual module I received, it appears to use a different XTAL anyway: A649N.
-
Maybe from a current consumption standpoint, not using an external XTAL crystal, but rather relying on the nRF52832's internal resonator would draw less current? I know that's true for the atmega328p. If so, then that's a trade-off worth examining more carefully.
-
Maybe it doesn't matter, because in looking at the actual module I received, it appears to use a different XTAL anyway: A649N.
Sorry i have been a little distracted because my waveshare BLE400 and jlink just turned up.
Took a little time to get it running but i loaded up the mockmysensors sketch with all the sensors un commented and pow all 30 odd sensors showed up in domoticz which made me chuckle.
Anyway post your sketch for the consumption testing and i will put it in and see if it works on my board.
The only problem is i can not unplug it from the Ble400 because i have no way of connecting wires to the core board because of the smaller pitch pins. -
Sorry i have been a little distracted because my waveshare BLE400 and jlink just turned up.
Took a little time to get it running but i loaded up the mockmysensors sketch with all the sensors un commented and pow all 30 odd sensors showed up in domoticz which made me chuckle.
Anyway post your sketch for the consumption testing and i will put it in and see if it works on my board.
The only problem is i can not unplug it from the Ble400 because i have no way of connecting wires to the core board because of the smaller pitch pins.@rmtucker
Here's the sketch I tested with:/* * MockMySensors * * This skecth is intended to crate fake sensors which register and respond to the controller * *** * Barduino 2015, GizMoCuz 2015 */ // Enable debug prints to serial monitor #define MY_DEBUG // Enable and select radio type attached //#define MY_RADIO_NRF24 #define MY_RADIO_NRF5_ESB //#define MY_RADIO_RFM69 //#define MY_RADIO_RFM95 #define MY_NODE_ID 254 #include <MySensors.h> #define RADIO_ERROR_LED_PIN 4 // Error led pin #define RADIO_RX_LED_PIN 6 // Receive led pin #define RADIO_TX_LED_PIN 5 // the PCB, on board LED // Wait times #define LONG_WAIT 500 #define SHORT_WAIT 50 #define SKETCH_NAME "MockMySensors " #define SKETCH_VERSION "v0.5" // Define Sensors ids /* S_DOOR, S_MOTION, S_SMOKE, S_LIGHT, S_DIMMER, S_COVER, S_TEMP, S_HUM, S_BARO, S_WIND, S_RAIN, S_UV, S_WEIGHT, S_POWER, S_HEATER, S_DISTANCE, S_LIGHT_LEVEL, S_ARDUINO_NODE, S_ARDUINO_REPEATER_NODE, S_LOCK, S_IR, S_WATER, S_AIR_QUALITY, S_CUSTOM, S_DUST, S_SCENE_CONTROLLER */ ////#define ID_S_ARDUINO_NODE //auto defined in initialization ////#define ID_S_ARDUINO_REPEATER_NODE //auto defined in initialization // Some of these ID's have not been updated for v1.5. Uncommenting too many of them // will make the sketch too large for a pro mini's memory so it's probably best to try // one at a time. //#define ID_S_ARMED 0 // dummy to controll armed stated for several sensors //#define ID_S_DOOR 1 //#define ID_S_MOTION 2 //#define ID_S_SMOKE 3 //#define ID_S_LIGHT 4 //#define ID_S_DIMMER 5 //#define ID_S_COVER 6 //#define ID_S_TEMP 7 //#define ID_S_HUM 8 #define ID_S_BARO 9 //#define ID_S_WIND 10 //#define ID_S_RAIN 11 //#define ID_S_UV 12 //#define ID_S_WEIGHT 13 //#define ID_S_POWER 14 //#define ID_S_HEATER 15 //#define ID_S_DISTANCE 16 //#define ID_S_LIGHT_LEVEL 17 //#define ID_S_LOCK 18 //#define ID_S_IR 19 //#define ID_S_WATER 20 //#define ID_S_AIR_QUALITY 21 //#define ID_S_DUST 22 //#define ID_S_SCENE_CONTROLLER 23 //// Lib 1.5 sensors //#define ID_S_RGB_LIGHT 24 //#define ID_S_RGBW_LIGHT 25 //#define ID_S_COLOR_SENSOR 26 //#define ID_S_HVAC 27 //#define ID_S_MULTIMETER 28 //#define ID_S_SPRINKLER 29 //#define ID_S_WATER_LEAK 30 //#define ID_S_SOUND 31 //#define ID_S_VIBRATION 32 //#define ID_S_MOISTURE 33 // //#define ID_S_CUSTOM 99 // Global Vars unsigned long SLEEP_TIME = 3600000; // Sleep time between reads (in milliseconds) bool metric = true; long randNumber; //Instanciate Messages objects #ifdef ID_S_ARMED bool isArmed; #endif #ifdef ID_S_DOOR // V_TRIPPED, V_ARMED MyMessage msg_S_DOOR_T(ID_S_DOOR,V_TRIPPED); MyMessage msg_S_DOOR_A(ID_S_DOOR,V_ARMED); #endif #ifdef ID_S_MOTION // V_TRIPPED, V_ARMED MyMessage msg_S_MOTION_A(ID_S_MOTION,V_ARMED); MyMessage msg_S_MOTION_T(ID_S_MOTION,V_TRIPPED); #endif #ifdef ID_S_SMOKE // V_TRIPPED, V_ARMED MyMessage msg_S_SMOKE_T(ID_S_SMOKE,V_TRIPPED); MyMessage msg_S_SMOKE_A(ID_S_SMOKE,V_ARMED); #endif #ifdef ID_S_LIGHT MyMessage msg_S_LIGHT(ID_S_LIGHT,V_LIGHT); bool isLightOn=0; #endif #ifdef ID_S_DIMMER MyMessage msg_S_DIMMER(ID_S_DIMMER,V_DIMMER); int dimmerVal=100; #endif #ifdef ID_S_COVER MyMessage msg_S_COVER_U(ID_S_COVER,V_UP); MyMessage msg_S_COVER_D(ID_S_COVER,V_DOWN); MyMessage msg_S_COVER_S(ID_S_COVER,V_STOP); MyMessage msg_S_COVER_V(ID_S_COVER,V_VAR1); int coverState=0; //0=Stop; 1=up; -1=down #endif #ifdef ID_S_TEMP MyMessage msg_S_TEMP(ID_S_TEMP,V_TEMP); #endif #ifdef ID_S_HUM MyMessage msg_S_HUM(ID_S_HUM,V_HUM); #endif #ifdef ID_S_BARO MyMessage msg_S_BARO_P(ID_S_BARO,V_PRESSURE); //MyMessage msg_S_BARO_F(ID_S_BARO,V_FORECAST); #endif #ifdef ID_S_WIND MyMessage msg_S_WIND_S(ID_S_WIND,V_WIND); MyMessage msg_S_WIND_G(ID_S_WIND,V_GUST); MyMessage msg_S_WIND_D(ID_S_WIND,V_DIRECTION); #endif #ifdef ID_S_RAIN MyMessage msg_S_RAIN_A(ID_S_RAIN,V_RAIN); MyMessage msg_S_RAIN_R(ID_S_RAIN,V_RAINRATE); #endif #ifdef ID_S_UV MyMessage msg_S_UV(ID_S_UV,V_UV); #endif #ifdef ID_S_WEIGHT MyMessage msg_S_WEIGHT(ID_S_WEIGHT,V_WEIGHT); #endif #ifdef ID_S_POWER MyMessage msg_S_POWER_W(ID_S_POWER,V_WATT); MyMessage msg_S_POWER_K(ID_S_POWER,V_KWH); #endif #ifdef ID_S_HEATER //////// REVIEW IMPLEMENTATION //////////// MyMessage msg_S_HEATER_SET_POINT(ID_S_HEATER, V_HVAC_SETPOINT_HEAT); // HVAC/Heater setpoint (Integer between 0-100). S_HEATER, S_HVAC MyMessage msg_S_HEATER_FLOW_STATE(ID_S_HEATER, V_HVAC_FLOW_STATE); // Mode of header. One of "Off", "HeatOn", "CoolOn", or "AutoChangeOver" // S_HVAC, S_HEATER //MyMessage msg_S_HEATER_STATUS(ID_S_HEATER,V_STATUS); //MyMessage msg_S_HEATER_TEMP(ID_S_HEATER,V_TEMP); float heater_setpoint=21.5; String heater_flow_state="Off"; // float heater_temp=23.5; // bool heater_status=false; // V_TEMP // Temperature // V_STATUS // Binary status. 0=off 1=on // V_HVAC_FLOW_STATE // Mode of header. One of "Off", "HeatOn", "CoolOn", or "AutoChangeOver" // V_HVAC_SPEED // HVAC/Heater fan speed ("Min", "Normal", "Max", "Auto") // V_HVAC_SETPOINT_HEAT // HVAC/Heater setpoint #endif #ifdef ID_S_DISTANCE MyMessage msg_S_DISTANCE(ID_S_DISTANCE,V_DISTANCE); #endif #ifdef ID_S_LIGHT_LEVEL MyMessage msg_S_LIGHT_LEVEL(ID_S_LIGHT_LEVEL,V_LIGHT_LEVEL); #endif #ifdef ID_S_LOCK MyMessage msg_S_LOCK(ID_S_LOCK,V_LOCK_STATUS); bool isLocked = 0; #endif #ifdef ID_S_IR MyMessage msg_S_IR_S(ID_S_IR,V_IR_SEND); MyMessage msg_S_IR_R(ID_S_IR,V_IR_RECEIVE); long irVal = 0; #endif #ifdef ID_S_WATER MyMessage msg_S_WATER_F(ID_S_WATER,V_FLOW); MyMessage msg_S_WATER_V(ID_S_WATER,V_VOLUME); #endif #ifdef ID_S_AIR_QUALITY MyMessage msg_S_AIR_QUALITY(ID_S_AIR_QUALITY,V_LEVEL); #endif #ifdef ID_S_DUST MyMessage msg_S_DUST(ID_S_DUST,V_LEVEL); #endif #ifdef ID_S_SCENE_CONTROLLER MyMessage msg_S_SCENE_CONTROLLER_ON(ID_S_SCENE_CONTROLLER,V_SCENE_ON); MyMessage msg_S_SCENE_CONTROLLER_OF(ID_S_SCENE_CONTROLLER,V_SCENE_OFF); // not sure if scene controller sends int or chars // betting on ints as Touch Display Scen by Hek // compiler warnings char *scenes[] = { (char *)"Good Morning", (char *)"Clean Up!", (char *)"All Lights Off", (char *)"Music On/Off" }; int sceneVal=0; int sceneValPrevious=0; #endif #ifdef ID_S_RGB_LIGHT MyMessage msg_S_RGB_LIGHT_V_RGB(ID_S_RGB_LIGHT,V_RGB); MyMessage msg_S_RGB_LIGHT_V_WATT(ID_S_RGB_LIGHT,V_WATT); String rgbState="000000"; //RGB light V_RGB, V_WATT //RGB value transmitted as ASCII hex string (I.e "ff0000" for red) #endif #ifdef ID_S_RGBW_LIGHT MyMessage msg_S_RGBW_LIGHT_V_RGBW(ID_S_RGBW_LIGHT,V_RGBW); MyMessage msg_S_RGBW_LIGHT_V_WATT(ID_S_RGBW_LIGHT,V_WATT); String rgbwState="00000000"; //RGBW light (with separate white component) V_RGBW, V_WATT //RGBW value transmitted as ASCII hex string (I.e "ff0000ff" for red + full white) S_RGBW_LIGHT #endif #ifdef ID_S_COLOR_SENSOR MyMessage msg_S_COLOR_SENSOR_V_RGB(ID_S_COLOR_SENSOR,V_RGB); //Color sensor V_RGB //RGB value transmitted as ASCII hex string (I.e "ff0000" for red) S_RGB_LIGHT, S_COLOR_SENSOR #endif #ifdef ID_S_HVAC MyMessage msg_S_HVAC_V_HVAC_SETPOINT_HEAT(ID_S_HVAC,V_HVAC_SETPOINT_HEAT); MyMessage msg_S_HVAC_V_HVAC_SETPOINT_COOL(ID_S_HVAC,V_HVAC_SETPOINT_COOL); MyMessage msg_S_HVAC_V_HVAC_FLOW_STATET(ID_S_HVAC,V_HVAC_FLOW_STATE); MyMessage msg_S_HVAC_V_HVAC_FLOW_MODE(ID_S_HVAC,V_HVAC_FLOW_MODE); MyMessage msg_S_HVAC_V_HVAC_SPEED(ID_S_HVAC,V_HVAC_SPEED); float hvac_SetPointHeat = 16.5; float hvac_SetPointCool = 25.5; String hvac_FlowState = "AutoChangeOver"; String hvac_FlowMode = "Auto"; String hvac_Speed = "Normal"; //Thermostat/HVAC device //V_HVAC_SETPOINT_HEAT, // HVAC/Heater setpoint //V_HVAC_SETPOINT_COOL, // HVAC cold setpoint //V_HVAC_FLOW_STATE, // Mode of header. One of "Off", "HeatOn", "CoolOn", or "AutoChangeOver" //V_HVAC_FLOW_MODE, // Flow mode for HVAC ("Auto", "ContinuousOn", "PeriodicOn") //V_HVAC_SPEED // HVAC/Heater fan speed ("Min", "Normal", "Max", "Auto") // NOT IMPLEMENTED YET //V_TEMP // Temperature //V_STATUS // Binary status. 0=off 1=on #endif #ifdef ID_S_MULTIMETER MyMessage msg_S_MULTIMETER_V_IMPEDANCE(ID_S_MULTIMETER,V_IMPEDANCE); MyMessage msg_S_MULTIMETER_V_VOLTAGE(ID_S_MULTIMETER,V_VOLTAGE); MyMessage msg_S_MULTIMETER_V_CURRENT(ID_S_MULTIMETER,V_CURRENT); // Multimeter device V_VOLTAGE, V_CURRENT, V_IMPEDANCE // V_IMPEDANCE 14 Impedance value // V_VOLTAGE 38 Voltage level // V_CURRENT 39 Current level #endif #ifdef ID_S_SPRINKLER // S_SPRINKLER 31 Sprinkler device V_STATUS (turn on/off), V_TRIPPED (if fire detecting device) // V_STATUS 2 Binary status. 0=off 1=on // V_ARMED 15 Armed status of a security sensor. 1=Armed, 0=Bypassed // V_TRIPPED 16 Tripped status of a security sensor. 1=Tripped, 0=Untripped #endif #ifdef ID_S_WATER_LEAK #endif #ifdef ID_S_SOUND #endif #ifdef ID_S_VIBRATION #endif #ifdef ID_S_MOISTURE #endif #ifdef ID_S_MOISTURE MyMessage msg_S_MOISTURE(ID_S_MOISTURE,V_LEVEL); #endif #ifdef ID_S_CUSTOM MyMessage msg_S_CUSTOM_1(ID_S_CUSTOM,V_VAR1); MyMessage msg_S_CUSTOM_2(ID_S_CUSTOM,V_VAR2); MyMessage msg_S_CUSTOM_3(ID_S_CUSTOM,V_VAR3); MyMessage msg_S_CUSTOM_4(ID_S_CUSTOM,V_VAR4); MyMessage msg_S_CUSTOM_5(ID_S_CUSTOM,V_VAR5); #endif void setup() { // Random SEED randomSeed(analogRead(0)); wait(LONG_WAIT); Serial.println("GW Started"); } void presentation() { // Send the Sketch Version Information to the Gateway Serial.print("Send Sketch Info: "); sendSketchInfo(SKETCH_NAME, SKETCH_VERSION); Serial.print(SKETCH_NAME); Serial.println(SKETCH_VERSION); wait(LONG_WAIT); // Get controller configuration Serial.print("Get Config: "); metric = getControllerConfig().isMetric; Serial.println(metric ? "Metric":"Imperial"); wait(LONG_WAIT); // Init Armed #ifdef ID_S_ARMED isArmed = true; #endif // Register all sensors to gw (they will be created as child devices) Serial.println("Presenting Nodes"); Serial.println("________________"); #ifdef ID_S_DOOR Serial.println(" S_DOOR"); present(ID_S_DOOR,S_DOOR,"Outside Door"); wait(SHORT_WAIT); #endif #ifdef ID_S_MOTION Serial.println(" S_MOTION"); present(ID_S_MOTION,S_MOTION,"Outside Motion"); wait(SHORT_WAIT); #endif #ifdef ID_S_SMOKE Serial.println(" S_SMOKE"); present(ID_S_SMOKE,S_SMOKE,"Kitchen Smoke"); wait(SHORT_WAIT); #endif #ifdef ID_S_LIGHT Serial.println(" S_LIGHT"); present(ID_S_LIGHT,S_LIGHT,"Hall Light"); wait(SHORT_WAIT); #endif #ifdef ID_S_DIMMER Serial.println(" S_DIMMER"); present(ID_S_DIMMER,S_DIMMER,"Living room dimmer"); wait(SHORT_WAIT); #endif #ifdef ID_S_COVER Serial.println(" S_COVER"); present(ID_S_COVER,S_COVER,"Window cover"); wait(SHORT_WAIT); #endif #ifdef ID_S_TEMP Serial.println(" S_TEMP"); present(ID_S_TEMP,S_TEMP,"House Temperarue"); wait(SHORT_WAIT); #endif #ifdef ID_S_HUM Serial.println(" S_HUM"); present(ID_S_HUM,S_HUM,"Current Humidity"); wait(SHORT_WAIT); #endif #ifdef ID_S_BARO Serial.println(" S_BARO"); present(ID_S_BARO,S_BARO," Voltage"); wait(SHORT_WAIT); #endif #ifdef ID_S_WIND Serial.println(" S_WIND"); present(ID_S_WIND,S_WIND,"Wind Station"); wait(SHORT_WAIT); #endif #ifdef ID_S_RAIN Serial.println(" S_RAIN"); present(ID_S_RAIN,S_RAIN,"Rain Station"); wait(SHORT_WAIT); #endif #ifdef ID_S_UV Serial.println(" S_UV"); present(ID_S_UV,S_UV,"Ultra Violet"); wait(SHORT_WAIT); #endif #ifdef ID_S_WEIGHT Serial.println(" S_WEIGHT"); present(ID_S_WEIGHT,S_WEIGHT,"Outdoor Scale"); wait(SHORT_WAIT); #endif #ifdef ID_S_POWER Serial.println(" S_POWER"); present(ID_S_POWER,S_POWER,"Power Metric"); wait(SHORT_WAIT); #endif #ifdef ID_S_HEATER Serial.println(" S_HEATER"); present(ID_S_HEATER,S_HEATER,"Garage Heater"); wait(SHORT_WAIT); #endif #ifdef ID_S_DISTANCE Serial.println(" S_DISTANCE"); present(ID_S_DISTANCE,S_DISTANCE,"Distance Measure"); wait(SHORT_WAIT); #endif #ifdef ID_S_LIGHT_LEVEL Serial.println(" S_LIGHT_LEVEL"); present(ID_S_LIGHT_LEVEL,S_LIGHT_LEVEL,"Outside Light Level"); wait(SHORT_WAIT); #endif #ifdef ID_S_LOCK Serial.println(" S_LOCK"); present(ID_S_LOCK,S_LOCK,"Front Door Lock"); wait(SHORT_WAIT); #endif #ifdef ID_S_IR Serial.println(" S_IR"); present(ID_S_IR,S_IR,"Univeral Command"); wait(SHORT_WAIT); #endif #ifdef ID_S_WATER Serial.println(" S_WATER"); present(ID_S_WATER,S_WATER,"Water Level"); wait(SHORT_WAIT); #endif #ifdef ID_S_AIR_QUALITY Serial.println(" S_AIR_QUALITY"); present(ID_S_AIR_QUALITY,S_AIR_QUALITY,"Air Station"); wait(SHORT_WAIT); #endif #ifdef ID_S_DUST Serial.println(" S_DUST"); present(ID_S_DUST,S_DUST,"Dust Level"); wait(SHORT_WAIT); #endif #ifdef ID_S_SCENE_CONTROLLER Serial.println(" S_SCENE_CONTROLLER"); present(ID_S_SCENE_CONTROLLER,S_SCENE_CONTROLLER,"Scene Controller"); wait(SHORT_WAIT); #endif #ifdef ID_S_RGB_LIGHT Serial.println(" RGB_LIGHT"); present(ID_S_RGB_LIGHT,S_RGB_LIGHT,"Mood Light"); wait(SHORT_WAIT); #endif #ifdef ID_S_RGBW_LIGHT Serial.println(" RGBW_LIGHT"); present(ID_S_RGBW_LIGHT,S_RGBW_LIGHT,"Mood Light 2"); wait(SHORT_WAIT); #endif #ifdef ID_S_COLOR_SENSOR Serial.println(" COLOR_SENSOR"); present(ID_S_COLOR_SENSOR,S_COLOR_SENSOR,"Hall Painting"); wait(SHORT_WAIT); #endif #ifdef ID_S_HVAC Serial.println(" HVAC"); present(ID_S_HVAC,S_HVAC,"HVAC"); wait(SHORT_WAIT); #endif #ifdef ID_S_MULTIMETER Serial.println(" MULTIMETER"); present(ID_S_MULTIMETER,S_MULTIMETER,"Electric Staion"); wait(SHORT_WAIT); #endif #ifdef ID_S_SPRINKLER #endif #ifdef ID_S_WATER_LEAK #endif #ifdef ID_S_SOUND #endif #ifdef ID_S_VIBRATION #endif #ifdef ID_S_MOISTURE #endif #ifdef ID_S_MOISTURE Serial.println(" S_MOISTURE"); present(ID_S_MOISTURE,S_MOISTURE,"Basement Sensor"); wait(SHORT_WAIT); #endif #ifdef ID_S_CUSTOM Serial.println(" S_CUSTOM"); present(ID_S_CUSTOM,S_CUSTOM,"Other Stuff"); wait(SHORT_WAIT); #endif Serial.println("________________"); } void loop() { Serial.println(""); Serial.println(""); Serial.println(""); Serial.println("#########################"); randNumber=random(0,101); Serial.print("RandomNumber:"); Serial.println(randNumber); // Send fake battery level Serial.println("Send Battery Level"); sendBatteryLevel(randNumber); wait(LONG_WAIT); // Request time Serial.println("Request Time"); requestTime(); wait(LONG_WAIT); //Read Sensors #ifdef ID_S_DOOR door(); #endif #ifdef ID_S_MOTION motion(); #endif #ifdef ID_S_SMOKE smoke(); #endif #ifdef ID_S_LIGHT light(); #endif #ifdef ID_S_DIMMER dimmer(); #endif #ifdef ID_S_COVER cover(); #endif #ifdef ID_S_TEMP temp(); #endif #ifdef ID_S_HUM hum(); #endif #ifdef ID_S_BARO baro(); #endif #ifdef ID_S_WIND wind(); #endif #ifdef ID_S_RAIN rain(); #endif #ifdef ID_S_UV uv(); #endif #ifdef ID_S_WEIGHT weight(); #endif #ifdef ID_S_POWER power(); #endif #ifdef ID_S_HEATER heater(); #endif #ifdef ID_S_DISTANCE distance(); #endif #ifdef ID_S_LIGHT_LEVEL light_level(); #endif #ifdef ID_S_LOCK lock(); #endif #ifdef ID_S_IR ir(); #endif #ifdef ID_S_WATER water(); #endif #ifdef ID_S_AIR_QUALITY air(); #endif #ifdef ID_S_DUST dust(); #endif #ifdef ID_S_SCENE_CONTROLLER scene(); #endif #ifdef ID_S_RGB_LIGHT rgbLight(); #endif #ifdef ID_S_RGBW_LIGHT rgbwLight(); #endif #ifdef ID_S_COLOR_SENSOR color(); #endif #ifdef ID_S_HVAC hvac(); #endif #ifdef ID_S_MULTIMETER multimeter(); #endif #ifdef ID_S_SPRINKLER #endif #ifdef ID_S_WATER_LEAK #endif #ifdef ID_S_SOUND #endif #ifdef ID_S_VIBRATION #endif #ifdef ID_S_MOISTURE #endif #ifdef ID_S_MOISTURE moisture(); #endif #ifdef ID_S_CUSTOM custom(); #endif sendBatteryLevel(randNumber); wait(SHORT_WAIT); Serial.println("#########################"); //wait(SLEEP_TIME); //sleep a bit //sleep(60000); // Sleeps for a minute in deep sleep //sleep(6000000); // Sleeps for 100 minutes in deep sleep sleep(digitalPinToInterrupt(10), FALLING,0); } // This is called when a new time value was received void receiveTime(unsigned long controllerTime) { Serial.print("Time value received: "); Serial.println(controllerTime); } //void door(){} #ifdef ID_S_DOOR void door() { Serial.print("Door is: " ); if (randNumber <= 50) { Serial.println("Open"); send(msg_S_DOOR_T.set((int16_t)1)); } else { Serial.println("Closed"); send(msg_S_DOOR_T.set((int16_t)0)); } #ifdef ID_S_ARMED Serial.print("System is: " ); Serial.println((isArmed ? "Armed":"Disarmed")); send(msg_S_DOOR_A.set(isArmed)); #endif } #endif #ifdef ID_S_MOTION void motion() { Serial.print("Motion is: " ); if (randNumber <= 50) { Serial.println("Active"); send(msg_S_MOTION_T.set(1)); } else { Serial.println("Quiet"); send(msg_S_MOTION_T.set(0)); } #ifdef ID_S_ARMED Serial.print("System is: " ); Serial.println((isArmed ? "Armed":"Disarmed")); send(msg_S_MOTION_A.set(isArmed)); #endif } #endif #ifdef ID_S_SMOKE void smoke() { Serial.print("Smoke is: " ); if (randNumber <= 50) { Serial.println("Active"); send(msg_S_SMOKE_T.set(1)); } else { Serial.println("Quiet"); send(msg_S_SMOKE_T.set(0)); } #ifdef ID_S_ARMED Serial.print("System is: " ); Serial.println((isArmed ? "Armed":"Disarmed")); send(msg_S_SMOKE_A.set(isArmed)); #endif } #endif #ifdef ID_S_LIGHT void light() { Serial.print("Light is: " ); Serial.println((isLightOn ? "On":"Off")); send(msg_S_LIGHT.set(isLightOn)); } #endif #ifdef ID_S_DIMMER void dimmer() { Serial.print("Dimmer is set to: " ); Serial.println(dimmerVal); send(msg_S_DIMMER.set(dimmerVal)); } #endif #ifdef ID_S_COVER void cover() { Serial.print("Cover is : " ); if (coverState == 1) { Serial.println("Opening"); send(msg_S_COVER_U.set(1)); } else if (coverState == -1) { Serial.println("Closing"); send(msg_S_COVER_D.set(0)); } else { Serial.println("Idle"); send(msg_S_COVER_S.set(-1)); } send(msg_S_COVER_V.set(coverState)); } #endif #ifdef ID_S_TEMP void temp() { Serial.print("Temperature is: " ); Serial.println(map(randNumber,1,100,0,45)); send(msg_S_TEMP.set(map(randNumber,1,100,0,45))); } #endif #ifdef ID_S_HUM void hum() { Serial.print("Humitidty is: " ); Serial.println(randNumber); send(msg_S_HUM.set(randNumber)); } #endif #ifdef ID_S_BARO void baro() { const char *weather[] = {"stable","sunny","cloudy","unstable","thunderstorm","unknown"}; //long pressure = map(randNumber,1,100,870,1086);// hPa? //int forecast = map(randNumber,1,100,0,5); long voltage = hwCPUVoltage(); Serial.print("Power source voltage is: " ); Serial.println(voltage); send(msg_S_BARO_P.set(voltage)); //Serial.print("Weather forecast: " ); //Serial.println(weather[forecast]); //send(msg_S_BARO_F.set(weather[forecast])); } #endif #ifdef ID_S_WIND void wind() { Serial.print("Wind Speed is: " ); Serial.println(randNumber); send(msg_S_WIND_S.set(randNumber)); Serial.print("Wind Gust is: " ); Serial.println(randNumber+10); send(msg_S_WIND_G.set(randNumber+10)); Serial.print("Wind Direction is: " ); Serial.println(map(randNumber,1,100,0,360)); send(msg_S_WIND_D.set(map(randNumber,1,100,0,360))); } #endif #ifdef ID_S_RAIN void rain() { Serial.print("Rain ammount is: " ); Serial.println(randNumber); send(msg_S_RAIN_A.set(randNumber)); Serial.print("Rain rate is: " ); Serial.println(randNumber/60); send(msg_S_RAIN_R.set(randNumber/60,1)); } #endif #ifdef ID_S_UV void uv() { Serial.print("Ultra Violet level is: " ); Serial.println(map(randNumber,1,100,0,15)); send(msg_S_UV.set(map(randNumber,1,100,0,15))); } #endif #ifdef ID_S_WEIGHT void weight() { Serial.print("Weight is: " ); Serial.println(map(randNumber,1,100,0,150)); send(msg_S_WEIGHT.set(map(randNumber,1,100,0,150))); } #endif #ifdef ID_S_POWER void power() { Serial.print("Watt is: " ); Serial.println(map(randNumber,1,100,0,150)); send(msg_S_POWER_W.set(map(randNumber,1,100,0,150))); Serial.print("KWH is: " ); Serial.println(map(randNumber,1,100,0,150)); send(msg_S_POWER_K.set(map(randNumber,1,100,0,150))); } #endif #ifdef ID_S_HEATER void heater() { // float heater_setpoint=21.5; // float heater_temp=23.5; // bool heater_status=false; // String heatState="Off"; Serial.print("Heater flow state is: " ); Serial.println(heater_flow_state); send(msg_S_HEATER_FLOW_STATE.set(heater_flow_state.c_str())); // Serial.print("Heater on/off is: " ); // Serial.println((heater_status==true)?"On":"Off"); // send(msg_S_HEATER_STATUS.set(heater_status)); // Serial.print("Heater Temperature is: " ); // Serial.println(heater_temp,1); // send(msg_S_HEATER_TEMP.set(heater_temp,1)); Serial.print("Heater Setpoint: " ); Serial.println(heater_setpoint,1); send(msg_S_HEATER_SET_POINT.set(heater_setpoint,1)); } #endif #ifdef ID_S_DISTANCE void distance() { Serial.print("Distance is: " ); Serial.println(map(randNumber,1,100,0,150)); send(msg_S_DISTANCE.set(map(randNumber,1,100,0,150))); } #endif #ifdef ID_S_LIGHT_LEVEL void light_level() { Serial.print("Light is: " ); Serial.println(map(randNumber,1,100,0,150)); send(msg_S_LIGHT_LEVEL.set(map(randNumber,1,100,0,150))); } #endif #ifdef ID_S_LOCK void lock() { Serial.print("Lock is: " ); Serial.println((isLocked ? "Locked":"Unlocked")); send(msg_S_LOCK.set(isLocked)); } #endif #ifdef ID_S_IR void ir() { Serial.print("Infrared is: " ); Serial.println(irVal); send(msg_S_IR_S.set(irVal)); send(msg_S_IR_R.set(irVal)); } #endif #ifdef ID_S_WATER void water() { Serial.print("Water flow is: " ); Serial.println(map(randNumber,1,100,0,150)); send(msg_S_WATER_F.set(map(randNumber,1,100,0,150))); Serial.print("Water volume is: " ); Serial.println(map(randNumber,1,100,0,150)); send(msg_S_WATER_V.set(map(randNumber,1,100,0,150))); } #endif #ifdef ID_S_AIR_QUALITY void air() { Serial.print("Air Quality is: " ); Serial.println(randNumber); send(msg_S_AIR_QUALITY.set(randNumber)); } #endif #ifdef ID_S_DUST void dust() { Serial.print("Dust level is: " ); Serial.println(randNumber); send(msg_S_DUST.set(randNumber)); } #endif #ifdef ID_S_SCENE_CONTROLLER void scene() { Serial.print("Scene is: " ); Serial.println(scenes[sceneVal]); if(sceneValPrevious != sceneVal) { send(msg_S_SCENE_CONTROLLER_OF.set(sceneValPrevious)); send(msg_S_SCENE_CONTROLLER_ON.set(sceneVal)); sceneValPrevious=sceneVal; } } #endif #ifdef ID_S_RGB_LIGHT void rgbLight() { Serial.print("RGB Light state is: " ); Serial.println(rgbState); send(msg_S_RGB_LIGHT_V_RGB.set(rgbState.c_str())); Serial.print("RGB Light Watt is: " ); Serial.println(map(randNumber,1,100,0,150)); send(msg_S_RGB_LIGHT_V_WATT.set(map(randNumber,1,100,0,150))); } #endif #ifdef ID_S_RGBW_LIGHT void rgbwLight() { Serial.print("RGBW Light state is: " ); Serial.println(rgbwState); send(msg_S_RGBW_LIGHT_V_RGBW.set(rgbwState.c_str())); Serial.print("RGBW Light Watt is: " ); Serial.println(map(randNumber,1,100,0,150)); send(msg_S_RGBW_LIGHT_V_WATT.set(map(randNumber,1,100,0,150))); } #endif #ifdef ID_S_COLOR_SENSOR void color() { String colorState; String red = String(random(0,256),HEX); String green = String(random(0,256),HEX); String blue = String(random(0,256),HEX); colorState=String(red + green + blue); Serial.print("Color state is: " ); Serial.println(colorState); send(msg_S_COLOR_SENSOR_V_RGB.set(colorState.c_str())); } #endif #ifdef ID_S_HVAC void hvac() { // float hvac_SetPointHeat = 16.5; // float hvac_SetPointCool = 25.5; // String hvac_FlowState = "AutoChangeOver"; // String hvac_FlowMode = "Auto"; // String hvac_Speed = "Normal"; Serial.print("HVAC Set Point Heat is: " ); Serial.println(hvac_SetPointHeat); send(msg_S_HVAC_V_HVAC_SETPOINT_HEAT.set(hvac_SetPointHeat,1)); Serial.print("HVAC Set Point Cool is: " ); Serial.println(hvac_SetPointCool); send(msg_S_HVAC_V_HVAC_SETPOINT_COOL.set(hvac_SetPointCool,1)); Serial.print("HVAC Flow State is: " ); Serial.println(hvac_FlowState); send(msg_S_HVAC_V_HVAC_FLOW_STATET.set(hvac_FlowState.c_str())); Serial.print("HVAC Flow Mode is: " ); Serial.println(hvac_FlowMode); send(msg_S_HVAC_V_HVAC_FLOW_MODE.set(hvac_FlowMode.c_str())); Serial.print("HVAC Speed is: " ); Serial.println(hvac_Speed); send(msg_S_HVAC_V_HVAC_SPEED.set(hvac_Speed.c_str())); } #endif #ifdef ID_S_MULTIMETER void multimeter() { int impedance=map(randNumber,1,100,0,15000); int volt=map(randNumber,1,100,0,380); int amps=map(randNumber,1,100,0,16); Serial.print("Impedance is: " ); Serial.println(impedance); send(msg_S_MULTIMETER_V_IMPEDANCE.set(impedance)); Serial.print("Voltage is: " ); Serial.println(volt); send(msg_S_MULTIMETER_V_VOLTAGE.set(volt)); Serial.print("Current is: " ); Serial.println(amps); send(msg_S_MULTIMETER_V_CURRENT.set(amps)); } #endif #ifdef ID_S_SPRINKLER #endif #ifdef ID_S_WATER_LEAK #endif #ifdef ID_S_SOUND #endif #ifdef ID_S_VIBRATION #endif #ifdef ID_S_MOISTURE #endif #ifdef ID_S_MOISTURE void moisture() { Serial.print("Moisture level is: " ); Serial.println(randNumber); send(msg_S_MOISTURE.set(randNumber)); } #endif #ifdef ID_S_CUSTOM void custom() { Serial.print("Custom value is: " ); Serial.println(randNumber); send(msg_S_CUSTOM_1.set(randNumber)); send(msg_S_CUSTOM_2.set(randNumber)); send(msg_S_CUSTOM_3.set(randNumber)); send(msg_S_CUSTOM_4.set(randNumber)); send(msg_S_CUSTOM_5.set(randNumber)); } #endif void receive(const MyMessage &message) { switch (message.type) { #ifdef ID_S_ARMED case V_ARMED: isArmed = message.getBool(); Serial.print("Incoming change for ID_S_ARMED:"); Serial.print(message.sensor); Serial.print(", New status: "); Serial.println((isArmed ? "Armed":"Disarmed" )); #ifdef ID_S_DOOR door();//temp ack for door #endif #ifdef ID_S_MOTION motion();//temp ack #endif #ifdef ID_S_SMOKE smoke();//temp ack #endif break; #endif case V_STATUS: // V_LIGHT: #ifdef ID_S_LIGHT if(message.sensor==ID_S_LIGHT) { isLightOn = message.getBool(); Serial.print("Incoming change for ID_S_LIGHT:"); Serial.print(message.sensor); Serial.print(", New status: "); Serial.println((isLightOn ? "On":"Off")); light(); // temp ack } #endif // #ifdef ID_S_HEATER // if(message.sensor == ID_S_HEATER){ // heater_status = message.getBool(); // Serial.print("Incoming change for ID_S_HEATER:"); // Serial.print(message.sensor); // Serial.print(", New status: "); // Serial.println(heater_status); // heater();//temp ack // } // #endif break; #ifdef ID_S_DIMMER case V_DIMMER: if ((message.getInt()<0)||(message.getInt()>100)) { Serial.println( "V_DIMMER data invalid (should be 0..100)" ); break; } dimmerVal= message.getInt(); Serial.print("Incoming change for ID_S_DIMMER:"); Serial.print(message.sensor); Serial.print(", New status: "); Serial.println(message.getInt()); dimmer();// temp ack break; #endif #ifdef ID_S_COVER case V_UP: coverState=1; Serial.print("Incoming change for ID_S_COVER:"); Serial.print(message.sensor); Serial.print(", New status: "); Serial.println("V_UP"); cover(); // temp ack break; case V_DOWN: coverState=-1; Serial.print("Incoming change for ID_S_COVER:"); Serial.print(message.sensor); Serial.print(", New status: "); Serial.println("V_DOWN"); cover(); //temp ack break; case V_STOP: coverState=0; Serial.print("Incoming change for ID_S_COVER:"); Serial.print(message.sensor); Serial.print(", New status: "); Serial.println("V_STOP"); cover(); //temp ack break; #endif case V_HVAC_SETPOINT_HEAT: #ifdef ID_S_HEATER if(message.sensor == ID_S_HEATER) { heater_setpoint=message.getFloat(); Serial.print("Incoming set point for ID_S_HEATER:"); Serial.print(message.sensor); Serial.print(", New status: "); Serial.println(heater_setpoint,1); heater();//temp ack } #endif #ifdef ID_S_HVAC if(message.sensor == ID_S_HVAC) { hvac_SetPointHeat=message.getFloat(); Serial.print("Incoming set point for ID_S_HVAC:"); Serial.print(message.sensor); Serial.print(", New status: "); Serial.println(hvac_SetPointHeat,1); hvac();//temp ack } #endif break; case V_HVAC_FLOW_STATE: #ifdef ID_S_HEATER if(message.sensor == ID_S_HEATER) { heater_flow_state=message.getString(); Serial.print("Incoming flow state change for ID_S_HEATER:"); Serial.print(message.sensor); Serial.print(", New status: "); Serial.println(heater_flow_state); heater();//temp ack } #endif #ifdef ID_S_HVAC if(message.sensor == ID_S_HVAC) { hvac_FlowState=message.getString(); Serial.print("Incoming set point for ID_S_HVAC:"); Serial.print(message.sensor); Serial.print(", New status: "); Serial.println(hvac_FlowState); hvac();//temp ack } #endif break; #ifdef ID_S_LOCK case V_LOCK_STATUS: isLocked = message.getBool(); Serial.print("Incoming change for ID_S_LOCK:"); Serial.print(message.sensor); Serial.print(", New status: "); Serial.println(message.getBool()?"Locked":"Unlocked"); lock(); //temp ack break; #endif #ifdef ID_S_IR case V_IR_SEND: irVal = message.getLong(); Serial.print("Incoming change for ID_S_IR:"); Serial.print(message.sensor); Serial.print(", New status: "); Serial.println(irVal); ir(); // temp ack break; case V_IR_RECEIVE: irVal = message.getLong(); Serial.print("Incoming change for ID_S_IR:"); Serial.print(message.sensor); Serial.print(", New status: "); Serial.println(irVal); ir(); // temp ack break; #endif #ifdef ID_S_SCENE_CONTROLLER case V_SCENE_ON: sceneVal = message.getInt(); Serial.print("Incoming change for ID_S_SCENE_CONTROLLER:"); Serial.print(message.sensor); Serial.print(", New status: "); Serial.print(scenes[sceneVal]); Serial.println(" On"); scene();// temp ack break; case V_SCENE_OFF: sceneVal = message.getInt(); Serial.print("Incoming change for ID_S_SCENE_CONTROLLER:"); Serial.print(message.sensor); Serial.print(", New status: "); Serial.print(scenes[sceneVal]); Serial.println(" Off"); scene();// temp ack break; #endif #ifdef ID_S_RGB_LIGHT case V_RGB: rgbState=message.getString(); Serial.print("Incoming flow state change for ID_S_RGB_LIGHT:"); Serial.print(message.sensor); Serial.print(", New status: "); Serial.println(rgbState); rgbLight(); // temp ack break; #endif #ifdef ID_S_RGBW_LIGHT case V_RGBW: rgbwState=message.getString(); Serial.print("Incoming flow state change for ID_S_RGBW_LIGHT:"); Serial.print(message.sensor); Serial.print(", New status: "); Serial.println(rgbwState); rgbwLight(); break; #endif #ifdef ID_S_HVAC // hvac_SetPointHeat // hvac_SetPointCool // hvac_FlowState // hvac_FlowMode // hvac_Speed case V_HVAC_SETPOINT_COOL: hvac_SetPointCool=message.getFloat(); Serial.print("Incoming set point for ID_S_HVAC:"); Serial.print(message.sensor); Serial.print(", New status: "); Serial.println(hvac_SetPointCool,1); hvac();//temp ack break; case V_HVAC_FLOW_MODE: hvac_Speed=message.getString(); Serial.print("Incoming set point for ID_S_HVAC:"); Serial.print(message.sensor); Serial.print(", New status: "); Serial.println(hvac_Speed); hvac();//temp ack break; case V_HVAC_SPEED: hvac_FlowMode=message.getString(); Serial.print("Incoming set point for ID_S_HVAC:"); Serial.print(message.sensor); Serial.print(", New status: "); Serial.println(hvac_FlowMode); hvac();//temp ack break; #endif default: Serial.print("Unknown/UnImplemented message type: "); Serial.println(message.type); } }I selected the board "Nordic nRF52832 DK" in the board manager.
You'll need a separate serial gateway running for it to communicate with, or else it will never get to the section where it sleeps. -
Sorry i have been a little distracted because my waveshare BLE400 and jlink just turned up.
Took a little time to get it running but i loaded up the mockmysensors sketch with all the sensors un commented and pow all 30 odd sensors showed up in domoticz which made me chuckle.
Anyway post your sketch for the consumption testing and i will put it in and see if it works on my board.
The only problem is i can not unplug it from the Ble400 because i have no way of connecting wires to the core board because of the smaller pitch pins.@rmtucker said in nRF5 Bluetooth action!:
The only problem is i can not unplug it from the Ble400 because i have no way of connecting wires to the core board because of the smaller pitch pins.
For the current measurement, just program it with the above sketch on your Waveshare, then unplug your module from the BLE400 board and power it using a GND dupont wire and a Vcc dupont wire connected through your uCurrent Gold, or whatever it is that you're using to measure current. I should think that would work, wouldn't it?

Or do you only have the main board without the smaller plug-in module?
It actually looks like a nice setup.
-
@rmtucker said in nRF5 Bluetooth action!:
The only problem is i can not unplug it from the Ble400 because i have no way of connecting wires to the core board because of the smaller pitch pins.
For the current measurement, just program it with the above sketch on your Waveshare, then unplug your module from the BLE400 board and power it using a GND dupont wire and a Vcc dupont wire connected through your uCurrent Gold, or whatever it is that you're using to measure current. I should think that would work, wouldn't it?
Or do you only have the main board without the smaller plug-in module?
It actually looks like a nice setup.
When you unplug the little board it only has 1.27mm spaced pins and they are not standard dupont size so shy soldering to them which would mean i could not plug it back in to the BLE.
Anyway i am only using a crappy multimeter and with it plugged in and running your sketch i am getting 140uA but i will find a way of unplugging it so hang fire. -
@rmtucker you could try to just solder 2 tiny wires on top of the board for vcc and gnd pins so you don't mess with the connectors for plugin it back on the main board ?
-
@rmtucker said in nRF5 Bluetooth action!:
The only problem is i can not unplug it from the Ble400 because i have no way of connecting wires to the core board because of the smaller pitch pins.
For the current measurement, just program it with the above sketch on your Waveshare, then unplug your module from the BLE400 board and power it using a GND dupont wire and a Vcc dupont wire connected through your uCurrent Gold, or whatever it is that you're using to measure current. I should think that would work, wouldn't it?
Or do you only have the main board without the smaller plug-in module?
It actually looks like a nice setup.
-
I'll try removing the 32.768Khz crystal from an infor-link module and then re-run the sketch that relies on an external interrupt to wake from sleep. Maybe that will get us closer to the theoretical minimum current of just the nRF52832 chip by itself.
-
@rmtucker said in nRF5 Bluetooth action!:
The only problem is i can not unplug it from the Ble400 because i have no way of connecting wires to the core board because of the smaller pitch pins.
For the current measurement, just program it with the above sketch on your Waveshare, then unplug your module from the BLE400 board and power it using a GND dupont wire and a Vcc dupont wire connected through your uCurrent Gold, or whatever it is that you're using to measure current. I should think that would work, wouldn't it?
Or do you only have the main board without the smaller plug-in module?
It actually looks like a nice setup.
Hello! It looks like you're interested in this conversation, but you don't have an account yet.
Getting fed up of having to scroll through the same posts each visit? When you register for an account, you'll always come back to exactly where you were before, and choose to be notified of new replies (either via email, or push notification). You'll also be able to save bookmarks and upvote posts to show your appreciation to other community members.
With your input, this post could be even better 💗
Register Login