💬 Soil Moisture Sensor
-
if you buy a capacitive sensor like this then it is extremely simple. Here are some sample sketches which work pretty good. Not sure why one should bother with corrosion and similar issues when you can buy a pretty cheap capacitive sensor. Are there any drawbacks I may have missed ? I just installed one in a pot and curious to see how it goes
Here's the code that I use
/*
 * The MySensors Arduino library handles the wireless radio link and protocol
 * between your home built sensors/actuators and HA controller of choice.
 * The sensors forms a self healing radio network with optional repeaters. Each
 * repeater and gateway builds a routing tables in EEPROM which keeps track of the
 * network topology allowing messages to be routed to nodes.
 *
 * Created by Henrik Ekblad <henrik.ekblad@mysensors.org>
 * Copyright (C) 2013-2015 Sensnology AB
 * Full contributor list: https://github.com/mysensors/Arduino/graphs/contributors
 *
 * Documentation: http://www.mysensors.org
 * Support Forum: http://forum.mysensors.org
 *
 * This program is free software; you can redistribute it and/or
 * modify it under the terms of the GNU General Public License
 * version 2 as published by the Free Software Foundation.
 *
 *******************************
 *
 * DESCRIPTION
 *
 * Arduino soil moisture based on gypsum sensor/resistive sensor to avoid electric catalyse in soil
 *  Required to interface the sensor: 2 * 4.7kOhm + 2 * 1N4148
 *
 * Gypsum sensor and calibration:
 *    DIY: See http://vanderleevineyard.com/1/category/vinduino/1.html
 *    Built: Davis / Watermark 200SS
 *        http://www.cooking-hacks.com/watermark-soil-moisture-sensor?_bksrc=item2item&_bkloc=product
 *        http://www.irrometer.com/pdf/supportmaterial/sensors/voltage-WM-chart.pdf
 *        cb (centibar) http://www.irrometer.com/basics.html
 *            0-10 Saturated Soil. Occurs for a day or two after irrigation
 *            10-20 Soil is adequately wet (except coarse sands which are drying out at this range)
 *            30-60 Usual range to irrigate or water (except heavy clay soils).
 *            60-100 Usual range to irrigate heavy clay soils
 *            100-200 Soil is becoming dangerously dry for maximum production. Proceed with caution.
 *
 * Connection:
 * D6, D7: alternative powering to avoid sensor degradation
 * A0, A1: alternative resistance measuring
 *
 *  Based on:
 *  "Vinduino" portable soil moisture sensor code V3.00
 *   Date December 31, 2012
 *   Reinier van der Lee and Theodore Kaskalis
 *   www.vanderleevineyard.com
 * Contributor: epierre
 */

// Copyright (C) 2015, Reinier van der Lee
// www.vanderleevineyard.com

// This program is free software: you can redistribute it and/or modify
// it under the terms of the GNU General Public License as published by
// the Free Software Foundation, either version 3 of the License, or
// any later version.

// This program is distributed in the hope that it will be useful,
// but WITHOUT ANY WARRANTY; without even the implied warranty of
// MERCHANTABILITY or FITNESS FOR A PARTICULAR PURPOSE.  See the
// GNU General Public License for more details.

#define MY_NODE_ID 6

// Enable debug prints to serial monitor
#define MY_DEBUG

// Enable and select radio type attached
//#define MY_RADIO_NRF24
//#define MY_RADIO_NRF5_ESB
#define MY_RADIO_RFM69
//#define MY_RADIO_RFM95
#define MY_RFM69_NEW_DRIVER


#include <math.h>       // Conversion equation from resistance to %
#include <MySensors.h>


#define CHILD_ID 0

MyMessage msg(CHILD_ID, V_LEVEL);
static const uint64_t UPDATE_INTERVAL = 43200000;

void setup()
{
 Serial.begin(115200); // open serial port, set the baud rate as 115200 bps
}

void presentation()
{
    sendSketchInfo("Soil Moisture Sensor", "1.0");
    present(CHILD_ID, S_MOISTURE);
}

void loop()
{
    int moisture;
    moisture = analogRead(0);
    //Serial.println(moisture); //print the value to serial port
    send(msg.set(moisture));
    sleep(UPDATE_INTERVAL);
}
Regards,
@cgeo the reasons I'm using the resistive sensor are:
- the cost for the resistive sensor is less than 10% of the cost of the capacitive sensor you linked
- after 3 years of use I don't experience corrosion issues except for the part that is above the dirt, which the capacitive sensor will have problems with as well
-
I mean, in sketch: A0, A1: alternative resistance measuring. In MySensors usually, A0 input battery level.
-
How to use:
Required to interface the sensor: 2 * 4.7kOhm + 2 * 1N4148 (DESCRIPTION in skech)
And: D6, D7: alternative powering to avoid sensor degradation- A0, A1: alternative resistance measuring
-
@mfalkvidd
I think they can actually. -
@hek not according to this https://github.com/arduino/Arduino/issues/6297
-
I use A0, A1
2018-08-12 01:31:11.969 [vent.ItemStateChangedEvent] - MoistHum changed from 11 to 9642018-08-12 01:31:42.386 [vent.ItemStateChangedEvent] - MoistHum changed from 964 to 121
2018-08-12 01:31:42.440 [vent.ItemStateChangedEvent] - MoistBat changed from 42 to 43
2018-08-12 01:32:13.860 [vent.ItemStateChangedEvent] - MoistHum changed from 121 to 299
2018-08-12 01:32:45.300 [vent.ItemStateChangedEvent] - MoistHum changed from 299 to 129
2018-08-12 01:33:16.717 [vent.ItemStateChangedEvent] - MoistHum changed from 129 to -11
2018-08-12 01:33:48.132 [vent.ItemStateChangedEvent] - MoistHum changed from -11 to -101
2018-08-12 01:34:19.528 [vent.ItemStateChangedEvent] - MoistHum changed from -101 to 514
2018-08-12 01:34:50.943 [vent.ItemStateChangedEvent] - MoistHum changed from 514 to 1478
2018-08-12 01:35:22.355 [vent.ItemStateChangedEvent] - MoistHum changed from 1478 to -265
What do I connect wrongly? the results are not true
-
Hi, I'm trying to get my first sensor to work and I followed this guide https://www.mysensors.org/build/moisture
I got my gateway to work and the sensor got discovered in openhab. But I think the values I'm getting are quite odd and I don't think it's working as intended for me.
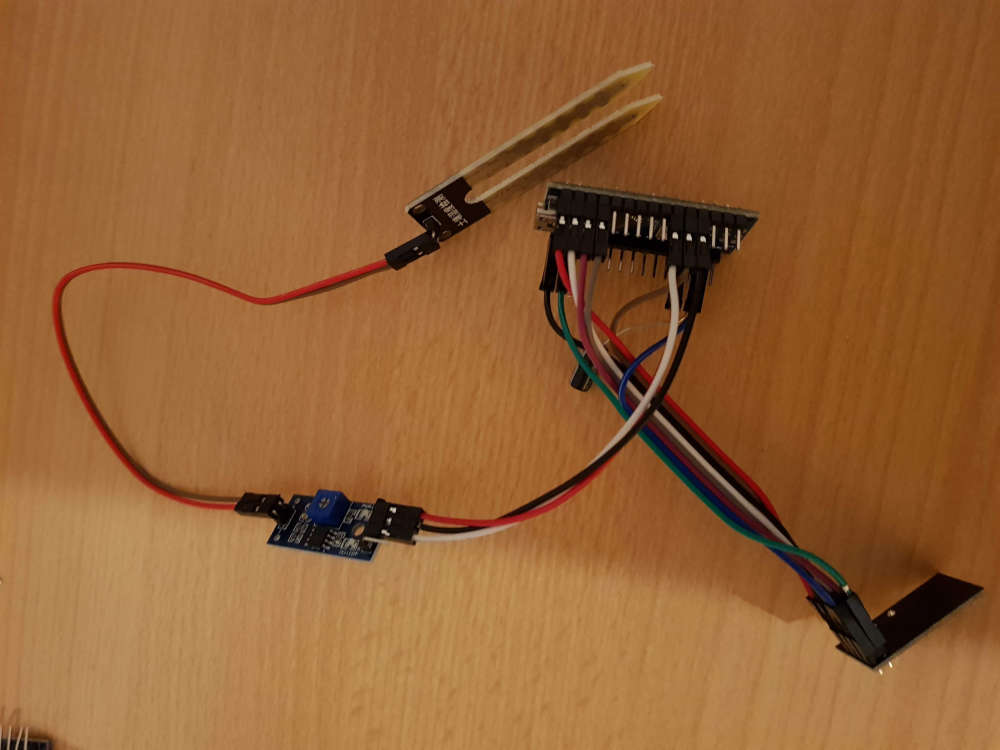
That's my setup, just like on the guide. When I put the sensor it into water, 2 LED start to light up on the small blue board.
I decreased the SLEEP_TIME for testing purpose and here's what I'm getting:
https://pastebin.com/e93P86aY (too many characters to post it directly here)
while this measuring, I put it several times into a cup with water and I dried it. Should negative values even happen? I'm not sure how to work with those values.
It feels like, it's just giving me random numbers without actually measuring something.
-
Hi @atzohy
The info in the page is confusing. The small board between the sensor and the arduino is an on-off level switcher. It provides a digital binary singnal so can't be connected to an analog pin on the arduino.
If you wish to measure the moisture level with an analogic scale, you need to eliminate that board and then use a voltage divider and an analog pin. The sketch will be also different. Everything in explained above in the thread.
You may want to read the full thread and then don't hesitate to come back with your questions.
-
Hi,
I have this message :
16 MCO:BGN:INIT NODE,CP=RNNNA---,FQ=16,REL=255,VER=2.3.2
26 TSM:INIT
28 TSF:WUR:MS=0
34 !TSM:INIT:TSP FAIL
36 TSM:FAIL:CNT=1
37 TSM:FAIL:DIS
39 TSF:TDI:TSL
10041 TSM:FAIL:RE-INIT
10043 TSM:INIT
10049 !TSM:INIT:TSP FAIL
10051 TSM:FAIL:CNT=2
10053 TSM:FAIL:DIS
10055 TSF:TDI:TSLWhat is the problem please ?
I'm noob.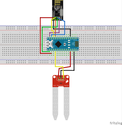
Thank you
-
Hi,
I have this message :
16 MCO:BGN:INIT NODE,CP=RNNNA---,FQ=16,REL=255,VER=2.3.2
26 TSM:INIT
28 TSF:WUR:MS=0
34 !TSM:INIT:TSP FAIL
36 TSM:FAIL:CNT=1
37 TSM:FAIL:DIS
39 TSF:TDI:TSL
10041 TSM:FAIL:RE-INIT
10043 TSM:INIT
10049 !TSM:INIT:TSP FAIL
10051 TSM:FAIL:CNT=2
10053 TSM:FAIL:DIS
10055 TSF:TDI:TSLWhat is the problem please ?
I'm noob.Thank you
@Diazovitch69 You can use the log parser : https://www.mysensors.org/build/parser
16 MCO:BGN:INIT NODE,CP=RNNNA---,FQ=16,REL=255,VER=2.3.2	Core initialization of NODE, with capabilities RNNNA---, CPU frequency 16 MHz, library version 2.3.2, release 255
26 TSM:INIT	Transition to Init state
28 TSF:WUR:MS=0	Wait until transport ready, timeout 0
34 !TSM:INIT:TSP FAIL	Transport device initialization failed
36 TSM:FAIL:CNT=1	Transition to Failure state, consecutive failure counter is 1
37 TSM:FAIL:DIS	Disable transport
39 TSF:TDI:TSL	Set transport to sleep
10041 TSM:FAIL:RE-INIT	Attempt to re-initialize transport
10043 TSM:INIT	Transition to Init state
10049 !TSM:INIT:TSP FAIL	Transport device initialization failed
10051 TSM:FAIL:CNT=2	Transition to Failure state, consecutive failure counter is 2
10053 TSM:FAIL:DIS	Disable transport
10055 TSF:TDI:TSL	Set transport to sleep
The initialization of the transport is failing. So there is a problem between your arduino? and your radio module.
You should check your wirings!
Hello! It looks like you're interested in this conversation, but you don't have an account yet.
Getting fed up of having to scroll through the same posts each visit? When you register for an account, you'll always come back to exactly where you were before, and choose to be notified of new replies (either via email, or push notification). You'll also be able to save bookmarks and upvote posts to show your appreciation to other community members.
With your input, this post could be even better 💗
Register Login