Office plant monitoring


  • Mod

    I do just like I did before I had the sensors: stick a finger into the pot to feel if it needs water. If it does, I set the warning level to whatever level the sensor reports (or slightly higher).


  • Admin

    Great idea @carlierd!

    One that has everything mounted and you just stick into the plant soil would be really useful.


  • Hardware Contributor

    yep, I think that would be a nice module!

    @mfalkvidd @hek I hope to not OT 😳 I just want to show you few old school pics, a small jump back of 20years! My dad's stuff, a real maker 😉

    This one was, I guess, the smallest soil moisture, in "virtual bulb", meaning there was no external electrodes, so no corrosion :
    0_1461316115256_2016-04-22_10-58-38.png
    2nd: still in virtual bulb, humidity, salinity, roots temperature, temperature compensated, pH tendancy
    0_1461316160275_2016-04-22_10-59-39.png
    Multi level soil moisture:
    0_1461316305917_2016-04-22_11-02-44.png
    And these old Aurel 433mhz emitter/receiver !
    0_1462008084352_IMAG0394.jpg
    I have lot of others old pics like this lol! He was selling his devices.

    Few months ago, I have started to mix some of his old project with our new techno, but not finished! I would like to have sort of flo** pow** but more professional..still open. what!!


  • @scalz : very interesting ! Will you plan to make one ? I am pretty sure that your design could be very very very small 😉


  • Hardware Contributor

    @carlierd yes this is planned, but don't know yet when ..I have already started something few months ago, but I need to think about few points mostly about the overall assembly, and to be sure of the power supply/battery I prefer..I will tell you when I will have something nice 🙂


  • Hello,

    I finally spent some hours on Eagles.

    See the result in this post !

    Do not hesitate to give me advice.

    David.


  • Mod

    Another update on battery life:
    The sensor in my bonsai tree has been reporting every 11,5 minutes since 2015-11-07, so over the last ~seven months it has done 48,965 measurements. It sends data over the radio every time, regardless if the value has changed. The battery level has gone from 3.187V to 3.134V, which means a drop of 0.0076V per month. Assuming I let it go down to 2.34V (limit for 8MHz according to the datasheet) and that the voltage drop is linear, I should get (3.187-2.34)/0.0076 = 111 months = ~9 years. There are several error sources in this calculation, but it looks like battery life will be quite good, even though the sensor reports much more often than necessary.
    0_1466870465803_Batteri plantmoisture.png


  • Hardware Contributor

    @mfalkvidd That sounds great! Are you using a pro mini too?
    I am using a 3V pro mini with power led and regulator removed and the nrf + sensor (on A0 and A1) connected and in about 1 day it dropped from 2945mV to 2907mV. Its running of of 2aa batteries and its on a breadboard for now (for testing).
    I am using your (slightly modified) code from above. Any idea why my power usage is so much higher?

    Here is my code:

    /*
    Based on https://github.com/mfalkvidd/arduino-plantmoisture
    
    This sketch uses the soilmoisture "forks" only that are found on ebay. They are connected between 2 analog pins where one gets pulled low and the other one measures.
    The pins are switched every time to avoid corrosion. Between readings the sensos sleeps to preserve batterylife.
    
    21.06.2016 V1.0 Base sketch
    */
    
    #include <SPI.h>
    #include <MySensor.h>
    
    #define round(x) ((x)>=0?(long)((x)+0.5):(long)((x)-0.5))
    
    #define CHILD_ID_MOISTURE 0
    #define CHILD_ID_BATTERY 1
    #define SLEEP_TIME 1800000 // Sleep time between reads (in milliseconds) - 30 minutes
    #define THRESHOLD 1.1 // Only make a new reading with reverse polarity if the change is larger than 10%.
    #define STABILIZATION_TIME 1000 // Let the sensor stabilize before reading
    #define BATTERY_FULL 3143 // 2xAA usually give 3.143V when full
    #define BATTERY_ZERO 1900 // 2.34V limit for 328p at 8MHz. 1.9V, limit for nrf24l01 without step-up. 2.8V limit for Atmega328 with default BOD settings.
    const int SENSOR_ANALOG_PINS[] = {A0, A1}; // Sensor is connected to these two pins. Avoid A3 if using ATSHA204. A6 and A7 cannot be used because they don't have pullups.
    
    MySensor gw;
    MyMessage msg(CHILD_ID_MOISTURE, V_HUM);
    MyMessage voltage_msg(CHILD_ID_BATTERY, V_VOLTAGE);
    long oldvoltage = 0;
    byte direction = 0;
    int oldMoistureLevel = -1;
    
    void setup()
    {
      gw.begin();
    
      gw.sendSketchInfo("Plant moisture w bat", "1.0 21062016");
    
      gw.present(CHILD_ID_MOISTURE, S_HUM);
      delay(250);
      gw.present(CHILD_ID_BATTERY, S_CUSTOM);
    
      Serial.println("Setting up pins...");  
      // init sensor pins
      pinMode(SENSOR_ANALOG_PINS[0], OUTPUT);
      pinMode(SENSOR_ANALOG_PINS[1], OUTPUT);
      digitalWrite(SENSOR_ANALOG_PINS[0], LOW);
      digitalWrite(SENSOR_ANALOG_PINS[1], LOW);
    }
    
    void loop()
    {
      int moistureLevel = readMoisture();
    
      // Send rolling average of 2 samples to get rid of the "ripple" produced by different resistance in the internal pull-up resistors
      // See http://forum.mysensors.org/topic/2147/office-plant-monitoring/55 for more information
      if (oldMoistureLevel == -1) { // First reading, save current value as old
        oldMoistureLevel = moistureLevel;
      }
      if (moistureLevel > (oldMoistureLevel * THRESHOLD) || moistureLevel < (oldMoistureLevel / THRESHOLD)) {
        // The change was large, so it was probably not caused by the difference in internal pull-ups.
        // Measure again, this time with reversed polarity.
        moistureLevel = readMoisture();
      }
    
      // send value and reset level
      gw.send(msg.set((moistureLevel + oldMoistureLevel) / 2.0 / 10.23, 1));
      oldMoistureLevel = moistureLevel;
    
    
      long voltage = readVcc();
    
      if (oldvoltage != voltage) { // Only send battery information if voltage has changed, to conserve battery.
        gw.send(voltage_msg.set(voltage / 1000.0, 3)); // redVcc returns millivolts. Set wants volts and how many decimals (3 in our case)
        gw.sendBatteryLevel(round((voltage - BATTERY_ZERO) * 100.0 / (BATTERY_FULL - BATTERY_ZERO)));
        oldvoltage = voltage;
      }
    
      // sleep to conserve energy
      gw.sleep(SLEEP_TIME);
    }
    
    /*
      Reads the current moisture level from the sensor.
      Alternates the polarity to reduce corrosion
    */
    int readMoisture() {
      pinMode(SENSOR_ANALOG_PINS[direction], INPUT_PULLUP); // Power on the sensor by activating the internal pullup
      analogRead(SENSOR_ANALOG_PINS[direction]);// Read once to let the ADC capacitor start charging
      gw.sleep(STABILIZATION_TIME);
    
      int sensorRead = analogRead(SENSOR_ANALOG_PINS[direction]);
      int moistureLevel = (1023 - sensorRead); // take the actual reading
    
      Serial.print("Sensor read: ");
      Serial.println(sensorRead);
      Serial.print("Moisture level: ");  
      Serial.println(moistureLevel);  
    
      // Turn off the sensor to conserve battery and minimize corrosion
      pinMode(SENSOR_ANALOG_PINS[direction], OUTPUT);
      digitalWrite(SENSOR_ANALOG_PINS[direction], LOW);
    
      direction = (direction + 1) % 2; // Make direction alternate between 0 and 1 to reverse polarity which reduces corrosion
      return moistureLevel;
    }
    
    long readVcc() {
      // From http://provideyourown.com/2012/secret-arduino-voltmeter-measure-battery-voltage/
      // Read 1.1V reference against AVcc
      // set the reference to Vcc and the measurement to the internal 1.1V reference
    #if defined(__AVR_ATmega32U4__) || defined(__AVR_ATmega1280__) || defined(__AVR_ATmega2560__)
      ADMUX = _BV(REFS0) | _BV(MUX4) | _BV(MUX3) | _BV(MUX2) | _BV(MUX1);
    #elif defined (__AVR_ATtiny24__) || defined(__AVR_ATtiny44__) || defined(__AVR_ATtiny84__)
      ADMUX = _BV(MUX5) | _BV(MUX0);
    #elif defined (__AVR_ATtiny25__) || defined(__AVR_ATtiny45__) || defined(__AVR_ATtiny85__)
      ADMUX = _BV(MUX3) | _BV(MUX2);
    #else
      ADMUX = _BV(REFS0) | _BV(MUX3) | _BV(MUX2) | _BV(MUX1);
    #endif
    
      delay(2); // Wait for Vref to settle
      ADCSRA |= _BV(ADSC); // Start conversion
      while (bit_is_set(ADCSRA, ADSC)); // measuring
    
      uint8_t low  = ADCL; // must read ADCL first - it then locks ADCH
      uint8_t high = ADCH; // unlocks both
    
      long result = (high << 8) | low;
    
      result = 1125300L / result; // Calculate Vcc (in mV); 1125300 = 1.1*1023*1000
      return result; // Vcc in millivolts
    }
    

  • Mod

    @LastSamurai that drop is just two bits difference so you can't really tell anything from it. There are lots of reasons that could cause it, for example measurement noise, temperature variation in the batteries, temperature variation in the internal reference, temporary drain of the battery.


  • Hardware Contributor

    Thanks I will keep testing for some days and then report again.


  • Plugin Developer

    To get rid of the ripple effect, maybe use the rolling average of the last two measurements for the voltage measurements also?


  • Mod

    @martinhjelmare which ripple effect are you referring to?


  • Plugin Developer

    @mfalkvidd

    Looking at your chart and also my own battery reporting charts, they contain small and tight ups and downs, "ripples". I was thinking about smoothing them out to have a nicer chart. But I also think this could make the measurement more accurate, which could help in @LastSamurai 's case where there's an unexpected dip in voltage. Maybe the next measurement will be higher again? Taking an average will give you more confidence in your measurement.


  • Hardware Contributor

    Mhm so I measured it for 2 days now and I am loosing about about 25mV per day (a little over 50mV overall). Thats really strange as I am using the pro mini without regulator or led. Has anybody seen similar problems?
    Otherwise I guess I have to start measuring, although I don't know how well my multimeter can do this 😞


  • Mod

    @LastSamurai is the drop steady or does it go up and down a lot? Mine goes up and down in the last bit (9mV) quite often, but not as much as 50mV.0_1467058275738_chart.png


  • Hardware Contributor

    @mfalkvidd Its more or less stable.
    0_1467058760247_upload-947392a5-8f6d-47f4-914b-dd6de12e6d09


  • Mod

    @LastSamurai that's a pity. Can you try measuring the current consumed from the battery in different situations (disconnect power to the nrf, disconnect the moisture sensor, disconnect both the nrf and the moisture sensor)?


  • Hardware Contributor

    Thanks! I will (later) and post the results here.


  • @LastSamurai
    I think Delay will really stop the MCU, Wait(xx) will continue to work in background? can anyone confirm this please

    You can try to use Delay(2000) between each step to know if the power is low between the steps, maybe it do something that increase the power consumption.

    Try to disconnect the Sensor, maybe it is damage? When sensor is disconnected it shall report 0%.

    Can you try with another Pro Mini?


  • Admin

    @flopp said:

    Wait(xx) will continue to work in background? can anyone confirm this please

    Yes, wait() continue processing incoming messages and does not sleep the MCU.


  • Hi.

    What is the last version from this ?


  • Oops! Looks like there was a serious issue with your project.

    If you are not sure what could be wrong please contact us.

    (file in sketch) Soil moisture for houseplants - multi-sensor internal pull-up.o: In function global constructors keyed to oldvoltage': Soil moisture for houseplants - multi-sensor internal pull-up.cpp:(.text._GLOBAL__I_oldvoltage+0xc): undefined reference to MySensor::MySensor(unsigned char, unsigned char)'
    (file in sketch) Soil moisture for houseplants - multi-sensor internal pull-up.o: In function setup': Soil moisture for houseplants - multi-sensor internal pull-up.cpp:(.text.setup+0x30): undefined reference to MySensor::begin(void (*)(MyMessage const&), unsigned char, unsigned char, unsigned char, rf24_pa_dbm_e, unsigned char, rf24_datarate_e)'
    Soil moisture for houseplants - multi-sensor internal pull-up.cpp:(.text.setup+0x50): undefined reference to MySensor::present(unsigned char, unsigned char, bool)' Soil moisture for houseplants - multi-sensor internal pull-up.cpp:(.text.setup+0x78): undefined reference to MySensor::present(unsigned char, unsigned char, bool)'

    This errors.

    @mfalkvidd said:

    How did thinks go @Lars65 ?

    I thought a bit more about this problem and I think I have come up with a pretty neat solution:
    Throw away the chip on the moisture sensor and connect the "pitchfork" directly to the Arduino. Connect one prong to GND and one prong to an analog pin. No power pins are required.
    https://codebender.cc/sketch:177182
    The chip on the moisture sensor is basically a voltage divider. We get the same thing if we use the internal pull-up resistor on the Atmega processor.
    EDIT: This means you can buy just the "pitchforks" really cheap: http://www.aliexpress.com/item/10pcs-Soil-Hygrometer-Detection-Module-Soil-Moisture-Sensor-Probes/2051713873.html


  • @Fat-Fly
    I have used the latest version of this sketch and it worked perfect.
    If you use the latest version it must be something with your PC/Arduino IDE


  • I trying compile from this and these errors.


  • Mod

    @Fat-Fly as flopp said, there is something wrong with your environment.

    Are you using the development version of MySensors? If so, remove it and install 1.5 or convert the sketch to the development version by following the conversion guide.

    If you already have 1.5, remove it and re-install it closely following the instructions. You can try verifying any of the stock MySensors example sketches if you like.


  • Good morning. I try after work. I use linux. I want monitor this https://goo.gl/photos/oqnXUU8Pa5wmz8k87 . Moisture and if needed open valves and switch on pump.At the moment i have 3 goups what i can control.Left , right tomatoes and 3 raised beds in center, sweet peppers.


  • Mod

    @Fat-Fly very nice greenhouse!


  • Greenhouse

    I want to monitor soil moisture and switch on irrigation valves and pump. Windows open arduino but why not mysensors+domoticz. I can't and not want every morning go to open greenhouse windows. let this make computer 🙂

    Kastmistest nr. 007. Paprikad. – 02:04
    — Ants Kosmos


  • This post is deleted!

  • Mod

    @Fat-Fly replace

    const int SENSOR_ANALOG_PINS[] = { 0 };
    

    with

    const int SENSOR_ANALOG_PINS[] = { A0 };
    

    Connect like this, except use D8 instead of A1 (the connection displayed is for a newer version of the sketch, which supports alternating polarity)


  • Hardware Contributor

    @mfalkvidd So after running my sensor for 3 days with the "fork" connected I had a pretty big loss of voltage. So (as you suggested) I ran it for ~2 days without the fork connected (just the pro mini + radio) and the loss has gone down to ~0 (it keeps alternating between 2806 and 2799mV).
    So its obviously the fork itself that is the problem. I connected it directly to A0 and A1 and my code is above.
    Any idea where the error might be? I will try some other cables later because thats the only idea I have...

    @LastSamurai said:

    @mfalkvidd That sounds great! Are you using a pro mini too?
    I am using a 3V pro mini with power led and regulator removed and the nrf + sensor (on A0 and A1) connected and in about 1 day it dropped from 2945mV to 2907mV. Its running of of 2aa batteries and its on a breadboard for now (for testing).
    I am using your (slightly modified) code from above. Any idea why my power usage is so much higher?

    Here is my code:

    /*
    Based on https://github.com/mfalkvidd/arduino-plantmoisture
    
    This sketch uses the soilmoisture "forks" only that are found on ebay. They are connected between 2 analog pins where one gets pulled low and the other one measures.
    The pins are switched every time to avoid corrosion. Between readings the sensos sleeps to preserve batterylife.
    
    21.06.2016 V1.0 Base sketch
    */
    
    #include <SPI.h>
    #include <MySensor.h>
    
    #define round(x) ((x)>=0?(long)((x)+0.5):(long)((x)-0.5))
    
    #define CHILD_ID_MOISTURE 0
    #define CHILD_ID_BATTERY 1
    #define SLEEP_TIME 1800000 // Sleep time between reads (in milliseconds) - 30 minutes
    #define THRESHOLD 1.1 // Only make a new reading with reverse polarity if the change is larger than 10%.
    #define STABILIZATION_TIME 1000 // Let the sensor stabilize before reading
    #define BATTERY_FULL 3143 // 2xAA usually give 3.143V when full
    #define BATTERY_ZERO 1900 // 2.34V limit for 328p at 8MHz. 1.9V, limit for nrf24l01 without step-up. 2.8V limit for Atmega328 with default BOD settings.
    const int SENSOR_ANALOG_PINS[] = {A0, A1}; // Sensor is connected to these two pins. Avoid A3 if using ATSHA204. A6 and A7 cannot be used because they don't have pullups.
    
    MySensor gw;
    MyMessage msg(CHILD_ID_MOISTURE, V_HUM);
    MyMessage voltage_msg(CHILD_ID_BATTERY, V_VOLTAGE);
    long oldvoltage = 0;
    byte direction = 0;
    int oldMoistureLevel = -1;
    
    void setup()
    {
      gw.begin();
    
      gw.sendSketchInfo("Plant moisture w bat", "1.0 21062016");
    
      gw.present(CHILD_ID_MOISTURE, S_HUM);
      delay(250);
      gw.present(CHILD_ID_BATTERY, S_CUSTOM);
    
      Serial.println("Setting up pins...");  
      // init sensor pins
      pinMode(SENSOR_ANALOG_PINS[0], OUTPUT);
      pinMode(SENSOR_ANALOG_PINS[1], OUTPUT);
      digitalWrite(SENSOR_ANALOG_PINS[0], LOW);
      digitalWrite(SENSOR_ANALOG_PINS[1], LOW);
    }
    
    void loop()
    {
      int moistureLevel = readMoisture();
    
      // Send rolling average of 2 samples to get rid of the "ripple" produced by different resistance in the internal pull-up resistors
      // See http://forum.mysensors.org/topic/2147/office-plant-monitoring/55 for more information
      if (oldMoistureLevel == -1) { // First reading, save current value as old
        oldMoistureLevel = moistureLevel;
      }
      if (moistureLevel > (oldMoistureLevel * THRESHOLD) || moistureLevel < (oldMoistureLevel / THRESHOLD)) {
        // The change was large, so it was probably not caused by the difference in internal pull-ups.
        // Measure again, this time with reversed polarity.
        moistureLevel = readMoisture();
      }
    
      // send value and reset level
      gw.send(msg.set((moistureLevel + oldMoistureLevel) / 2.0 / 10.23, 1));
      oldMoistureLevel = moistureLevel;
    
    
      long voltage = readVcc();
    
      if (oldvoltage != voltage) { // Only send battery information if voltage has changed, to conserve battery.
        gw.send(voltage_msg.set(voltage / 1000.0, 3)); // redVcc returns millivolts. Set wants volts and how many decimals (3 in our case)
        gw.sendBatteryLevel(round((voltage - BATTERY_ZERO) * 100.0 / (BATTERY_FULL - BATTERY_ZERO)));
        oldvoltage = voltage;
      }
    
      // sleep to conserve energy
      gw.sleep(SLEEP_TIME);
    }
    
    /*
      Reads the current moisture level from the sensor.
      Alternates the polarity to reduce corrosion
    */
    int readMoisture() {
      pinMode(SENSOR_ANALOG_PINS[direction], INPUT_PULLUP); // Power on the sensor by activating the internal pullup
      analogRead(SENSOR_ANALOG_PINS[direction]);// Read once to let the ADC capacitor start charging
      gw.sleep(STABILIZATION_TIME);
    
      int sensorRead = analogRead(SENSOR_ANALOG_PINS[direction]);
      int moistureLevel = (1023 - sensorRead); // take the actual reading
    
      Serial.print("Sensor read: ");
      Serial.println(sensorRead);
      Serial.print("Moisture level: ");  
      Serial.println(moistureLevel);  
    
      // Turn off the sensor to conserve battery and minimize corrosion
      pinMode(SENSOR_ANALOG_PINS[direction], OUTPUT);
      digitalWrite(SENSOR_ANALOG_PINS[direction], LOW);
    
      direction = (direction + 1) % 2; // Make direction alternate between 0 and 1 to reverse polarity which reduces corrosion
      return moistureLevel;
    }
    
    long readVcc() {
      // From http://provideyourown.com/2012/secret-arduino-voltmeter-measure-battery-voltage/
      // Read 1.1V reference against AVcc
      // set the reference to Vcc and the measurement to the internal 1.1V reference
    #if defined(__AVR_ATmega32U4__) || defined(__AVR_ATmega1280__) || defined(__AVR_ATmega2560__)
      ADMUX = _BV(REFS0) | _BV(MUX4) | _BV(MUX3) | _BV(MUX2) | _BV(MUX1);
    #elif defined (__AVR_ATtiny24__) || defined(__AVR_ATtiny44__) || defined(__AVR_ATtiny84__)
      ADMUX = _BV(MUX5) | _BV(MUX0);
    #elif defined (__AVR_ATtiny25__) || defined(__AVR_ATtiny45__) || defined(__AVR_ATtiny85__)
      ADMUX = _BV(MUX3) | _BV(MUX2);
    #else
      ADMUX = _BV(REFS0) | _BV(MUX3) | _BV(MUX2) | _BV(MUX1);
    #endif
    
      delay(2); // Wait for Vref to settle
      ADCSRA |= _BV(ADSC); // Start conversion
      while (bit_is_set(ADCSRA, ADSC)); // measuring
    
      uint8_t low  = ADCL; // must read ADCL first - it then locks ADCH
      uint8_t high = ADCH; // unlocks both
    
      long result = (high << 8) | low;
    
      result = 1125300L / result; // Calculate Vcc (in mV); 1125300 = 1.1*1023*1000
      return result; // Vcc in millivolts
    }


  • I correct this and try again after work. Yesterday i do not find time.

    @mfalkvidd said:

    @Fat-Fly replace

    const int SENSOR_ANALOG_PINS[] = { 0 };
    

    with

    const int SENSOR_ANALOG_PINS[] = { A0 };
    

    Connect like this, except use D8 instead of A1 (the connection displayed is for a newer version of the sketch, which supports alternating polarity)


  • @mfalkvidd : Maybe change sleeping time to 60 min and STABILIZATION_TIME 1000 to 500 ms or smaller ? This place is pure lost energy. Why not to try without stablization time ?


  • Mod

    @Fat-Fly with the current solution it looks like I will get many years of battery life. Why make the solution worse without any gain?

    Without stabilization time you will get very unreliable results. I suggest you try and see what happens. Compare readings with and without stabilization times.


  • I in home and try this at the moment.


  • I upload sketch from here and pro mini not connect to gateway. GW from this pro mini away maybe 50 cm.


  • end: 0-0-1-0 s=255,c=0,t=17,pt=0,l=5,sg=0,st=fail:1.5.3
    send: 0-0-1-0 s=255,c=3,t=6,pt=1,l=1,sg=0,st=fail:1
    sensor started, id=0, parent=1, distance=2
    send: 0-0-1-0 s=255,c=3,t=11,pt=0,l=21,sg=0,st=fail:Plants moisture w bat
    send: 0-0-1-0 s=255,c=3,t=12,pt=0,l=3,sg=0,st=fail:1.2
    send: 0-0-1-0 s=0,c=0,t=23,pt=0,l=0,sg=0,st=fail:
    find parent


  • sensor started, id=0, parent=1, distance=2

    You have no connection to GW since ID=0.

    Looks you have a Repeater node since distance=2?


  • I deleted all my libaries catalog and unpack mysensors 1.4. Previous was 1.5. Too many options what i do not understand. After work i try again and to let you know from results.


  • 2016-07-04 14:58:10.793 MySensors: Gateway Ready...
    2016-07-04 14:58:10.869 MySensors: Gateway Version: 1.4.2
    This domoticz log

    This from Arduino ide
    sensor started, id 0
    send: 0-0-1-0 s=255,c=0,t=17,pt=0,l=5,st=fail:1.4.2
    send: 0-0-1-0 s=255,c=3,t=6,pt=1,l=1,st=fail:1
    send: 0-0-1-0 s=255,c=3,t=11,pt=0,l=8,st=fail:Humidity
    send: 0-0-1-0 s=255,c=3,t=12,pt=0,l=3,st=fail:1.0
    send: 0-0-1-0 s=0,c=0,t=7,pt=0,l=0,st=fail:
    send: 0-0-1-0 s=1,c=0,t=6,pt=0,l=0,st=fail:
    send: 0-0-1-0 s=1,c=1,t=0,pt=7,l=5,st=fail:80.2
    send: 0-0-255-255 s=255,c=3,t=7,pt=0,l=0,st=fail:
    T: 80.24
    send: 0-0-1-0 s=0,c=1,t=1,pt=7,l=5,st=fail:38.7
    H: 38.70
    send: 0-0-1-0 s=0,c=1,t=1,pt=7,l=5,st=fail:38.5
    H: 38.50
    send: 0-0-1-0 s=0,c=1,t=1,pt=7,l=5,st=fail:37.8
    H: 37.80
    send: 0-0-1-0 s=1,c=1,t=0,pt=7,l=5,st=fail:80.1
    T: 80.06

    This is not moisture sketch. I try with different sketches.

    Maybe need change nrf? I try.2016-07-04 15:42:12.816 MySensors: Gateway Ready...
    2016-07-04 15:42:12.891 MySensors: Gateway Version: 1.5.3


  • Hardware Contributor

    Version 1.5 should work if you do it right. It does for me.
    In your case the sensor can't seem to get any connection to your gateway.
    You should try adding a capacitor to the radio, check your power supply and change the nrf module. These are the reasons for most errors imo (especially the power supply)

    There are extra Threads/Topics to finding an error with your setup here in the forum. I think this doesn't really belong to this thread anymore.


  • Okay. I search


  • Hardware Contributor

    @Fat-Fly said:

    Okay. I search

    This might help.


  • Today morning i can say : working. I bought arduinos 3,3v 10 pcs from Aliexpress. Yesterday i change this to 5V pro mini and this sensor get work. I take picture from this Arduino. Maybe 5volts not 3,3. Voltage stabilizer on the arduino is S201 ?
    0_1467781824908_13607043_10210198205936111_585322452755227500_n.jpg
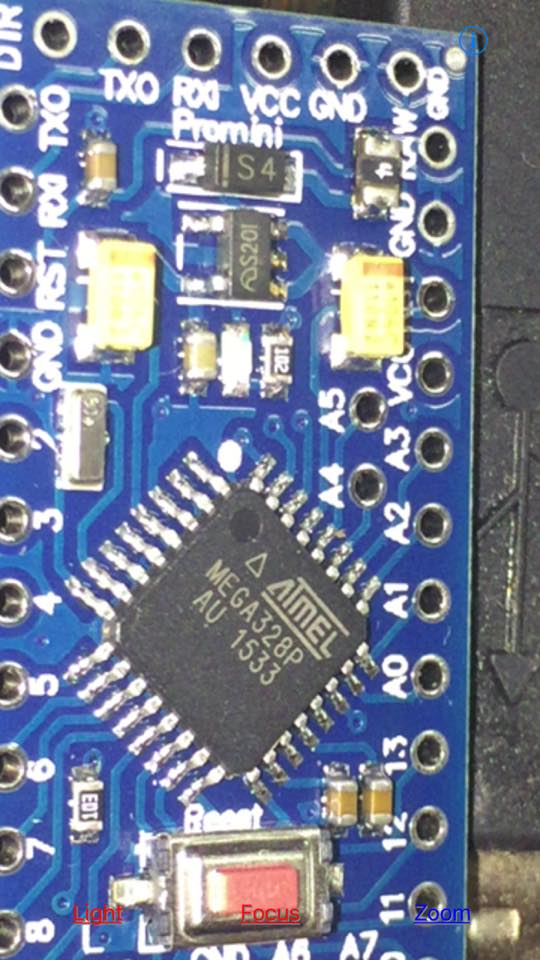
    I'll change this china moisture fork with something stainless steel


  • One question. This sketch measure moisture every 60000 ms, 10 min.It is possible to measure every 30 min ? Battery power lost is minimal.
    If this fork in water domoticz reported 88% of moisture. How to change value?


  • @Fat-Fly Hi there! This is Fay from codebender.cc Thank you for using codebender! I just wanted to let you know that the sketch you are using here has been deleted and so it is not available for users to view it. Let me know if you have any question!
    Cheers!
    Fay


  • @Fay Candiliari good morning.
    I copied this scketch to my comp and delete all mysensors libraries and install development. After this all in ok.


  • Thought I would throw this in the pot
    Why not change the sensor Probe ?? no credit to me , just was googleing as you do,
    Home made sensors I think less prone to corrosion
    here's the link

    http://www.cheapvegetablegardener.com/how-to-make-cheap-soil-moisture-sensor-2/

    Had some seeds from very tasty tomatoes last year ,have planted and this year growing like tiffids !!
    Getting quite big so have move from kitchen to Greenhouse ASP really
    Will try with this type of sensor


  • Mod

    @mutantx nice idea, thanks for sharing!


  • I build moisture sensors from stainless wire. If this in pot at a depth of 1 inch domoticz reported 83% of moistre level.Real plant was dry and needed watering. I put moisture level on the soil

    0_1468159204580_IMG_4526.JPG

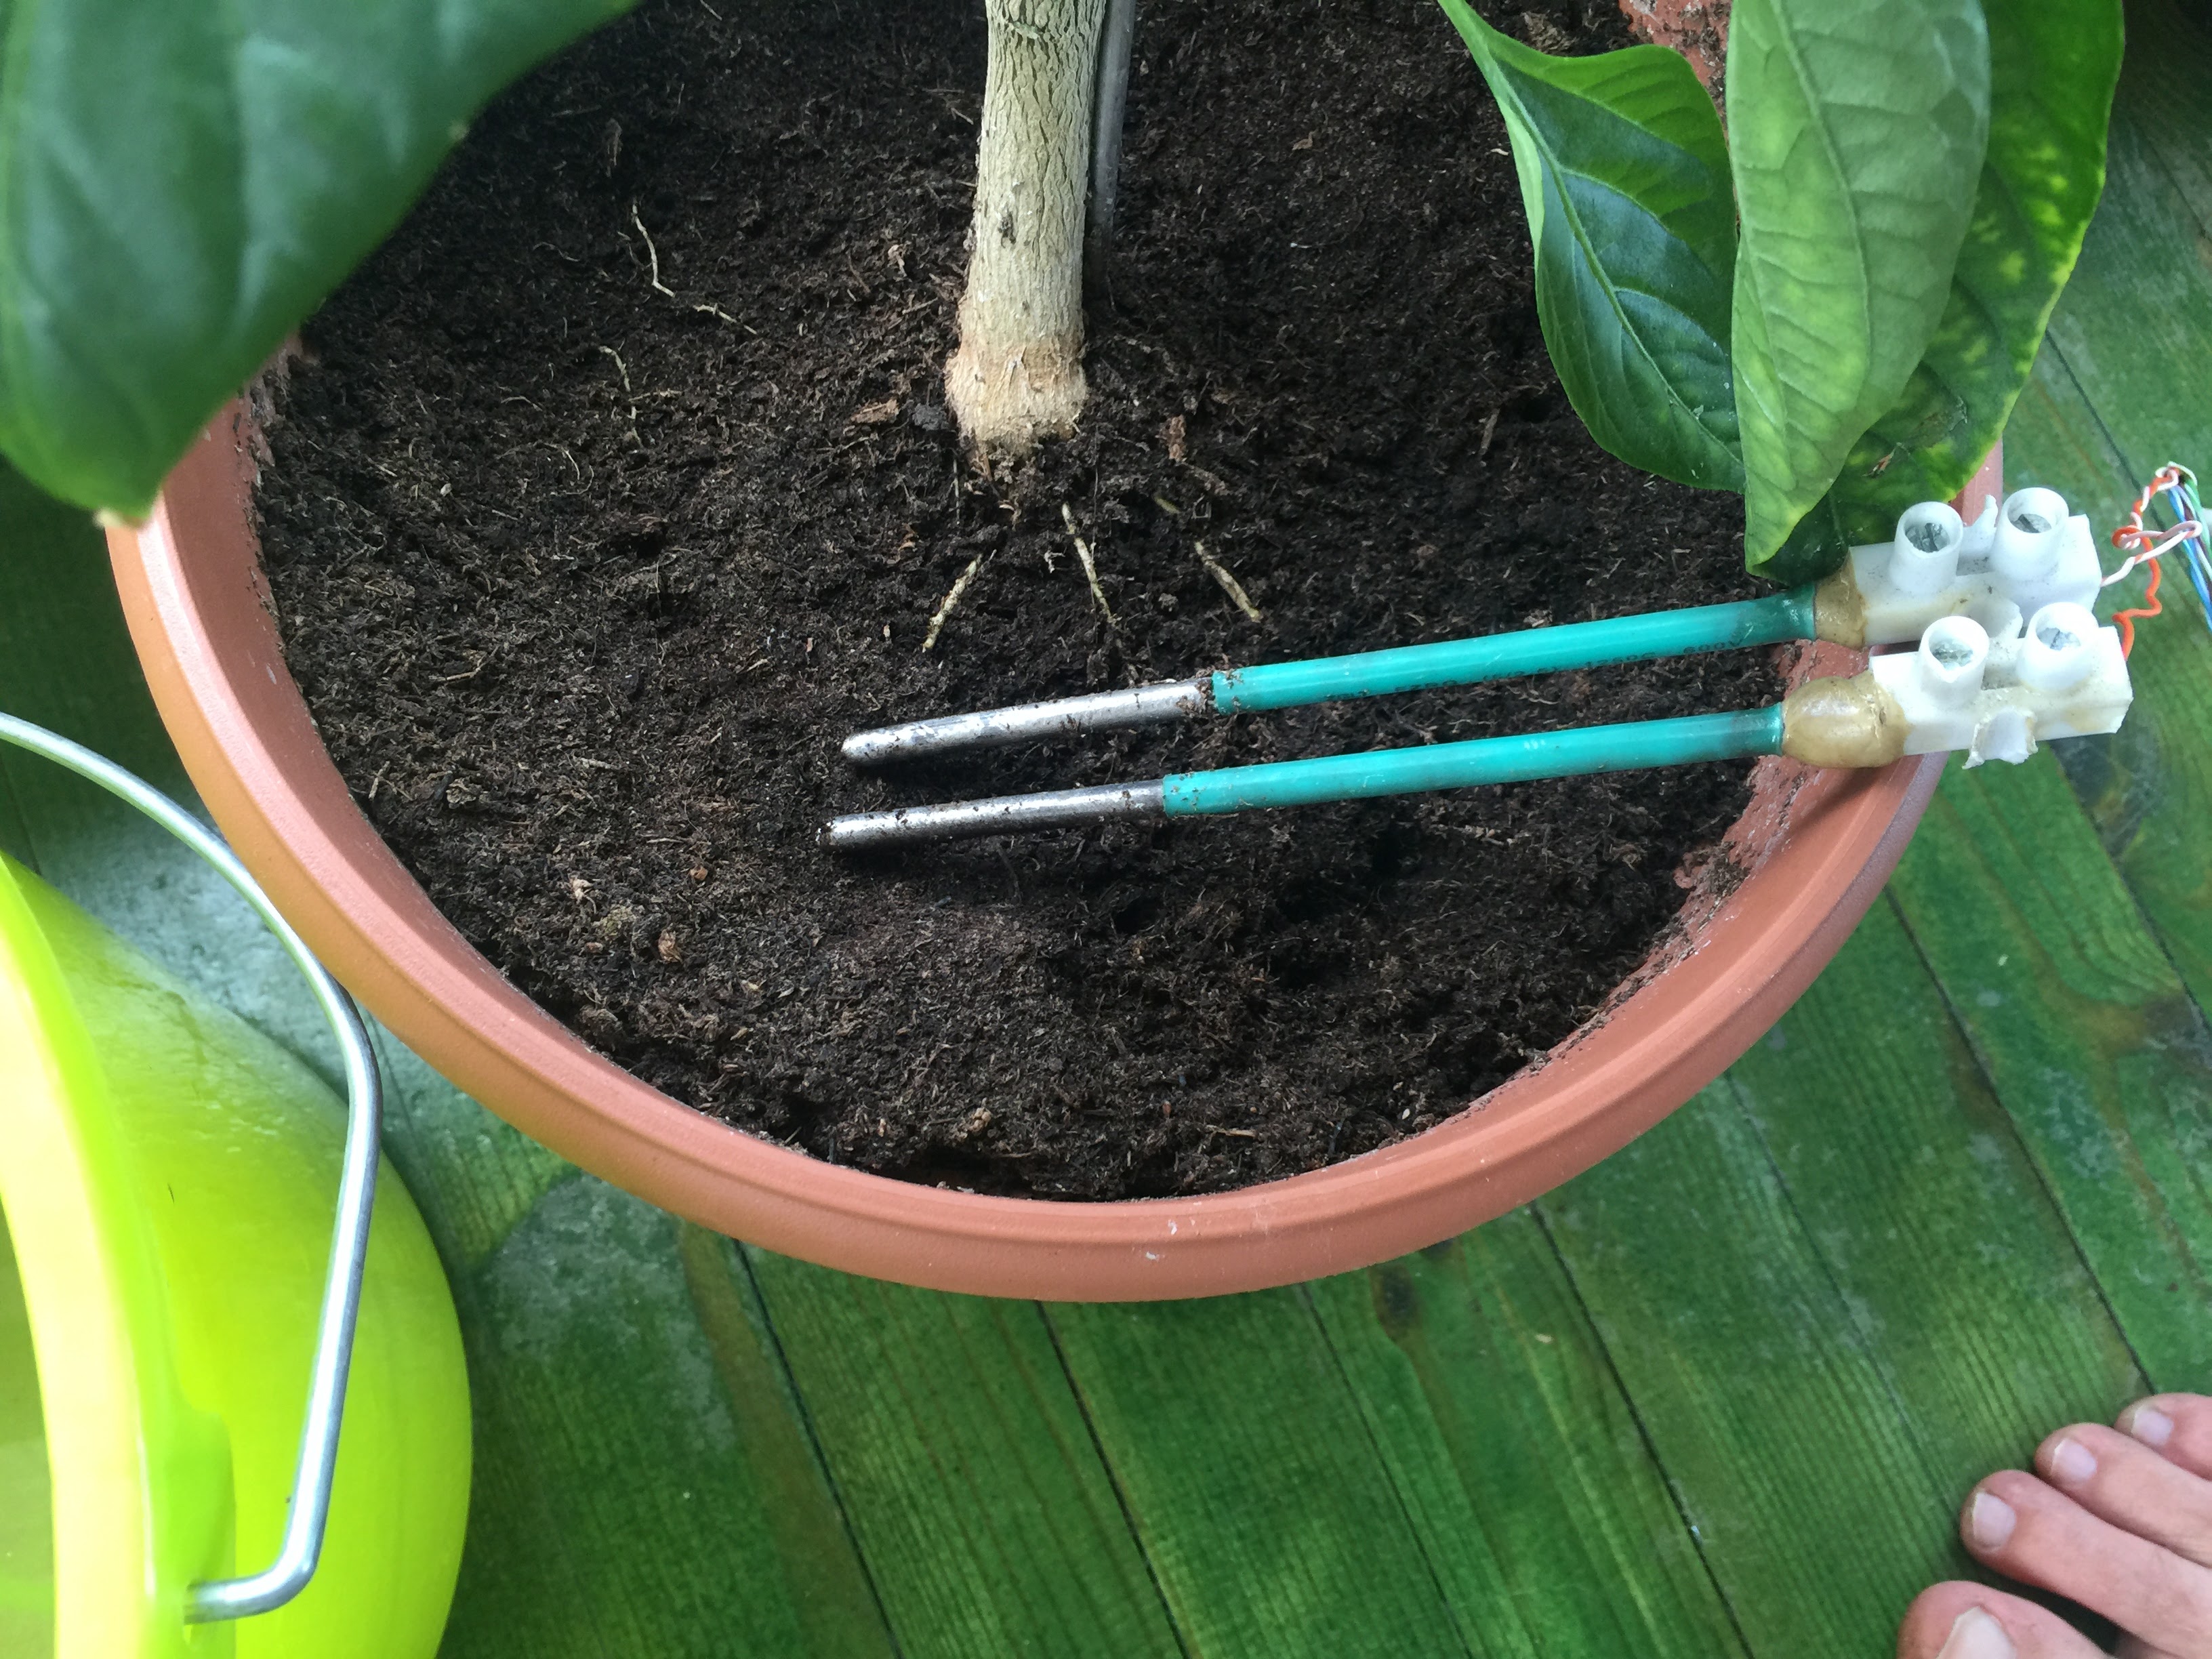
    and sensor reported moisture level 43%. I test and put moisture sensor to the soil at depth 1 inch

    0_1468159222643_IMG_4527.JPG

    Sensor reported moisture level 96%.


  • Hello,

    After several weeks I finally succeed to create a dedicated PCB ! It was started yesterday evening and works fine.

    Some pictures:
    0_1469782265724_Photo 1.jpg
    0_1469782279459_Photo 2.jpg
    0_1469782286758_Photo 3.jpg

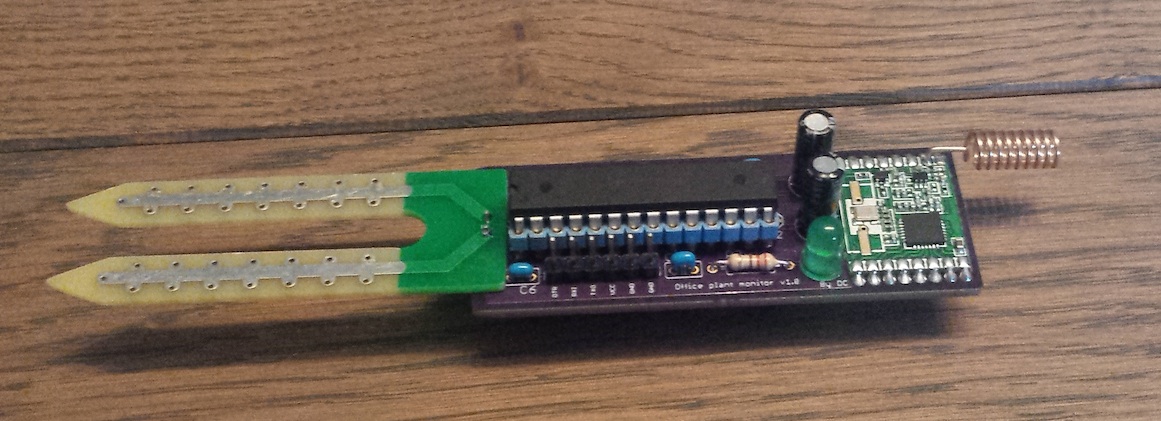
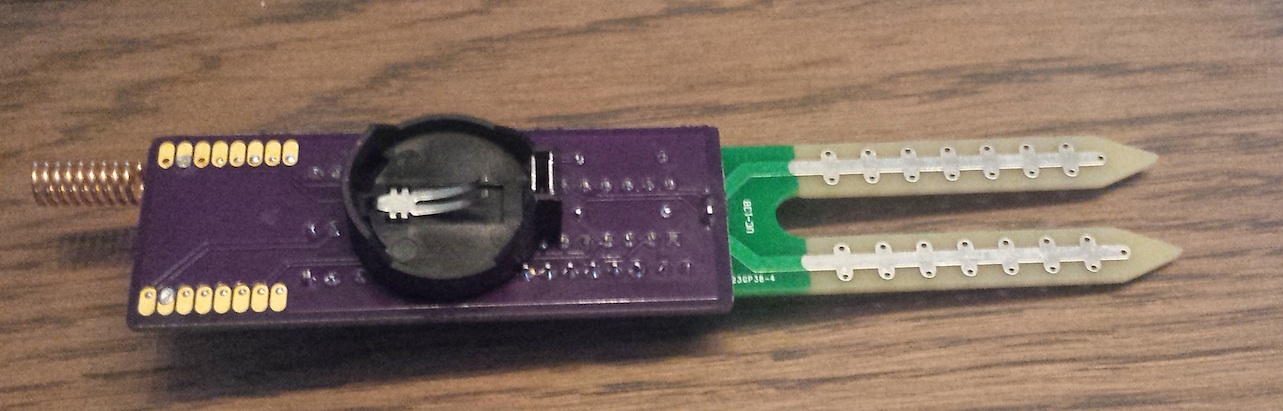
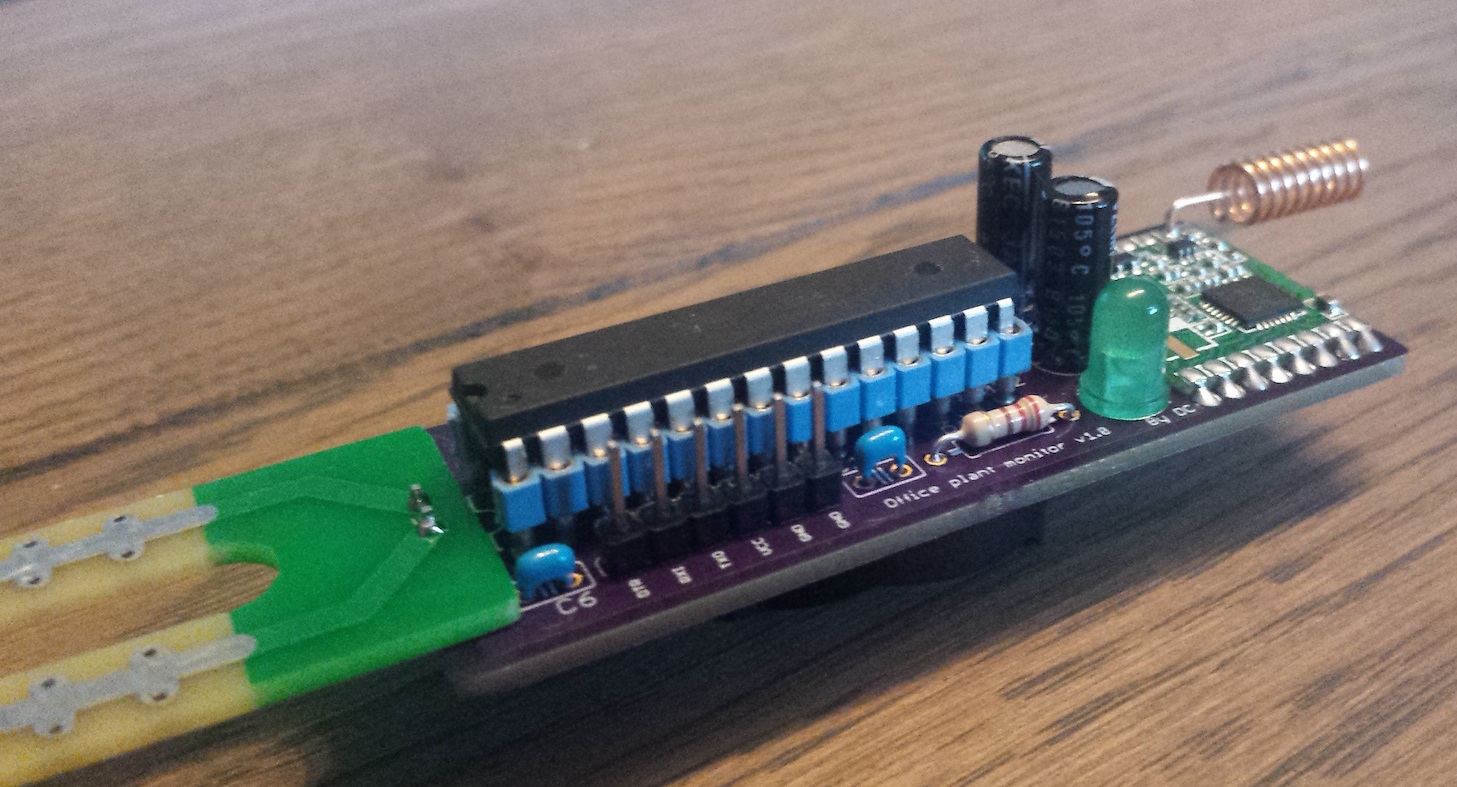
    Measure is reported each two hours. So I expect more than two years on a CR2032 (using @GertSanders firmware).

    I can off course provide any information as PCB.

    Thanks @mfalkvidd for the idea and the code. The project is now WAF 😉

    David.


  • Great. Nothing to say. But i need build this. 10 pcs first time. 🙂 I live in farm or how to right say in english. With rubber boots from the land ?


  • Is it possible to purchase it somewhere? 🙂


  • Why not mastered it self ?


  • Yesterday my sensor reported moisture 80% but soil was very wet. Thoughts.


  • Mod

    @Fat-Fly that is normal. Did you expect something else? If so, what did you expect?


  • @Fat-Fly
    I have sensors that report 25-35% and they are still not dry.
    I water for 10-20 min and they report 40%, sometimes 45%. But I know that when they report 25% it starts to be time to water.


  • Mod

    @flopp the level reported will depend on the following things (maybe more):

    • the pullup resistor - varies between different arduinos
    • the soil composition - varies between different pots
    • the temperature - varies throughout the day

    That means it is impossible to compare readings from two different Arduinos in the same pot and it is impossible to compare readings from different pots using the same Arduino.


  • @mfalkvidd
    Thanks


  • From temp varies moisture level and from fertilizer too. At the bottom of the bucket was more. Yesterday i install moisture sensor to the greenhouse. Level was 60-70%. This is normal if i check with finger. :). Today i try drive relays and water pump.
    0_1470039173699_34c652b1-4f64-42a6-9ffd-f41f8e3964ca.jpg


  • This sort of sensor is not good, because the electrolyticeffect.
    You always should use soil sensors, which are based on the capacitive effect.

    Like this one:
    https://forum.mysensors.org/topic/4474/capacitive-soilsensor-for-measurement-the-humidity-of-flowers

    Best regards,
    NetRap


  • My sensors is not good yes. I do not understand what is soil moisture % really. 😞 My pepper was overwatering. Very wet and moisture was 80% only.


  • Mod

    @NetRap there are downsides but "no good" is incorrect. I have used these sensors successfully for almost a year.


  • The problem is, that your design is based on conductivity.
    This means, that the electrodes will be destroyed over time
    and the produced metal salts are in your flower,garden,...

    I don't will have metal salts in my tomatoes !!! 😉


  • Mod

    @NetRap I doubt that one second of 3V electric power every hour (0.03% duty cycle) will produce measurable amount of salt but yes, for food production capacitive measurements are probably better. The topic of this thread is "office plant monitoring" though and I hope you don't have to live off your office plants 🙂


  • Hardware Contributor

    "Metal salts" doesn't sound very dangerous unless you're more specific. I prefer some NaCl on my tomatoes.

    How about some gold- or silver plated electrodes if you're of the worrying kind?


  • I want to try electrodes from stainless steel.


  • Normaly when you use eletricity and water, you need to sacrify something. For an example, when you cool a boat engine with water, you normaly use zinkanodes. I guess this is also the same when we want to messure humidity for an plant.
    So, if you should use copper anodes for messuring, you could paint them with a zink color.
    What it effects the resistance, I don't know.


  • Maybe in scketch needed change measure time? Maybe need use function round ?


  • Hardware Contributor

    @mfalkvidd Short question concerning battery life: I am using a custom board with an atmega328 and an nrf powered directly by a coin cell. When measuring temp/hum with something like an SHT21 the voltage drops are minimal (less than 100mV in more than a month). Using your sketch from post 25 here and connecting the fork to pins A1 and 2 (changed that in the sketch) I get a much higher power consumption. Any ideas why?
    I guess the measuring takes too long or something? It also reports lots of 1% changes to my domoticz server... which is kind of strange. Shouldn't the threshold take care of that? Perhaps I have to use a higher value here...


  • Mod

    @LastSamurai are you using the same sketch on both nodes?

    The sketch in post 25 sends the moisture value every 10 minutes. There are no thresholds and no comparison to previous value.

    Do the 1% changes look like a square wave? If so, the reason is probably that the pullup resistors differ from pin to min, even on the same atmega. A newer version of the sketch takes care of that, but I am still using the old version in my oldest node.

    As we discussed around post 79, my node is dropping very slowly. It is currently at 3.117 V after approximately 9 months on the same 2xAA. The node started at 3.187V so that is a drop of 70mV, less than 10mV per month.


  • Good morning people.
    Can somebody help add to this moisture sensing sketch relay ?


  • So does this work with 2.0?


  • Mod

    @cattoo yes if it is converted.


  • What needs to be added/edited so its converted?


  • Mod

    @cattoo that is described in the instructions I linked to 🙂


  • Its driving me crazy! Could you not convert this mfalkvidd! Its better to have your sketch on the front instead of that one there is there now.


  • Mod

    @cattoo I won't convert it in the near future. I have too many projects that are more fun and more useful. My current setup works great, upgrading everything to 2.0 would mean a lot of work and no gain.


  • After my other failed attempt I needed to try this.
    I have a 5V Mini using A4 and A5 and a fork YL-69 and I get these result:

    Direction: 1
    Moist: 171
    Direction: 0
    Moist: 23
    Direction: 1
    Moist: 172
    Direction: 0
    Moist: 0
    Direction: 1
    Moist: 164
    Direction: 0
    Moist: 0
    Direction: 1
    Moist: 156
    Direction: 0
    Moist: 0
    Direction: 1
    Moist: 144
    Direction: 0
    Moist: 0

    This is not the percentage value , its this value I print: moistureLevel = (1023 - analogRead(SENSOR_ANALOG_PINS[direction]));

    Any Ideas?


  • Mod

    @Martin-Tellblom could you describe what an YL-69 is?

    How much time do you let the measurement settle after switching directions?
    Which of the code versions are you using? There have been many revisions in this thread and they all work slightly different.


  • @mfalkvidd said:

    me do you le

    My "Fork" is stamped with YL-69. Looks exacly like the XD-28
    It's your code from post 25 so I suppose 1000 (#define STABILIZATION_TIME 1000 )


  • Mod

    @Martin-Tellblom Thanks. You did throw away the middle chip and only use the fork, right? (as described in post 41)


  • @mfalkvidd : Yes I did, and I have tried using A2&A3 and its the same


  • Mod

    @Martin-Tellblom can you try another Arduino?


  • @mfalkvidd
    Have tried both a 3.3V and a 5V both behave the same.
    I check every 30 seconds now and after about 10 minutes the result is 0 on both directions.
    I restart the arduino and then one direction shows a value and the other 0.
    There is proberbly something with my forks 🙂

    Did I mention that I upgraded the sketch to 2.0? Could that be a problem?


  • Mod

    There is proberbly something with my forks 🙂

    They are (or at least should be) completely passive, so there is nothing that should be able to go wrong.

    Could you post a photo of your connections?

    If you disconnect the fork from the Arduino and measure the resistance between the two connectors using a multimeter (in both directions), what resistance do you get?

    Did I mention that I upgraded the sketch to 2.0? Could that be a problem?

    Not if you did it right 🙂 I have no experience with 2.0 unfortunately.


  • @mfalkvidd

    I at the office right now, measure them when I home


  • @mfalkvidd said:

    should be) completely passive, so there is nothing that should be able to go wrong.

    Could you post a photo of your connections?

    Here is my setup. Using the Easy/Newbie board that @sundberg84 created with a 5V arduino mini pro 16Mhz. Using A4 and A5 to the sensor
    alt text

    Regarding the resistance when its out of the soil there is no connection at all. If I put it in the soil there a strange thing happening .
    The resistance start around 10K and then slowly increase (no matter if I switch the direction) the longer I test the higher value.
    If I switch the direction the resistance start from whre it just was and keep rising . If I let the senor pause for a while (5 minutes or so) it's back to around 10K.

    Maybe I test it to often? Don't let the moisture get back to the soil?


  • Mod

    Stange. The setup looks good. The soil in my plants doesn't behave like that.


  • It seems like @sundberg84 nailed it 🙂
    The battey metering I use with his PCB is this:

    #if defined(__AVR_ATmega2560__)
      analogReference(INTERNAL1V1);
    #else
      analogReference(INTERNAL);
    #endif
    

    And that reflect on all analog channels and break the function..
    After I removed the battery sensing code it work great


  • You should check out this side (Use Google Side Translator):
    https://github.com/Zentris/erdfeuchtemessung/wiki

    Theres also the sensor from here:
    Giesomat


  • Mod

    So my Bonsai tree humidity node just celebrated 1 year on battery! 🎉 💝
    During the last year, the gateway has received 76,164 updates on humidity level (and an additional 13,996 updates on voltage level).

    The battery level has gone from 3.187V to 3.108V, which means an average drop of 0.0066V per month. Assuming I let it go down to 2.34V (limit for 8MHz according to the datasheet) and that the voltage drop is linear, I should get (3.187-2.34)/0.0066 = 128 months = ~10.7 years. There are several error sources in this calculation, but it looks like battery life will be quite good.

    Here are the voltage and humidity graphs for the last year
    0_1478891116569_chart.png
    0_1478891124165_humidity_bonsai.png


  • @mfalkvidd that is really awesome!

    Did you set any Brown Out Fuses?
    From what I gather the arduino pro mini will stop working at 2.8V and you have to set other fuses for it to reach the lower voltages.

    I did a quick test with one flowerpot and from what I see my power consumption will be around 0.2V per year. It's more than double of what you're getting. But still low enough as changing 2 AA over 1-2 years is OK in my book if I'm not changing the fuses 🙂

    EDIT: Actually, calculating with your numbers of updates I get around 0.6V consumption per year for my setup and that is far from your low power consumption.
    I think I will have to go through this thread once more to try to find why the difference is so big and what you have done. I see 2 potential culprits. One is the arduino mini pro (china clone without power LED and voltage regulator) or maybe it could be my mysensors 2.0 version vs your 1.6.


  • Mod

    @Nicklas-Starkel if I remember correctly I disabled bod completely.


  • @mfalkvidd, @Nicklas-Starkel
    similar problem here. I have a bare ATMega 328P, running @ 8 MHz internal oszillator. no LED, bod disabled, (if enabled, the ADC is running also during sleep, so this means additional power consumption), nothing else connected that could draw additional power.
    I use mfalkvidd's sketch (BTW, thanks a lot for it !), but converted to mysensors 2.0. I see a voltage drop way higher than mfalkvidd, although I don't use a china clone ;-).
    So it seems, that the higher power consumption may be due to mysensors V2 ? I cannot imagine a reason for that, because why should relatively low level functions like power save routines be different in 2.0 ?
    Perhaps hek can comment ?


  • @mfalkvidd
    I think that in a previous post you mentioned that you are using mysensors V1.6, right ? Where did you get it from ? On the mysensors pages I only found references and links to V1.4 and V1,5, not V1.6. I would like to try to remove V2.0 from my system and switch to V1.6 - no idea if this will work ...
    I would like to use a setup as close as possible to yours to track down the problem. Your very low power consumption is really amazing and I would like to come as close as possibe to int in my case. I have a 'clone' of your hardware setup described in openhardware.io - minus the LED. So in my case, power consumption should be even lower than yours 😉


  • Hero Member

    @joshmosh I think that version 1.5.4 or 1.5.3 was called 1.6 while it was under development but no version 1.6 was ever released.


  • @korttoma
    OK, thanks for the hint. I will try if I can get this version work with the Arduino version I am using.


  • @korttoma
    OK, after some fiddling I was able to exchange mysensors V2.0 with V1.5.4 and to compile mfalkvidd's sketch. I will adapt it now to my hardware (removing references to LED etc) and give it a twirl. Please be patient, since I need to run it at least a coupl eof days to see if there is a difference in power consumption.
    Very interesting stuff 🙂


Log in to reply
 

Suggested Topics

  • 8
  • 2
  • 2
  • 2
  • 3
  • 29

0
Online

11.2k
Users

11.1k
Topics

112.5k
Posts