Office plant monitoring
-
Just built this sensor and it is working great. However I am seeing different results with every run. It seems as if the value is always higher with one polarity than with the other one. Is this normal?
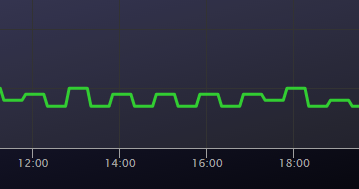
@Jan-Gatzke I have updated my skech on codebender to report rolling average. I have not tested it yet though.
The change is available at https://github.com/mfalkvidd/arduino-plantmoisture/commit/5e98c5e625075d62ae27956ab8dc3ea9dec4a29e -
@Jan-Gatzke I have updated my skech on codebender to report rolling average. I have not tested it yet though.
The change is available at https://github.com/mfalkvidd/arduino-plantmoisture/commit/5e98c5e625075d62ae27956ab8dc3ea9dec4a29e@mfalkvidd At the moment I am testing a modified version of the sketch which always does two readings. I don't think this will have a big impact on the battery life because most power is consumend by the nrf and not by the sensor. Or am I wrong? The pullups are rated at 10k Ohm. The sensors resistance will be about the same in average. So we talk about 20k at 3V which is 0.15 mA. The nrf uses abot 15 mA when sending.
-
Hi.
I have been trying to connect two sensors to the same arduino nano using this code and i have add sensor 1 pin to A0 and GND, and sensor 2 pin A1 and GND.
But i only get the reads from sensor 1 sensor 2 doesn't appear...
Can anyone help me with this on how to get more than one moisture sensor working.Thanks.
@mrc-core there have been quite a few revisions of the sketch. The latest version (which can be found at github) only support one sensor, which is connected to A0 and A1 in the default configuration. Both pins are required to enable alternating the direction of the current when measuring, to try to minimize corrosion.
Adding support for up to three sensors is technically possible (using A0-A5), but would make the code harder to read and since I have no use for multiple sensor I haven't spent the time required to program and test a sketch with multiple sensors.
-
An update on battery life: The sensor in my bonsai tree has been reporting every 11,5 minutes since 2015-11-07, so over the last ~four months it has done 24,504 measurements. The battery level has gone from 3.187V to 3.142V, which means a drop of 0.01125V per month. Assuming I let it go down to 2.34V (limit for 8MHz according to the datasheet) and that the voltage drop is linear, I should get (3.187-2.34)/0.01125 = 75 months = ~6 years. There are several error sources in this calculation, but it looks like battery life will be quite good, even though the sensor reports much more often than necessary.
-
@mrc-core there have been quite a few revisions of the sketch. The latest version (which can be found at github) only support one sensor, which is connected to A0 and A1 in the default configuration. Both pins are required to enable alternating the direction of the current when measuring, to try to minimize corrosion.
Adding support for up to three sensors is technically possible (using A0-A5), but would make the code harder to read and since I have no use for multiple sensor I haven't spent the time required to program and test a sketch with multiple sensors.
@mfalkvidd Thanks for the replay.
Will use only one sensor per arduino.Once again thanks
-
An update on battery life: The sensor in my bonsai tree has been reporting every 11,5 minutes since 2015-11-07, so over the last ~four months it has done 24,504 measurements. The battery level has gone from 3.187V to 3.142V, which means a drop of 0.01125V per month. Assuming I let it go down to 2.34V (limit for 8MHz according to the datasheet) and that the voltage drop is linear, I should get (3.187-2.34)/0.01125 = 75 months = ~6 years. There are several error sources in this calculation, but it looks like battery life will be quite good, even though the sensor reports much more often than necessary.
@mfalkvidd since you are using 2 AA battery(3V max) with a sensor , how are you powering the sensors ? What sensors are you using ?.Most of the sensors need 5V right ? how are you providing the required voltage for sensor ?. If possible can you share a circuit diagram or close up picture for your sensor node with connection to NRF , Sensor and battery ?
Appreciate it .
-
@iotcrazy the fork is entirely passive so no requirements on voltage. See earlier posts in this thread for wiring information.
@mfalkvidd sorry if questions seems like a dump . What do you mean by passive ? every sensors needs some voltage to perform a task right ?
I tried connecting a DHt11 Temp and humidity sensor using a arduino pro min(with led and voltage divider removed). It is connected to 2 AA battery. Unfortunate the node sends out value(proper value) only when I power on the Mini. It never sends the data again. However if I disconnect power supply and re attach it , it again sends the data. any idea what I am doing wrong ?
Also , whats the best way to create a Node which needs to monitor a sensor which uses 5 V . Arduino Mini is 3.3 V which.
Thanks
-
Hello,
Thanks for this useful and simple project !
My first node is running perfectly since 10 days.
Next step is to create a PCB and try running on a CR2032 to minimize the size (WAF request ;))One question on the uses : when do you set a warning on the result ? When I need to water the flower ?
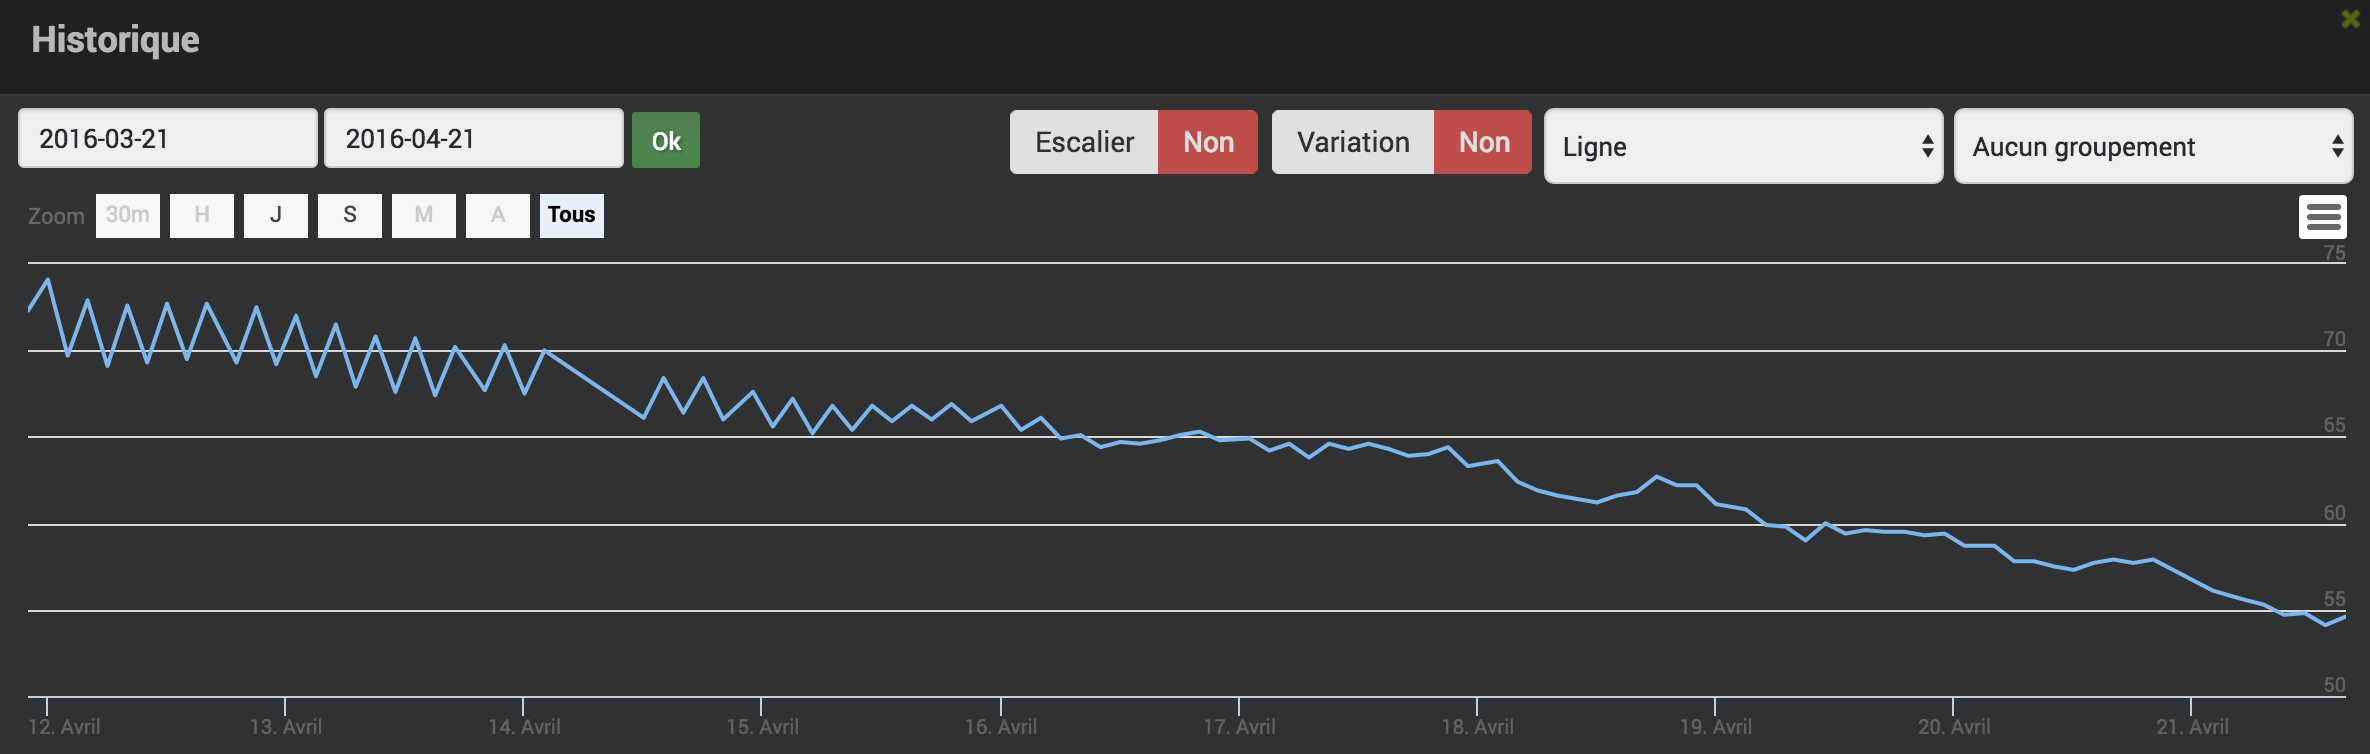
My first node is close to 50%, is it time ? Off course it depends on the nature of the flower but I was not able to found the information on Google ...
David.
-
yep, I think that would be a nice module!
@mfalkvidd @hek I hope to not OT :flushed: I just want to show you few old school pics, a small jump back of 20years! My dad's stuff, a real maker ;)
This one was, I guess, the smallest soil moisture, in "virtual bulb", meaning there was no external electrodes, so no corrosion :
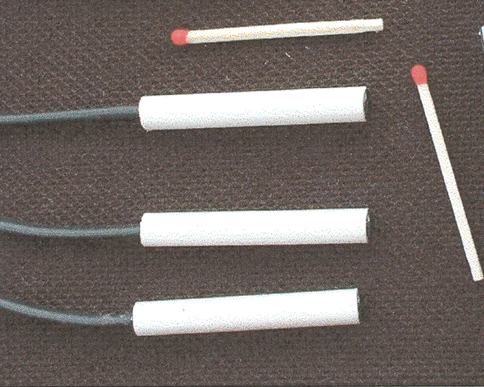
2nd: still in virtual bulb, humidity, salinity, roots temperature, temperature compensated, pH tendancy

Multi level soil moisture:
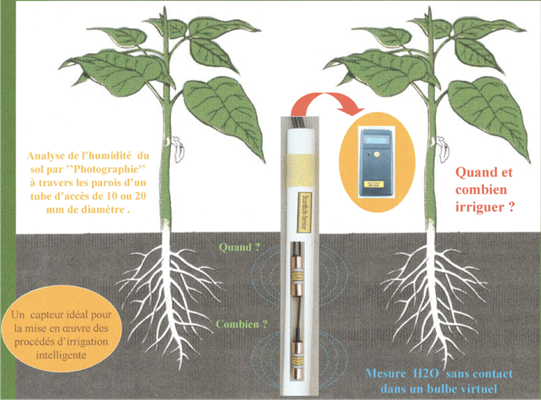
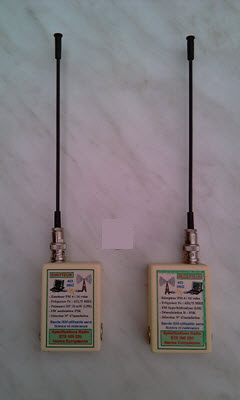
And these old Aurel 433mhz emitter/receiver !
I have lot of others old pics like this lol! He was selling his devices.Few months ago, I have started to mix some of his old project with our new techno, but not finished! I would like to have sort of flo** pow** but more professional..still open. what!!
-
@carlierd yes this is planned, but don't know yet when ..I have already started something few months ago, but I need to think about few points mostly about the overall assembly, and to be sure of the power supply/battery I prefer..I will tell you when I will have something nice :)
-
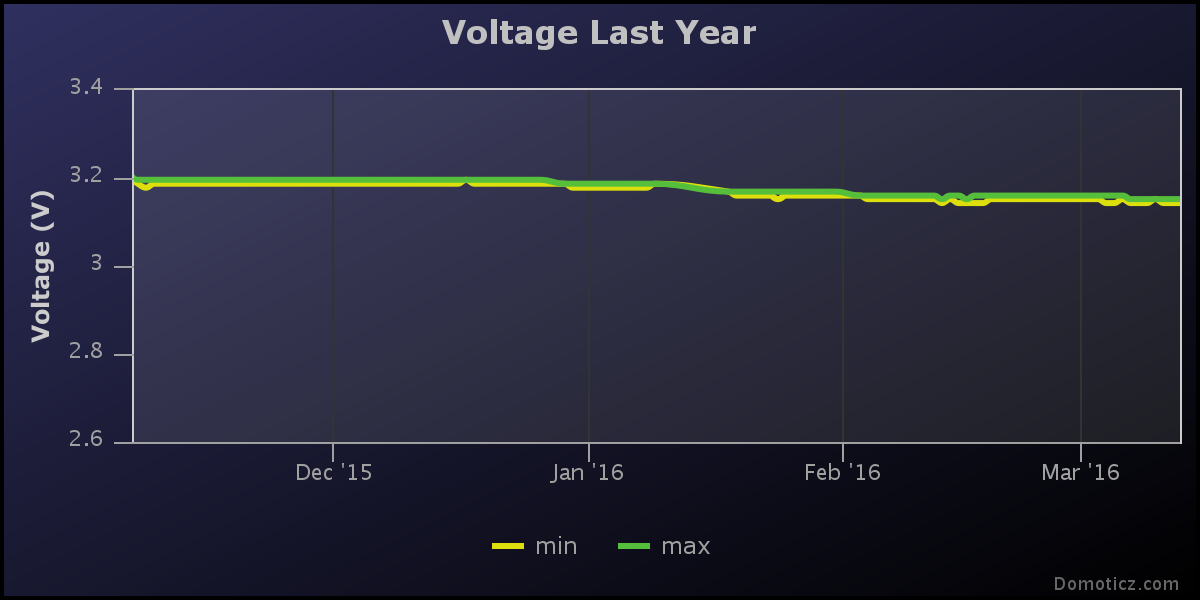
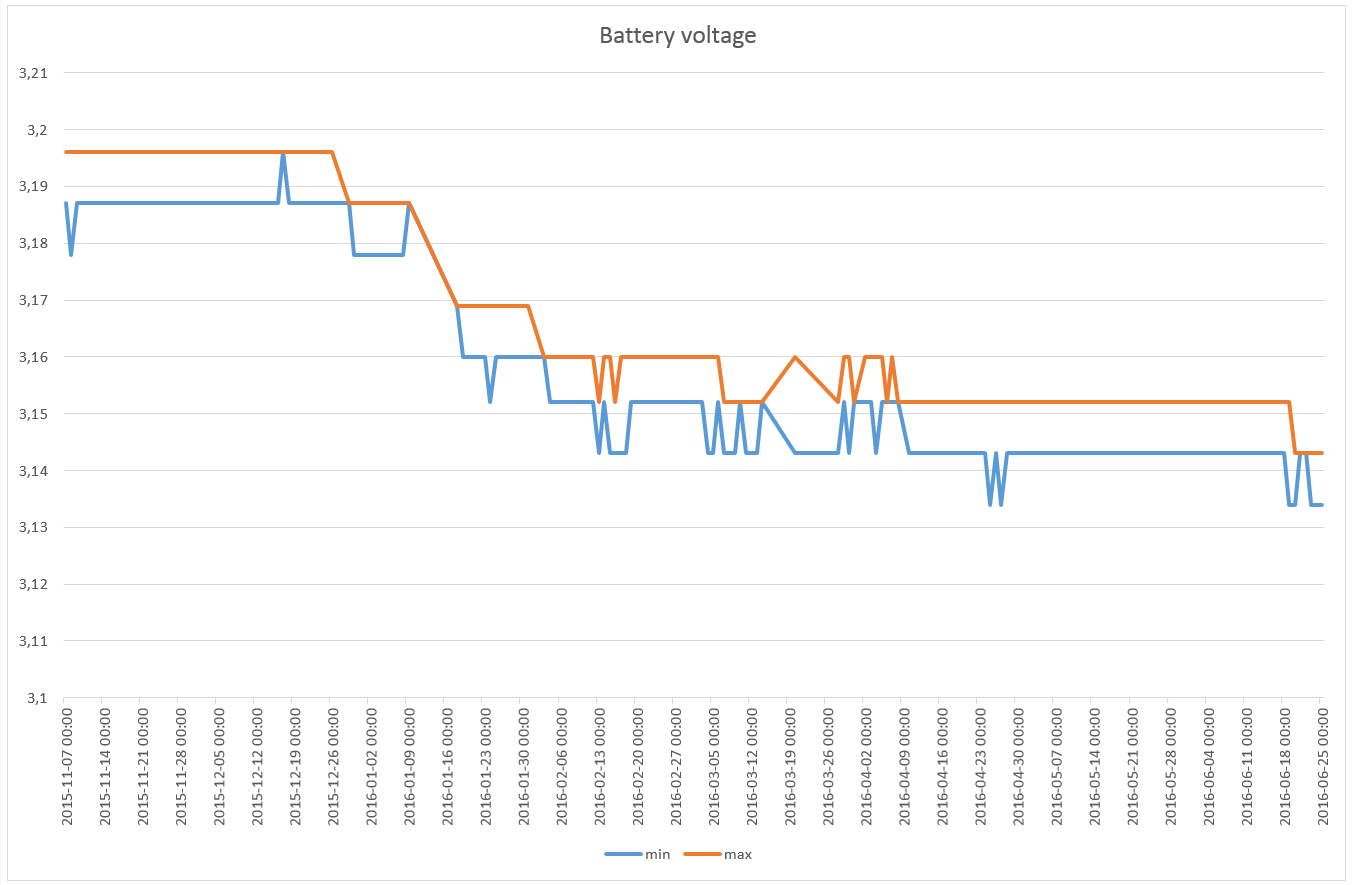
Another update on battery life:
The sensor in my bonsai tree has been reporting every 11,5 minutes since 2015-11-07, so over the last ~seven months it has done 48,965 measurements. It sends data over the radio every time, regardless if the value has changed. The battery level has gone from 3.187V to 3.134V, which means a drop of 0.0076V per month. Assuming I let it go down to 2.34V (limit for 8MHz according to the datasheet) and that the voltage drop is linear, I should get (3.187-2.34)/0.0076 = 111 months = ~9 years. There are several error sources in this calculation, but it looks like battery life will be quite good, even though the sensor reports much more often than necessary.
-
@mfalkvidd That sounds great! Are you using a pro mini too?
I am using a 3V pro mini with power led and regulator removed and the nrf + sensor (on A0 and A1) connected and in about 1 day it dropped from 2945mV to 2907mV. Its running of of 2aa batteries and its on a breadboard for now (for testing).
I am using your (slightly modified) code from above. Any idea why my power usage is so much higher?Here is my code:
/*
Based on https://github.com/mfalkvidd/arduino-plantmoisture

This sketch uses the soilmoisture "forks" only that are found on ebay. They are connected between 2 analog pins where one gets pulled low and the other one measures.
The pins are switched every time to avoid corrosion. Between readings the sensos sleeps to preserve batterylife.

21.06.2016 V1.0 Base sketch
*/

#include <SPI.h>
#include <MySensor.h>

#define round(x) ((x)>=0?(long)((x)+0.5):(long)((x)-0.5))

#define CHILD_ID_MOISTURE 0
#define CHILD_ID_BATTERY 1
#define SLEEP_TIME 1800000 // Sleep time between reads (in milliseconds) - 30 minutes
#define THRESHOLD 1.1 // Only make a new reading with reverse polarity if the change is larger than 10%.
#define STABILIZATION_TIME 1000 // Let the sensor stabilize before reading
#define BATTERY_FULL 3143 // 2xAA usually give 3.143V when full
#define BATTERY_ZERO 1900 // 2.34V limit for 328p at 8MHz. 1.9V, limit for nrf24l01 without step-up. 2.8V limit for Atmega328 with default BOD settings.
const int SENSOR_ANALOG_PINS[] = {A0, A1}; // Sensor is connected to these two pins. Avoid A3 if using ATSHA204. A6 and A7 cannot be used because they don't have pullups.

MySensor gw;
MyMessage msg(CHILD_ID_MOISTURE, V_HUM);
MyMessage voltage_msg(CHILD_ID_BATTERY, V_VOLTAGE);
long oldvoltage = 0;
byte direction = 0;
int oldMoistureLevel = -1;

void setup()
{
  gw.begin();

  gw.sendSketchInfo("Plant moisture w bat", "1.0 21062016");

  gw.present(CHILD_ID_MOISTURE, S_HUM);
  delay(250);
  gw.present(CHILD_ID_BATTERY, S_CUSTOM);

  Serial.println("Setting up pins...");
  // init sensor pins
  pinMode(SENSOR_ANALOG_PINS[0], OUTPUT);
  pinMode(SENSOR_ANALOG_PINS[1], OUTPUT);
  digitalWrite(SENSOR_ANALOG_PINS[0], LOW);
  digitalWrite(SENSOR_ANALOG_PINS[1], LOW);
}

void loop()
{
  int moistureLevel = readMoisture();

  // Send rolling average of 2 samples to get rid of the "ripple" produced by different resistance in the internal pull-up resistors
  // See http://forum.mysensors.org/topic/2147/office-plant-monitoring/55 for more information
  if (oldMoistureLevel == -1) { // First reading, save current value as old
    oldMoistureLevel = moistureLevel;
  }
  if (moistureLevel > (oldMoistureLevel * THRESHOLD) || moistureLevel < (oldMoistureLevel / THRESHOLD)) {
    // The change was large, so it was probably not caused by the difference in internal pull-ups.
    // Measure again, this time with reversed polarity.
    moistureLevel = readMoisture();
  }

  // send value and reset level
  gw.send(msg.set((moistureLevel + oldMoistureLevel) / 2.0 / 10.23, 1));
  oldMoistureLevel = moistureLevel;


  long voltage = readVcc();

  if (oldvoltage != voltage) { // Only send battery information if voltage has changed, to conserve battery.
    gw.send(voltage_msg.set(voltage / 1000.0, 3)); // redVcc returns millivolts. Set wants volts and how many decimals (3 in our case)
    gw.sendBatteryLevel(round((voltage - BATTERY_ZERO) * 100.0 / (BATTERY_FULL - BATTERY_ZERO)));
    oldvoltage = voltage;
  }

  // sleep to conserve energy
  gw.sleep(SLEEP_TIME);
}

/*
  Reads the current moisture level from the sensor.
  Alternates the polarity to reduce corrosion
*/
int readMoisture() {
  pinMode(SENSOR_ANALOG_PINS[direction], INPUT_PULLUP); // Power on the sensor by activating the internal pullup
  analogRead(SENSOR_ANALOG_PINS[direction]);// Read once to let the ADC capacitor start charging
  gw.sleep(STABILIZATION_TIME);

  int sensorRead = analogRead(SENSOR_ANALOG_PINS[direction]);
  int moistureLevel = (1023 - sensorRead); // take the actual reading

  Serial.print("Sensor read: ");
  Serial.println(sensorRead);
  Serial.print("Moisture level: ");
  Serial.println(moistureLevel);

  // Turn off the sensor to conserve battery and minimize corrosion
  pinMode(SENSOR_ANALOG_PINS[direction], OUTPUT);
  digitalWrite(SENSOR_ANALOG_PINS[direction], LOW);

  direction = (direction + 1) % 2; // Make direction alternate between 0 and 1 to reverse polarity which reduces corrosion
  return moistureLevel;
}

long readVcc() {
  // From http://provideyourown.com/2012/secret-arduino-voltmeter-measure-battery-voltage/
  // Read 1.1V reference against AVcc
  // set the reference to Vcc and the measurement to the internal 1.1V reference
#if defined(__AVR_ATmega32U4__) || defined(__AVR_ATmega1280__) || defined(__AVR_ATmega2560__)
  ADMUX = _BV(REFS0) | _BV(MUX4) | _BV(MUX3) | _BV(MUX2) | _BV(MUX1);
#elif defined (__AVR_ATtiny24__) || defined(__AVR_ATtiny44__) || defined(__AVR_ATtiny84__)
  ADMUX = _BV(MUX5) | _BV(MUX0);
#elif defined (__AVR_ATtiny25__) || defined(__AVR_ATtiny45__) || defined(__AVR_ATtiny85__)
  ADMUX = _BV(MUX3) | _BV(MUX2);
#else
  ADMUX = _BV(REFS0) | _BV(MUX3) | _BV(MUX2) | _BV(MUX1);
#endif

  delay(2); // Wait for Vref to settle
  ADCSRA |= _BV(ADSC); // Start conversion
  while (bit_is_set(ADCSRA, ADSC)); // measuring

  uint8_t low  = ADCL; // must read ADCL first - it then locks ADCH
  uint8_t high = ADCH; // unlocks both

  long result = (high << 8) | low;

  result = 1125300L / result; // Calculate Vcc (in mV); 1125300 = 1.1*1023*1000
  return result; // Vcc in millivolts
}
Hello! It looks like you're interested in this conversation, but you don't have an account yet.
Getting fed up of having to scroll through the same posts each visit? When you register for an account, you'll always come back to exactly where you were before, and choose to be notified of new replies (either via email, or push notification). You'll also be able to save bookmarks and upvote posts to show your appreciation to other community members.
With your input, this post could be even better 💗
Register Login