SCT-013-030 Energy Meter
-
Hi all
It's late and I finished the sketch for my Energy Meter. I'ts not tested yet, but the part for sct-reading is tested and works.
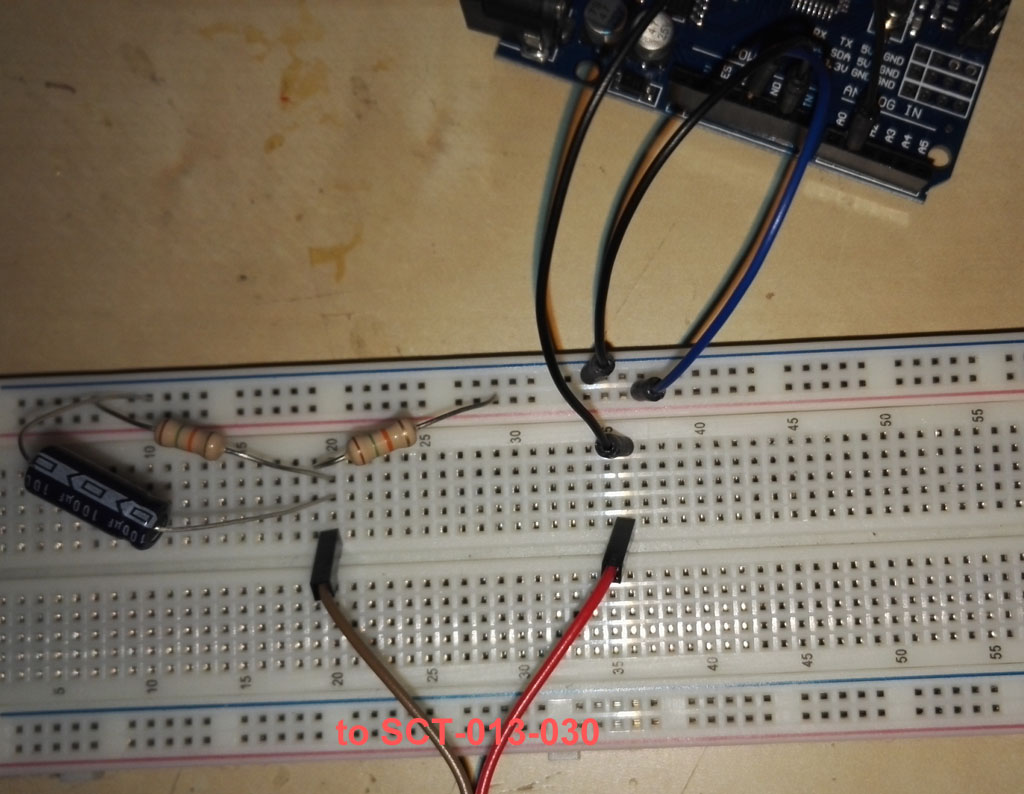
In a few days more nanos arrive, then I can test it./** * The MySensors Arduino library handles the wireless radio link and protocol * between your home built sensors/actuators and HA controller of choice. * The sensors forms a self healing radio network with optional repeaters. Each * repeater and gateway builds a routing tables in EEPROM which keeps track of the * network topology allowing messages to be routed to nodes. * * Created by Henrik Ekblad <henrik.ekblad@mysensors.org> * Copyright (C) 2013-2015 Sensnology AB * Full contributor list: https://github.com/mysensors/Arduino/graphs/contributors * * Documentation: http://www.mysensors.org * Support Forum: http://forum.mysensors.org * * This program is free software; you can redistribute it and/or * modify it under the terms of the GNU General Public License * version 2 as published by the Free Software Foundation. * ******************************* * * EnergyMeterSCT by Patrick Schaerer * This Sketch is a WattMeter used with a SCT-013-030 non invasive PowerMeter * see documentation for schematic * * Special thanks to Surge, who optimized my code. * * updated to mySensors Library 2.0 */ #define MY_RADIO_NRF24 #define MY_REPEATER_FEATURE #define MY_DEBUG #include <SPI.h> #include <MySensors.h> #include <EmonLib.h> #define ANALOG_INPUT_SENSOR 1 // The digital input you attached your SCT sensor. (Only 2 and 3 generates interrupt!) //#define INTERRUPT DIGITAL_INPUT_SENSOR-2 // Usually the interrupt = pin -2 (on uno/nano anyway) #define CHILD_ID 1 // Id of the sensor child EnergyMonitor emon1; MyMessage wattMsg(CHILD_ID,V_WATT); MyMessage kwhMsg(CHILD_ID,V_KWH); MyMessage msgKWH(CHILD_ID,V_VAR1); unsigned long SLEEP_TIME = 60000 - 3735; // sleep for 60 seconds (-4 seconds to calculate values) float wattsumme = 0; float kwh = 0; float wh = 0; int minuten = 0; //vorher 61 boolean KWH_received=false; //Humidity Sensor Code #include <DHT.h> #define CHILD_ID_HUM 2 #define CHILD_ID_TEMP 3 #define HUMIDITY_SENSOR_DIGITAL_PIN 2 DHT dht; float lastTemp; float lastHum; boolean metric = true; MyMessage msgHum(CHILD_ID_HUM, V_HUM); MyMessage msgTemp(CHILD_ID_TEMP, V_TEMP); //End of Humidity Sensor Code void setup() { //energy clamp code //gw.begin(incomingMessage, AUTO, true,0); Serial.begin(115200); emon1.current(ANALOG_INPUT_SENSOR, 30); // Current: input pin, calibration. double Irms = emon1.calcIrms(1480); // initial boot to charge up capacitor (no reading is taken) - testing request(CHILD_ID,V_VAR1); //end of energy clamp code //Humidity Sensor Code dht.setup(HUMIDITY_SENSOR_DIGITAL_PIN); metric = getConfig().isMetric; //End of Humidity Sensor Code } void presentation() { // Send the sketch version information to the gateway and Controller // Register this device as power sensor sendSketchInfo("Energy Meter SCT013", "2.0"); present(CHILD_ID, S_POWER); present(CHILD_ID_HUM, S_HUM); present(CHILD_ID_TEMP, S_TEMP); } void loop() { //process(); //KWH reveived check if (!KWH_received) request(CHILD_ID,V_VAR1); // power used each minute if (minuten < 60) { double Irms = emon1.calcIrms(1480); // Calculate Irms only if (Irms < 0.3) Irms = 0; long watt = Irms*240.0; // default was 230 but our local voltage is about 240 wattsumme = wattsumme+watt; minuten++; send(wattMsg.set(watt)); // Send watt value to gw Serial.print(watt); // Apparent power Serial.print("W I= "); Serial.println(Irms); // Irms } // end power used each minute // hours KW reading if (minuten >= 60) { wh = wh + wattsumme/60; kwh = wh/1000; send(kwhMsg.set(kwh, 3)); // Send kwh value to gw send(msgKWH.set(kwh, 3)); // Send kwh value to gw wattsumme = 0; minuten = 0; } // end of hourly KW reading // Humidity Sensor Code if (minuten == 15 || minuten == 30 || minuten == 45|| minuten == 60) { float temperature = dht.getTemperature(); if (isnan(temperature)) { Serial.println("Failed reading temperature from DHT"); } else if (temperature != lastTemp) { lastTemp = temperature; if (!metric) { temperature = dht.toFahrenheit(temperature); } send(msgTemp.set(temperature, 1)); Serial.print("T: "); Serial.println(temperature); } float humidity = dht.getHumidity(); if (isnan(humidity)) { Serial.println("Failed reading humidity from DHT"); } else if (humidity != lastHum) { lastHum = humidity; send(msgHum.set(humidity, 1)); Serial.print("H: "); Serial.println(humidity); } } //End of Humidity Sensor Code wait(SLEEP_TIME); } void receive(const MyMessage &message) { if (message.type==V_VAR1) { kwh = message.getFloat(); wh = kwh*1000; Serial.print("Received last KWH from gw:"); Serial.println(kwh); //send(kwhMsg.set(kwh, 3)); // Send kwh value to gw KWH_received = true; } }The schematics for attaching of the sct-013-030 is shown in the picture.
-
Ok I tested it and it works fine. Because the reading of low current was not acurate I change readings up to 60W as 0W. I mesure the energy consumption of a room dryer that consumes about 1400W. Mabe SCT-013-005 would be more acurate in low current mesurements.
-
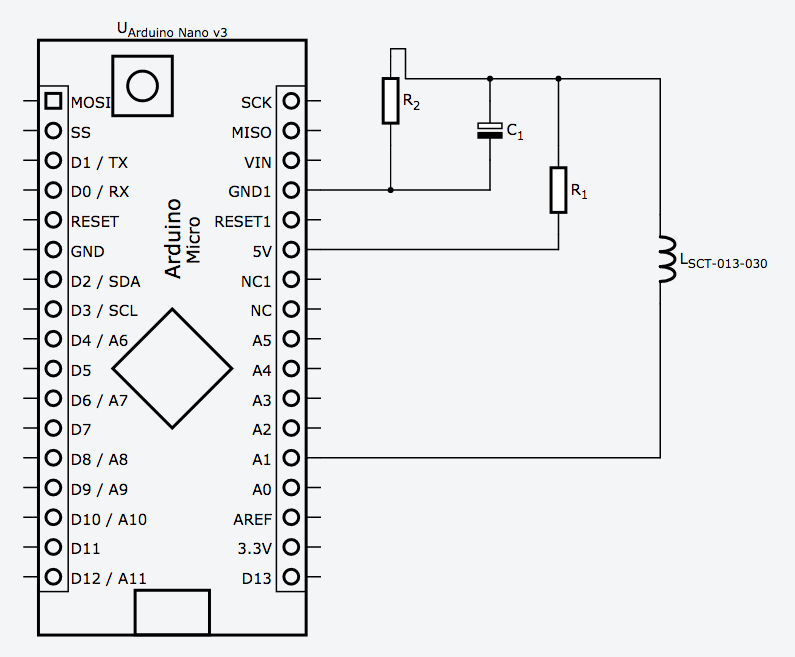
C1 is 100uF
R1+2 are 15k
-
Thanks for doing the groundwork in developing this. Before i copy your implementation, has there been any updates/improvements/observations now that you've had it running for almost a month? Cheers
-
I made some changes in the software. There was a mistake in the kwh and I added a DHT-Sensor (see comment in the code).
It works well. The kwh is reset on each restart. I probably will change that in the future. -
Hey Mate,
Had a chance to sit down and build this node. Made a few tweaks which you may be interested in.
Rewrote the code to sleep for 60 seconds between measurements. This saves approx 80% power ( 22mA down to 4.6mA on my 3.3v pro mini). This also corrects for the drift in the original code which resulted in gaining a second every few mins of measurements (its now only 2ms/min)
Added battery level monitoring which is reported in volts every hour and require no additional hardware or wiring than the originally posted circuit but requires a new vcc library. The actual votlage is only reported if the battery level has changed since the last reading - to save power) .
Let me know what you think:
https://codebender.cc/sketch:276398 -
@maciejka : you can change the value on column 98: minuten == 60
"Minuten" is german for minutes. if you want to report every minute change the value to 1.@Surge86 : thank you for your improvements! I will compare our codes and hopefully learn a lot.
I startet arduino programming in november and keep on learning.greets patrick
-
Thanks for sharing this! I am hoping to create an all-in-one extension cord plus this meter. I hope this way I can detect when a pump fails or maybe just how much power is being used.
I have read that you when using a CT you must be careful to avoid a voltage build up on the CT output. Is that a concern with this current setup? With a battery powered arduino you are not grounded? In my extension cord project I was thinking I could use the ground from the extension cord.
I am not an electrical engineer so I may be way off here, just trying to be safe.
I think this setup could be very useful. In the high school greenhouse where I have my sensor network there are so many pumps, heaters, air stones, that need to be monitored and an alert sent if they stop working.
I may also try this with the sensebender micro.
-
As far as i understand there is a resistor built in the sct013 that prevents this voltage buildup. But i am not an electrician.
-
I optimized my code with the help of Surge.
I added a KWH reading on a restart of the node.
Now it's Version 1.3 -
Hello Patrick, thank you for sharing your project. I tested it and it works fine but I want to test how acurate it is with low current measurements. Can you please tell me how to change your code to get results below 60W? I'm just beginning to learn arduino-programming so i don't understand everything..
-
Hello Patrick, thank you for sharing your project. I tested it and it works fine but I want to test how acurate it is with low current measurements. Can you please tell me how to change your code to get results below 60W? I'm just beginning to learn arduino-programming so i don't understand everything..
@m1rk0
In Line 95 is the following expression:
if (Irms < 0.3) Irms = 0;Irms is RMS current. The expression sets all current smaller than 0.3 as 0.
You can delete this line for smaller values.
I suggest to use a SCT-013-005 instead of a SCT-013-030. -
Thank you patrik, i already ordered an sct-013-005, but i need sometimes higher measurements than 5a. With this second sensor i will be able to compare the results.
@m1rk0 said:
Thank you patrik, i already ordered an sct-013-005, but i need sometimes higher measurements than 5a. With this second sensor i will be able to compare the results.
yeah 5A is within its range. I usually sit between 1A-20A
-
This is made for an earlier version of the library, things has changed a lot since.
first off, the library header file is now called MySensors.h (note the added "s" to the name). But also how you use / initialize the mysensors project is very different in 2.x, than in 1.x,
have a look at this post to get an idea of what you have to change, to upgrade your arduino sketch to work with MySensors 2.x library
-
I alread updated to MySensors 2.0
This is the update code:
I also edited the first post.
/** * The MySensors Arduino library handles the wireless radio link and protocol * between your home built sensors/actuators and HA controller of choice. * The sensors forms a self healing radio network with optional repeaters. Each * repeater and gateway builds a routing tables in EEPROM which keeps track of the * network topology allowing messages to be routed to nodes. * * Created by Henrik Ekblad <henrik.ekblad@mysensors.org> * Copyright (C) 2013-2015 Sensnology AB * Full contributor list: https://github.com/mysensors/Arduino/graphs/contributors * * Documentation: http://www.mysensors.org * Support Forum: http://forum.mysensors.org * * This program is free software; you can redistribute it and/or * modify it under the terms of the GNU General Public License * version 2 as published by the Free Software Foundation. * ******************************* * * EnergyMeterSCT by Patrick Schaerer * This Sketch is a WattMeter used with a SCT-013-030 non invasive PowerMeter * see documentation for schematic * * Special thanks to Surge, who optimized my code. * * updated to mySensors Library 2.0 */ #define MY_RADIO_NRF24 #define MY_REPEATER_FEATURE #define MY_DEBUG #include <SPI.h> #include <MySensors.h> #include <EmonLib.h> #define ANALOG_INPUT_SENSOR 1 // The digital input you attached your SCT sensor. (Only 2 and 3 generates interrupt!) //#define INTERRUPT DIGITAL_INPUT_SENSOR-2 // Usually the interrupt = pin -2 (on uno/nano anyway) #define CHILD_ID 1 // Id of the sensor child EnergyMonitor emon1; MyMessage wattMsg(CHILD_ID,V_WATT); MyMessage kwhMsg(CHILD_ID,V_KWH); MyMessage msgKWH(CHILD_ID,V_VAR1); unsigned long SLEEP_TIME = 60000 - 3735; // sleep for 60 seconds (-4 seconds to calculate values) float wattsumme = 0; float kwh = 0; float wh = 0; int minuten = 0; //vorher 61 boolean KWH_received=false; //Humidity Sensor Code #include <DHT.h> #define CHILD_ID_HUM 2 #define CHILD_ID_TEMP 3 #define HUMIDITY_SENSOR_DIGITAL_PIN 2 DHT dht; float lastTemp; float lastHum; boolean metric = true; MyMessage msgHum(CHILD_ID_HUM, V_HUM); MyMessage msgTemp(CHILD_ID_TEMP, V_TEMP); //End of Humidity Sensor Code void setup() { //energy clamp code //gw.begin(incomingMessage, AUTO, true,0); Serial.begin(115200); emon1.current(ANALOG_INPUT_SENSOR, 30); // Current: input pin, calibration. double Irms = emon1.calcIrms(1480); // initial boot to charge up capacitor (no reading is taken) - testing request(CHILD_ID,V_VAR1); //end of energy clamp code //Humidity Sensor Code dht.setup(HUMIDITY_SENSOR_DIGITAL_PIN); metric = getConfig().isMetric; //End of Humidity Sensor Code } void presentation() { // Send the sketch version information to the gateway and Controller // Register this device as power sensor sendSketchInfo("Energy Meter SCT013", "2.0"); present(CHILD_ID, S_POWER); present(CHILD_ID_HUM, S_HUM); present(CHILD_ID_TEMP, S_TEMP); } void loop() { //process(); //KWH reveived check if (!KWH_received) request(CHILD_ID,V_VAR1); // power used each minute if (minuten < 60) { double Irms = emon1.calcIrms(1480); // Calculate Irms only if (Irms < 0.3) Irms = 0; long watt = Irms*240.0; // default was 230 but our local voltage is about 240 wattsumme = wattsumme+watt; minuten++; send(wattMsg.set(watt)); // Send watt value to gw Serial.print(watt); // Apparent power Serial.print("W I= "); Serial.println(Irms); // Irms } // end power used each minute // hours KW reading if (minuten >= 60) { wh = wh + wattsumme/60; kwh = wh/1000; send(kwhMsg.set(kwh, 3)); // Send kwh value to gw send(msgKWH.set(kwh, 3)); // Send kwh value to gw wattsumme = 0; minuten = 0; } // end of hourly KW reading // Humidity Sensor Code if (minuten == 15 || minuten == 30 || minuten == 45|| minuten == 60) { float temperature = dht.getTemperature(); if (isnan(temperature)) { Serial.println("Failed reading temperature from DHT"); } else if (temperature != lastTemp) { lastTemp = temperature; if (!metric) { temperature = dht.toFahrenheit(temperature); } send(msgTemp.set(temperature, 1)); Serial.print("T: "); Serial.println(temperature); } float humidity = dht.getHumidity(); if (isnan(humidity)) { Serial.println("Failed reading humidity from DHT"); } else if (humidity != lastHum) { lastHum = humidity; send(msgHum.set(humidity, 1)); Serial.print("H: "); Serial.println(humidity); } } //End of Humidity Sensor Code wait(SLEEP_TIME); } void receive(const MyMessage &message) { if (message.type==V_VAR1) { kwh = message.getFloat(); wh = kwh*1000; Serial.print("Received last KWH from gw:"); Serial.println(kwh); //send(kwhMsg.set(kwh, 3)); // Send kwh value to gw KWH_received = true; } } -
I alread updated to MySensors 2.0
This is the update code:
I also edited the first post.
/** * The MySensors Arduino library handles the wireless radio link and protocol * between your home built sensors/actuators and HA controller of choice. * The sensors forms a self healing radio network with optional repeaters. Each * repeater and gateway builds a routing tables in EEPROM which keeps track of the * network topology allowing messages to be routed to nodes. * * Created by Henrik Ekblad <henrik.ekblad@mysensors.org> * Copyright (C) 2013-2015 Sensnology AB * Full contributor list: https://github.com/mysensors/Arduino/graphs/contributors * * Documentation: http://www.mysensors.org * Support Forum: http://forum.mysensors.org * * This program is free software; you can redistribute it and/or * modify it under the terms of the GNU General Public License * version 2 as published by the Free Software Foundation. * ******************************* * * EnergyMeterSCT by Patrick Schaerer * This Sketch is a WattMeter used with a SCT-013-030 non invasive PowerMeter * see documentation for schematic * * Special thanks to Surge, who optimized my code. * * updated to mySensors Library 2.0 */ #define MY_RADIO_NRF24 #define MY_REPEATER_FEATURE #define MY_DEBUG #include <SPI.h> #include <MySensors.h> #include <EmonLib.h> #define ANALOG_INPUT_SENSOR 1 // The digital input you attached your SCT sensor. (Only 2 and 3 generates interrupt!) //#define INTERRUPT DIGITAL_INPUT_SENSOR-2 // Usually the interrupt = pin -2 (on uno/nano anyway) #define CHILD_ID 1 // Id of the sensor child EnergyMonitor emon1; MyMessage wattMsg(CHILD_ID,V_WATT); MyMessage kwhMsg(CHILD_ID,V_KWH); MyMessage msgKWH(CHILD_ID,V_VAR1); unsigned long SLEEP_TIME = 60000 - 3735; // sleep for 60 seconds (-4 seconds to calculate values) float wattsumme = 0; float kwh = 0; float wh = 0; int minuten = 0; //vorher 61 boolean KWH_received=false; //Humidity Sensor Code #include <DHT.h> #define CHILD_ID_HUM 2 #define CHILD_ID_TEMP 3 #define HUMIDITY_SENSOR_DIGITAL_PIN 2 DHT dht; float lastTemp; float lastHum; boolean metric = true; MyMessage msgHum(CHILD_ID_HUM, V_HUM); MyMessage msgTemp(CHILD_ID_TEMP, V_TEMP); //End of Humidity Sensor Code void setup() { //energy clamp code //gw.begin(incomingMessage, AUTO, true,0); Serial.begin(115200); emon1.current(ANALOG_INPUT_SENSOR, 30); // Current: input pin, calibration. double Irms = emon1.calcIrms(1480); // initial boot to charge up capacitor (no reading is taken) - testing request(CHILD_ID,V_VAR1); //end of energy clamp code //Humidity Sensor Code dht.setup(HUMIDITY_SENSOR_DIGITAL_PIN); metric = getConfig().isMetric; //End of Humidity Sensor Code } void presentation() { // Send the sketch version information to the gateway and Controller // Register this device as power sensor sendSketchInfo("Energy Meter SCT013", "2.0"); present(CHILD_ID, S_POWER); present(CHILD_ID_HUM, S_HUM); present(CHILD_ID_TEMP, S_TEMP); } void loop() { //process(); //KWH reveived check if (!KWH_received) request(CHILD_ID,V_VAR1); // power used each minute if (minuten < 60) { double Irms = emon1.calcIrms(1480); // Calculate Irms only if (Irms < 0.3) Irms = 0; long watt = Irms*240.0; // default was 230 but our local voltage is about 240 wattsumme = wattsumme+watt; minuten++; send(wattMsg.set(watt)); // Send watt value to gw Serial.print(watt); // Apparent power Serial.print("W I= "); Serial.println(Irms); // Irms } // end power used each minute // hours KW reading if (minuten >= 60) { wh = wh + wattsumme/60; kwh = wh/1000; send(kwhMsg.set(kwh, 3)); // Send kwh value to gw send(msgKWH.set(kwh, 3)); // Send kwh value to gw wattsumme = 0; minuten = 0; } // end of hourly KW reading // Humidity Sensor Code if (minuten == 15 || minuten == 30 || minuten == 45|| minuten == 60) { float temperature = dht.getTemperature(); if (isnan(temperature)) { Serial.println("Failed reading temperature from DHT"); } else if (temperature != lastTemp) { lastTemp = temperature; if (!metric) { temperature = dht.toFahrenheit(temperature); } send(msgTemp.set(temperature, 1)); Serial.print("T: "); Serial.println(temperature); } float humidity = dht.getHumidity(); if (isnan(humidity)) { Serial.println("Failed reading humidity from DHT"); } else if (humidity != lastHum) { lastHum = humidity; send(msgHum.set(humidity, 1)); Serial.print("H: "); Serial.println(humidity); } } //End of Humidity Sensor Code wait(SLEEP_TIME); } void receive(const MyMessage &message) { if (message.type==V_VAR1) { kwh = message.getFloat(); wh = kwh*1000; Serial.print("Received last KWH from gw:"); Serial.println(kwh); //send(kwhMsg.set(kwh, 3)); // Send kwh value to gw KWH_received = true; } }@patrick-schaerer said:
I alread updated to MySensors 2.0
I just got my sct-013-000 non-burden version and will try it as soon as atmega+nrf packs arrive. Thanks for code update. :thumbsup:
Meanwhile what is "msgKWH" for? What is different than "kwhMsg"? Which controller do you use?