💬 Easy/Newbie PCB for MySensors
-
Could you give me the size when the pcb is fully soldered as battery sensor?
-
@Nca78 - sounds great, let me know how it works out for you! Good luck!
@Rasenheizung - 50x50cm fully soldered. The dept is about 35mm (Batteryholder + PCB + Components)
-
So - I have a question for the community about boosters. I had a 3.3v Arduino running with my PCB. The radio is connected directly to the battery and the rest through a booster. I experienced alot of st:fails.

I tested adding a 0.1uF cap on the booster from OUT to GND and the st:fails became st:ok, even though the radio does not get its power from this booster.
Im sure the boosters are in different qualities and renders alot of noice - but could it effect the radio - through the arduino?
If this continues Im going to add the possibility to add this cap on my PCB. (Or maybe its possible to use 0.1uF cap by the voltage divider...)Any feedback ?
Controller: Proxmox VM - Home Assistant
MySensors GW: Arduino Uno - W5100 Ethernet, Gw Shield Nrf24l01+ 2,4Ghz
MySensors GW: Arduino Uno - Gw Shield RFM69, 433mhz
RFLink GW - Arduino Mega + RFLink Shield, 433mhz -
So - I have a question for the community about boosters. I had a 3.3v Arduino running with my PCB. The radio is connected directly to the battery and the rest through a booster. I experienced alot of st:fails.
I tested adding a 0.1uF cap on the booster from OUT to GND and the st:fails became st:ok, even though the radio does not get its power from this booster.
Im sure the boosters are in different qualities and renders alot of noice - but could it effect the radio - through the arduino?
If this continues Im going to add the possibility to add this cap on my PCB. (Or maybe its possible to use 0.1uF cap by the voltage divider...)Any feedback ?
@sundberg84 typically, I try to add the lc-filter to the booster as some of them are very noisy. This is very simple - 3.3µH Axial lead inducter and a large 220µF capacitor (I use the SMD version). This helps to smooth any ripple effect.
-
Any sort of manipulation, including regulators and boosters, added to any module i would always attempt to filter and smooth the input AND the output of the devices. The noise from the boosters would technically be reaching your radio from those traces. I'm not sure if a diode would stop it from feeding back to the radio, but either way if it did i would still prefer to smooth and filter the power instead of stopping it coming backwards.
-
@sundberg84
it could be multiple things..
But as alexsh1 said you can try to fix it with filtering.You can usea capa + an inductor or a ferrite bead too (a bit different), or a small resistor too can work like a snubber in fact. Generally 0-2ohms<100ohms, but the smaller the better depending of the capa too because it could generate drop out voltage. So for ferrite, it's the same, it's better to use a low ferrite res.
But then, with filtering come some compromise regarding the booster efficiency and the load etc... Use formula and calc or the scope or iterate to choose the better compromise. But that should fix it mostly.There are two main strategy:
- you filter each power input of concerned ics,
- or you filter at powersupply (booster) output because lack of footprint on pcb.
Note :
- it's better for filtering to use small multilayer ceramic capa. low esr, low esl when you can, but again there can be some compromise in this.
- shielded inductor on the booster module is better
- if high esr and esl capacitor used at booster input, then you can have noise back into the batterie, and then propagate elsewhere. If it's your case, and can't fix it at power supply input, try to filter at your radio vcc input with another res for instance and a capa
- there is also the ground loop, having a strong gnd, is better. this is one point why it's useful to use gnd pour plane on your pcb.
- etc...
I hope this will help you a bit ;)
-
Boards received from DirtyPCB, they look gorgeous in white, too bad I have to put those ugly blue nrf and promini boards on top of it :P
I received exactly 10, they are looking good except the silkscreen 1/2mm too much on the left for some of the boards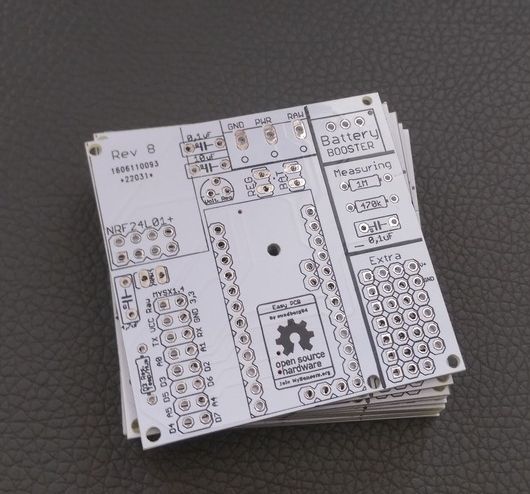
-
@sundberg84 sorry to bother you but maybe you have an idea.
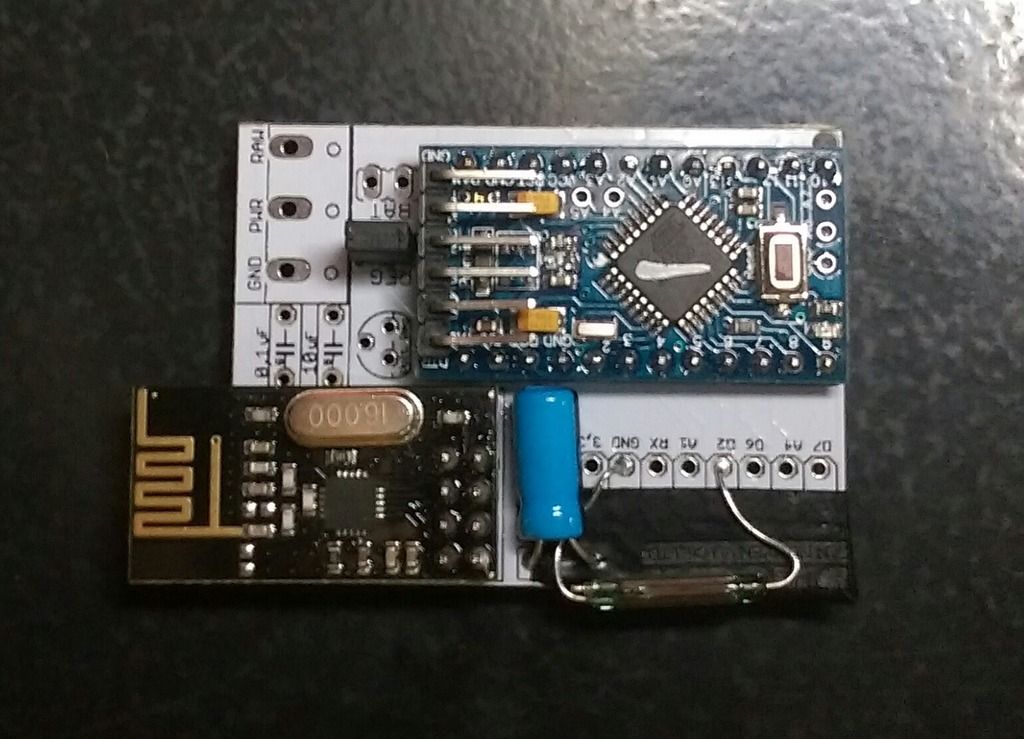
I soldered components as in the picture below (looking so much cleaner than with all the cables...), I am using a 3.3V pro mini.
Before soldering I tested the pro mini and the nrf24 together, connected with cables, and simulated the reed switch with some wires: everything was fine and I was receiving the open/close messages in domoticz.
I soldered the components as below but I only got some "radio init failed" when connected to my PC, power coming to the GND/VCC on top of the arduino.
As I put the jumper on "reg" to bypass the regulator, my understanding is that in this case the raw/power/vcc are all connected together, am I wrong ?Another subject, I suffered to cut the right part of the PCB with a cutter, would it be possible to add some slots along the black line to reduce a bit the length we have to cut ?
-
@sundberg84 sorry to bother you but maybe you have an idea.
I soldered components as in the picture below (looking so much cleaner than with all the cables...), I am using a 3.3V pro mini.
Before soldering I tested the pro mini and the nrf24 together, connected with cables, and simulated the reed switch with some wires: everything was fine and I was receiving the open/close messages in domoticz.
I soldered the components as below but I only got some "radio init failed" when connected to my PC, power coming to the GND/VCC on top of the arduino.
As I put the jumper on "reg" to bypass the regulator, my understanding is that in this case the raw/power/vcc are all connected together, am I wrong ?Another subject, I suffered to cut the right part of the PCB with a cutter, would it be possible to add some slots along the black line to reduce a bit the length we have to cut ?
@Nca78, do you have power on the radio, do you have power present everywhere it should be? Arduino included. If this is all present i would then go into diode mode with a multimeter to make sure all of your pins on the radio are connected to those of the ATMega328 on the arduino.
This would be just a basic starting point at troubleshooting this.
-
@sundberg84 sorry to bother you but maybe you have an idea.
I soldered components as in the picture below (looking so much cleaner than with all the cables...), I am using a 3.3V pro mini.
Before soldering I tested the pro mini and the nrf24 together, connected with cables, and simulated the reed switch with some wires: everything was fine and I was receiving the open/close messages in domoticz.
I soldered the components as below but I only got some "radio init failed" when connected to my PC, power coming to the GND/VCC on top of the arduino.
As I put the jumper on "reg" to bypass the regulator, my understanding is that in this case the raw/power/vcc are all connected together, am I wrong ?Another subject, I suffered to cut the right part of the PCB with a cutter, would it be possible to add some slots along the black line to reduce a bit the length we have to cut ?
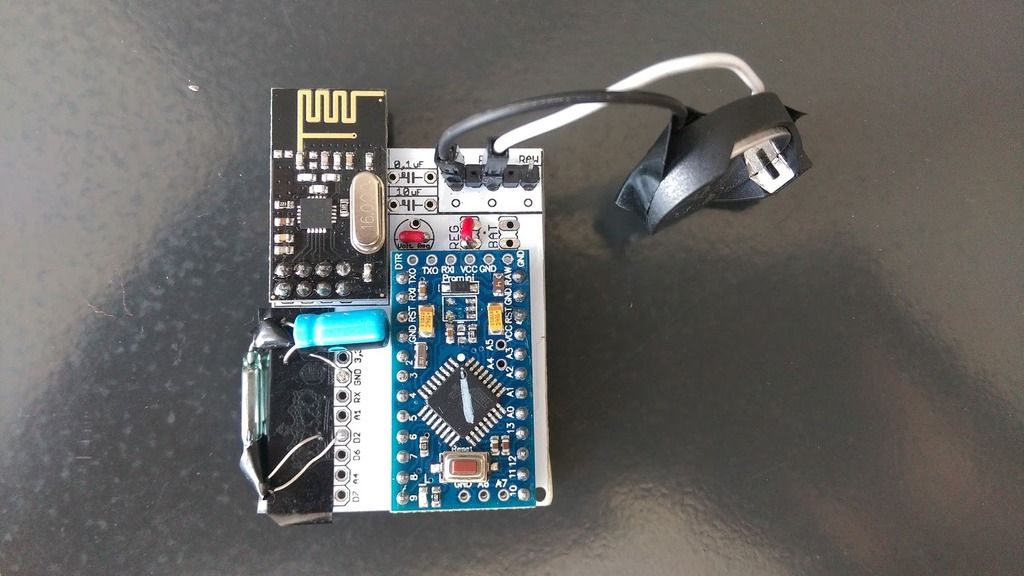
@Nca78 - Hi, nice to see your white boards ! :)
I see your image, and you have choosen a REG jumper (regulated power supply). How do you power it? Through RAW?
You have missed the voltage regulator with caps for the radio, so at this point it does not get any power at all?If you are using a 3.3v arudino with RAW you can bypass it with a wire.
If you are using a 5v with RAW or Regulated power (PWR) you need a 5 to 3.3v voltage regulator. -
@sundberg84 said:
If you use the FTDI connector, make sure its the 3.3v and connect it to Gnd/Pwr on the PCB and not Arduino FDTI connector.
You could just exclude those pins and connect a battery directly and use that as power and the FDTI as programmer/serial debug onlyBat or Reg is nessecary!
See this picture for battery use: https://www.openhardware.io/view/4/EasyNewbie-PCB-for-MySensors
https://www.openhardware.io/uploads/568ed84b60aa3f8965fbf095/image/3.jpg
All components in the image is needed (except battery measurment).
If you dont want to use booster you need to bypass that one with a wire/jumper (or set the jumper on REG instead of BAT but that kills the logic).The battery doesnt "need" the 0,1uF but see here:https://www.mysensors.org/build/battery
"The tap point could be bypassed with a 0.1 uF capacitor to keep the noise level low, at this otherwise high impedance point. "@sundberg84
@BastienVH said:@sundberg84 said:
If you use the FTDI connector, make sure its the 3.3v and connect it to Gnd/Pwr on the PCB and not Arduino FDTI connector.
You could just exclude those pins and connect a battery directly and use that as power and the FDTI as programmer/serial debug onlyBat or Reg is nessecary!
See this picture for battery use: https://www.openhardware.io/view/4/EasyNewbie-PCB-for-MySensors
https://www.openhardware.io/uploads/568ed84b60aa3f8965fbf095/image/3.jpg
All components in the image is needed (except battery measurment).
If you dont want to use booster you need to bypass that one with a wire/jumper (or set the jumper on REG instead of BAT but that kills the logic).The battery doesnt "need" the 0,1uF but see here:https://www.mysensors.org/build/battery
"The tap point could be bypassed with a 0.1 uF capacitor to keep the noise level low, at this otherwise high impedance point. "Hi. I've been using this board with 5V power from cell chargers and it works great. I'm trying to make my first battery sensor and am a bit confused (again) as to what is necessary. I'm powering using 2 AA batteries. I've cut the right side off the board so I'm obviously not using the measuring portion, but the above bit about the booster leaves me confused. Can someone answer:
- I connect via the PWR and GND pads right?
- Do I jumper BAT or REG?
- Do I need to do anything else to get this to work?
I tried to program using battery in but was using the ground from the ftdi connector. I could not get this to work. I'm thinking that this was a major problem and that I should have used the battery ground. That's the right approach right?
-
@chuckconnors - assuming you are using a Arduino Pro Mini 3.3v it will die when the voltage drops below 3v (about) so it leaves alot of power left in your batteries and also it will die rather quickly.
Thats why I have designed the PCB with a booster for battery operations, and then its not possible to cut the right side of the PCB since the booster is located there. Check the image out: https://www.openhardware.io//uploads/568ed84b60aa3f8965fbf095/image/Rev8 Bat.jpg and you see the booster on the top right corner.
-
Thank you for the tip @sundberg84, it just needed the bypassing of the regulator, and then I can connect my cell battery to the GND and PWR and it runs fine.
@Samuel235 yes you are right I did it and it didn't have Vcc power that's why I asked that question to sundberg84, next time I'll precise it as it could have ended in wasted time...
@chuckconnors this is how you have to connect the jumpers to use directly on battery power (on GND and PWR pins). But as sundberg84 says you will not have a long battery life with AA batteries and without a booster. Even if you update the fuses and bootloader to run at 1MHz and have the BOD at 1.8V there will still be power left (I guess not far from 25% of capacity with 2 batteries) that is wasted. If you keep the defaults settings of the arduino at 8MHz it will run down to 2.4V and around half of the energy in your batteries will be wasted.
-
@sundberg84 is the board ready for Ver 2.0.0 ?
the final version announced yesterday at HERE, anyhow can you share an example of Node sketch ? -
@Lior-Rubin - the PCB or the hardware has nothing to do with 2.0
It will work fine - 2.0 is only software (what you program it with).
I have been running 2.0 beta (dev) for a long time now without any problems.Controller: Proxmox VM - Home Assistant
MySensors GW: Arduino Uno - W5100 Ethernet, Gw Shield Nrf24l01+ 2,4Ghz
MySensors GW: Arduino Uno - Gw Shield RFM69, 433mhz
RFLink GW - Arduino Mega + RFLink Shield, 433mhz -
@Lior-Rubin - the PCB or the hardware has nothing to do with 2.0
It will work fine - 2.0 is only software (what you program it with).
I have been running 2.0 beta (dev) for a long time now without any problems.@sundberg84 I'm aware of it. I just ask to be sure.
Can you upload here an example sketch (v2.0) with battery reporting ? -
@sundberg84 I'm aware of it. I just ask to be sure.
Can you upload here an example sketch (v2.0) with battery reporting ?@Lior-Rubin said:
@sundberg84 I'm aware of it. I just ask to be sure.
Can you upload here an example sketch (v2.0) with battery reporting ?You can just check the examples included in the library, I've been using the beta version of MySensors 2 for a long time and started from supplied examples, never had a problem.
This is some code I use to report battery level, it's harder to make it more simple, juste keep your existing code to read the battery level and replace the line sending the value with the sendBatteryLevel() :
int currentBatteryPercent = SystemStatus().getVCCPercent(VccMin, VccMax); if (currentBatteryPercent != LastBatteryPercent) { LastBatteryPercent = currentBatteryPercent; sendBatteryLevel(currentBatteryPercent); }``` -
@sundberg84 I'm aware of it. I just ask to be sure.
Can you upload here an example sketch (v2.0) with battery reporting ?@Lior-Rubin - If you use a voltage divider and 2xAA use this:
Defines:
//=========================
// BATTERY VOLTAGE DIVIDER SETUP
// 1M, 470K divider across battery and using internal ADC ref of 1.1V
// Sense point is bypassed with 0.1 uF cap to reduce noise at that point
// ((1e6+470e3)/470e3)*1.1 = Vmax = 3.44 Volts
// 3.44/1023 = Volts per bit = 0.003363075
#define VBAT_PER_BITS 0.003363075
#define VMIN 1.9                                  //  Vmin (radio Min Volt)=1.9V (564v)
#define VMAX 3.0                                  //  Vmax = (2xAA bat)=3.0V (892v)
int batteryPcnt = 0;                              // Calc value for battery %
int batLoop = 0;                                  // Loop to help calc average
int batArray[3];                                  // Array to store value for average calc.
int BATTERY_SENSE_PIN = A0;                       // select the input pin for the battery sense point
//=========================
void batM() //The battery calculations { delay(500); // Battery monitoring reading int sensorValue = analogRead(BATTERY_SENSE_PIN); delay(500); // Calculate the battery in % float Vbat = sensorValue * VBAT_PER_BITS; int batteryPcnt = static_cast<int>(((Vbat-VMIN)/(VMAX-VMIN))*100.); Serial.print("Battery percent: "); Serial.print(batteryPcnt); Serial.println(" %"); // Add it to array so we get an average of 3 (3x20min) batArray[batLoop] = batteryPcnt; if (batLoop > 2) { batteryPcnt = (batArray[0] + batArray[1] + batArray[2] + batArray[3]); batteryPcnt = batteryPcnt / 3; if (batteryPcnt > 100) { batteryPcnt=100; } Serial.print("Battery Average (Send): "); Serial.print(batteryPcnt); Serial.println(" %"); sendBatteryLevel(batteryPcnt); batLoop = 0; } else { batLoop++; } }Add batM(); in the loop where you want to measure.
This calculates an avarage and sends it every 3rd time. So i sleep my sensors for 20 min, and battery is reported every 1hour.If you want to measure incoming VCC agains ref use @Nca78 but this does not work if you are using a booster (since it will always be 3.3v on incoming).
-
Thank you for the tip @sundberg84, it just needed the bypassing of the regulator, and then I can connect my cell battery to the GND and PWR and it runs fine.
@Samuel235 yes you are right I did it and it didn't have Vcc power that's why I asked that question to sundberg84, next time I'll precise it as it could have ended in wasted time...
@chuckconnors this is how you have to connect the jumpers to use directly on battery power (on GND and PWR pins). But as sundberg84 says you will not have a long battery life with AA batteries and without a booster. Even if you update the fuses and bootloader to run at 1MHz and have the BOD at 1.8V there will still be power left (I guess not far from 25% of capacity with 2 batteries) that is wasted. If you keep the defaults settings of the arduino at 8MHz it will run down to 2.4V and around half of the energy in your batteries will be wasted.
Hello @sundberg84 I have a request for update for your board :)
Can you remove the trace from the INT pin of the NRF24 to the D2 pin of the pro mini ? As interrupt is not used in MySensors for the NRF24, it's not useful while it creates some side effects.I explain you my problem:
I made a door sensor using a reed switch with both normally open and normally closed pins, and connected them to D2 and D3 (+ ground on the other side connected, as on my last picture above).
In the code I switch the status of the pins in the loop between HIGH/LOW values and set the interrupt on the unconnected pin so the pin is connected to ground only during a very short time (just the time to get out of the sleep mode). I'm supposed to have a very low consumption during deep sleep mode (few microamps). But I have that only when D2 is not connected to ground. If it's connected then it seems I have some current leaking from the INT pin of the NRF24 to the ground through the reed switch, as the board is using 6.5mA.
Without any other change, I made a barbaric cut of the trace near the NRF24 and now the current consumption is around 1.5 µA for both states of the reed switch. For the next boards I will just remove the INT pin of the NRF24, but it would be more simple to have nothing to do :PJust in case this is my sketch (not final, please be tolerant) but I don't think it's really relevant
// Enable debug prints #define MY_DEBUG // Enable and select radio type attached #define MY_RADIO_NRF24 #include <SPI.h> #include <MyConfig.h> #include <MySensors.h> #include <SystemStatus.h> #define SKETCH_NAME "NCA Door Sensor" #define SKETCH_MAJOR_VER "0" #define SKETCH_MINOR_VER "7" #define PRIMARY_CHILD_ID 30 #define SECONDARY_CHILD_ID 4 #define PRIMARY_BUTTON_PIN 2 // Arduino Digital I/O pin for button/reed switch #define SECONDARY_BUTTON_PIN 3 // Arduino Digital I/O pin for button/reed switch #if (PRIMARY_BUTTON_PIN < 2 || PRIMARY_BUTTON_PIN > 3) #error PRIMARY_BUTTON_PIN must be either 2 or 3 for interrupts to work #endif #if (SECONDARY_BUTTON_PIN < 2 || SECONDARY_BUTTON_PIN > 3) #error SECONDARY_BUTTON_PIN must be either 2 or 3 for interrupts to work #endif #if (PRIMARY_BUTTON_PIN == SECONDARY_BUTTON_PIN) #error PRIMARY_BUTTON_PIN and BUTTON_PIN2 cannot be the same #endif #if (PRIMARY_CHILD_ID == SECONDARY_CHILD_ID) #error PRIMARY_CHILD_ID and SECONDARY_CHILD_ID cannot be the same #endif #define MY_NODE_ID 2 #define MY_PARENT_NODE_ID 0 // Change to V_LIGHT if you use S_LIGHT in presentation below MyMessage msg(PRIMARY_CHILD_ID, V_TRIPPED); //MyMessage msg2(SECONDARY_CHILD_ID, V_TRIPPED); // Parameters for VCC measurement const int VccMin = 2400; // Minimum expected Vcc level, in Volts. If you have updated bootloader&BOD you can change to 1.8V here const int VccMax = 3000; // Maximum expected Vcc level, in Volts. SystemStatus vcc(); int LastBatteryPercent = 200; // so we are sure to send the battery level at first check bool isEven = false; // to check+send battery level only for each open+close cycles // This is the activated pin, on which the interrupt is set byte connectedPin = PRIMARY_BUTTON_PIN; byte connectedPinAtLastSending = 0; // Initialized at 0 so we will always send the first time void setup() { // First thing to do: change clock prescaling to 8 to change from 8MHz to 1MHz // of course not necessary if you already have updated fuses and bootloader... #ifndef MY_DEBUG // only if we are not in debug mode, so we can keep the fast baudrate in debug clock_prescale_set (clock_div_8); #endif } void presentation() { // Send the sketch version information to the gateway and Controller sendSketchInfo(SKETCH_NAME, SKETCH_MAJOR_VER "." SKETCH_MINOR_VER); // Register binary input sensor to sensor_node (they will be created as child devices) present(PRIMARY_CHILD_ID, S_DOOR); } // Loop will iterate on changes on the BUTTON_PINs void loop() { // Short delay to allow buttons to properly settle sleep(5); deActivatePin(PRIMARY_BUTTON_PIN); deActivatePin(SECONDARY_BUTTON_PIN); // Check if the previously connected pin is now connected. We do that because it's the most likely to be unconnected now // so it's the best way not to lose any current byte newConnectedPin = GetNonConnectedPin(); if (checkPinIsConnected(connectedPin)) { // If pin is still connected we set back the value to connected pin newConnectedPin = connectedPin; #ifdef MY_DEBUG Serial.println("Connected pin is connected !"); #endif } connectedPin = newConnectedPin; // If connected pin is different that the one during the last sending of status, we send again #ifdef MY_DEBUG Serial.print("Connected pin = "); Serial.println(connectedPin); Serial.print("New Connected pin = "); Serial.println(newConnectedPin); #endif if (connectedPin != connectedPinAtLastSending) { // Value has changed from last transmission, send the updated value send(msg.set(connectedPin==PRIMARY_BUTTON_PIN ? 1 : 0)); connectedPinAtLastSending = connectedPin; isEven = !isEven; } if (isEven) { // send only every two changes for a full open + close cycle int currentBatteryPercent = SystemStatus().getVCCPercent(VccMin, VccMax); if (currentBatteryPercent != LastBatteryPercent) { LastBatteryPercent = currentBatteryPercent; sendBatteryLevel(currentBatteryPercent); } } #ifdef MY_DEBUG Serial.print("Preparing to sleep, pin "); Serial.println(GetNonConnectedPin()); wait(50); #endif // Activate the non connected pin before setting up interrupt activatePin(GetNonConnectedPin()); // Sleep until something happens with the door sensor sleep(GetNonConnectedPin()-2, CHANGE); } void activatePin(byte pin) { // Set pin as input pinMode(pin, INPUT); // Activate internal pull up digitalWrite(pin, HIGH); } void deActivatePin(byte pin) { // Set back pin as output, low pinMode(pin, OUTPUT); digitalWrite(pin, LOW); } // Will check if pin is grounded (returns true) or not boolean checkPinIsConnected(byte pin) { activatePin(pin); // Read value byte valPin = digitalRead(pin); deActivatePin(pin); #ifdef MY_DEBUG Serial.print("checkPinIsConnected pin = "); Serial.print(pin); Serial.print(", value = "); Serial.println(valPin); #endif return valPin != HIGH; } // Returns the pin that is not connected byte GetNonConnectedPin() { return (connectedPin == PRIMARY_BUTTON_PIN) ? SECONDARY_BUTTON_PIN : PRIMARY_BUTTON_PIN; } -
Hello @sundberg84 I have a request for update for your board :)
Can you remove the trace from the INT pin of the NRF24 to the D2 pin of the pro mini ? As interrupt is not used in MySensors for the NRF24, it's not useful while it creates some side effects.I explain you my problem:
I made a door sensor using a reed switch with both normally open and normally closed pins, and connected them to D2 and D3 (+ ground on the other side connected, as on my last picture above).
In the code I switch the status of the pins in the loop between HIGH/LOW values and set the interrupt on the unconnected pin so the pin is connected to ground only during a very short time (just the time to get out of the sleep mode). I'm supposed to have a very low consumption during deep sleep mode (few microamps). But I have that only when D2 is not connected to ground. If it's connected then it seems I have some current leaking from the INT pin of the NRF24 to the ground through the reed switch, as the board is using 6.5mA.
Without any other change, I made a barbaric cut of the trace near the NRF24 and now the current consumption is around 1.5 µA for both states of the reed switch. For the next boards I will just remove the INT pin of the NRF24, but it would be more simple to have nothing to do :PJust in case this is my sketch (not final, please be tolerant) but I don't think it's really relevant
// Enable debug prints #define MY_DEBUG // Enable and select radio type attached #define MY_RADIO_NRF24 #include <SPI.h> #include <MyConfig.h> #include <MySensors.h> #include <SystemStatus.h> #define SKETCH_NAME "NCA Door Sensor" #define SKETCH_MAJOR_VER "0" #define SKETCH_MINOR_VER "7" #define PRIMARY_CHILD_ID 30 #define SECONDARY_CHILD_ID 4 #define PRIMARY_BUTTON_PIN 2 // Arduino Digital I/O pin for button/reed switch #define SECONDARY_BUTTON_PIN 3 // Arduino Digital I/O pin for button/reed switch #if (PRIMARY_BUTTON_PIN < 2 || PRIMARY_BUTTON_PIN > 3) #error PRIMARY_BUTTON_PIN must be either 2 or 3 for interrupts to work #endif #if (SECONDARY_BUTTON_PIN < 2 || SECONDARY_BUTTON_PIN > 3) #error SECONDARY_BUTTON_PIN must be either 2 or 3 for interrupts to work #endif #if (PRIMARY_BUTTON_PIN == SECONDARY_BUTTON_PIN) #error PRIMARY_BUTTON_PIN and BUTTON_PIN2 cannot be the same #endif #if (PRIMARY_CHILD_ID == SECONDARY_CHILD_ID) #error PRIMARY_CHILD_ID and SECONDARY_CHILD_ID cannot be the same #endif #define MY_NODE_ID 2 #define MY_PARENT_NODE_ID 0 // Change to V_LIGHT if you use S_LIGHT in presentation below MyMessage msg(PRIMARY_CHILD_ID, V_TRIPPED); //MyMessage msg2(SECONDARY_CHILD_ID, V_TRIPPED); // Parameters for VCC measurement const int VccMin = 2400; // Minimum expected Vcc level, in Volts. If you have updated bootloader&BOD you can change to 1.8V here const int VccMax = 3000; // Maximum expected Vcc level, in Volts. SystemStatus vcc(); int LastBatteryPercent = 200; // so we are sure to send the battery level at first check bool isEven = false; // to check+send battery level only for each open+close cycles // This is the activated pin, on which the interrupt is set byte connectedPin = PRIMARY_BUTTON_PIN; byte connectedPinAtLastSending = 0; // Initialized at 0 so we will always send the first time void setup() { // First thing to do: change clock prescaling to 8 to change from 8MHz to 1MHz // of course not necessary if you already have updated fuses and bootloader... #ifndef MY_DEBUG // only if we are not in debug mode, so we can keep the fast baudrate in debug clock_prescale_set (clock_div_8); #endif } void presentation() { // Send the sketch version information to the gateway and Controller sendSketchInfo(SKETCH_NAME, SKETCH_MAJOR_VER "." SKETCH_MINOR_VER); // Register binary input sensor to sensor_node (they will be created as child devices) present(PRIMARY_CHILD_ID, S_DOOR); } // Loop will iterate on changes on the BUTTON_PINs void loop() { // Short delay to allow buttons to properly settle sleep(5); deActivatePin(PRIMARY_BUTTON_PIN); deActivatePin(SECONDARY_BUTTON_PIN); // Check if the previously connected pin is now connected. We do that because it's the most likely to be unconnected now // so it's the best way not to lose any current byte newConnectedPin = GetNonConnectedPin(); if (checkPinIsConnected(connectedPin)) { // If pin is still connected we set back the value to connected pin newConnectedPin = connectedPin; #ifdef MY_DEBUG Serial.println("Connected pin is connected !"); #endif } connectedPin = newConnectedPin; // If connected pin is different that the one during the last sending of status, we send again #ifdef MY_DEBUG Serial.print("Connected pin = "); Serial.println(connectedPin); Serial.print("New Connected pin = "); Serial.println(newConnectedPin); #endif if (connectedPin != connectedPinAtLastSending) { // Value has changed from last transmission, send the updated value send(msg.set(connectedPin==PRIMARY_BUTTON_PIN ? 1 : 0)); connectedPinAtLastSending = connectedPin; isEven = !isEven; } if (isEven) { // send only every two changes for a full open + close cycle int currentBatteryPercent = SystemStatus().getVCCPercent(VccMin, VccMax); if (currentBatteryPercent != LastBatteryPercent) { LastBatteryPercent = currentBatteryPercent; sendBatteryLevel(currentBatteryPercent); } } #ifdef MY_DEBUG Serial.print("Preparing to sleep, pin "); Serial.println(GetNonConnectedPin()); wait(50); #endif // Activate the non connected pin before setting up interrupt activatePin(GetNonConnectedPin()); // Sleep until something happens with the door sensor sleep(GetNonConnectedPin()-2, CHANGE); } void activatePin(byte pin) { // Set pin as input pinMode(pin, INPUT); // Activate internal pull up digitalWrite(pin, HIGH); } void deActivatePin(byte pin) { // Set back pin as output, low pinMode(pin, OUTPUT); digitalWrite(pin, LOW); } // Will check if pin is grounded (returns true) or not boolean checkPinIsConnected(byte pin) { activatePin(pin); // Read value byte valPin = digitalRead(pin); deActivatePin(pin); #ifdef MY_DEBUG Serial.print("checkPinIsConnected pin = "); Serial.print(pin); Serial.print(", value = "); Serial.println(valPin); #endif return valPin != HIGH; } // Returns the pin that is not connected byte GetNonConnectedPin() { return (connectedPin == PRIMARY_BUTTON_PIN) ? SECONDARY_BUTTON_PIN : PRIMARY_BUTTON_PIN; }@Nca78 Thanks. Someone else posted this as well. I will update this Inow rev 9 with some jumper or something.