Skip to content
  • MySensors
  • OpenHardware.io
  • Categories
  • Recent
  • Tags
  • Popular
Skins
  • Light
  • Brite
  • Cerulean
  • Cosmo
  • Flatly
  • Journal
  • Litera
  • Lumen
  • Lux
  • Materia
  • Minty
  • Morph
  • Pulse
  • Sandstone
  • Simplex
  • Sketchy
  • Spacelab
  • United
  • Yeti
  • Zephyr
  • Dark
  • Cyborg
  • Darkly
  • Quartz
  • Slate
  • Solar
  • Superhero
  • Vapor

  • Default (No Skin)
  • No Skin
Collapse
Brand Logo
  1. Home
  2. General Discussion
  3. What did you build today (Pictures) ?

What did you build today (Pictures) ?

Scheduled Pinned Locked Moved General Discussion
1.1k Posts 105 Posters 203.2k Views 98 Watching
  • Oldest to Newest
  • Newest to Oldest
  • Most Votes
Reply
  • Reply as topic
Log in to reply
This topic has been deleted. Only users with topic management privileges can see it.
  • zboblamontZ Offline
    zboblamontZ Offline
    zboblamont
    wrote on last edited by zboblamont
    #676

    @gohan Sorry, had to edit original post which was too confused on re-reading.
    The pump speed curves determine the pressure and flow rate to the radiators, it is the radiators which determine the actual flow for a given temperature drop across them, and speed in raising room temperatures.
    The combined flow rate for all the radiators falls within the lower pump curve, any increase in pump speed only increases pressure, NOT speed of heating.
    Aside the original mis-set HIGH rate on the pump, there are 3 manual valves left in the system, and no matter how close I try to balance them it was always a compromise, and heat inevitably goes back to the return as pressure increases
    Once these are replaced with flow control version in the next week, it will not matter what the pressure is, the radiator flows will be capped at the most efficient level.

    1 Reply Last reply
    0
    • D Offline
      D Offline
      dakipro
      wrote on last edited by dakipro
      #677

      My wife said "I do not want to see "those things""...
      Challenge accepted!
      0_1544224086865_TV LED display 1 - 20181207_171500.jpg

      1_1544224086867_TV LED display 2 - 20181207_183612.jpg

      0_1544224266422_MVI_5770.00_00_03_13.Still001.jpg

      (see the gif in action here https://ibb.co/BCbS2Dc )

      C: OpenHAB2 with node-red on linux laptop
      GW: Arduino Nano - W5100 Ethernet, Nrf24l01+ 2,4Ghz mqtt
      GW: Arduino Mega, RFLink 433Mhz

      sundberg84S Nca78N bjacobseB 3 Replies Last reply
      14
      • E Offline
        E Offline
        executivul
        wrote on last edited by executivul
        #678

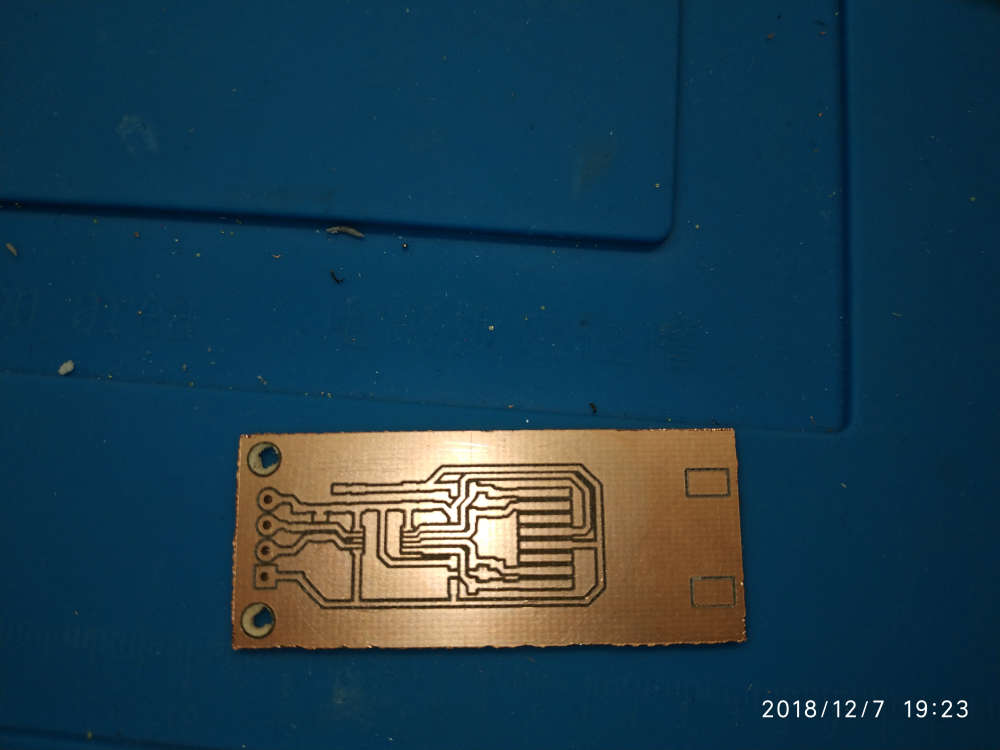
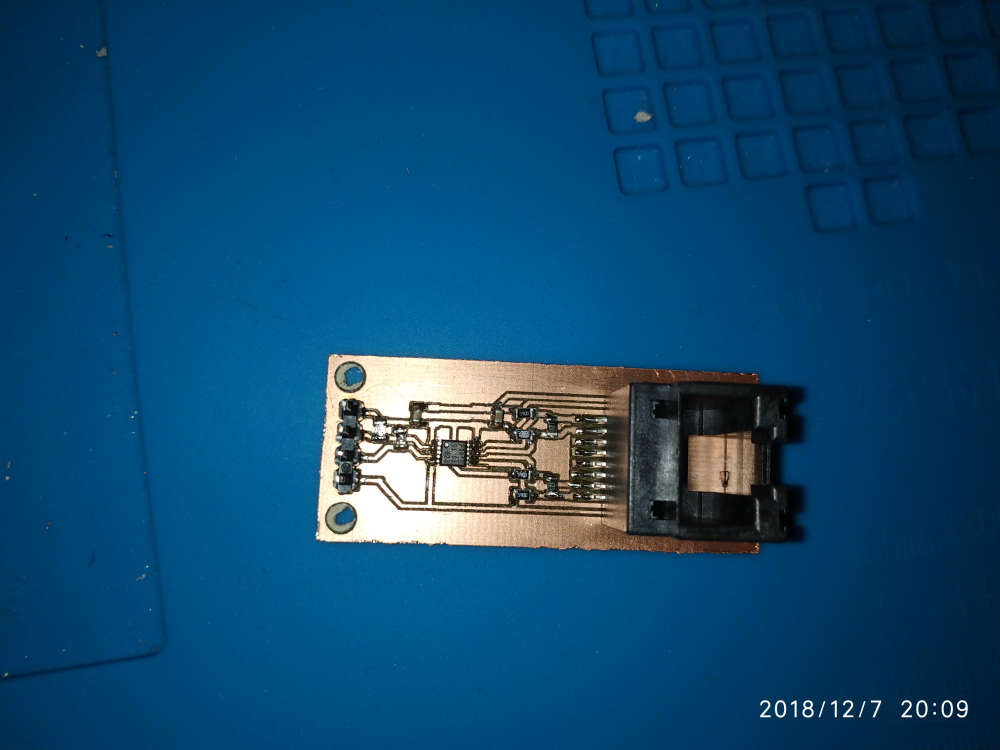
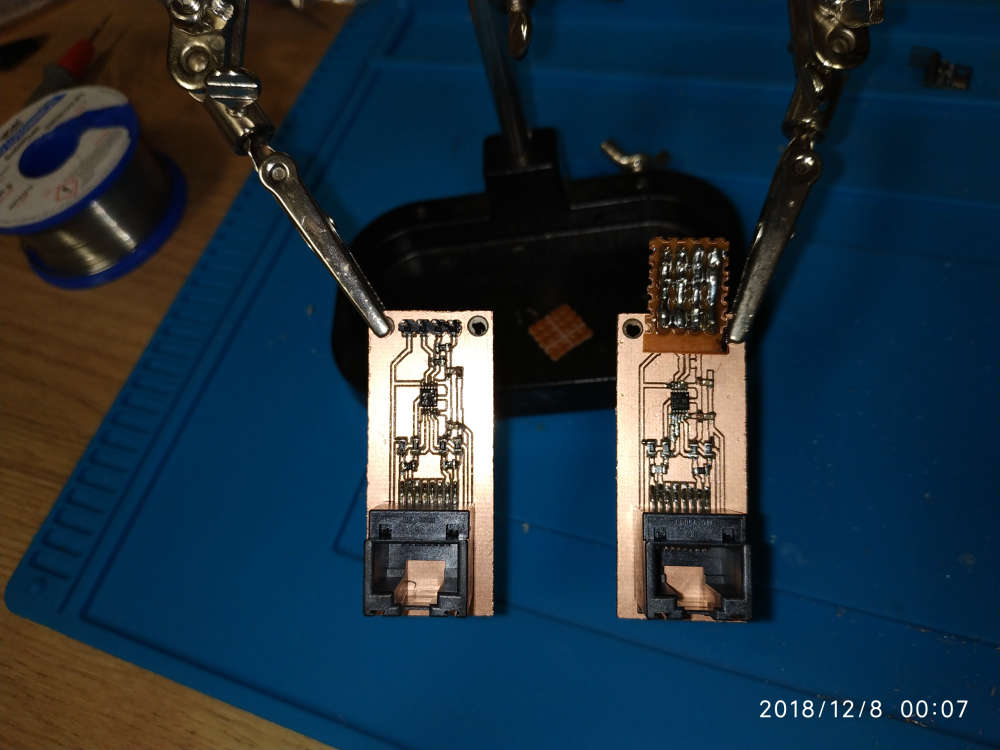
        Milled some PCA9615 differential I2C converters for the sensors ouside: magnetometer for the gas meter, temp/hum, baro.
        Until now I've used a 7 meter long cable, but whenever the gas water heater fired up the Arduino would just freeze losing the count of gas pulses, I've tried shielded cable but it hasn't solved the issue.
        Since Sparkfun's breakout boards are on the wrong side of the pond I decided to make my own.
        Really hope the Arduino doesn't lock up anymore.

        LE. That TSSOP10 was a b*tch to solder 😁

        0_1544228821399_IMG_20181207_192354.jpg 0_1544228904350_IMG_20181207_200947.jpg 0_1544228912010_IMG_20181208_000800.jpg

        1 Reply Last reply
        3
        • D dakipro

          My wife said "I do not want to see "those things""...
          Challenge accepted!
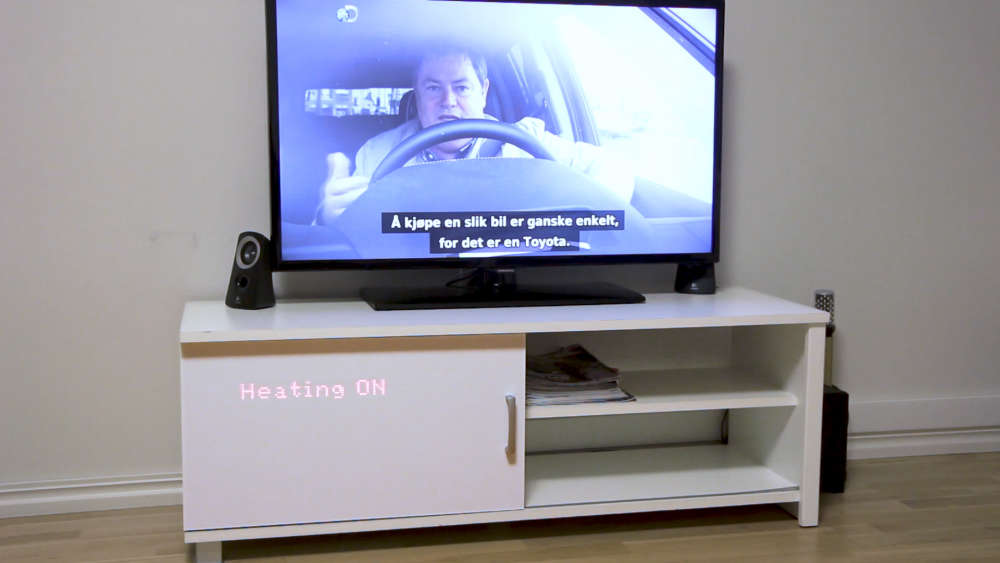
          0_1544224086865_TV LED display 1 - 20181207_171500.jpg

          1_1544224086867_TV LED display 2 - 20181207_183612.jpg

          0_1544224266422_MVI_5770.00_00_03_13.Still001.jpg

          (see the gif in action here https://ibb.co/BCbS2Dc )

          sundberg84S Offline
          sundberg84S Offline
          sundberg84
          Hardware Contributor
          wrote on last edited by
          #679

          @dakipro woaw!!! 👏

          Controller: Proxmox VM - Home Assistant
          MySensors GW: Arduino Uno - W5100 Ethernet, Gw Shield Nrf24l01+ 2,4Ghz
          MySensors GW: Arduino Uno - Gw Shield RFM69, 433mhz
          RFLink GW - Arduino Mega + RFLink Shield, 433mhz

          1 Reply Last reply
          0
          • D dakipro

            My wife said "I do not want to see "those things""...
            Challenge accepted!

            0_1544224086865_TV LED display 1 - 20181207_171500.jpg

            1_1544224086867_TV LED display 2 - 20181207_183612.jpg

            0_1544224266422_MVI_5770.00_00_03_13.Still001.jpg

            (see the gif in action here https://ibb.co/BCbS2Dc )

            Nca78N Offline
            Nca78N Offline
            Nca78
            Hardware Contributor
            wrote on last edited by
            #680

            @dakipro thank you that's what I planned to do but wasn't sure it would be visible through the plastic layer.
            Coupled with capacitive sensors it could give awesome results !

            D 1 Reply Last reply
            0
            • D dakipro

              My wife said "I do not want to see "those things""...
              Challenge accepted!

              0_1544224086865_TV LED display 1 - 20181207_171500.jpg

              1_1544224086867_TV LED display 2 - 20181207_183612.jpg

              0_1544224266422_MVI_5770.00_00_03_13.Still001.jpg

              (see the gif in action here https://ibb.co/BCbS2Dc )

              bjacobseB Offline
              bjacobseB Offline
              bjacobse
              wrote on last edited by
              #681

              @dakipro
              great job :-)
              , and also the show on TV is quite funny, those two Englishmen in US buying old cars renovating and selling those

              1 Reply Last reply
              0
              • Nca78N Nca78

                @dakipro thank you that's what I planned to do but wasn't sure it would be visible through the plastic layer.
                Coupled with capacitive sensors it could give awesome results !

                D Offline
                D Offline
                dakipro
                wrote on last edited by
                #682

                @nca78 I used white decorative self adhesive wallpaper, so not sure which plastic you are planing to use, but you can easily test that before mounting I think. If you go for paper/foil, put some one-peace plastic in front of the displays as they (mine) are not perfectly soldered in line, so they are noticeable sa foil will glue to them. Not a big deal for me, but would love "the perfection". But yeah, plastic or some harder material would work awesome I think.

                All in all, not difficult project and a very high wow-factor/time-spent value (and waf)

                C: OpenHAB2 with node-red on linux laptop
                GW: Arduino Nano - W5100 Ethernet, Nrf24l01+ 2,4Ghz mqtt
                GW: Arduino Mega, RFLink 433Mhz

                Nca78N bjacobseB 2 Replies Last reply
                0
                • D dakipro

                  @nca78 I used white decorative self adhesive wallpaper, so not sure which plastic you are planing to use, but you can easily test that before mounting I think. If you go for paper/foil, put some one-peace plastic in front of the displays as they (mine) are not perfectly soldered in line, so they are noticeable sa foil will glue to them. Not a big deal for me, but would love "the perfection". But yeah, plastic or some harder material would work awesome I think.

                  All in all, not difficult project and a very high wow-factor/time-spent value (and waf)

                  Nca78N Offline
                  Nca78N Offline
                  Nca78
                  Hardware Contributor
                  wrote on last edited by
                  #683

                  @dakipro ah ok you cheated :D

                  I thought you kept the plastic layer that's glued on top of the wood panel. I'll try to get some samples from the company selling those here and make some tests then.

                  1 Reply Last reply
                  0
                  • D dakipro

                    @nca78 I used white decorative self adhesive wallpaper, so not sure which plastic you are planing to use, but you can easily test that before mounting I think. If you go for paper/foil, put some one-peace plastic in front of the displays as they (mine) are not perfectly soldered in line, so they are noticeable sa foil will glue to them. Not a big deal for me, but would love "the perfection". But yeah, plastic or some harder material would work awesome I think.

                    All in all, not difficult project and a very high wow-factor/time-spent value (and waf)

                    bjacobseB Offline
                    bjacobseB Offline
                    bjacobse
                    wrote on last edited by
                    #684

                    @dakipro
                    BTW I can only recommend to spray your bare cobber wires with Plastic 70, as this will protect your cobber from corrosion with a thin layer acrylic

                    0_1544345727981_plastik_70.png

                    1 Reply Last reply
                    0
                    • alexsh1A Offline
                      alexsh1A Offline
                      alexsh1
                      wrote on last edited by alexsh1
                      #685

                      Try this one.
                      The smallest board I have ever assembled using just a hot fan. A solar battery charger based on BQ25504 from a solar panel. Almost all components are 0402. Far too small for my liking, but can go under the solar panel.
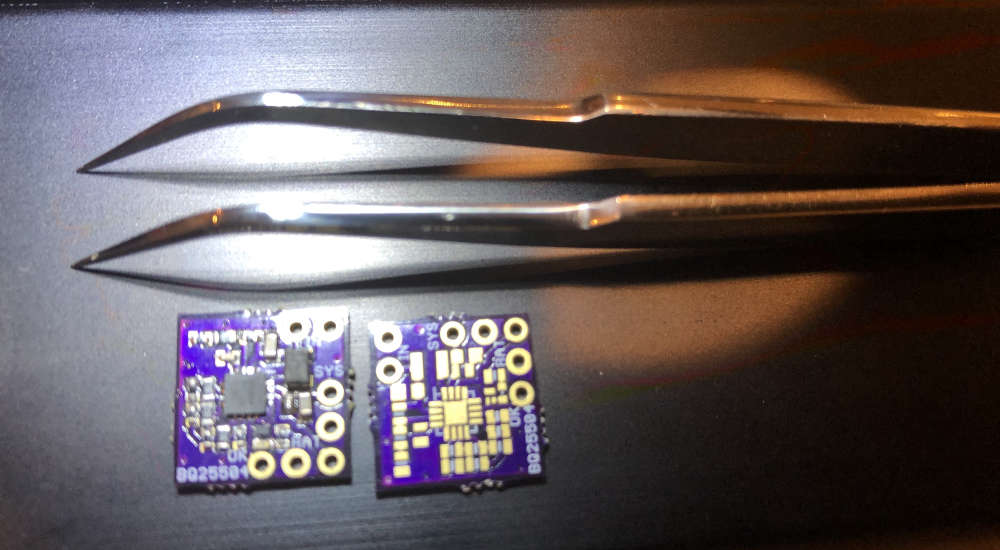
                      0_1546964306401_FFE84E8C-991D-4342-8272-2180F79333A8.jpeg

                      gohanG 1 Reply Last reply
                      5
                      • nagelcN Offline
                        nagelcN Offline
                        nagelc
                        wrote on last edited by
                        #686

                        Looks great. I'm still happy when I get an 0805 down well. Guess I have to keep practicing.

                        Nca78N alexsh1A 2 Replies Last reply
                        0
                        • nagelcN nagelc

                          Looks great. I'm still happy when I get an 0805 down well. Guess I have to keep practicing.

                          Nca78N Offline
                          Nca78N Offline
                          Nca78
                          Hardware Contributor
                          wrote on last edited by
                          #687

                          @nagelc said in What did you build today (Pictures) ?:

                          Looks great. I'm still happy when I get an 0805 down well. Guess I have to keep practicing.

                          Try solder paste applied with a thin needle, and a hot air gun at minimum speed (so components don't fly away). Then it's really easy to do SMD :)

                          alexsh1A nagelcN 2 Replies Last reply
                          0
                          • Nca78N Nca78

                            @nagelc said in What did you build today (Pictures) ?:

                            Looks great. I'm still happy when I get an 0805 down well. Guess I have to keep practicing.

                            Try solder paste applied with a thin needle, and a hot air gun at minimum speed (so components don't fly away). Then it's really easy to do SMD :)

                            alexsh1A Offline
                            alexsh1A Offline
                            alexsh1
                            wrote on last edited by
                            #688

                            @nca78 there many other aspects. I’m using a low temp melting solder paste. I have been using only a top quality (no AliExpress) one from Chipquick. It has to be stored property in the fridge.

                            Using stencil may help. I’m not using it and have to doze the paste very precisely which is a challenge. This is why my soldering is not 100% consistent, but it works. With 0402 components it is not easy - the pad size is very small.

                            However, I must admit, 0402 are far too small. In the process, unless your space / lab is very well organised many components are lost. And a good magnifying glass / microscope is a must too. In the future, i’ll try to stick to 0805 or larger - these are a bit larger and more visible.

                            All in all, this is not as difficult as many people may think. With a little bit of practice, this can be done.

                            1 Reply Last reply
                            1
                            • nagelcN nagelc

                              Looks great. I'm still happy when I get an 0805 down well. Guess I have to keep practicing.

                              alexsh1A Offline
                              alexsh1A Offline
                              alexsh1
                              wrote on last edited by
                              #689

                              @nagelc try 0603 size first. I am sure you will manage it with 0402 with a good microscope ;-))

                              I’m still using a magnifying glass which is an extra challenge. Eventually I will have to buy a good microscope

                              1 Reply Last reply
                              0
                              • alexsh1A alexsh1

                                Try this one.
                                The smallest board I have ever assembled using just a hot fan. A solar battery charger based on BQ25504 from a solar panel. Almost all components are 0402. Far too small for my liking, but can go under the solar panel.

                                0_1546964306401_FFE84E8C-991D-4342-8272-2180F79333A8.jpeg

                                gohanG Offline
                                gohanG Offline
                                gohan
                                Mod
                                wrote on last edited by
                                #690

                                @alexsh1 how much did one module cost?

                                sundberg84S alexsh1A 2 Replies Last reply
                                0
                                • gohanG gohan

                                  @alexsh1 how much did one module cost?

                                  sundberg84S Offline
                                  sundberg84S Offline
                                  sundberg84
                                  Hardware Contributor
                                  wrote on last edited by
                                  #691

                                  Today i recieved my new mini-easy-pcb i posted some info about 3 months ago. This with a breakoutboard-daugher board for all "common" sensors in the MySensors shop. I want to create a small motherboard which can be powered using a battery but also can use the battery for UPS/backup if powered from another daugherboard. The motherboard should be standard and then I would be able to add 1-2 daugherboards to specify the node.

                                  The breakoutboard is just for test, but can be used by newbies offcourse.
                                  My wish is to create the ultimate security sensor running on 12v but with a battery backup. It should include motion, temp, smoke and light.
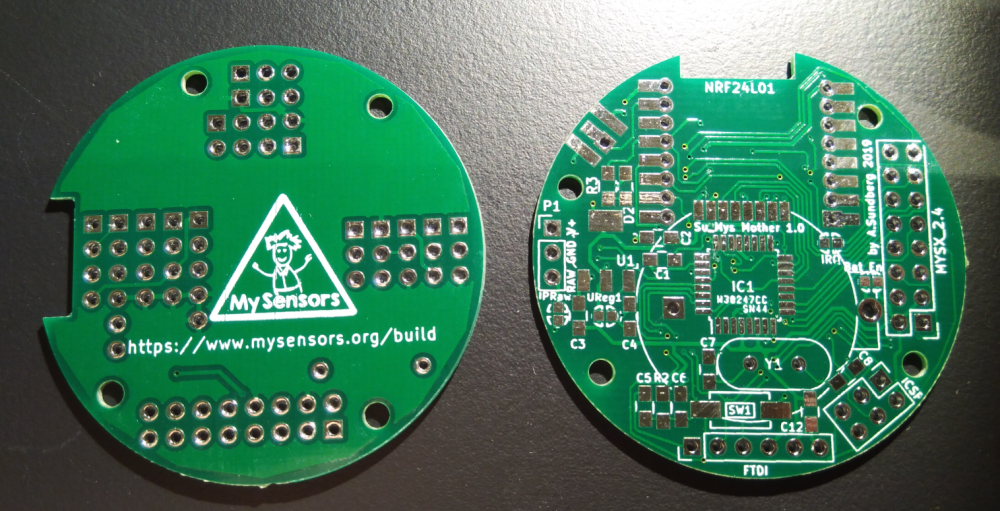
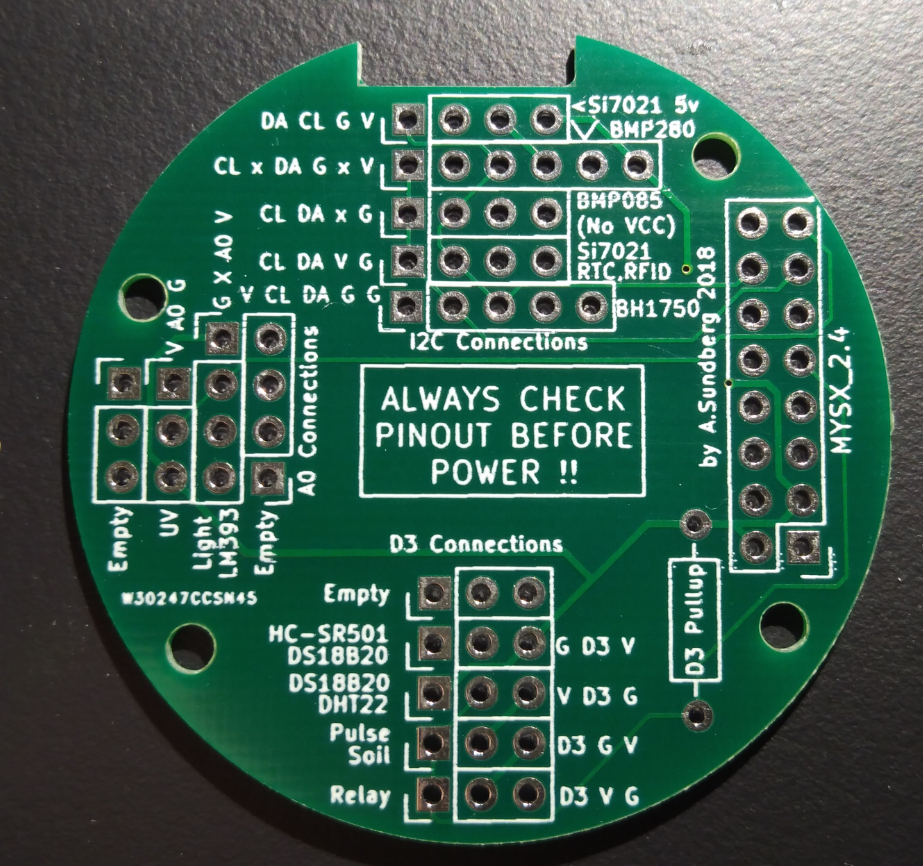
                                  0_1548081587912_377d9c22-187f-4482-812f-80bb7d553bce-image.png

                                  0_1548081617961_8349e553-898f-4e17-b29d-87eba091e53c-image.png

                                  Il will get back in another 3 months when tested ;)

                                  Controller: Proxmox VM - Home Assistant
                                  MySensors GW: Arduino Uno - W5100 Ethernet, Gw Shield Nrf24l01+ 2,4Ghz
                                  MySensors GW: Arduino Uno - Gw Shield RFM69, 433mhz
                                  RFLink GW - Arduino Mega + RFLink Shield, 433mhz

                                  dbemowskD 1 Reply Last reply
                                  4
                                  • sundberg84S sundberg84

                                    Today i recieved my new mini-easy-pcb i posted some info about 3 months ago. This with a breakoutboard-daugher board for all "common" sensors in the MySensors shop. I want to create a small motherboard which can be powered using a battery but also can use the battery for UPS/backup if powered from another daugherboard. The motherboard should be standard and then I would be able to add 1-2 daugherboards to specify the node.

                                    The breakoutboard is just for test, but can be used by newbies offcourse.
                                    My wish is to create the ultimate security sensor running on 12v but with a battery backup. It should include motion, temp, smoke and light.

                                    0_1548081587912_377d9c22-187f-4482-812f-80bb7d553bce-image.png

                                    0_1548081617961_8349e553-898f-4e17-b29d-87eba091e53c-image.png

                                    Il will get back in another 3 months when tested ;)

                                    dbemowskD Offline
                                    dbemowskD Offline
                                    dbemowsk
                                    wrote on last edited by
                                    #692

                                    @sundberg84 Nice job.

                                    Vera Plus running UI7 with MySensors, Sonoffs and 1-Wire devices
                                    Visit my website for more Bits, Bytes and Ramblings from me: http://dan.bemowski.info/

                                    1 Reply Last reply
                                    0
                                    • Nca78N Nca78

                                      @nagelc said in What did you build today (Pictures) ?:

                                      Looks great. I'm still happy when I get an 0805 down well. Guess I have to keep practicing.

                                      Try solder paste applied with a thin needle, and a hot air gun at minimum speed (so components don't fly away). Then it's really easy to do SMD :)

                                      nagelcN Offline
                                      nagelcN Offline
                                      nagelc
                                      wrote on last edited by
                                      #693

                                      @nca78
                                      Thanks for giving me a push. I had used hot air only for removing parts. I got some paste and populated my first board. So easy compared to the soldering iron.

                                      1 Reply Last reply
                                      2
                                      • gohanG gohan

                                        @alexsh1 how much did one module cost?

                                        alexsh1A Offline
                                        alexsh1A Offline
                                        alexsh1
                                        wrote on last edited by
                                        #694

                                        @gohan module? you mean the PCB? or total?

                                        1 Reply Last reply
                                        0
                                        • dbemowskD Offline
                                          dbemowskD Offline
                                          dbemowsk
                                          wrote on last edited by
                                          #695

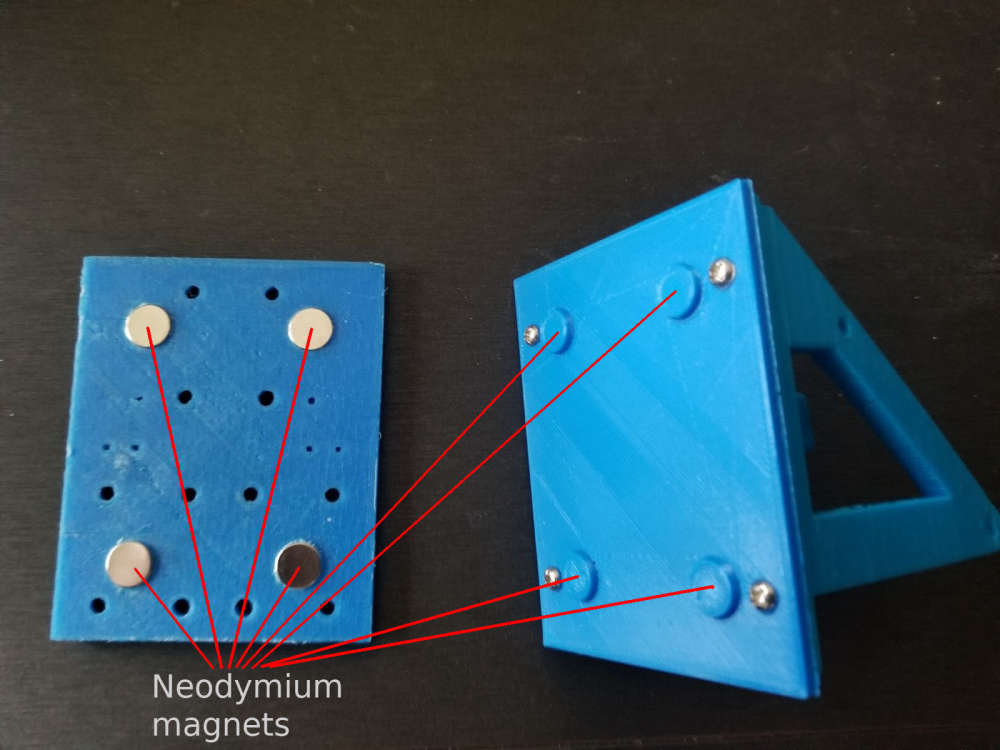
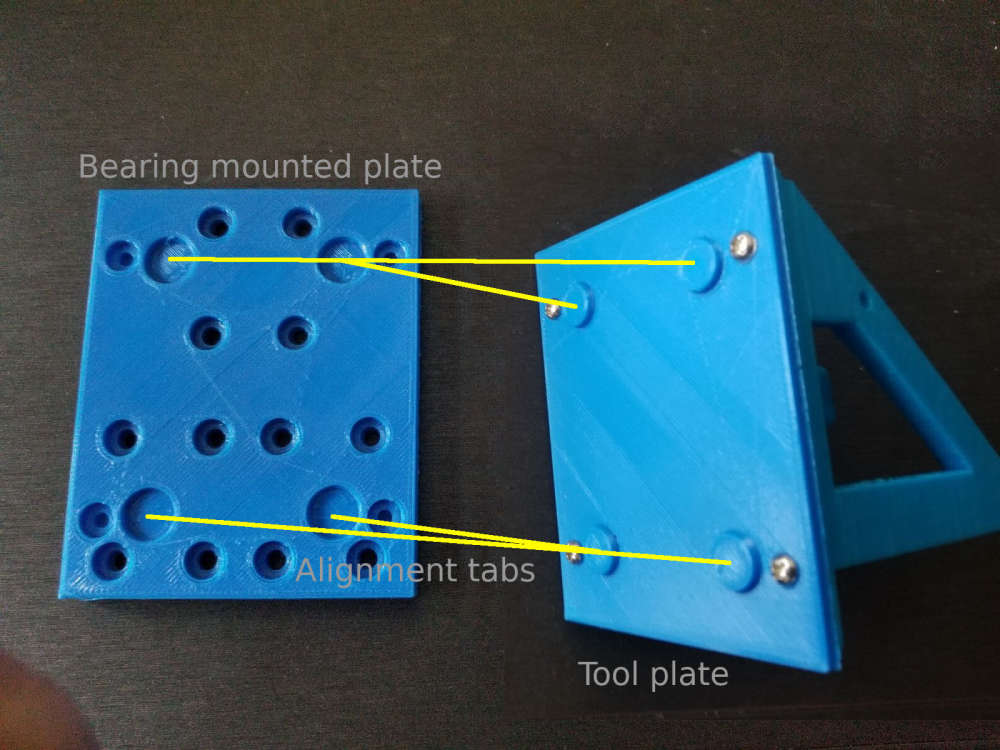
                                          So for some time now I have been working on a conversion to my 3D printer to allow me to change between different tool heads easily, thus increasing the versatility of the machine. To jump right in and give a little background on the mod, I have a plate that mounts to my X carriage that has 4 10mm neodymium magnets in it. These magnets hold the tool in place that will be used which also has 4 magnets in it's mounting plate.0_1549168718079_Resized_20181230_084440_8356-2.jpg
                                          0_1549168740823_Resized_20181230_084411_8868-2.jpg
                                          The first tool that I did was my 3D printer head. I obviously did that one first because I would need that to make future parts and tool heads to expand the machine. Here is my 3D printer head mounted to the working assembly.
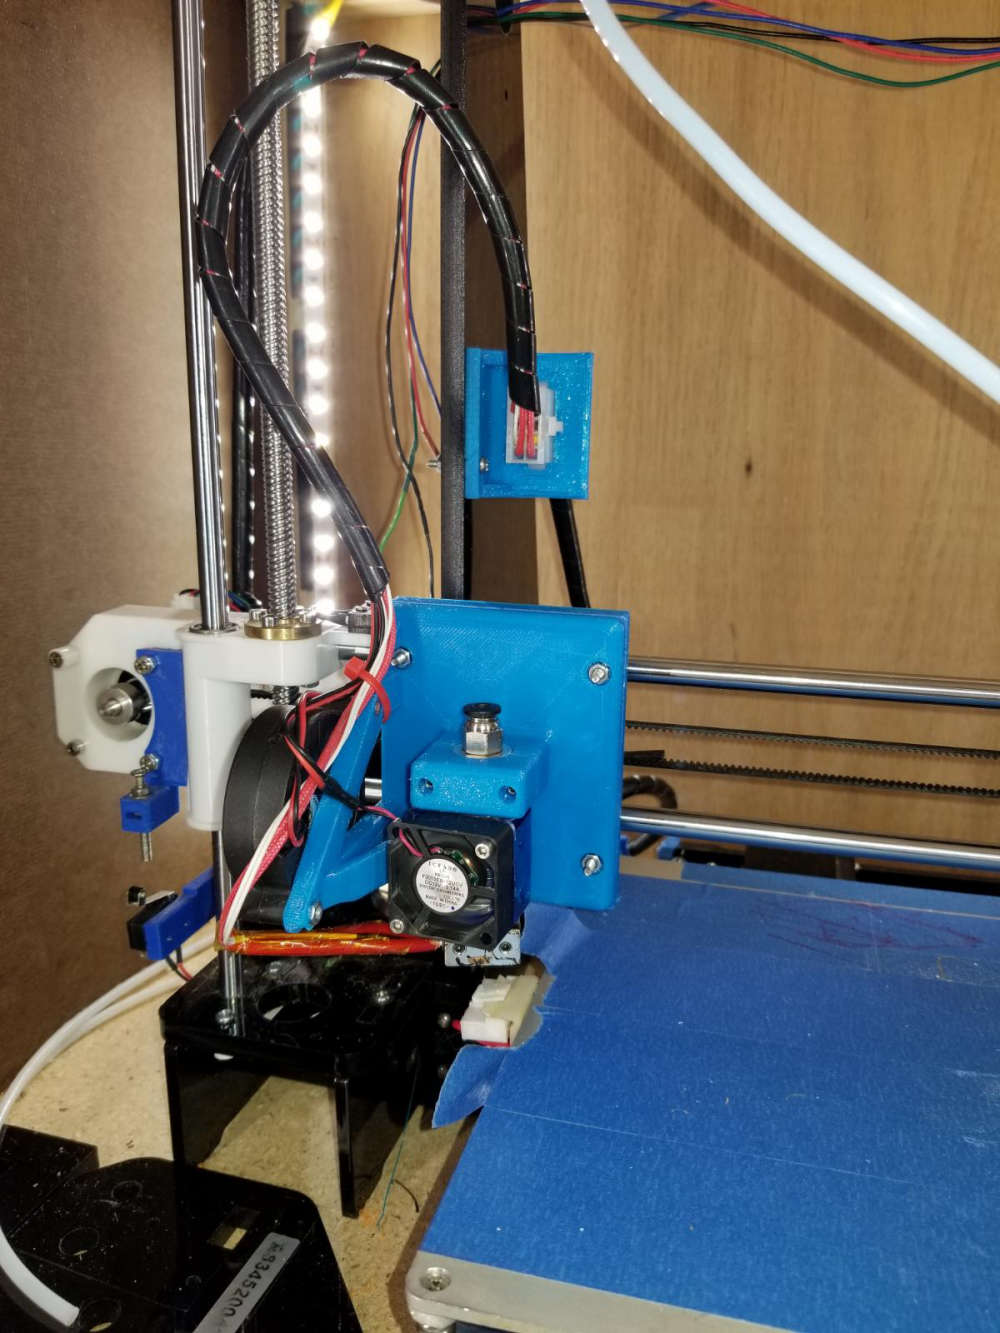
                                          0_1549169544562_Resized_20190118_013816_2670.jpg
                                          Another tool head that I made for this is my simple pen plotter tool for drawing.
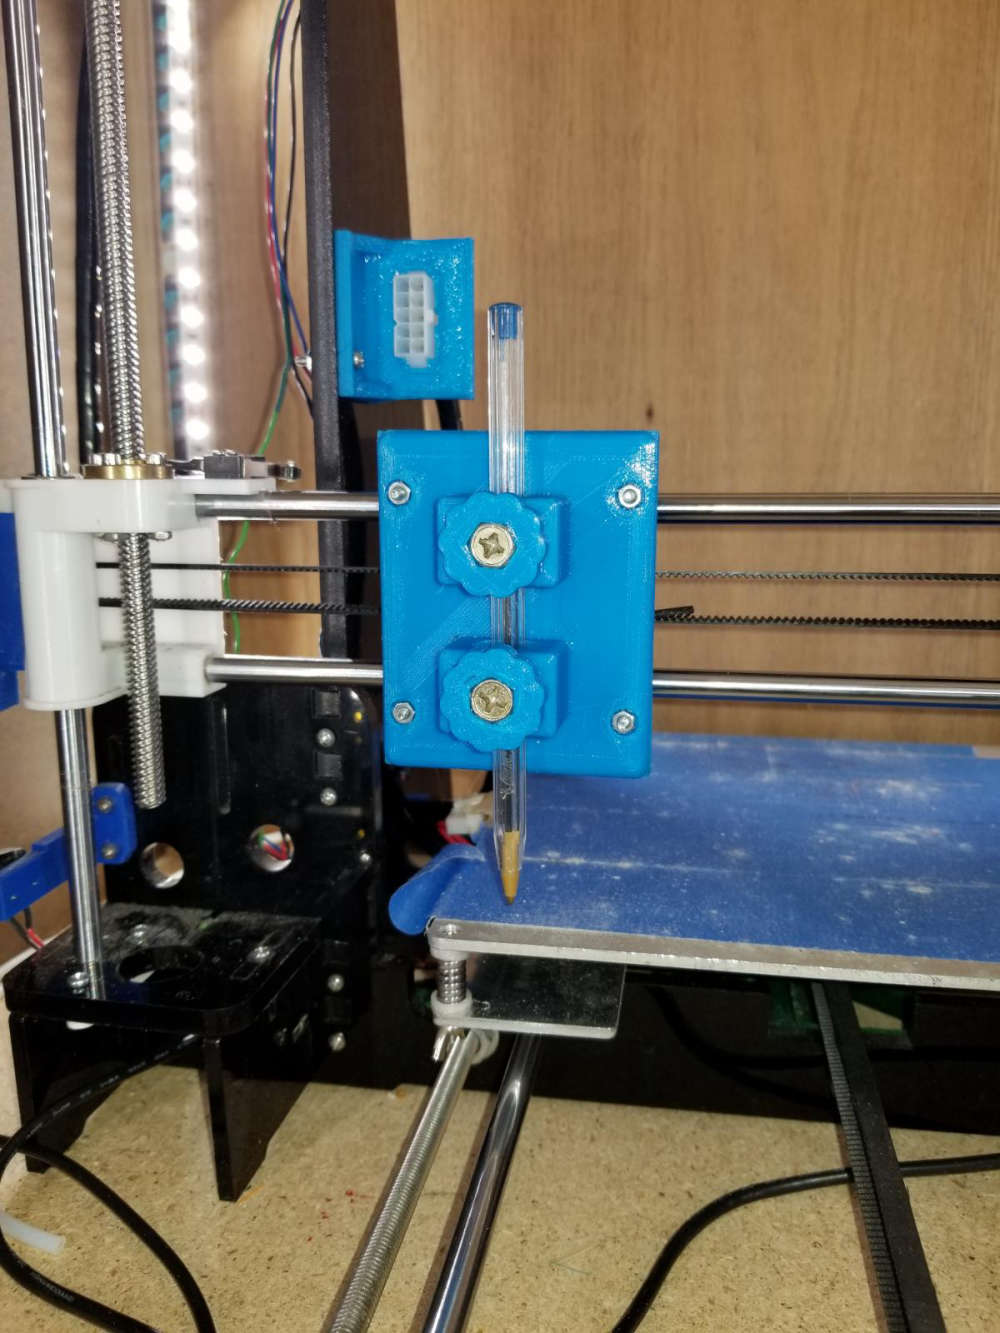
                                          0_1549169817834_Resized_20190202_225547_6180.jpg
                                          Here is a sample of something I did with the pen plotter using fine point sharpie markers. The left is the original image, and the right was done with the plotter.
                                          0_1549170644769_0f86124a-cf32-4e8a-a078-f2e4870df5a3-image.png
                                          The most recent tool head that I did was my laser engraver tool. This tool is the main reason for this post. This is the 6 watt laser module mounted to the carriage.
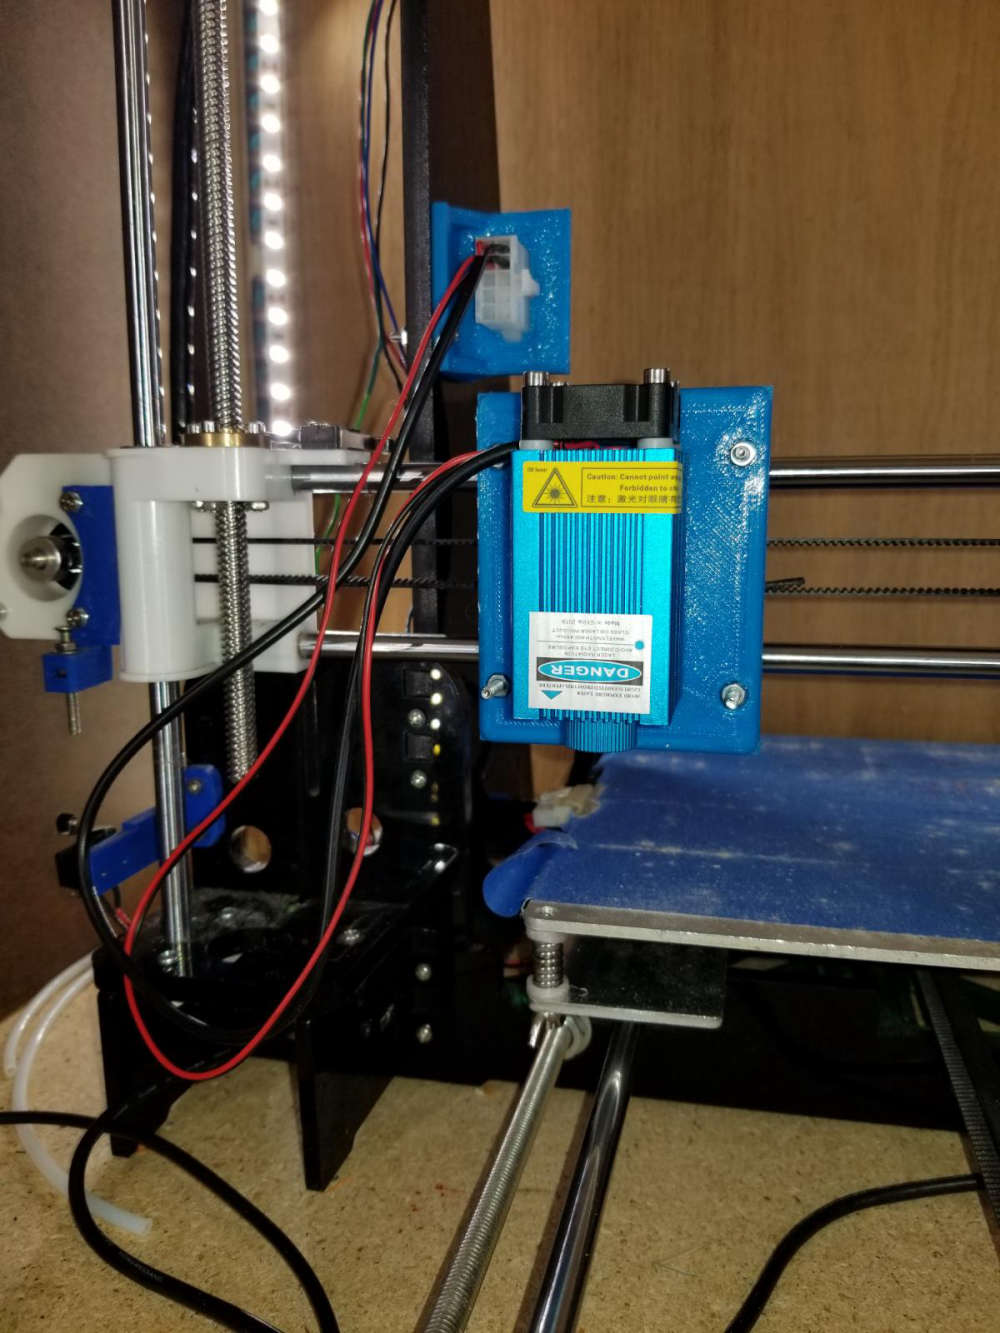
                                          0_1549170198674_Resized_20190202_230033_4069.jpg
                                          So what I am looking to do with this on the MySensors end of things is to build some sort of flame sensor that can monitor the engraving operation to indicate a small fire and take some sort of action, and also report it to my vera controller. Exactly what action I would have it take I have not figured out yet. If anyone has suggestions I'm all ears. I was thinking of something that could easily extinguish the small flame. As for the flame sensor, I know they make these small flame sensor modules, but I don't know how reliable they are, ore even how they work.
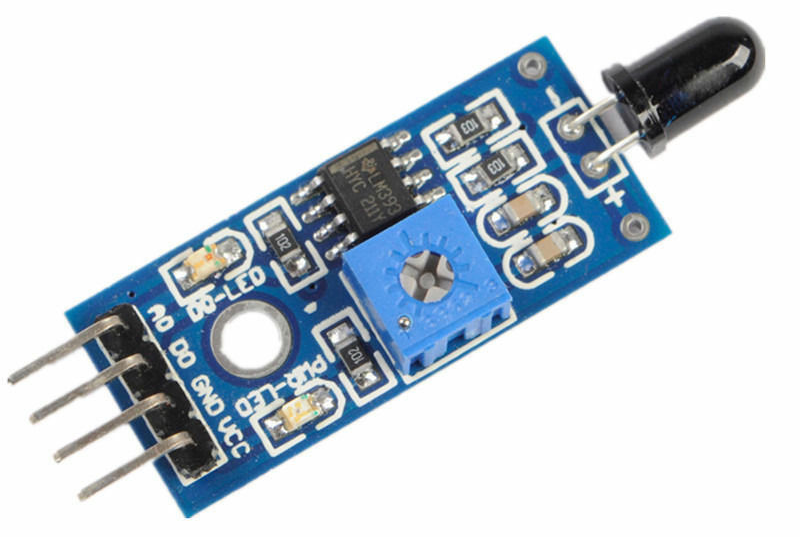
                                          0_1549171496732_6c6a2026-c4f2-408a-83a5-745076ec537d-image.png

                                          For anyone interested, here is a sample engraving on a piece of thin plywood. The left image is the original. The center is at a low resolution, and the right one was at a high resolution.
                                          0_1549172116707_f5a6f311-a35e-4363-8e9d-e4c3cb6460a6-image.png
                                          One other thing that I want to test with this is I've seen people that make circuit boards with these. They spray a layer or two of paint on their blank copper clad and then laser etch their pattern on the painted surface. Then they run it through their ferric chloride or other etching solution. Finally, sand off the layer of paint.

                                          Any suggestions or help people can give is greatly appreciated. Thanks for viewing.

                                          Vera Plus running UI7 with MySensors, Sonoffs and 1-Wire devices
                                          Visit my website for more Bits, Bytes and Ramblings from me: http://dan.bemowski.info/

                                          dbemowskD 1 Reply Last reply
                                          4
                                          Reply
                                          • Reply as topic
                                          Log in to reply
                                          • Oldest to Newest
                                          • Newest to Oldest
                                          • Most Votes


                                          23

                                          Online

                                          11.7k

                                          Users

                                          11.2k

                                          Topics

                                          113.1k

                                          Posts


                                          Copyright 2025 TBD   |   Forum Guidelines   |   Privacy Policy   |   Terms of Service
                                          • Login

                                          • Don't have an account? Register

                                          • Login or register to search.
                                          • First post
                                            Last post
                                          0
                                          • MySensors
                                          • OpenHardware.io
                                          • Categories
                                          • Recent
                                          • Tags
                                          • Popular