Windows GUI/Controller for MySensors
-
@tekka WOW! I thought that was going to be SO difficult... but it took 10mins total! Thank you very much... I'm good to go ;)
For completeness, here are the MYSBootloader instructions for OTA updates via MYSController:
-
Load gw sketch and connect arduino either via serial or ethernet port. No special bootloader needed for that part (i.e. standard optiboot bootloader will do the job).
-
Add these lines to the boards.txt file in your Arduino IDE installation folder (located somewhere like C:/Program Files/Arduino/hardware/arduino/avr)
proMYSBL16.name=ATmega328 external 16Mhz with MYSBootloader
proMYSBL16.upload.tool=avrdude
proMYSBL16.upload.protocol=arduino
proMYSBL16.upload.maximum_size=30720
proMYSBL16.upload.maximum_data_size=2048
proMYSBL16.upload.speed=115200
proMYSBL16.bootloader.tool=avrdude
proMYSBL16.bootloader.low_fuses=0xF7
proMYSBL16.bootloader.high_fuses=0xDA
proMYSBL16.bootloader.extended_fuses=0x06
proMYSBL16.bootloader.unlock_bits=0x3F
proMYSBL16.bootloader.lock_bits=0x3F
proMYSBL16.bootloader.file=MySensors/MYSBootloader.hex
proMYSBL16.build.mcu=atmega328p
proMYSBL16.build.f_cpu=16000000L
proMYSBL16.build.board=AVR_UNO
proMYSBL16.build.core=arduino
proMYSBL16.build.variant=standard######## settings for 8Mhz internal clock
proMYSBL8.name=ATmega328 internal 8Mhz with MYSBootloader
proMYSBL8.upload.tool=avrdude
proMYSBL8.upload.protocol=arduino
proMYSBL8.upload.maximum_size=30720
proMYSBL8.upload.maximum_data_size=2048
proMYSBL8.upload.speed=57600
proMYSBL8.bootloader.tool=avrdude
proMYSBL8.bootloader.low_fuses=0xE2
proMYSBL8.bootloader.high_fuses=0xDA
proMYSBL8.bootloader.extended_fuses=0x06
proMYSBL8.bootloader.unlock_bits=0x3F
proMYSBL8.bootloader.lock_bits=0x3F
proMYSBL8.bootloader.file=MySensors/MYSBootloader.hex
proMYSBL8.build.mcu=atmega328p
proMYSBL8.build.f_cpu=8000000L
proMYSBL8.build.board=AVR_UNO
proMYSBL8.build.core=arduino
proMYSBL8.build.variant=standard -
Copy MYSBootloader.hex (from MYSController/Bootloader folder) to the Arduino IDE installation folder C:/Program Files/Arduino/hardware/arduino/avr/bootloaders/MySensors/
-
Restart Arduino IDE, choose under Tools | Board | ATmega328 external 16Mhz with MYSBootloader or Tools | Board | ATmega328 internal 8Mhz with MYSBootloader depending on your HW settings
-
Connect USBasp to sensor node and select Tools | Burn Bootloader
-
If everything worked well until here, you now have the MYSBootloader with the fuse settings from above burnt to your sensor node (16Mhz extXTAL or 8Mhz intRC, BOOTSZ 1024W, BOD 1V8).
-
Please use the AVR fuse calculator to retrieve the individual fuse settings. If you need to change frequency, BOD or other settings, change the fuse settings based on the fuse calculator.
Important: The MYSBootloader.hex file was compiled for 16Mhz oscillators but it should also work at 8Mhz. If you intend to go below 8Mhz, I highly recommend to compile the bootloader with adjusted frequency settings. -
Start MYSController, hit config and adjust settings (COM-Port & baud or IP address:port)
-
Hit connect: Connection to gateway should be established (gateway answers with gateway ready message), the node should appear and request an ID & FW.
-
Right-mouse click on that node, select assign FW, choose for example **TimeReporter ** (demo firmware included in the MYSController/Firmware folder). Then click reboot and wait until FW is uploaded and node boots.
-
TimeReporter firmware reports every few seconds some values such as time, millis, and voltage.
-
Custom firmware: compile your sketch and retrieve the generated .hex file (activate verbose mode in the Arduino IDE to get compiler messages and output path).
-
Copy .hex file to MYSController/Firmware folder and edit firmware_config.csv file according to the existing lines.
-
Hit Refresh Repo in MYSController and the newly copied firmware should appear in the Assign FW dropdown list, ready to be uploaded.
Have fun :)
-
-
Hi,
I have tried to use the GUI controller but I cannot get any output although it claims to be connected to my ethernet GW.
I should mention that I run on the development branch. Perhaps there are changes that prevents your tool from acknowlegding my "development" gateway?
EDIT: When connected through serial, it seem to work though. Perhaps the gw does not permit multiple connections on Ethernet. Nice! It barfs on my messages though but I guess it is because I run on dev and you have already stated that development branch support is "coming" so I don't worry about that.
This is the output though in case you are interested:2015-03-10 20:31:02 ERROR: Truncated message, Msg=101;1;1;1;36;0 101;1;1;1;36;0 2015-03-10 20:31:14 RECV: 101;1;1;1;36;1 101;1;1;1;36;1 2015-03-10 20:31:14 ERROR: Truncated message, Msg=101;1;1;1;36;1 101;1;1;1;36;1 2015-03-10 20:31:20 RECV: 101;1;1;1;36;0 101;1;1;1;36;0 2015-03-10 20:31:20 ERROR: Truncated message, Msg=101;1;1;1;36;0 101;1;1;1;36;0Do you feel secure today? No? Start requiring some signatures and feel better tomorrow ;)
-
Hi,
I have tried to use the GUI controller but I cannot get any output although it claims to be connected to my ethernet GW.
I should mention that I run on the development branch. Perhaps there are changes that prevents your tool from acknowlegding my "development" gateway?
EDIT: When connected through serial, it seem to work though. Perhaps the gw does not permit multiple connections on Ethernet. Nice! It barfs on my messages though but I guess it is because I run on dev and you have already stated that development branch support is "coming" so I don't worry about that.
This is the output though in case you are interested:2015-03-10 20:31:02 ERROR: Truncated message, Msg=101;1;1;1;36;0 101;1;1;1;36;0 2015-03-10 20:31:14 RECV: 101;1;1;1;36;1 101;1;1;1;36;1 2015-03-10 20:31:14 ERROR: Truncated message, Msg=101;1;1;1;36;1 101;1;1;1;36;1 2015-03-10 20:31:20 RECV: 101;1;1;1;36;0 101;1;1;1;36;0 2015-03-10 20:31:20 ERROR: Truncated message, Msg=101;1;1;1;36;0 101;1;1;1;36;0MYSController 0.1.2.276 and MYSBootloader 1.1 released:
- send message upon RX (for battery-powered nodes)
- bootloader commands (for MYSBootloader 1.1)
- bugfixes
Enjoy!
-
MYSController 0.1.2.276 and MYSBootloader 1.1 released:
- send message upon RX (for battery-powered nodes)
- bootloader commands (for MYSBootloader 1.1)
- bugfixes
Enjoy!
-
@tekka very good job :+1: Thx !
The ID change worked (but tried it only one time :-) A stesstest will follow ! )
Next thing: Know how often a node send a package (or how long it like to sleep) and take this info to create a quality level and a warning if - i.e. after 3 times - there is no feedback from the node ?
- Pit
-
i tried using the OTA FW update by following your guide a few posts up and i must say i like it a lot!
i just cant figure out how to upload FW from the software. every time it starts uploading FW by responding on FW requests my gateway seems to freeze, i use a usb ttl converter and arduino pro mini with radio as gw. i also uploaded the log. by the time the server responds to the FW req i have assigned FW to the node. then the GW just stops recieving and transmitting for no apearent reason so there is no communication back and forth, then when i reset the GW ( by pushing the reset button on the GW the comm is back up.. when the GW is frosen the led (pin 13, clock) is also completely off.. and yes, i also tried a radio with capacitor.
MySensors_20150318-202006.log -
i tried using the OTA FW update by following your guide a few posts up and i must say i like it a lot!
i just cant figure out how to upload FW from the software. every time it starts uploading FW by responding on FW requests my gateway seems to freeze, i use a usb ttl converter and arduino pro mini with radio as gw. i also uploaded the log. by the time the server responds to the FW req i have assigned FW to the node. then the GW just stops recieving and transmitting for no apearent reason so there is no communication back and forth, then when i reset the GW ( by pushing the reset button on the GW the comm is back up.. when the GW is frosen the led (pin 13, clock) is also completely off.. and yes, i also tried a radio with capacitor.
MySensors_20150318-202006.log@diamantmatch
The link to the log file is broken (currently, the forum experiences some issues with uploading files / pictures. Can you share it on e.g. dropbox and post the link?).
I've come across similar issues with debug mode activated on the GW sketch - try reflashing the GW with debug mode disabled and give it another shot. -
@tekka
Awesome! everything now works like a charm! many thanks for your help! -
@tekka I am still a bit confused after rereading this thread.
I have a humidity sensor plugged by usb and using config and debug see this sensor.
Question is for the full gui do I need to unplug serial usb from gw and plug it into computer and start your program?If this is correct, then it will be temporarily disconnected from vera3 controller while I study and learn to understand what is being presented to me, when I again config and debug.
After reviewing then reconfigure gw back to vera?
-
@tekka I update my bootloader to MYSbootloader and the fuses as per the doc but now when I try to program the Arduino mini pro I get this error can you help?
-
@tekka A further small bug or misunerstanding by us - the unix time:
API:
I_TIME 1 Sensors can request the current time from the Controller using this message. The time will be reported as the seconds since 1970 = unix time ?The MYSController send the local time, but not the unix time (the unix time is the same all over te world)
-
@tekka what does the dc =1 mean in this example?
I understand the s c t pt and l but not d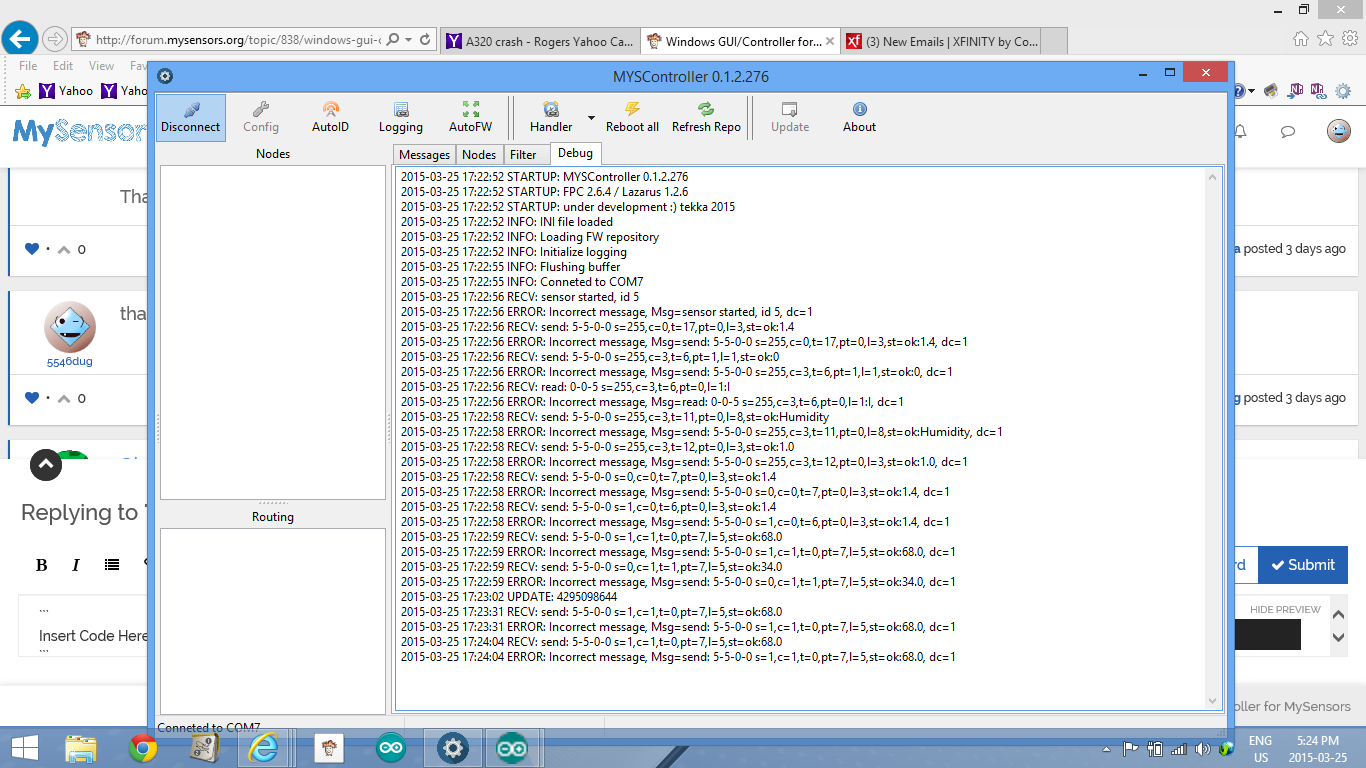 c
cis the humidity sensor ok?
pro mini
serial gw nano to win 8.1 via usb interface
ver 1.4
lib 1.4
humidity sketch mysensorsreadings seem accurate
also have temp read 30 sec and hum read when changes only
is all well or issues?
thanks
-
@tekka what does the dc =1 mean in this example?
I understand the s c t pt and l but not d cis the humidity sensor ok?
pro mini
serial gw nano to win 8.1 via usb interface
ver 1.4
lib 1.4
humidity sketch mysensorsreadings seem accurate
also have temp read 30 sec and hum read when changes only
is all well or issues?
thanks
@5546dug dc=1 indicates that the message is truncated (i.e. you lack the first part of the telegram, see below). Please make sure, that you are running the most recent version of the library, i.e. 1.4.1.
Your messages lack the bytes in bold:
3/25/2015 23:24:29 RECV: **5;0;1;0;1;**send: 5-5-0-0...etc
