CNC PCB milling
-
@andrew said in CNC PCB milling:
you should use A5 connector
Does using A5 somehow automagically just work, or does it require additional software configuration?
@neverdie said in CNC PCB milling:
@andrew said in CNC PCB milling:
you should use A5 connector
Does using A5 somehow automagically just work, or does it require additional software configuration?
it should work by default
-
@zboblamont said in CNC PCB milling:
@neverdie I used to use nail varnish on threads as it was just as effective, even though it annoyed the partner whose nail varnish it was. It is not the bond between the metals which is that important, it is adding resistance between the threads to prevent unscrewing, were it to completely bond, you would shear the bolt before it was removed, which is a whole lot of trouble....
Does nail varnish cure anaerobically in the presence of metal ions? That seems to be much of the theory behind thread lockers.
I thought nail varnish cured by evaporation.
In any case, I wiped off the excess loctite, because it might never dry (or, at least, take a long while to do so).
I think the loctite is likely to work, since Andrew had success without anything but torquing it down hard. On the other hand, maybe his is threaded differently than what came in my kit.
@neverdie Torquing down correctly normally prevents threads unwinding, but have seen bolts come loose with vibration on occasion. Only ever used loctite or equivalent on cylinder head bolts, particularly alloy heads, it never actually sets solid and is oil etc resistant.
Although lacquer or plastic paints do harden, as a plastic filler between the threads, it increases contact friction, yet will shear to permit removal of the bolt when necessary. Typical threads do not fully engage metal to metal, the clearance is essential to allow the nut to be run on the bolt.
Loctite is fine if you have it already, nail varnish works fine for me in non oily scenarios. -
I've retried it now, and so far it's not coming lose. :)
I added some machine oil on the rods and screws, and that seems to have helped. Before that, there were some areas where the screw rod on the y-axis was binding, but not now.
-
Are you guys running bCNC under Linux? Because installing it under Windows is proving to be challenging....
-
Are you guys running bCNC under Linux? Because installing it under Windows is proving to be challenging....
-
Are you guys running bCNC under Linux? Because installing it under Windows is proving to be challenging....
-
Here's the machine oil I'm using. As you can tell from the manufacturer, it's meant for sewing machines and similar:


-
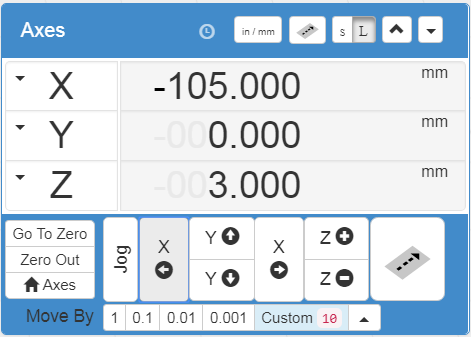
Well, now that I found this pulldown in Chilipeppr, I might stick with it a while longer:
-
The strange thing is that the Chilipeppr demo seems to mill at z=0.000. So, if I were to try to etch the pattern for real, I would have to "zero" z at an actual z value of, say, z=-0.5 or something (whatever depth I wanted it to etch at).
Is that normal?
Anyhow, I've been through multiple trial iterations with no bit installed and with the spindle disabled, and during all that the X and Y couplers have not come loose. So, I think that the Locktite has lived up to its name and solved the problem I was having earlier. :)
@neverdie said in CNC PCB milling:
The strange thing is that the Chilipeppr demo seems to mill at z=0.000. So, if I were to try to etch the pattern for real, I would have to "zero" z at an actual z value of, say, z=-0.5 or something (whatever depth I wanted it to etch at).
Is that normal?
Anyhow, I've been through multiple trial iterations with no bit installed and with the spindle disabled, and during all that the X and Y couplers have not come loose. So, I think that the Locktite has lived up to its name and solved the problem I was having earlier. :)
yes, the chilipeppr demo works like this. but keep in mind, that for "real" isolation milling, the milling depth which you used during the g code generation will be calculate from the relative z zero, so in that case you really have to set z0 to the pcb surface.
-
Disaster. Out of the blue, it suddenly just stopped working. Now I can't get it to spin the spindle or move in any x, y, or z direction. Gcode appears to be sent to it, and it does respond to me if I send it a '$" through the Chilipeppr console window. Just no movement whatsoever.
I removed the heatsinks, as a possible culprit, but still no go.
Suggestions on how to diagnose it?
-
I found the problem: bad power supply brick. It is supplying no voltage at all. :(
The power brick that came as part of the kit says it is rated at 24v dc 5.62amp. Is that enough, or should I get something that can do more amps?
-
I found the problem: bad power supply brick. It is supplying no voltage at all. :(
The power brick that came as part of the kit says it is rated at 24v dc 5.62amp. Is that enough, or should I get something that can do more amps?
@neverdie oh :( if you have a chance to power the cnc from a variable current power supply, then check the current it drains by starting from low to higher current. if it eats lot, maybe there is a short somewhere. you could also try to open the power supply and find a fuse.
good luck! -
I found the problem: bad power supply brick. It is supplying no voltage at all. :(
The power brick that came as part of the kit says it is rated at 24v dc 5.62amp. Is that enough, or should I get something that can do more amps?
-
I don't have much optimism that the cheap-ass power supply that came with the kit can be repaired (well, not by me anyway).
I ordered a 6amp one as a replacement, just to have a little more headroom:
https://www.amazon.com/gp/product/B01AJQ9G2C/ref=oh_aui_detailpage_o01_s00?ie=UTF8&psc=1It may turn out to be cheap-ass also, but I can get it tomorrow, so I'm rolling the dice.
If that burns out too, then there's this one, which looks more beefy and would be my first choice, but will take a week to receive it:
https://www.amazon.com/gp/product/B01J19G00E/ref=oh_aui_detailpage_o00_s00?ie=UTF8&psc=1 -
Dang. I cancelled the order, as I'm not sure whether its 5.5mmx2.1mm barrel jack will fit or whether a 5.5mm x2.5mm is required.
Looks as though the barrel on the woodpeck is 2.5mm inside diameter....
-
Powering it from a variable power supply, it apparently works. Here's the etching on a piece of plywood:
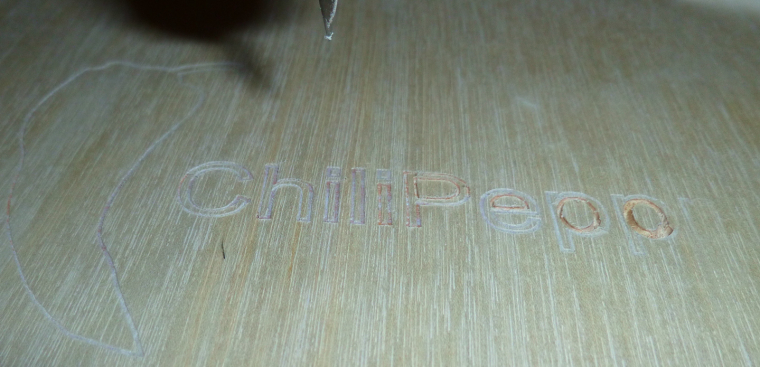
I watched the current being drawn, and it appeared to always be below 1 amp. The variable power supply can supply up to 5 amps, so no problem there as far as I can see.The etching that it did was a bit weird: deep cuts in the inside diameter of the P's, but only faint cuts just outside. The R was barely even touched at all. The surface doesn't feel sufficiently non-flat to account for that.
Ideas as to what's going wrong there?
-
Here is a contextual photo:
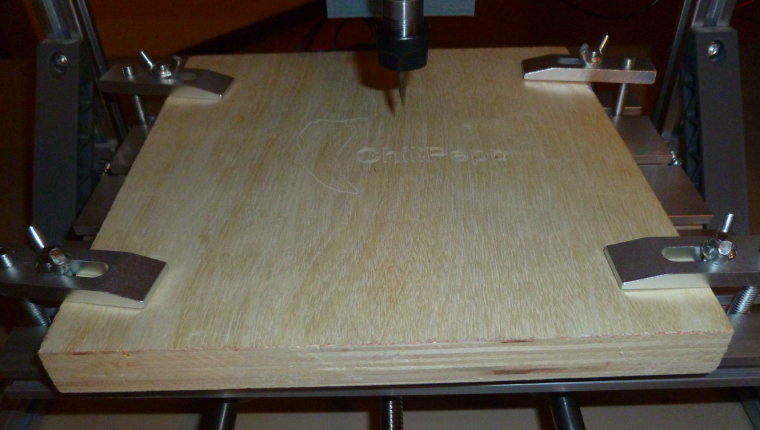
The clamps are holding the board very securely. -
After thinking about it, my hypothesis is that the feedrate is too high. I have it set to 1 in ChilliPeppr. I think maybe it comes down rapidly to the programmed height, but if it meets resistance then it skips some motor steps. Since it's open loop, it doesn't know. Then it dwells at that depth until it picks up the bit and relocates. I'll try a slower feedrate and see if it makes a difference.
-
Maybe the bit is too dull as well. It's one of the freebies that came with the kit.
